API-First Development | Build Spring Boot Application With Swagger Codegen and JPA Buddy
In this video, we'll use IntelliJ IDEA Ultimate, Swagger Codegen, and JPA Buddy to build a fully working Spring Boot application based on the OpenAPI specification file.
Estimated Reading Time: 10 mins
Introduction
When following an API-first approach, you start by defining the DTOs then implement the data model. The first thing that comes to mind when talking about the API-first approach is Swagger. Apart from the excellent API design and documentation functionality, Swagger provides a codegen tool to simplify the build process by generating server stubs and client SDKs for any API using the OpenAPI specification.
In this guide, you will build a Spring Boot application for a premade petclinic application using JPA Buddy and Swagger codegen based on the OpenAPI specification file.
Overview
You will learn how to:
- Set up a new project
- Set up a database connection
- Generate DTOs from a Swager JSON file
- Generate entities from POJOs
- Write controllers using Coding Assistance
- Generate an init script
- Test the application
You can find the code for this application on github.
Setting up a New Project
First, you will go through a few steps to set up a new project. In this section, you will:
- Create a new project using Spring Initializr
- Load the project in IntelliJ IDEA
Start by creating a Spring Boot application using Spring Initializr.
- Visit Spring Initializr’s Website.
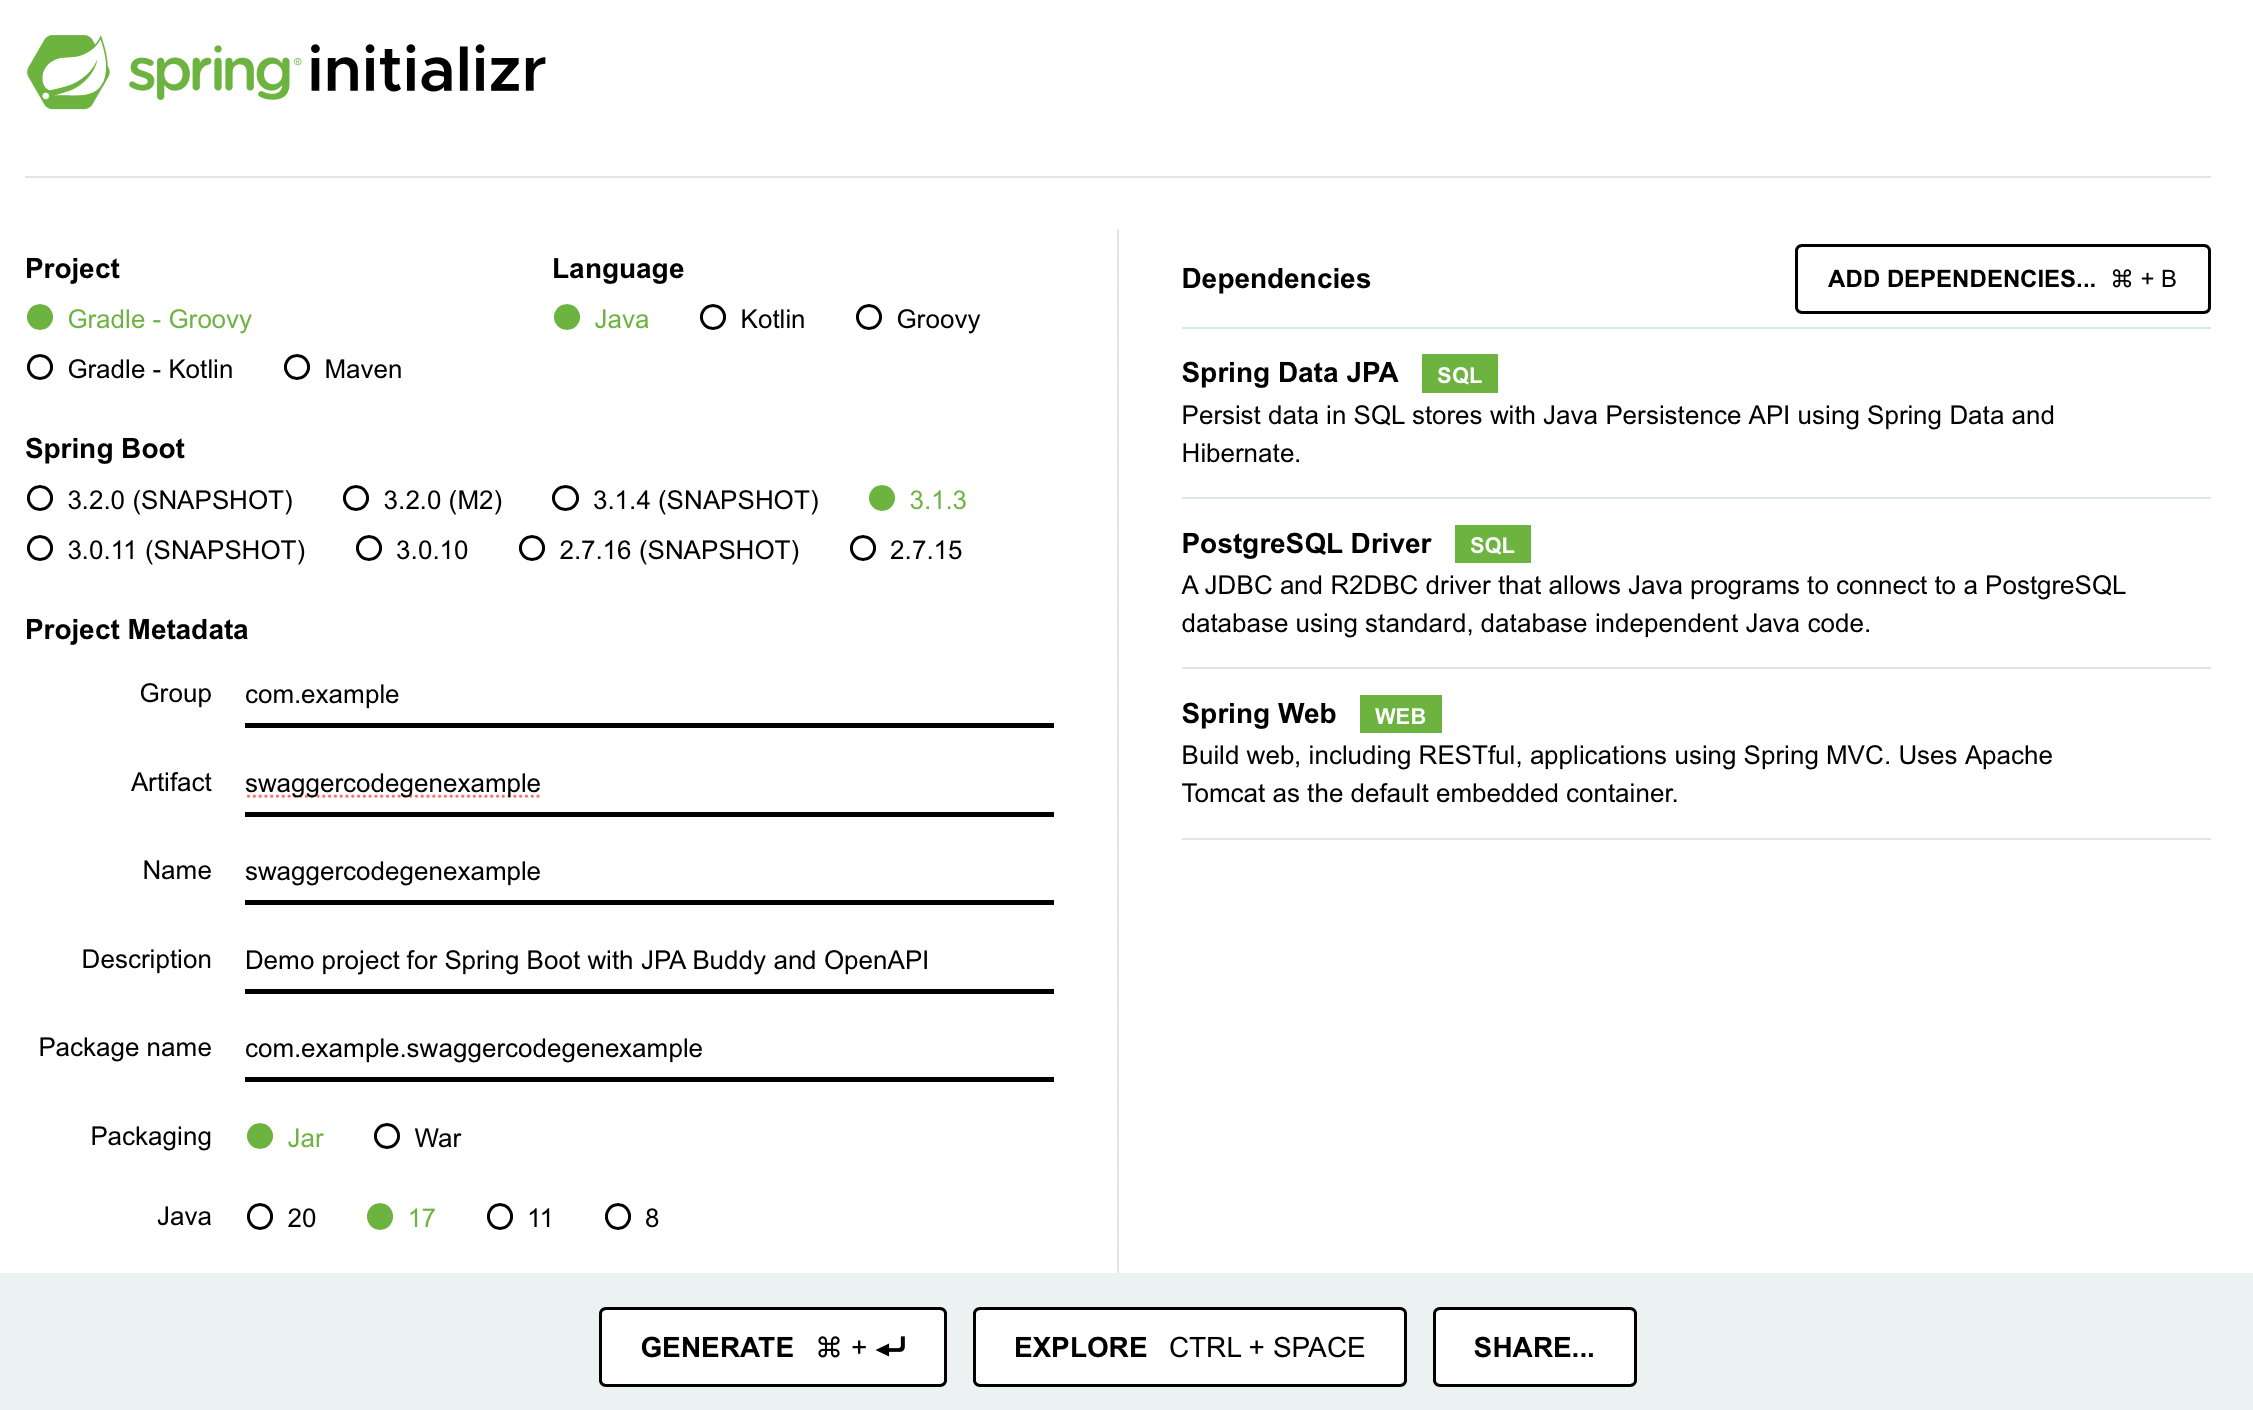
- Select the following settings:
- Java 17 as the programming language
- Maven as the build tool
- The latest stable version of Spring Boot
- The application will be packaged as a JAR file
- Add the following dependencies to your project:
- Spring Data JPA enables us to use JPA and Data Repositories
- PostgreSQL Driver provides database access
- Spring Web allows you to create REST endpoints
These dependencies enable you to use JPA Buddy’s functionalities with Flyway and access a PostgresSQL database.
Here are the selected settings in Spring Initializr:
Download the created project and open it in IntelliJ IDEA by clicking on File → Open.
To use Swagger MapStruct mappers in the project, add the following dependencies and plugins your pom.xml file:
<dependencies>
 //...
 <dependency>
  <groupId>io.swagger</groupId>
  <artifactId>swagger-codegen</artifactId>
  <version>2.3.1</version>
 </dependency>
 <dependency>
  <groupId>org.mapstruct</groupId>
  <artifactId>mapstruct</artifactId>
  <version>1.5.3.Final</version>
 </dependency>
</dependencies>
Click on the Load Gradle Changes icon to apply those changes to your project.
Setting up a Database Connection
To connect your application to the database, you need to:
- Set up a new connection
- Link the application to a datasource using a properties file
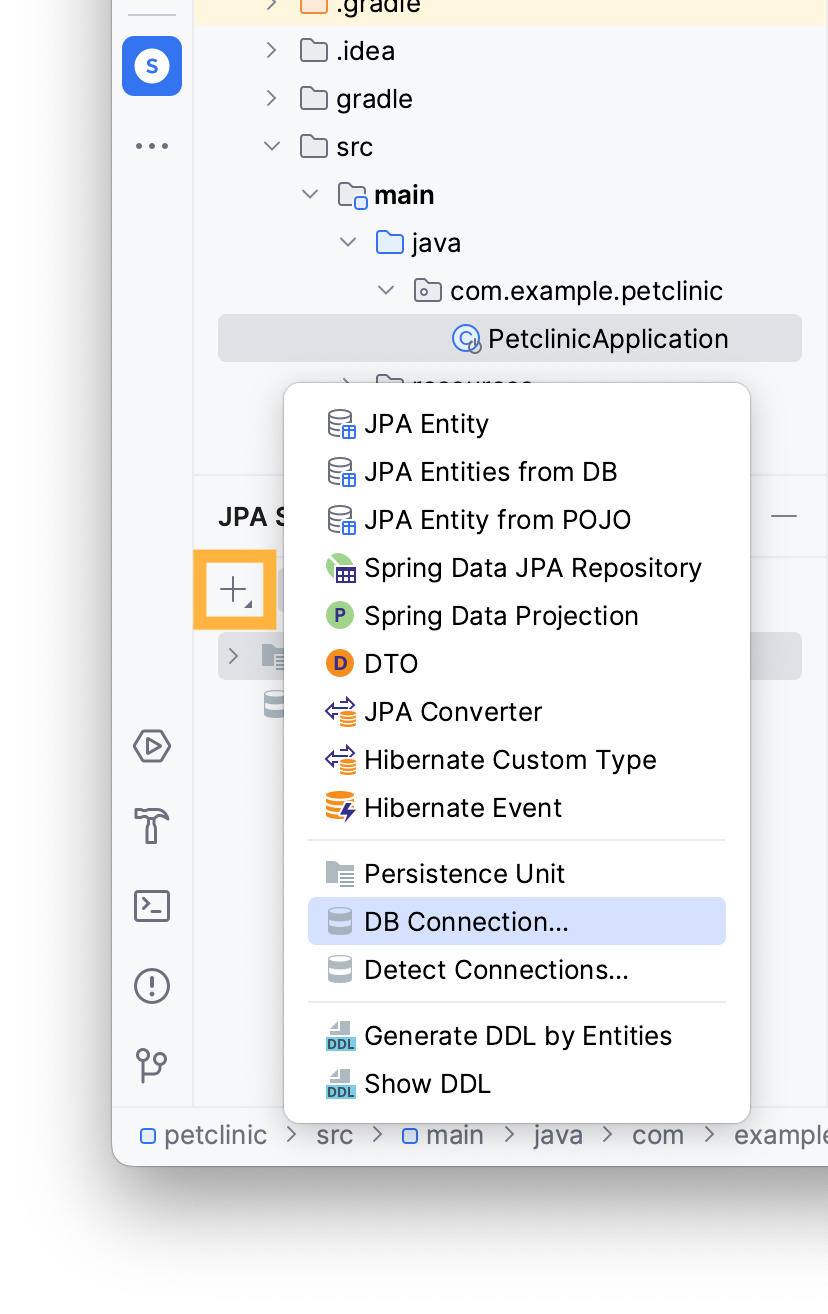
You can use JPA Buddy to set up a new connection through the JPA Structure tab:
- Navigate to the JPA Structure tab
- Click on the + button
- Click on DB Connection...
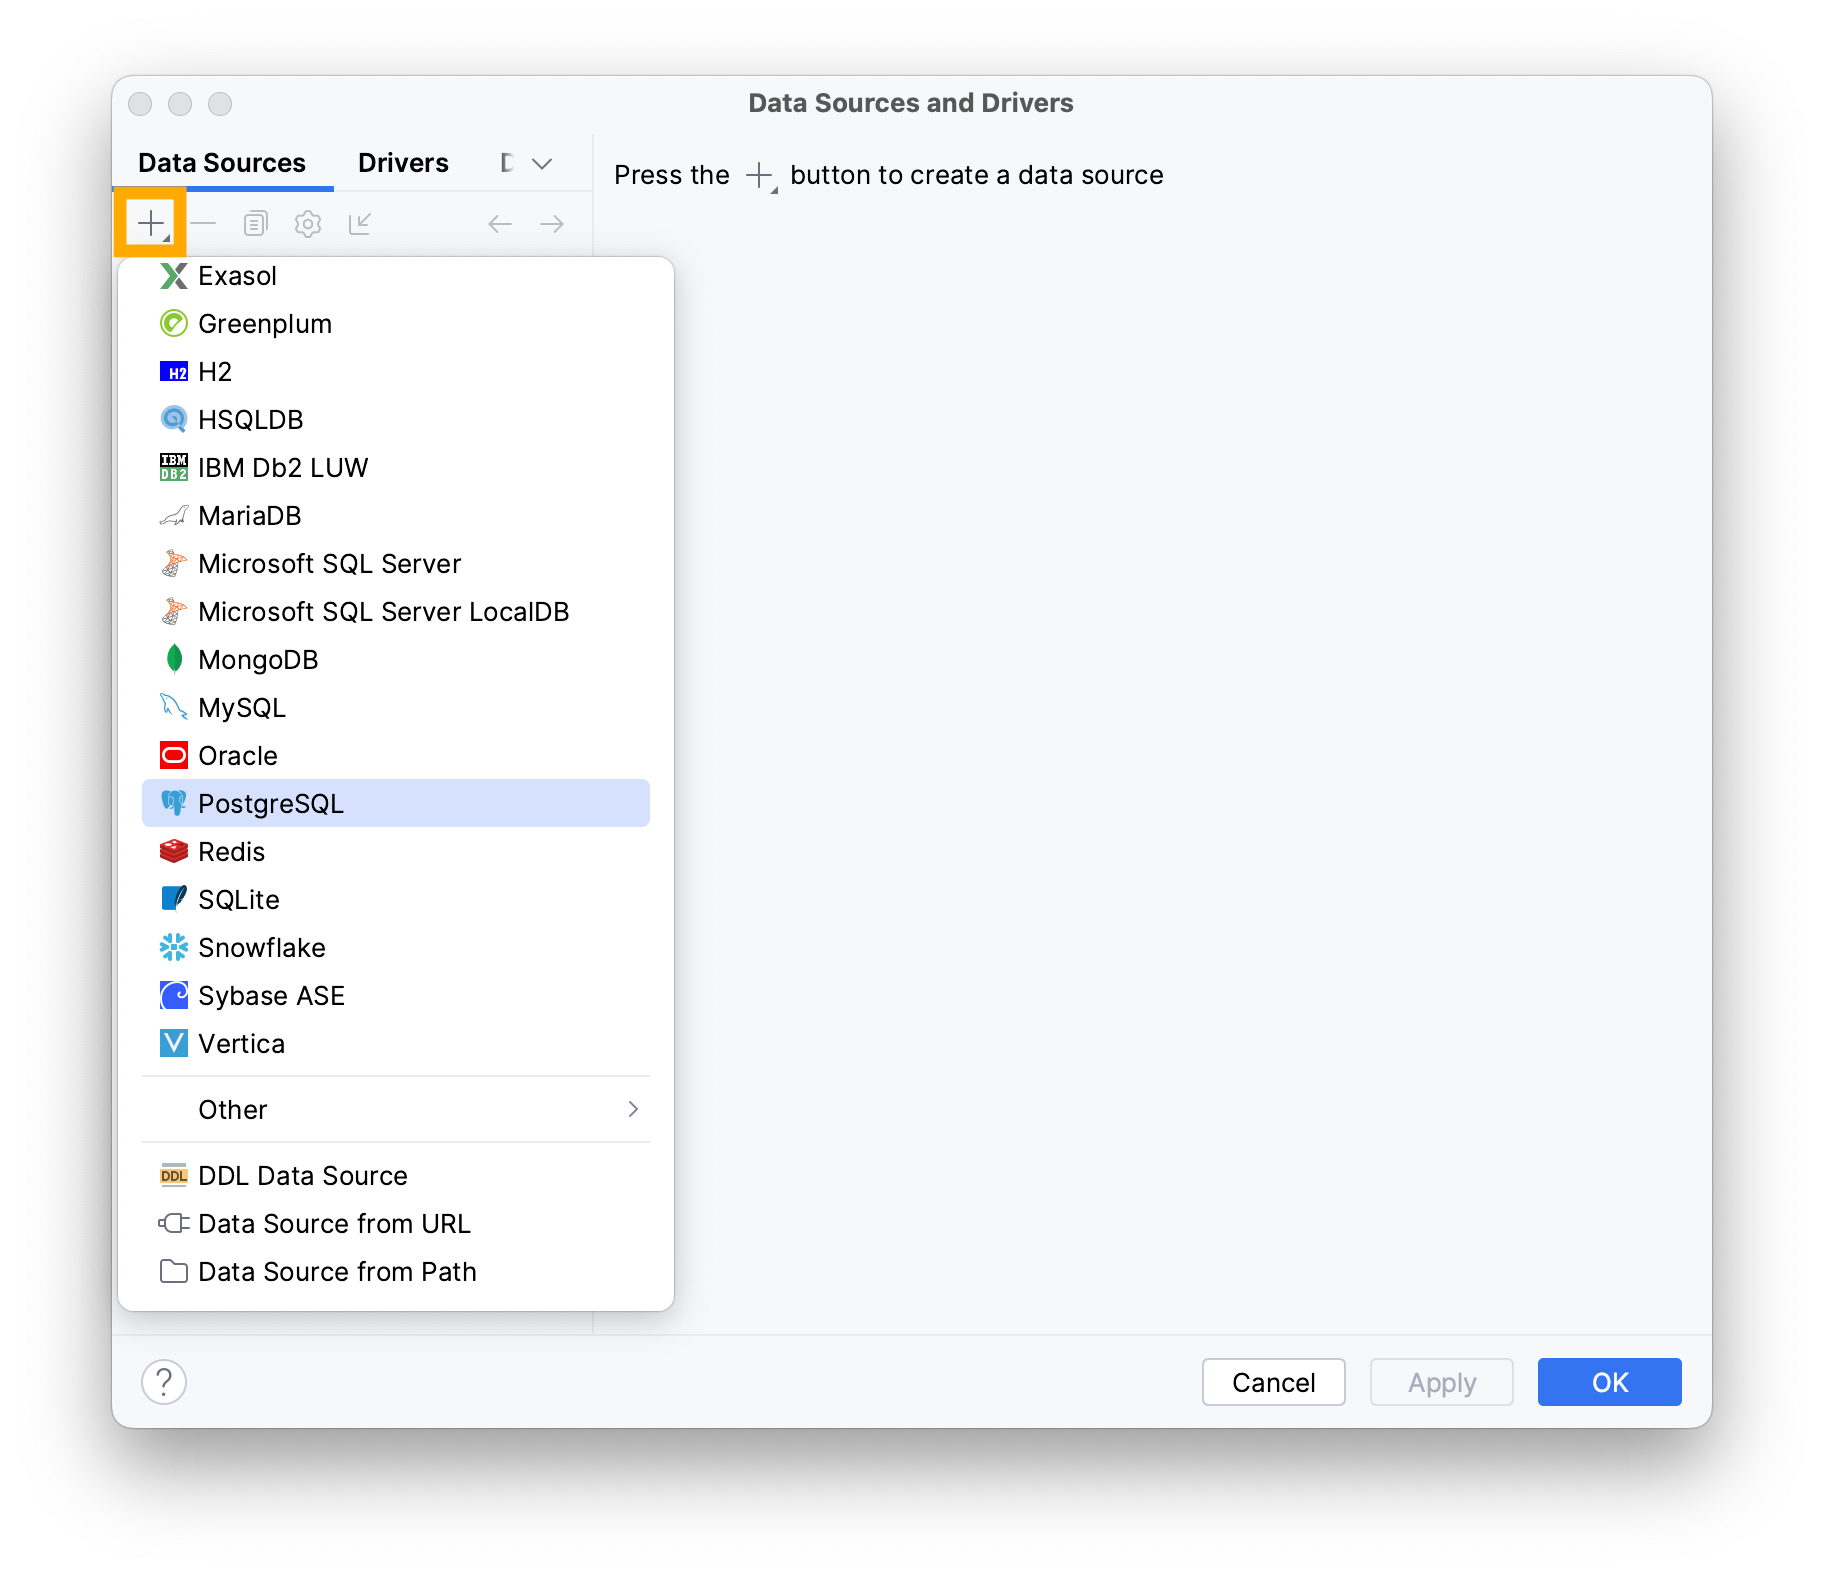
Add a new connection by clicking on the + button and choosing PostgreSQL.
Type the following information in the invoked window:
- Username
- Password
- Name of the database
Note that your values may vary depending on your local environment.

To check if your database works as intended click on Test Connection, it should display Succeeded if your database is properly configured and actively listening on its assigned port.
Click OK.
Next, provide the necessary datasource details to your application in the application.properties file under the resources folder:
- Open your
application.propertiesfile - Use IntelliJ IDEA’s Generate shortcut (command/ctrl + N)
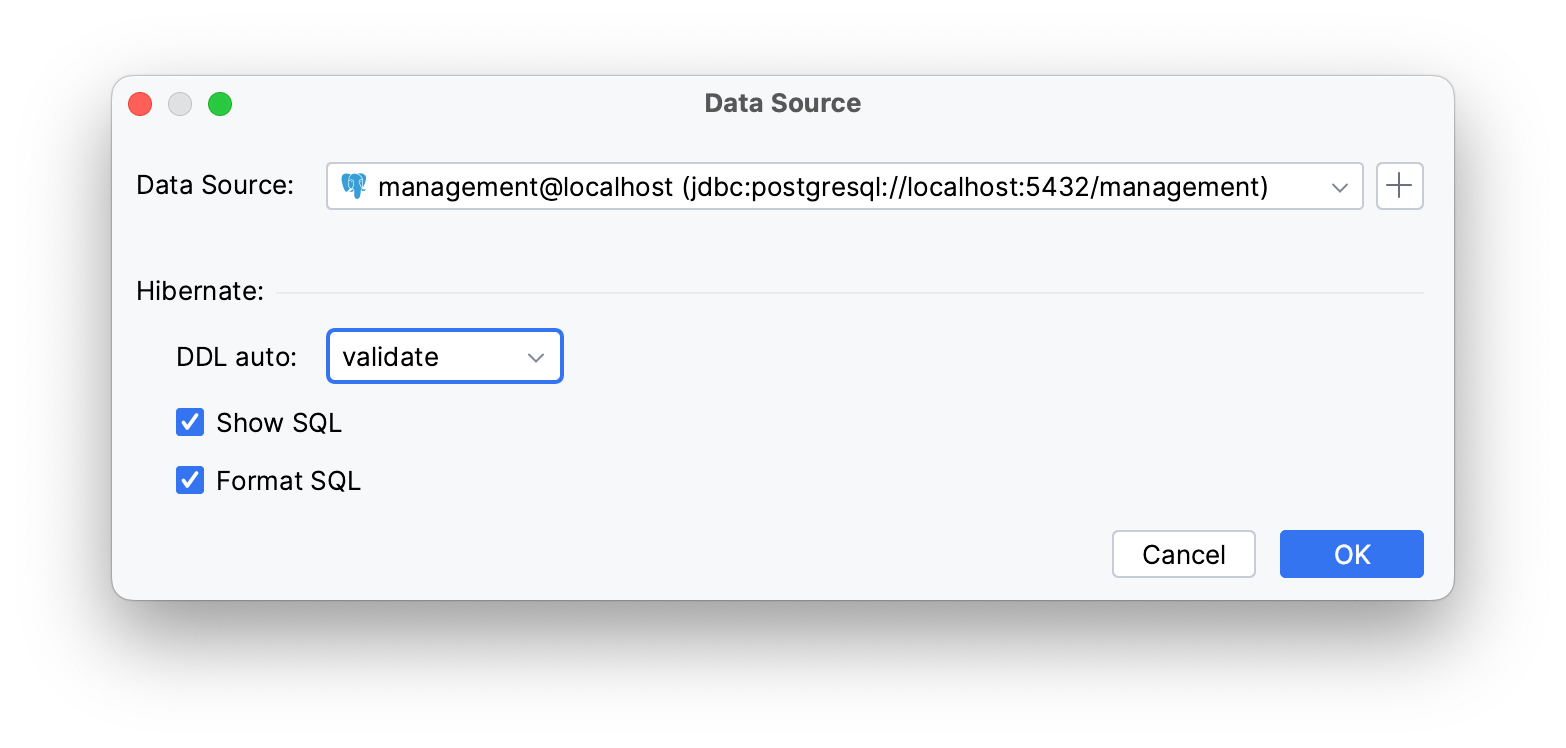
- Select the Data source option

JPA Buddy automatically detects the existing datasource.
Hibernate will validate your schema with your entity mappings during startup, if you set the Hibernate DDL-auto property to validate.
The Show/Format SQL options allow you to view formatted SQL logs on your terminal.
The mentioned settings generate the following properties:
spring.datasource.url=jdbc:postgresql://localhost:5432/blog
spring.datasource.username=postgres
spring.datasource.password=postgres
spring.datasource.driverClassName=org.postgresql.Driver
spring.jpa.hibernate.ddl-auto=validate
spring.jpa.show-sql=true
spring.jpa.properties.hibernate.format_sql=true
Generating DTOs from a Swager JSON File
In our PetClinic app, we collect pet visit data from local clinics and show an overview of all regional visits. To do this, we need to connect to local clinics' APIs. With Swagger Codegen, we can easily create the necessary server stubs and client SDKs. In this section, you will:
- Configure a code generation tasks in Maven
- Generate DTOs from the specification
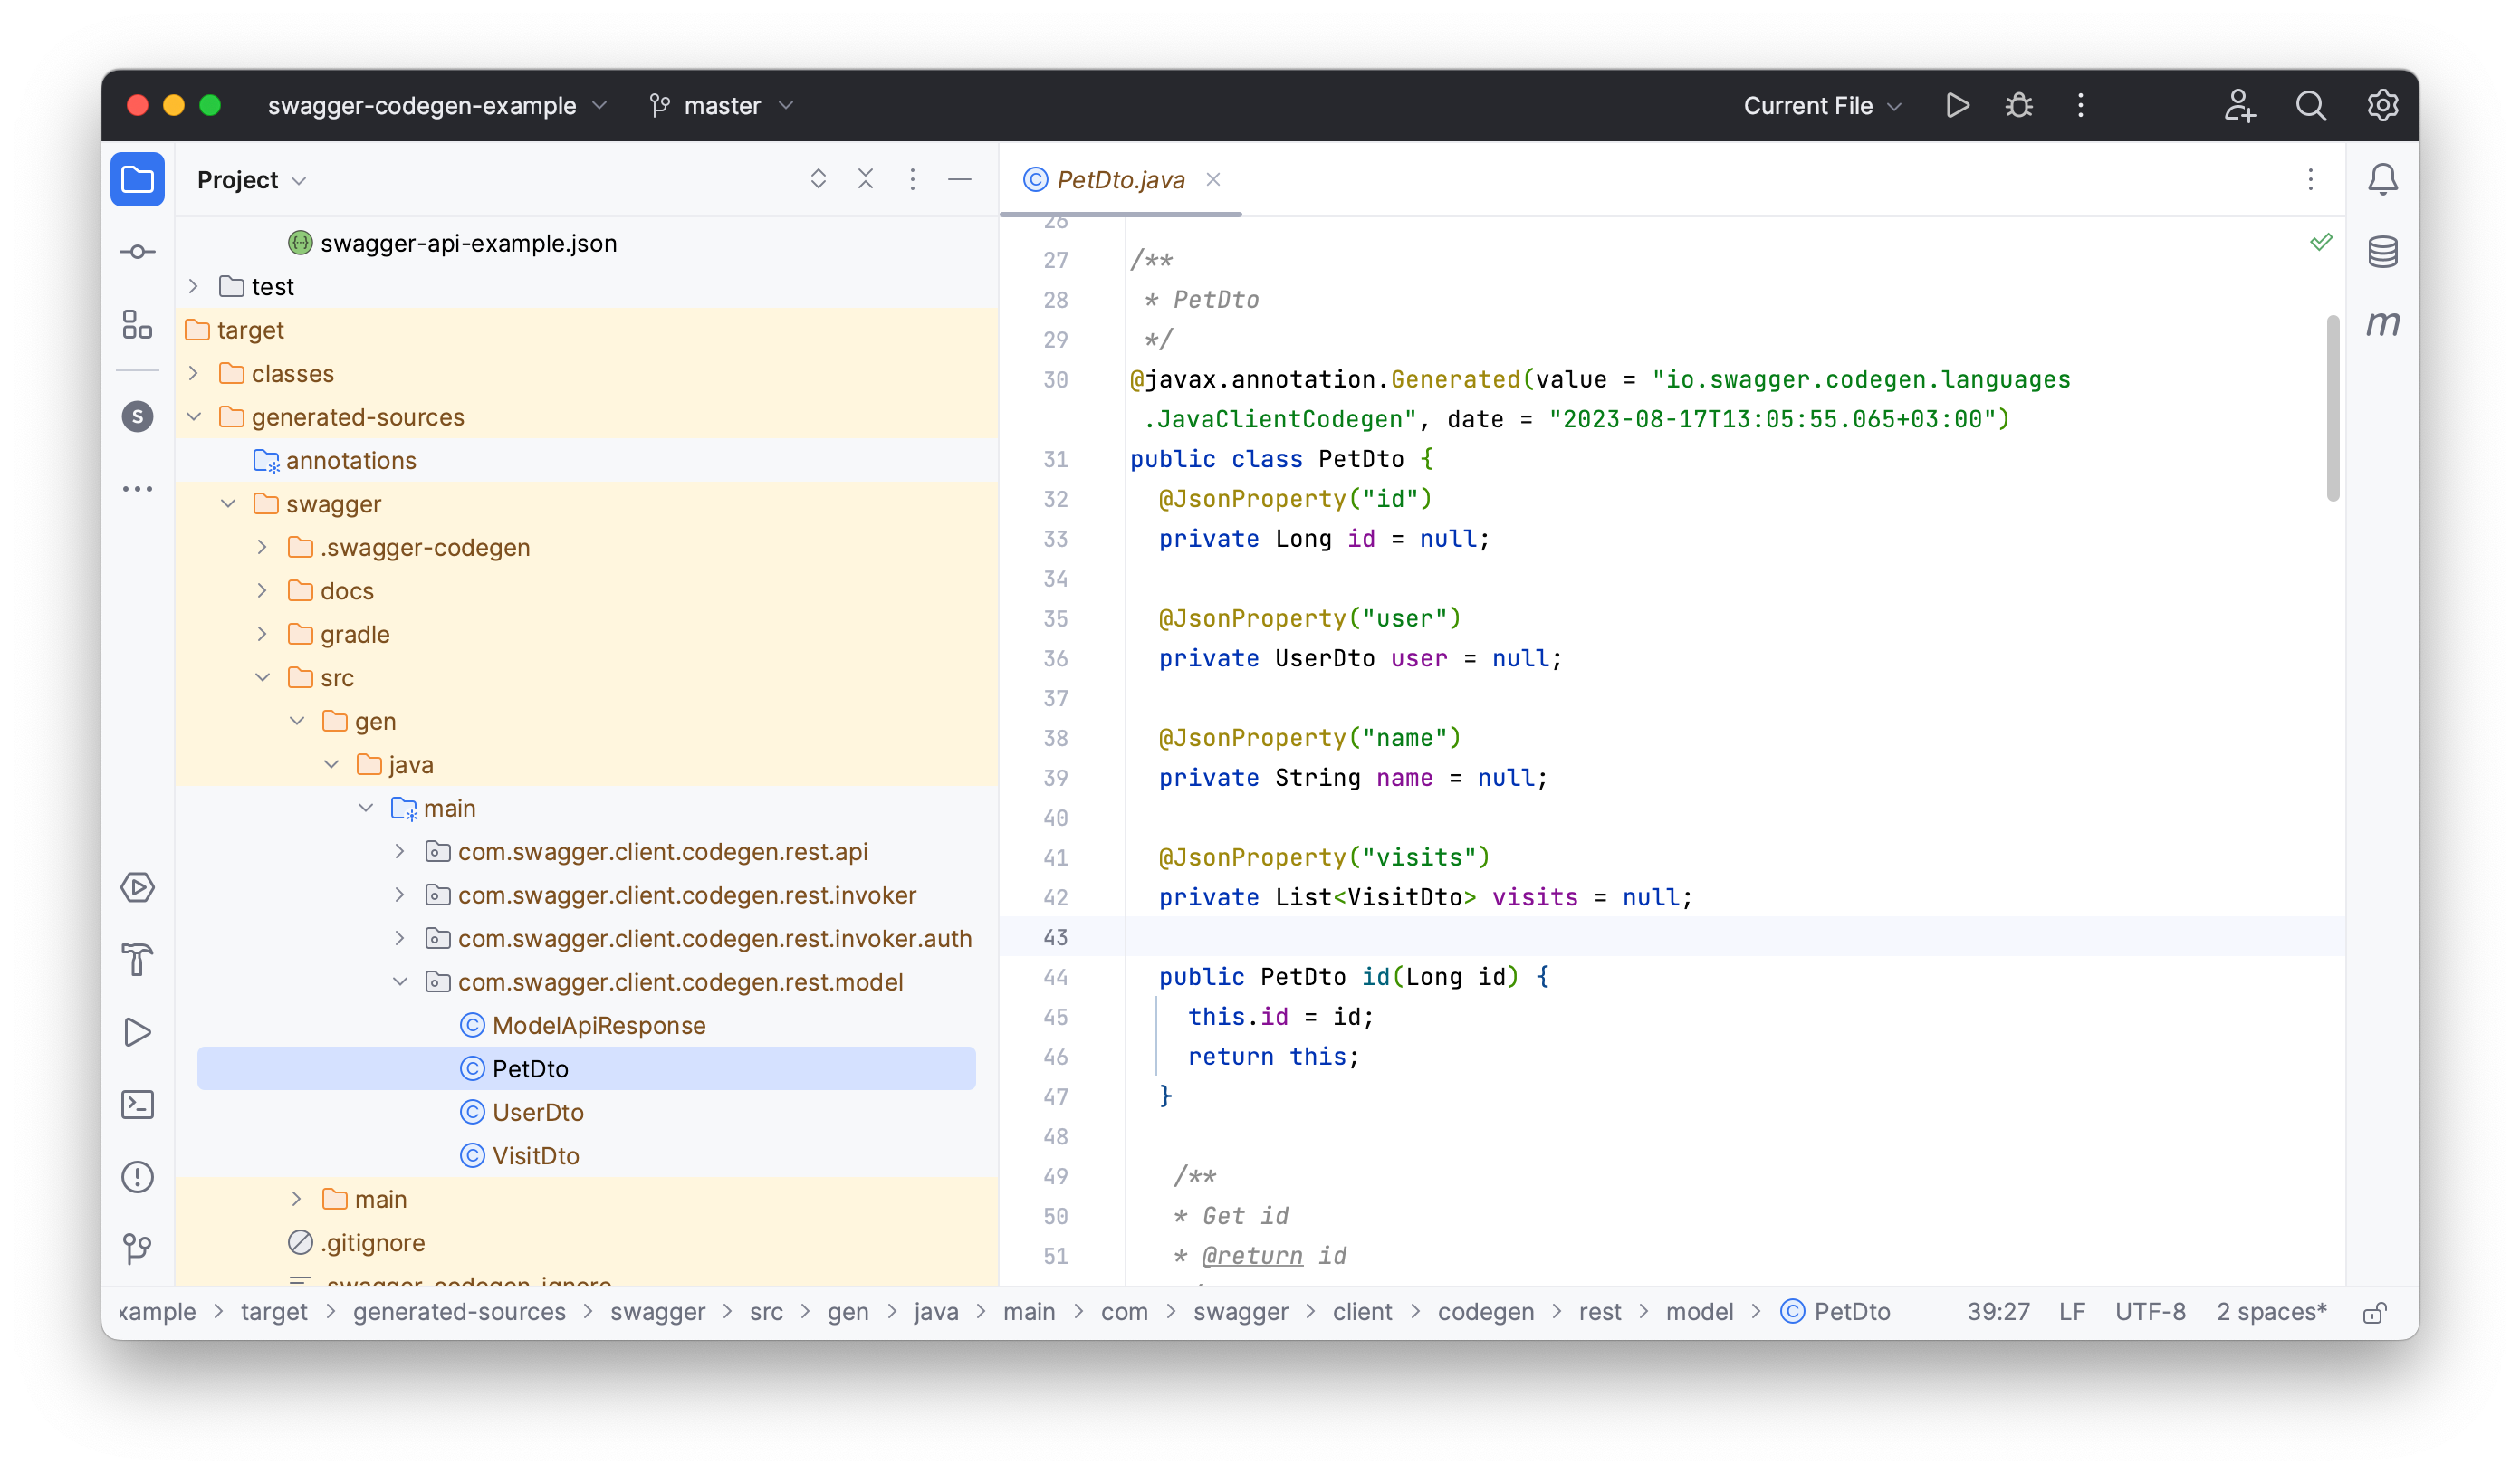
You can create your own Swagger JSON using Swagger UI or use the Petclinic API defined in the provided Swagger JSON. The mentioned API sepcification has a Pet endpoint that supports various operations, from image uploads to pet management, and three DTOs: PetDto, VisitDto and UserDto. ModelApiResponse outlines the structure of responses returned by an API endpoint.
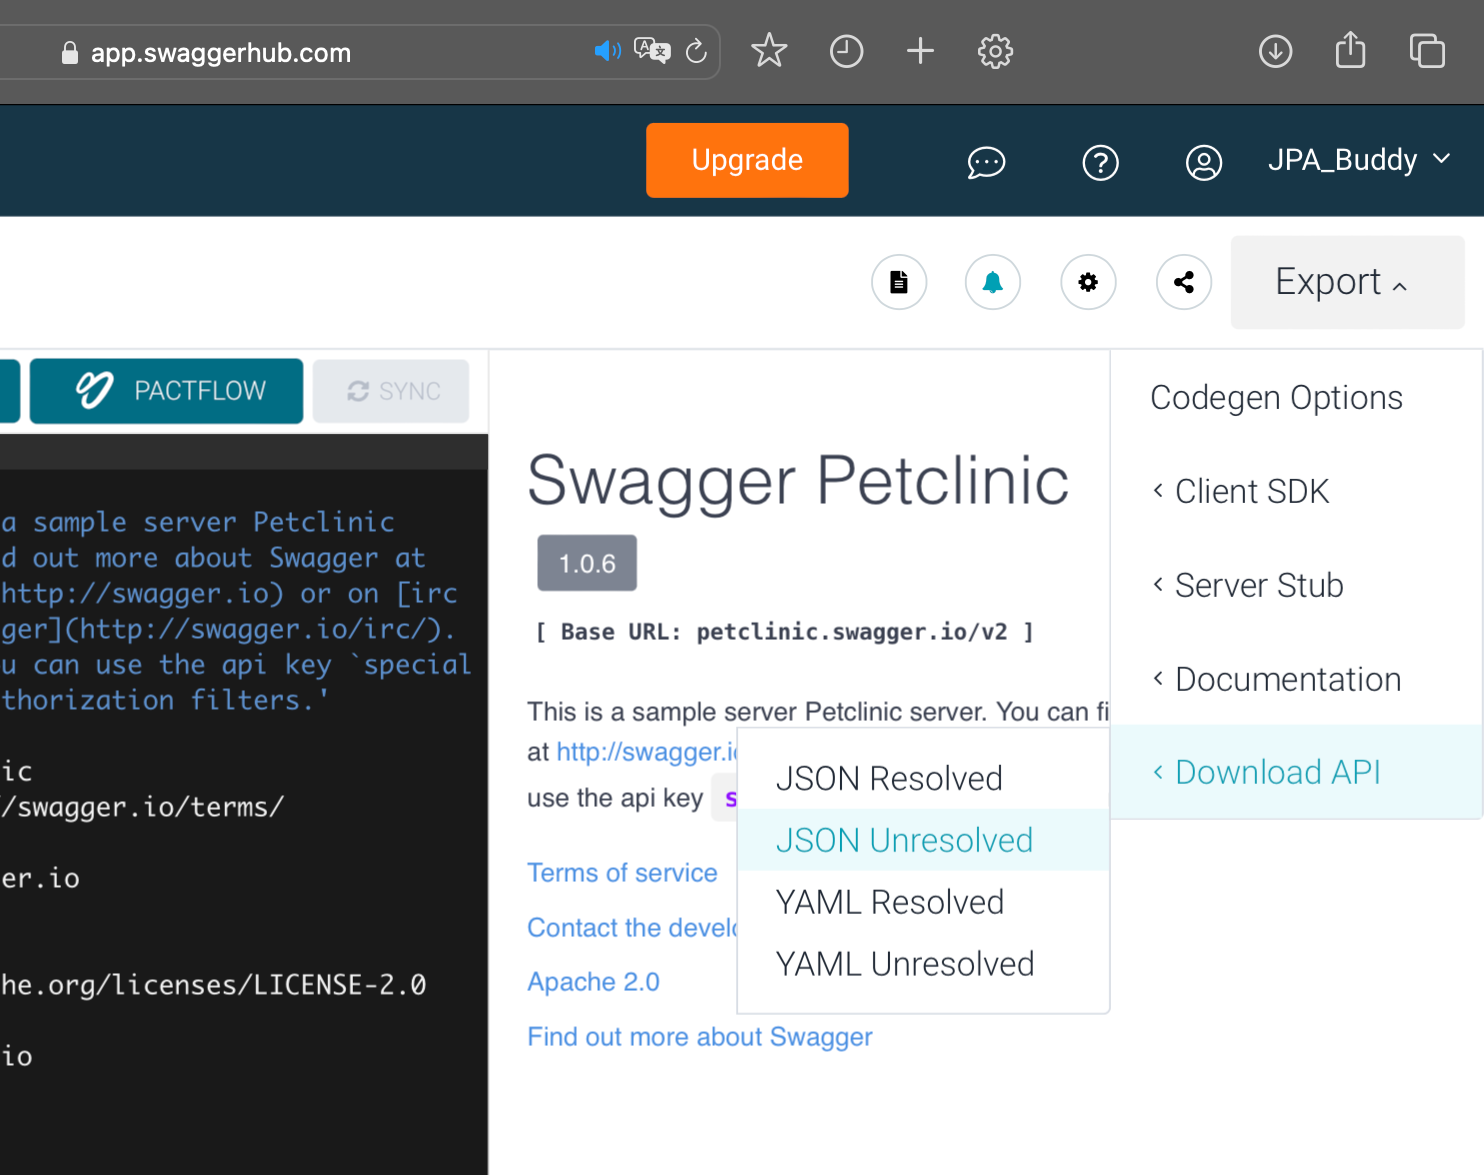
To use it in your project, click on Export and choose Download → JSON Unresolved. Paste the downloaded file into the resources folder.
Set up the code generation task by configuring your pom.xml file. To use Swagger codegen in your project, add the following plugin and configuration to your pom.xml file in the <plugins> tag:
<plugin>
 <groupId>io.swagger</groupId>
 <artifactId>swagger-codegen-maven-plugin</artifactId>
 <version>2.3.1</version>
 <executions>
  <execution>
   <goals>
    <goal>generate</goal>
   </goals>
   <configuration>
    <inputSpec>/src/main/resources/swagger-api-example.json</inputSpec>
    <language>java</language>
    <configOptions>
     <sourceFolder>src/gen/java/main</sourceFolder>
     <interfaceOnly>true</interfaceOnly>
     <dateLibrary>java8</dateLibrary>
    </configOptions>
    <library>resttemplate</library>
    <modelPackage>com.swagger.client.codegen.rest.model</modelPackage>
    <apiPackage>com.swagger.client.codegen.rest.api</apiPackage>
    <invokerPackage>com.swagger.client.codegen.rest.invoker</invokerPackage>
    <generateApiTests>false</generateApiTests>
   </configuration>
  </execution>
 </executions>
</plugin>
To launch Swagger codegen, locate the Maven tab and click on the compile task.
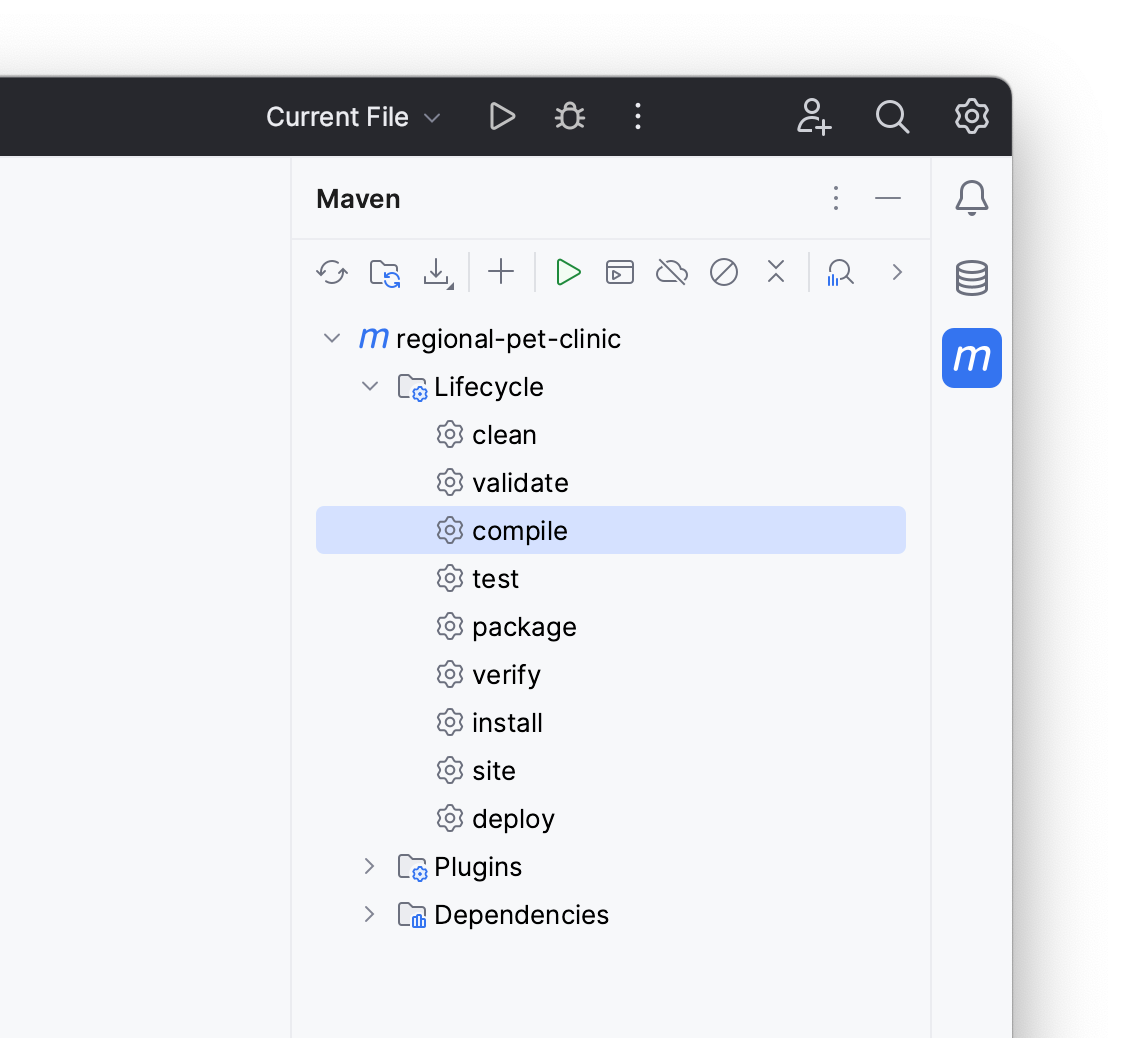
Swagger will generate the defined API’s components under the target/generated-sources/swagger folder.
Generating Entities from POJOs
The next step is to create a JPA data model for the application based on the generated DTOs to represent the database later. In this section, you will:
- Generate entities from the generated DTOs
- Create MapStruct mappers to map DTOs to entities
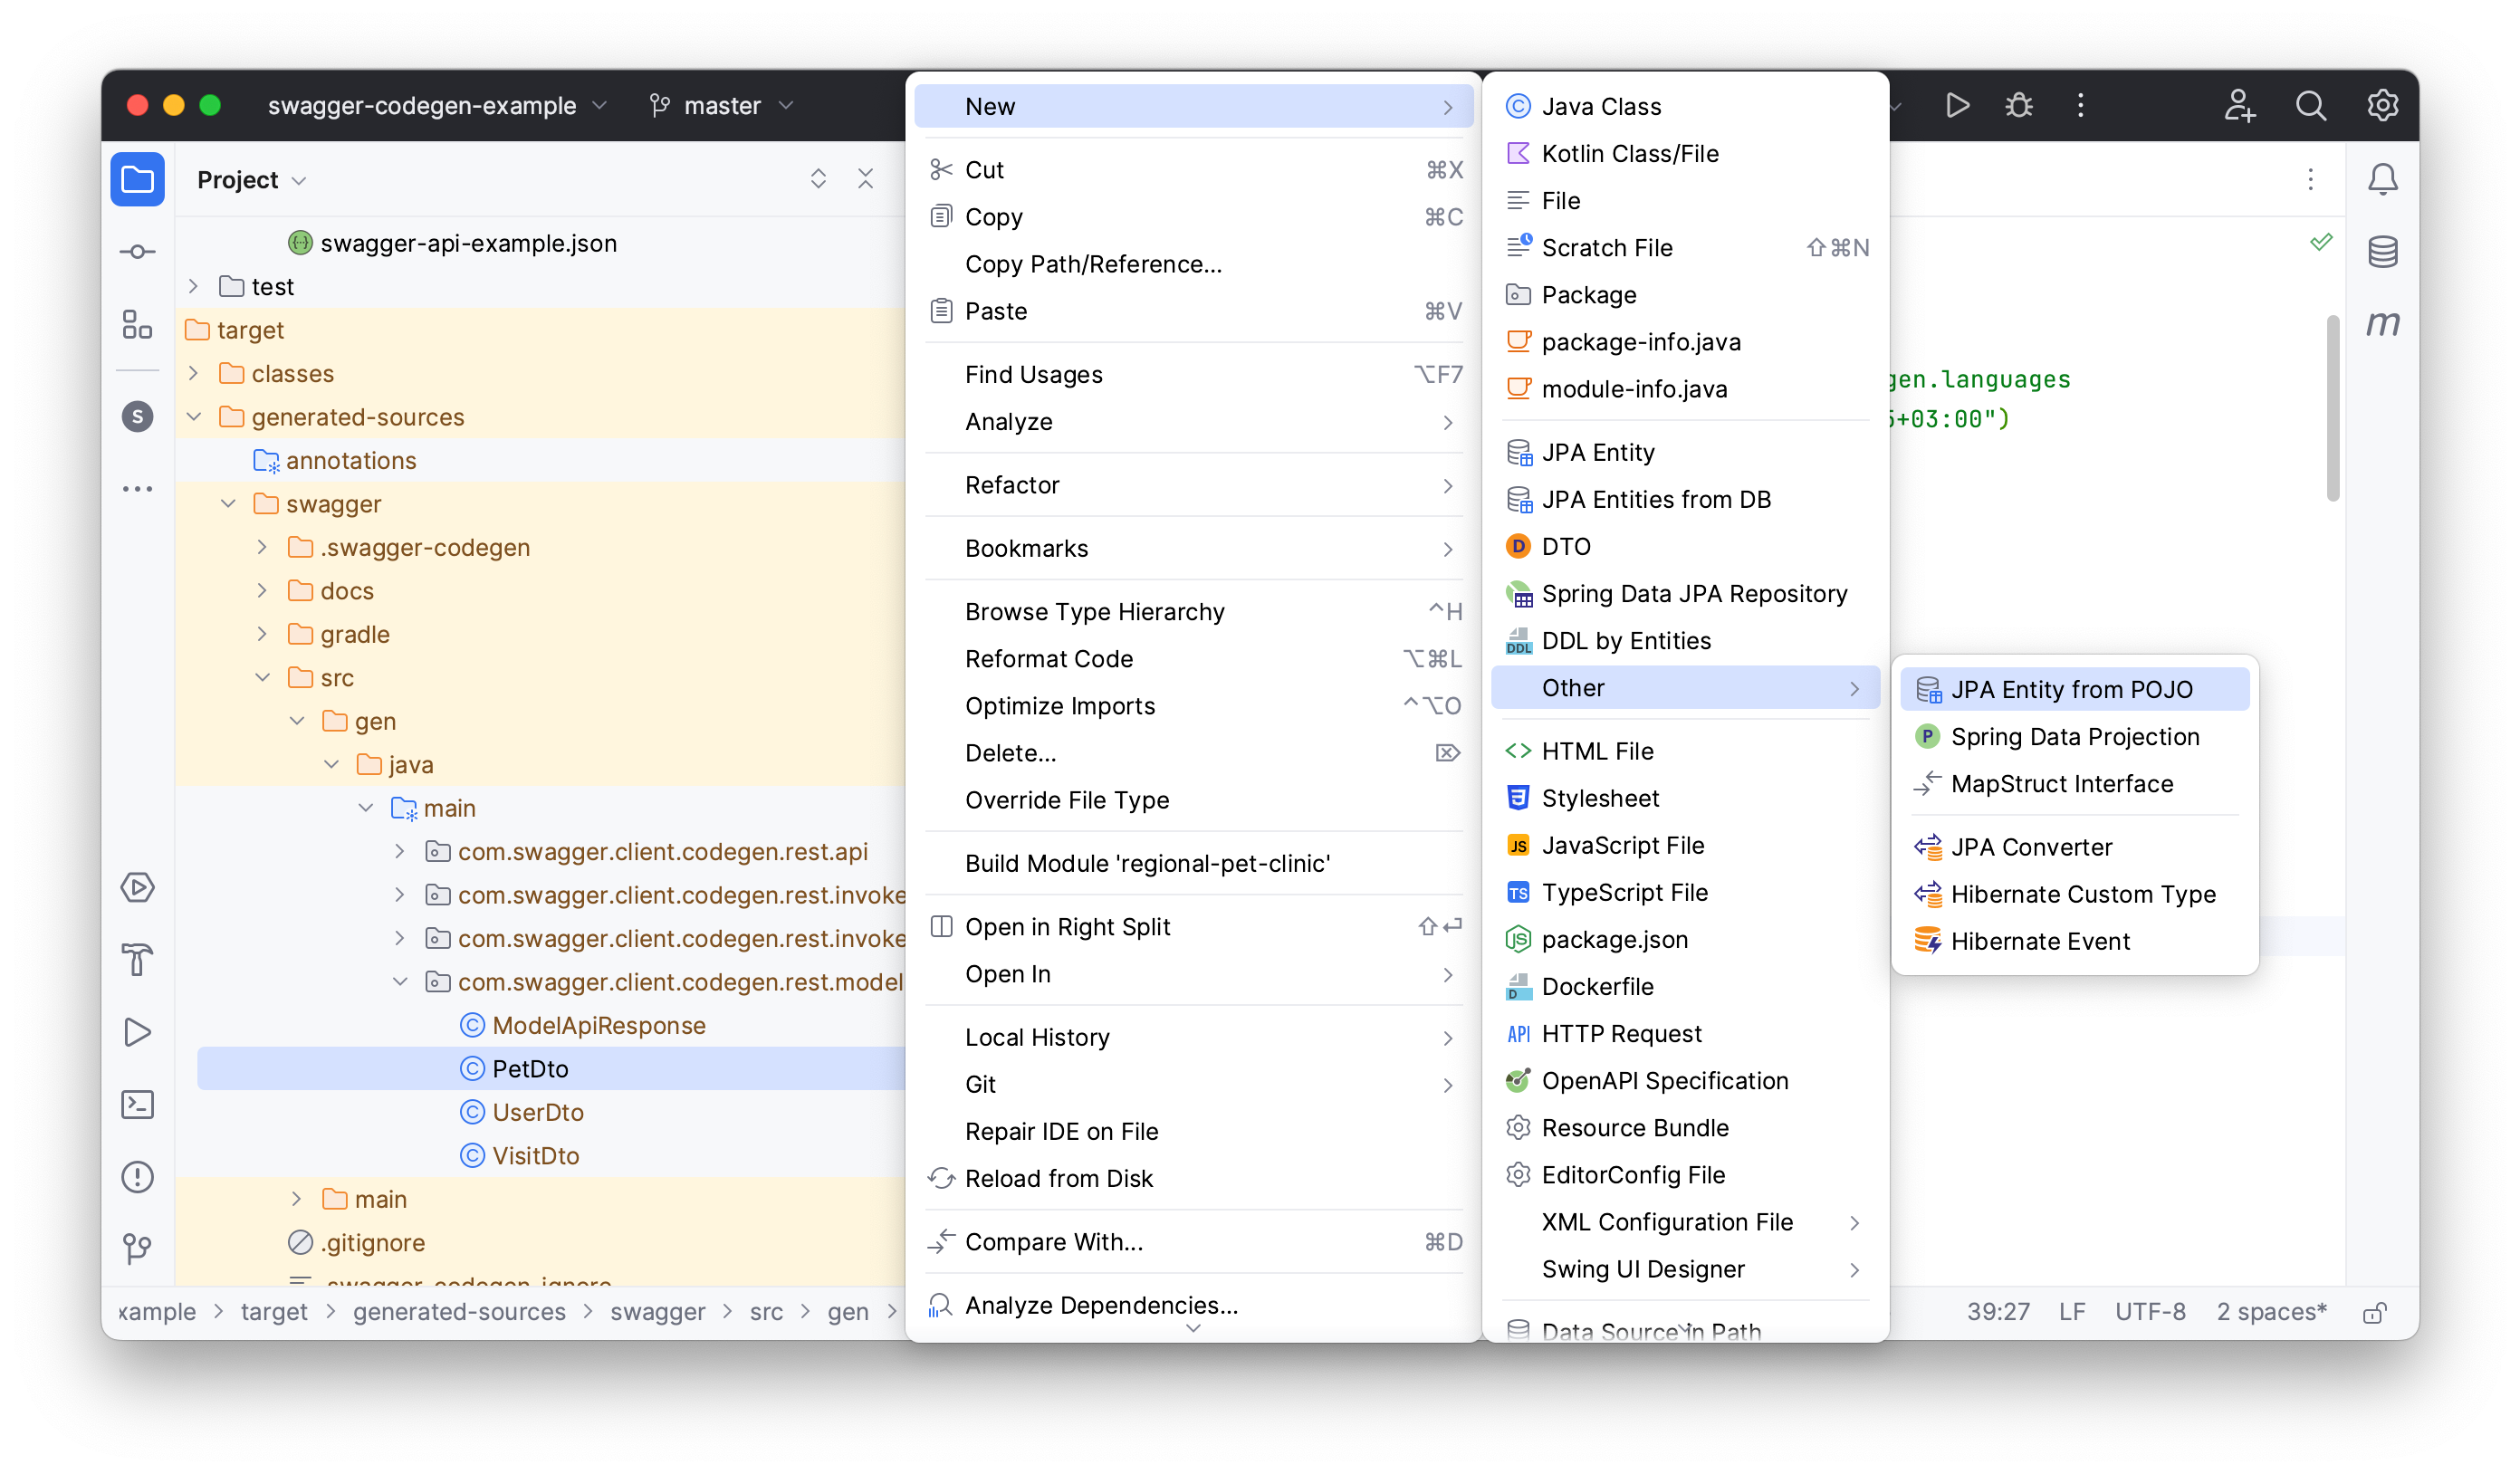
JPA Buddy can help you generate entities from your API’s DTOs. To do so, right-click on the DTO you want to generate an entity from and choose New → Other → JPA Entity from POJO.
Rename your entity package to entities in the invoked window. JPA Buddy allows you to create a MapStruct mapper right in the same window. Click on the + button near the MapStruct interface field to invoke the Create MapStruct Interface. Name your package to mappers.
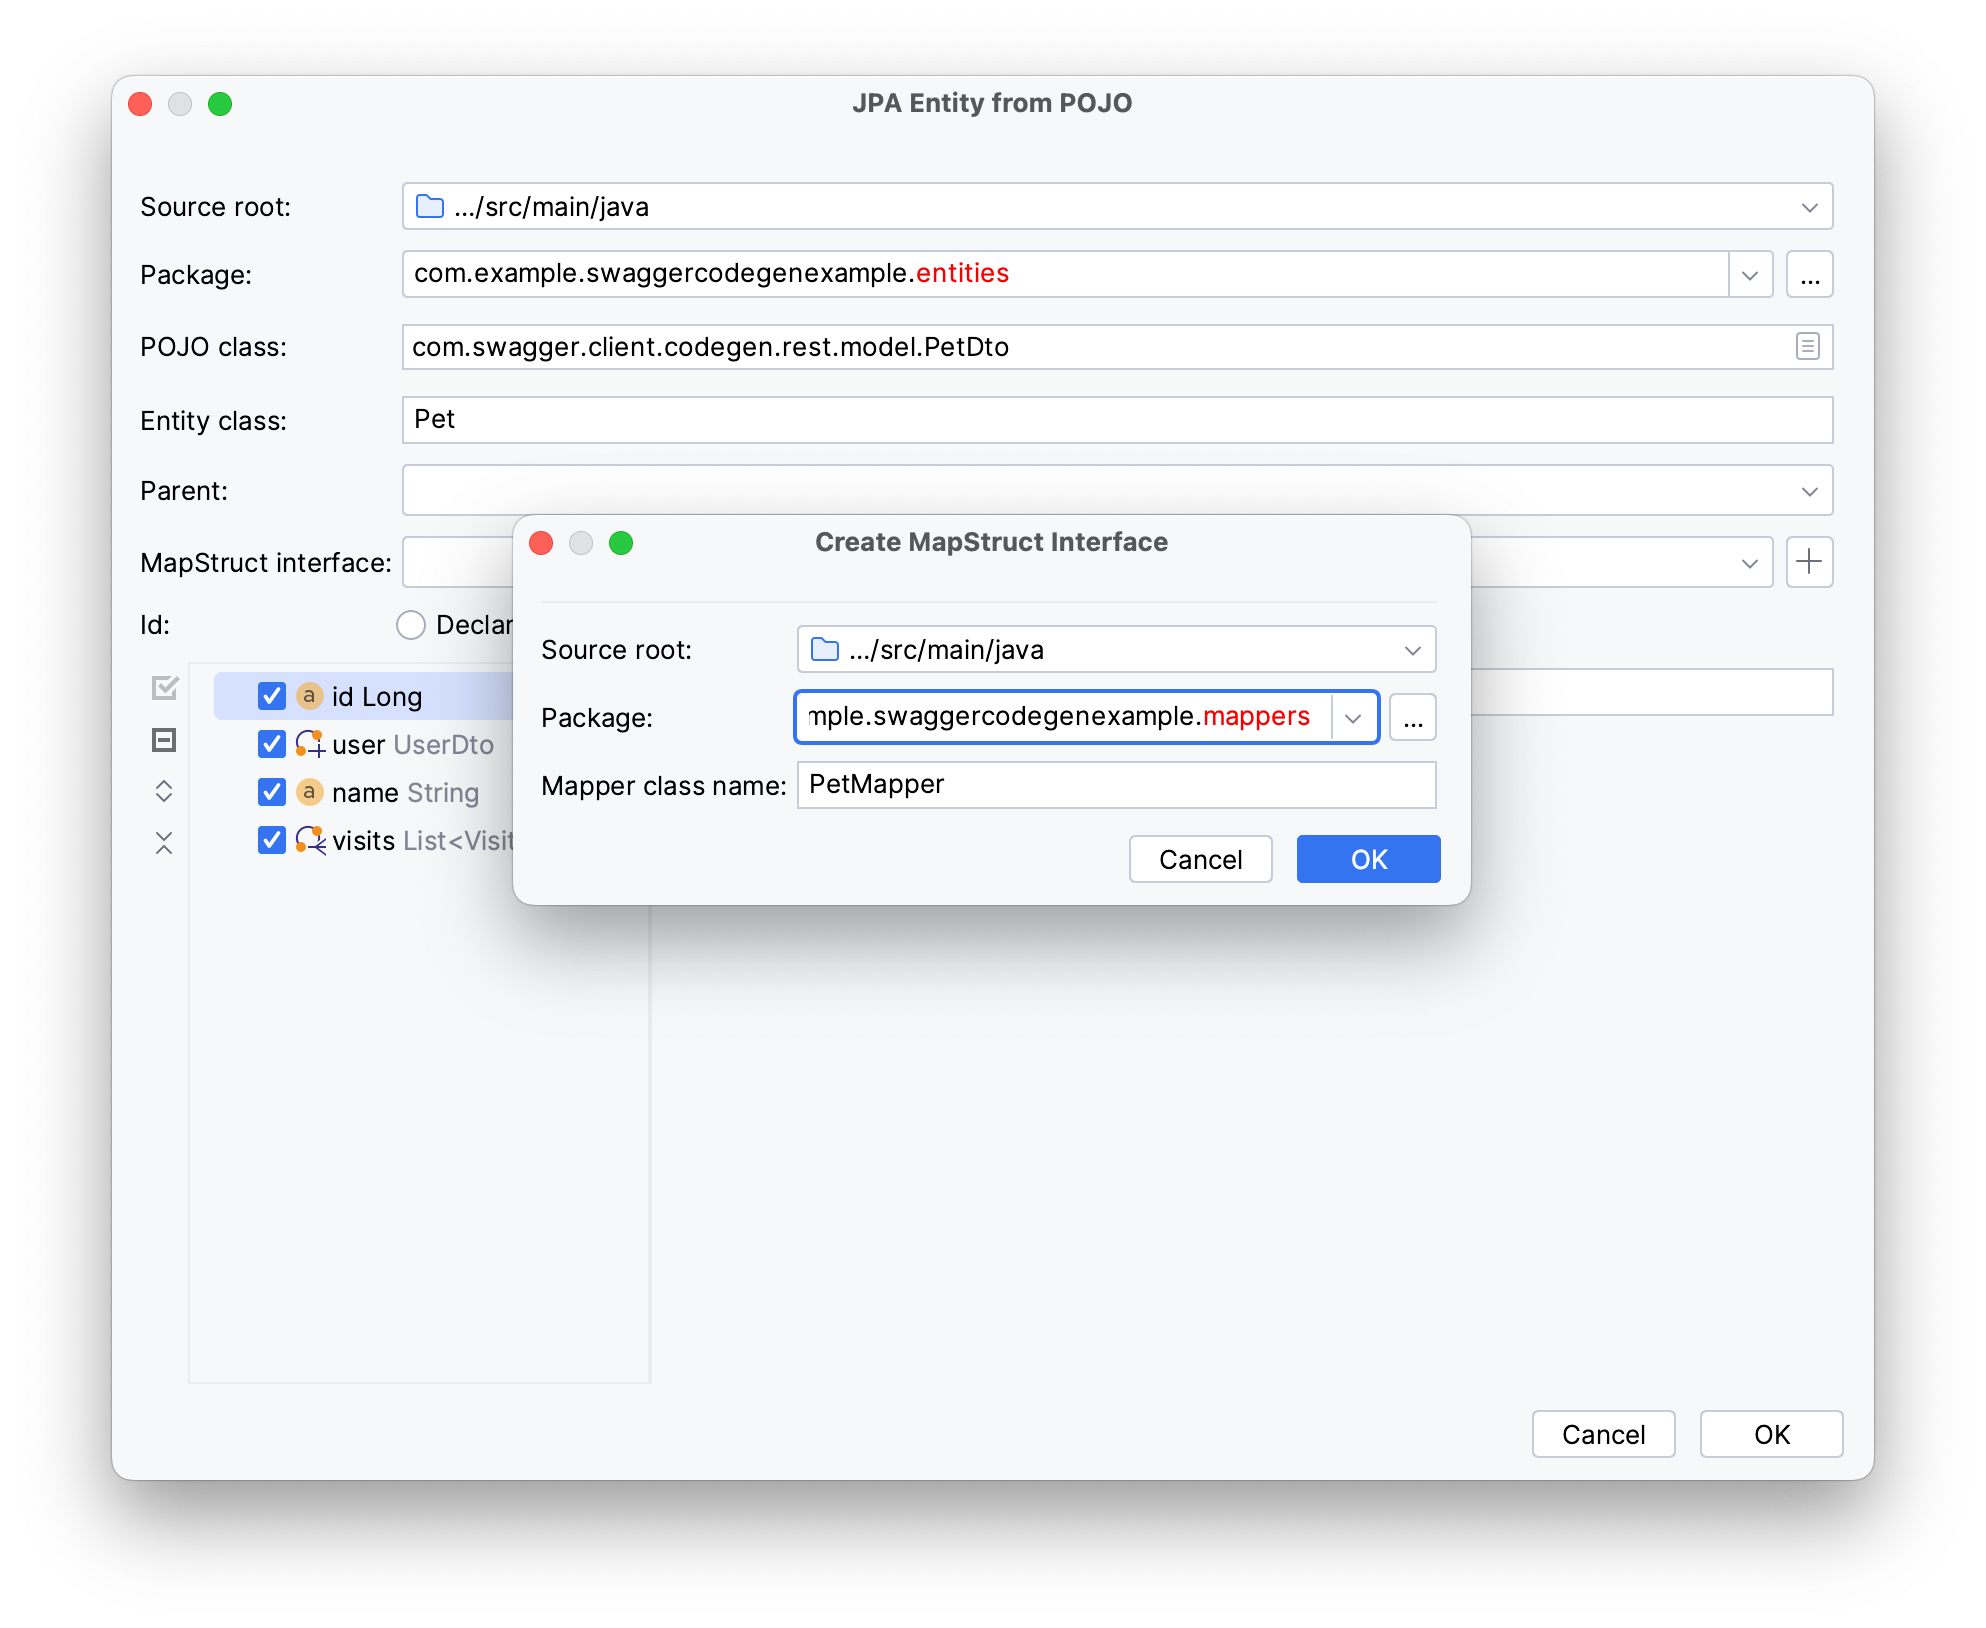
Click OK to return to the JPA Entity from POJO window.
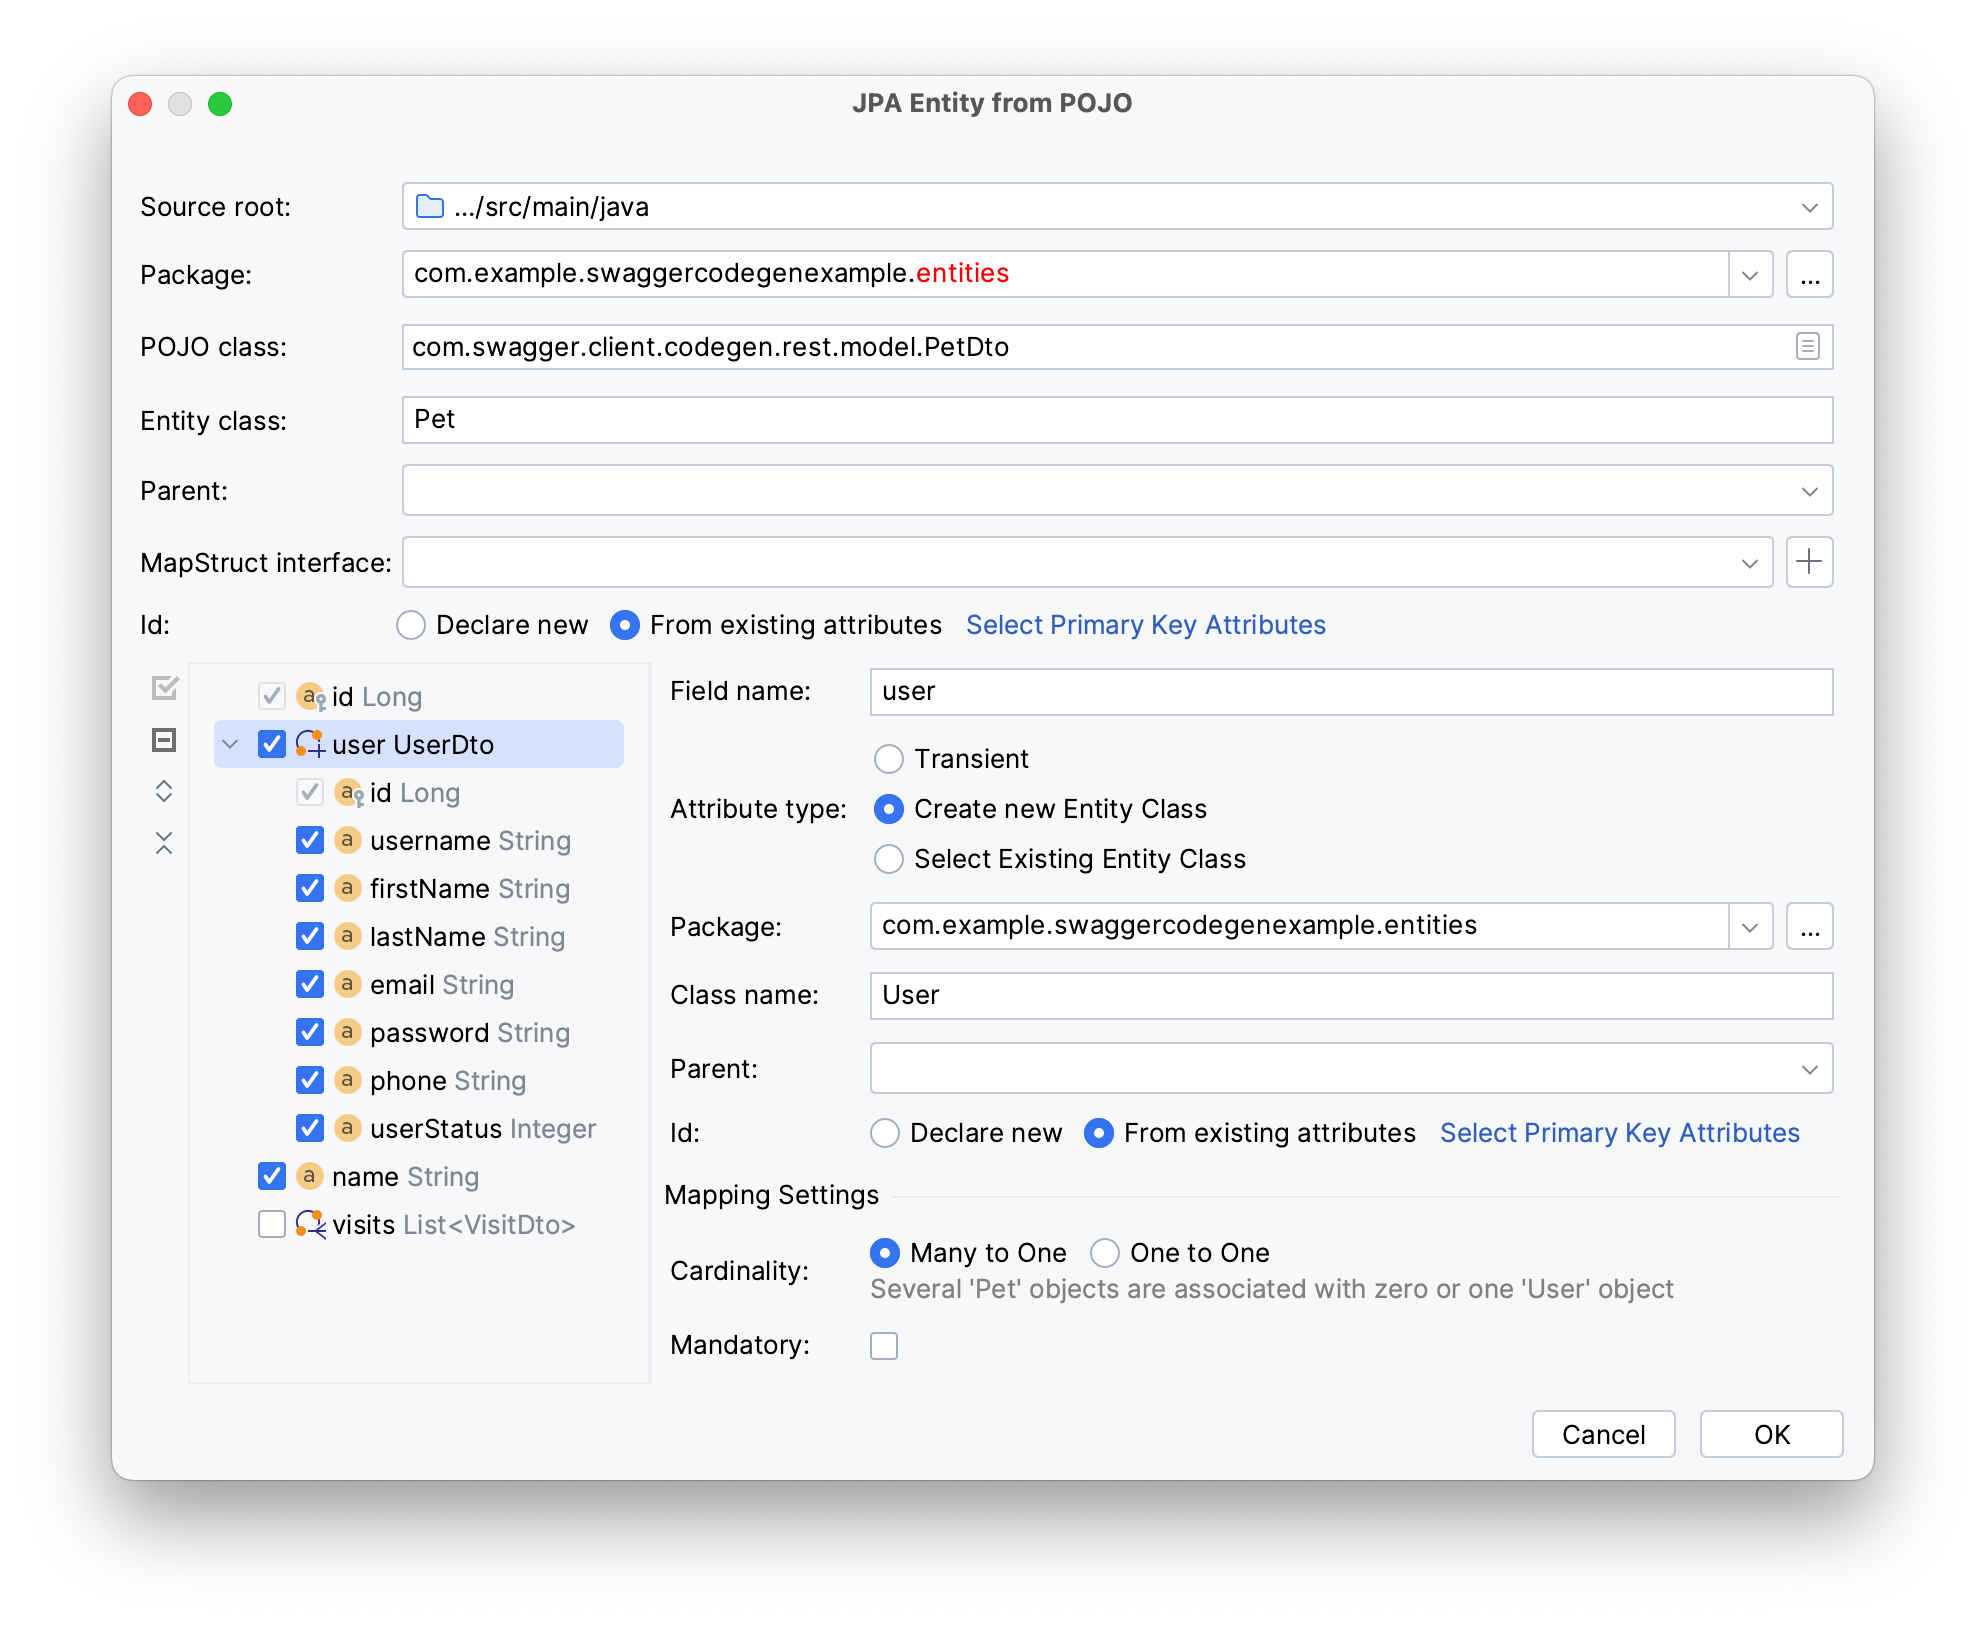
JPA Buddy detects the related DTOs in PetDto and allows you to create those entities along with the Pet entity.
Select user, then tick the Create new Entity Class option to create an associated User entity. The relationship between the Pet and User entities is ManyToOne, meaning several pets can only belong to one user. Type the package of the User entity and move on to the visits.
Type the Visist’s package. Enable cascade operations by ticking the ALL option as your Cascade type. The cardinality type for this entity will be OneToMany, meaning one pet can visit the clinic several times.
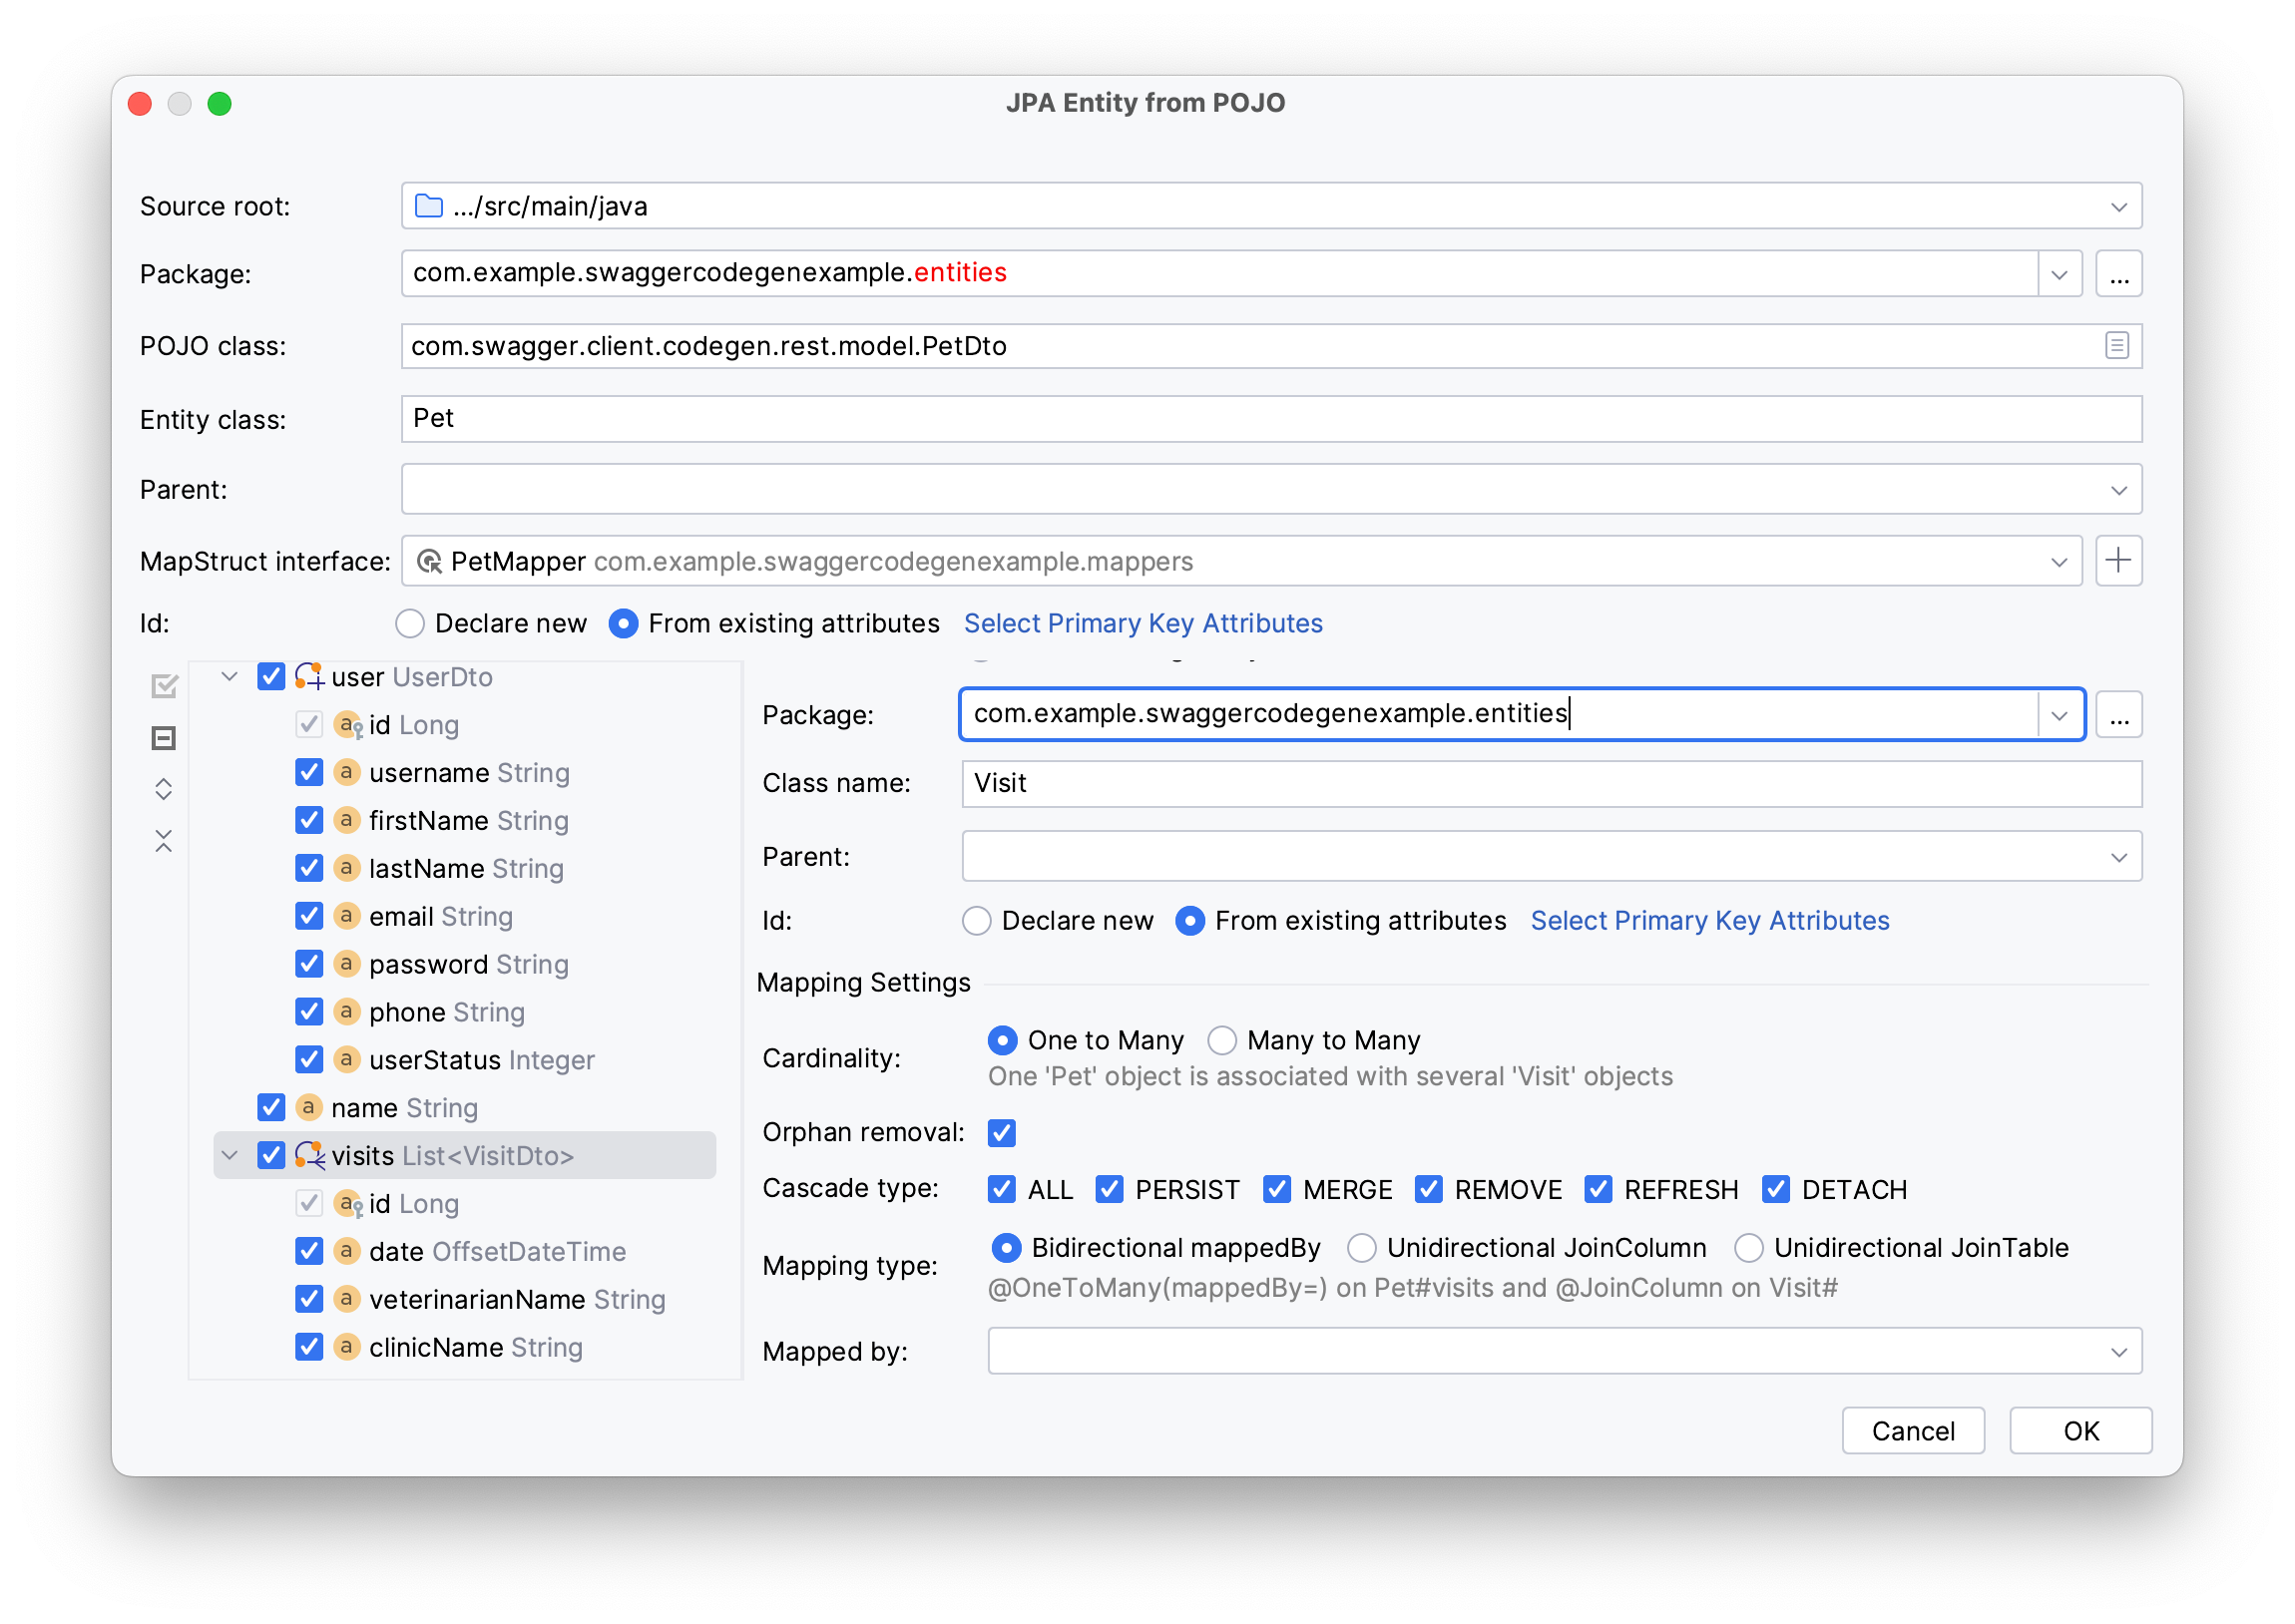
You can choose to create a mapped attribute to enable a bidirectional relationship in the data model. Click on the Mapped by field → select create inverse attribute... to invoke the Create Mapped Attribute window. JPA Buddy fills the fields with default values based on your entity names; click OK to return to the JPA Entities from POJO window.
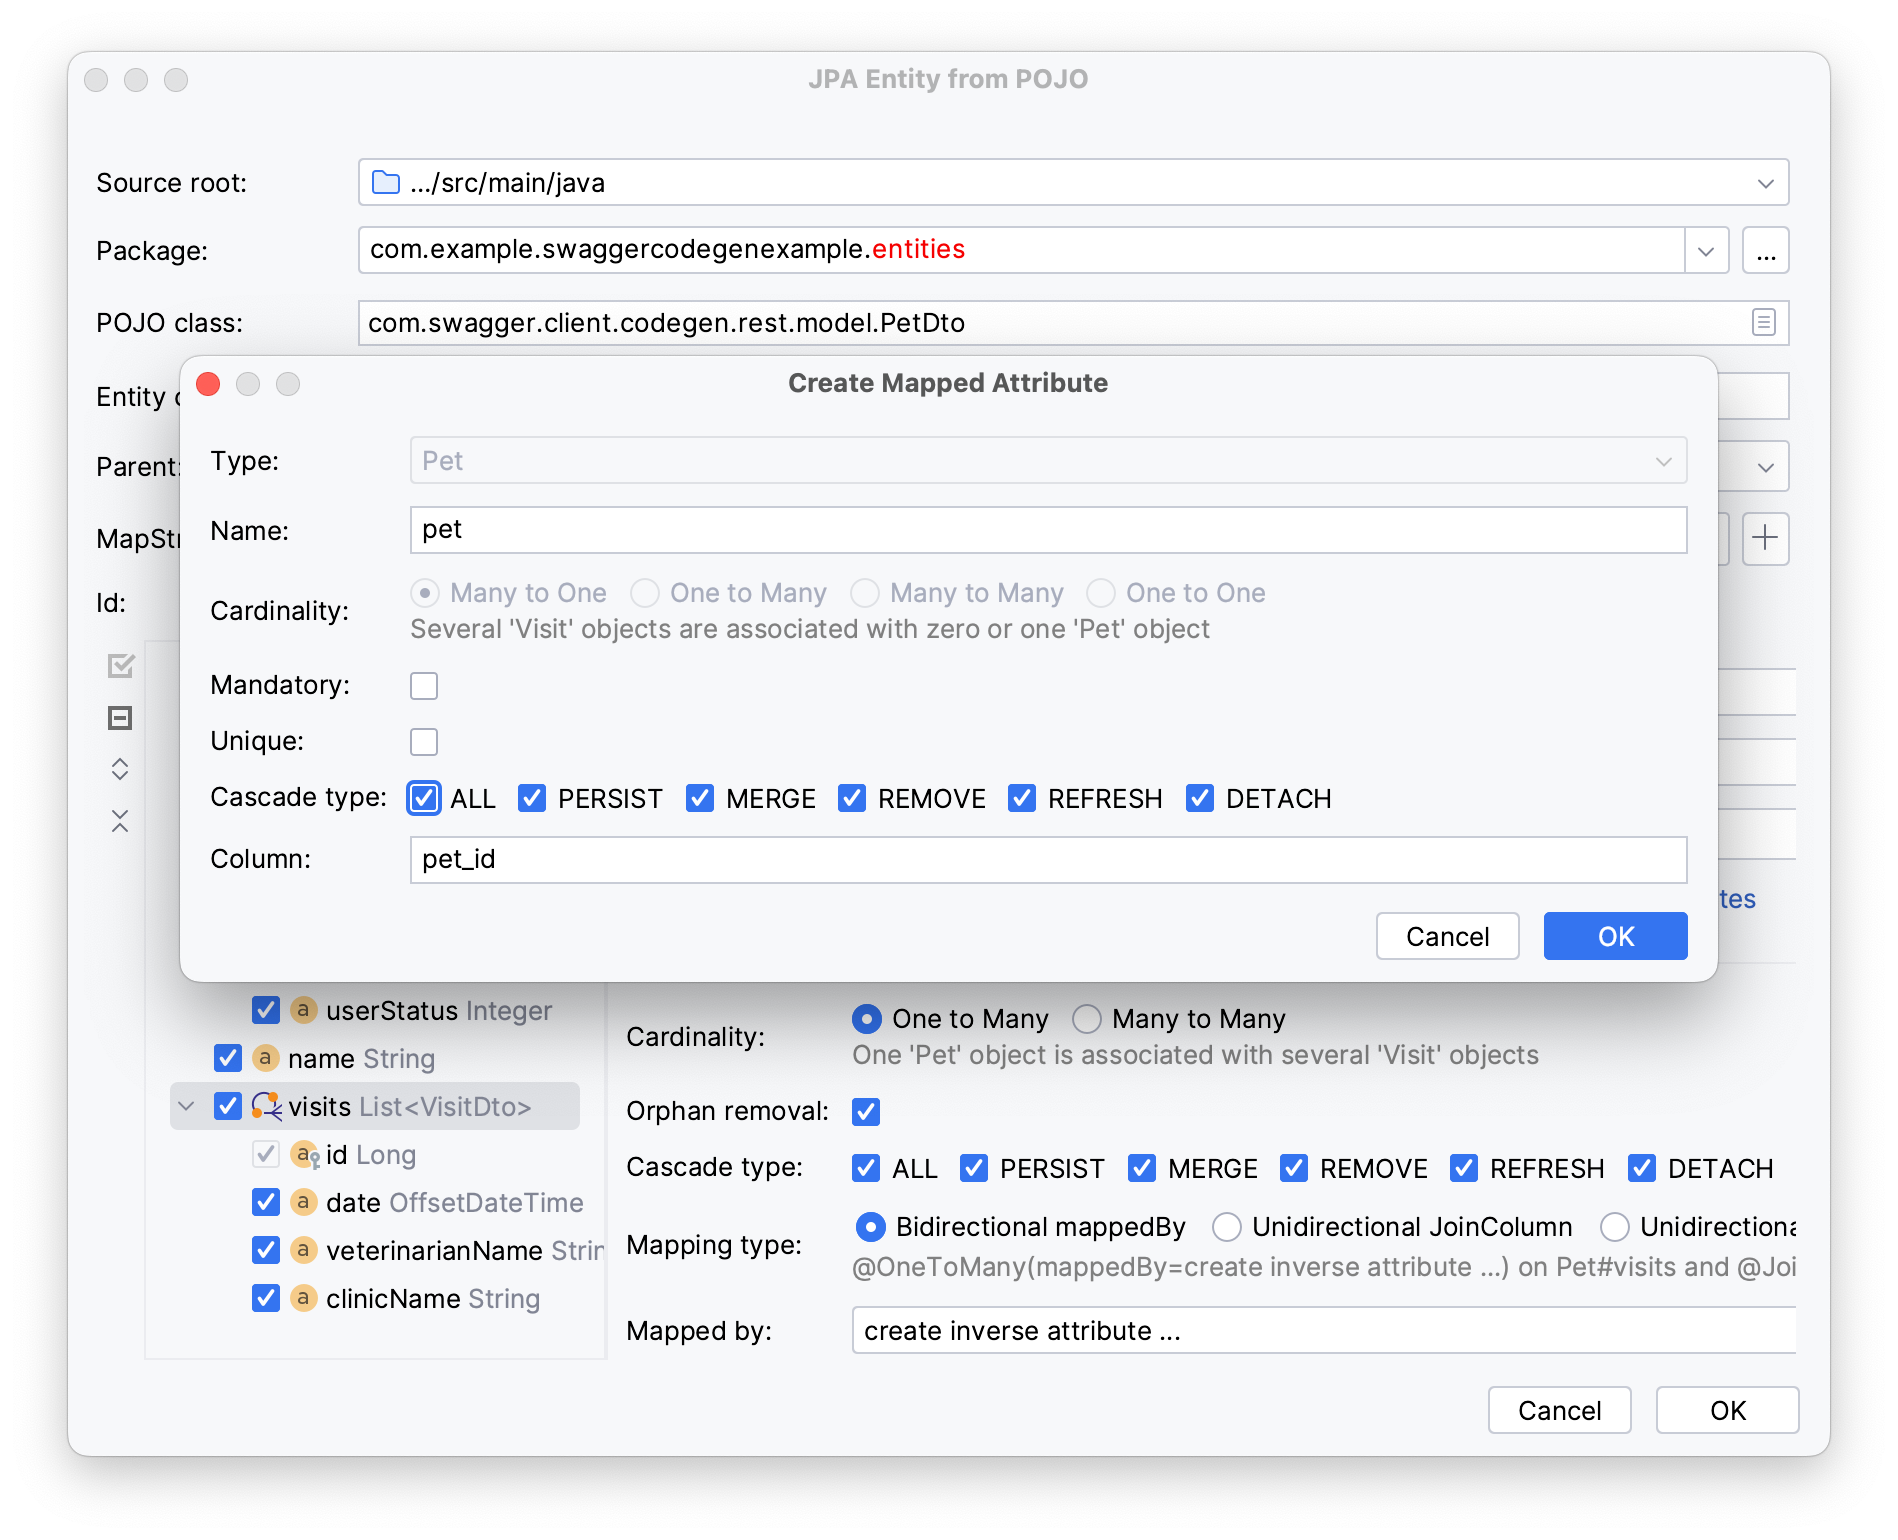
Click OK.
JPA Buddy will create three entities in an entities package and a mapper for the Pet entity in the mappers package.
Configuring an API
Your domain model is ready; now you need to configure how your application will interact with the local petclinic. In this section, you will:
- Create a configuration class
- Use the generated stubs to set up API interactions
- Define beans for the API client and specific endpoints
Create a system package in the application and an ApiConfig class with a @Configuration annotation.
@Configuration
public class ApiConfig {
}
Next, define a property to hold the base path of the petclinic service in the ApiConfig class. This value will be fetched from the application's properties using the @Value annotation.
@Value("${petclinic.host.uri}")
private String hostInfoBasePath;
To point the client to the right endpoint for correct communication and data exchange, add the following URI in your application.properties file:
petclinic.host.uri=http://localhost:8081
Create a bean for the ApiClient stub. This client will be configured with the base path you've just defined.
@Bean
public ApiClient apiClient() {
 return new ApiClient().setBasePath(hostInfoBasePath);
}
Define a bean for the PetApi which will use the ApiClient bean to interact with the pet endpoints from the local petclinic.
@Bean
public PetApi petApi() {
 return new PetApi(apiClient());
}
With these configurations in place, your application is now set up to communicate with the petclinic service using the generated API stubs.
@Configuration
public class ApiConfig {
 @Value("${petclinic.host.uri}")
 private String hostInfoBasePath;

 @Bean
 public ApiClient apiClient() {
 return new ApiClient().setBasePath(hostInfoBasePath);
 }

 @Bean
 public PetApi petApi() {
 return new PetApi(apiClient());
 }
}
Writing a PetController
The next step is to create a controller to handle incoming requests related to pets. In this section, you will:
- Set up a REST controller for pet-related operations
- Use Coding Assistance to write a service class
- Generate a repository for the
Petentity
Begin by creating a PetController class in a controllers package with the @RestController and @RequestMapping(“/api/v1/pet/”) annotations to specify the base path for all pet-related endpoints.
@RestController
@RequestMapping("/api/v1/pet")
public class PetController {
}
Define a petSyncService service and inject it into the class through a constructor.
private final PetSyncService petSyncService;

public PetController(PetSyncService petSyncService) {
 this.petSyncService = petSyncService;
}
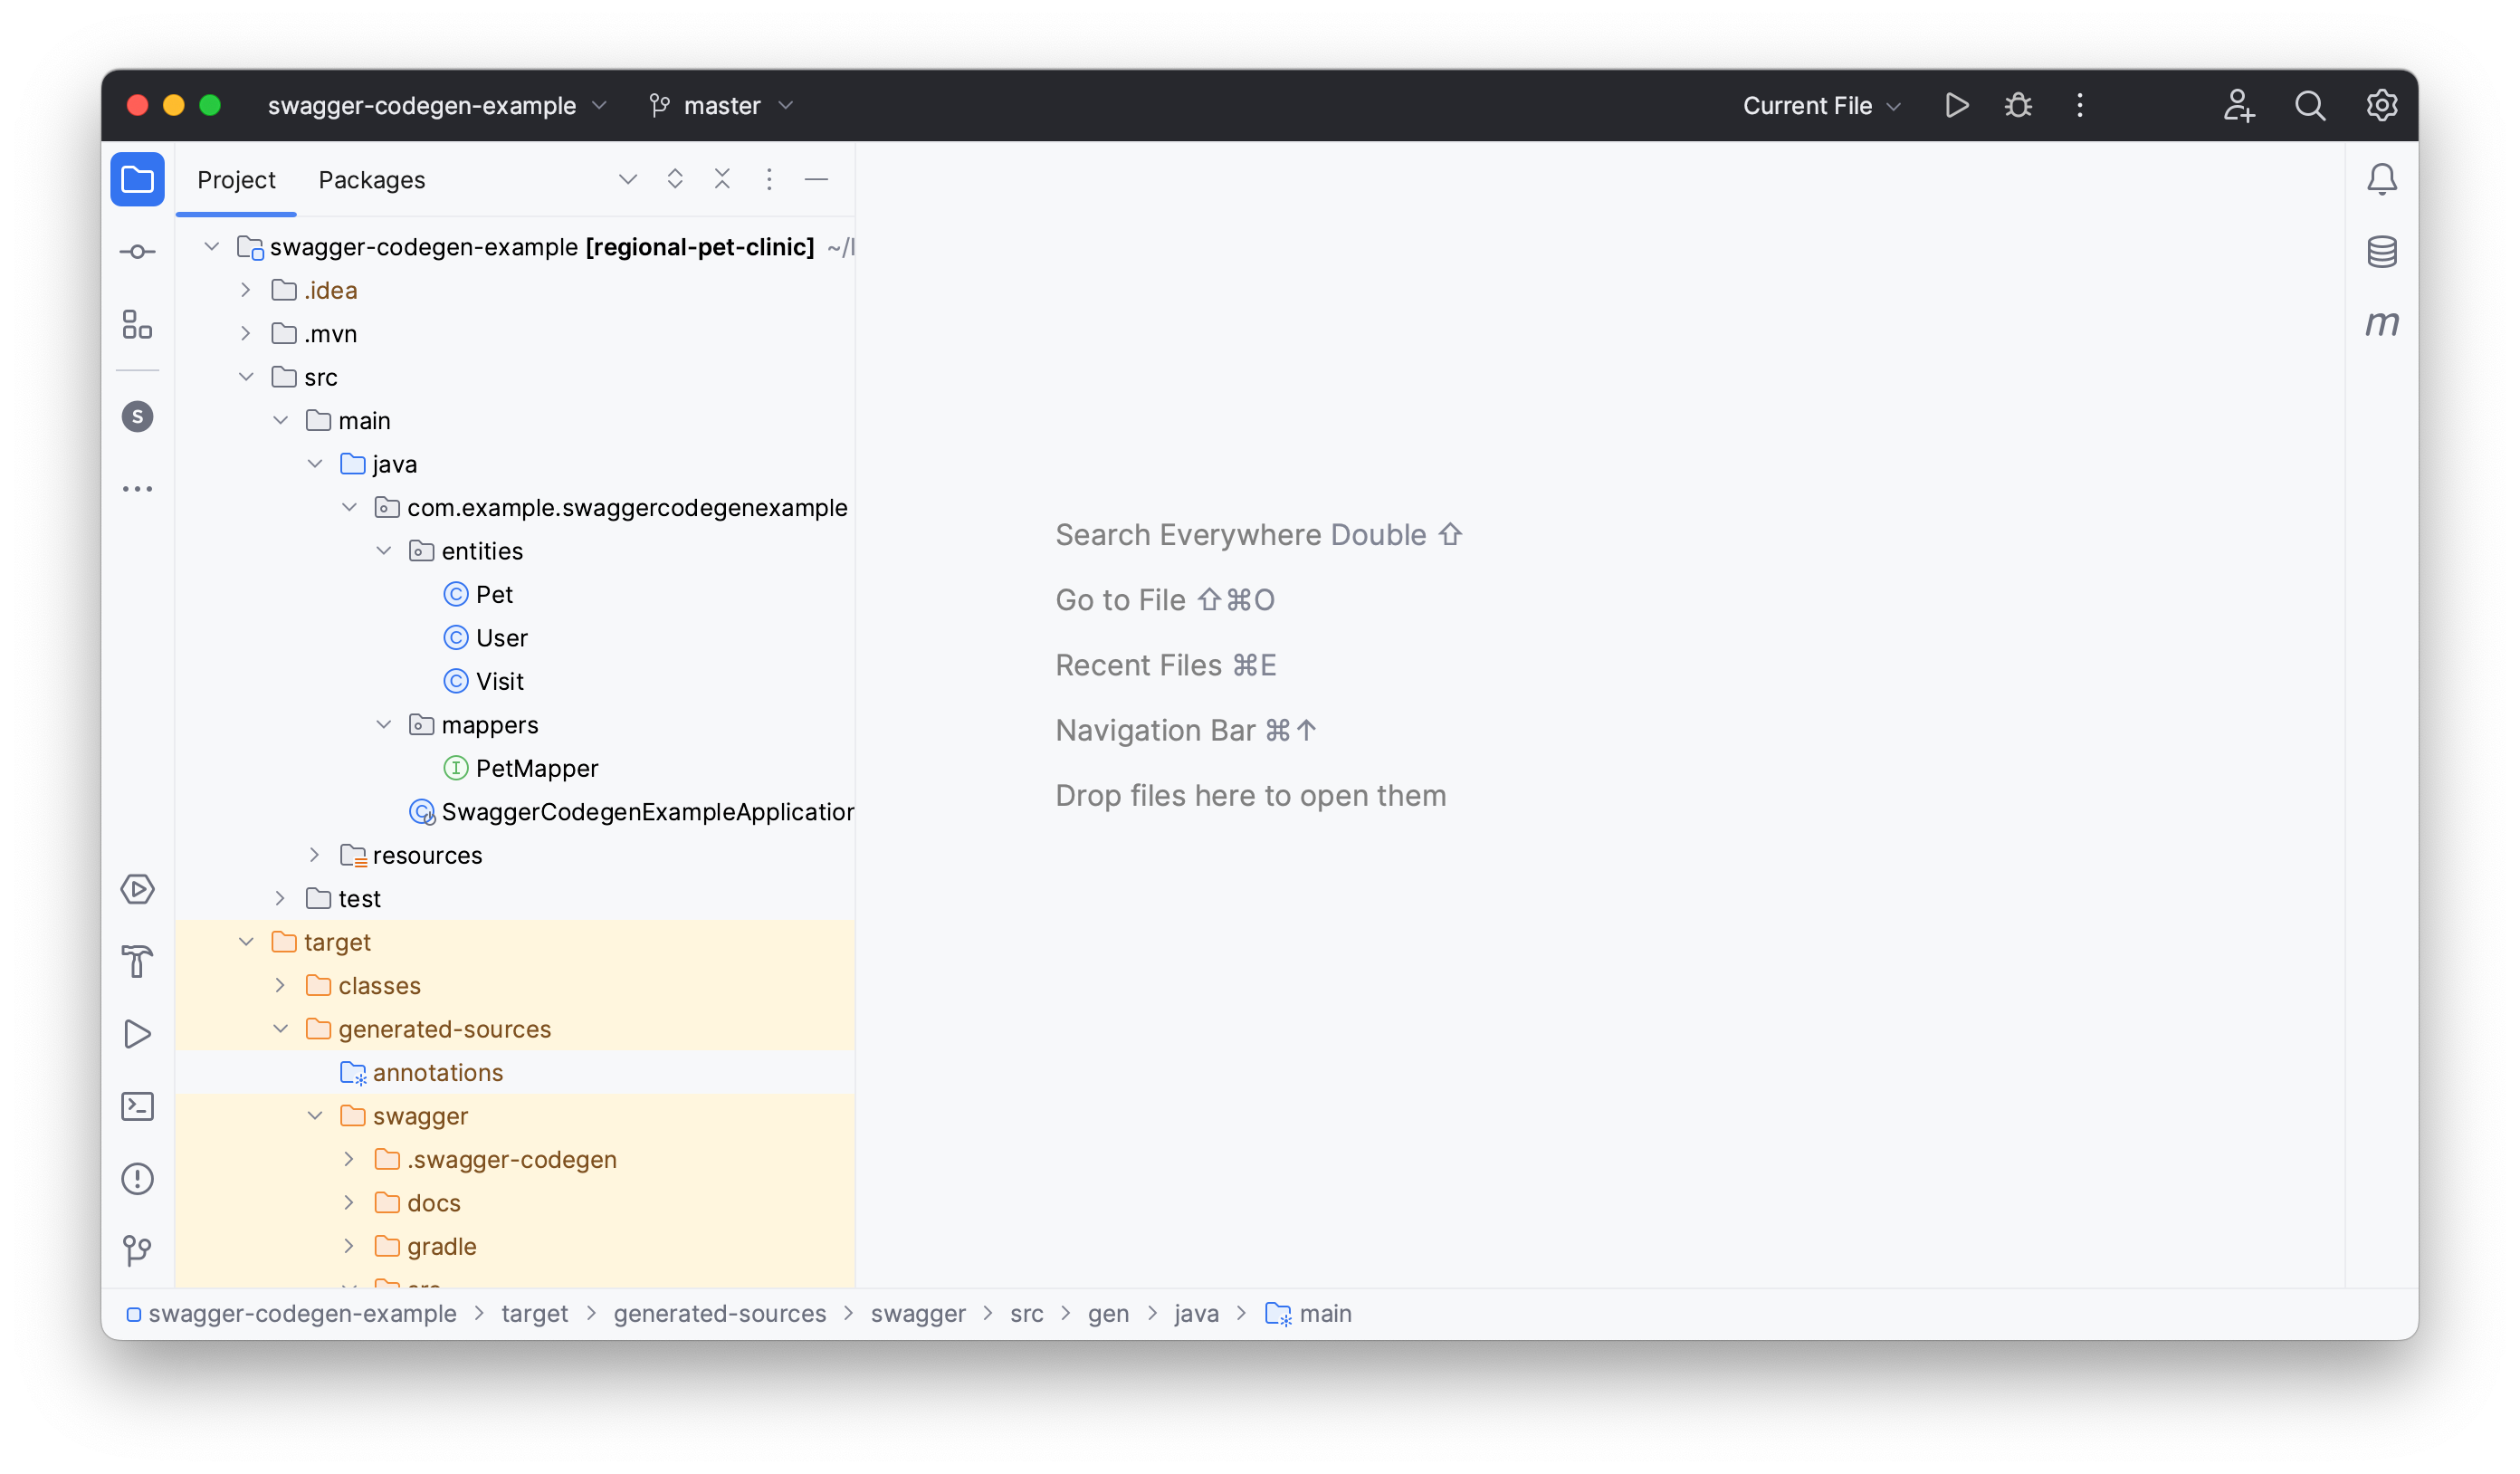
To implement the synchronization logic, click on the service name, invoke the Show Context Action Menu (Opt/Alt + Enter), and select the Create Class PetSyncService to create the class.
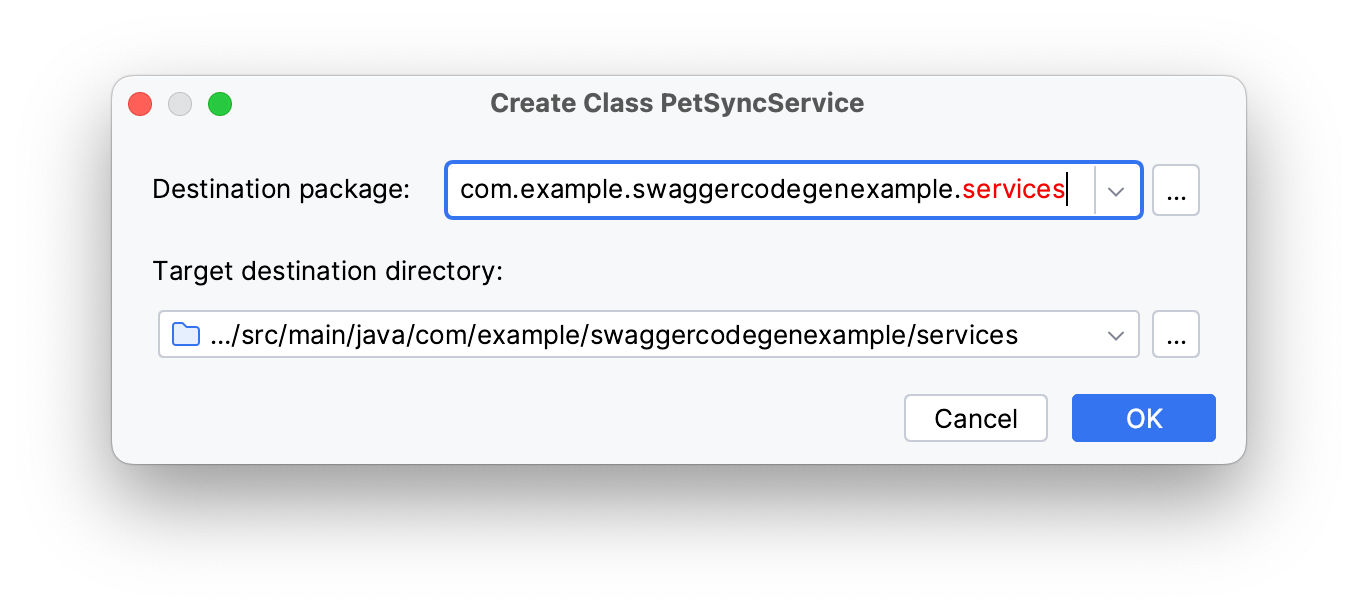
Name the package services and click OK to create the class inside a services package.
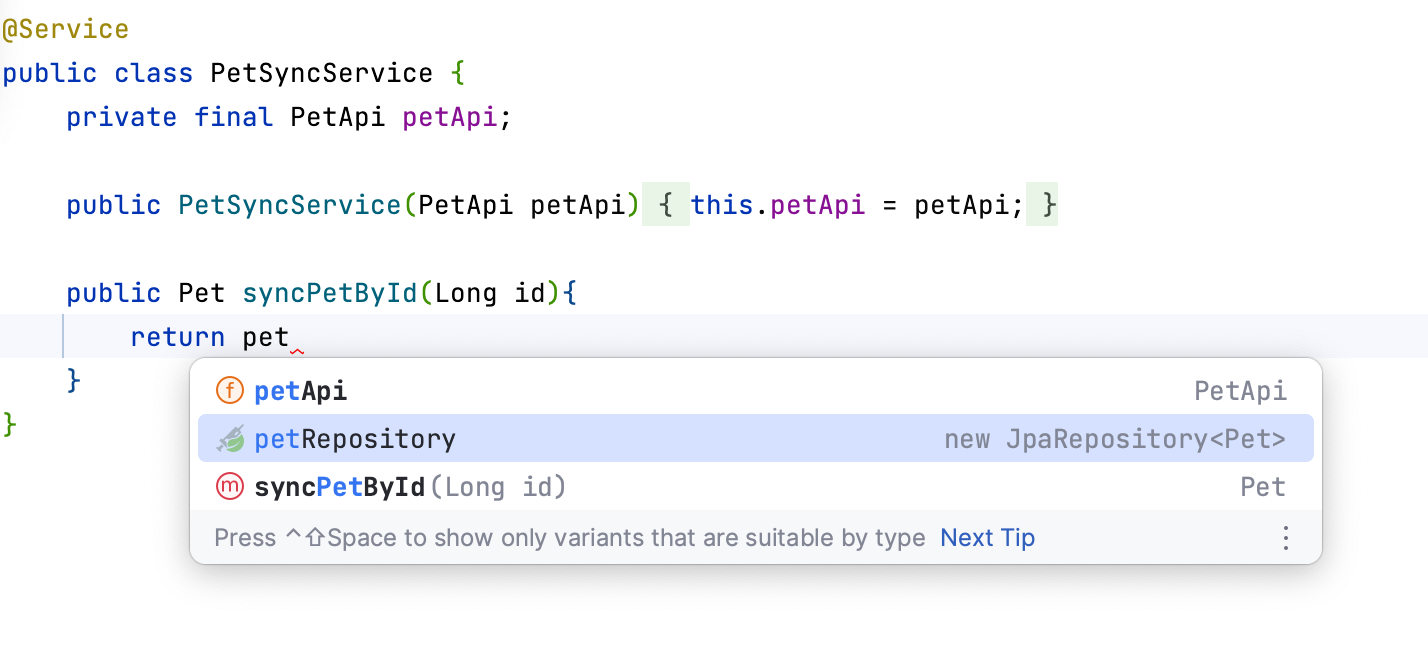
Add the @Service annotation in the petSyncService class, inject the PetApi class to let Spring locate and use it in the service class.
private final PetApi petApi;
public PetSyncService(PetApi petApi) {
 this.petApi = petApi;
}
Write a public Pet syncPetById(Long id) method, that will add an entry to the database if there is no pet with the passed id yet. Use JPA Buddy’s Coding Assistance to create a repository as you write your code. Start typing petRepository in the created method after the return statement and choose the suggested petRespitory option.
Type the package name for the pet repository and click OK.
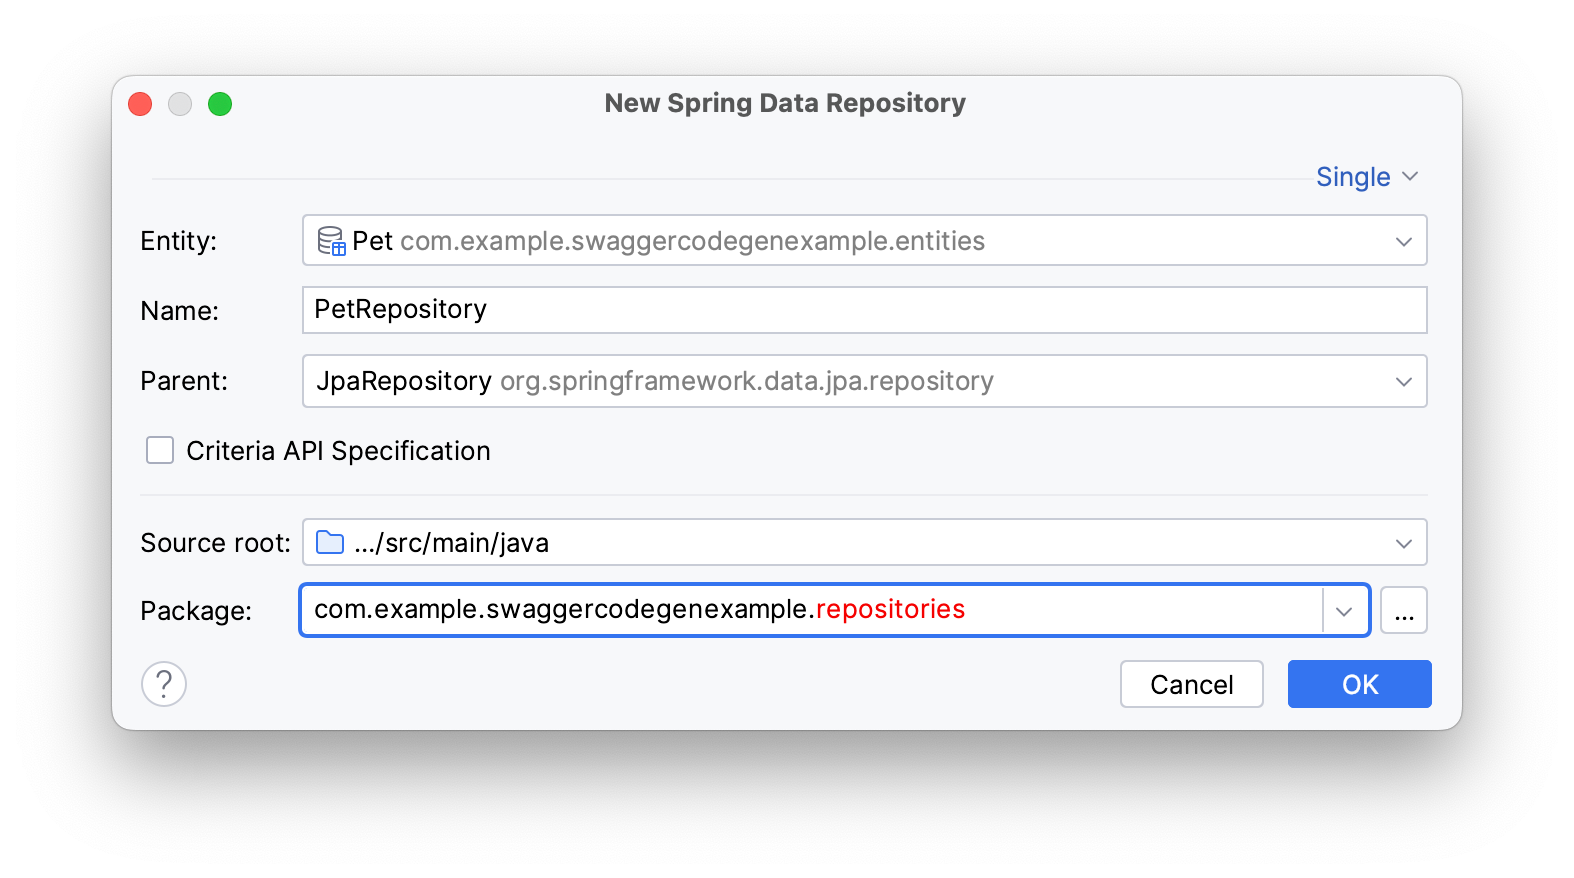
This will create a repository and inject it in the created constructor. Your syncPetById should look like this:
public Pet syncPetById(Long id){
 return petRepository.existsById(id) ? updatePetById(id) : addPet(id);
}
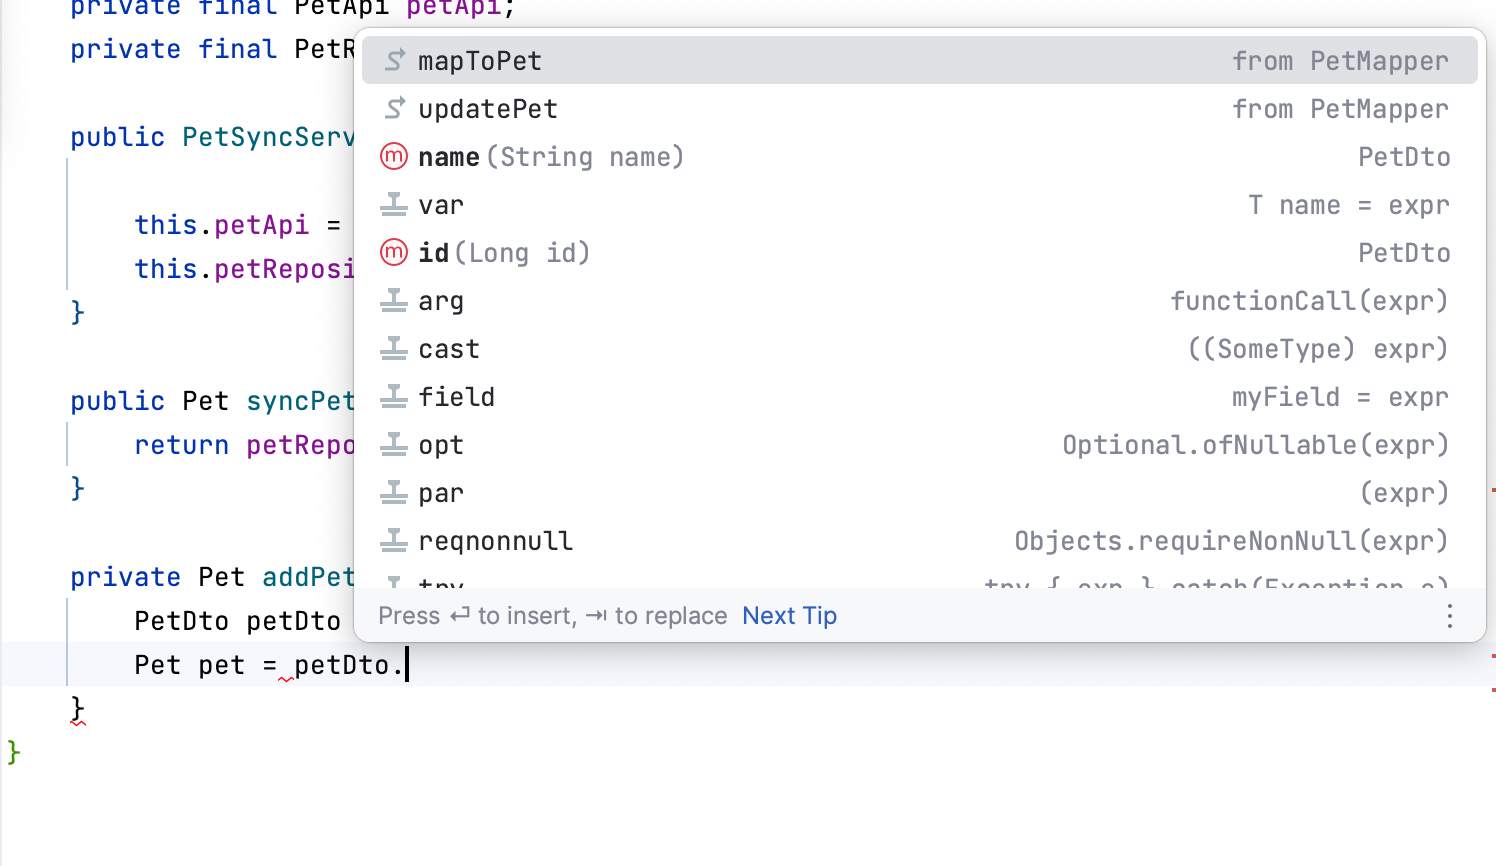
Next, write a Pet addPet(Long id) method, create a petDto instance to store the pet details for a given ID using the petApi object. Use the mapper you generated earlier to convert the retrieved PetDto object into a Pet entity and store it in a pet variable. JPA Buddy type .map after petDto and choose mapToPet to use the mapper’s method and inject the mapper interface.
Then save it in the created repository by returning pet and typing save after it.
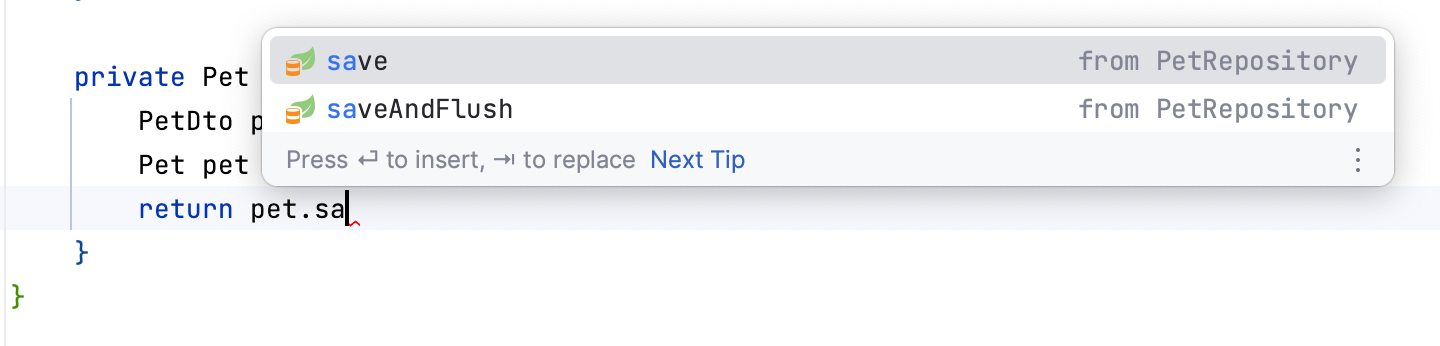
Your addPet method should look as follows:
private Pet addPet(Long id) {
 PetDto petDto = petApi.getPetById(id);
 Pet pet = petMapper.toEntity(petDto);
 return petRepository.save(pet)
}
For the private Pet updatePetById(Long id), the goal is to update the existing pet's details by searching for the existing pet by the passed Id and throwing an EntityNotFoundException exception if it’s not found.
Pet pet = petRepository.findById(id).orElseThrow(EntityNotFoundException::new);
Fetch the updated pet details for the given ID using the petApi instance and merge these details with the existing Pet entity using the petMapper.partialUpdate method using JPA Buddy’s Coding Assistance.
Pet updatedPet = petMapper.partialUpdate(petApi.getPetById(id), pet);
Save the updatePet into the repository as in the previous method to get the following code.
private Pet updatePetById(Long id) {
 Pet pet = petRepository.findById(id).orElseThrow(EntityNotFoundException::new);
 Pet updatedPet = petMapper.partialUpdate(petApi.getPetById(id), pet);
 return petRepository.save(updatedPet);
}
Return to your PetController to write a syncPetById(@RequestParam("id") Long id) GET handler using the created service. The @GetMapping(“/sync”) annotation specifies the HTTP method and path, while the @RequestParam captures the pet ID from the request.
@GetMapping("/sync")
public PetDto syncPetById(@RequestParam("id") Long id) {
}
Call the petSyncService.syncPetById(id) method and use JPA Buddy Coding Assistance to map the returned pet into a pet DTO and inject the mapper interface.
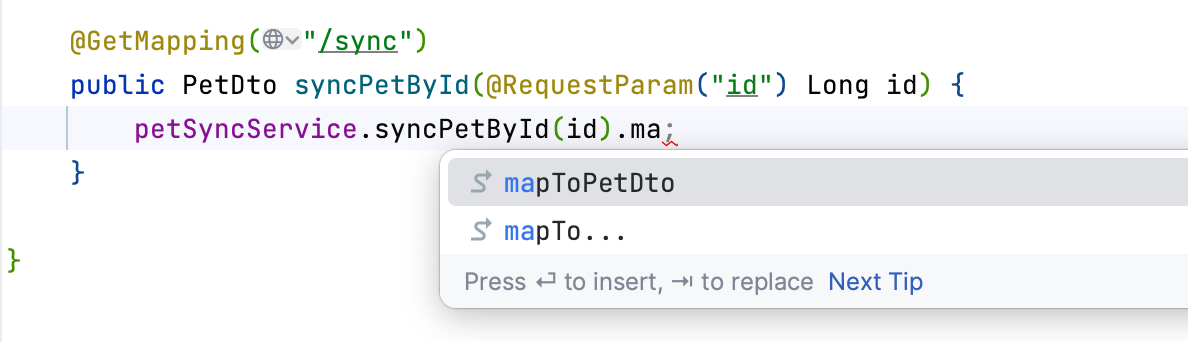
You will get the following GET handler:
@GetMapping("/sync")
public PetDto syncPetById(@RequestParam("id") Long id) {
 return petMapper.toDto(petSyncService.syncPetById(id));
}
Generating an Init Script
To create tables within the connected database, you will need to generate an initial schema based on your entity model.
In this section, you will learn how to:
- Generate an initial DDL script
- Create database tables
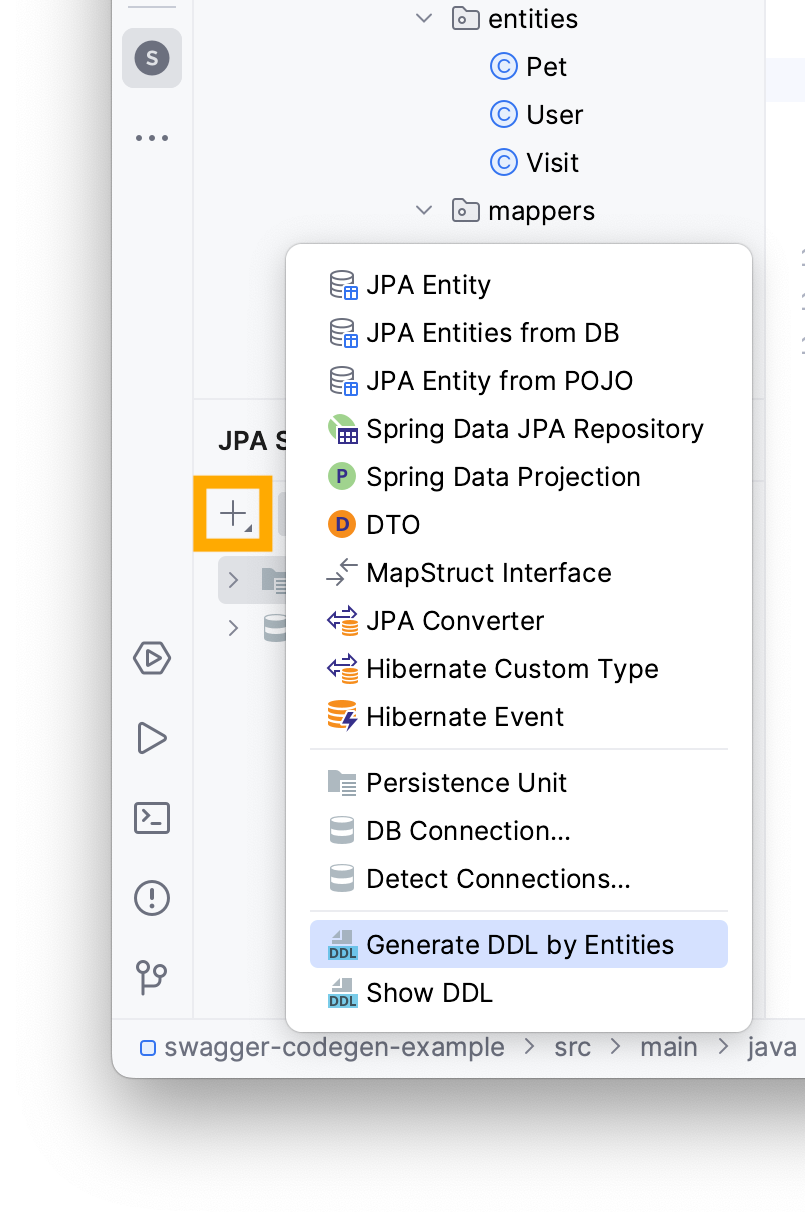
JPA Buddy can generate an initialization script to define your database schema, based on your current entity model:
- Navigate to the JPA Structure tab
- Click on the + button
- Choose Generate DDL by Entities
Select DB schema initialization to create tables based on your JPA model, and choose PostgreSQL as your DB type.
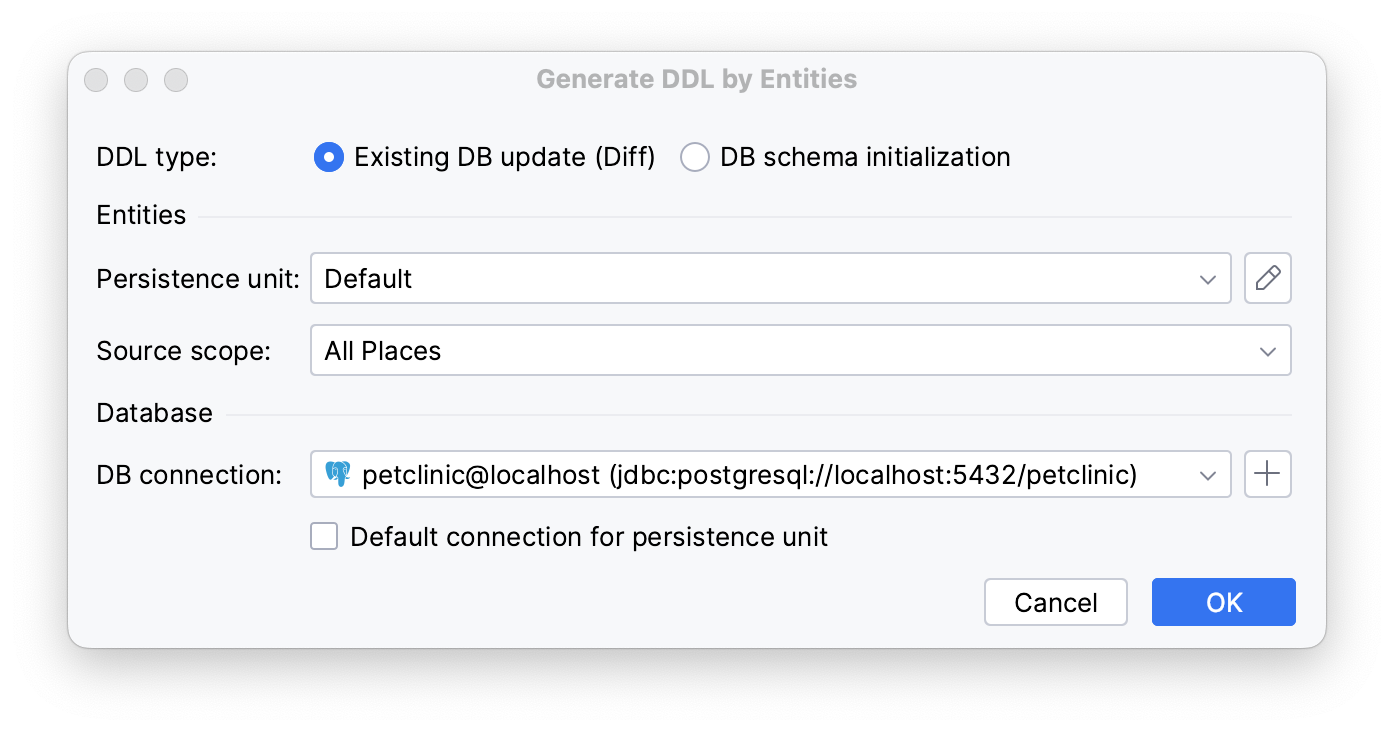
Click OK.
In the DDL by Entities Preview window, you can preview and adjust the generated init script.
You can choose where to save your script: in a separate file, a scratch file in the IDE, copy it to your clipboard, or paste it to your connected database console. Let’s choose the Database Console option.

Click OK.
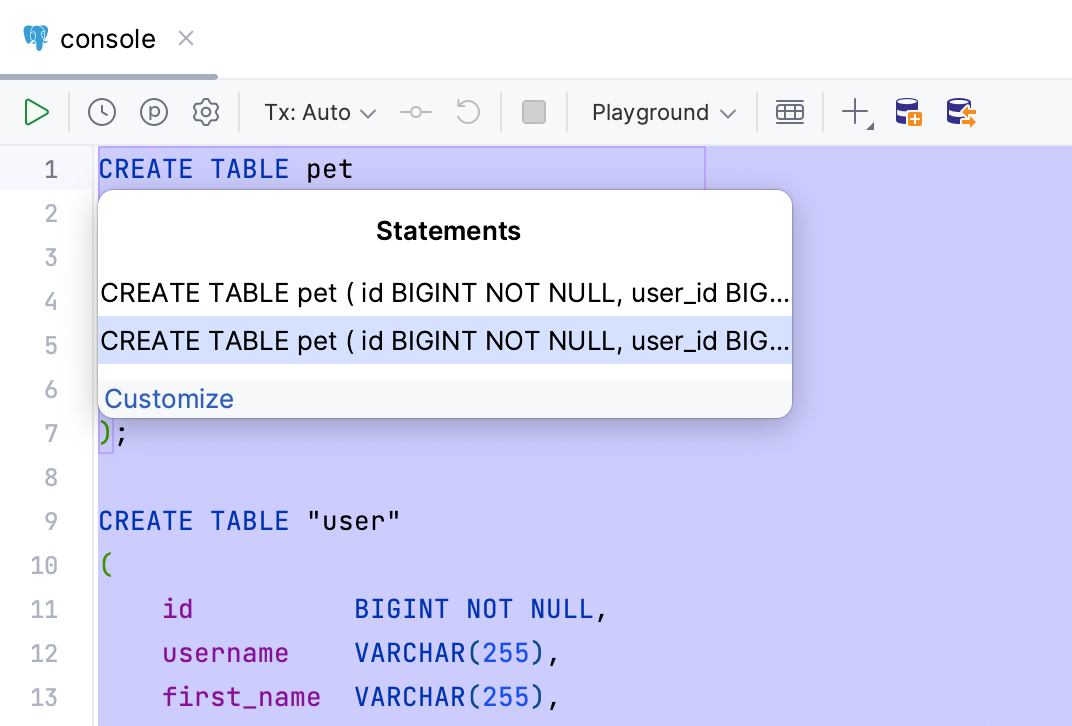
The generated DDL script will appear in the console. To apply this script to your database, execute your script by clicking on the Execute button.
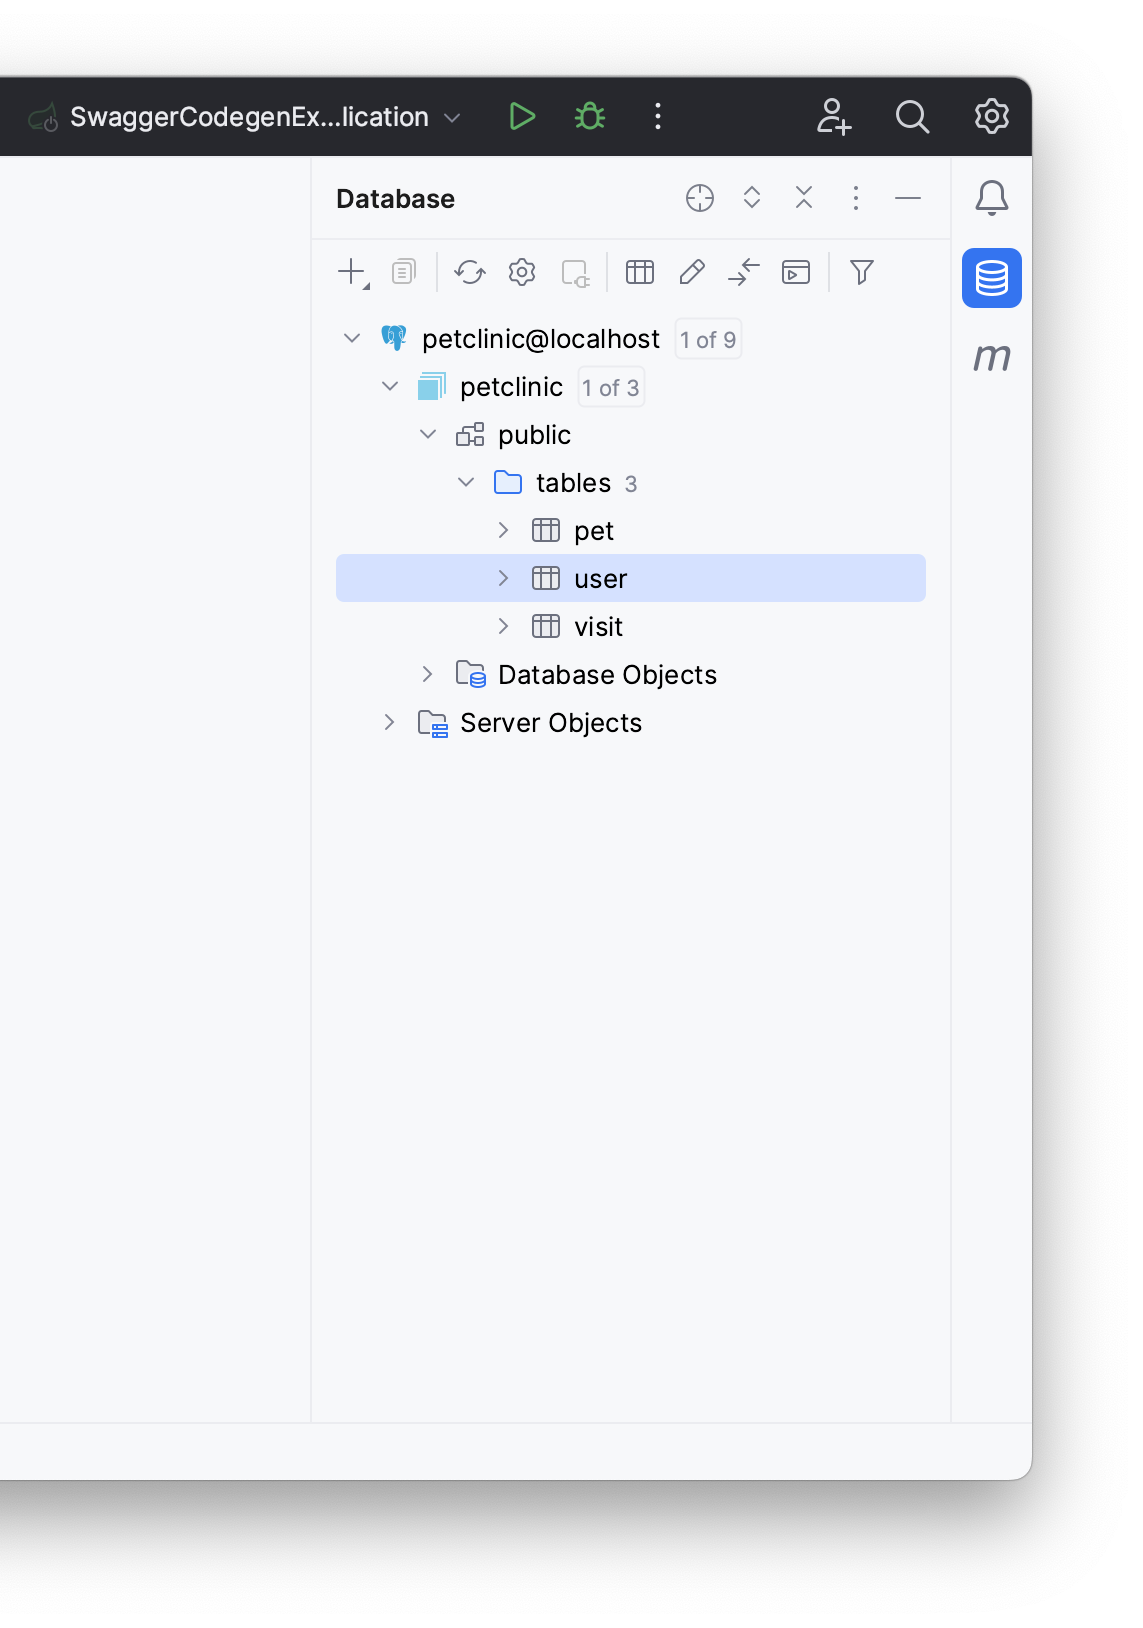
You can view the newly created table along with its columns in the Database tab.
Testing the Application
Now that your API methods are set, it's time to test the application using IntelliJ IDEA Ultimate's web client. Alternatively, you can use any other client, such as Postman, for example. In this section of the guide, you will:
- Generate HTTP requests
- View response JSON objects
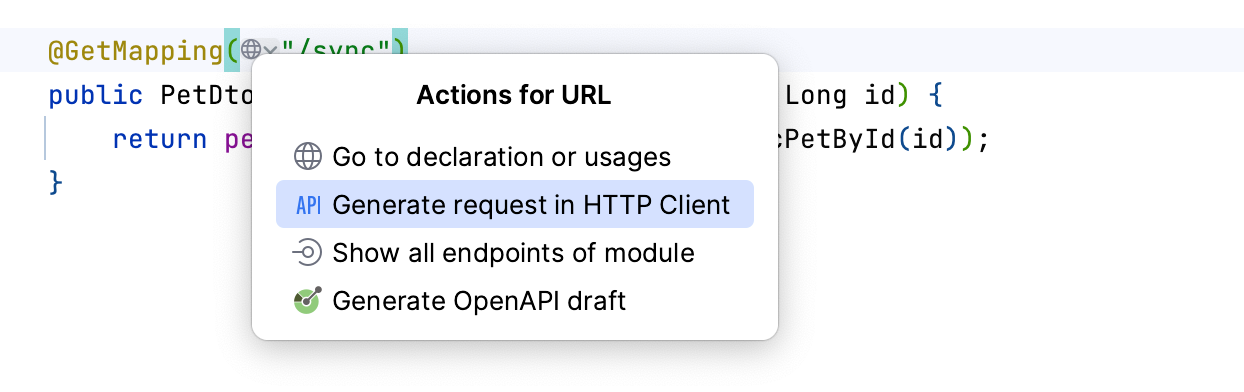
To start, generate an HTTP request by clicking on the globe icon next to your endpoint and selecting Generate request in HTTP Client.
IntelliJ IDEA will generate an HTTP file with the following GET request, add the id you want to find to the end of the endpoint path, e.g. ?id=0:
GET http://localhost:8080/api/v1/pet/sync?id=0
Before launching the generated request, pull the linked github repository and launch the application to imitate the local petclinic that will be listening to the 8081 port. The requests created in this section will receive data from the local pet clinic.
Make another HTTP request for the second endpoint. The from-interval receives two dates with the following format:
GET http://localhost:8080/api/v1/statistics/from-interval?start=2022-12-09T15:49:05.630Z&end=2022-12-12T15:49:05.630Z
Adjust the start and end dates according to the values in the database.
Launch the requests by running the created application and clicking on Run HTTP Request.

You will get JSON files with the queried data for each request. To check the result of each request, press Command/Ctrl + left-click on the generated JSON file.
You should get a 200 HTTP status code and the pet’s details from the local petclinic application as in the following JSON object:
[
 {
 "id": 9426,
 "pet": {
 "id": 0,
 "userId": 0,
 "name": "Charlie"
 },
 "date": "2023-08-18T03:08:24.693+03:00"
 },
 {
 "id": 4711,
 "pet": {
 "id": 0,
 "userId": 0,
 "name": "Charlie"
 },
 "date": "2023-08-15T04:18:12.162+03:00"
 }
]
Conclusion
In this guide, you've set up two controllers in a Spring application, learned how to create endpoints, connect services, and map data using Swagger, MapStruct and JPA Buddy. It's essential to keep your API structure consistent and test your endpoints regularly.