Best practices and common pitfalls of using Lombok with JPA | JPA Buddy
Whether you're a seasoned Java developer or just getting started with JPA, this guide has insights and advice to make using Lombok with JPA smoother. You'll learn valuable tips to simplify your development process and ways to avoid common pitfalls.
Estimated Reading Time: 15 mins
Introduction
Lombok is a Java library that boosts productivity by generating boilerplate code using annotations. Using Lombok with JPA requires attention to detail. Ignoring this can cause more errors instead of minimizing them. Today, we'll discuss potential issues that can occur when using Lombok with JPA and ways to avoid them.
In this guide, you will set up an existing sample project to explore common pitfalls found in Lombok when used with JPA entities and how JPA Buddy helps deal with them.
Overview
You will learn how to:
- Set up a new project
- Set up a database connection
- Create entities
- Generate an init script
- Test @EqualsAndHashcode
- Test @ToString
- Use @Builder correctly
You can find the code of this application on github.
Setting up a New Project
First, you will go through a few steps to set up a new project. In this section, you will:
- Create a new project using Spring Initializr
- Load the project in IntelliJ IDEA
Start by creating a Spring Boot application using Spring Initializr.
- Visit Spring Initializr’s website.
- Select the following settings:
- Java 17 as the programming language
- Gradle as the build tool
- The latest stable version of Spring Boot
- The application will be packaged as a JAR file
- Add the following dependencies to your project:
- Spring Data JPA enables you to use JPA and Data Repositories
- PostgreSQL Driver provides PostgreSQL database access
- Lombok helps to reduce boilerplate code
Here are the selected settings in Spring Initializr:

Download the created project and open it in IntelliJ IDEA by clicking on File → Open.
It’s important to include Lombok dependencies for JPA Buddy to use its annotations when generating entities and DTOs.
Setting up a Database Connection
To connect your application to the database, you need to:
- Set up a new connection
- Link the application to a datasource using a properties file
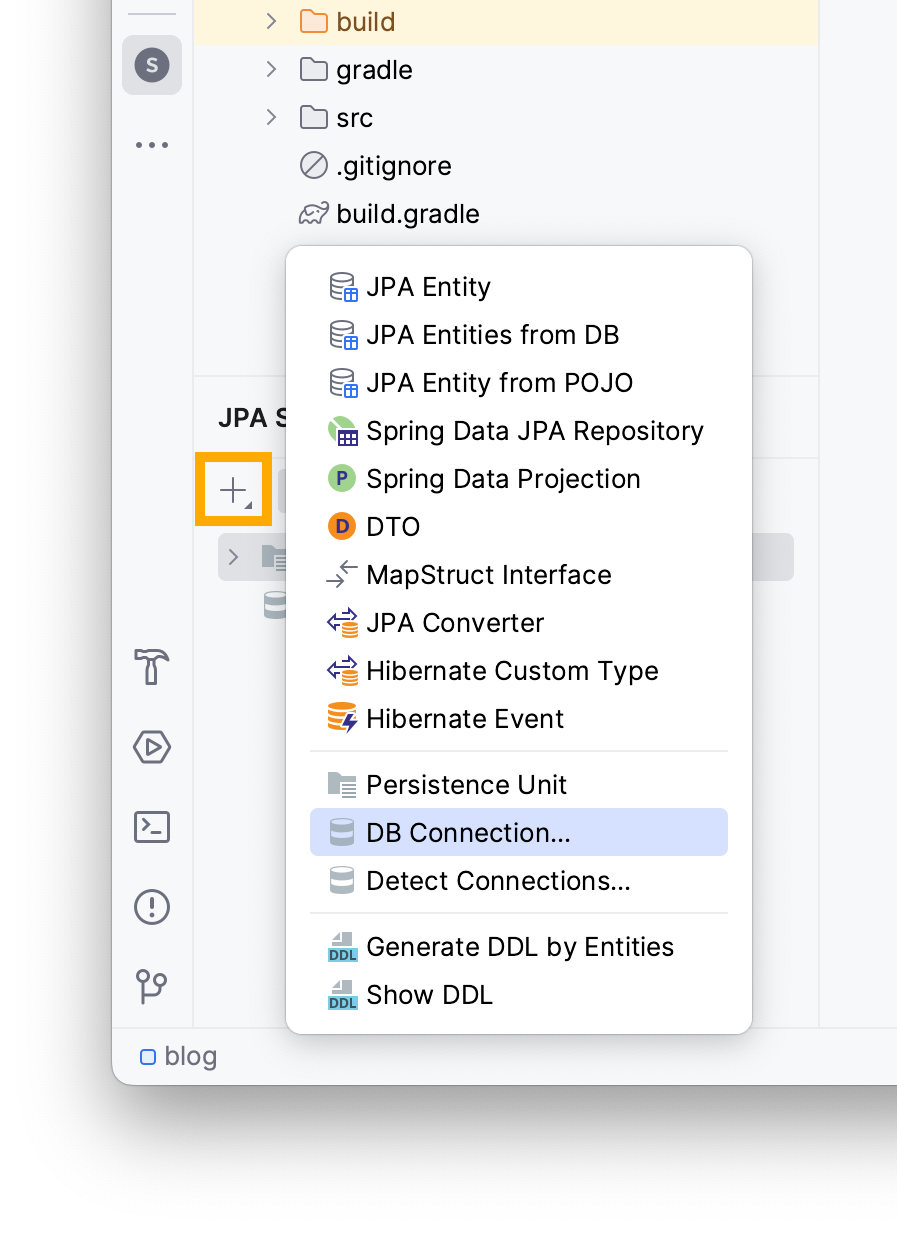
You can use JPA Buddy to set up a new connection through the JPA Structure tab:
- Navigate to the JPA Structure tab
- Click on the + button
- Click on DB Connection...
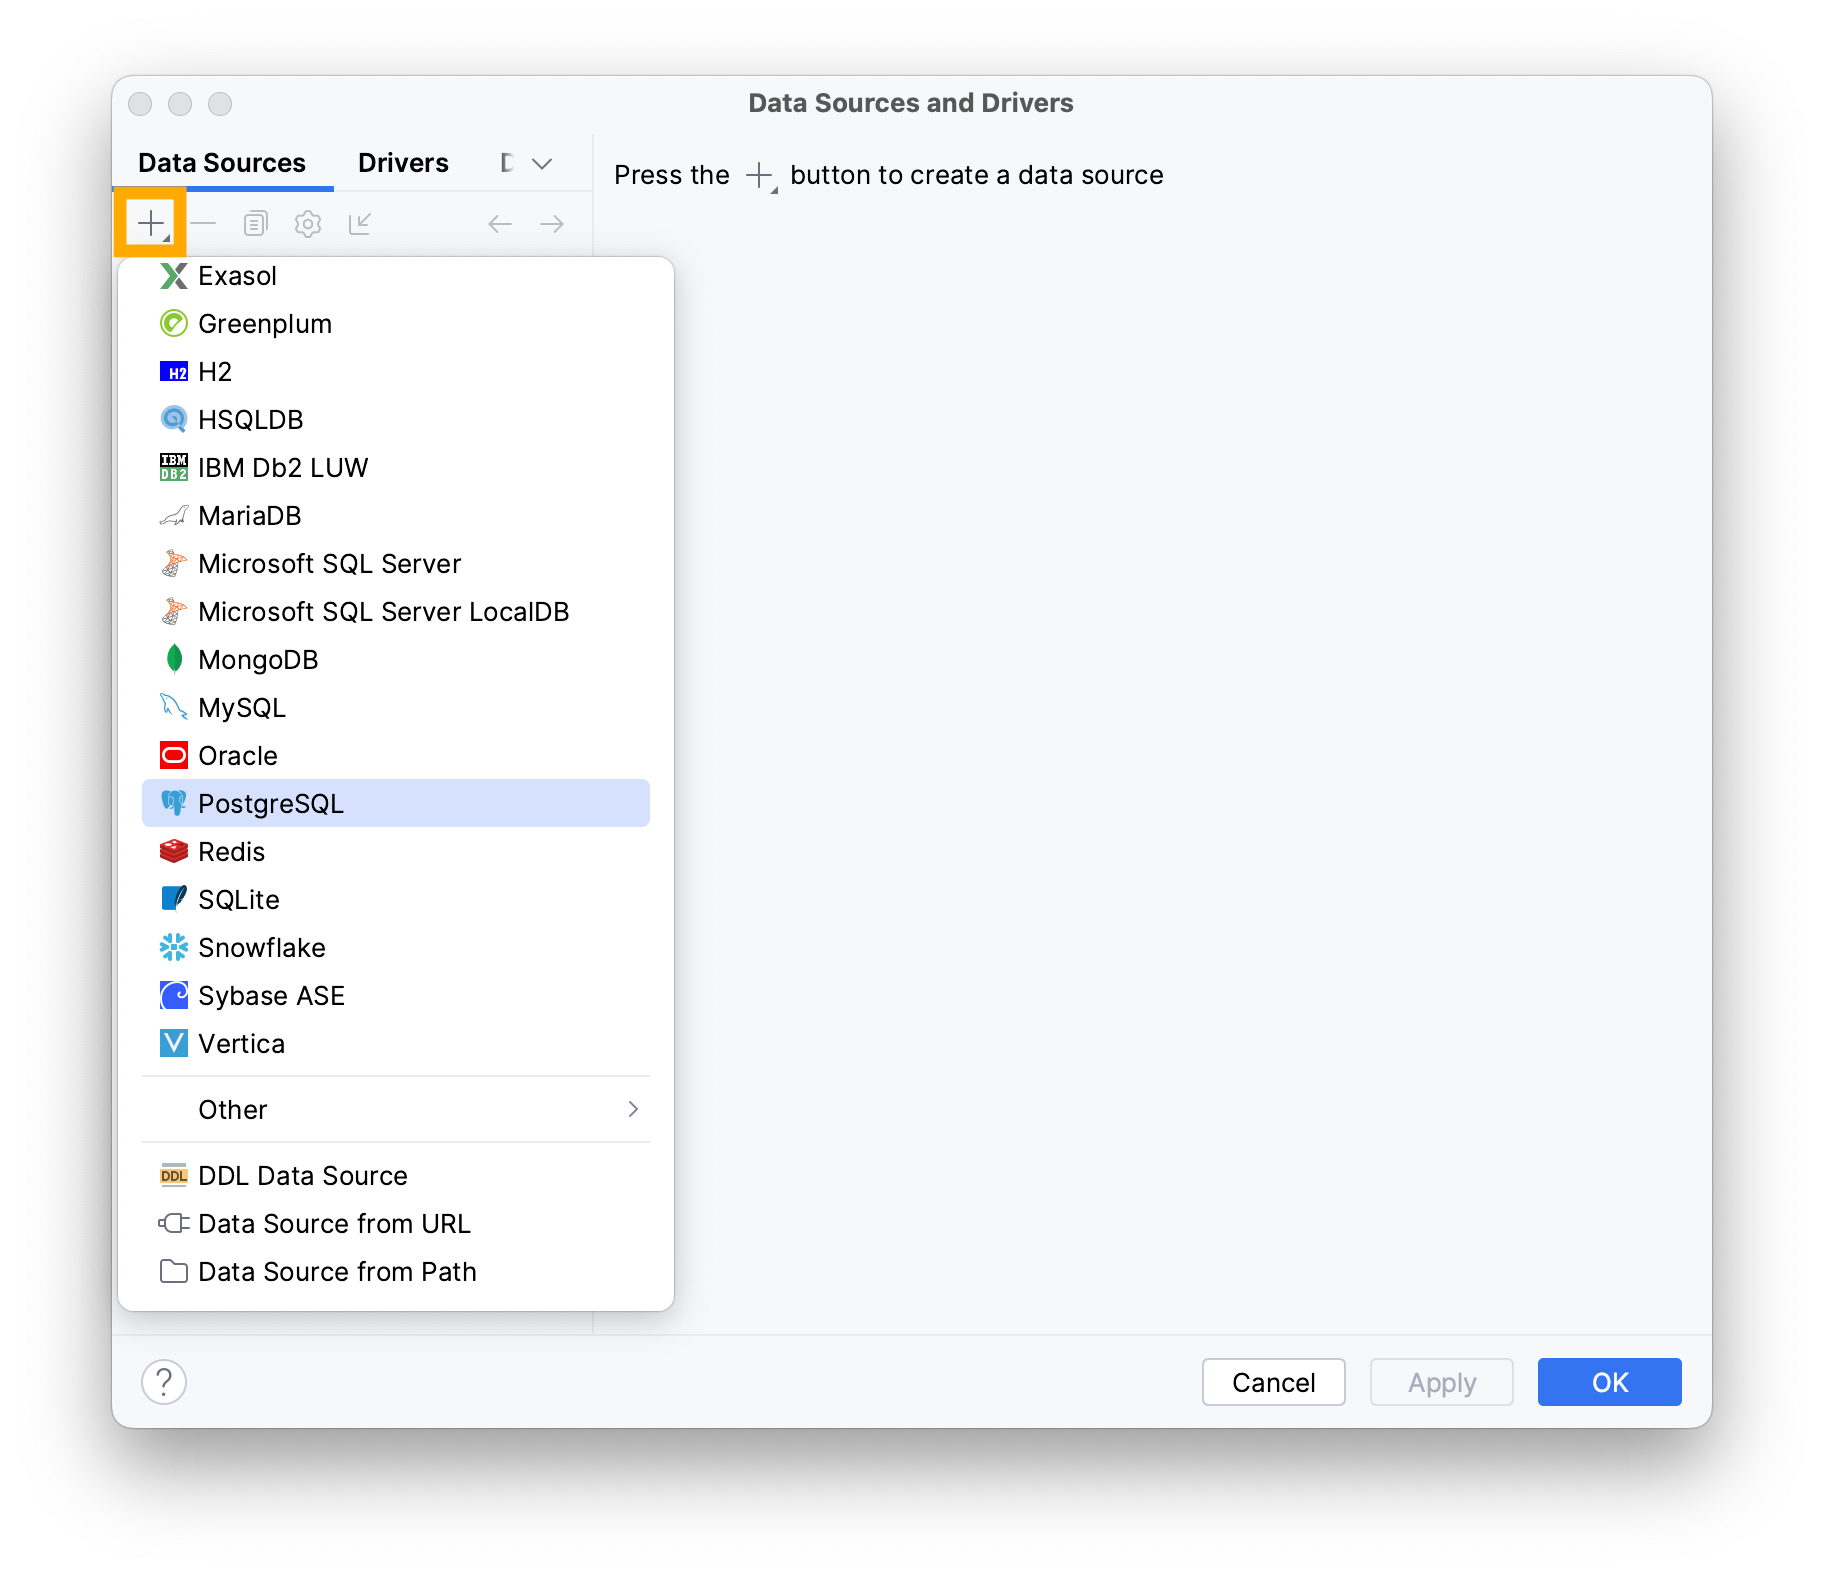
Add a new connection by clicking on the + button and choosing PostgreSQL.
Type the following information in the invoked window:
- Username
- Password
- Name of the database
Note that your values may vary depending on your local environment.
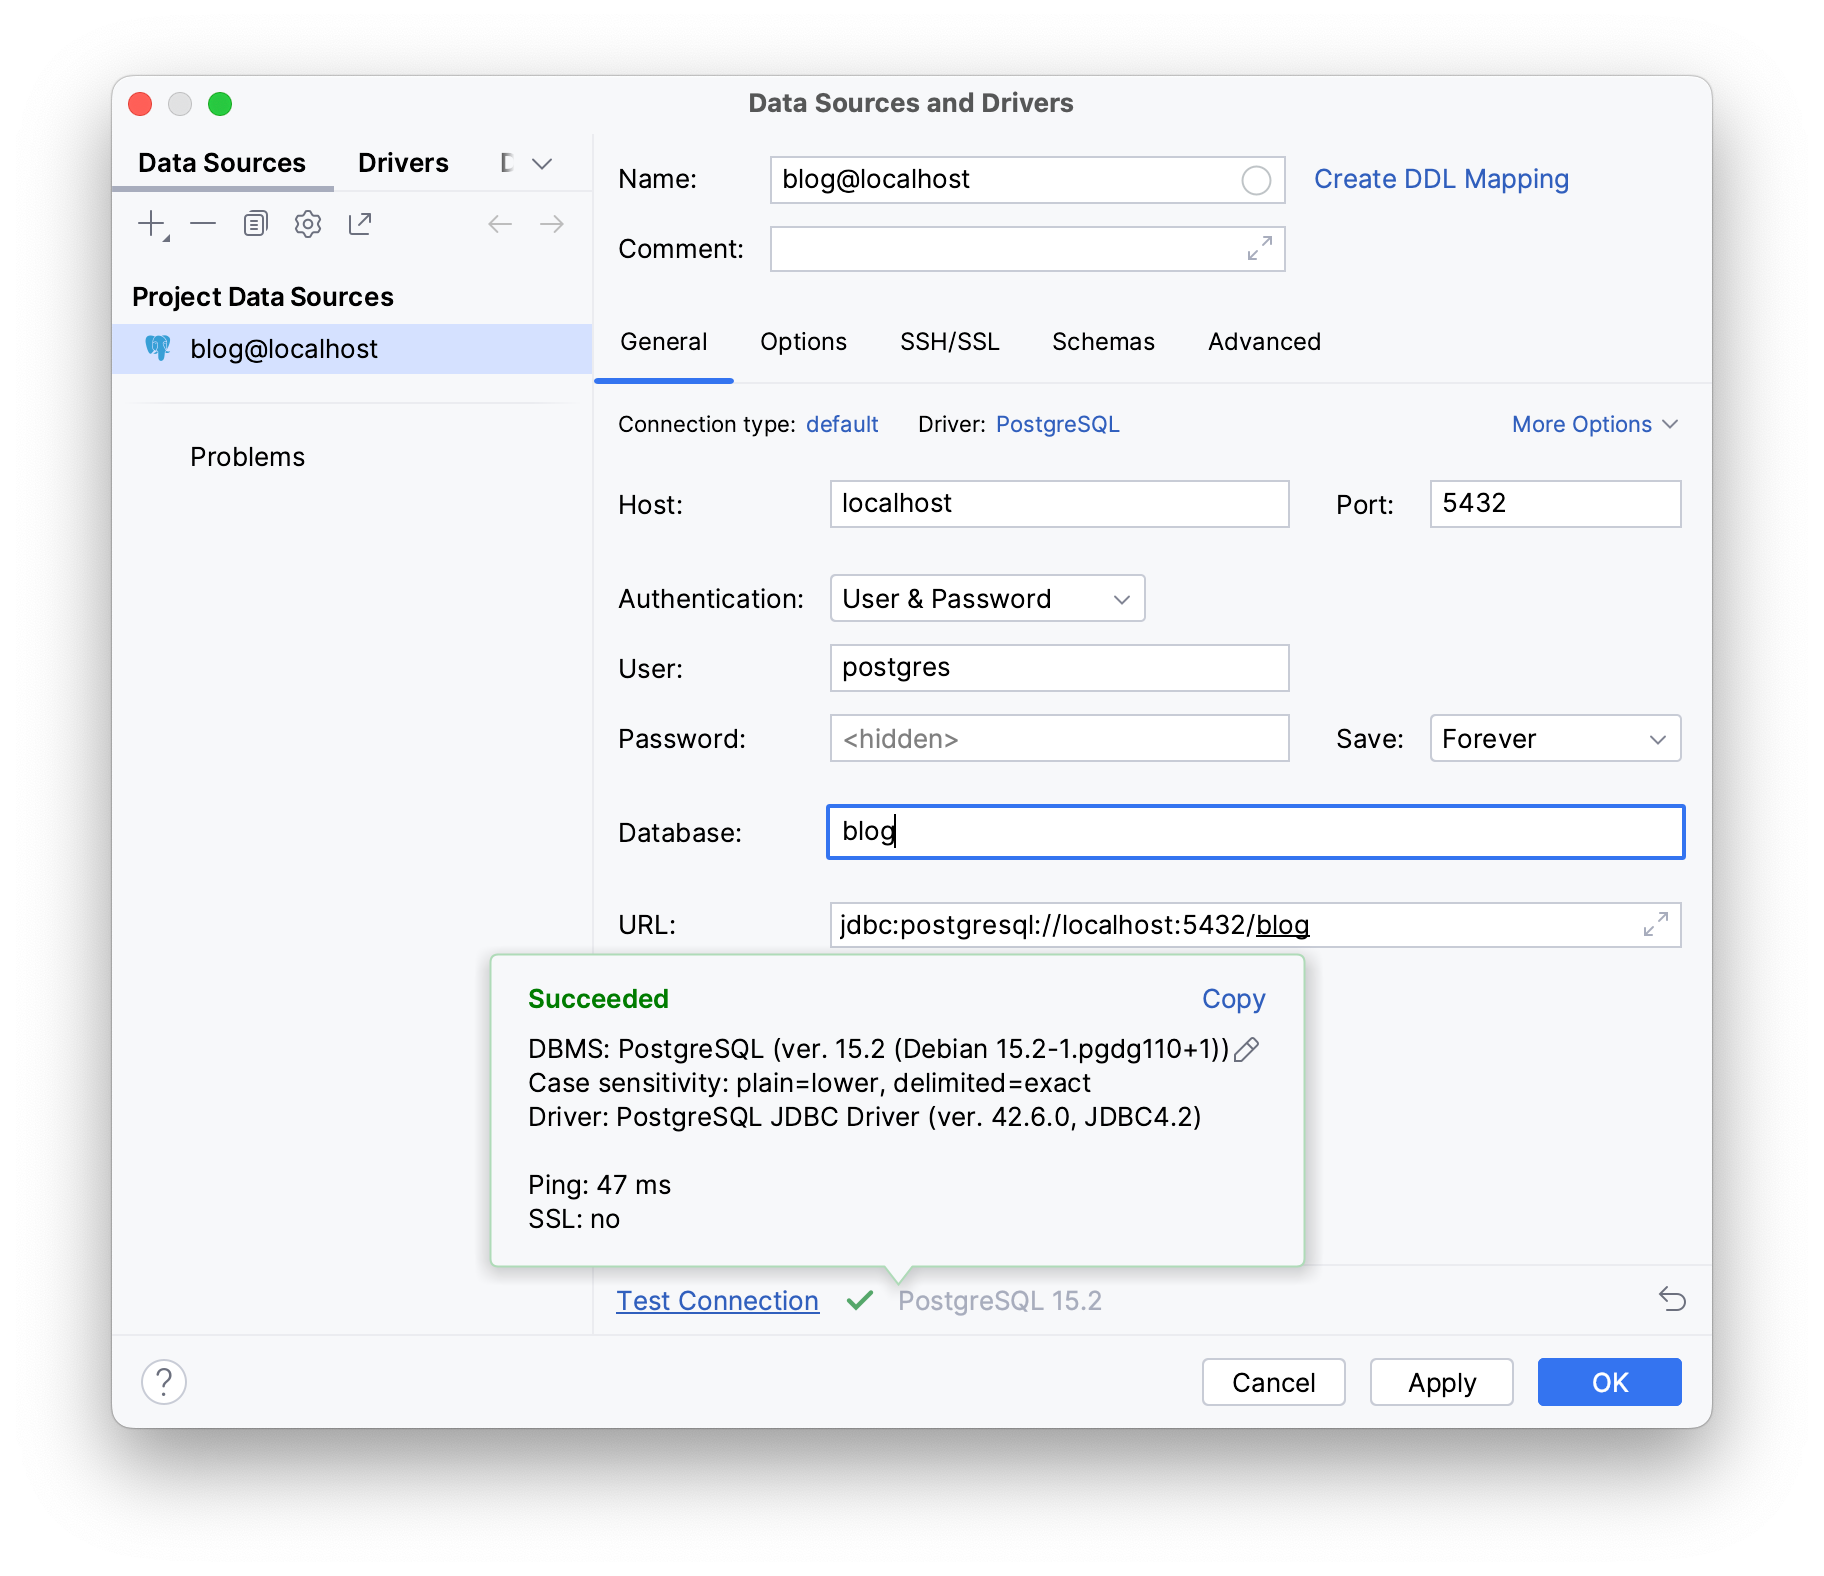
To check if your database works as intended, click on Test Connection; it should display Succeeded if your database is properly configured and actively listening on its assigned port.
Click OK.
Next, provide the necessary datasource details to your application in the application.properties file under the resources folder:
- Open your
application.propertiesfile - Use IntelliJ IDEA’s Generate shortcut (Command/Ctrl + N)
- Select the Data source option

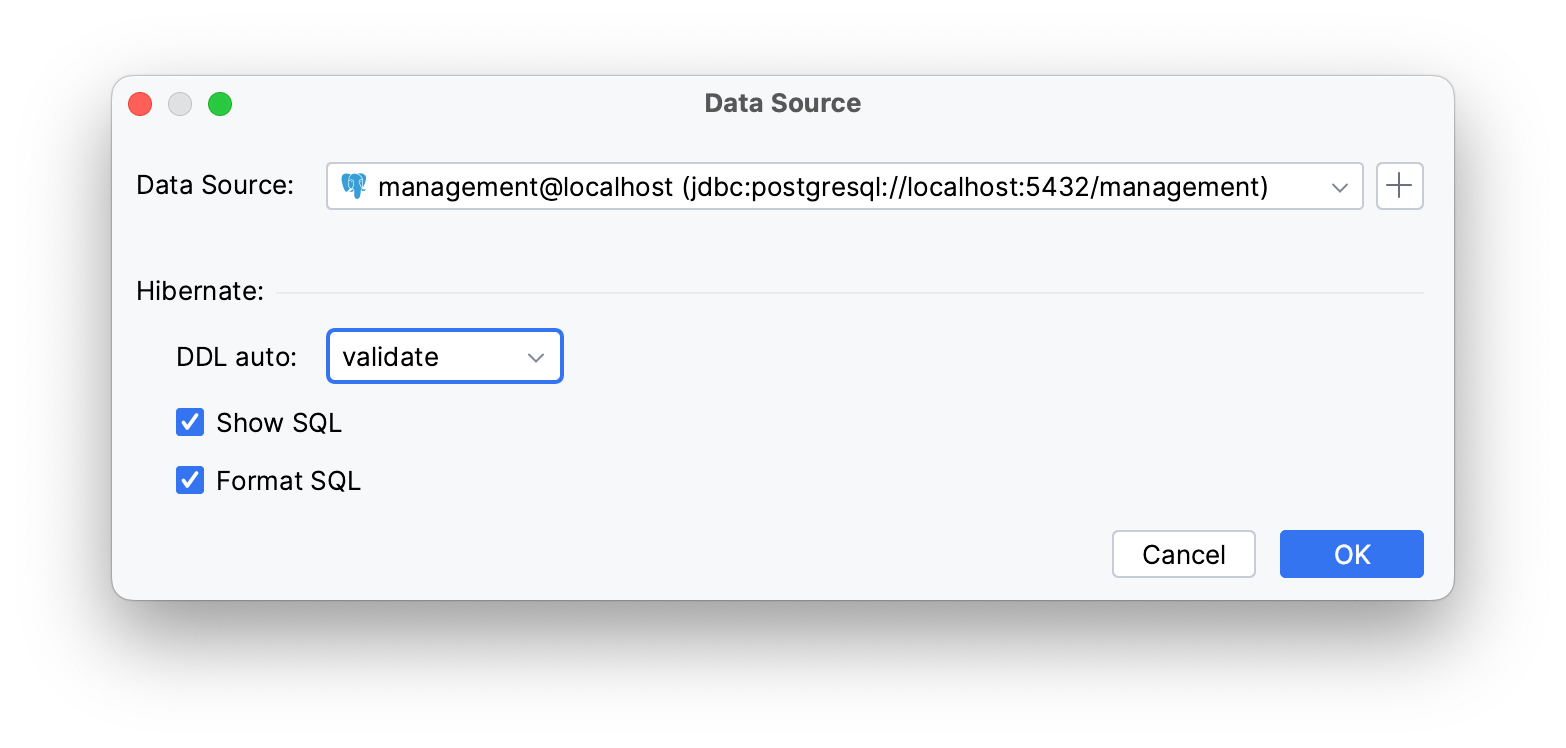
JPA Buddy automatically detects the existing datasource.
Hibernate will validate your schema with your entity mappings during startup if you set the Hibernate DDL-auto property to validate.
The Show/Format SQL options allow you to view formatted SQL logs on your terminal.
The mentioned settings generate the following properties:
spring.datasource.url=jdbc:postgresql://localhost:5432/blog
spring.datasource.username=postgres
spring.datasource.password=postgres
spring.datasource.driverClassName=org.postgresql.Driver
spring.jpa.hibernate.ddl-auto=validate
spring.jpa.show-sql=true
spring.jpa.properties.hibernate.format_sql=true
Creating Entities
The blog application you will build consists of three tables:
user: table for storing blog user informationpost: table for storing blog postscomment: table for users’ comments
The relationship between post and user is OneToMany, meaning that multiple posts can be associated with a single user. The same goes to comment and user.
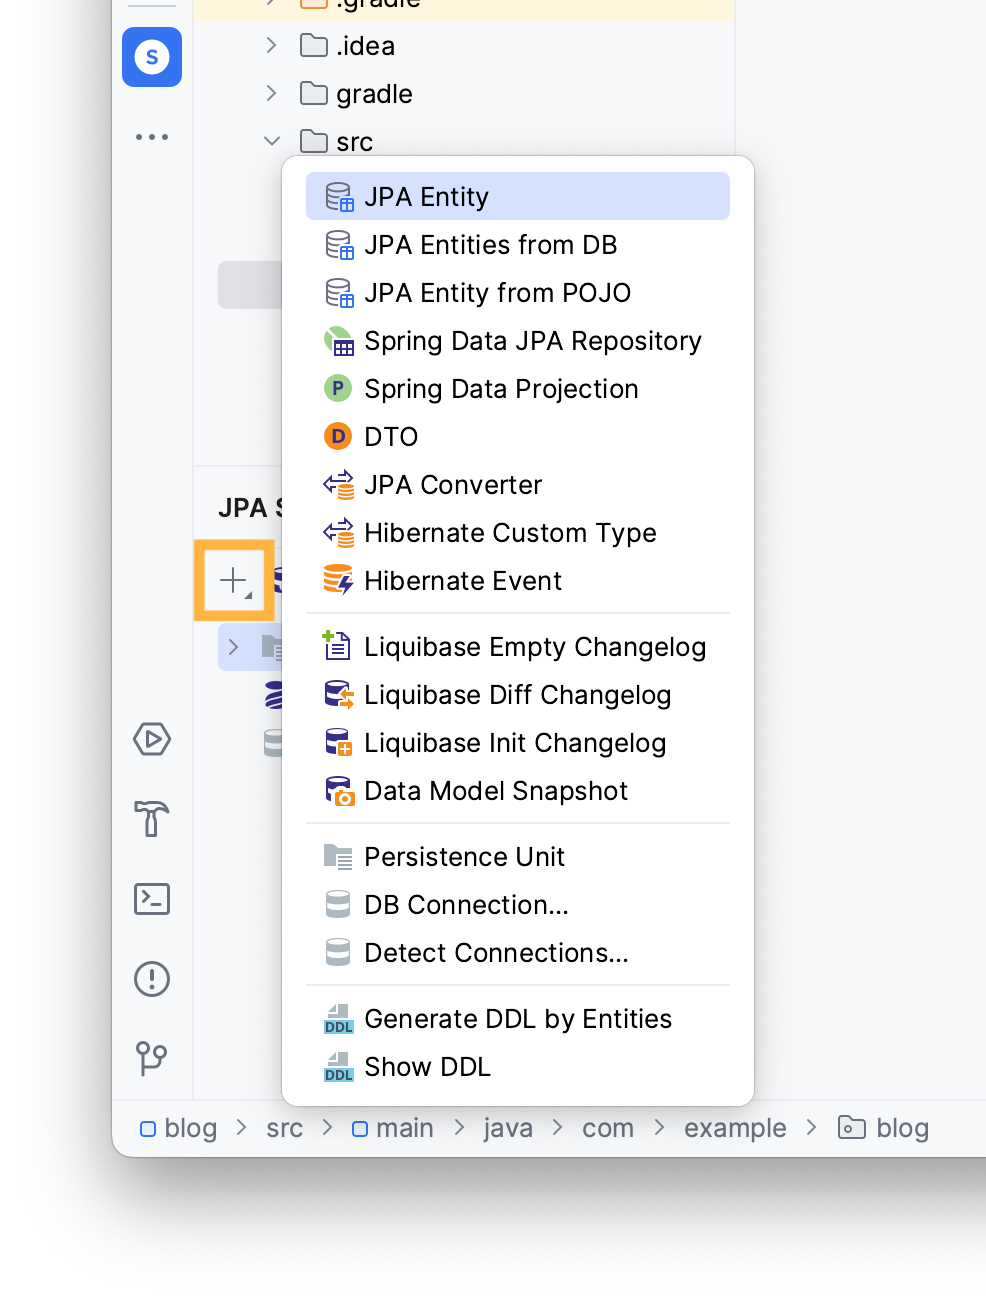
Let’s create the User entity using JPA Structure:
- Locate the JPA Structure tab
- Click on the + button
- Select the JPA Entity option
Type the name of your entity in the invoked window and add .entities to the package name. Choose the Id type and the desired Id generation method.
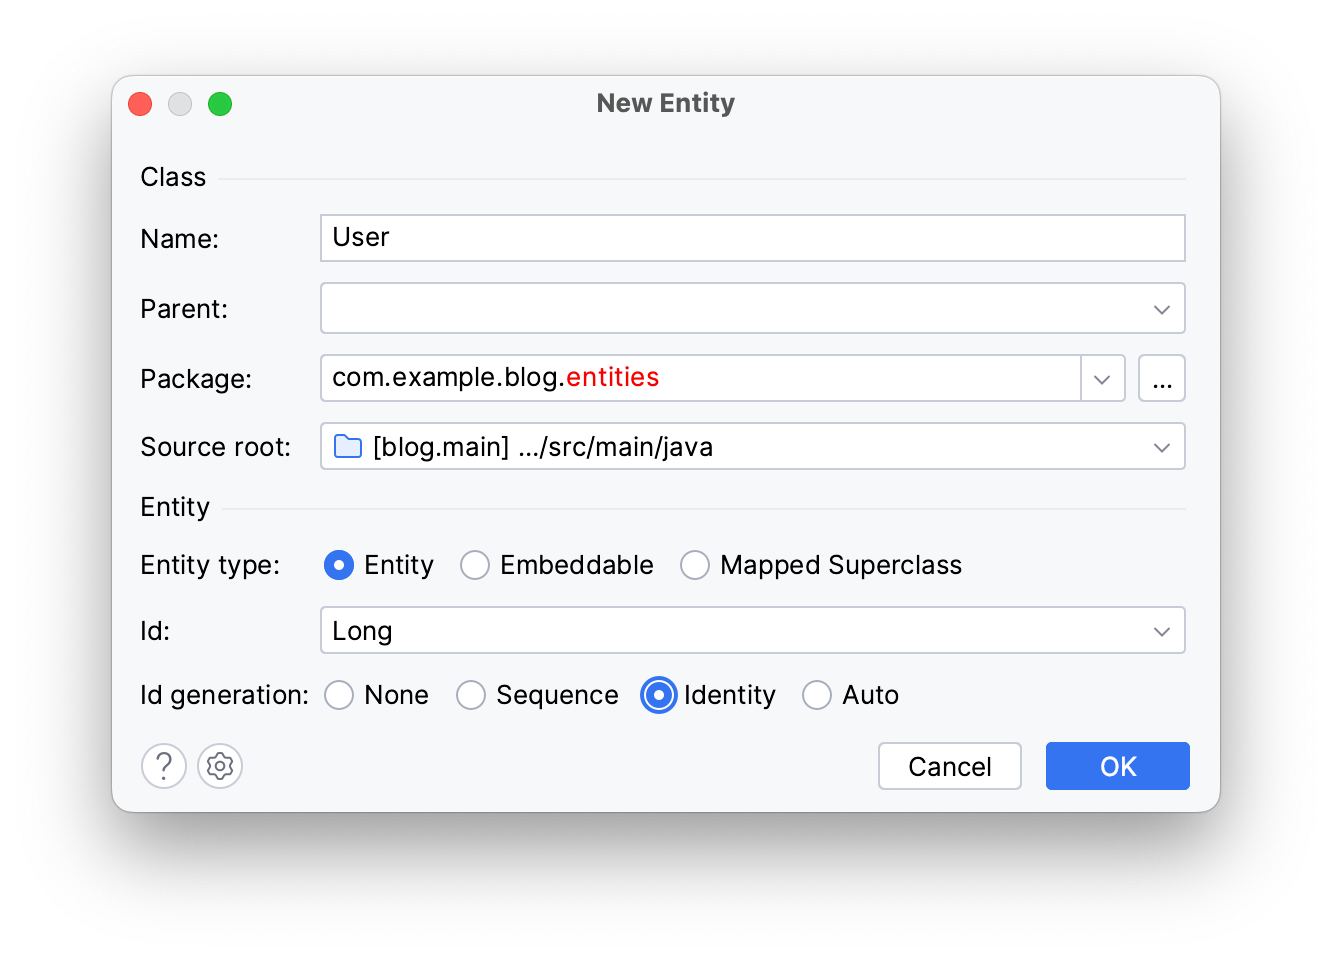
Click OK.
Follow the same steps to create Comment and Post entities.
You can find your newly created entities in the entities package in your project panel. JPA Buddy automatically applies the @Setter and @Getter annotations to them.
User entity:
@Getter
@Setter
@Entity
@Table(name = "user")
public class User {
 @Id
 @GeneratedValue(strategy = GenerationType.IDENTITY)
 @Column(name = "id", nullable = false)
 private Long id;
}
Post entity:
@Getter
@Setter
@Entity
@Table(name = "post")
public class Post {
 @Id
 @GeneratedValue(strategy = GenerationType.IDENTITY)
 @Column(name = "id", nullable = false)
 private Long id;
}
Comment entity:
@Getter
@Setter
@Entity
@Table(name = "comment")
public class Comment {
 @Id
 @GeneratedValue(strategy = GenerationType.IDENTITY)
 @Column(name = "id", nullable = false)
 private Long id;
}
Generating an Init Script
To create tables within the connected database, you will need to generate an initial schema based on your entity model. In this section, you will learn how to:
- Generate an initial DDL script
- Create database tables
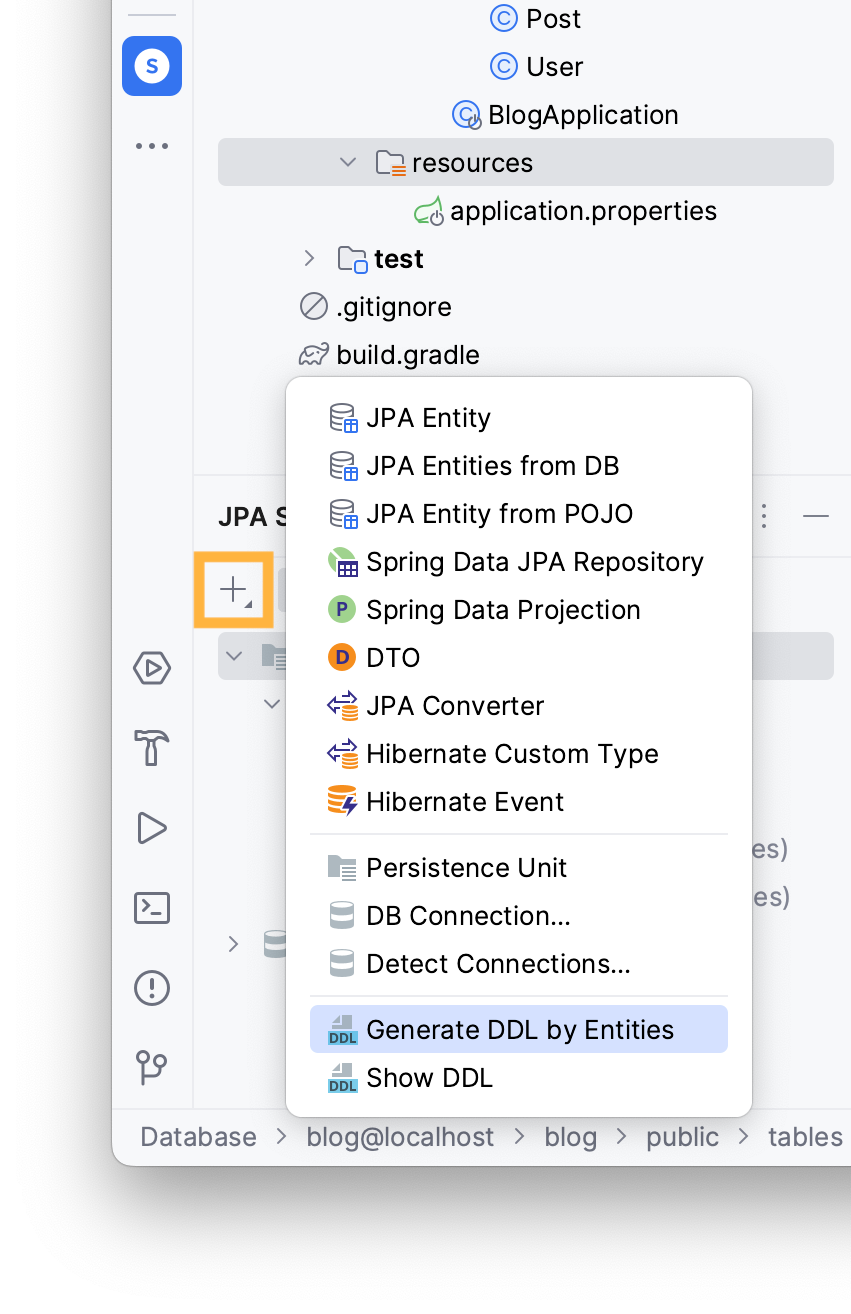
JPA Buddy can generate an initialization script to define your database schema, based on your current entity model:
- Navigate to the JPA Structure tab
- Click on the + button
- Choose Generate DDL by Entities
Select DB schema initialization to create tables based on your JPA model, and choose PostgreSQL as your DB type.

Click OK.
In the DDL by Entities Preview window, you can preview and adjust the generated init script.
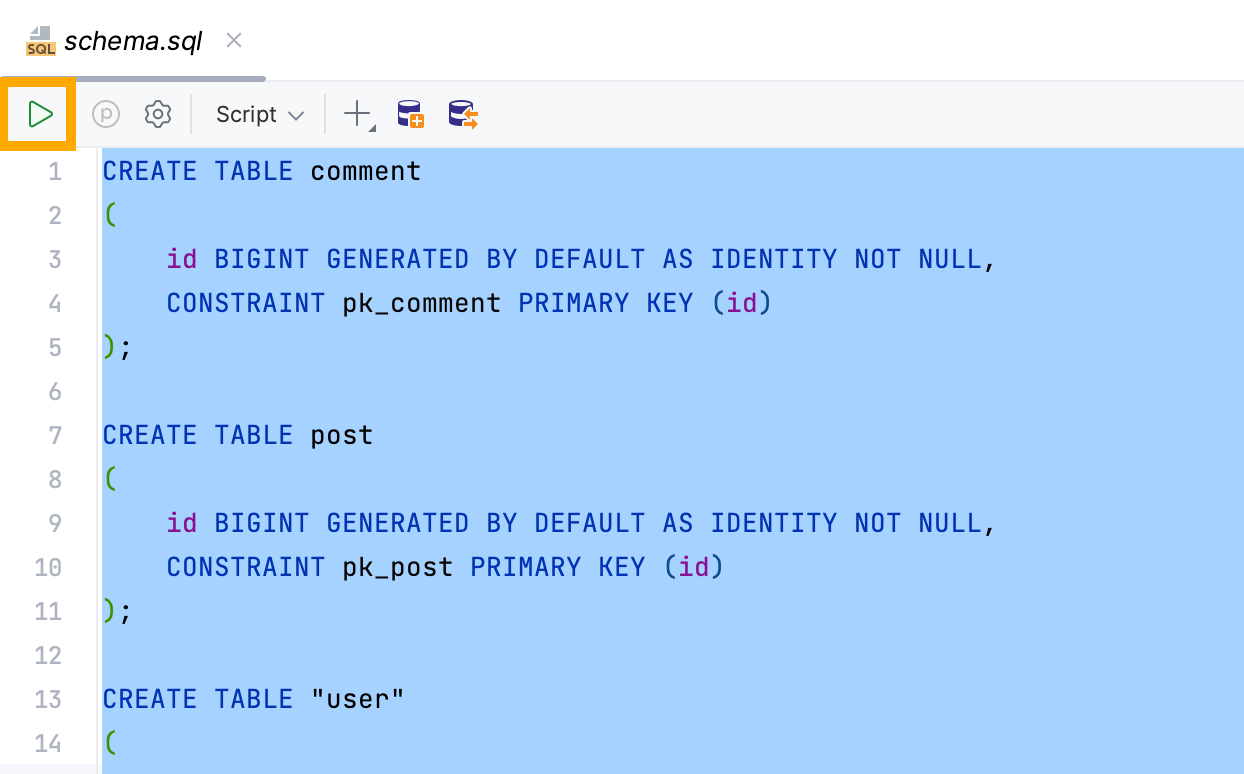
You can choose where to save your script: in a separate file, a scratch file in the IDE, copy it to your clipboard, or paste it to your connected database console. Let’s choose to save the script in a file called schema in the resources folder.
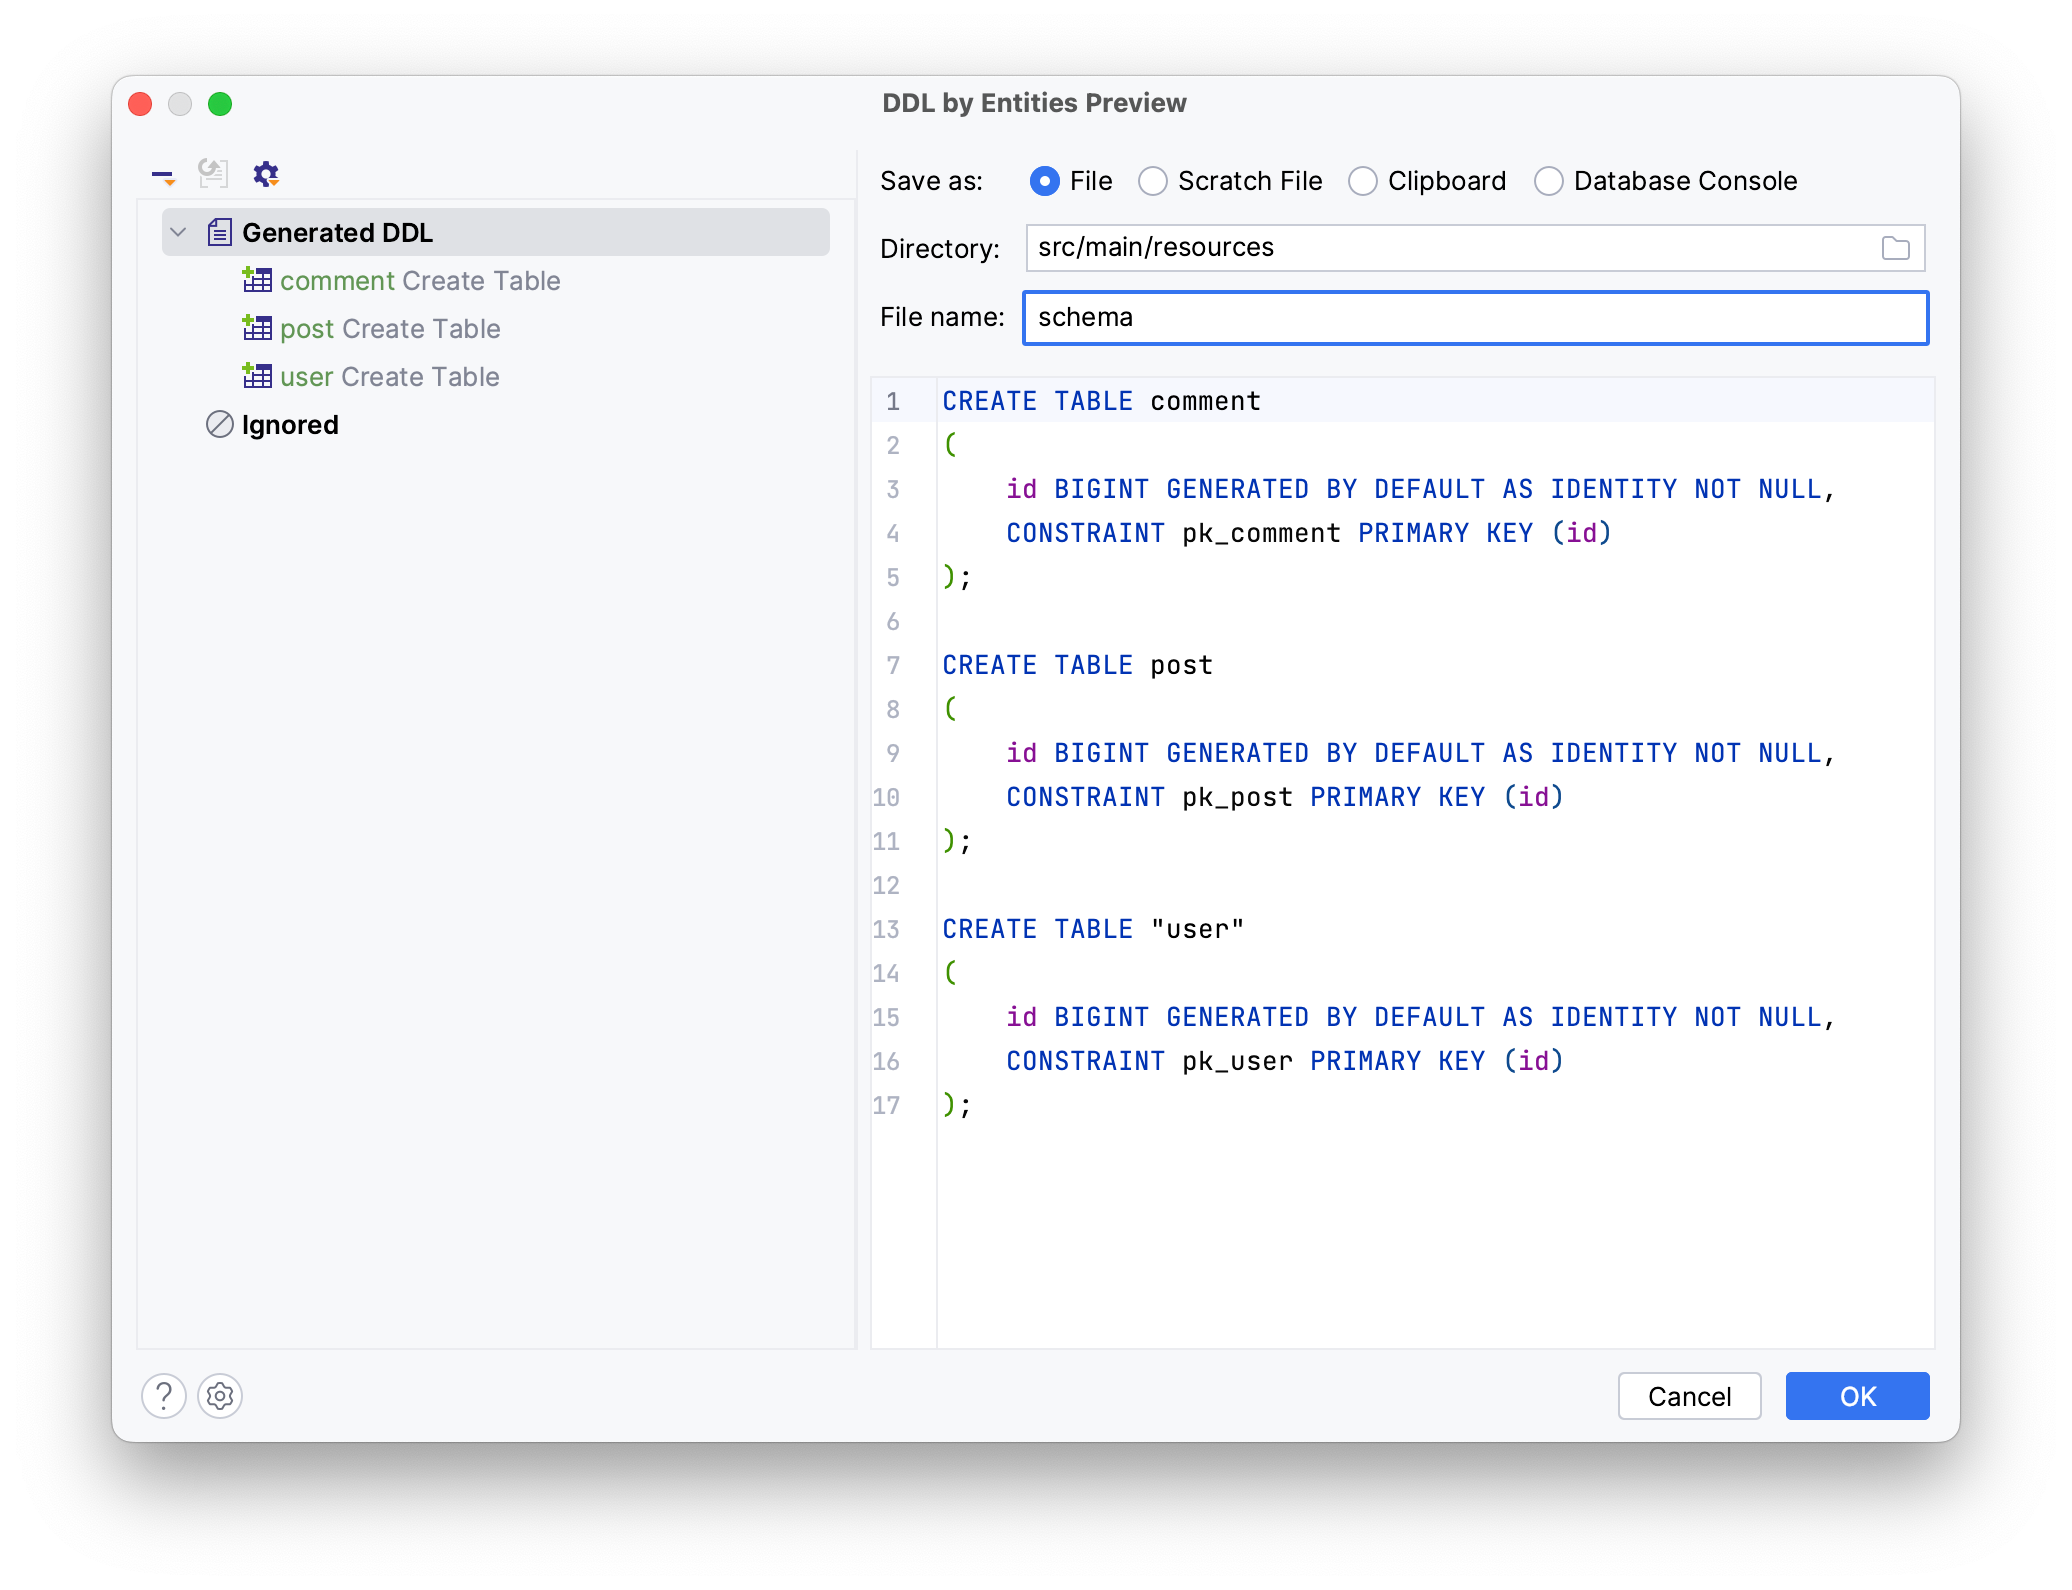
Click OK.
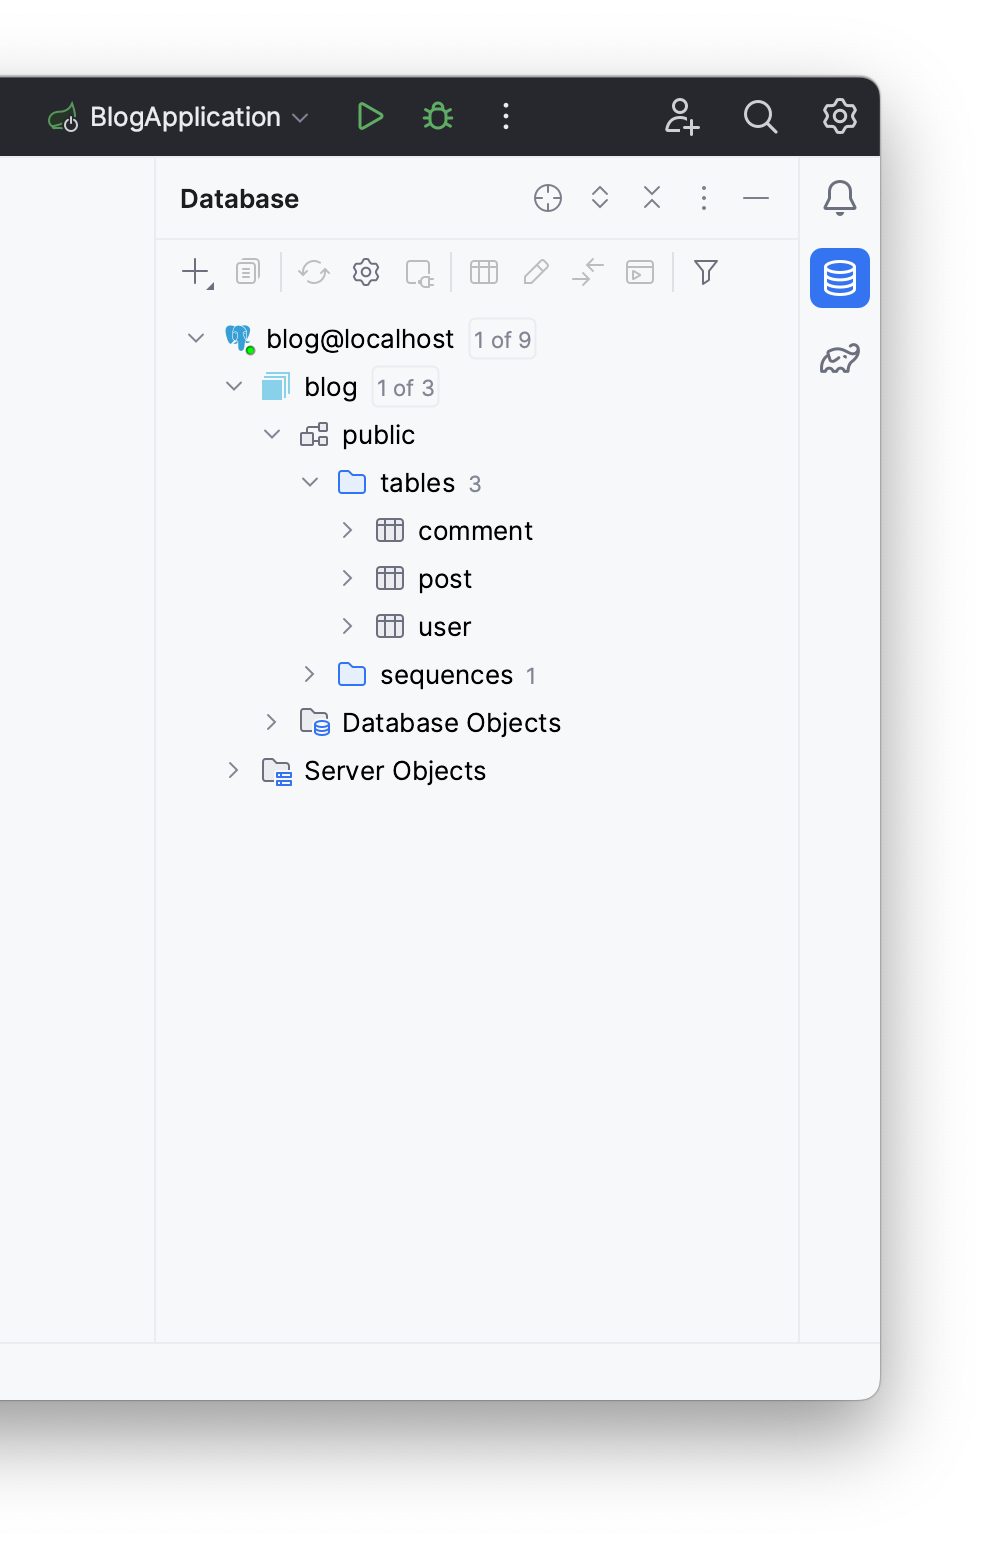
The generated DDL script will appear in a schema.sql file under the resources folder. To apply this script to your database, select the script and execute it by clicking on the Execute button.
You can view the newly created table along with its columns in the Database tab.
Testing @EqualsAndHashcode
Lombok’s @EqualsAndHashCode annotation generates equals() and hashCode() methods based on the class’s fields. While this annotation can be useful for regular Java classes, it can cause issues with entity comparison and persistence for JPA entities. In this section, you will test three different implementations of equals and hashcode:
- Lombok’s implementation
- Base Object’s class implementation
- JPA Buddy’s implementation
Apply Lombok’s @EqualsAndHashcode annotation on the Comment entity:
@EqualsAndHashCode
@Getter
@Setter
@Entity
@Table(name = "comment")
public class Comment {
To generate equals and hashcode implementation using JPA Buddy in User:
- Open
Usersource code from the project pannel - Click on Utilities in the JPA Designer tab
- Choose Equals and Hashcode
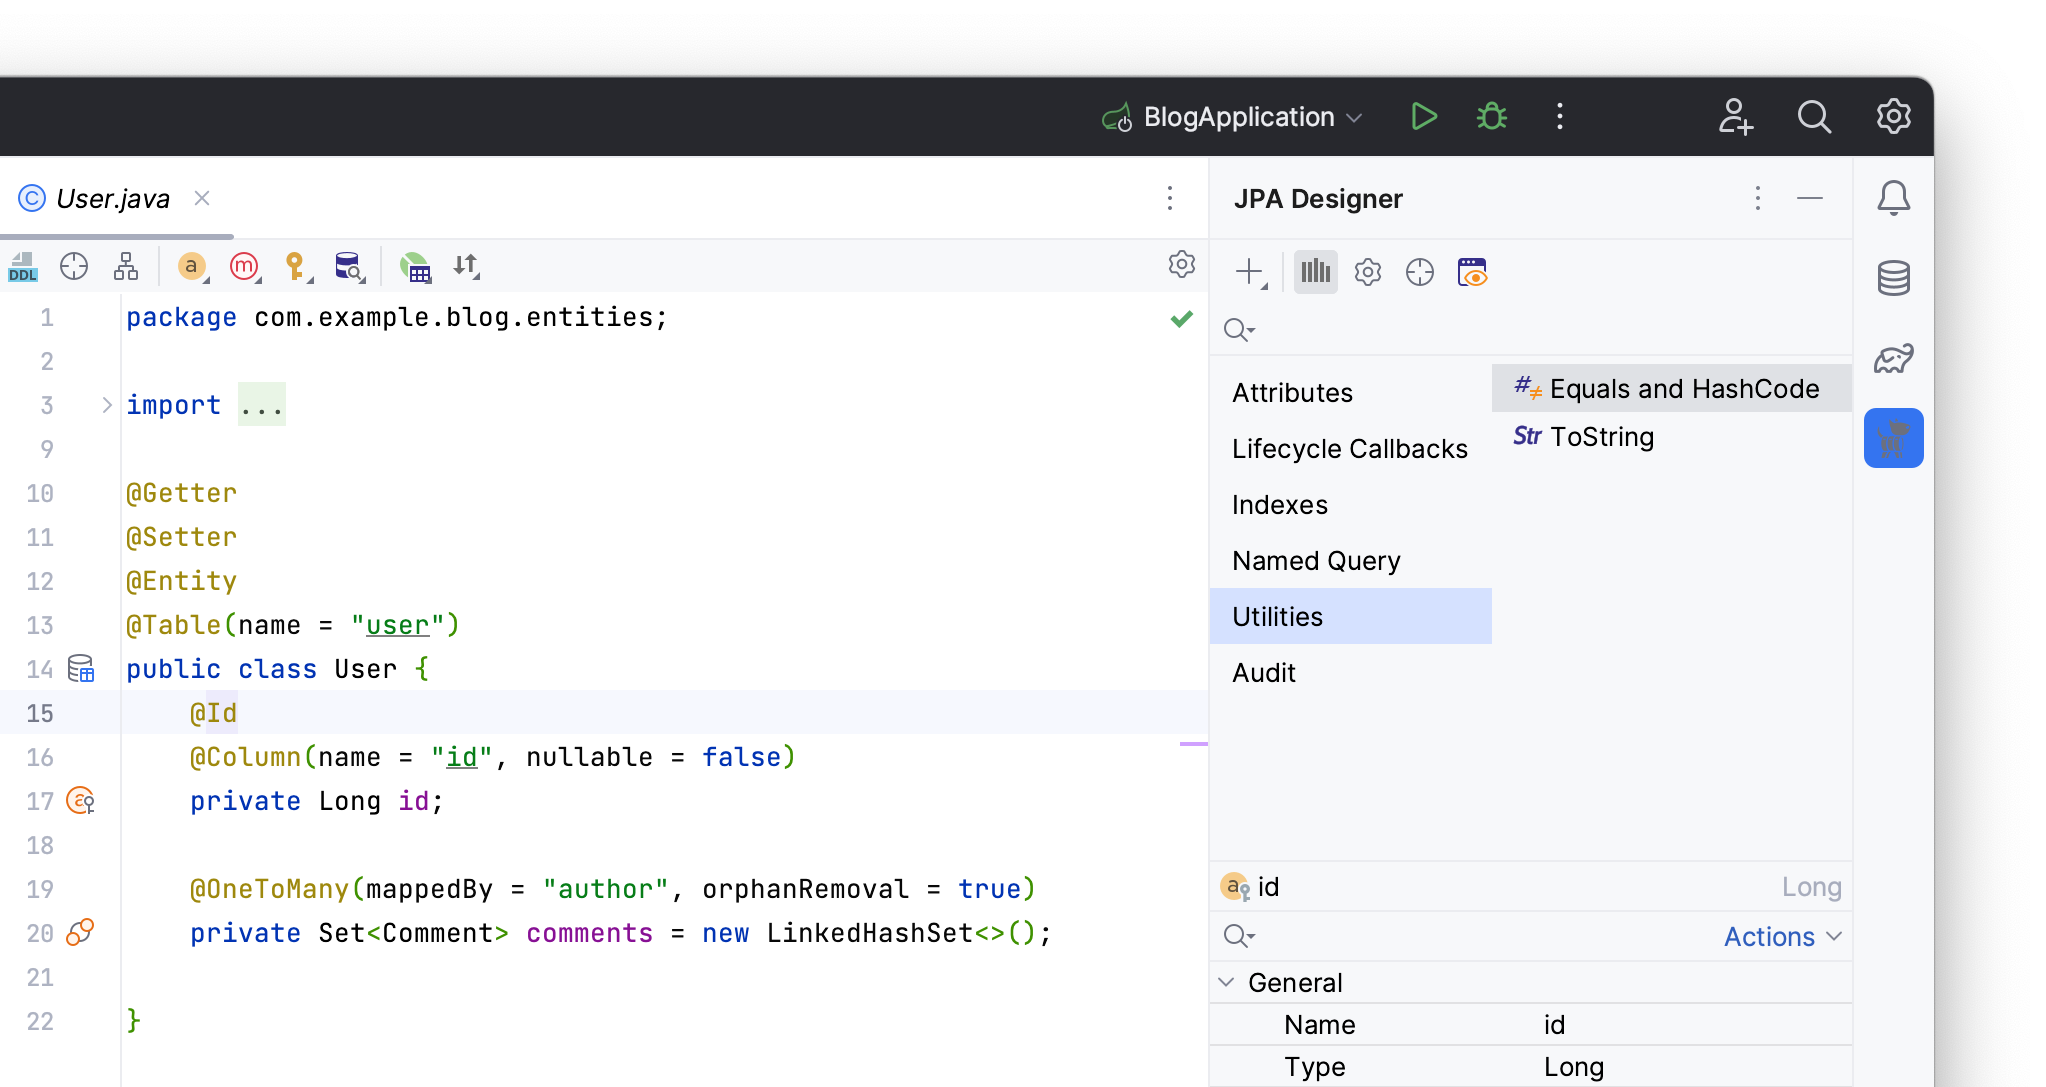
JPA Buddy’s overriden equals and hashcode methods look as follows:
@Override
public final boolean equals(Object o) {
 if (this == o) return true;
 if (o == null) return false;
 Class<?> oEffectiveClass = o instanceof HibernateProxy ? ((HibernateProxy) o).getHibernateLazyInitializer().getPersistentClass() : o.getClass();
 Class<?> thisEffectiveClass = this instanceof HibernateProxy ? ((HibernateProxy) this).getHibernateLazyInitializer().getPersistentClass() : this.getClass();
 if (thisEffectiveClass != oEffectiveClass) return false;
 User user = (User) o;
 return getId() != null && Objects.equals(getId(), user.getId());
}

@Override
public final int hashCode() {
 return this instanceof HibernateProxy ? ((HibernateProxy) this).getHibernateLazyInitializer().getPersistentClass().hashCode() : getClass().hashCode();
}
The Post entity will inherit Objects’s methods.
Let’s write a test class that adds the entity to the set, saves it to the database, and checks whether the contains method returns true or false.
Create a BrokenMapsTests class under the test folder’s packages and annotate it with @SpringBootTest.
@SpringBootTest
class BrokenMapsTests {
}
Each entity will have its own test method; let’s start with User. Create a userSetTest test method:
@Test
void userSetTest() {
}
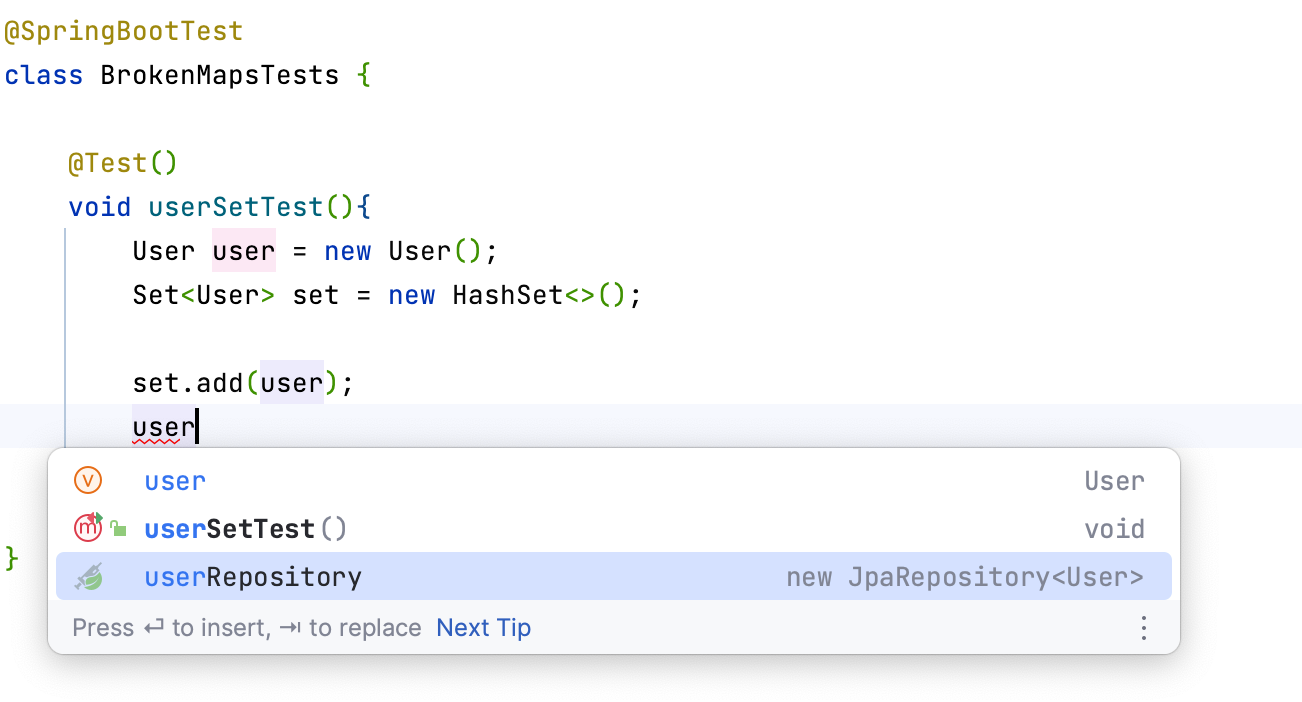
Define a new User and hashSet then add the user to the set.
User user = new User();
Set<User> set = new HashSet<>();

set.add(user);
To save the user to the database, you need to create a user repository. JPA Buddy allows you to create one without switching contexts. Start typing userRepository and click on the suggested repository creation option.
In the invoked wizard, rename the package to repositories and click OK.
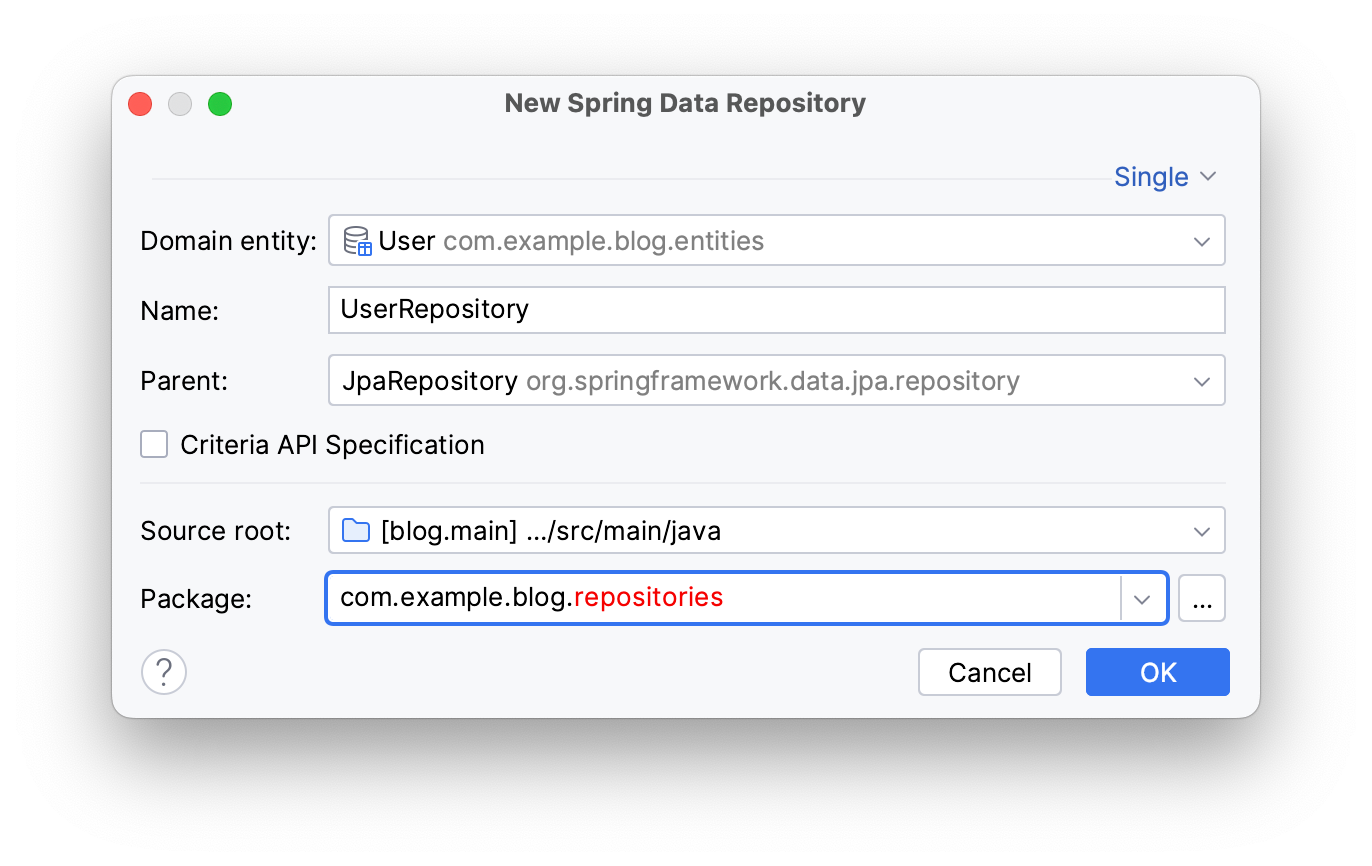
JPA Buddy will generate UserRepository in the created repositories package and inject it in the test class:
public interface UserRepository extends JpaRepository<User, Long> {
}
Save the user into the created repository in the test method and verify if the set contains the added user.
userRepository.save(user);

Assertions.assertTrue(set.contains(user));
Repeat the same steps for Comment and Post entities. Here is the resulting test class:
@SpringBootTest
class BrokenMapsTests {

 @Autowired
 private UserRepository userRepository;
 @Autowired
 private PostRepository postRepository;
 @Autowired
 private CommentRepository commentRepository;

 @Test
 void userSetTest() {
  User user = new User();
  Set<User> set = new HashSet<>();

  set.add(user);
  userRepository.save(user);

  Assertions.assertTrue(set.contains(user));
 }

 @Test
 void postSetTest() {
  Post post = new Post();
  Set<Post> set = new HashSet<>();

  set.add(post);
  postRepository.save(post);

  Assertions.assertTrue(set.contains(post));
 }

 @Test
 void commentSetTest() {
  Comment comment = new Comment();
  Set<Comment> set = new HashSet<>();

  set.add(comment);
  commentRepository.save(comment);

  Assertions.assertTrue(set.contains(comment));
 }
}
After running the test class, you will notice that Lombok’s implementation of equals and hashcode methods in the Comment entity didn’t pass the test.
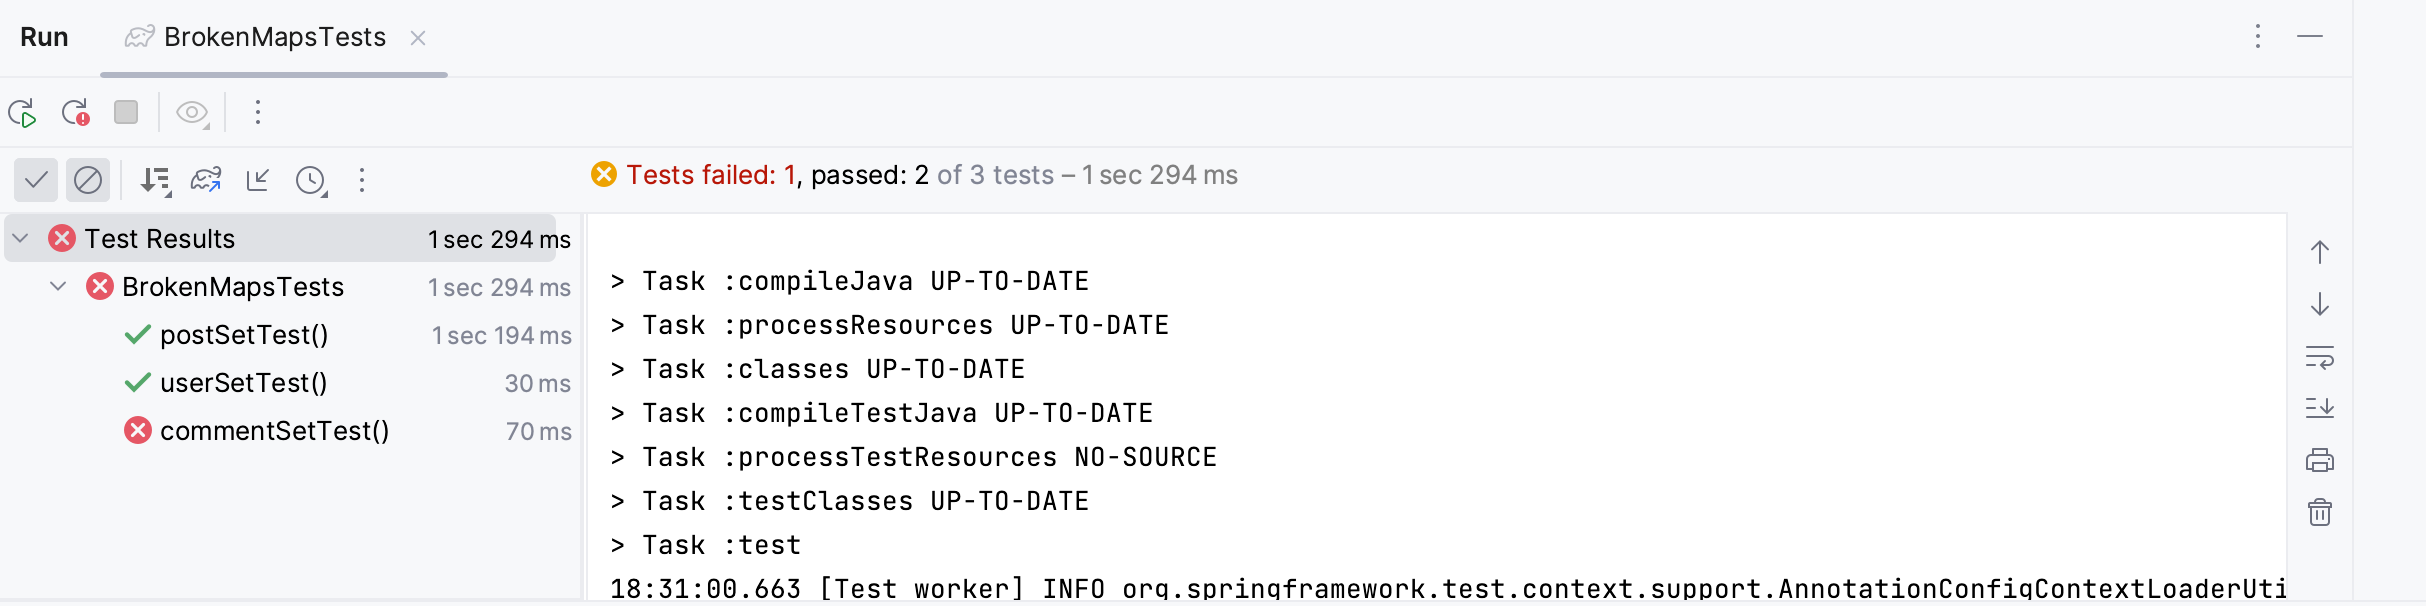
After adding the entity to the set and saving it, its id changed from null to a specific number. The @EqualsAndHashCode annotation relies on this id, so when it changes, the entities are considered different, even though they're the same in the database.
Let's examine a scenario where we use the default Object methods. Imagine we need to compare two entities that come from the same database row but exist in different persistence contexts.
Create a separate test class called SameRecordTests, annotate it with @SpringBootTest and @Transactional.
@SpringBootTest
@Transactional
public class SameRecordTests {
}
Define a persistence context inside the class.
@PersistenceContext
private EntityManager em;
Each entity will have its own method, create a userDetachTest method for User:
@Test
void userDetachTest() {
}
This method saves the entity to the database, retrieves it, and detaches it from the context.
User user = new User();
em.persist(user);

User firstFetched = em.find(User.class, user.getId());
em.detach(firstFetched);
Then it retrieves the entity from the database again and compares both entities using equals.
User secondFetched = em.find(User.class, user.getId());

Assertions.assertEquals(firstFetched, secondFetched);
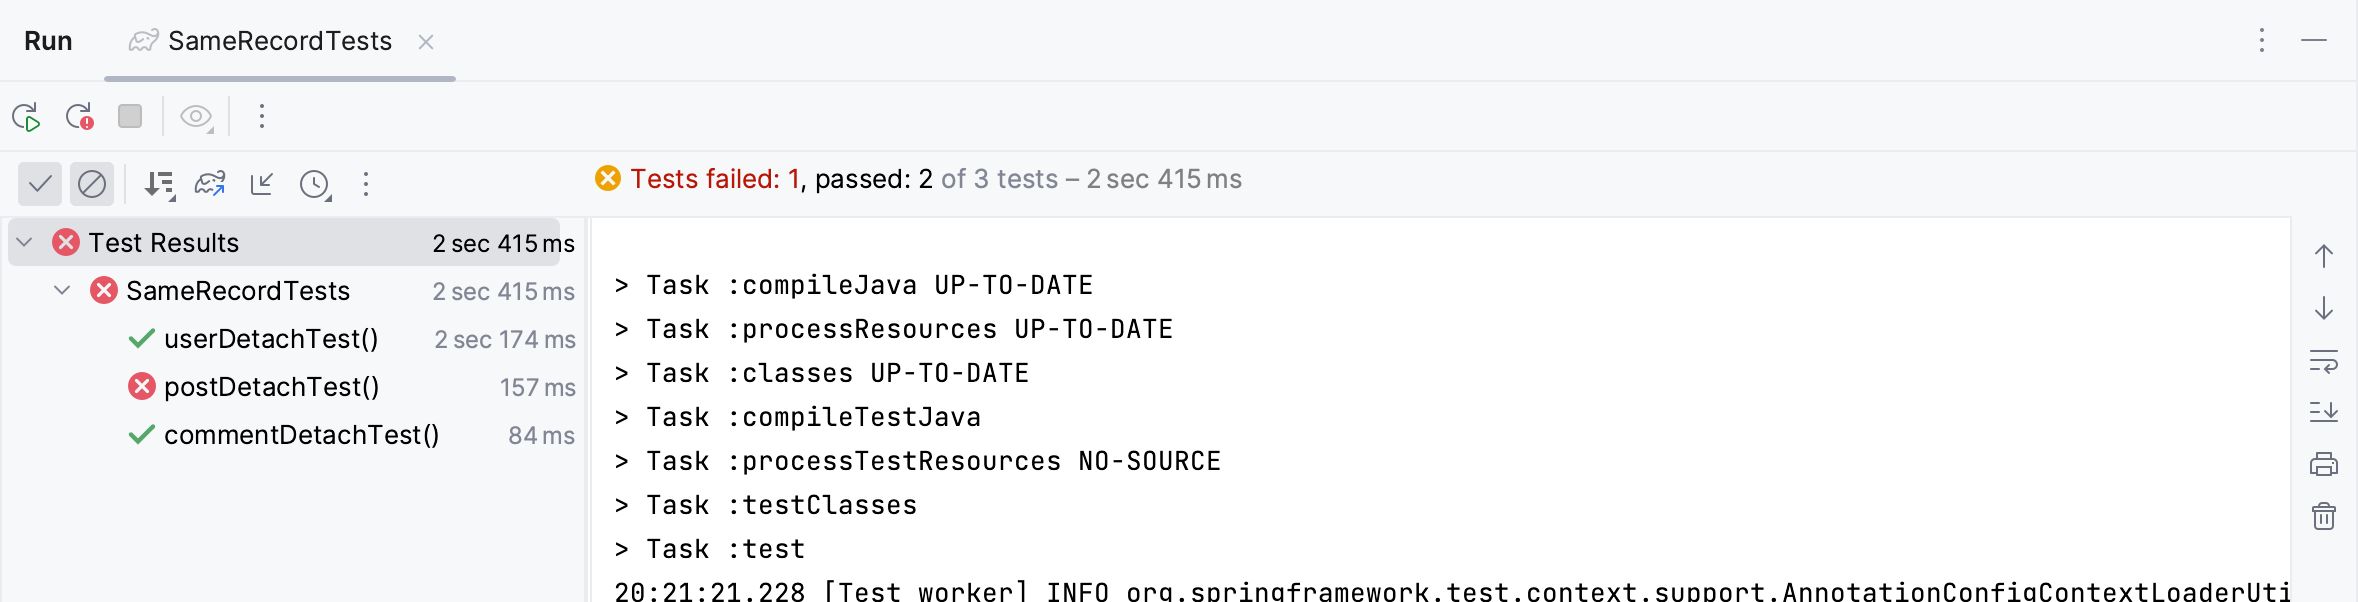
Write the same methods for Comment and Post entities:
@SpringBootTest
@Transactional
public class SameRecordTests {
 @PersistenceContext
 private EntityManager em;

 @Test
 void userDetachTest() {
  User user = new User();
  em.persist(user);

  User firstFetched = em.find(User.class, user.getId());
  em.detach(firstFetched);

  User secondFetched = em.find(User.class, user.getId());

  Assertions.assertEquals(firstFetched, secondFetched);
 }

 @Test
 void postDetachTest() {
  Post post = new Post();
  em.persist(post);

  Post firstFetched = em.find(Post.class, post.getId());
  em.detach(firstFetched);

  Post secondFetched = em.find(Post.class, post.getId());

  Assertions.assertEquals(firstFetched, secondFetched);
 }

 @Test
 void commentDetachTest() {
  Comment comment = new Comment();
  em.persist(comment);

  Comment firstFetched = em.find(Comment.class, comment.getId());
  em.detach(firstFetched);

  Comment secondFetched = em.find(Comment.class, comment.getId());

  Assertions.assertEquals(firstFetched, secondFetched);
 }
}
Run the tests. This time Post entity's equals method fails. Although the two entities represent the same record in the database, the Java Virtual Machine sees them as different and causes the inherited Object’s implementation to fail.
You can generate proper implementations right from JPA Buddy’s inspection. Invoke Show Context Menu (Opt/Alt + Enter) over @EqualsAndHashcode and choose the suggested option to replace the annotation with the correct implementation.
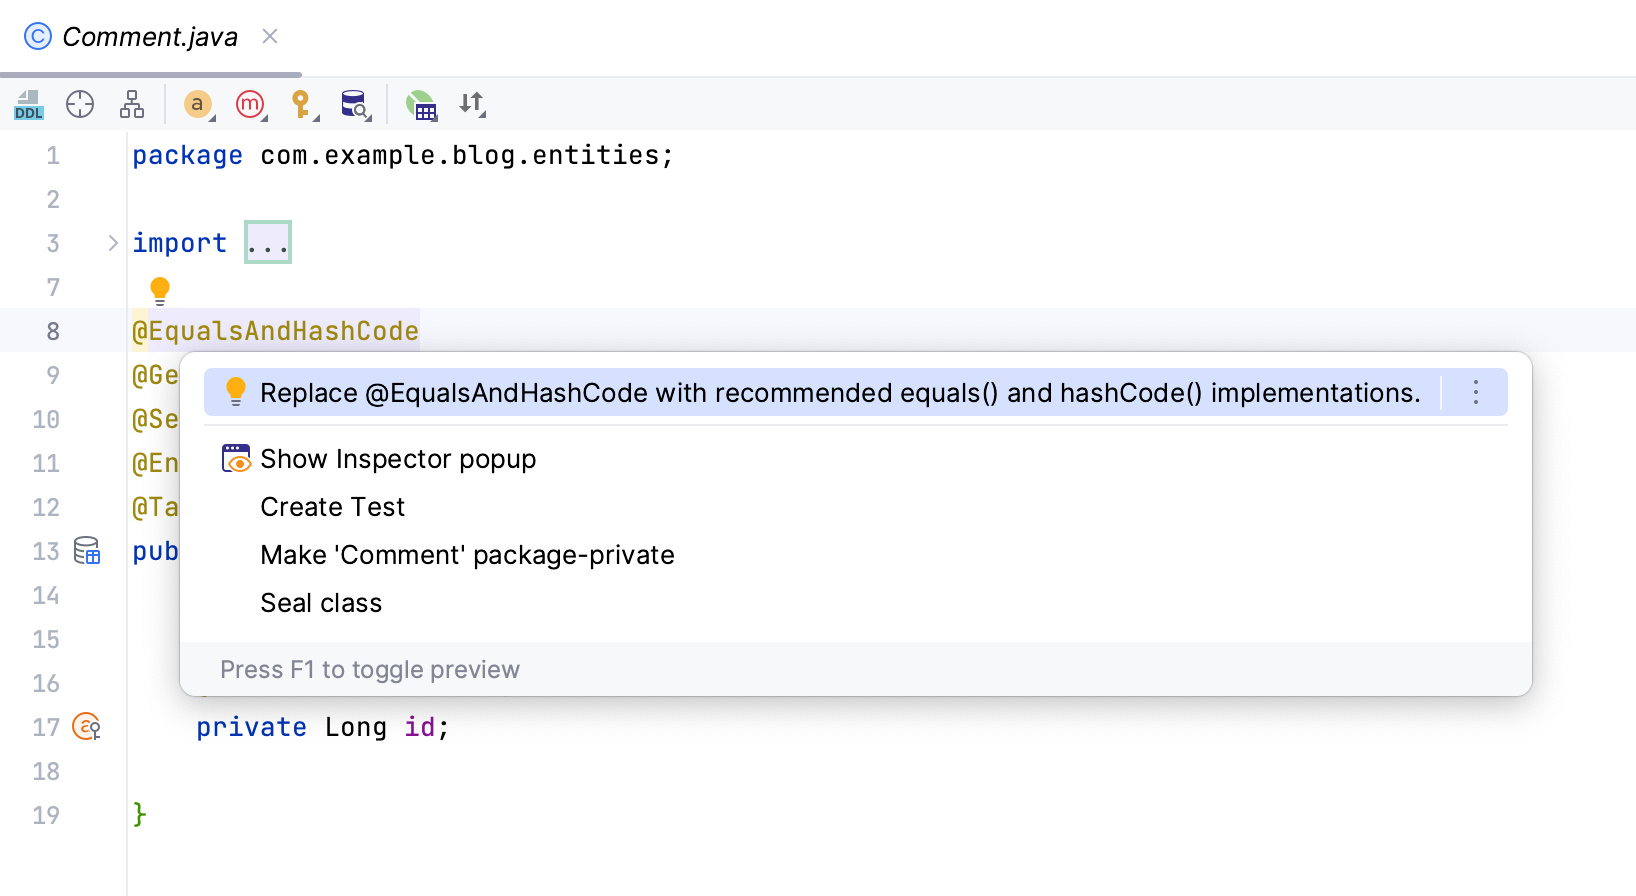
JPA Buddy generates an implementation that is not based on fields that can change when saved to the database:
@Override
public final boolean equals(Object o) {
    if (this == o) return true;
    if (o == null) return false;
    Class<?> oEffectiveClass = o instanceof HibernateProxy ? ((HibernateProxy) o).getHibernateLazyInitializer().getPersistentClass() : o.getClass();
    Class<?> thisEffectiveClass = this instanceof HibernateProxy ? ((HibernateProxy) this).getHibernateLazyInitializer().getPersistentClass() : this.getClass();
    if (thisEffectiveClass != oEffectiveClass) return false;
    User user = (User) o;
    return getId() != null && Objects.equals(getId(), user.getId());
}

@Override
public final int hashCode() {
    return this instanceof HibernateProxy ? ((HibernateProxy) this).getHibernateLazyInitializer().getPersistentClass().hashCode() : getClass().hashCode();
}
Testing @ToString
By default, it generates a toString() method that includes all fields, even references. If called, it might load lazy fields, triggering extra database queries or even an infinite loop with circular relationships between entities. This could slow down your application or even cause it to crash if there are many nested relationships. In this section, you will explore issues related to Lombok’s @ToString annotation with JPA entities.
You will need a OneToMany relationship in your User entity to reference Post and Comment entities and their corresponding inverse author attributes in each entity:
- Open
Userentity's source code - Choose Association from the JPA Designer tab
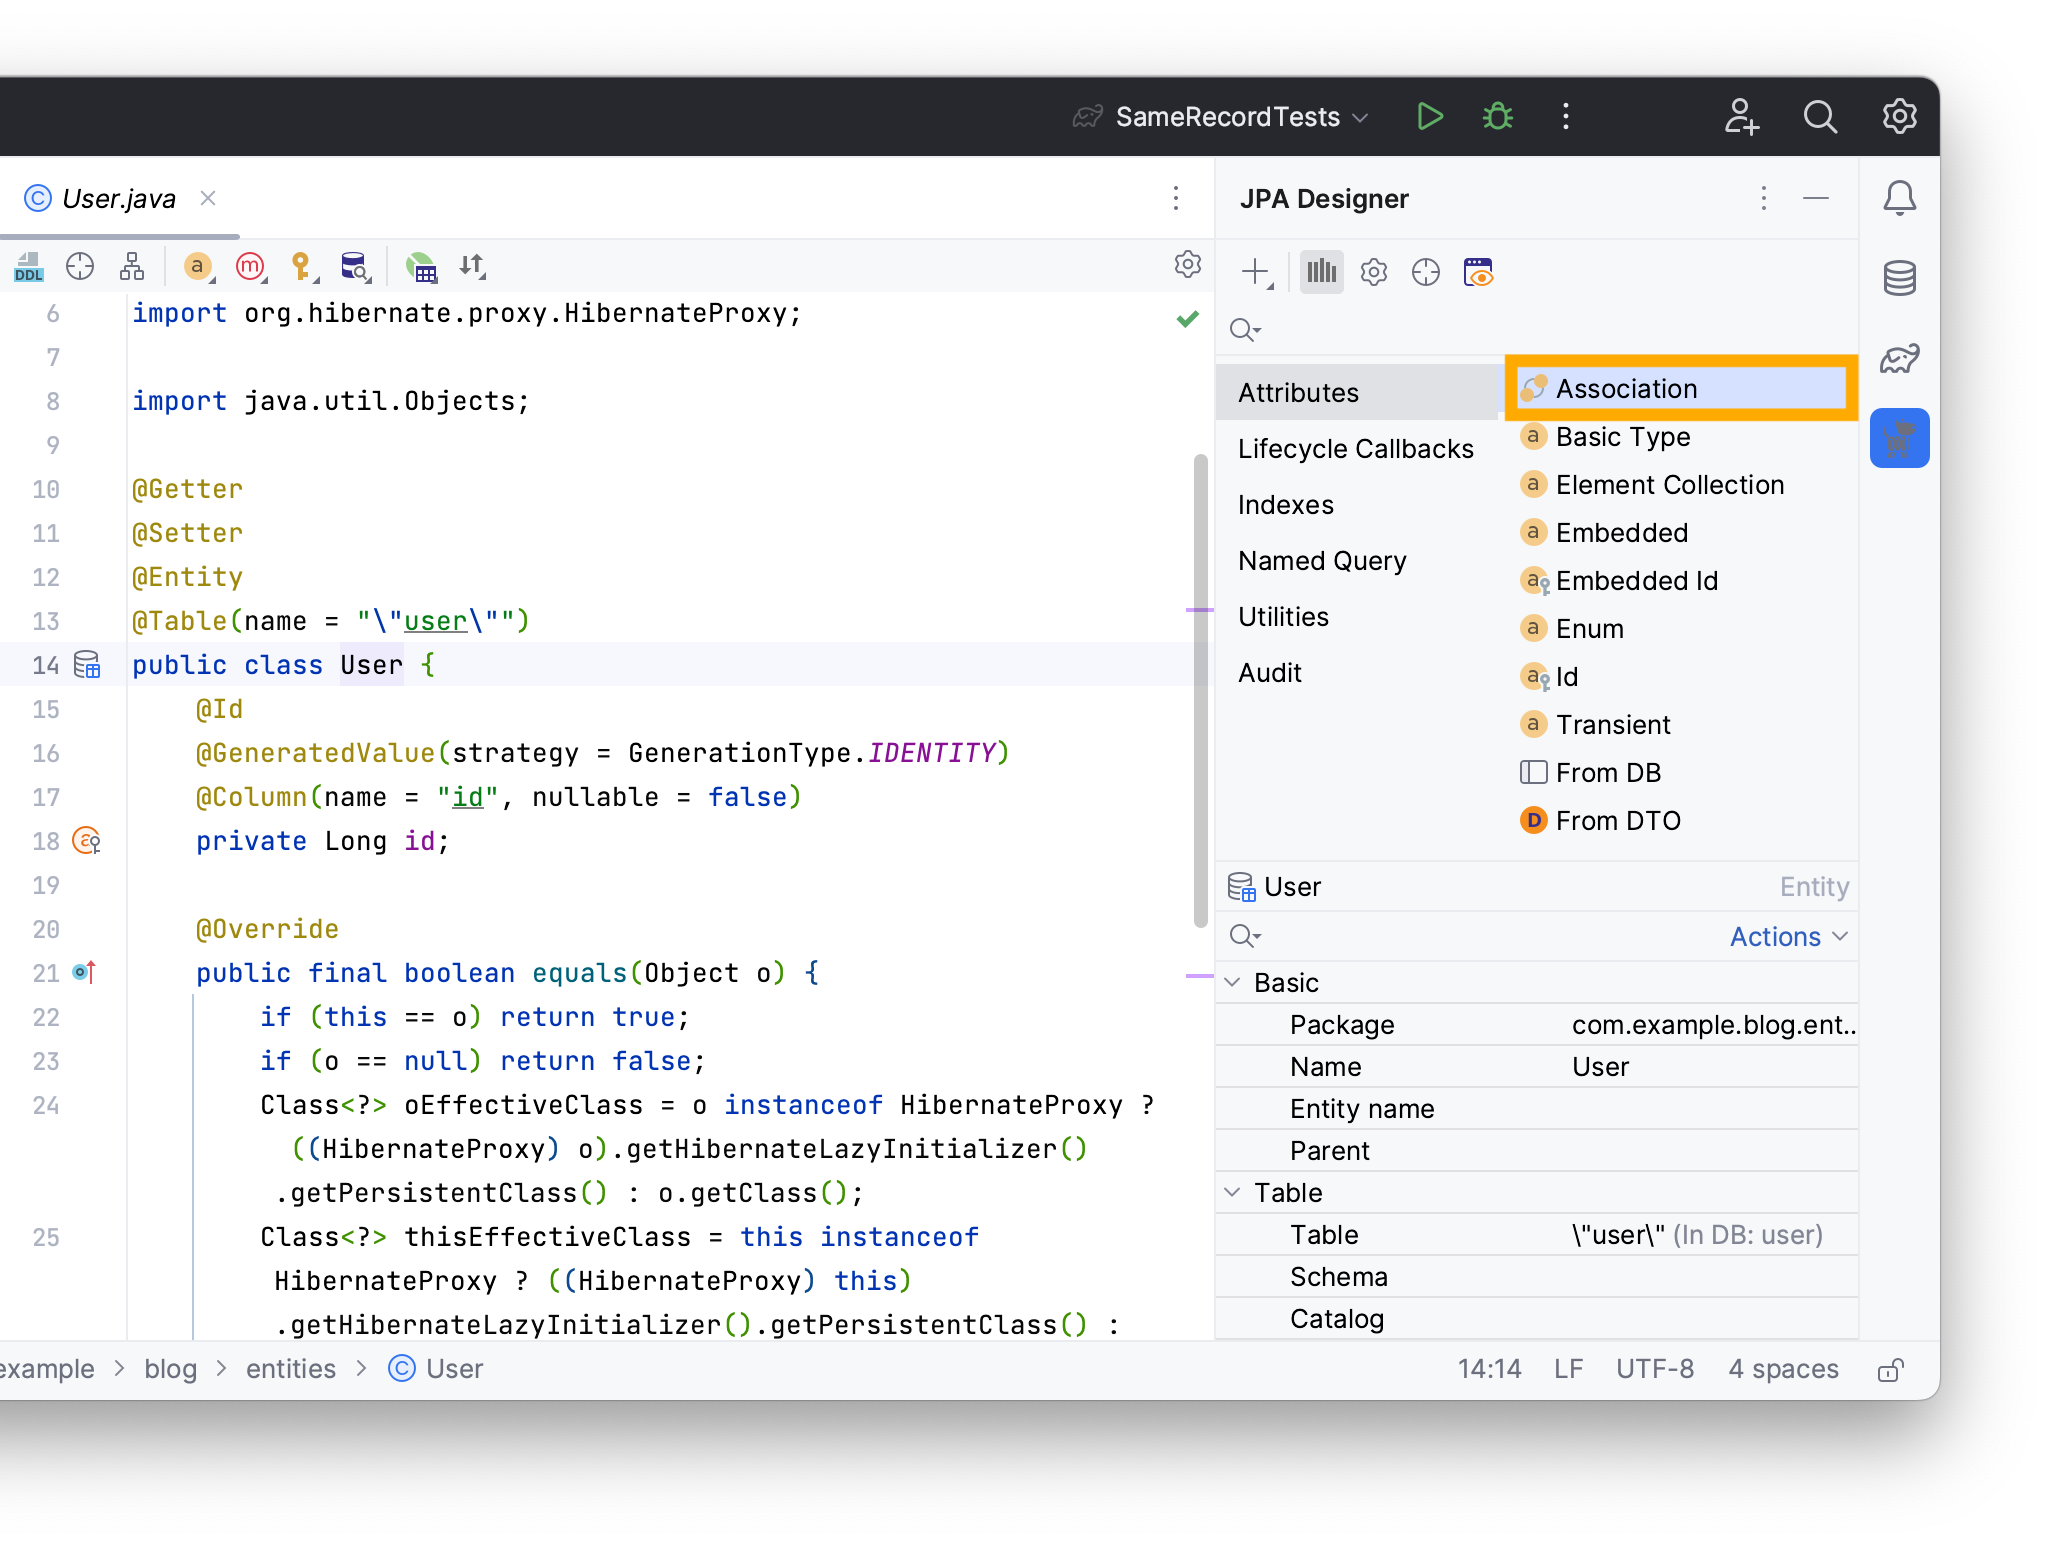
- Write
Postas the attribute’s type - Choose a
OneToManycardinality - Tick ALL as its Cascade type
Create an inverse attribute in the Post entity by clicking on create inverse attribute in the Mapped by field, and name it author.
Click OK.
Repeat the same process to create a OneToMany relationship with the Comment entity.
JPA Buddy generates the following sets in the User entity:
@OneToMany(mappedBy = "author", cascade = CascadeType.ALL, orphanRemoval = true)
private Set<Post> posts = new LinkedHashSet<>();

@OneToMany(mappedBy = "author", cascade = CascadeType.ALL, orphanRemoval = true)
private Set<Comment> comments = new LinkedHashSet<>();
The generated author attribute represents the linked User entity and should look as follows in both Comment and Post entities:
@ManyToOne
@JoinColumn(name = "author_id")
private User author;
The @JoinColumn annotation indicates that the author_id column in the database is used as a foreign key.
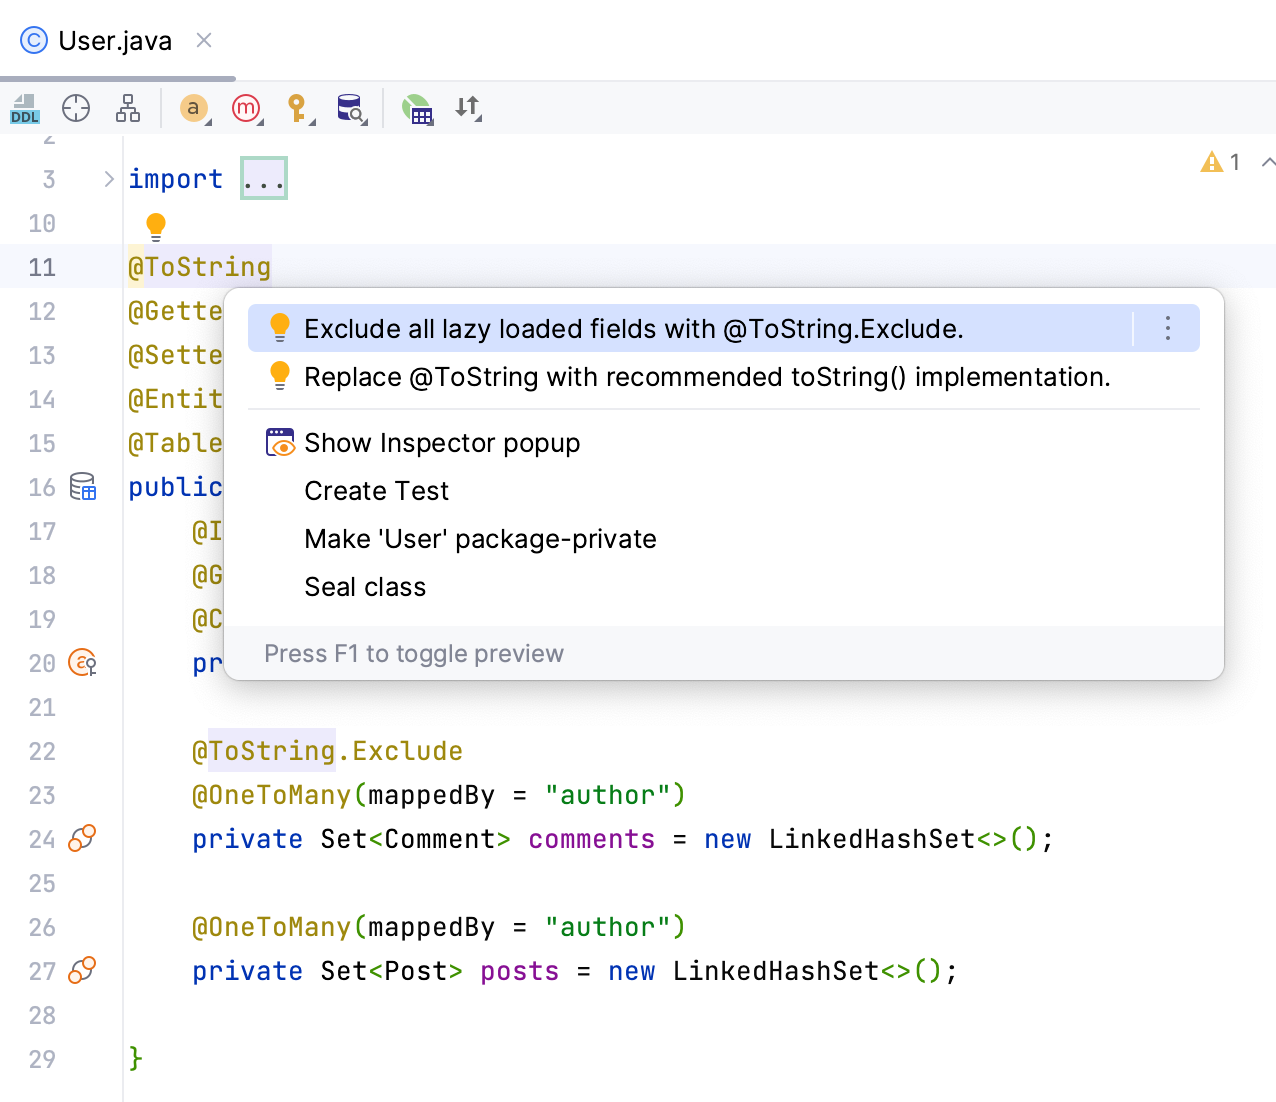
Apply the @ToString annotation to the User entity and add an @ToString.Exclude annotation over the comments attribute to exclude comments from being called in the toString method. So far, your User entity will look as follows:
@ToString
@Getter
@Setter
@Entity
@Table(name = "\"user\"")
public class User {
 @Id
 @GeneratedValue(strategy = GenerationType.IDENTITY)
 @Column(name = "id", nullable = false)
 private Long id;

 @OneToMany(mappedBy = "author", cascade = CascadeType.ALL, orphanRemoval = true)
 private Set<Post> posts = new LinkedHashSet<>();

 @ToString.Exclude
 @OneToMany(mappedBy = "author", cascade = CascadeType.ALL, orphanRemoval = true)
 private Set<Comment> comments = new LinkedHashSet<>();

 @Override
 public final boolean equals(Object o) {
  if (this == o) return true;
  if (o == null) return false;
  Class<?> oEffectiveClass = o instanceof HibernateProxy ? ((HibernateProxy)        o).getHibernateLazyInitializer().getPersistentClass() : o.getClass();
  Class<?> thisEffectiveClass = this instanceof HibernateProxy ? ((HibernateProxy) this).getHibernateLazyInitializer().getPersistentClass() : this.getClass();
  if (thisEffectiveClass != oEffectiveClass) return false;
  User user = (User) o;
  return getId() != null && Objects.equals(getId(), user.getId());
 }

 @Override
 public final int hashCode() {
  return this instanceof HibernateProxy ? ((HibernateProxy) this).getHibernateLazyInitializer().getPersistentClass().hashCode() : getClass().hashCode();
 }
}
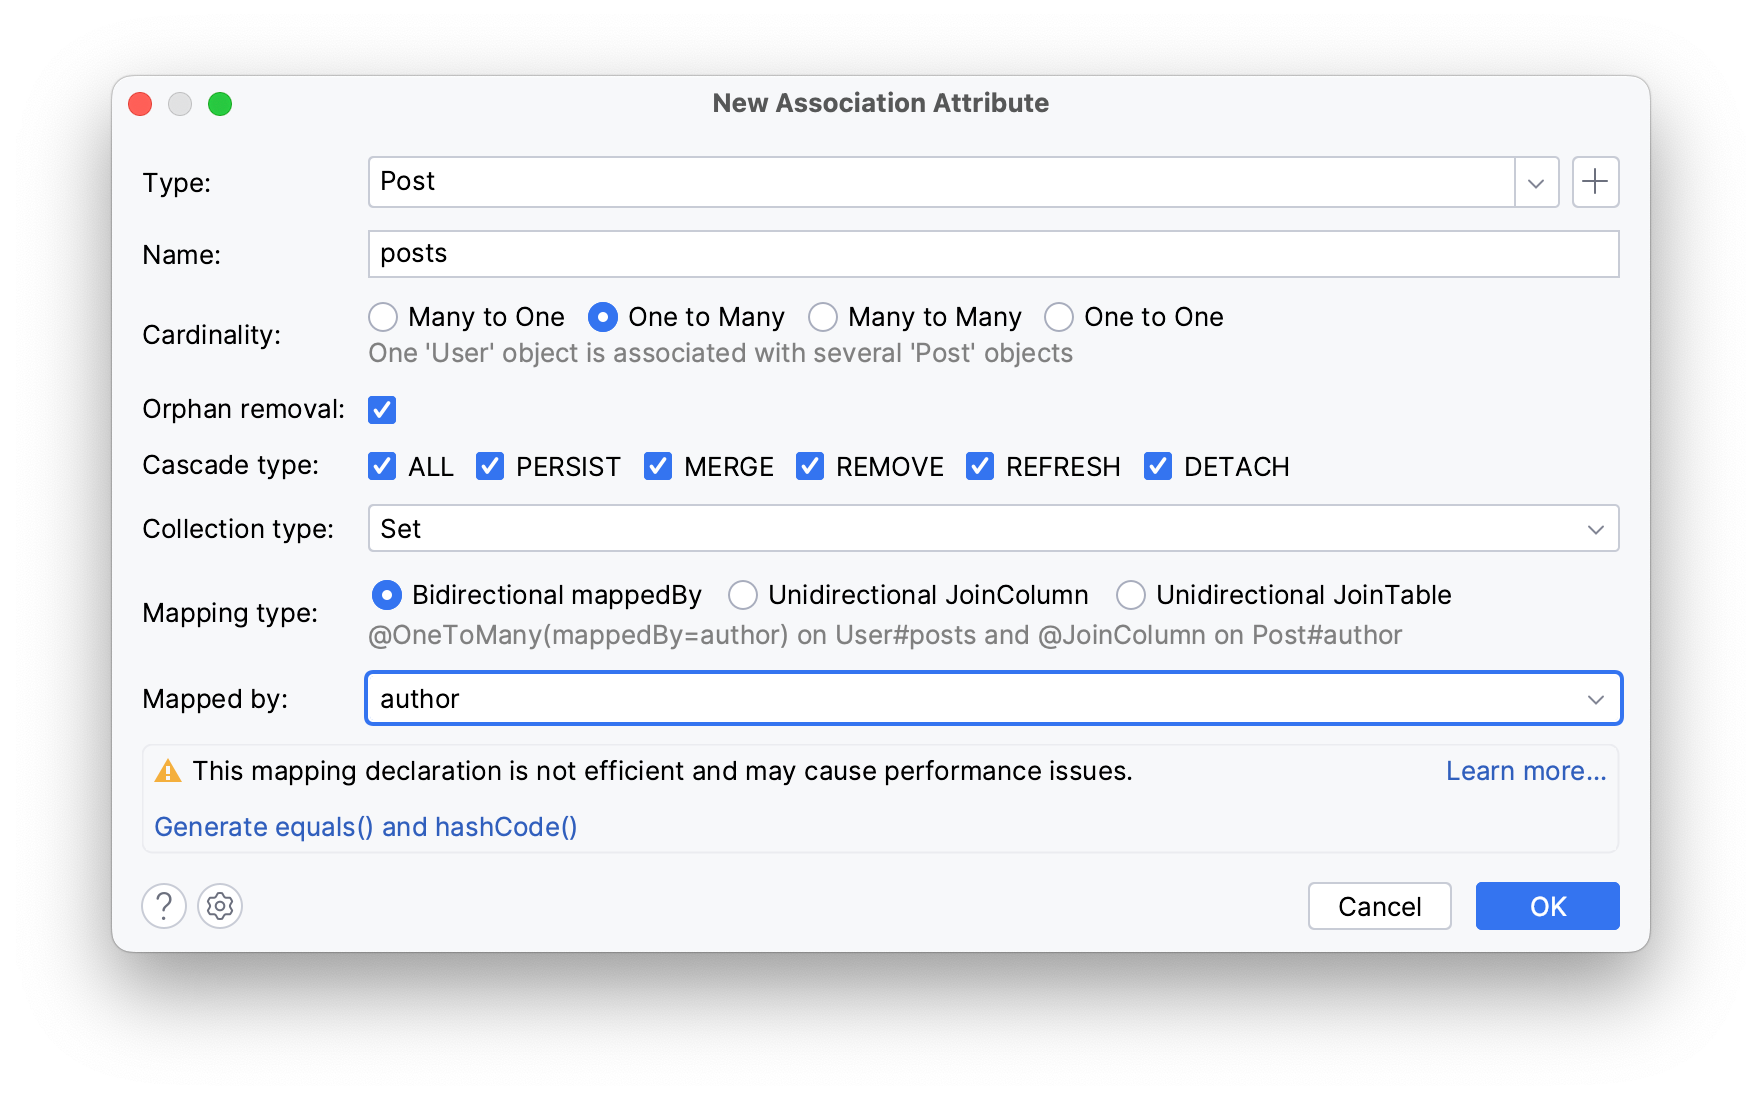
To update the database structure, use JPA Buddy’s Generate DDL by Entities function in the JPA Structure tab.
- Click on the + in the JPA Structure tab
- Select Generate DDL by Entities
In the invoked window, pick the Existing DB update (Diff) option as your DDL type to compare your current JPA model with your database tables.
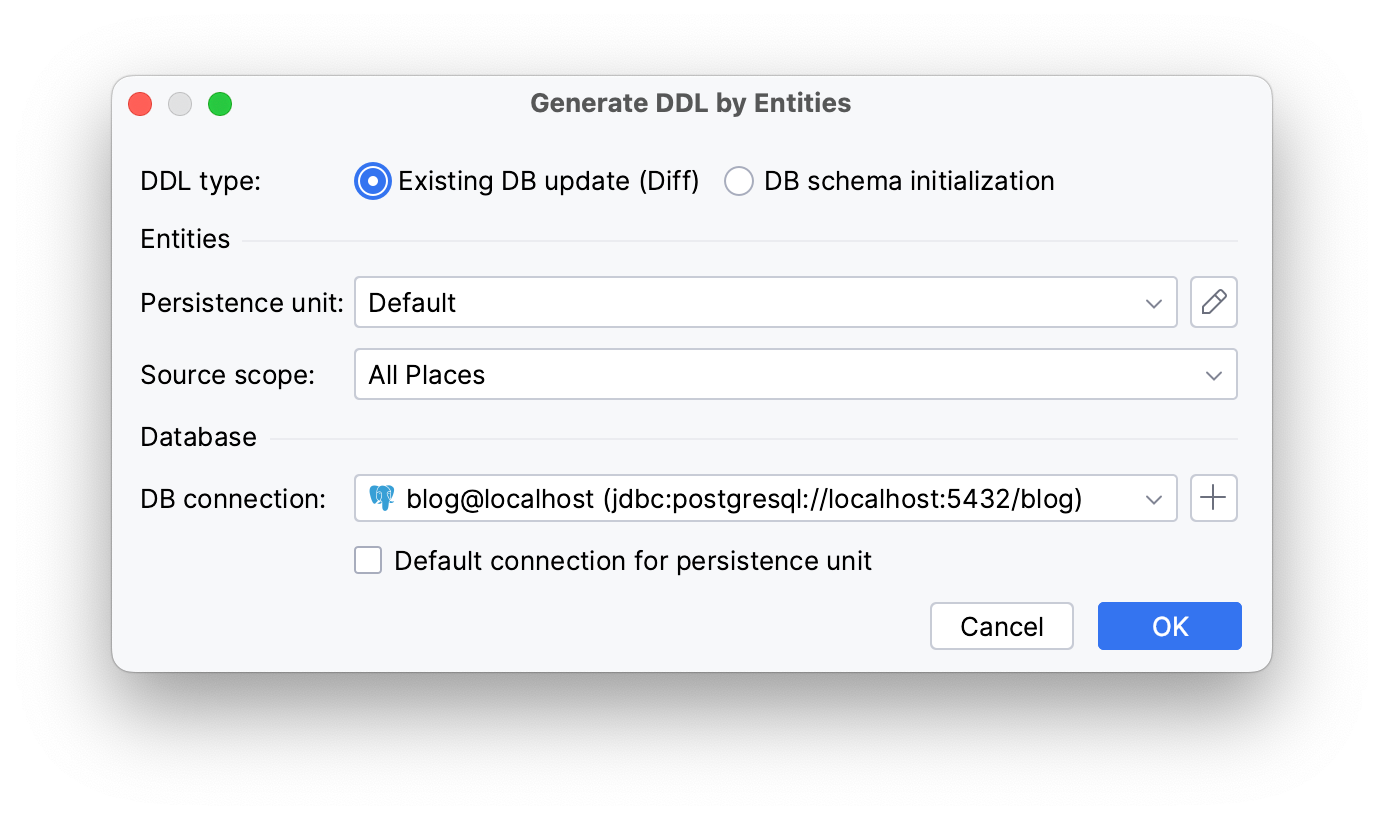
Click OK. In the preview window, choose Database Console to paste those changes directly to the console and click OK to confirm your changes.
JPA Buddy generates the following script, execute it to apply those changes to your database:
ALTER TABLE comment
 ADD author_id BIGINT;

ALTER TABLE post
 ADD author_id BIGINT;

ALTER TABLE comment
 ADD CONSTRAINT FK_COMMENT_ON_AUTHOR FOREIGN KEY (author_id) REFERENCES "user" (id);

ALTER TABLE post
 ADD CONSTRAINT FK_POST_ON_AUTHOR FOREIGN KEY (author_id) REFERENCES "user" (id);
Next, add a new test class called LazyAssociationsTests in your test folder and annotate it with @Transactional. This annotation ensures that database operations within the test methods are part of a transaction, allowing for easier rollback and isolation:
@SpringBootTest
@Transactional
public class LazyAssociationsTests {
}
Now, define the persistence unit with PersistenceUtil. This is needed to interact with the JPA persistence context to check if an entity attribute is loaded lazily or eagerly.
private final PersistenceUtil persistenceUnitUtil = Persistence.getPersistenceUtil();
You will create two methods to test each aggregated attribute lists in User. post is an attribute that will be included in Lombok’s toString method, create toStringLazyTest() for it.
You can use the @Sql annotations over your test method to run insert-user-with-posts.sql before this test and delete-user-with-posts.sql afterward.
@Test
@Sql(scripts = "insert-user-with-posts.sql", executionPhase = Sql.ExecutionPhase.BEFORE_TEST_METHOD)
@Sql(scripts = "delete-user-with-posts.sql", executionPhase = Sql.ExecutionPhase.AFTER_TEST_METHOD)
public void toStringLazyTest() {
}
To create the missing SQL files in the same directory, click on their names and invoke the Show Context Menu option (Opt/Alt + Enter):
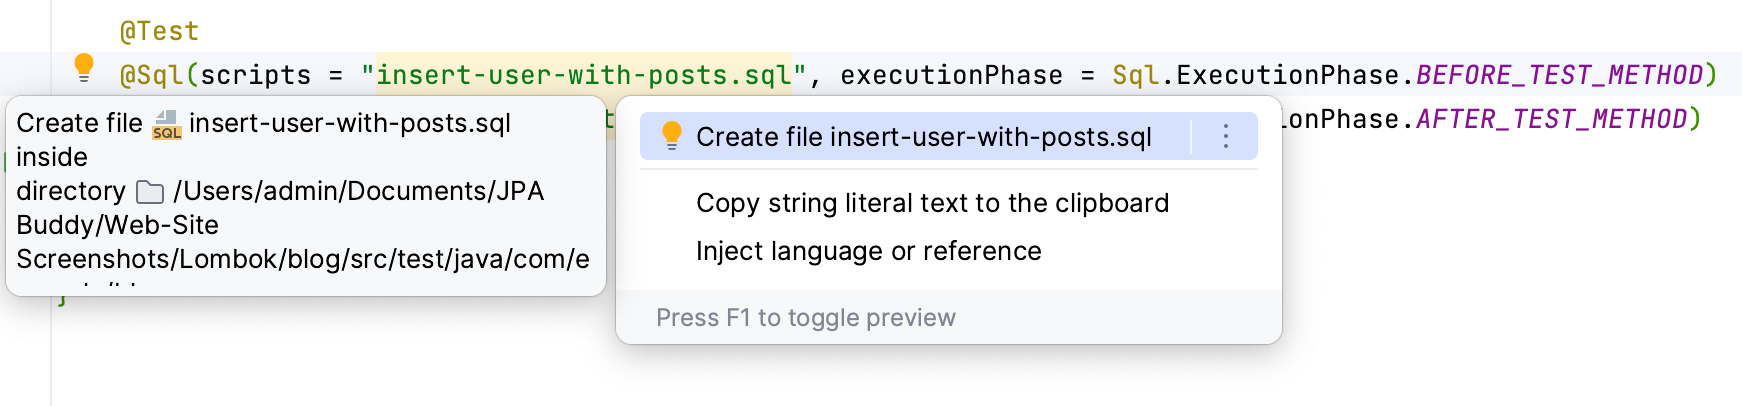
insert-user-with-posts.sql will contain sample data that you will need to populate the table:
INSERT INTO "user" (id) VALUES (0);
INSERT INTO post (author_id) VALUES (0);
delete-user-with-posts.sql deletes the created data after executing the test method:
DELETE FROM post;
DELETE FROM “user”;
In the test method, fetch the user from the database, then check if the one-to-many relationship is loaded. Use JPA Buddy’s Coding Assistance to inject user’s repository.
User user = userRepository.findById(0L).orElseThrow();
Assertions.assertFalse(persistenceUnitUtil.isLoaded(user.getPosts()));
Then call the toString method and verify if the relationship is loaded or not.
String s = user.toString();
Assertions.assertFalse(persistenceUnitUtil.isLoaded(user.getPosts()));
Follow the same steps to test the excluded comments attribute. Use the corresponding sample SQL files to populate the comment table. For insert-user-with-comments.sql:
INSERT INTO "user" (id) VALUES (0);
INSERT INTO comment (author_id)) VALUES (0);
For delete-user-with-comments.sql:
DELETE FROM comment;
DELETE FROM “user”;
Your LazyAssociationsTests class should look as follows:
@SpringBootTest
@Transactional
public class LazyAssociationsTests {
@Autowired
private UserRepository userRepository;
private final PersistenceUtil persistenceUnitUtil = Persistence.getPersistenceUtil();
@Test
@Sql(scripts = "insert-user-with-posts.sql", executionPhase = Sql.ExecutionPhase.BEFORE_TEST_METHOD)
@Sql(scripts = "delete-user-with-posts.sql", executionPhase = Sql.ExecutionPhase.AFTER_TEST_METHOD)
public void toStringLazyTest() {
User user = userRepository.findById(0L).orElseThrow();
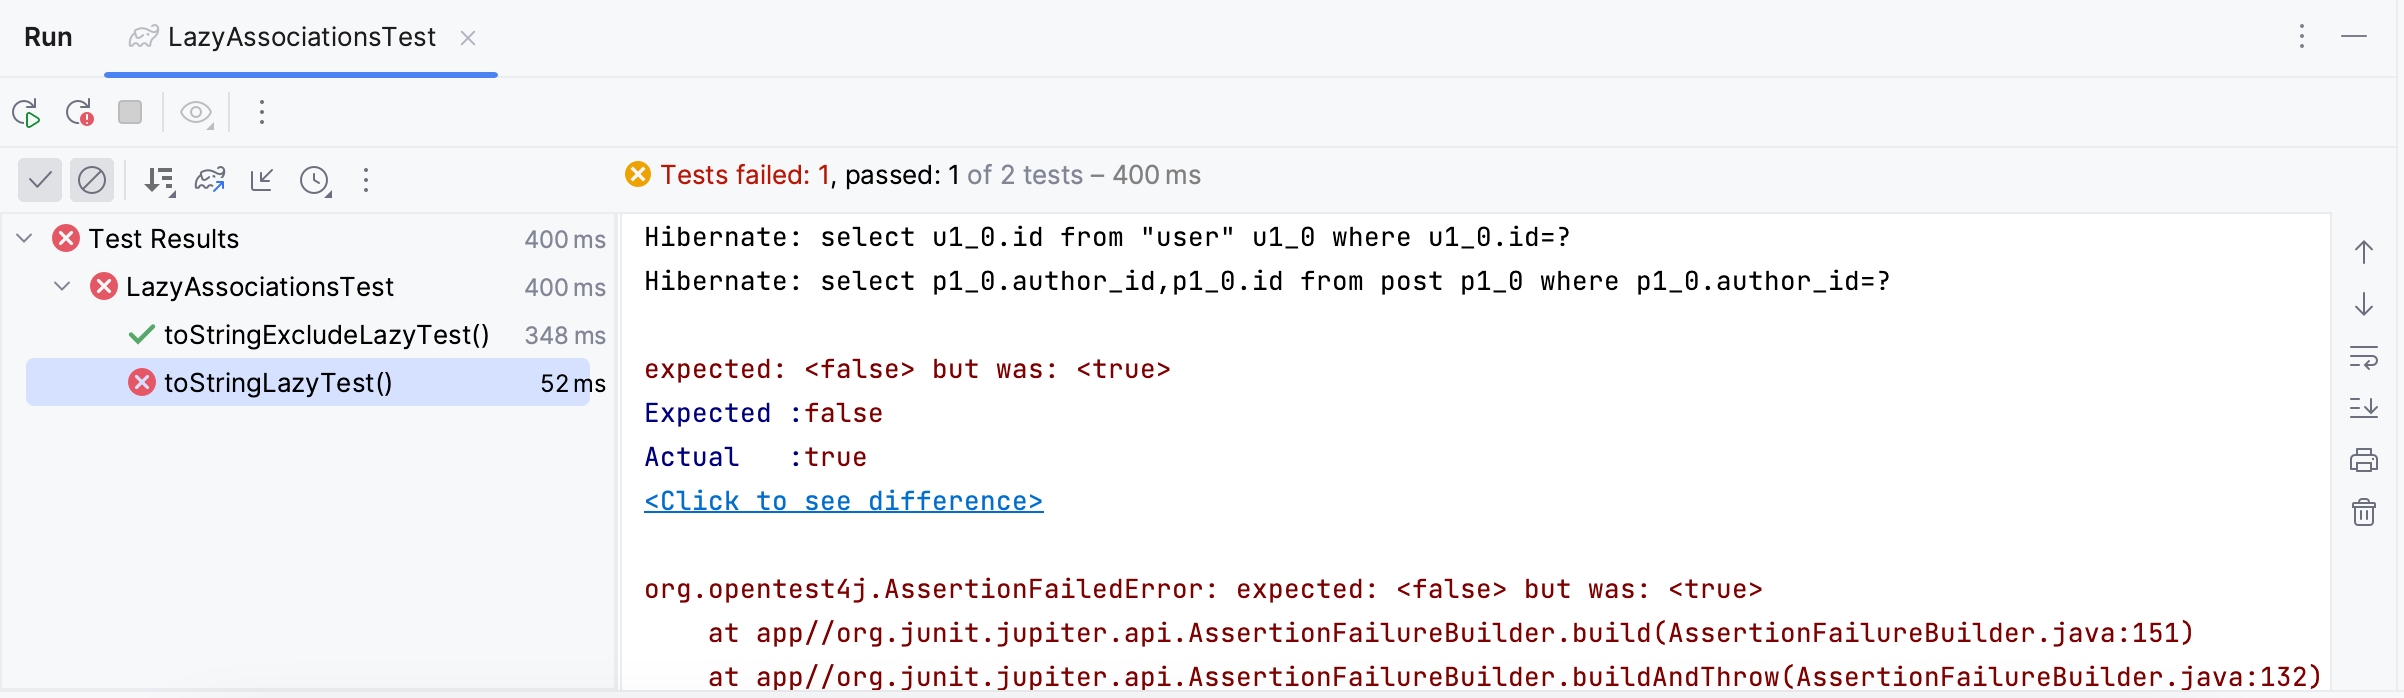
Assertions.assertFalse(persistenceUnitUtil.isLoaded(user.getPosts()));
String s = user.toString();
Assertions.assertFalse(persistenceUnitUtil.isLoaded(user.getPosts()));
}
@Test
@Sql(scripts = "insert-user-with-comments.sql", executionPhase = Sql.ExecutionPhase.BEFORE_TEST_METHOD)
@Sql(scripts = "delete-user-with-comments.sql", executionPhase = Sql.ExecutionPhase.AFTER_TEST_METHOD)
public void toStringExcludeLazyTest() {
User user = userRepository.findById(0L).orElseThrow();
Assertions.assertFalse(persistenceUnitUtil.isLoaded(user.getComments()));
String s = user.toString();
Assertions.assertFalse(persistenceUnitUtil.isLoaded(user.getComments()));
}
}
Run the test class; you'll find that the test without the @ToString.Exclude fails. This means that lazy associations could unintentionally become eager.
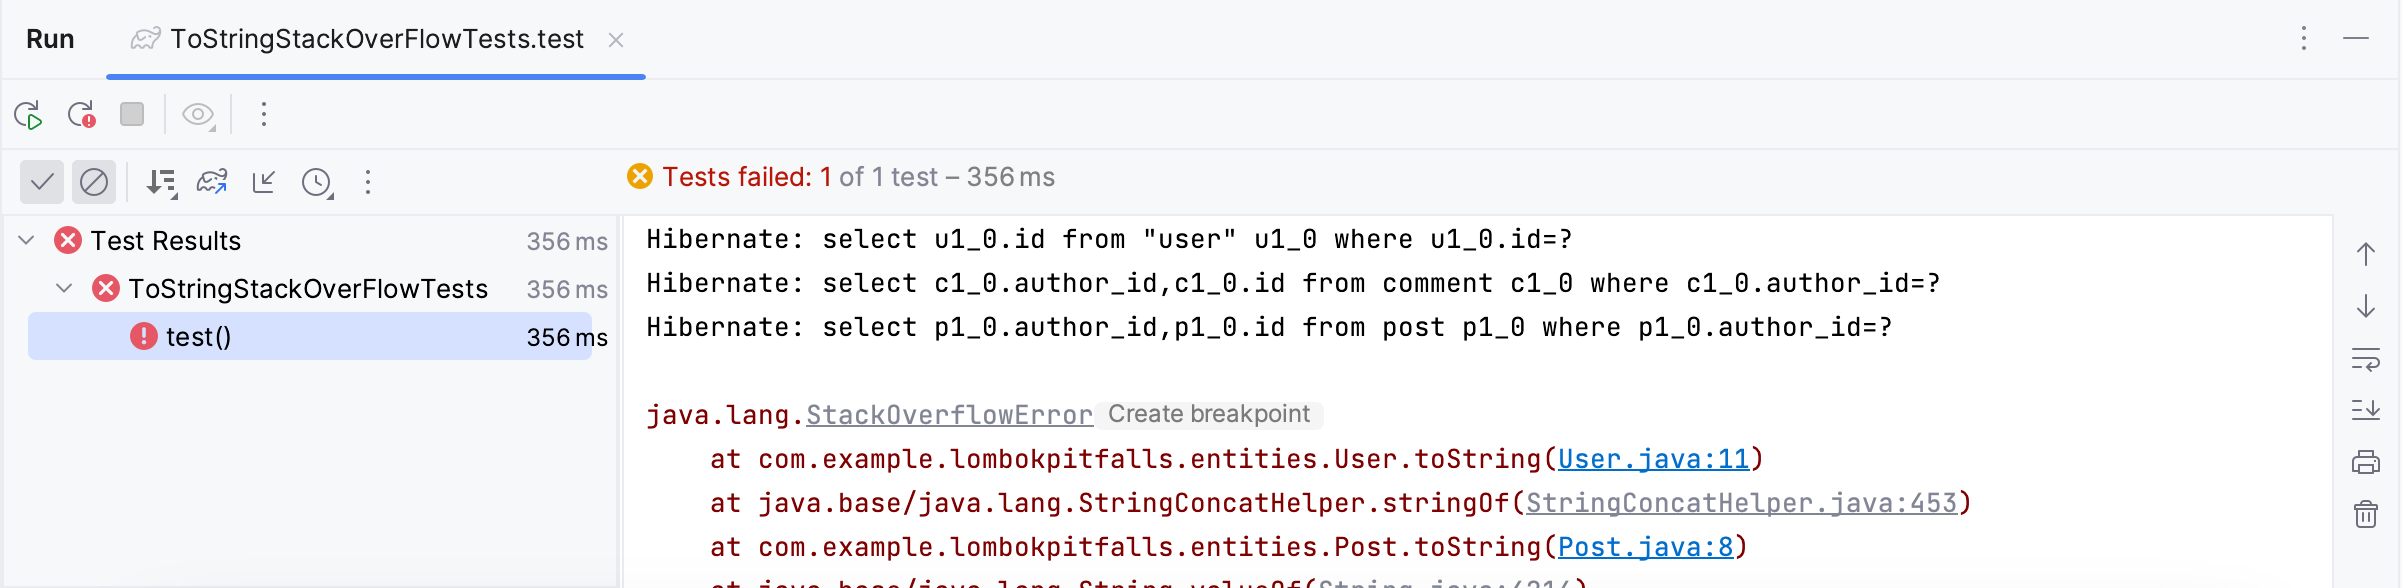
Another issue you may encounter while using the @ToString annotation is the StackOverflowError exception when your entities include an inverse attribute, as in the Post entity.
To illustrate this issue, let’s annotate the Post entity with @ToString and create a test class called ToStringStackOverFlowTests under the test folder. Annotate the class with @SpringBootTest and @Transactional.
@SpringBootTest
@Transactional
public class ToStringStackOverFlowTests {
}
Call the insert-user-with-posts.sql file before the test() method and retrieve the user from the database. Lastly, call the toString() method.
@Test
@Sql(scripts = "insert-user-with-posts.sql", executionPhase = Sql.ExecutionPhase.BEFORE_TEST_METHOD)
public void test() {
 User user = userRepository.findById(1L).orElseThrow();
 String s = user.toString();
}
Running the test triggers a StackOverflowError. This happens because the toString() methods in both Post and User keep calling each other, creating an endless loop of calls.
JPA Buddy helps you avoid such mistakes in production and highlights the @ToString annotation in your User entity. Invoke Show Context Menu (Opt/Alt + Enter) over the inspection to exclude all references in the entity or generate toString() implementation with the necessary fields and removes the @ToString annotation.
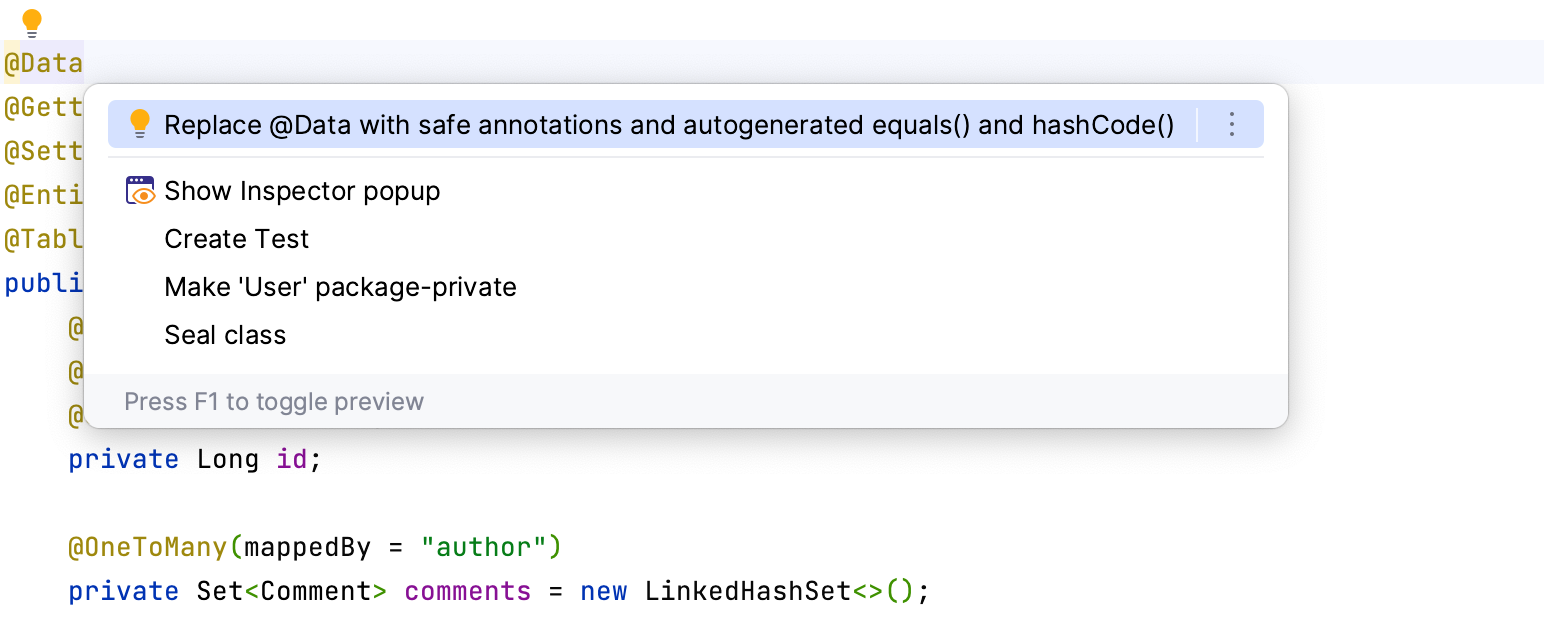
The @Data annotation includes both @EqualsAndHashCode and @ToString annotations. As a result, using it results in all four issues you’ve encountered in previous sections. Therefore, it is not recommended to use @Data with JPA entities.
JPA Buddy detects whenever you use the @Data annotation and suggests generating appropriate toString(), equals() and hashcode() implementations instead.
Using @Builder with JPA Entities
@Builder annotation implements an entire design pattern in one annotation! Unfortunately, it removes the no-args constructor, which goes against JPA specification rules. The @AllArgsConstructor does the same thing. In this section you will test and fix issues related to the @Builder annotation.
Let’s test both annotations. For simplicity, delete every attribute in User and Post entities then apply the @Builder annotation over the User entity and @AllArgsConstructor over Post. Your entities should look as follows.
User entity:
@Builder
@Getter
@Setter
@Entity
@Table(name = "\"user\"")
public class User {
    @Id
    @GeneratedValue(strategy = GenerationType.IDENTITY)
    @Column(name = "id", nullable = false)
    private Long id;
}
Post entity:
@AllArgsConstructor
@Getter
@Setter
@Entity
@Table(name = "post")
public class Post {
    @Id
    @GeneratedValue(strategy = GenerationType.IDENTITY)
    @Column(name = "id", nullable = false)
    private Long id;
}
Prepare a NoArgsConstructorTests test class under your test folder.
@SpringBootTest
@Transactional
class NoArgsConstructorTests {
}
The first builderTest method will test the @Builder annotation. It creates a user using its builder() method and tries to save it to the repository.
@Test
public void builderTest() {
 User user = User.builder().id(1L).build();
 userRepository.save(user);
}
The second method, called allArgsConstructorTest() creates a new post using the only available constructor and saves it.
@Test
public void allArgsConstructorTest() {
 Post post = new Post(1L);
 postRepository.save(post);
}
Before running these, disable previous tests to avoid errors. Both tests fail, showing that these entities lack a default constructor, which is a requirement in JPA.
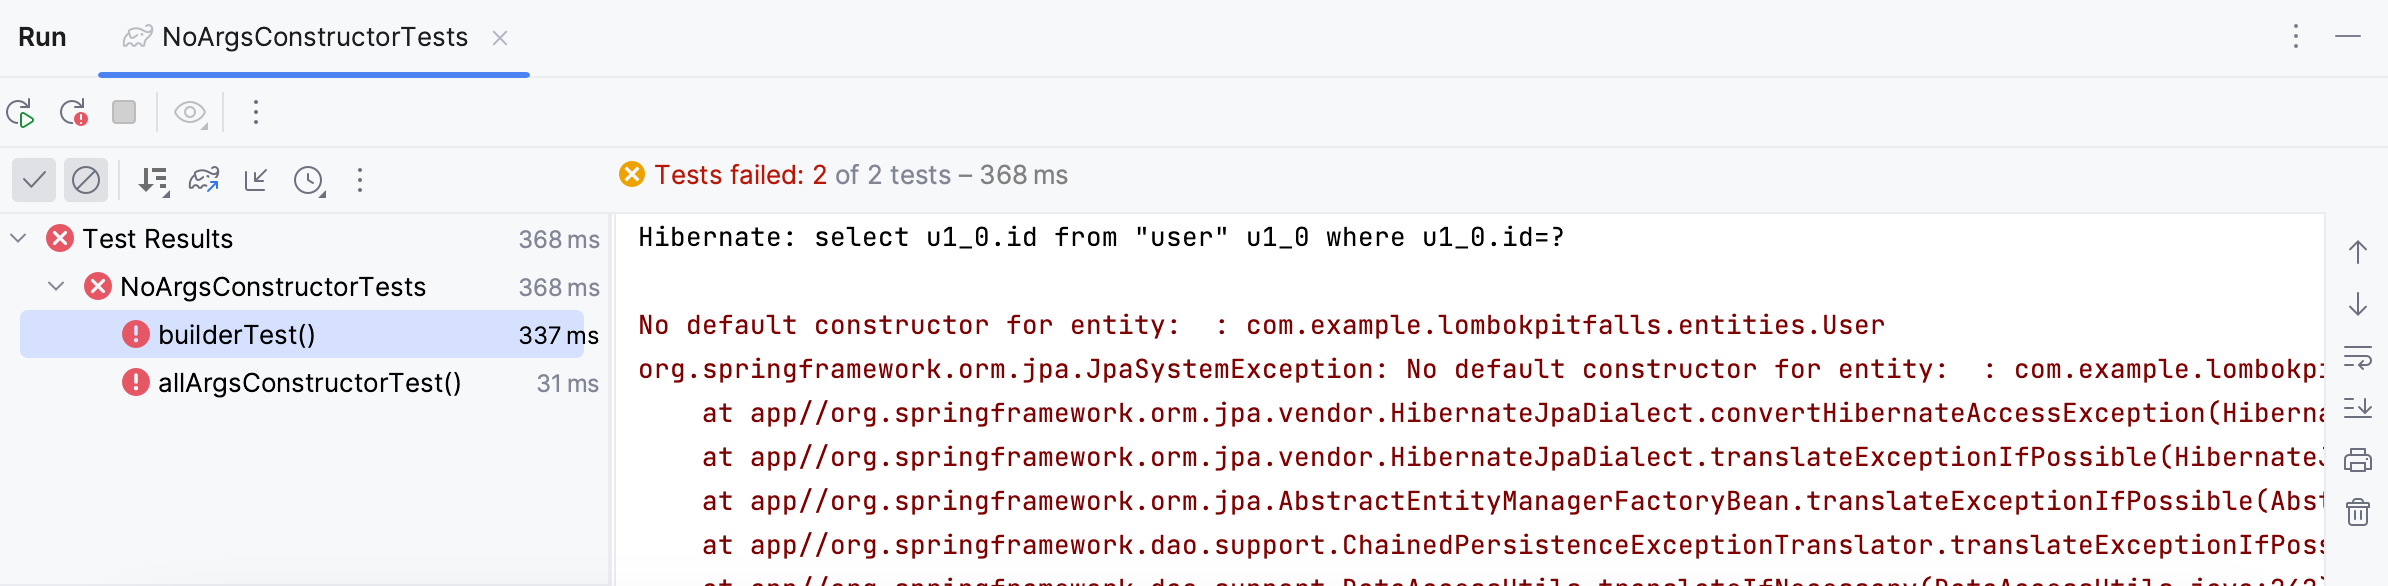
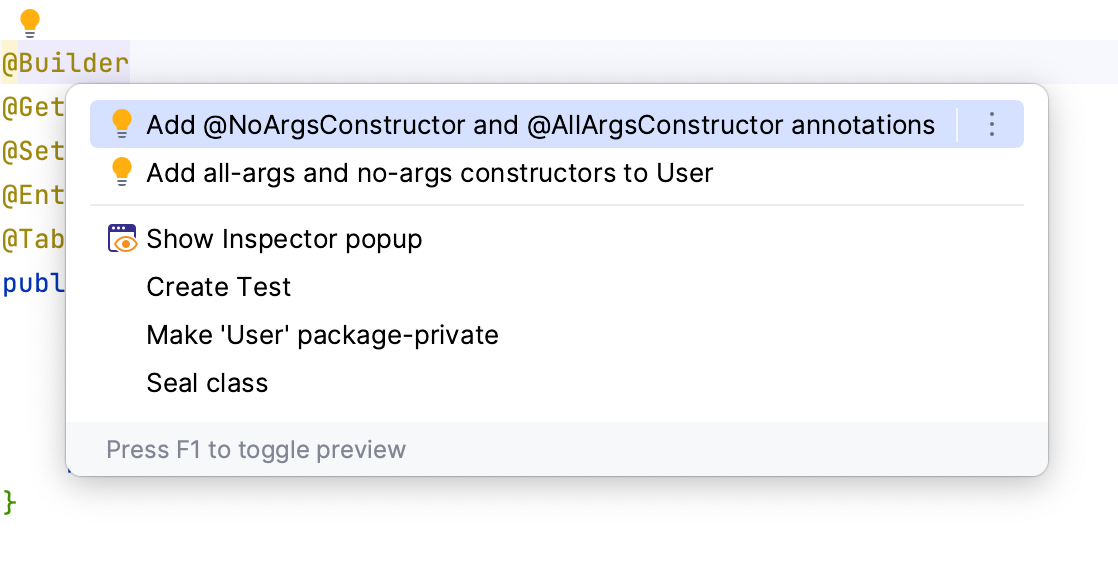
To fix it, invoke Show Context Menu (Opt/Alt + Enter) over JPA Buddy’s inspection on @Builder. Choose the suggested action to add the necessary constructors through Lombok annotations or actual constructors.
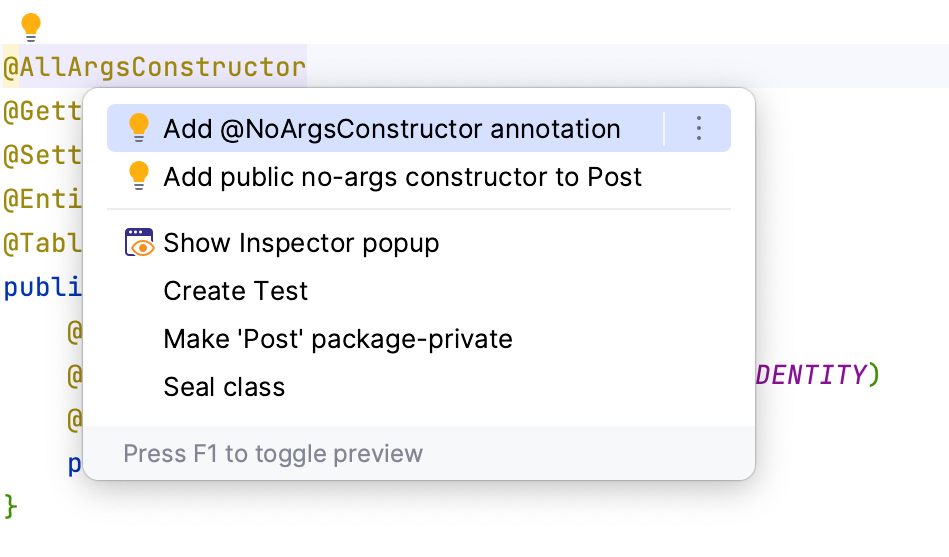
JPA Buddy also reminds you to add a @NoArgsConstructor when using the @AllArgsConstructor annotation. Invoke Show Context Menu (Opt/Alt + Enter) over the inspection and choose either option to add the needed annotation or a Post constructor.
Conclusion
In this guide, you explored various Lombok annotations and their compatibility with JPA entities.
You learned that using @EqualsAndHashCode and @ToString can cause problems with saving and comparing data through testing. Additionally, features like @Builder can conflict with JPA's constructor requirements. Fortunately, JPA Buddy helps detect these common pitfalls and offers quick fixes.