Best way to create/update DB in IntelliJ IDEA or why ddl-auto/hbm2ddl doesn't work well | JPA Buddy
This video will show you why using `ddl-auto` and `hbm2ddl` properties is not a good idea. With JPA Buddy, you have a better way to convert entities into DDL statements. You can fully control the process and review DDL before execution, set up proper Java → DB types mapping, and do many more things. Watch the video to create better DDL!
Estimated Reading Time: less than 15 mins
Introduction
The "Generate DDL by Entities" feature transforms entities into DDL statements, offering both initialization scripts for new database schemas and differential DDL for updating existing databases based on JPA entities. While the ddl-auto property produces DDL, it has its own set of limitations: it doesn't allow pre-execution DDL review, struggles with Java to Database type mapping, and doesn't support attribute converters or Hibernate types, leading to suboptimal database schemas. In contrast, JPA Buddy understands these nuances, producing better DDL aligned with the JPA model. This DDL can be saved, viewed, modified, and even integrated into tools like Liquibase or Flyway.
In this guide, you will build a sample blog application, generate its schema, add sample data using JPA Buddy and learn the differences between using Hibernate’s ddl-auto properties and JPA Buddy’s DDL generation to manage your database schema.
Overview
You will learn how to:
- Set up a new project
- Set up a database connection
- Create entities
- Generate an init script
- Initialize sample data
- Update the database to reflect removed attributes
- Reflect attribute deletions in the Database
- Fix schema mismatches
You can find the code of this application on github.
Setting up a New Project
First, you will go through a few steps to set up a new project. In this section, you will:
- Create a new project using Spring Initializr
- Load the project in IntelliJ IDEA
Start by creating a Spring Boot application using Spring Initializr.
- Visit Spring Initializr’s Website.
- Select the following settings:
- Java 17 as the programming language
- Gradle - Groovy as the build tool
- The latest stable version of Spring Boot
- The application will be packaged as a JAR file
- Add the following dependencies to your project:
- Spring Data JPA enables us to use JPA and Data Repositories
- PostgreSQL Driver provides database access
These dependencies enable you to use JPA Buddy’s functionalities and access a PostgresSQL database.
Here are the selected settings in Spring Initializr:

Download the created project and open it in IntelliJ IDEA by clicking on File → Open.
Setting up a Database Connection
To connect your application to the database, you need to:
- Set up a new connection
- Link the application to a datasource using a properties file
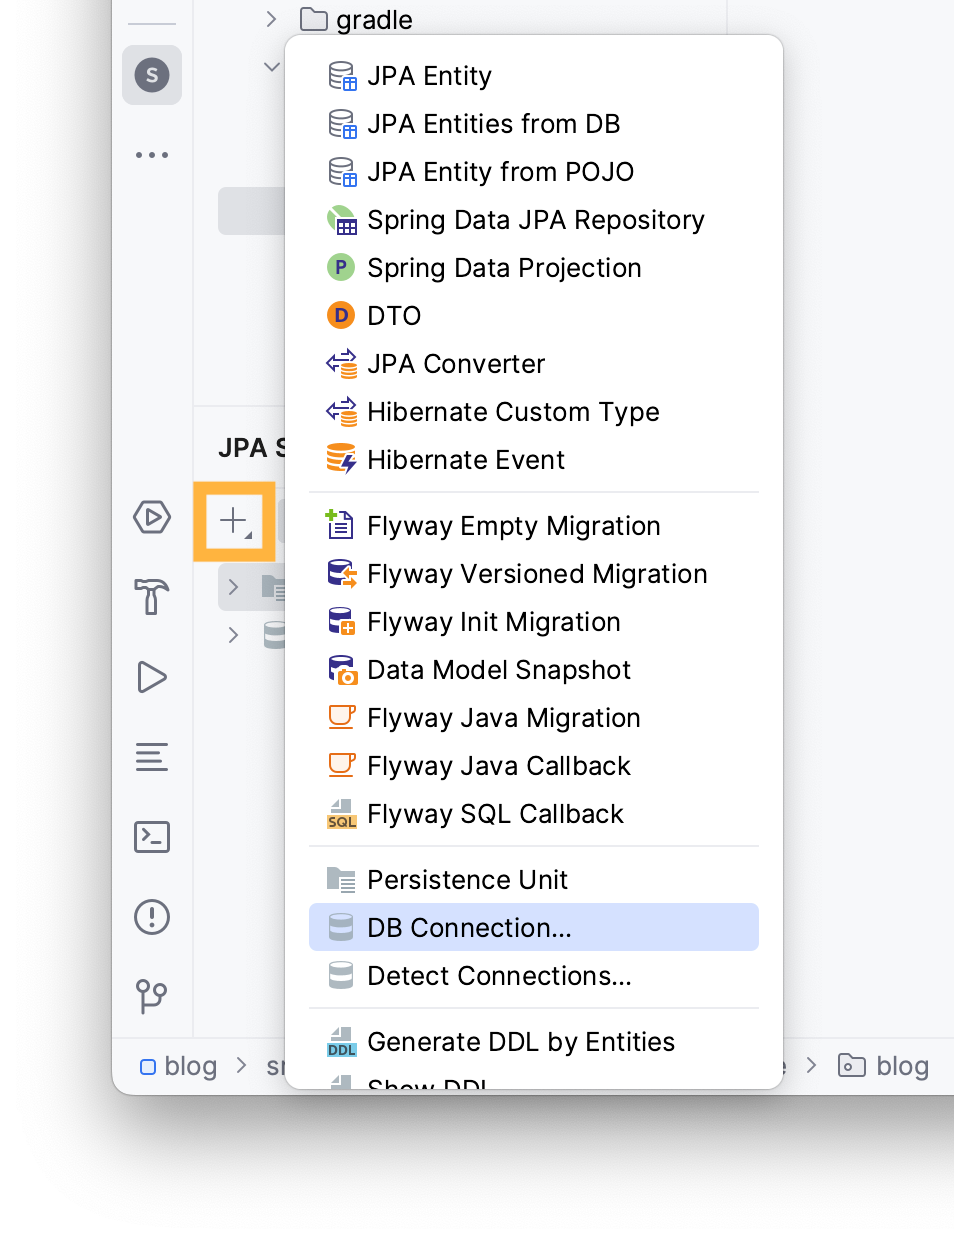
You can use JPA Buddy to set up a new connection through the JPA Structure tab:
- Navigate to the JPA Structure tab
- Click on the + button
- Click on DB Connection...
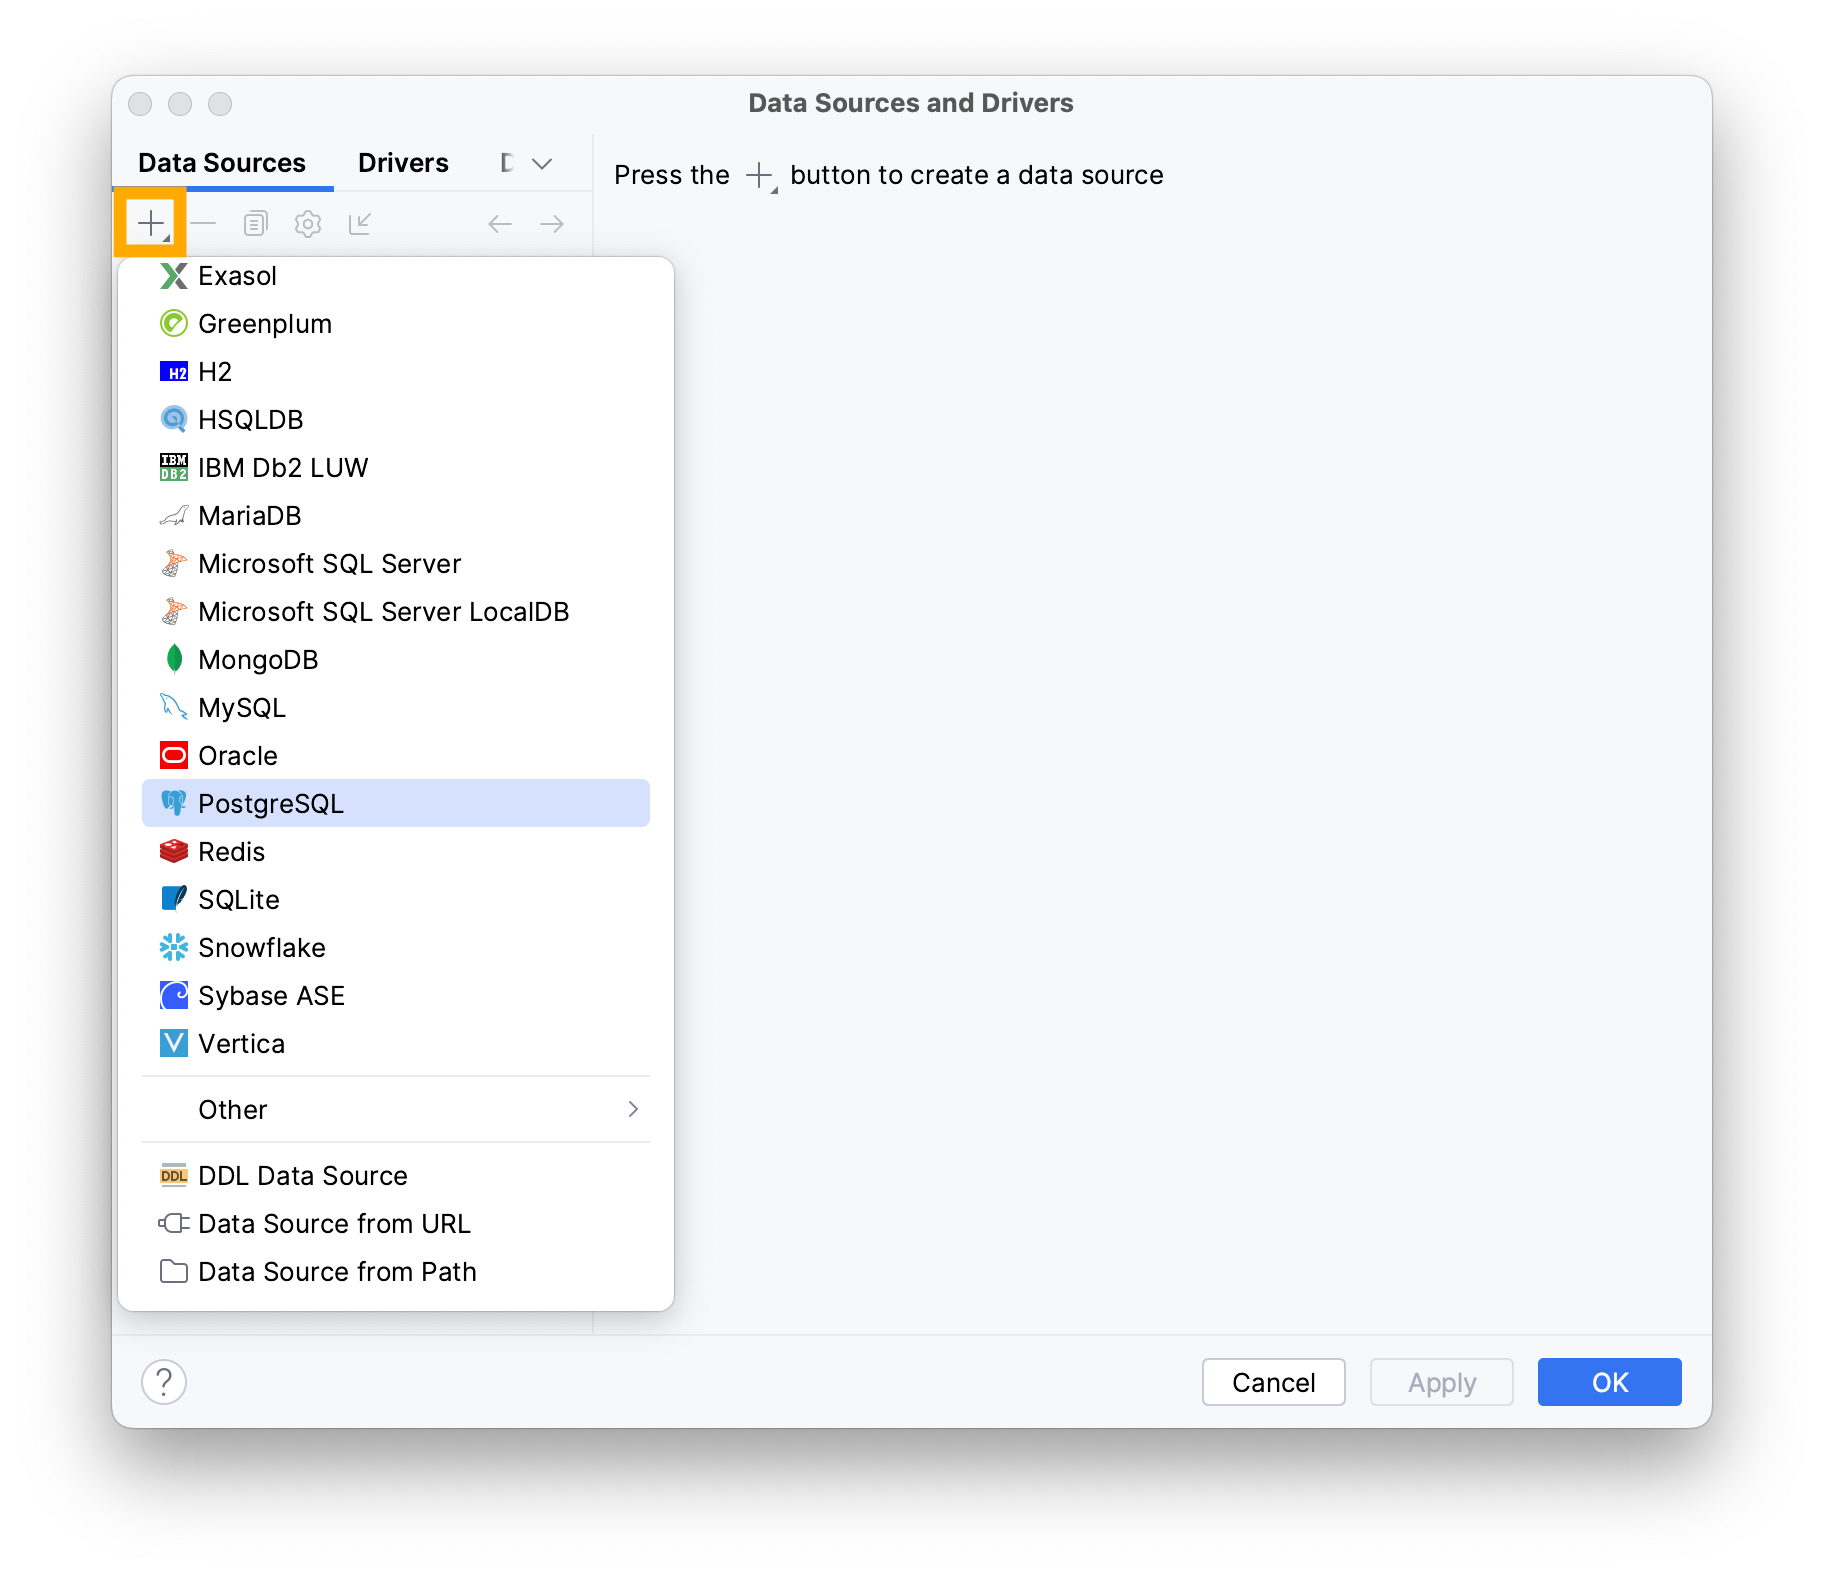
Add a new connection by clicking on the + button and choose PostgreSQL.
Type the following information in the invoked window:
- Username
- Password
- Name of the database
Note that your values may vary depending on your local environment.
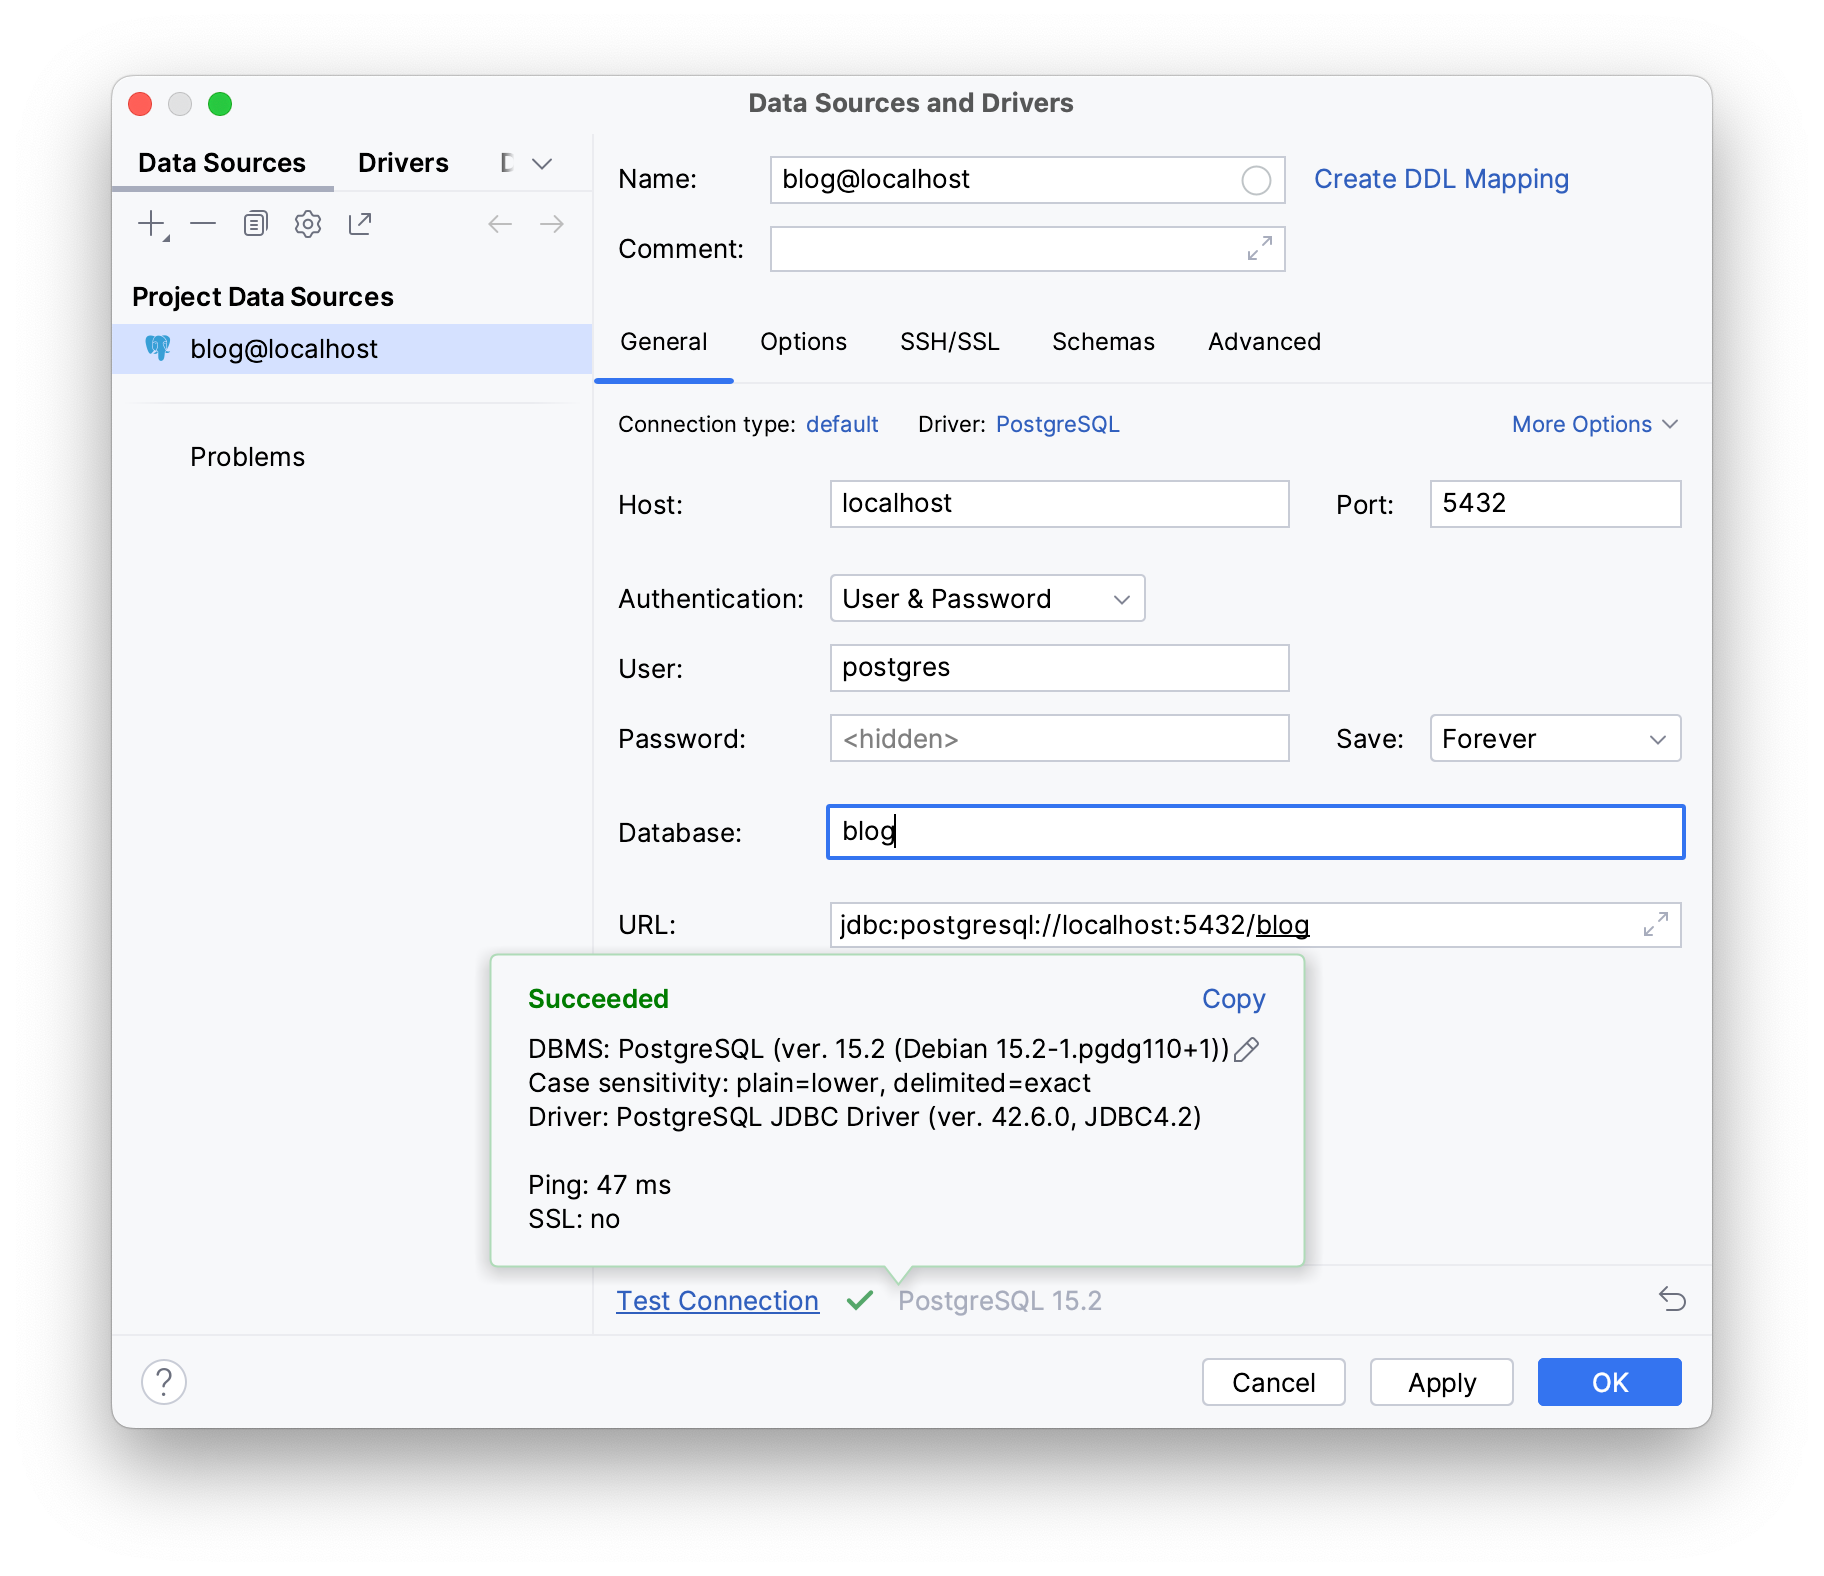
To check if your database works as intended, click on Test Connection. It should display Succeeded if your database is properly configured and actively listening on its assigned port.
Click OK.
Next, provide the necessary datasource details to your application in the application.properties file under the resources folder:
- Open your
application.propertiesfile - Use IntelliJ IDEA’s Generate shortcut (Command/Ctrl + N)
- Select the Data source option

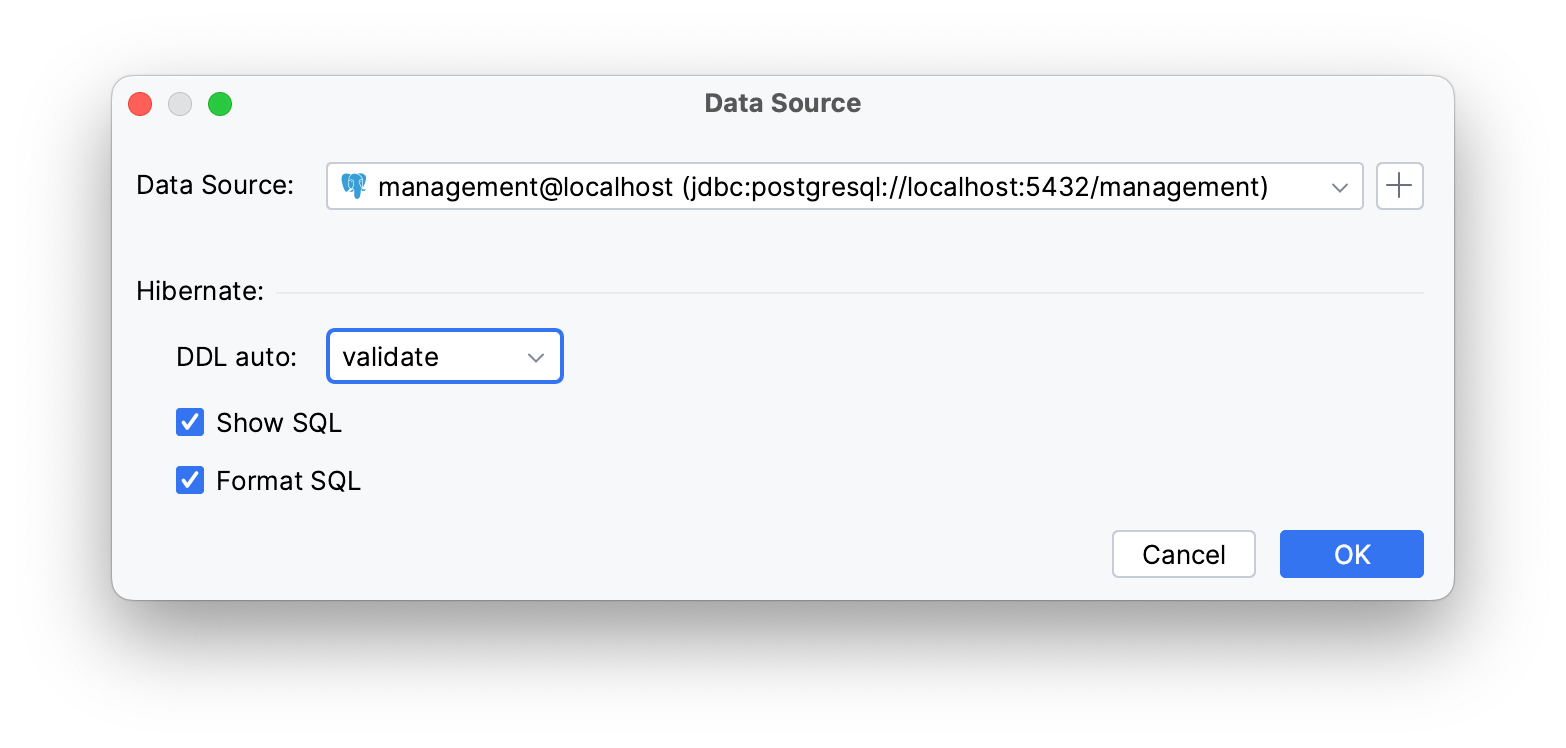
JPA Buddy automatically detects the existing datasource.
Hibernate will validate your schema with your entity mappings during startup, if you set the Hibernate DDL-auto property to validate.
The Show/Format SQL options allow you to view formatted SQL logs on your terminal.
The mentioned settings generate the following properties:
spring.datasource.url=jdbc:postgresql://localhost:5432/blog
spring.datasource.username=postgres
spring.datasource.password=postgres
spring.datasource.driverClassName=org.postgresql.Driver
spring.jpa.hibernate.ddl-auto=validate
spring.jpa.show-sql=true
spring.jpa.properties.hibernate.format_sql=true
Creating Entities
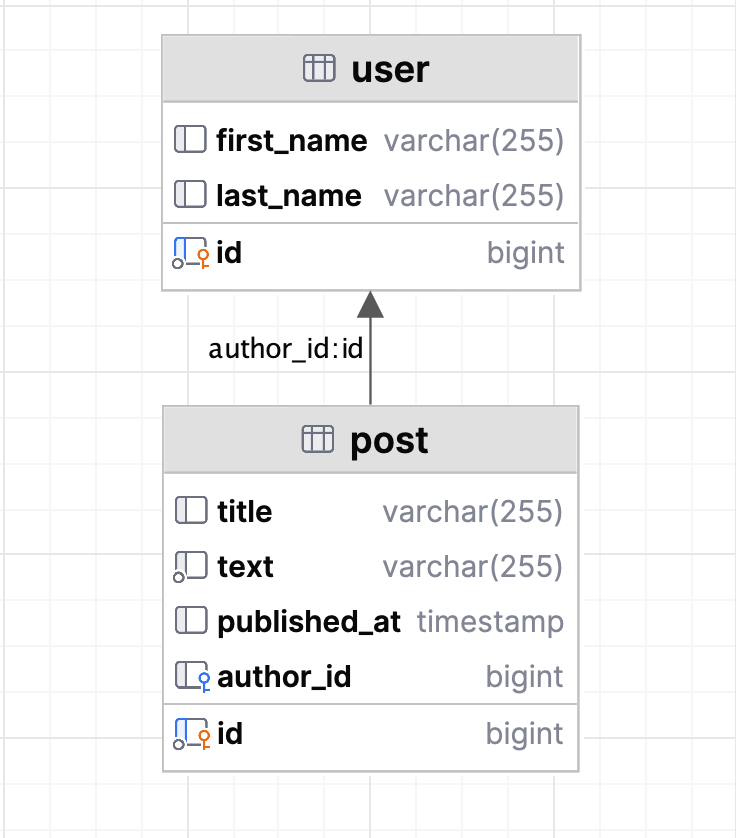
The blog application you will build consists of two tables:
user: table for storing blog user informationpost: table for storing blog posts
The relationship between post and user is OneToMany, meaning that multiple posts can be associated with a single user.
Let’s create the User entity using JPA Structure:
- Locate the JPA Structure tab in the left lower corner
- Click on the + button
- Select the JPA Entity option
Type the name of your entity in the invoked window and add .entities to the package name, choose the Id type and the desired Id generation method.
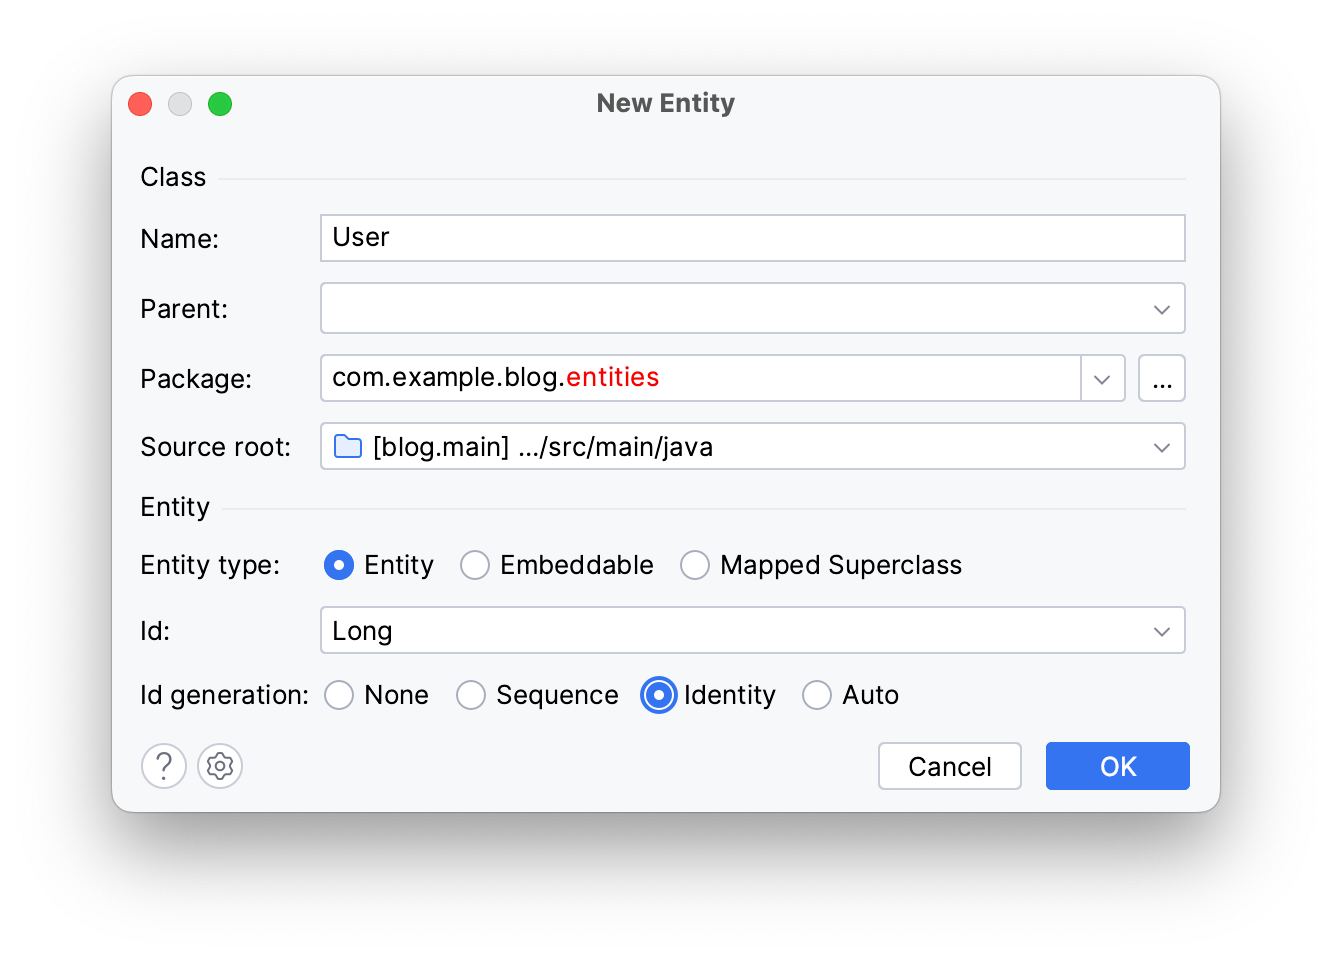
Click OK.
You can find your newly created entity in the entities package in your project panel.
You can use JPA Designer to create your entity’s attributes:
- Open
Usersource code from the project panel - Click on Basic Type in the JPA Designer tab
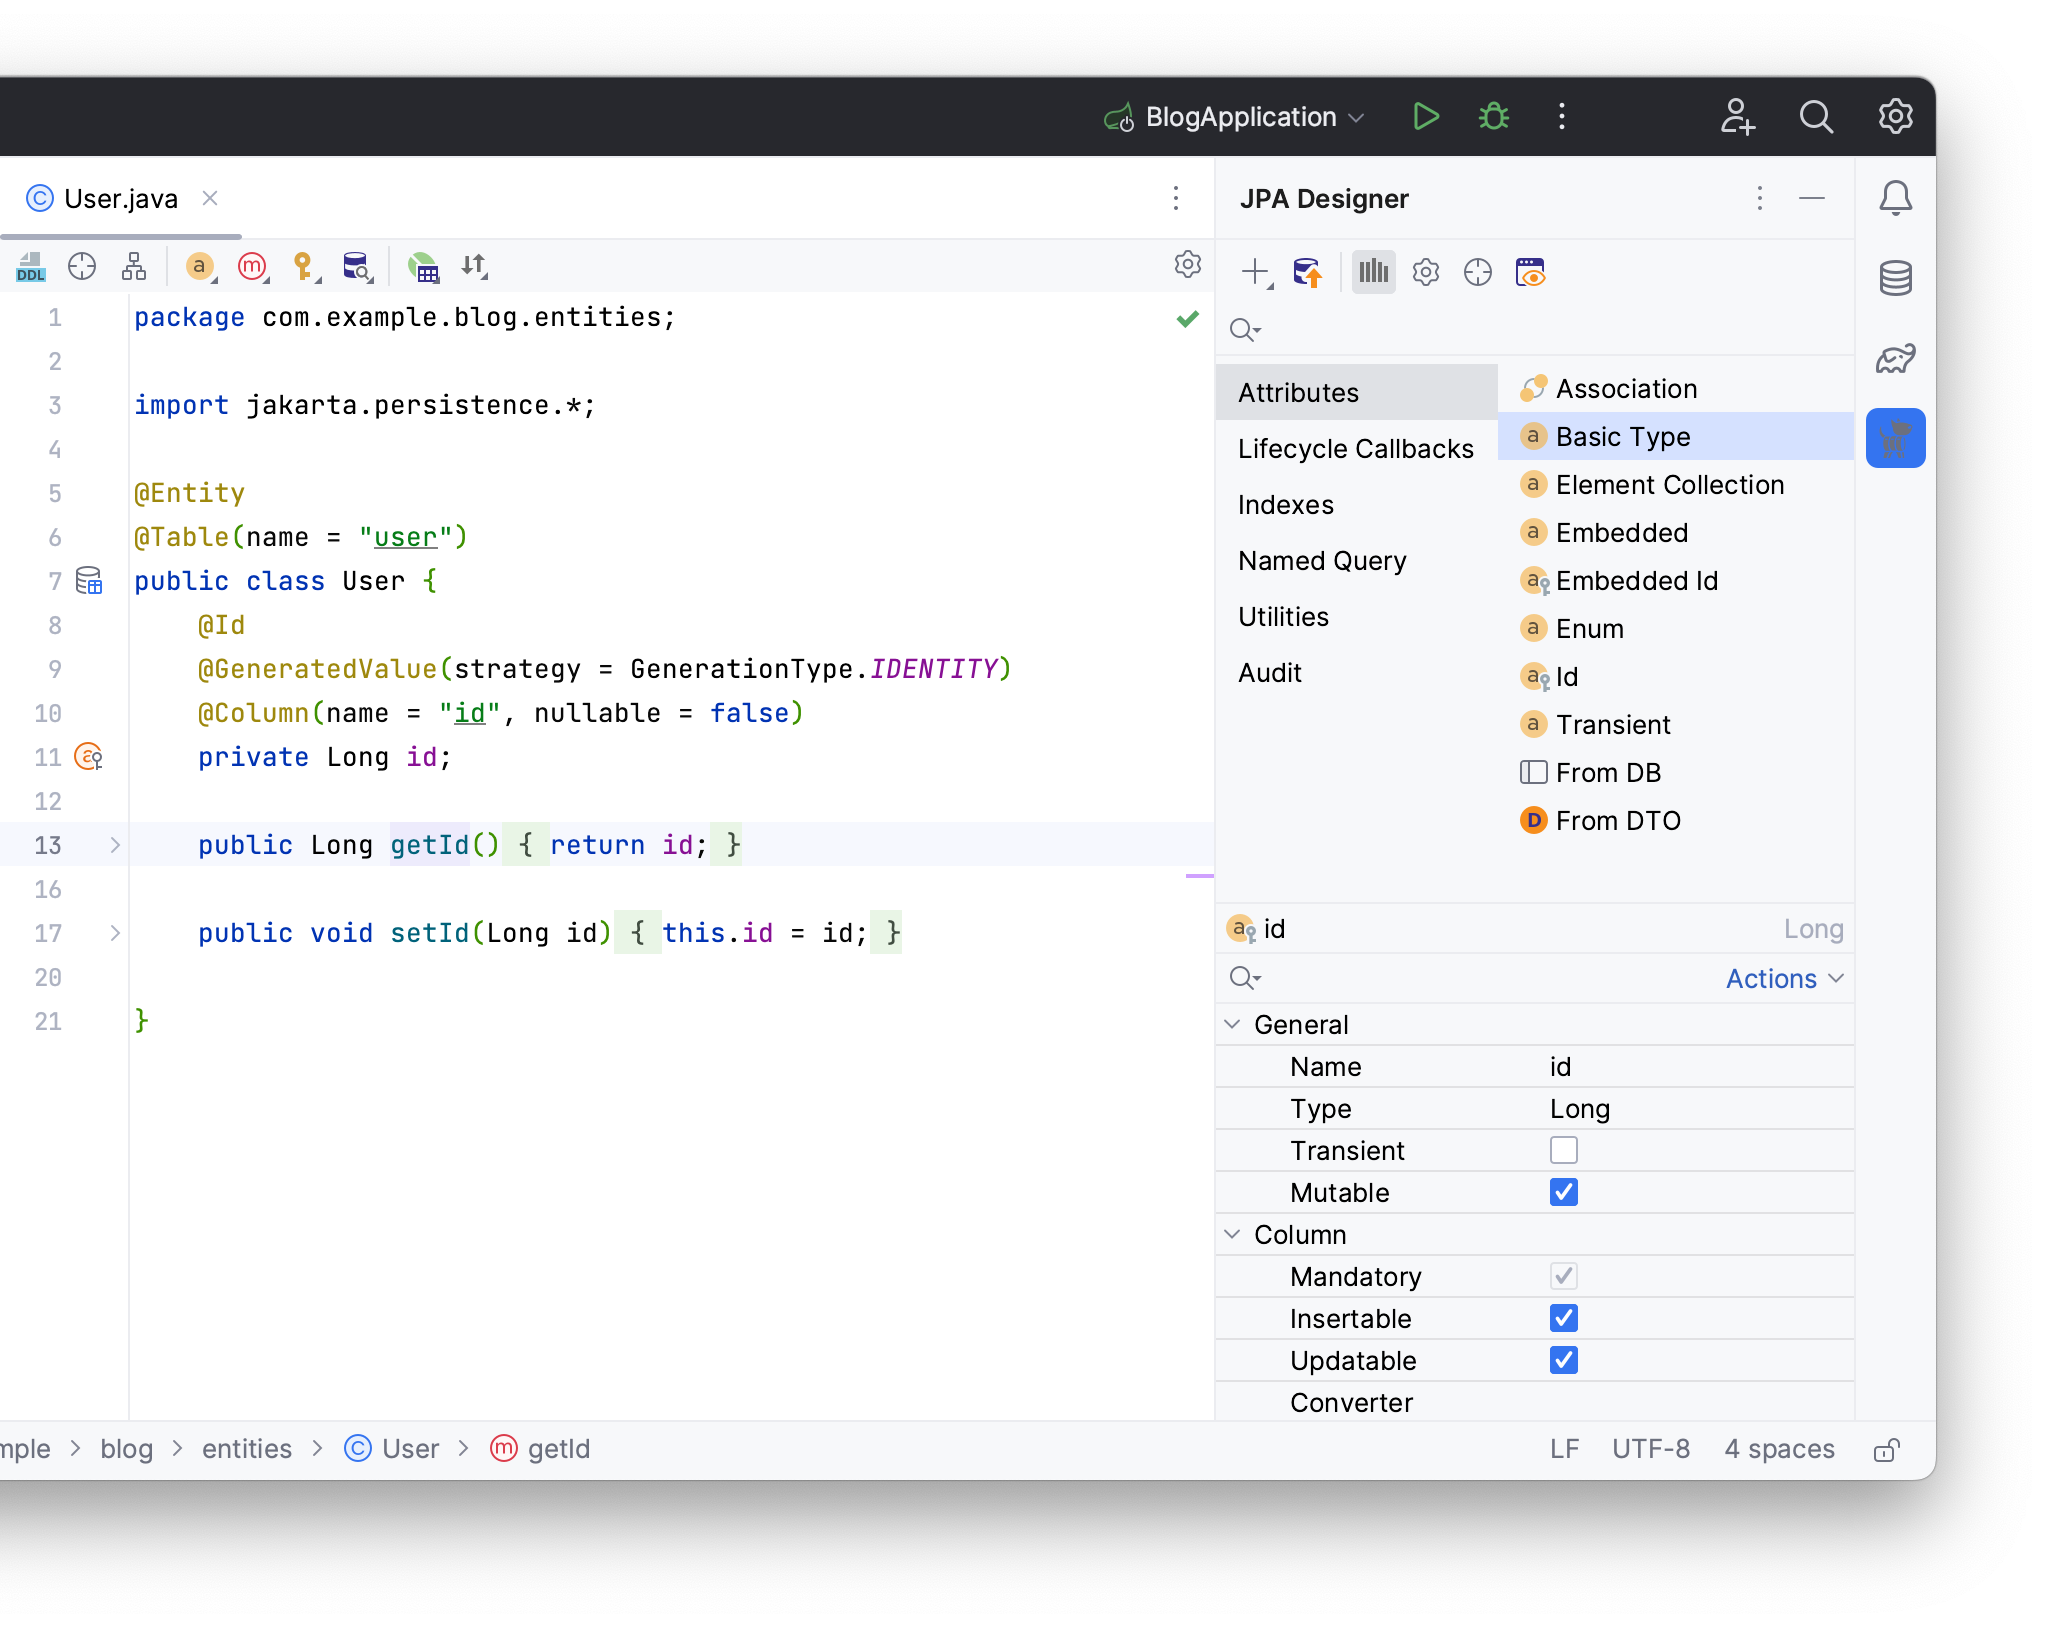
Pick your attributes type, write its name, and JPA Buddy will automatically name your table’s column according to naming conventions.
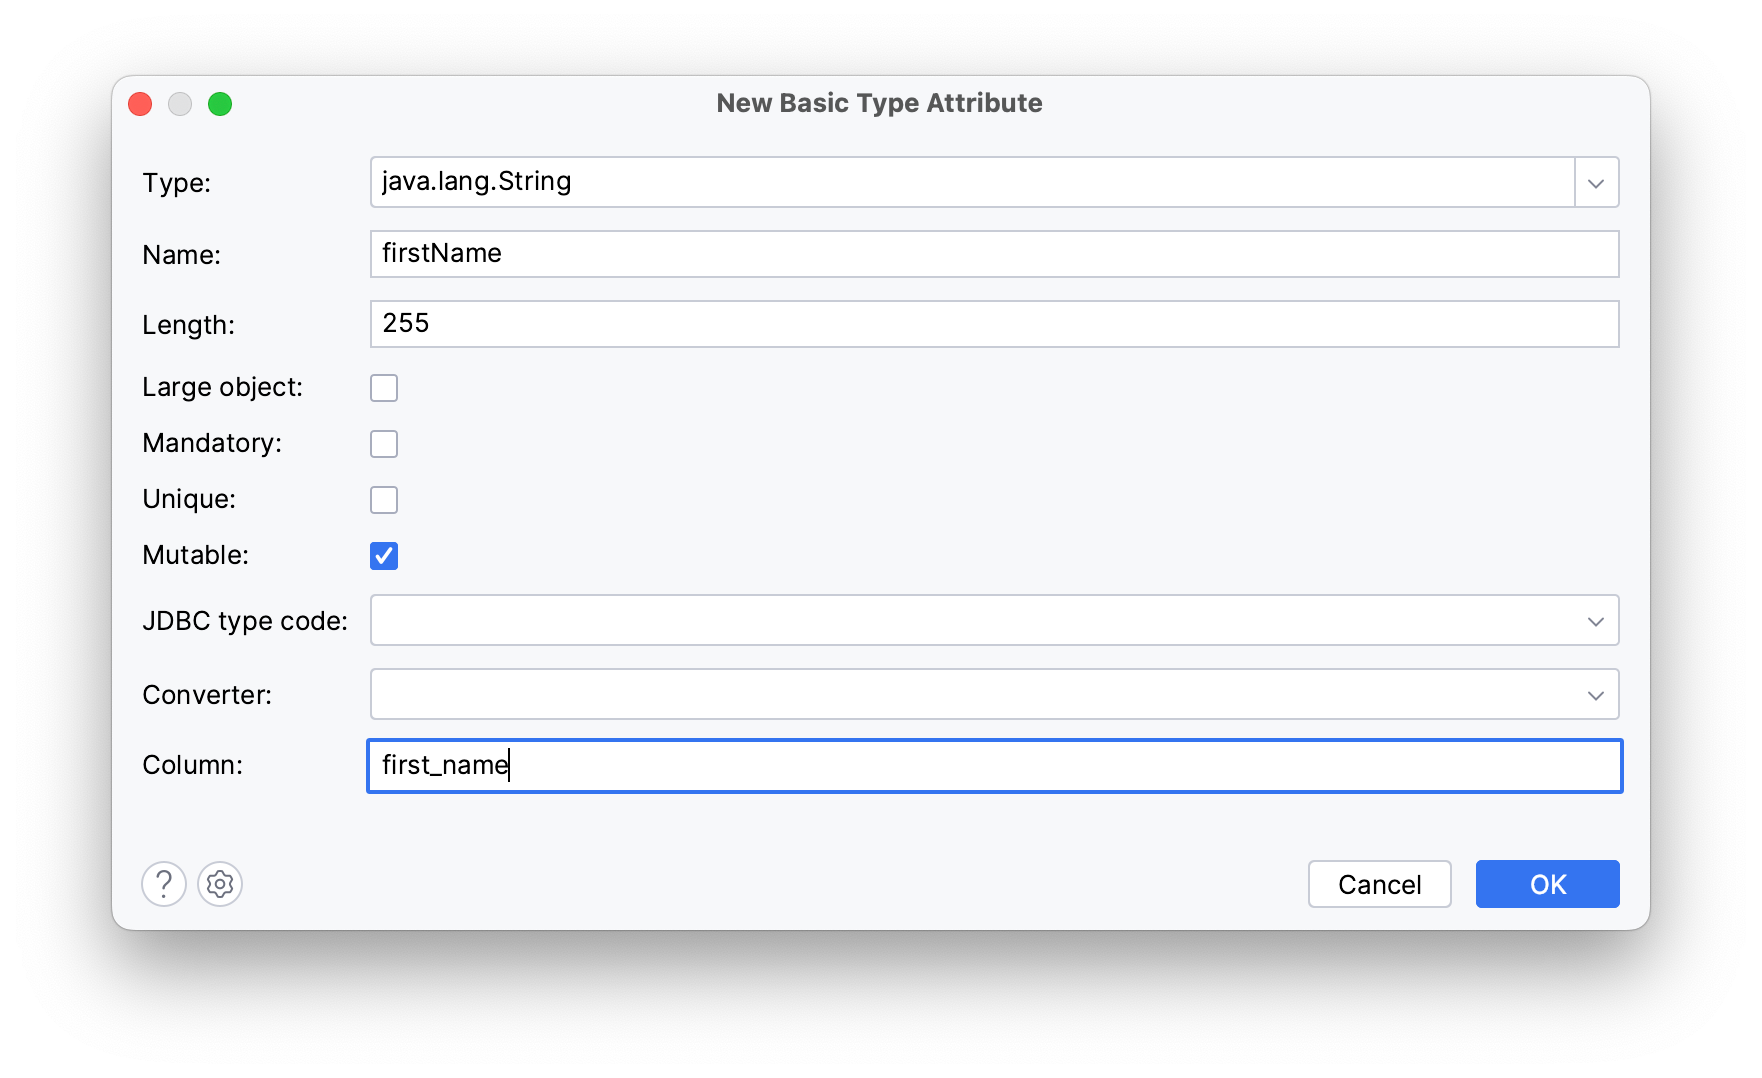
Click OK.
These instructions will create a firstName attribute with its getter and setter.
Using these tools, you can create the following entities.
User entity:
@Entity
@Table(name = "user")
public class User {
 @Id
 @GeneratedValue(strategy = GenerationType.IDENTITY)
 @Column(name = "id", nullable = false)
 private Long id;
 @Column(name = "first_name")
 private String firstName;
 @Column(name = "last_name")
 private String lastName;

 // getters and setters have been omitted for brevity
}
Post entity:
@Entity
@Table(name = "post")
public class Post {
@Id
@GeneratedValue(strategy = GenerationType.IDENTITY)
@Column(name = "id", nullable = false)
private Long id;
@Column(name = "title")
private String title;
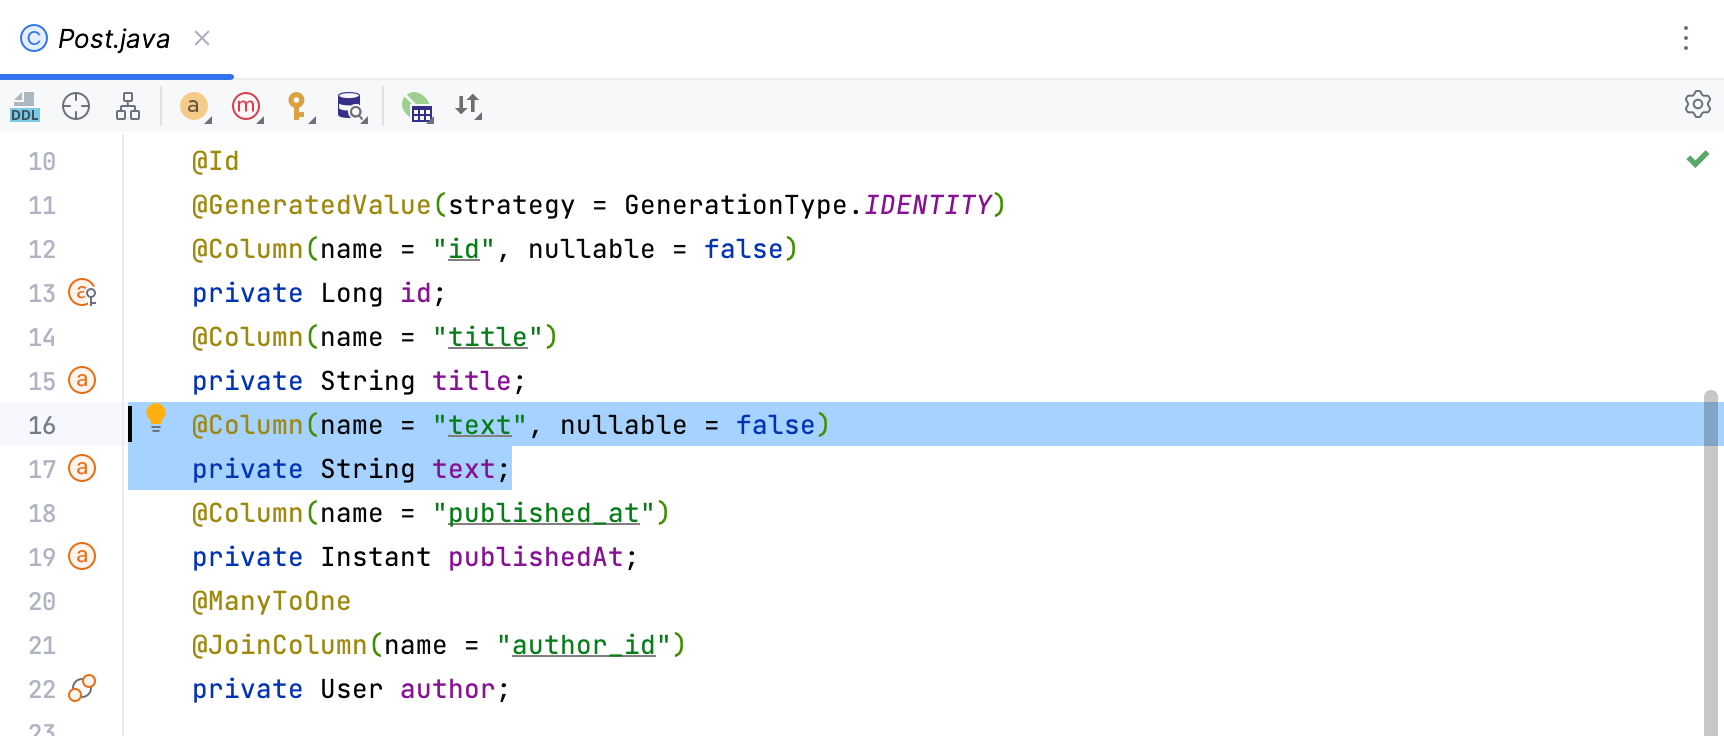
@Column(name = "text")
private String text;
@Column(name = "published_at")
private Instant publishedAt;
// getters and setters have been omitted for brevity
}
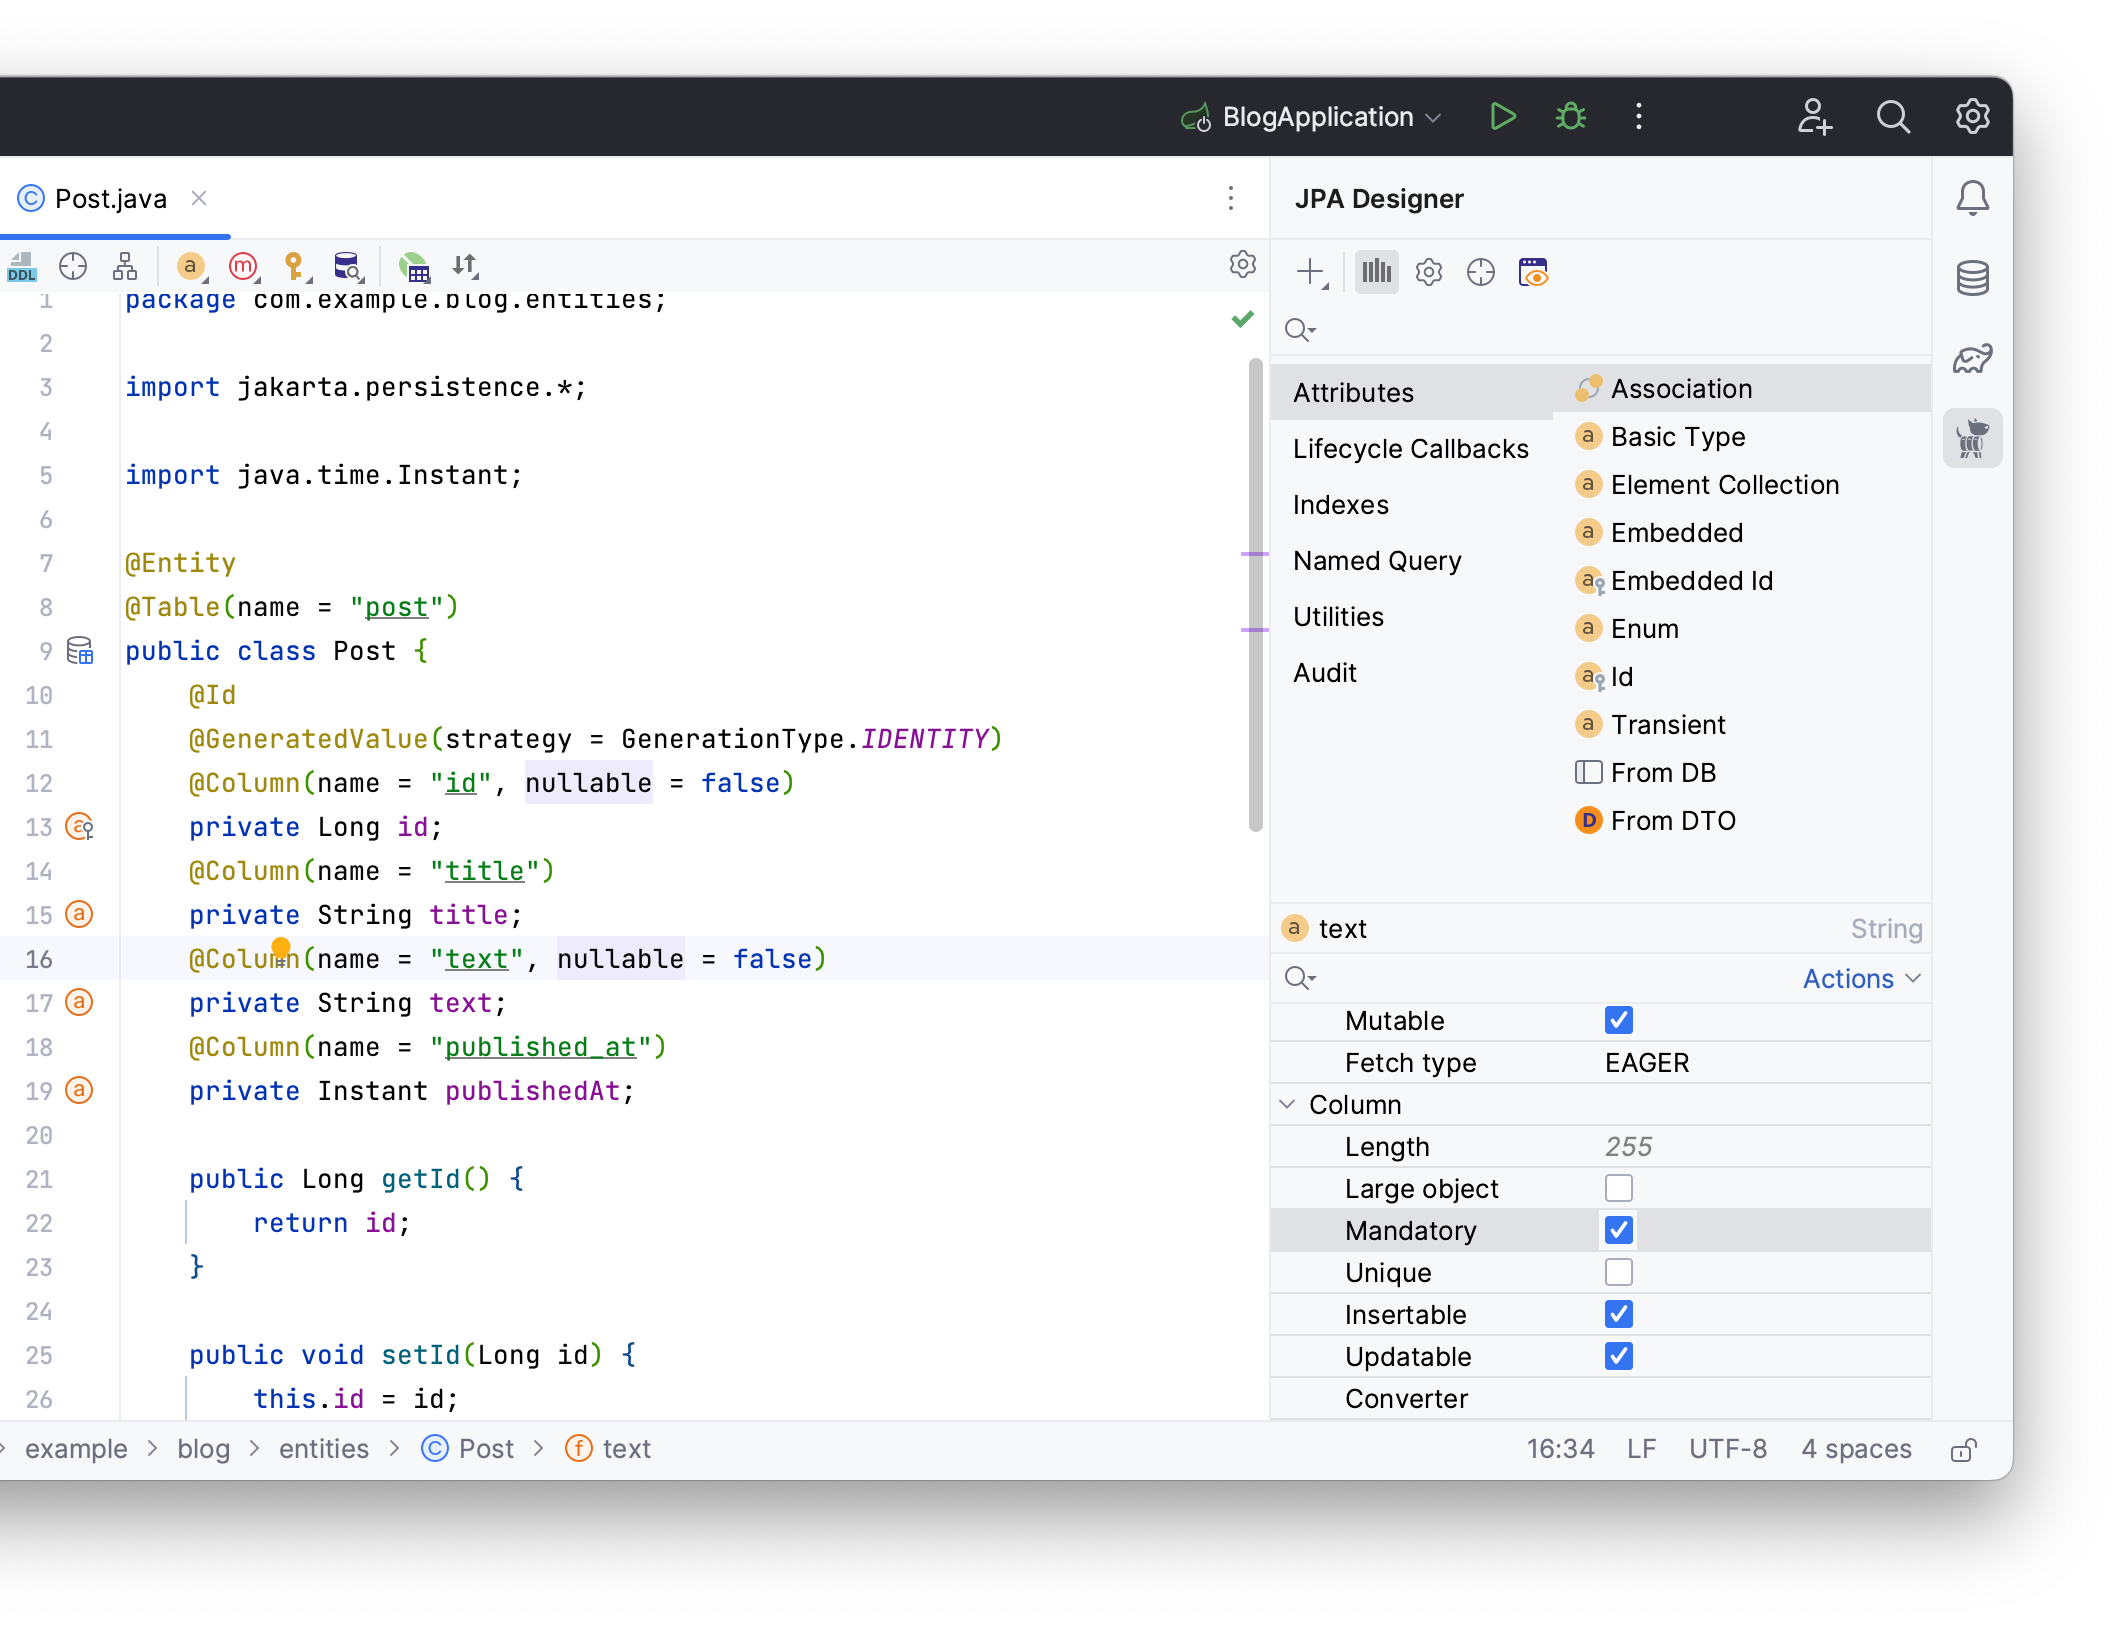
Let’s make the text attribute mandatory in the Post entity:
- Open
Postsource code - Click on
textin your code - Locate the JPA Designer tab
- Find and choose the Mandatory option
You will need an author attribute in your Post entity to reference the User entity:
- Open
Postentity's source code - Choose Association from the JPA Designer tab
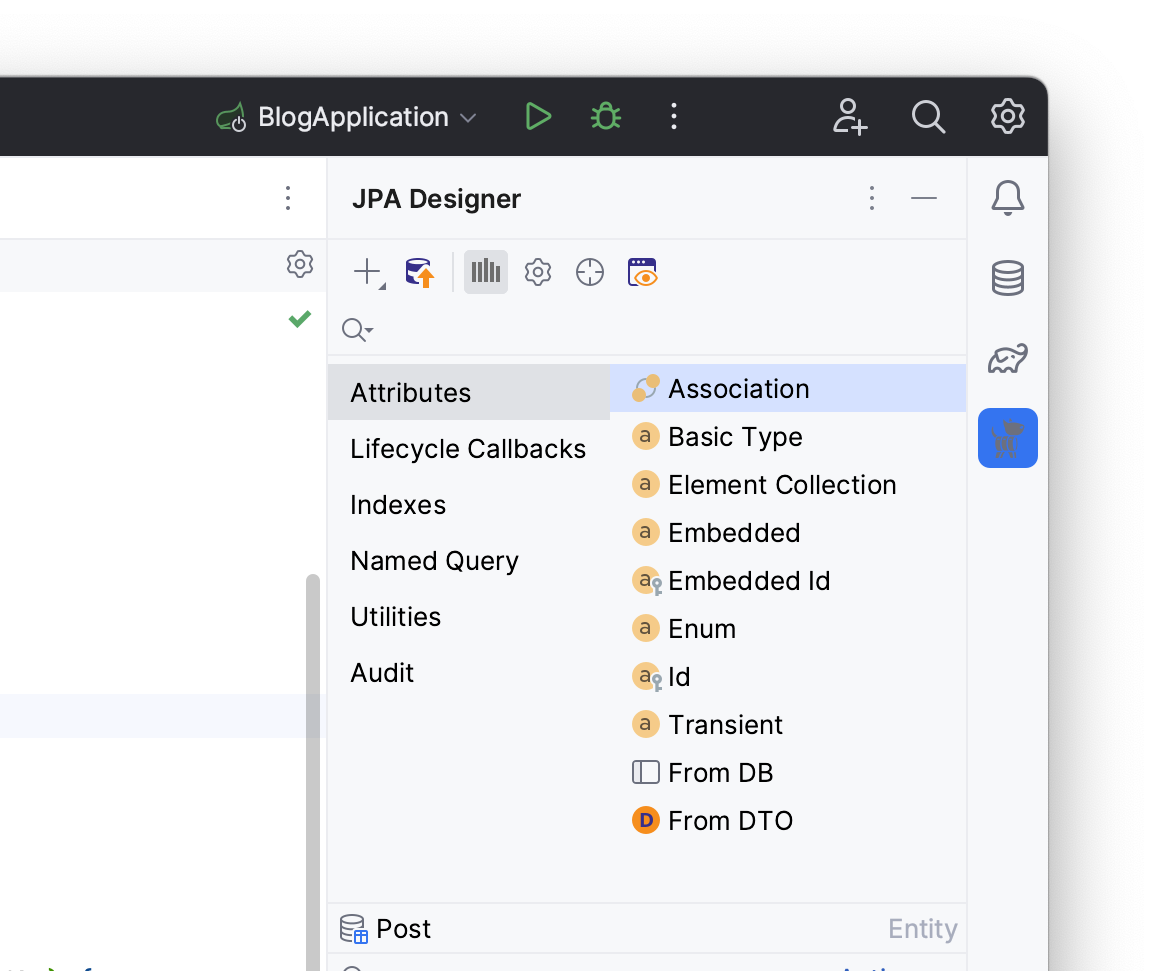
- Write
Useras the attribute’s type - Rename it to
author - Choose a
ManyToOnecardinality

Click OK.
The generated author attribute represents the linked User entity and should look as follows:
@ManyToOne
@JoinColumn(name = "author_id")
private User author;
public User getAuthor() {
 return author;
}
public void setAuthor(User author) {
 this.author = author;
}
The @JoinColumn annotation indicates that the author_id column in the database is used as a foreign key.
Generating an Init Script
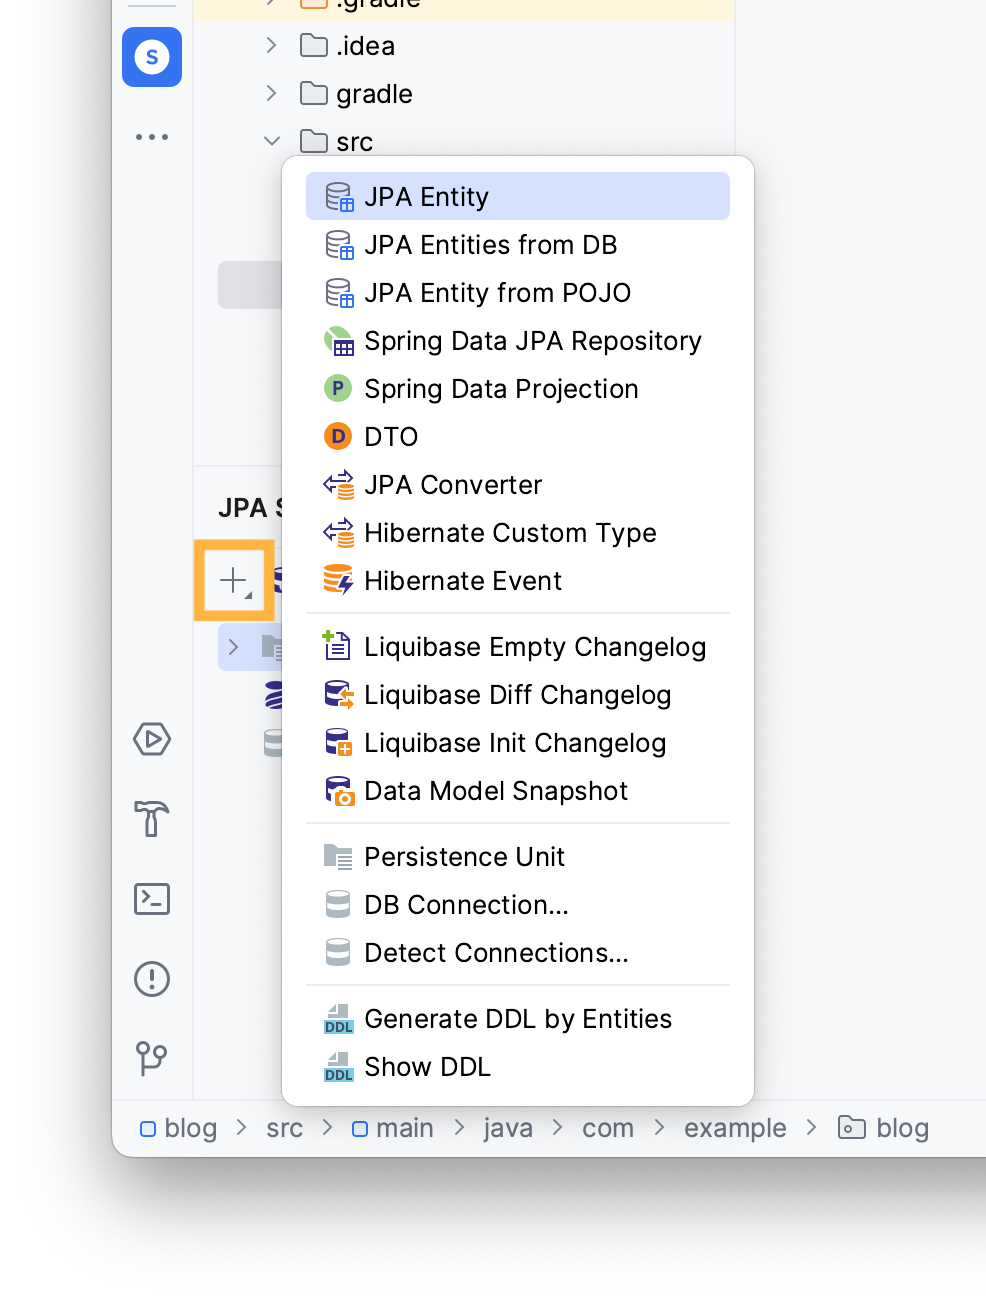
To create tables within the connected database, you will need to generate an initial schema based on your entity model. In this section, you will learn how to:
- Generate an initial DDL script
- Create database tables
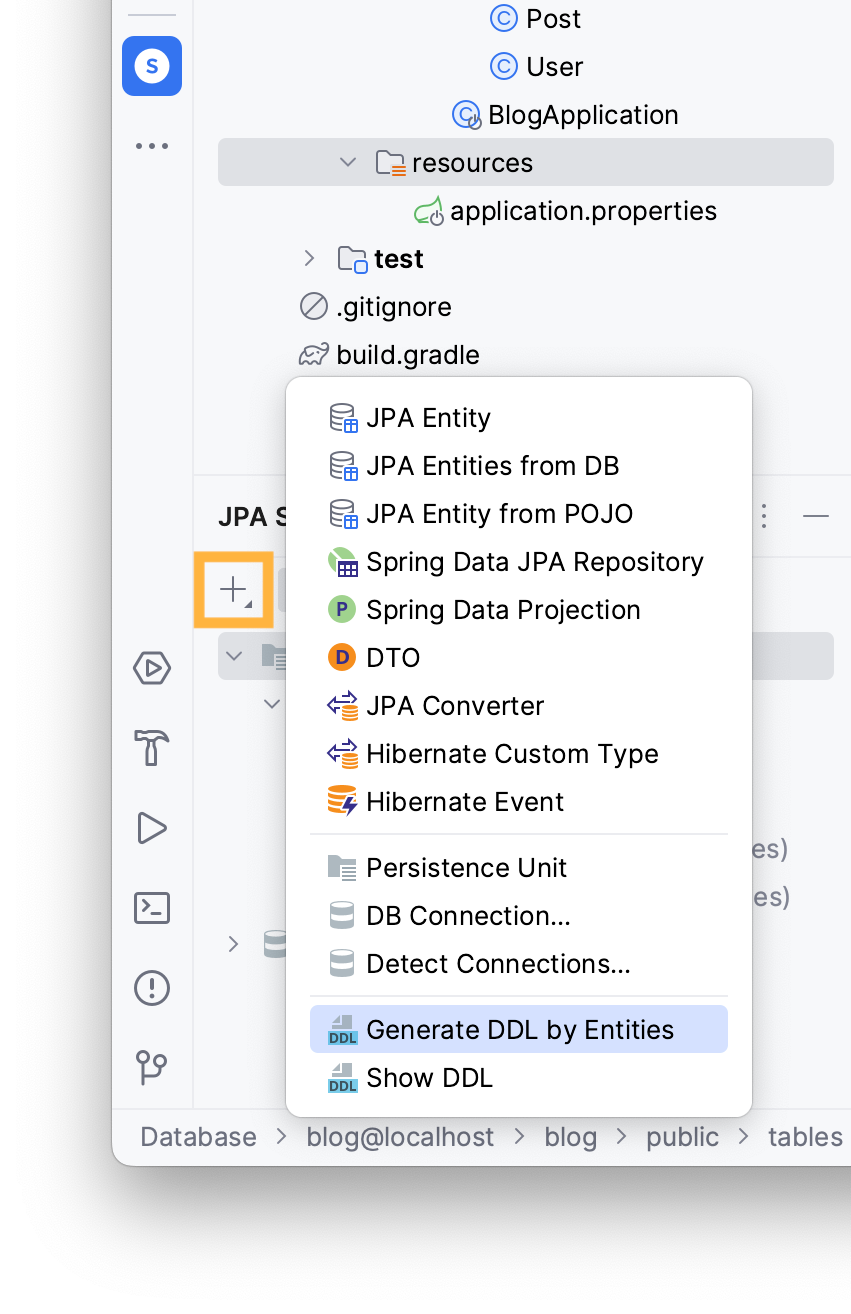
JPA Buddy can generate an initialization script to define your database schema, based on your current entity model:
- Navigate to the JPA Structure tab
- Click on the + button
- Choose Generate DDL by Entities

Select DB schema initialization to create tables based on your JPA model and choose PostgreSQL as your DB type.

Click OK.
In the DDL by Entities Preview window, you can preview and adjust the generated init script.
You can choose where to save your script: in a separate file, a scratch file in the IDE, copy it to your clipboard or paste it to your connected database console. Let’s choose the Database Console option.
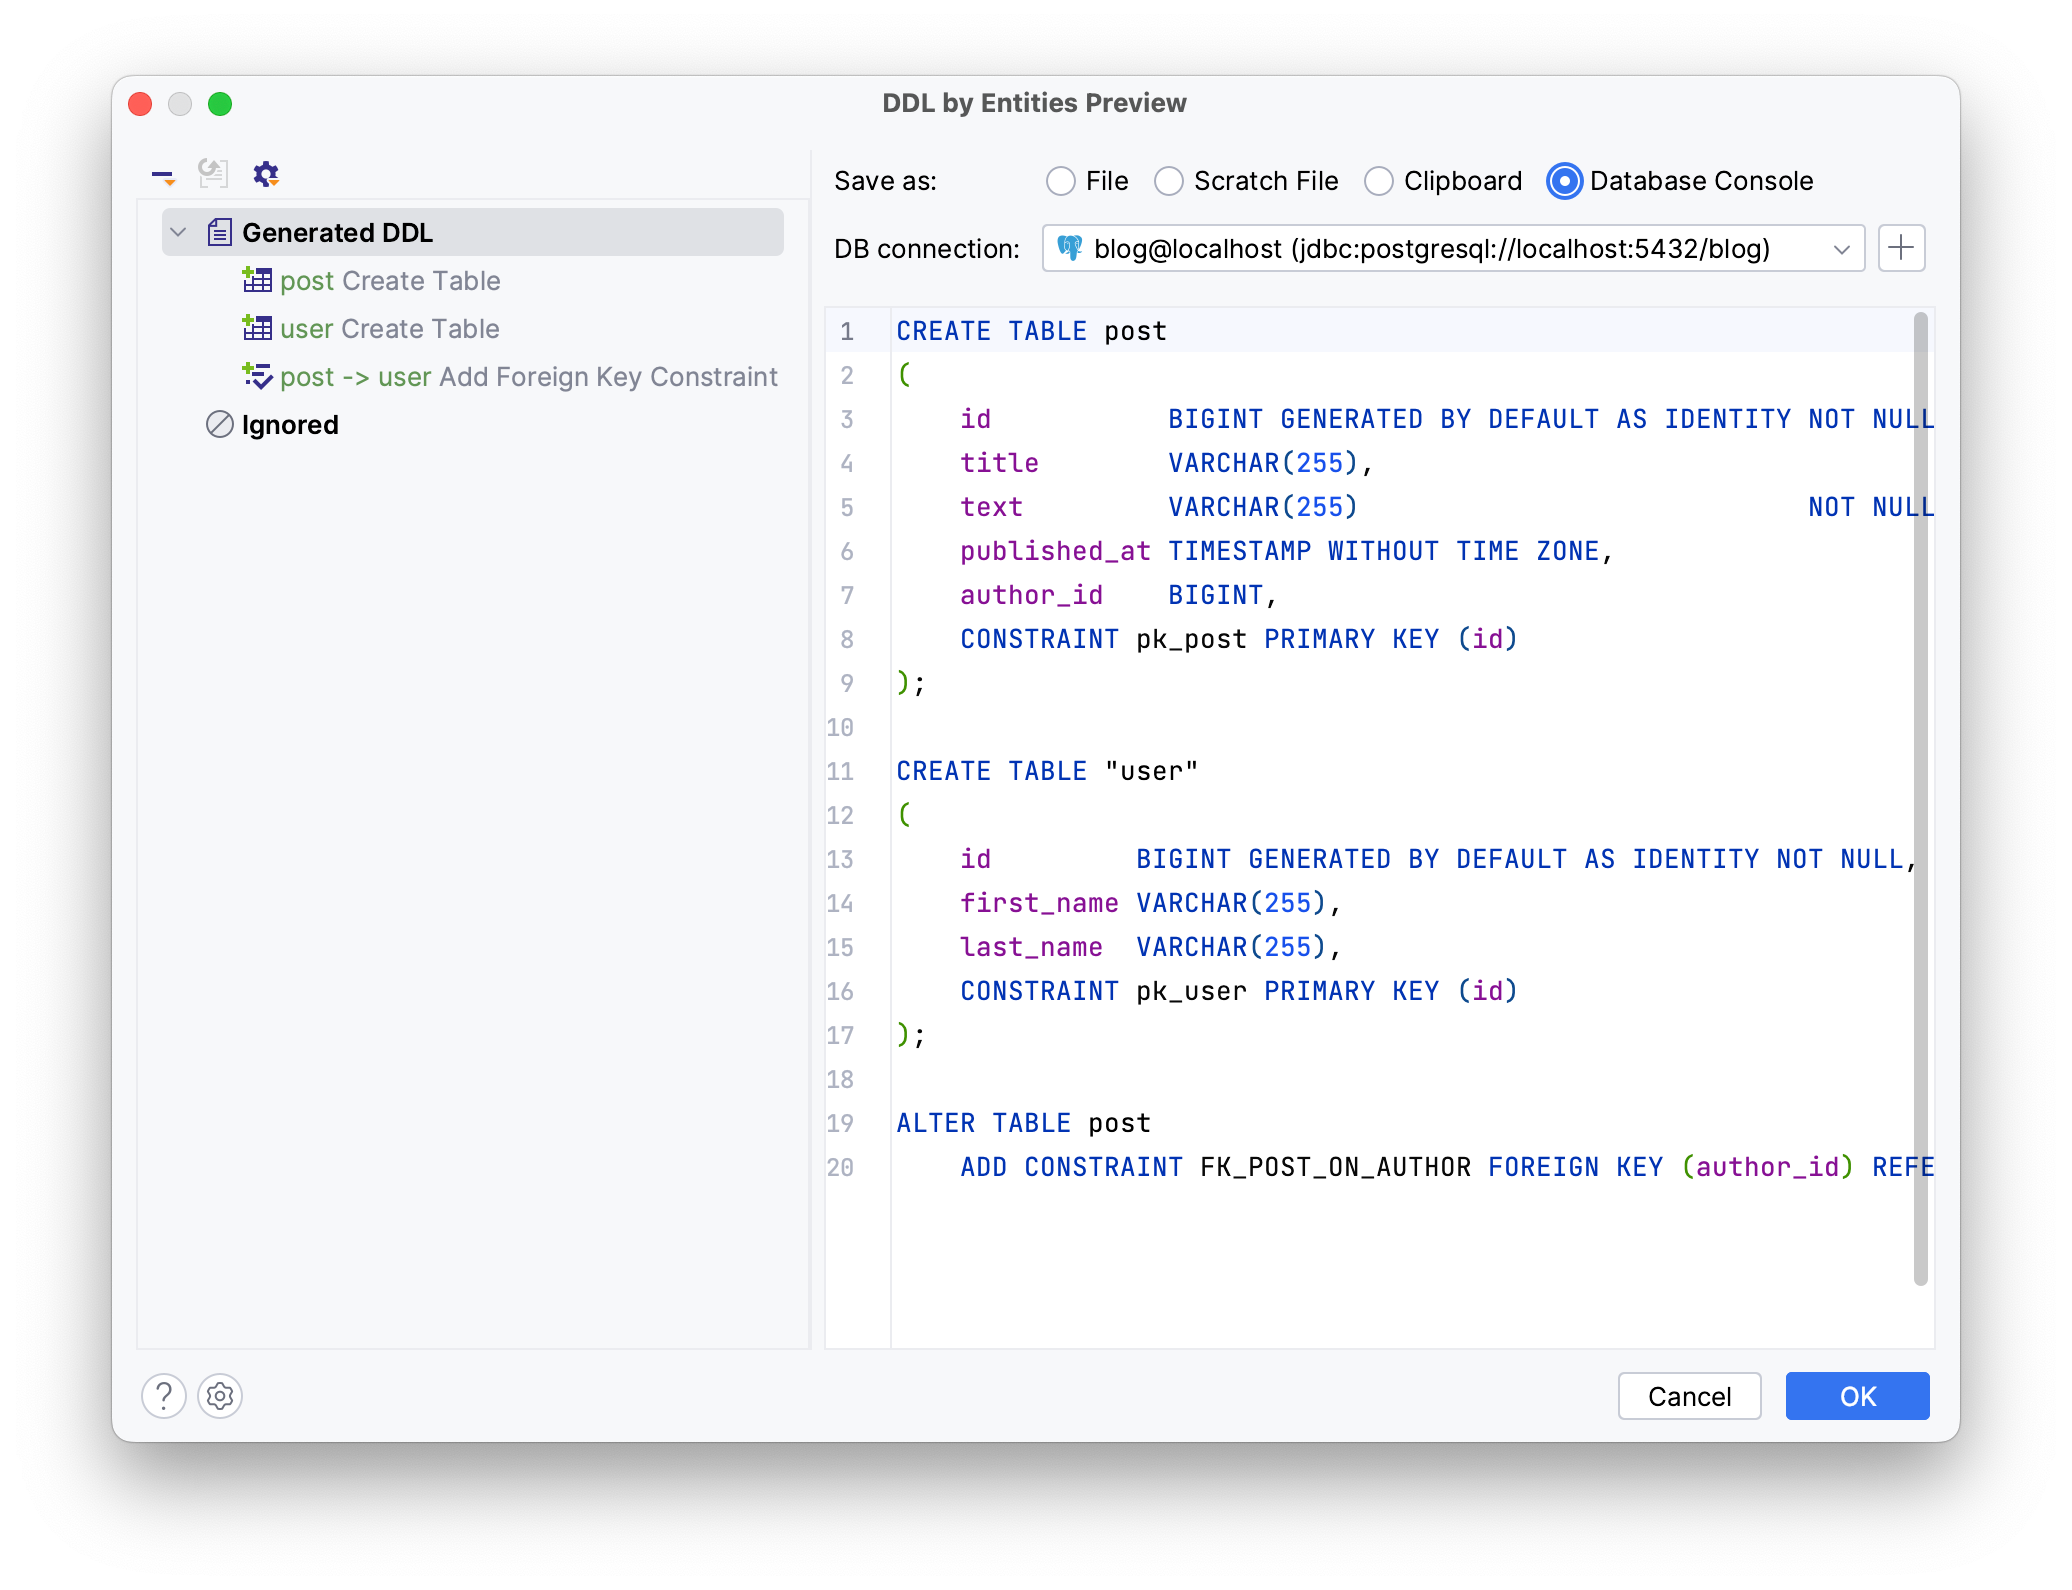
Click OK.
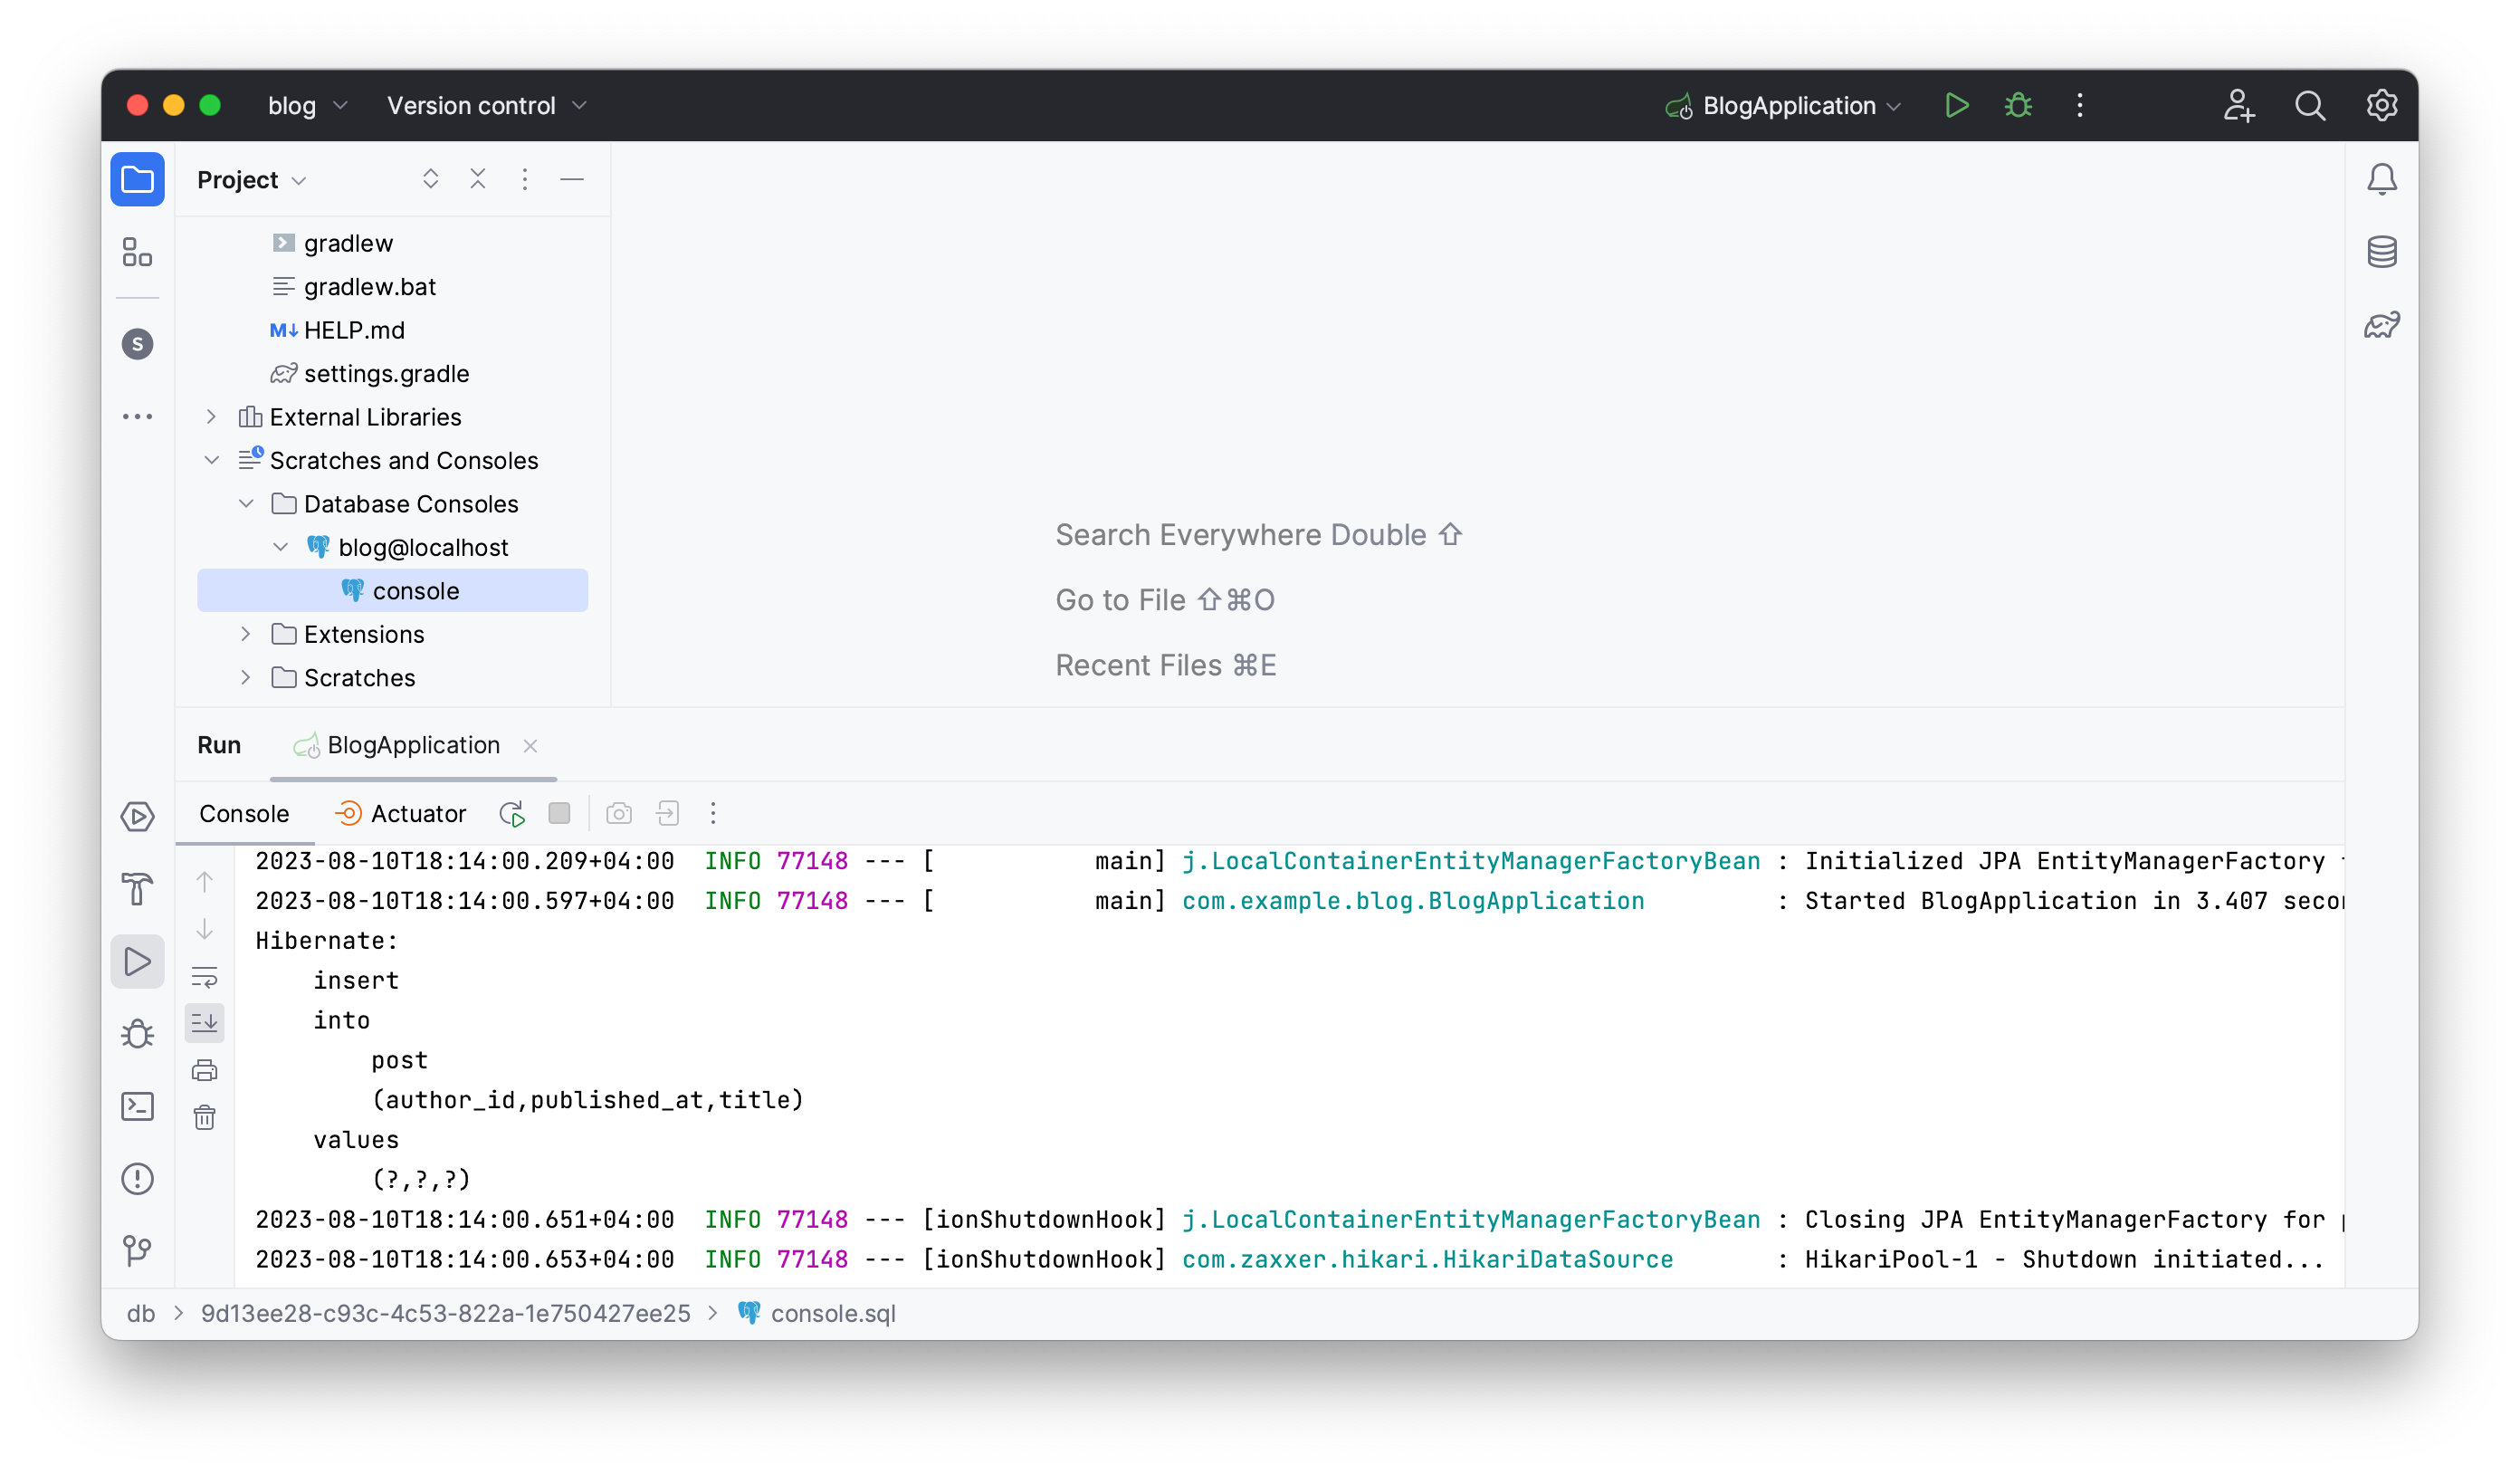
The generated DDL script will appear on the console. To apply this script to your database, execute your script by clicking on the Execute button.

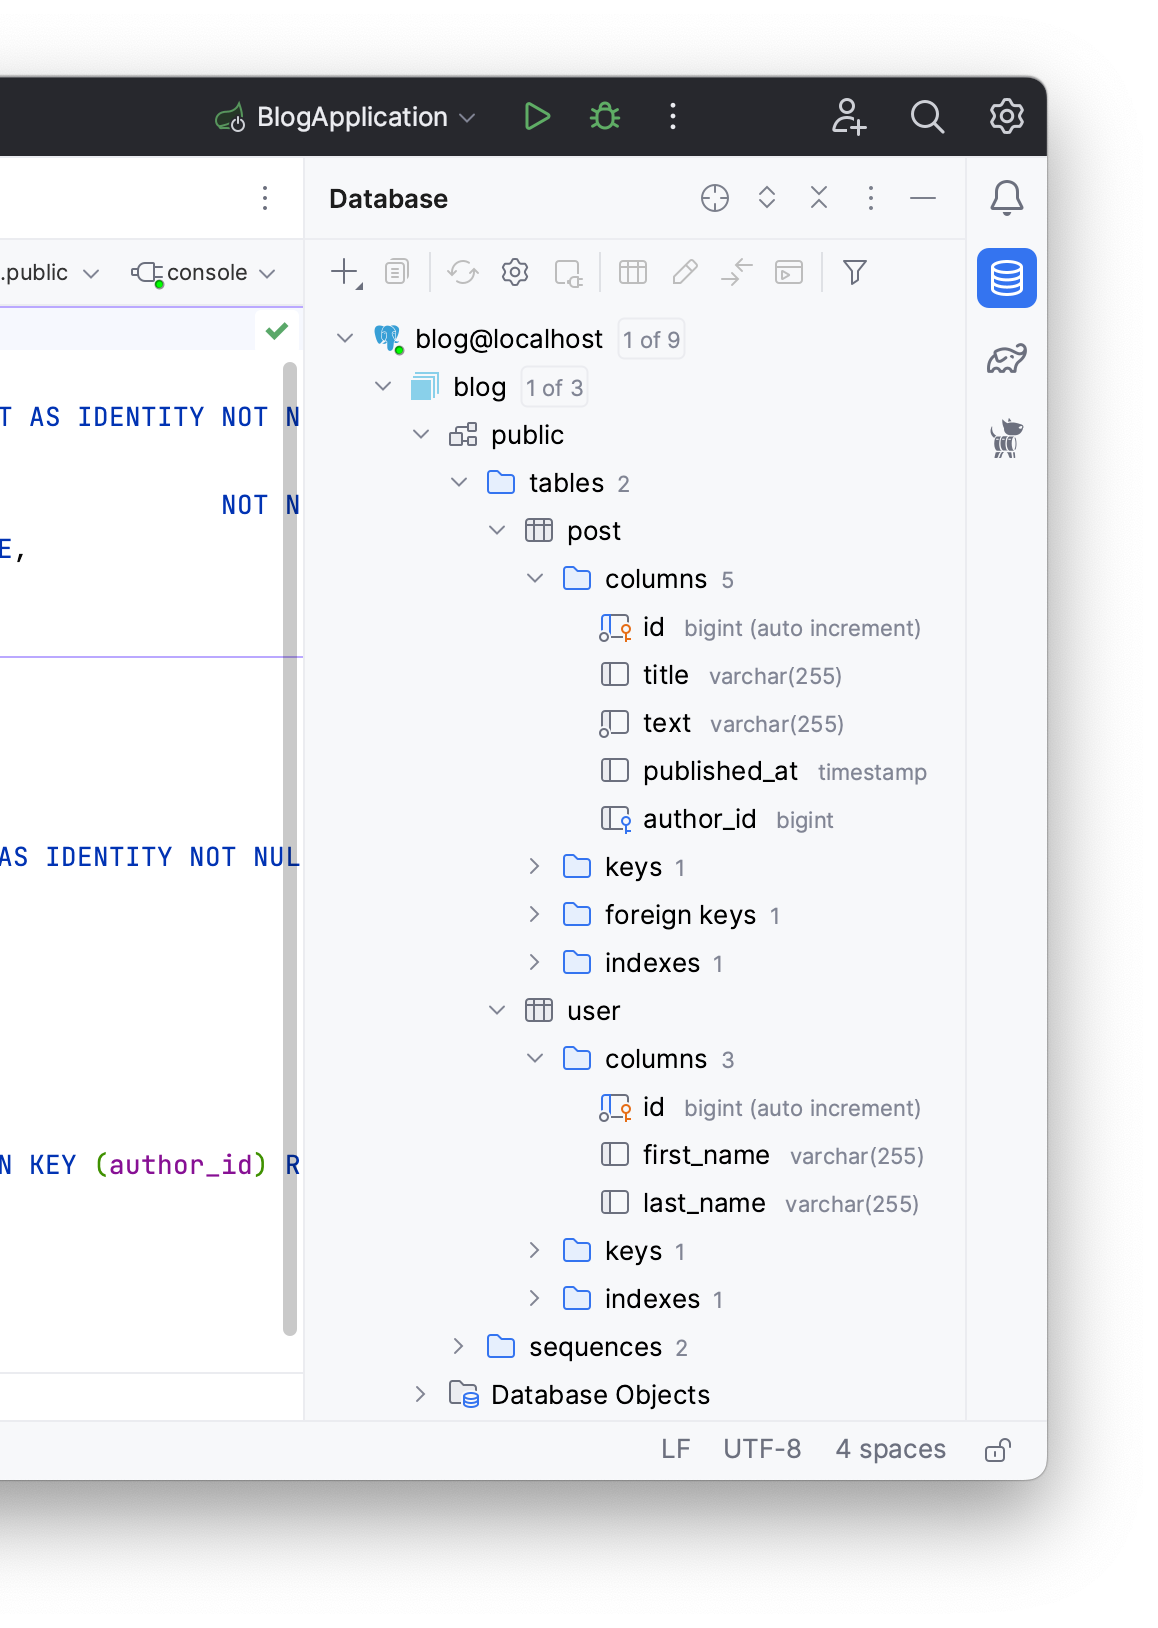
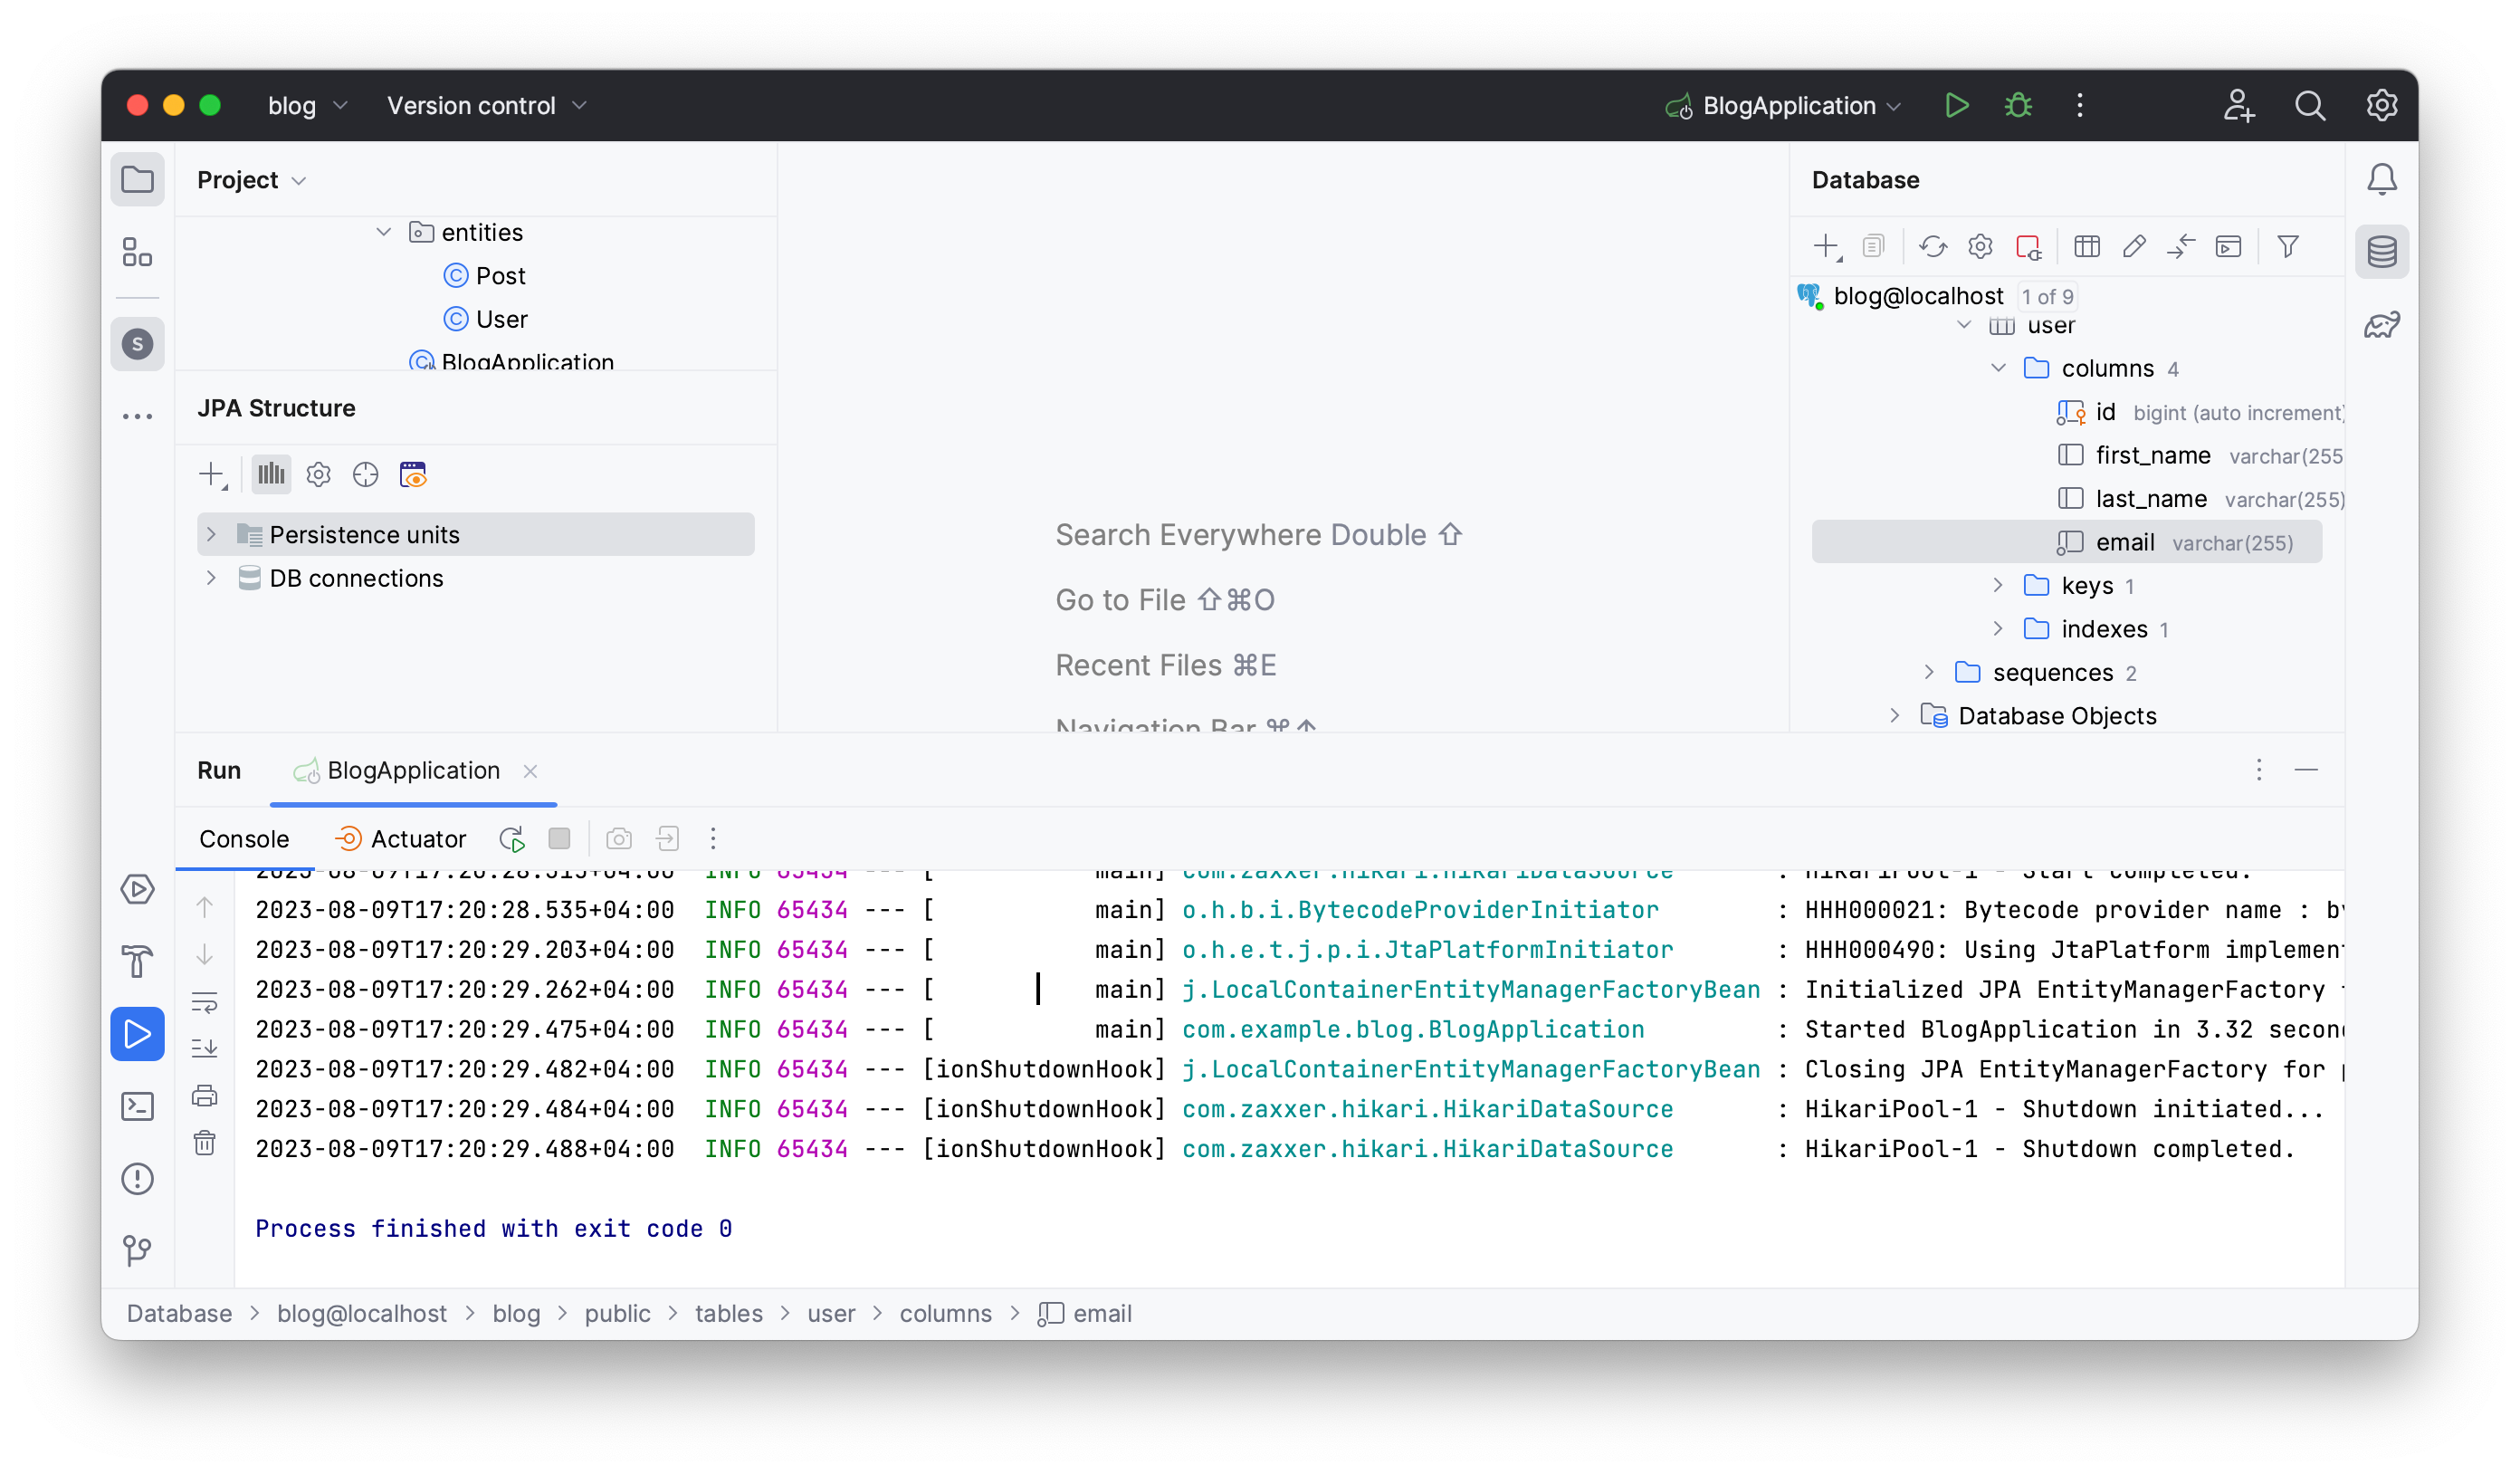
You can view the newly created table along with its columns in the Database tab.
Initialize sample data
In practical scenarios, we frequently deal with databases that already have data. To emulate this situation, you will:
- Create sample data for the
Usertable - Apply them to the database
Create a data.sql file to store those commands under your resources folder. Right-click on resources → New → File and type data.sql in the New File window.
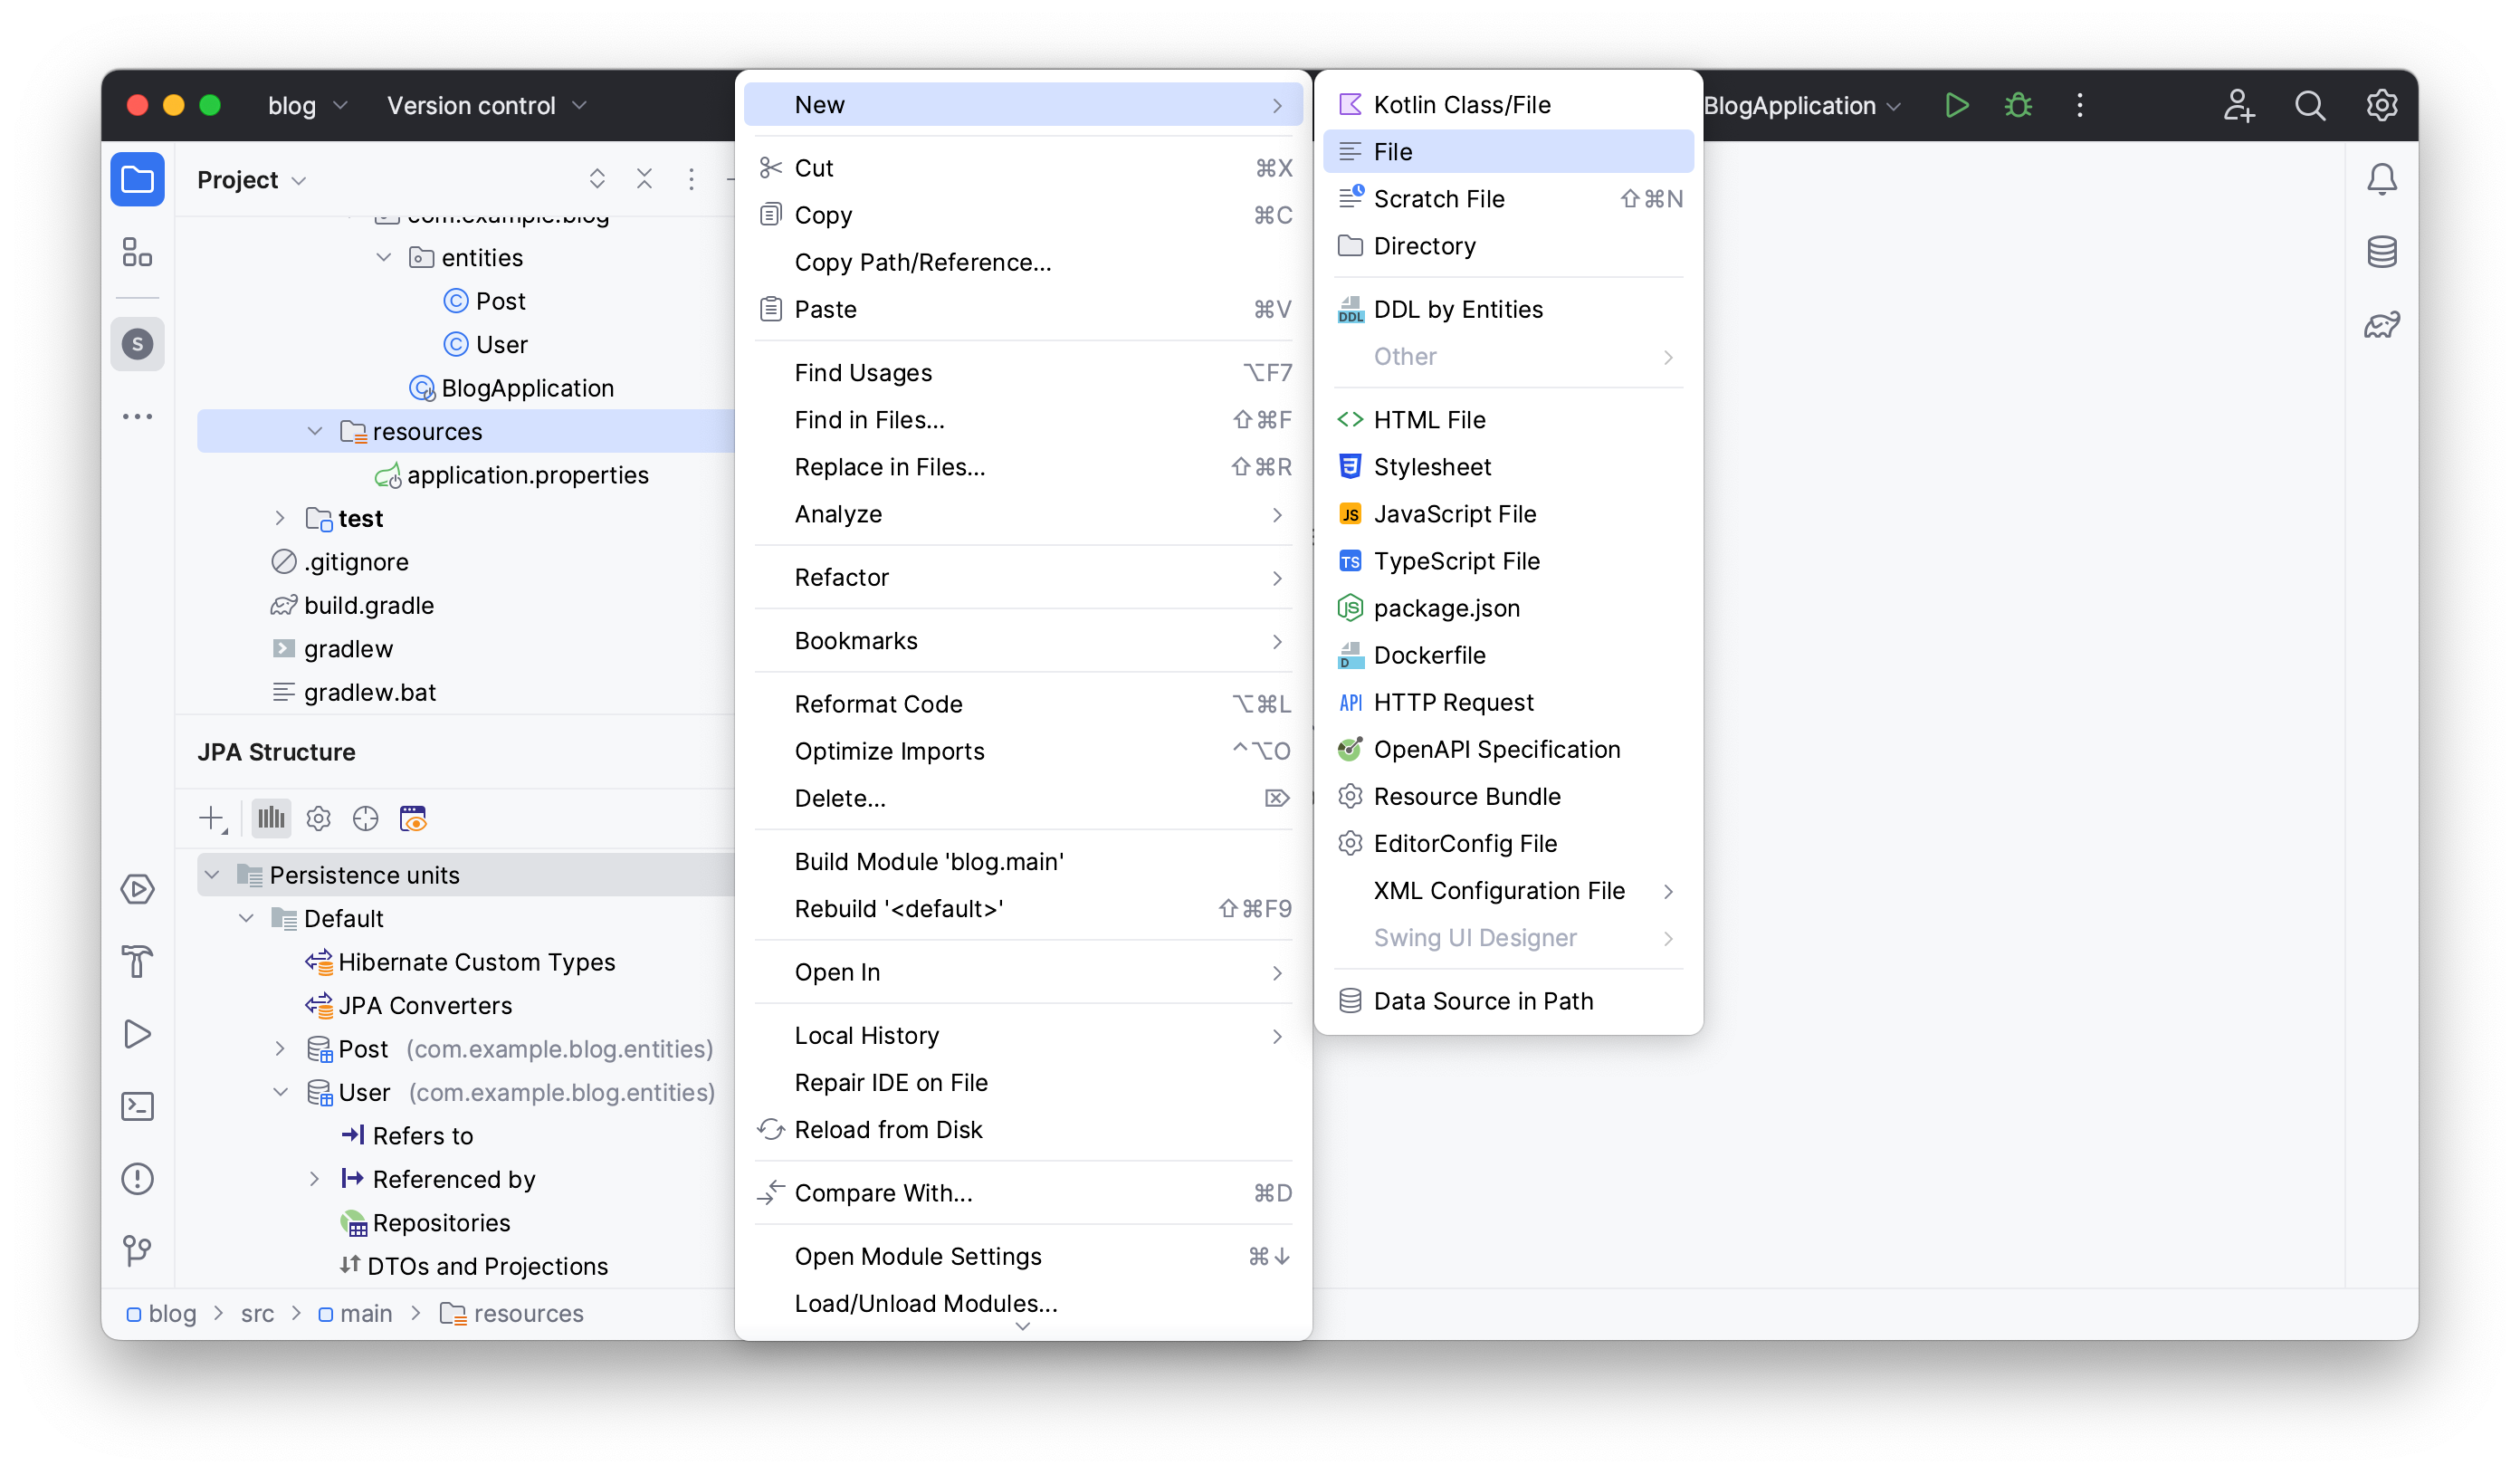
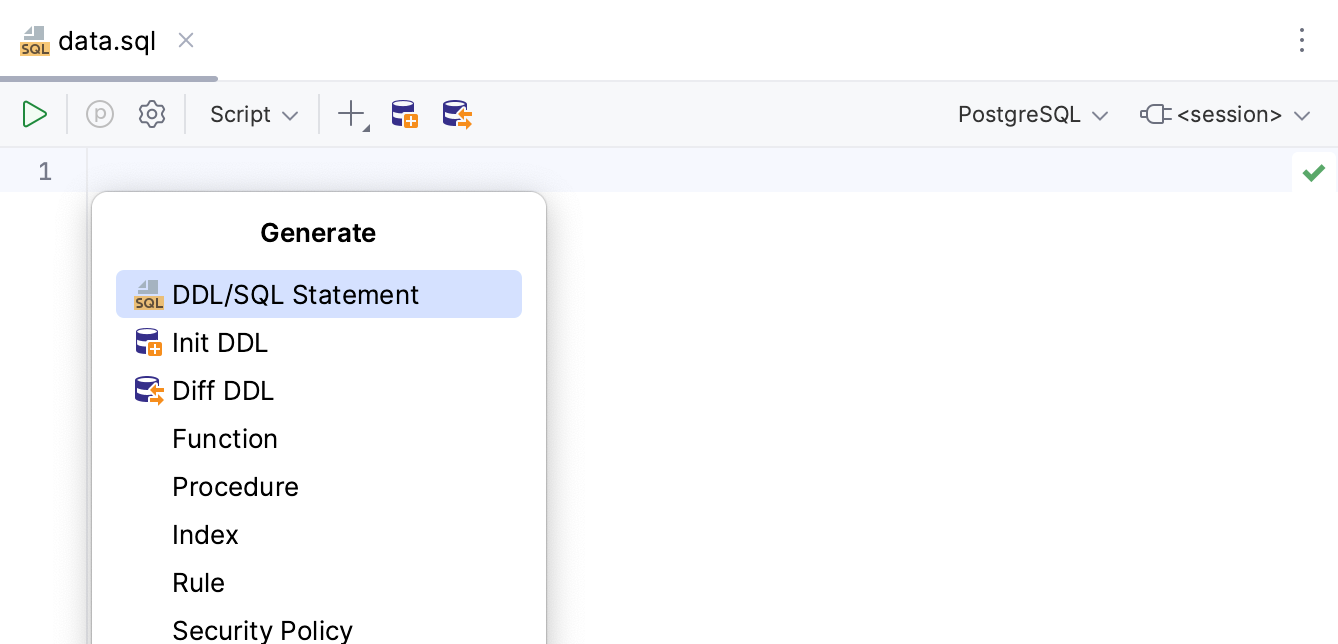
Next, invoke the Generate menu (Command/Ctrl + N) in the created file and select JPA Buddy’s DDL/SQL Statement option.
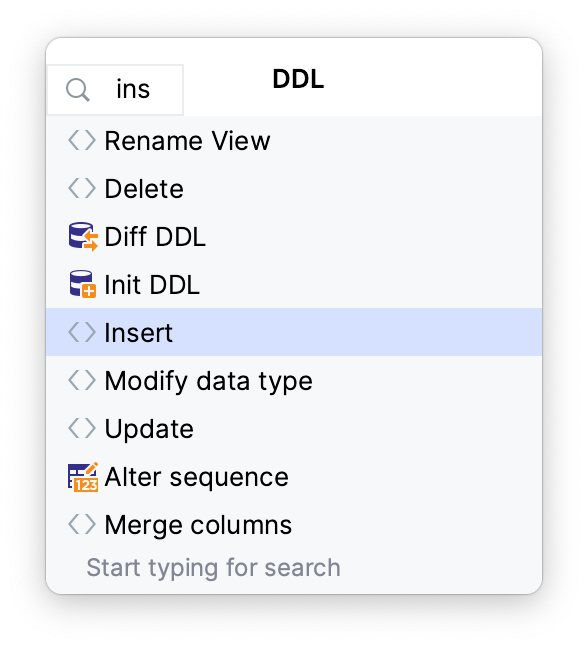
Type and choose the Insert command.
In the invoked window, choose the columns you want to populate and fill the Value field with the desired values.
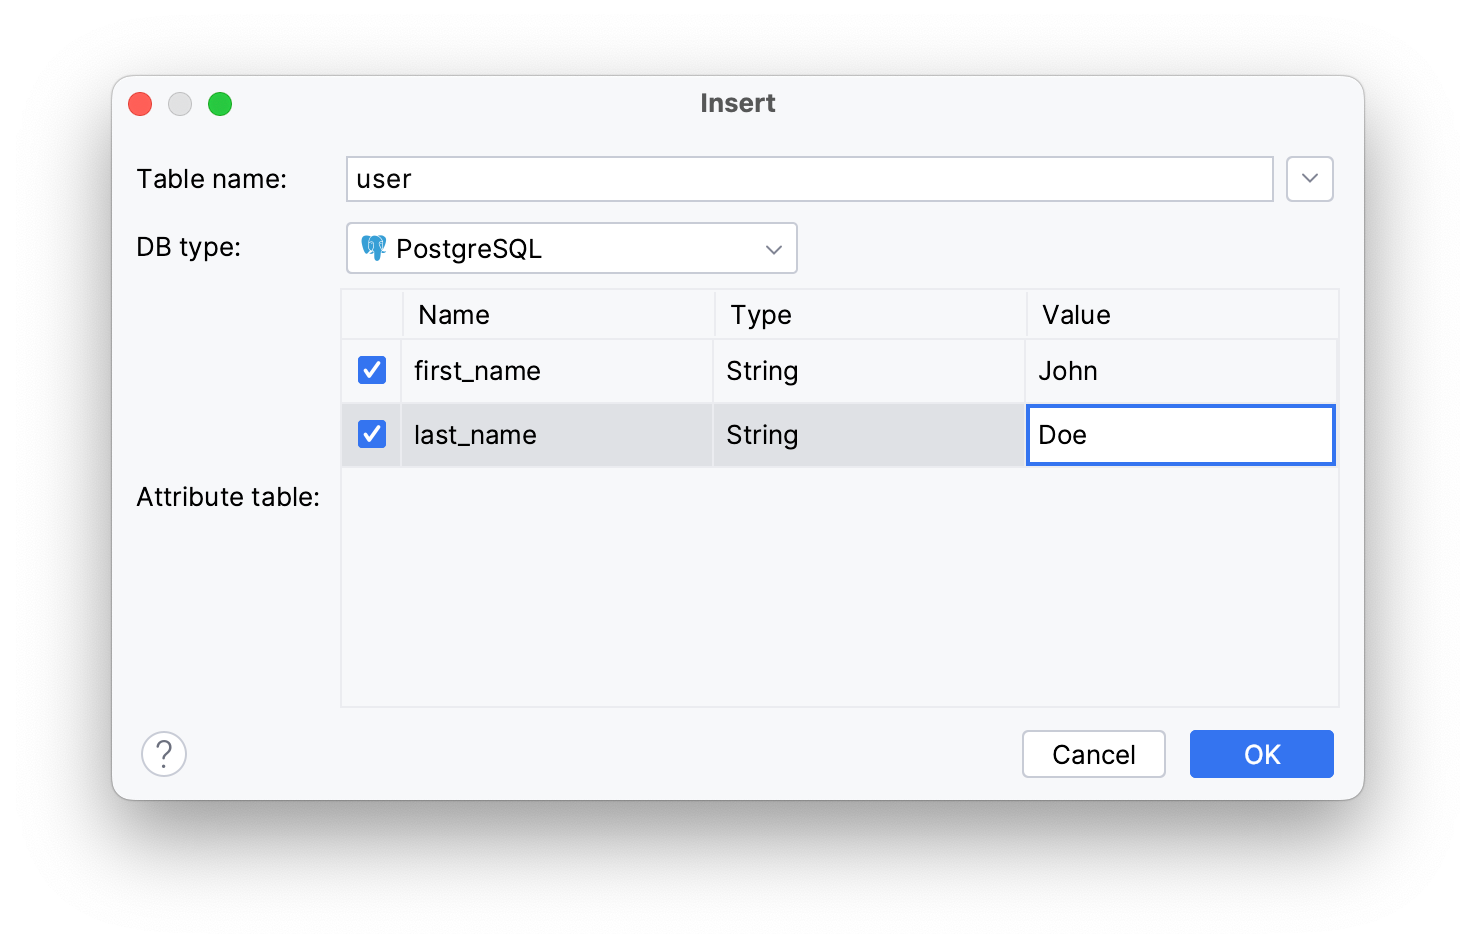
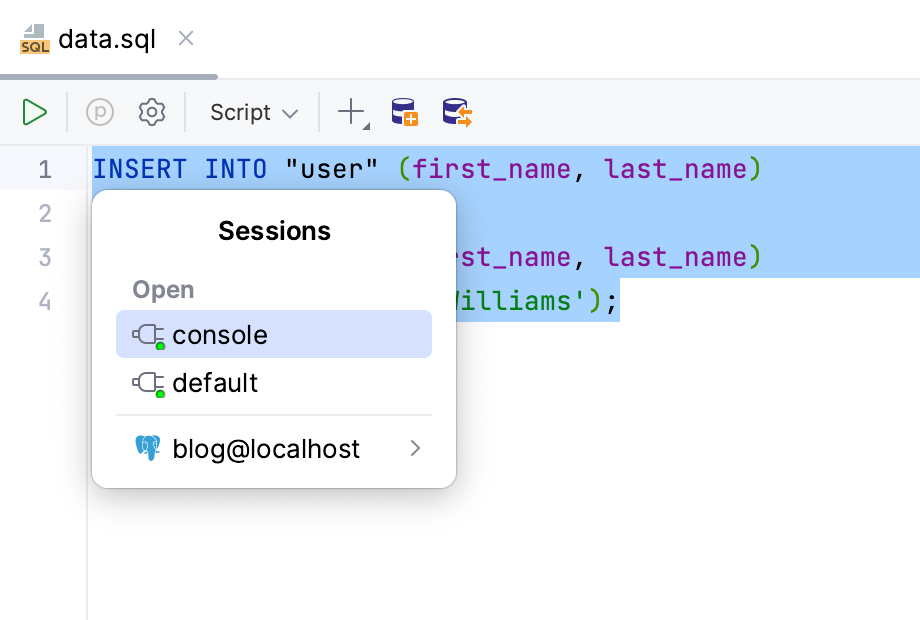
Repeat the process as many times as you need, in this case two records in the database will be enough. You will get two Insert statements as in the script below:
INSERT INTO "user" (first_name, last_name)
VALUES ('John', 'Doe');
INSERT INTO "user" (first_name, last_name)
VALUES ('Alexander', 'Williams');
Click the Execute button and select the console option to apply these changes from the console.
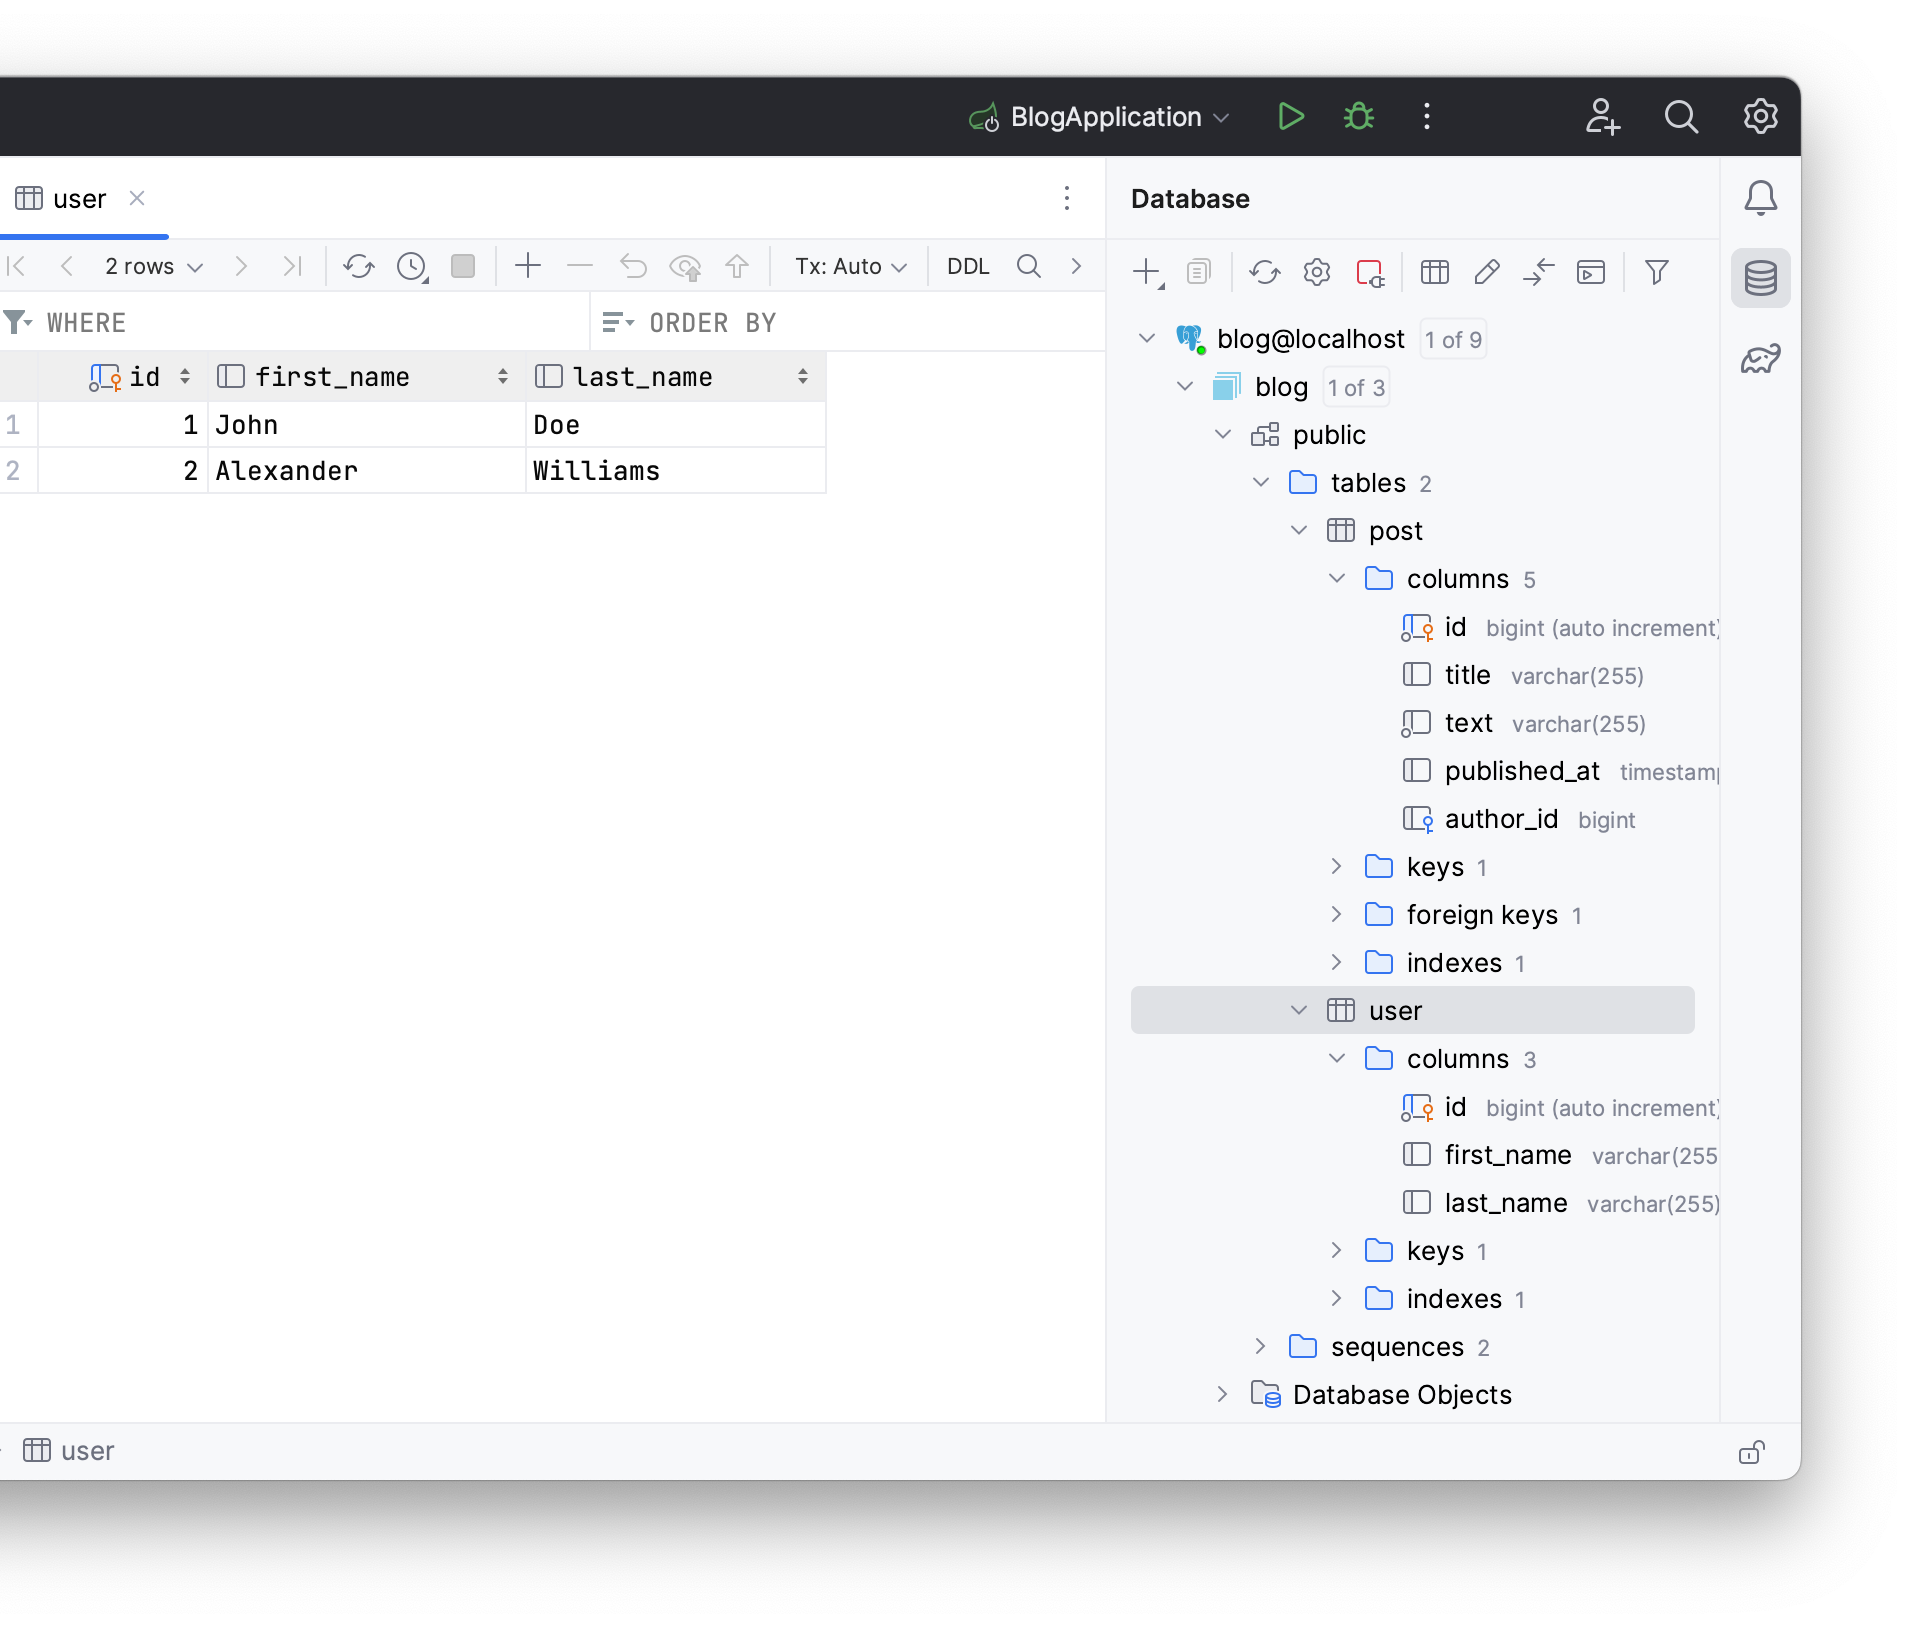
You can see your user records by double clicking on the user table from the Database tab.
Handling Schema Changes with Existing Data
Often, when changing the JPA model, you might use Hibernate's ddl-auto property for database updates. However, this approach can sometimes lead to problems. In this section, you will:
- Add a mandatory attribute to your JPA model
- Learn about
hibernate.ddl-auto=updateissues - Update your database using DDL diff script generation
First, given that your database already contains data, you'll proceed to adjust your JPA model. Let’s add a mandatory email attribute to the User entity as in the Creating Entities section of this guide:
@Column(name = "email", nullable = false)
private String email;

public String getEmail() {
 return email;
}

public void setEmail(String email) {
 this.email = email;
}
To explore how Hibernate handles this during startup, adjust the ddl-auto value to update:
spring.jpa.hibernate.ddl-auto=update
Run the application to apply the changes.
After execution, you'll get an error displayed in the terminal.
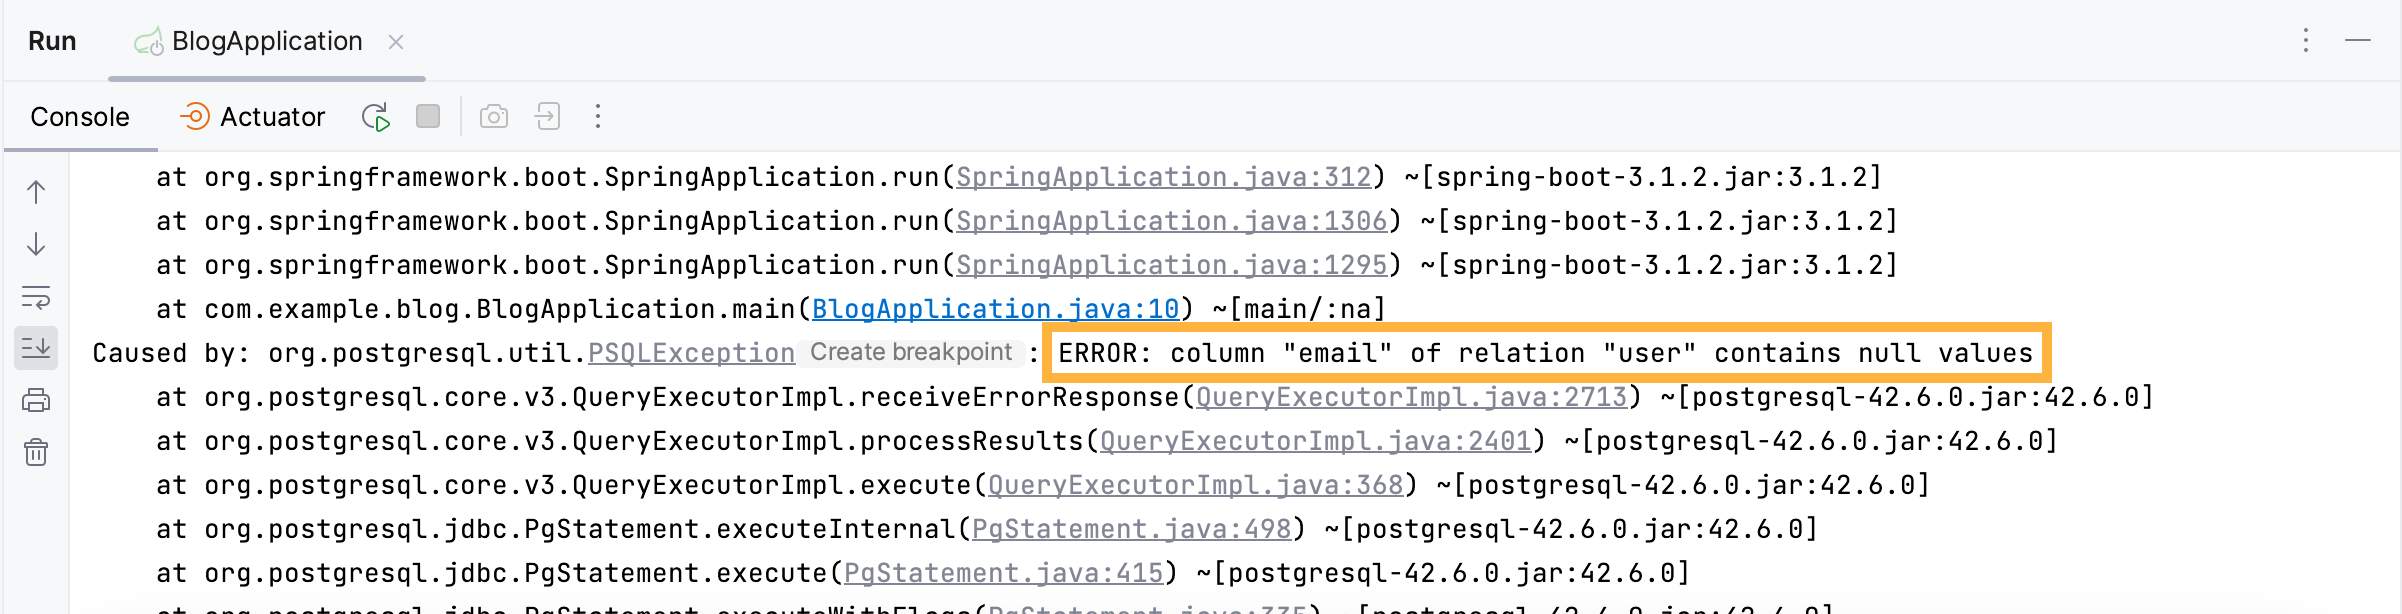
When a new column is added, the database fills the email field with NULL for all current records. But with the NOT NULL constraint on this new column, it triggers a constraint violation error.
Using JPA Buddy's DDL generation, you can create a non-null column to assign a default value to every existing record.
To let Hibernate verify if the schema matches the JPA model without automatically generating or executing DDL, set the ddl-auto property to validate in the application.properties file. Next, to update your database using JPA Buddy instead:
- Click on the + in the JPA Structure tab
- Select Generate DDL by Entities
In the invoked window, pick the Existing DB update (Diff) option as your DDL type to compare your current JPA model with your database tables
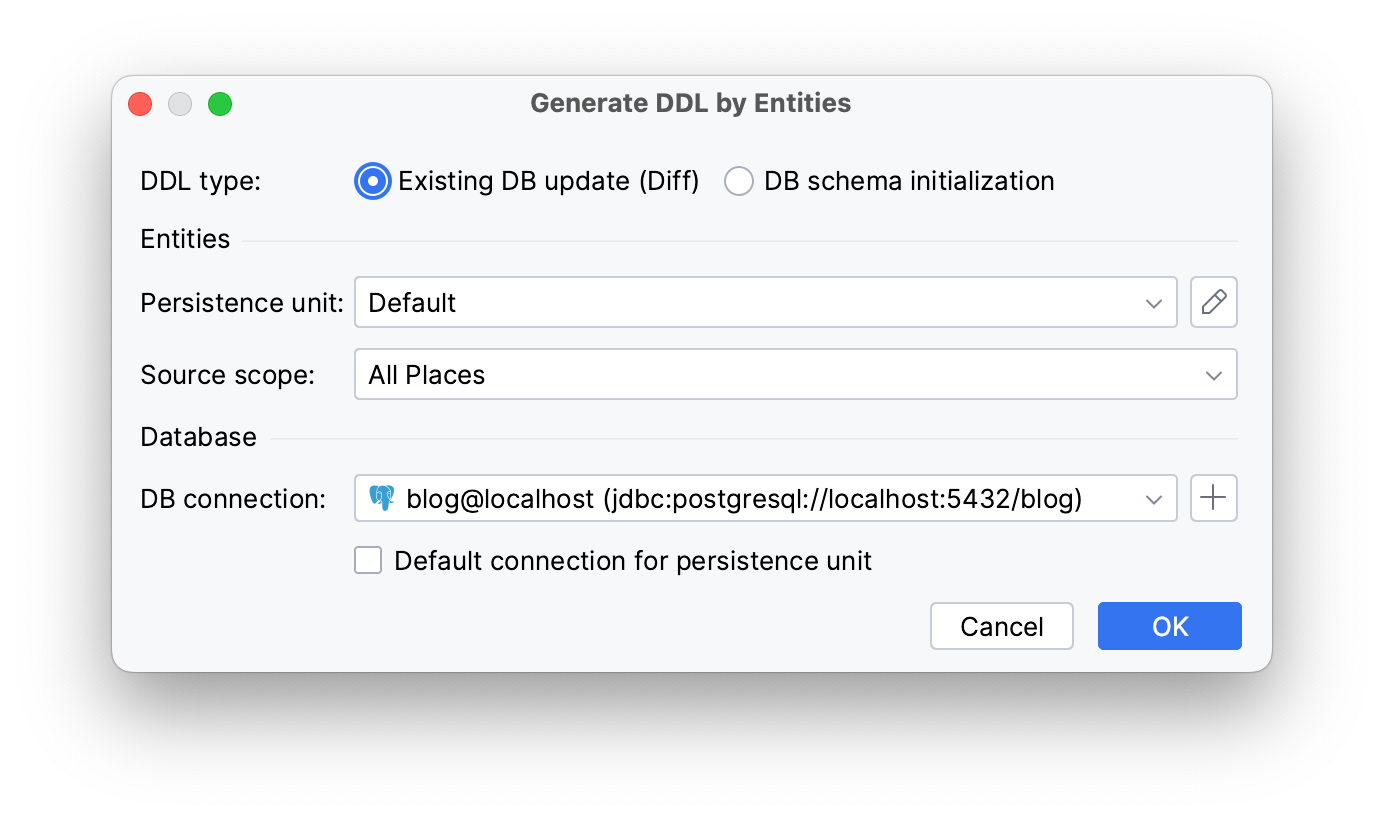
Click OK.
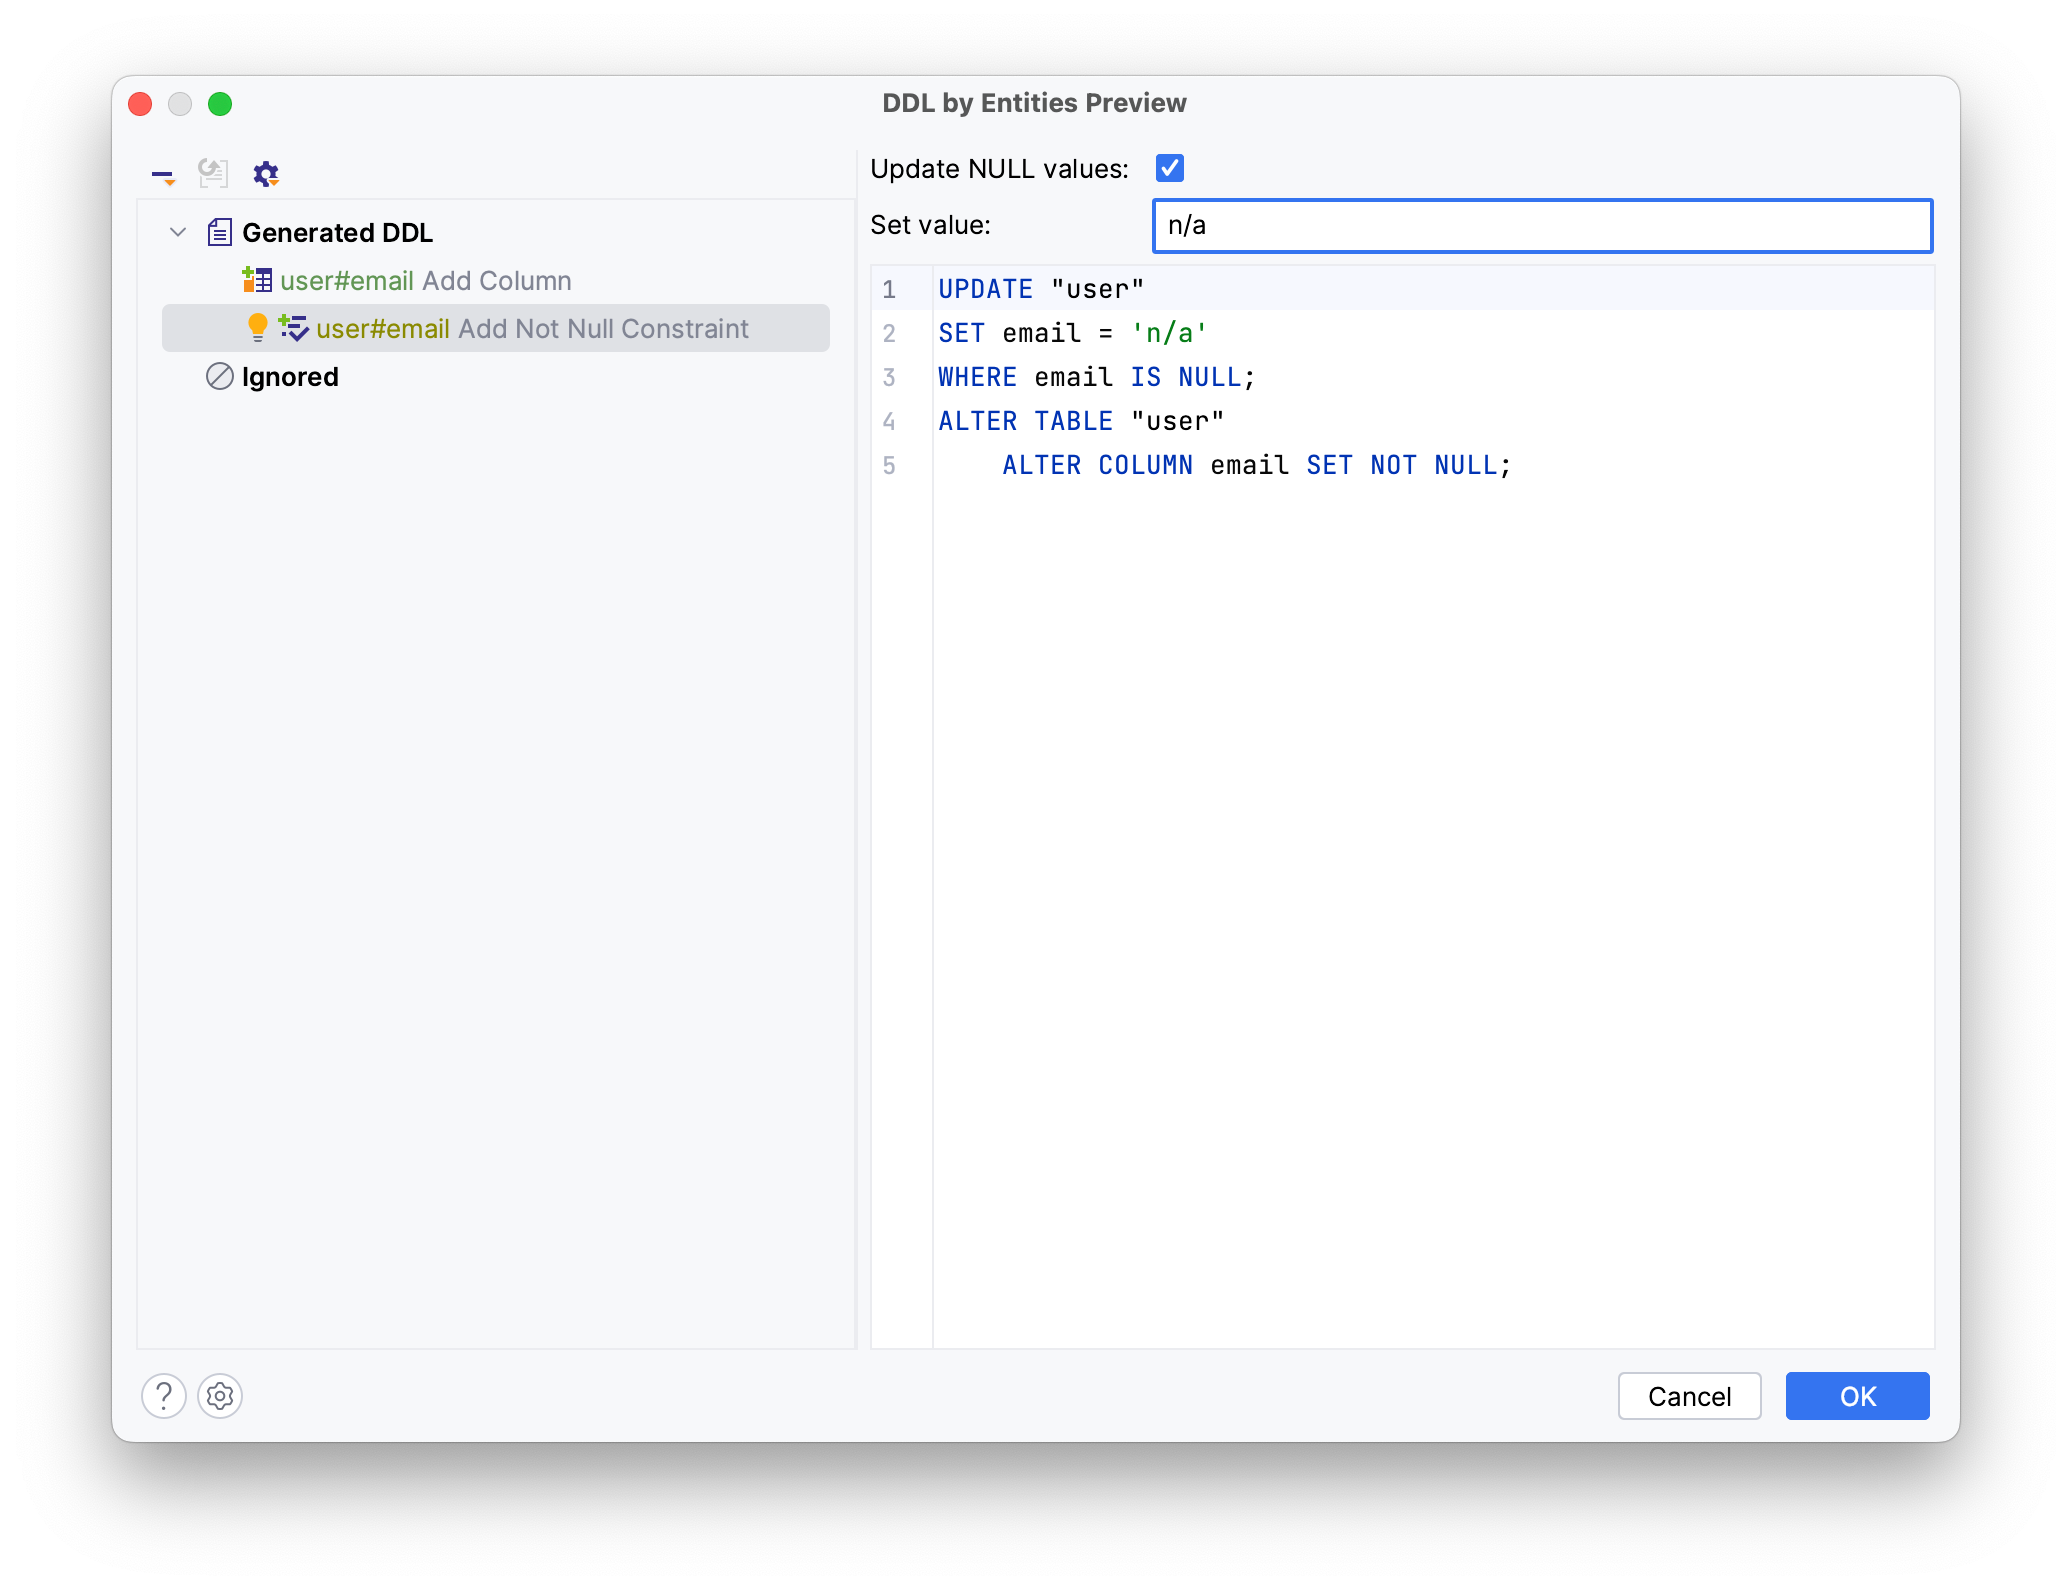
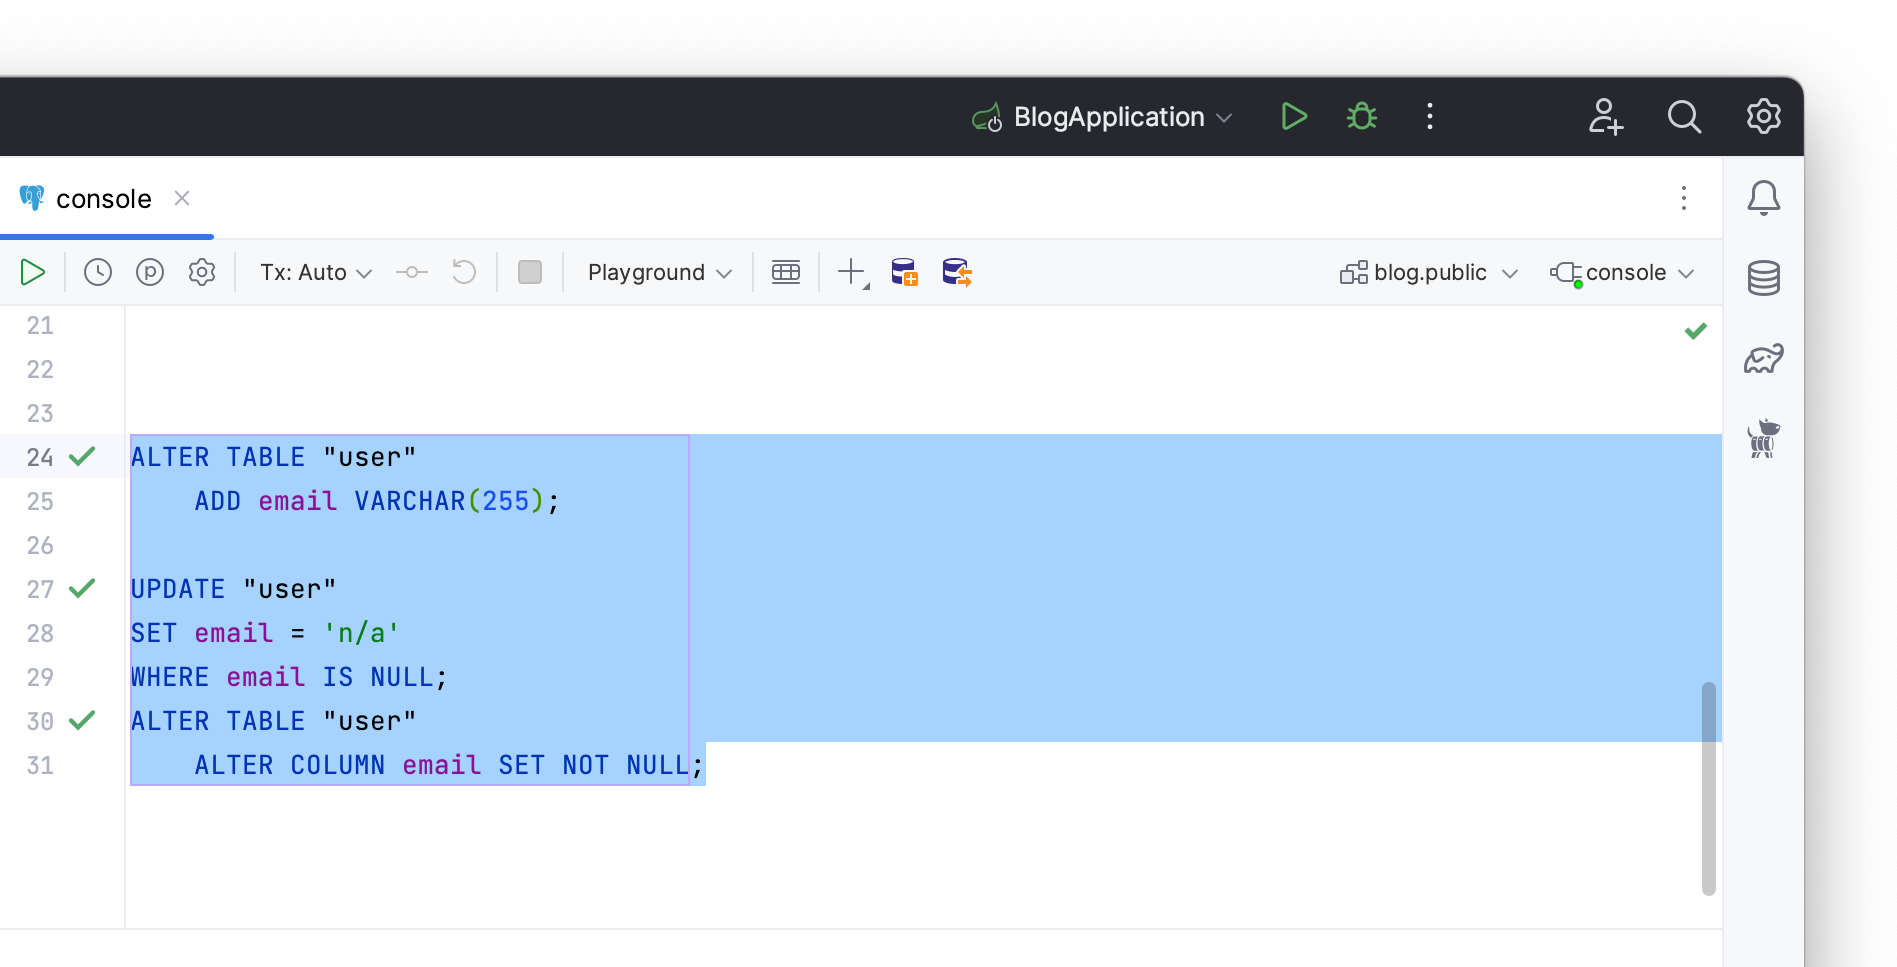
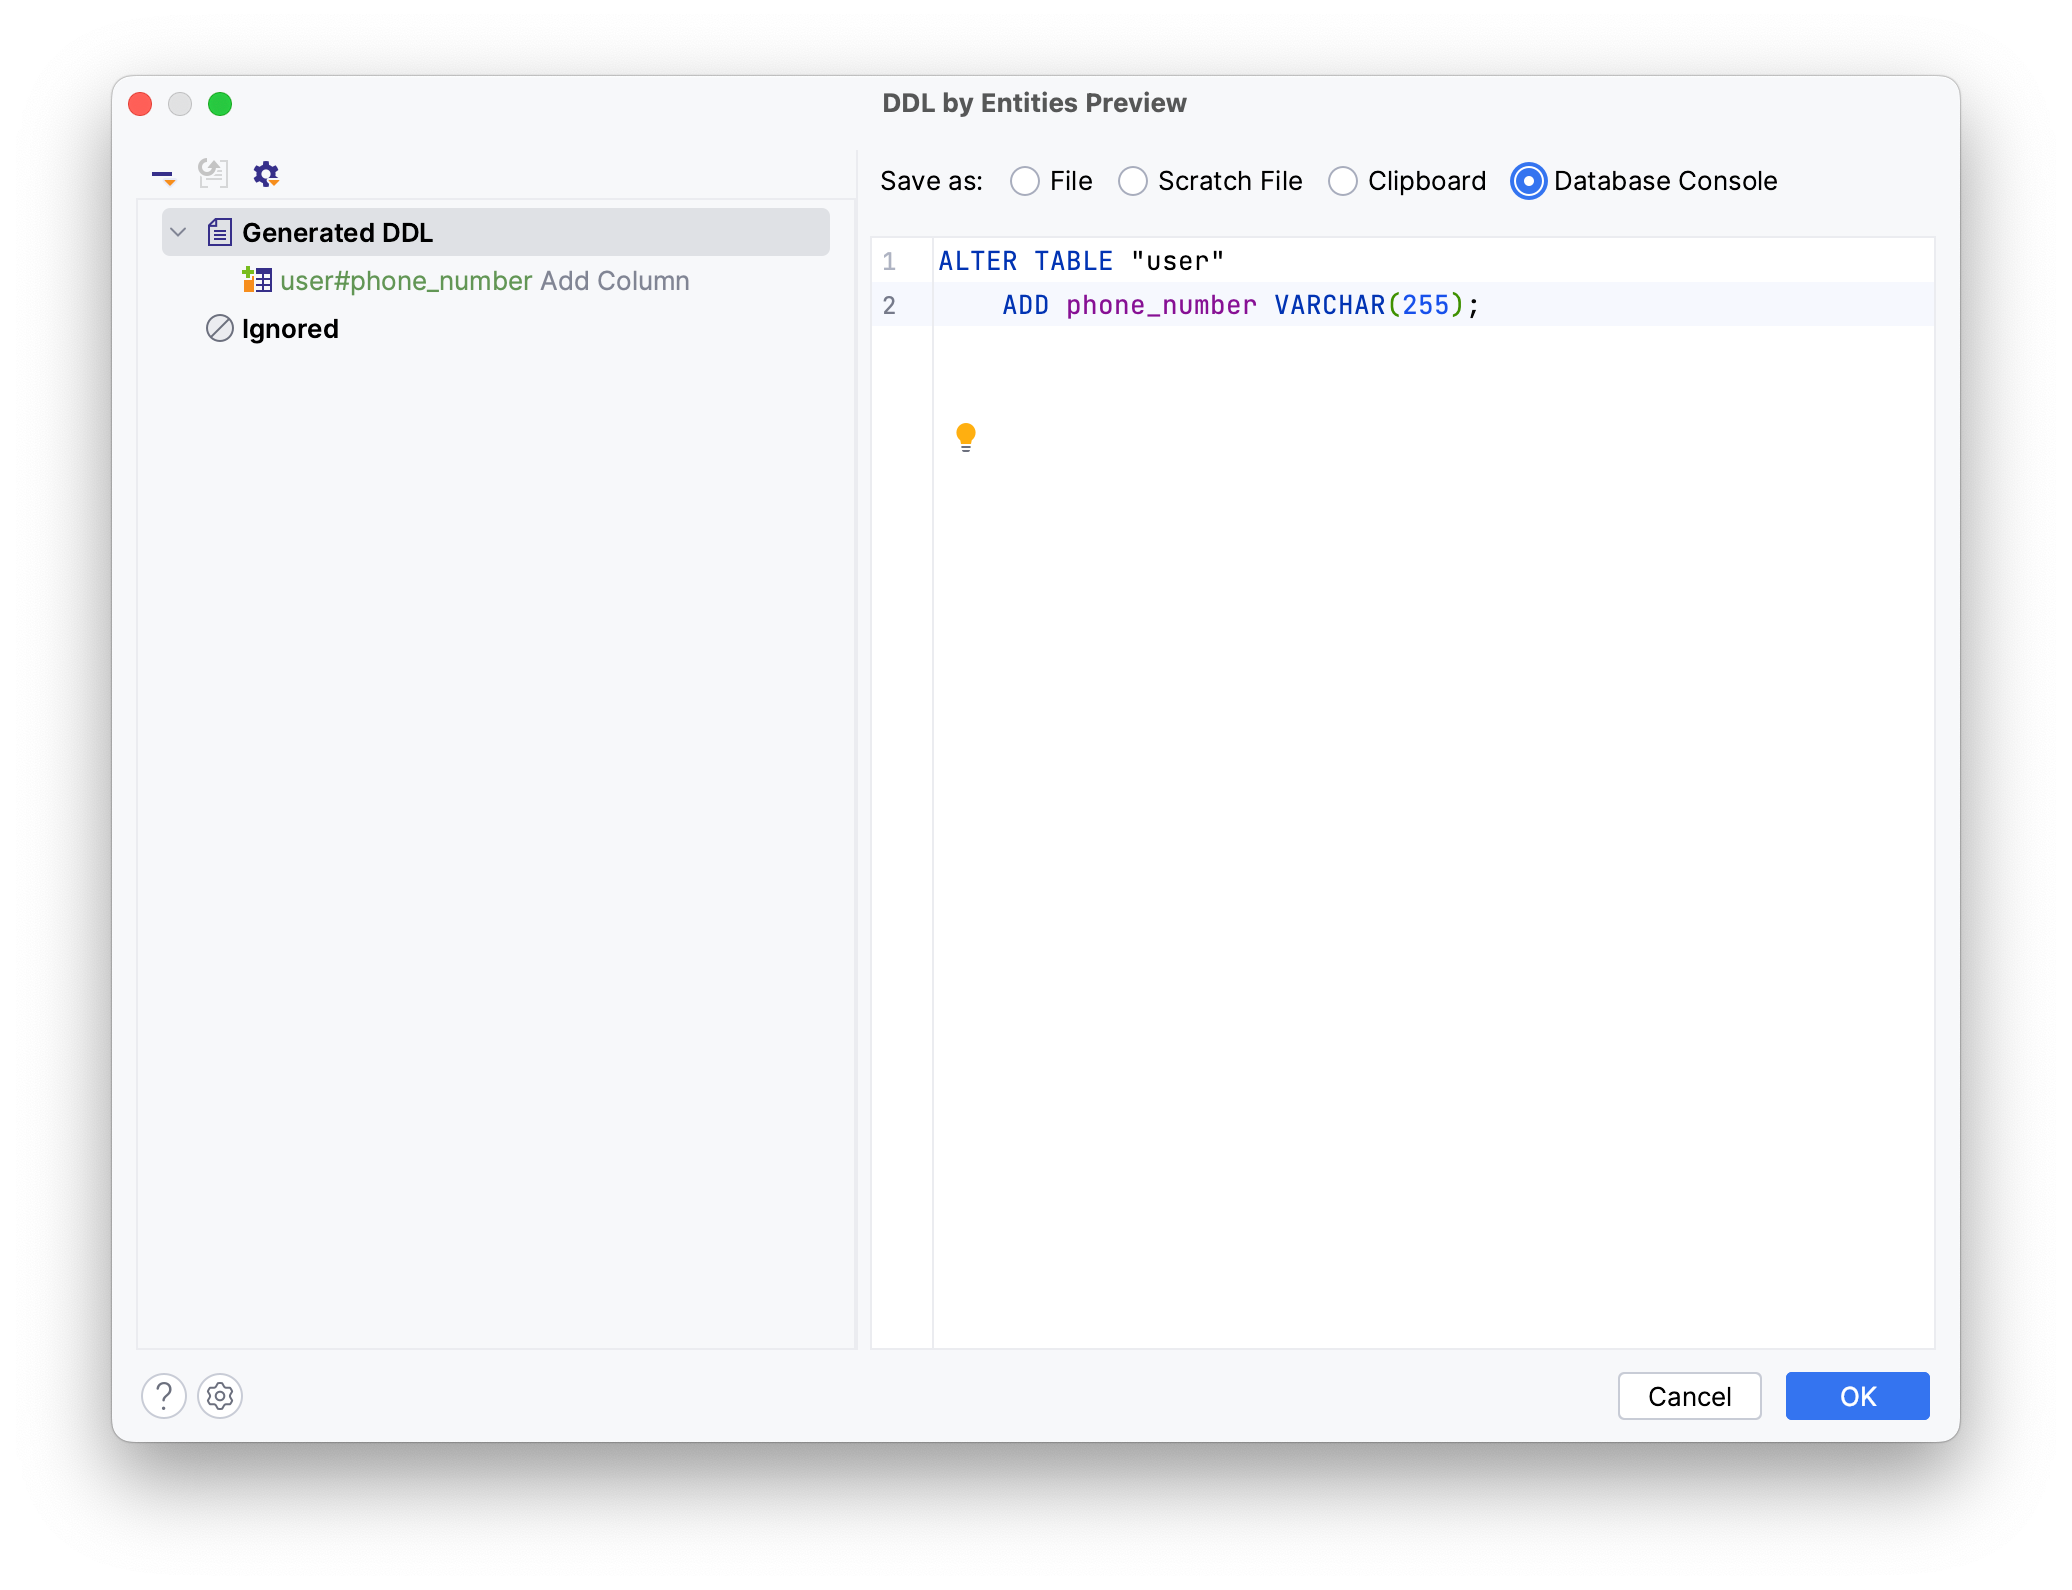
In the preview window, JPA Buddy produces two DDL statements: one to introduce the new column and another to apply a constraint. To add a default value to all existing empty fields:
- Click on the
user#email Add Not Null Constraint - Tick the Update NULL values checkbox
- Type the default value in the Set value field, in this case
n/a
Click on the Generated DDL tab, choose Database Console to paste those changes directly to the console.
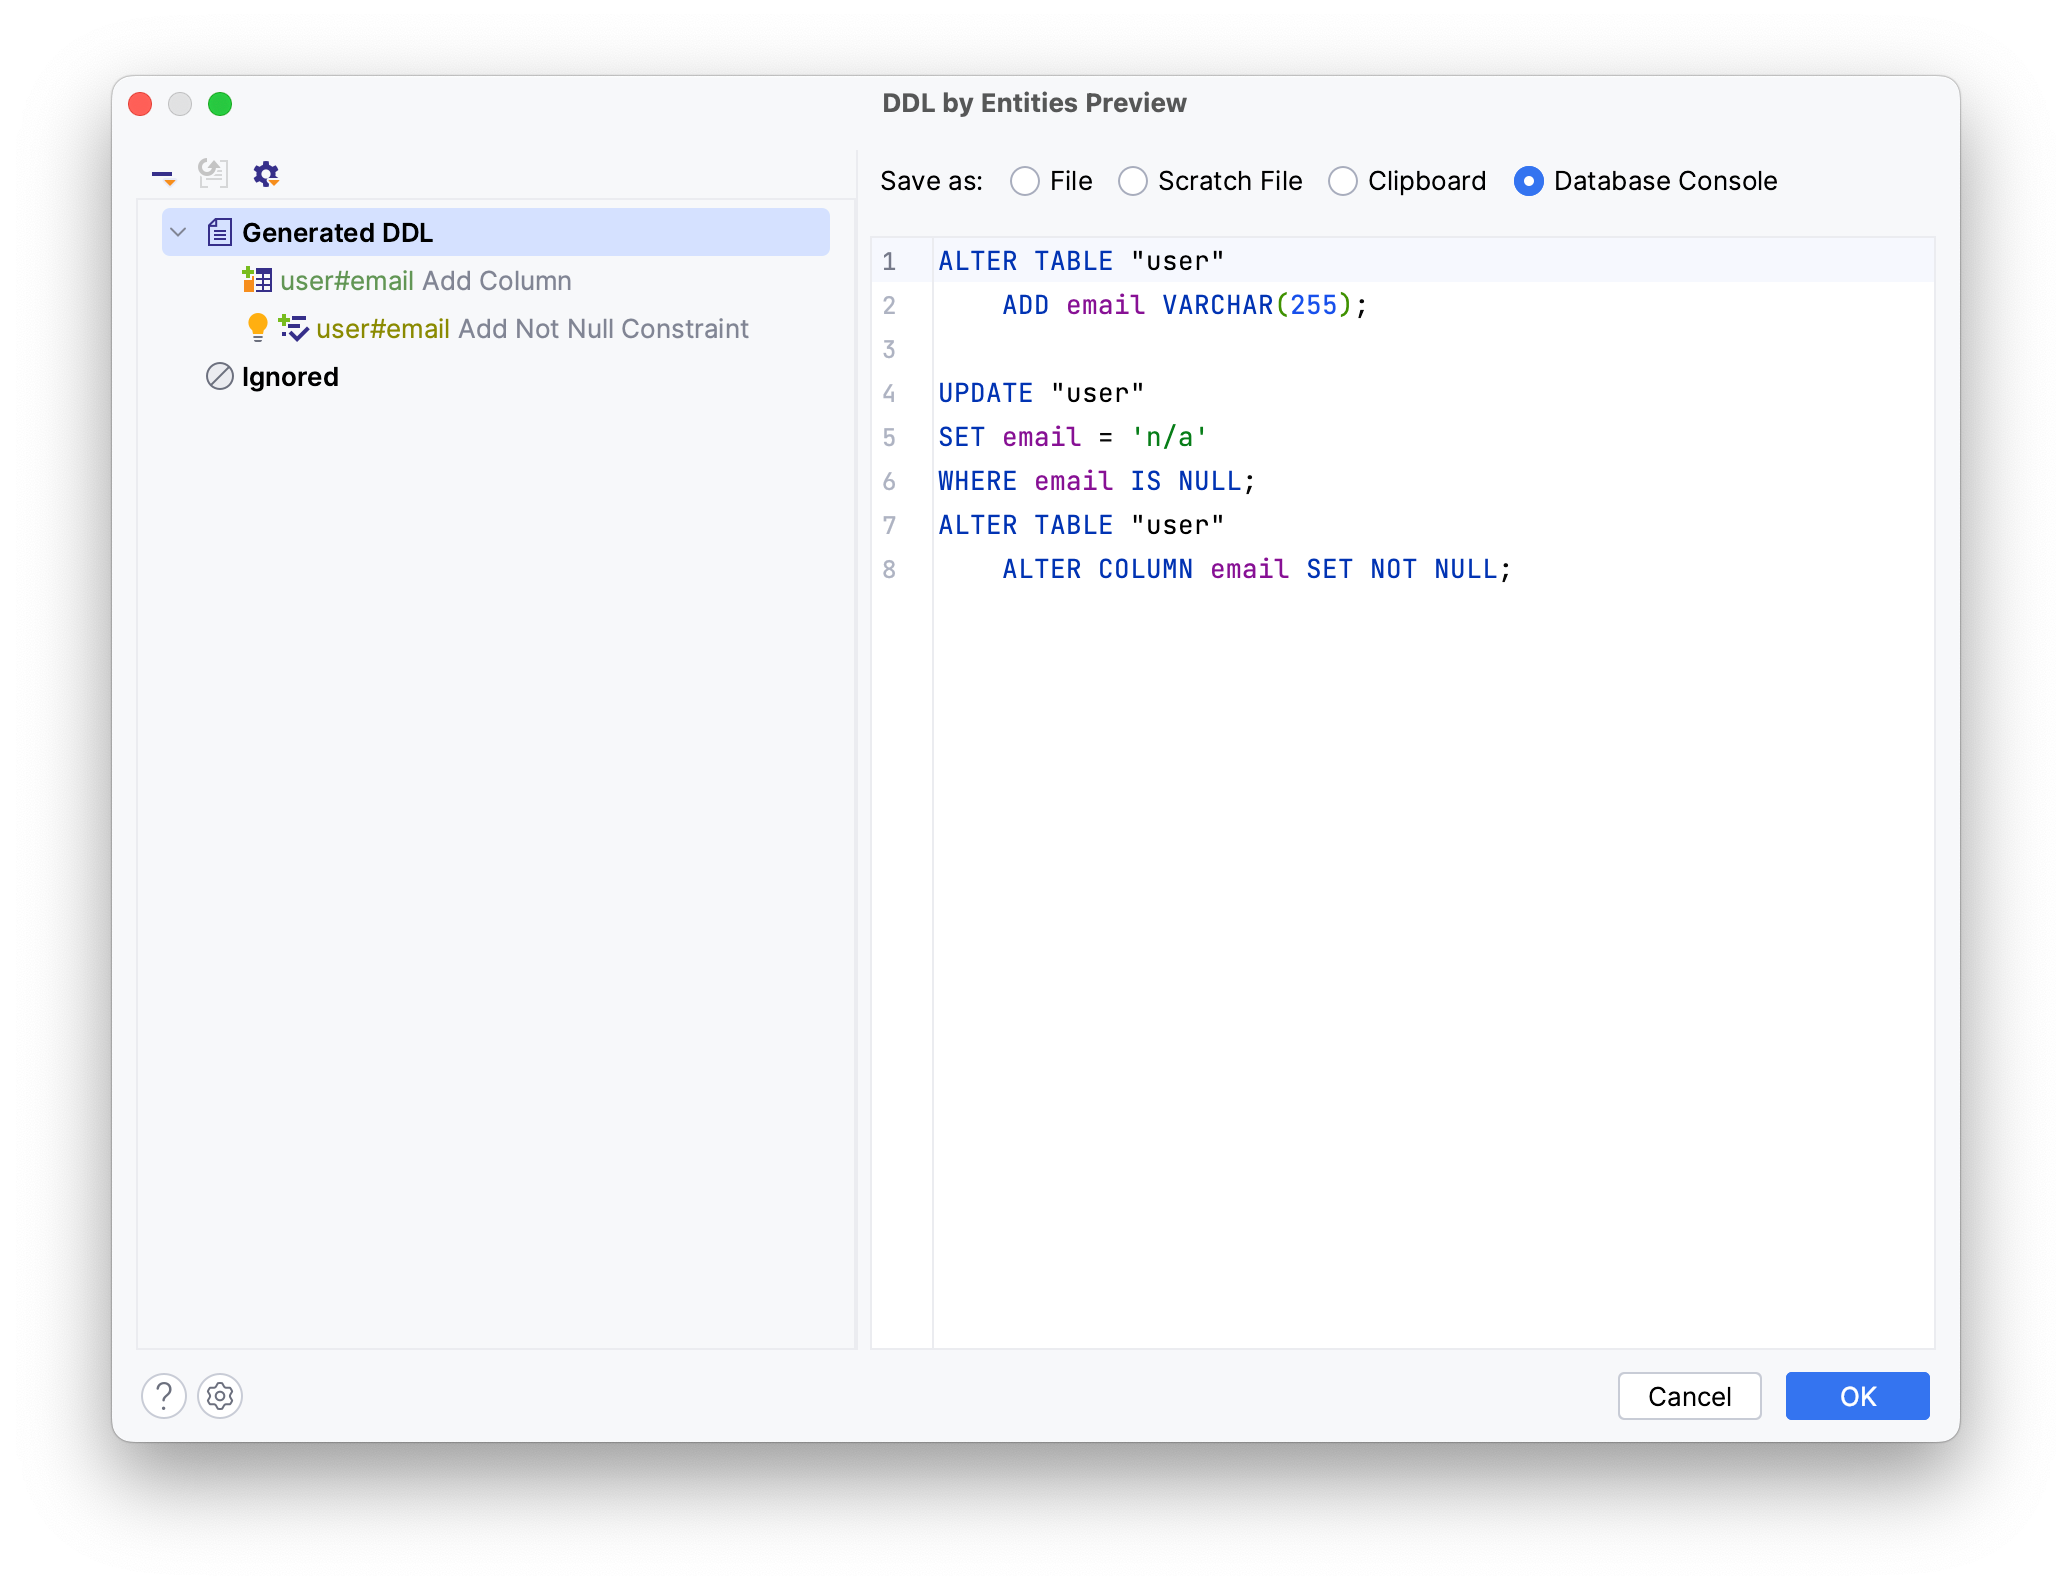
Click OK.
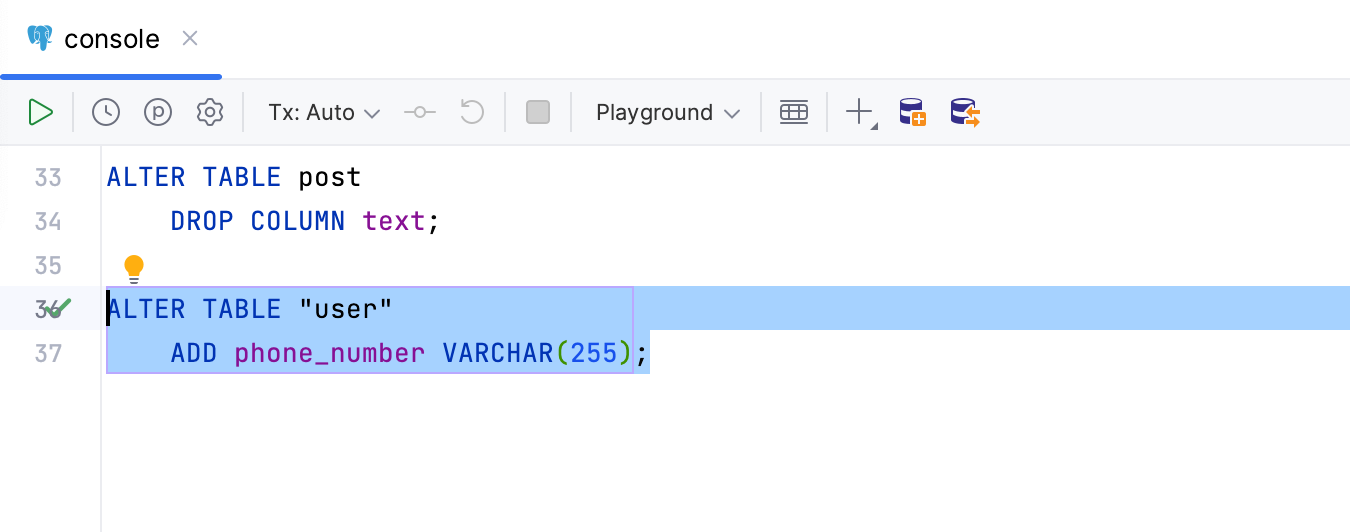
Use your mouse to select the generated changes in the console and click on the Execute button to update your database then run the application.
Now the mandatory email attribute is added to the table and the application runs as expected.
Updating the Database to Reflect Removed Attributes
Another moment: when you set the ddl-auto property to update, Hibernate doesn’t create drop statements, which can leave outdated database structures and lead to unexpected errors. In this section, you will:
- Explore the effect of Hibernate’s update property with a deleted attribute
- Generate a drop statement using JPA Buddy
First, let’s set the ddl-auto property value to update in the application.properties file.
spring.jpa.hibernate.ddl-auto=update
Remove the non-null text attribute in the Post entity, along with its setter and getter.
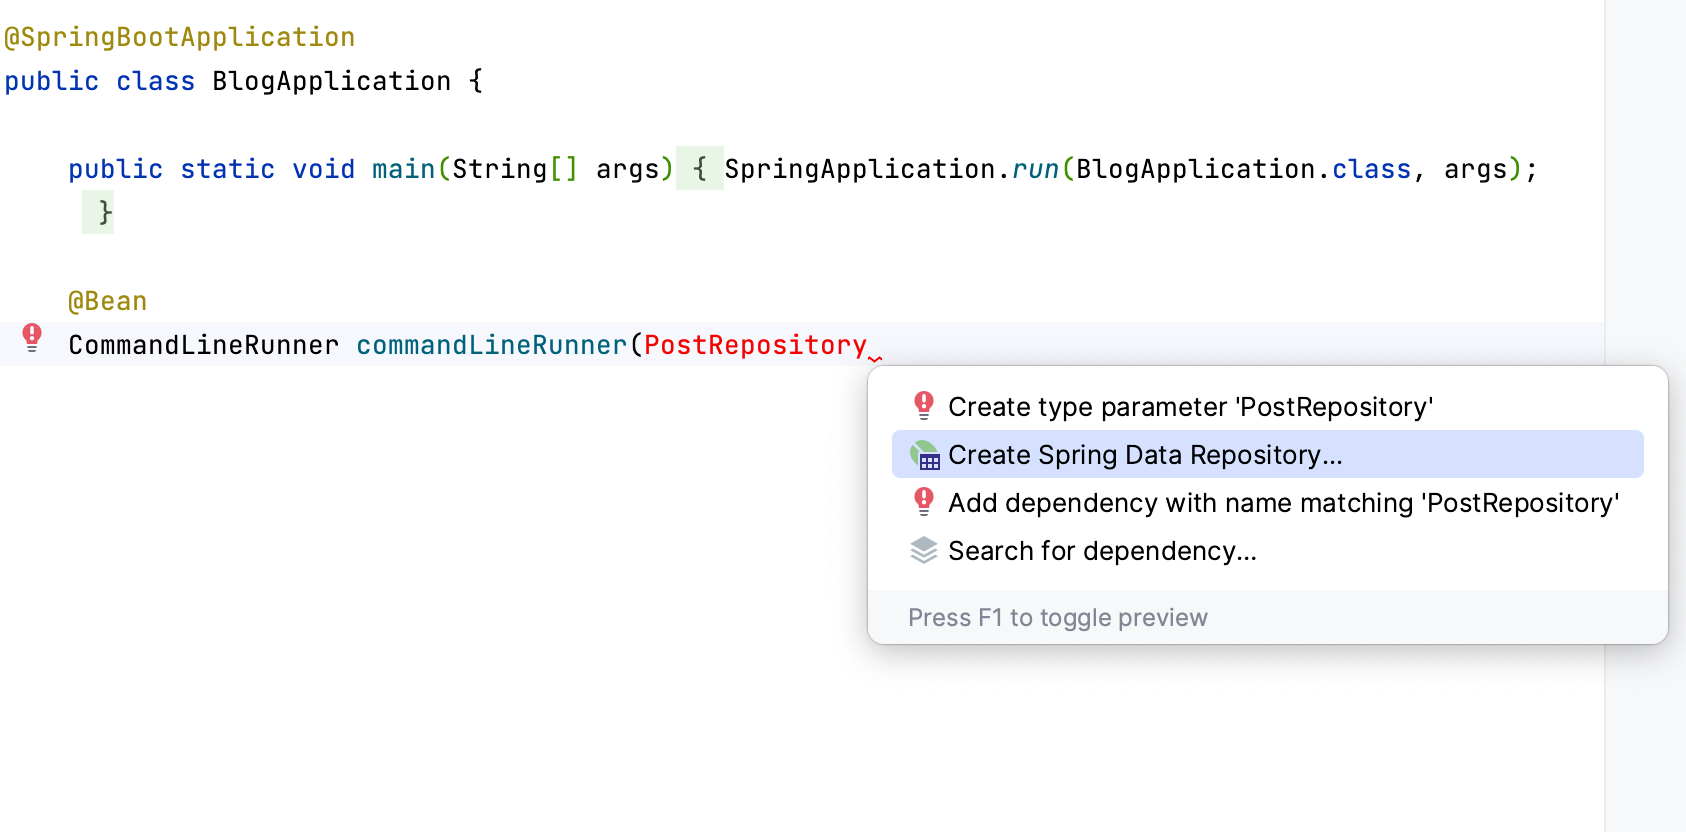
Let’s create a method to test if the column has been dropped. You can use the CommandLineRunner to run a bean in your BlogApplication class.
Write a class that saves a new post into PostRepository, setting only its title. To create a repository, type its interface when passing it as an argument to the CommanLineRunner commandlineRunner(PostRepository postRepository) method, invoke Show Context Menu (Option/Alt + Enter) and choose Create Spring Data Repository.
In the New Spring Data Repository, pick Post as the repository’s Domain entity and add a .repositories to the package name.
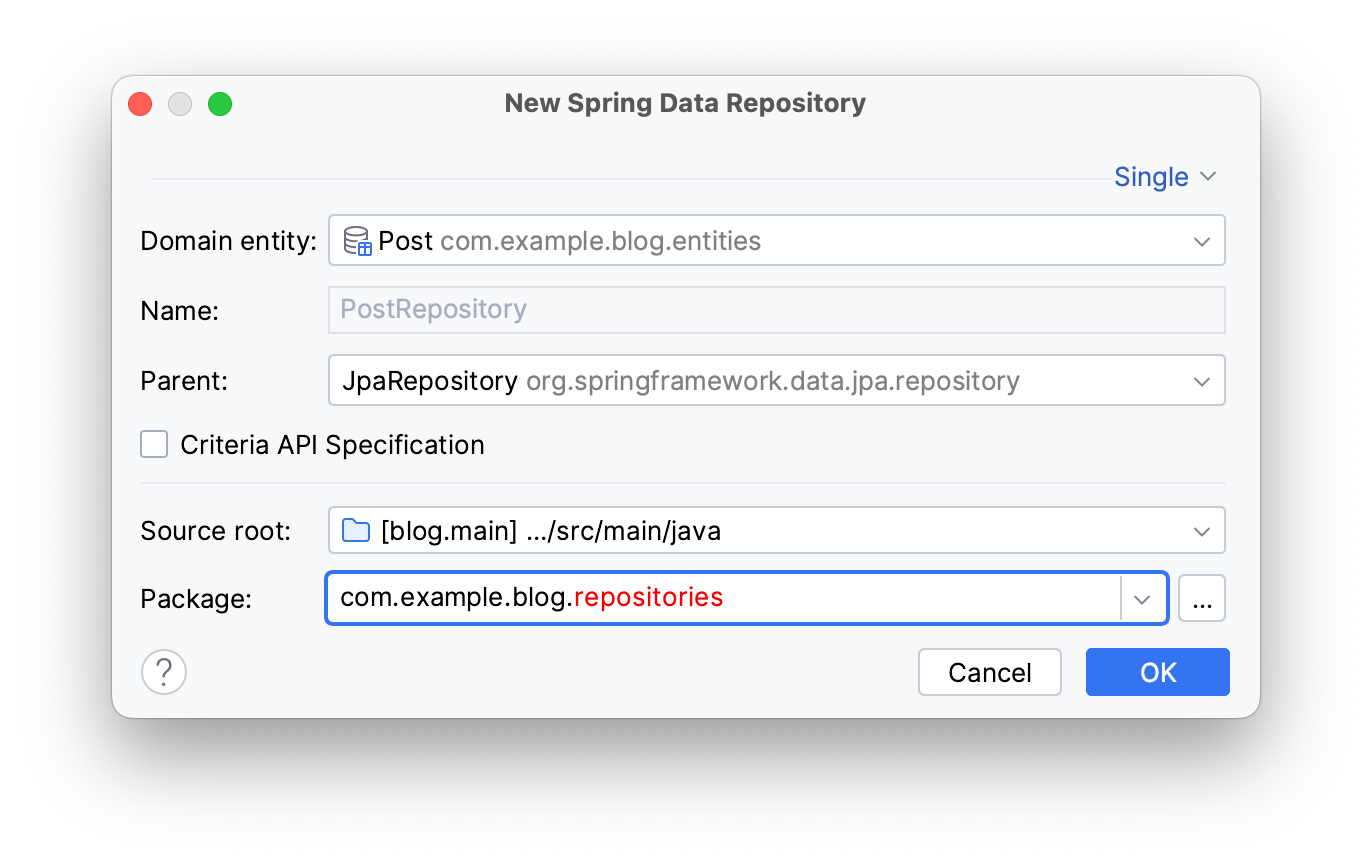
Click OK.
This will create a repository interface in the repositories package as in the code below:
public interface PostRepository extends JpaRepository<Post, Long> {
}
Return to your BlogApplication class and write the following code to create an instance of Post, set its title and save it to the repository.
@Bean
CommandLineRunner commandLineRunner(PostRepository postRepository) {
 return args -> {
 Post post = new Post();
 post.setTitle("This is my first comment");
 postRepository.save(post);
 };
}
Start the application. You'll encounter an error caused by missing data in the text column. It's absent in the JPA model but Hibernate left it in the database schema.
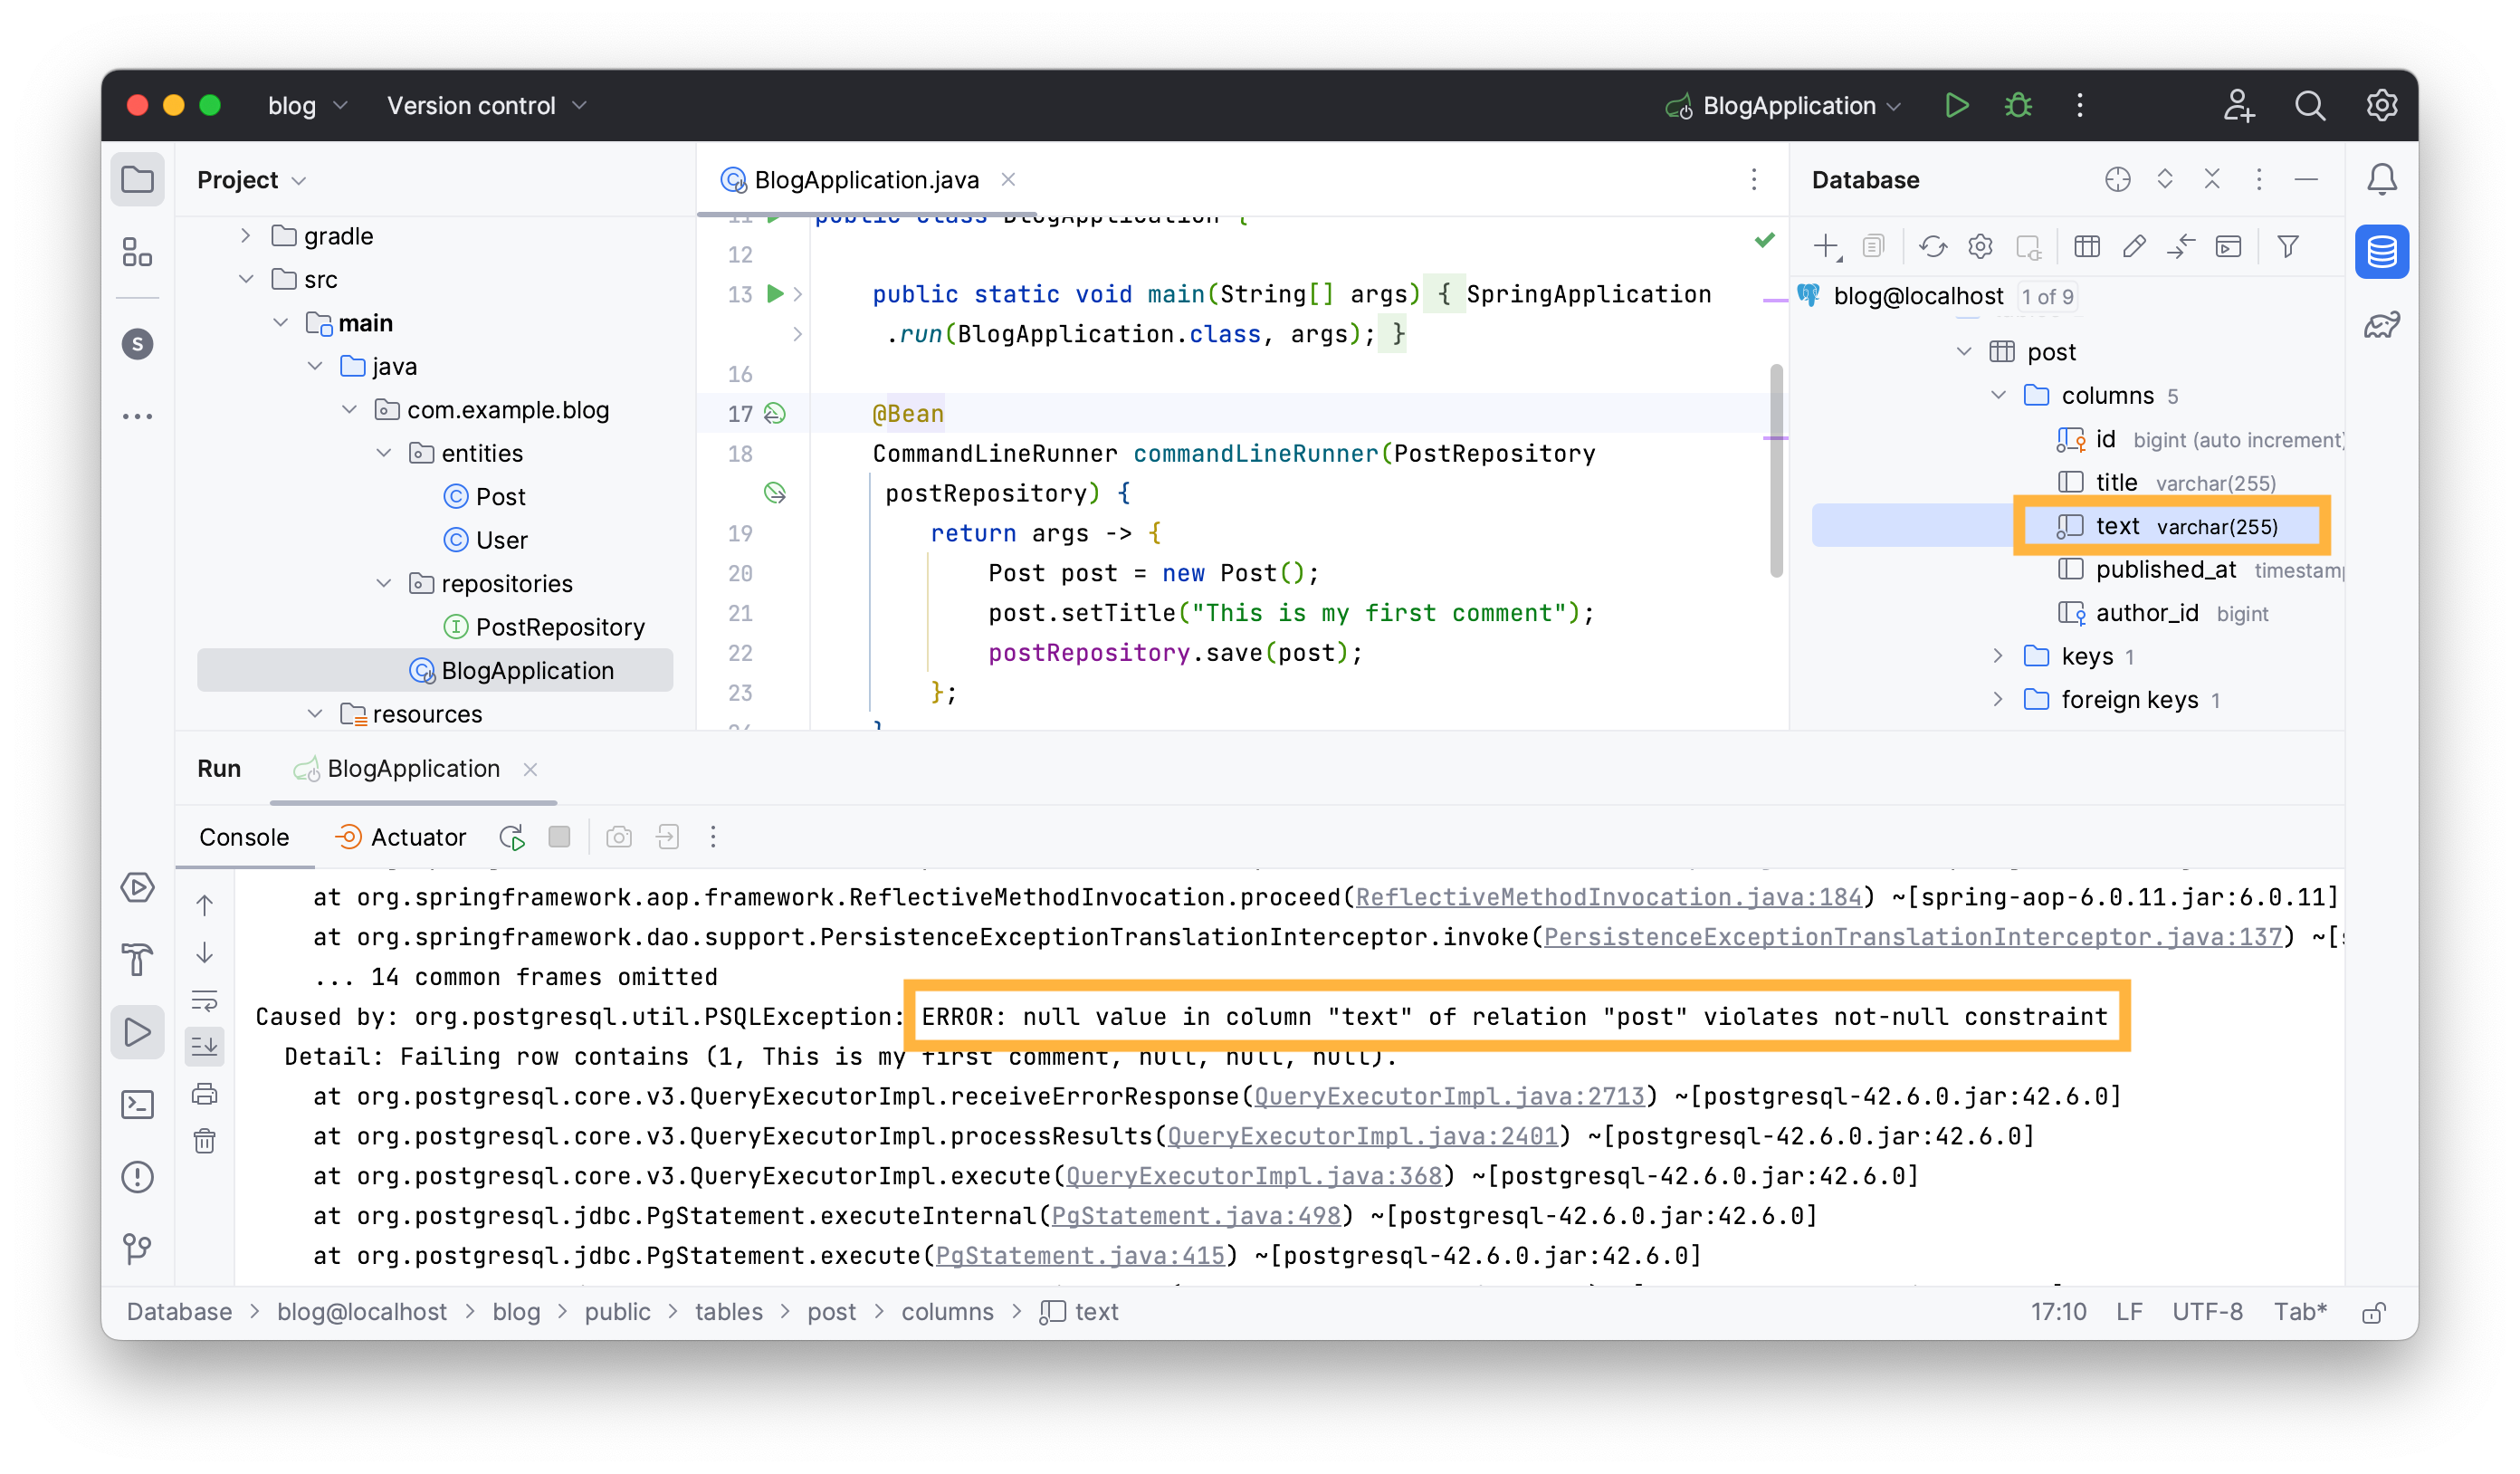
Use JPA Buddy to drop the column instead. Return to the database console by clicking on the Jump to Query Console... button in the Database tab.
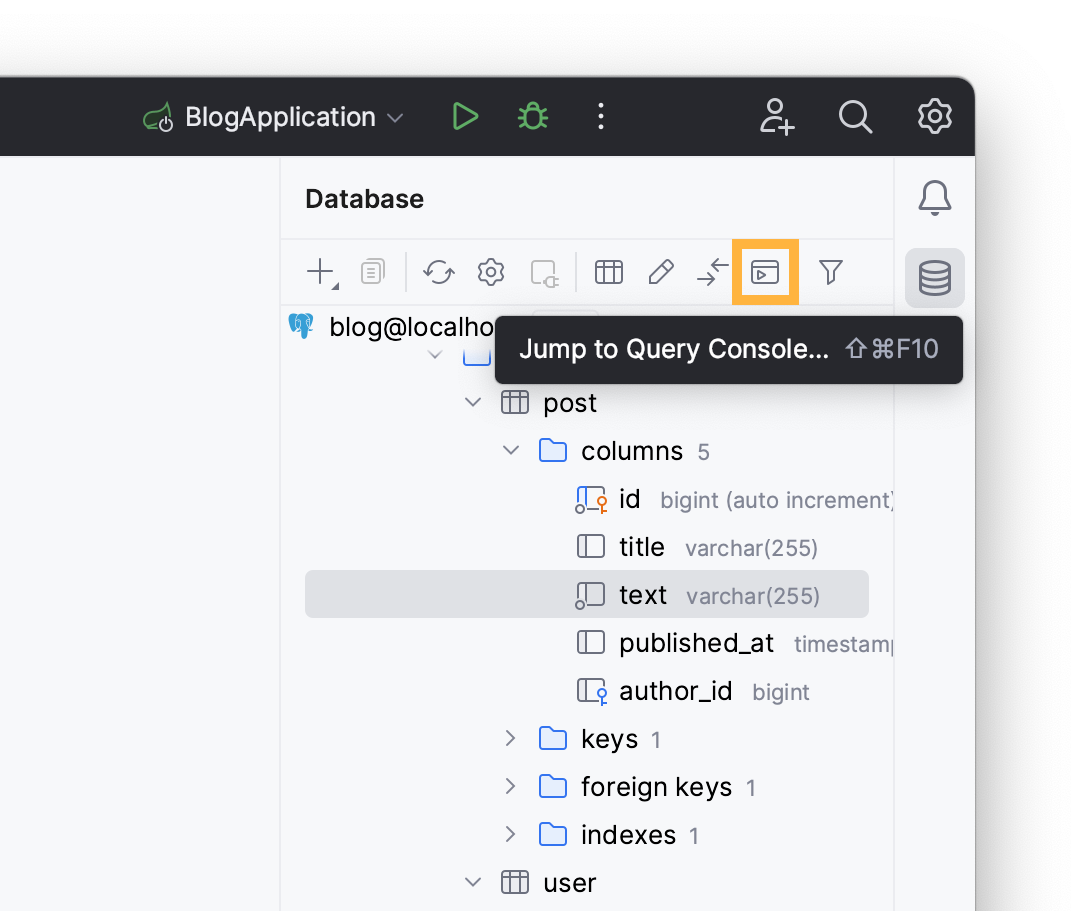
Choose console and invoke the Generate menu in it. Choose the Diff DDL option.
Pick the Model as source and DB as target to apply the changes made in the model to the database.
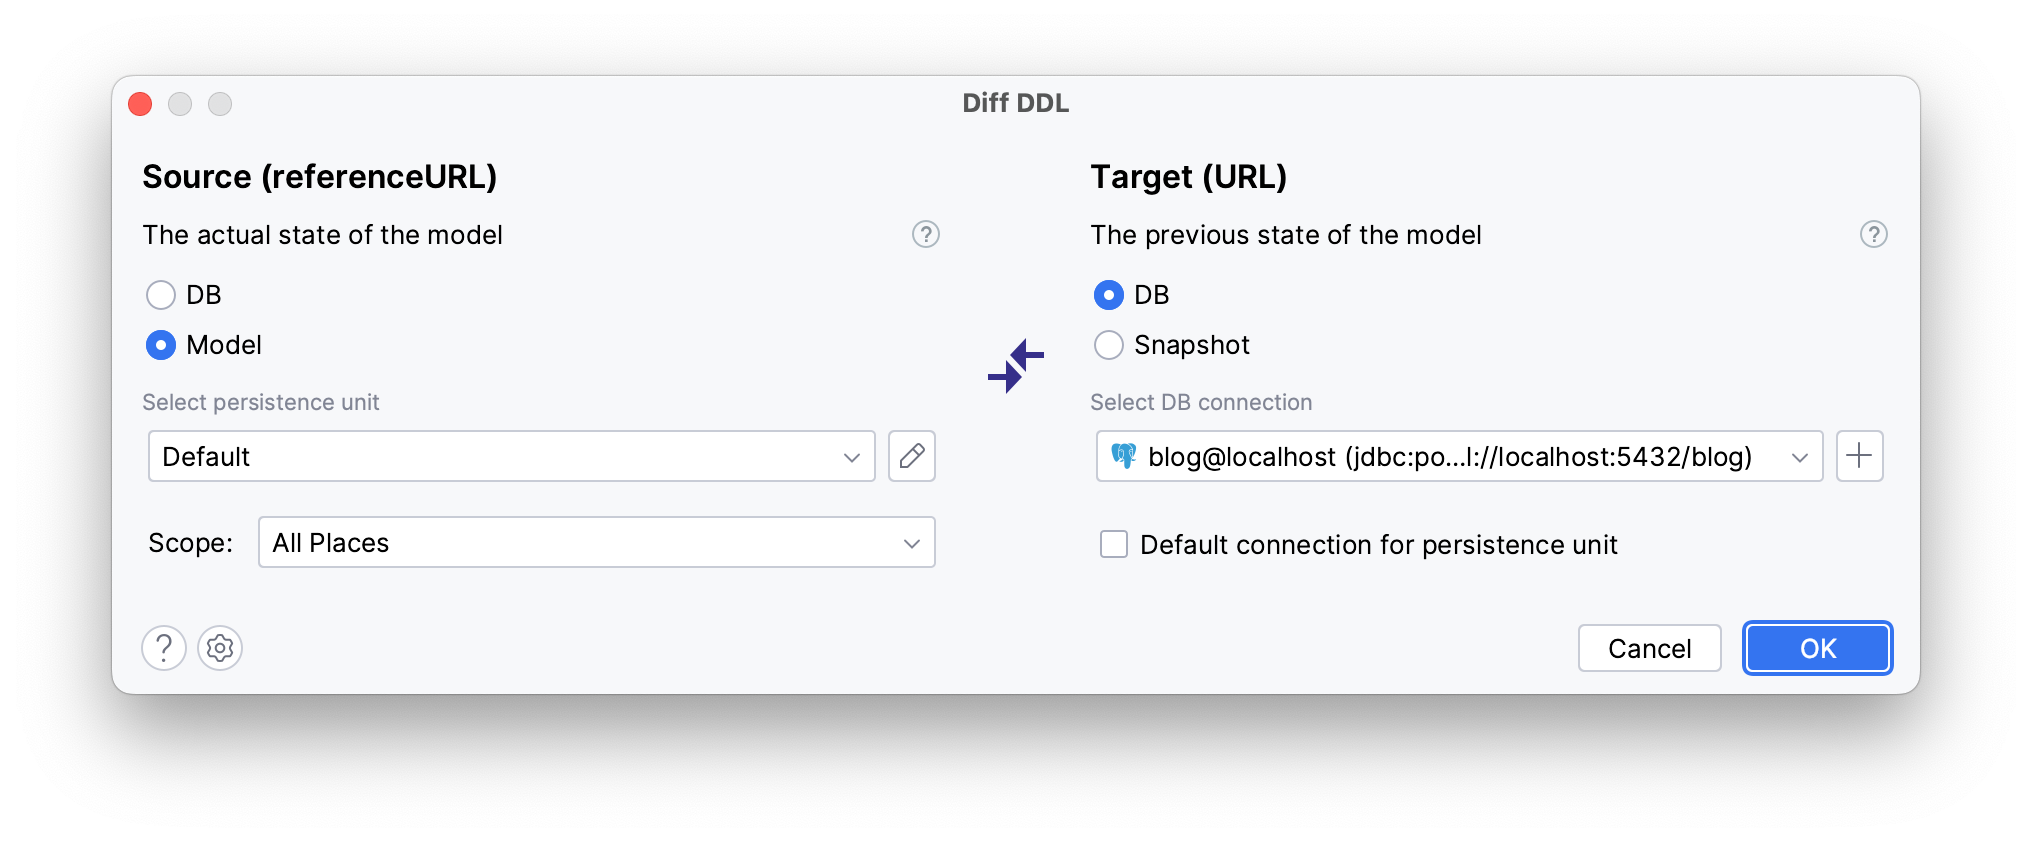
Click OK.
JPA Buddy will compare the JPA model with the database and generate a diff script accordingly, note that the drop statement is marked in red, signalling potential data loss and its irreversible nature.
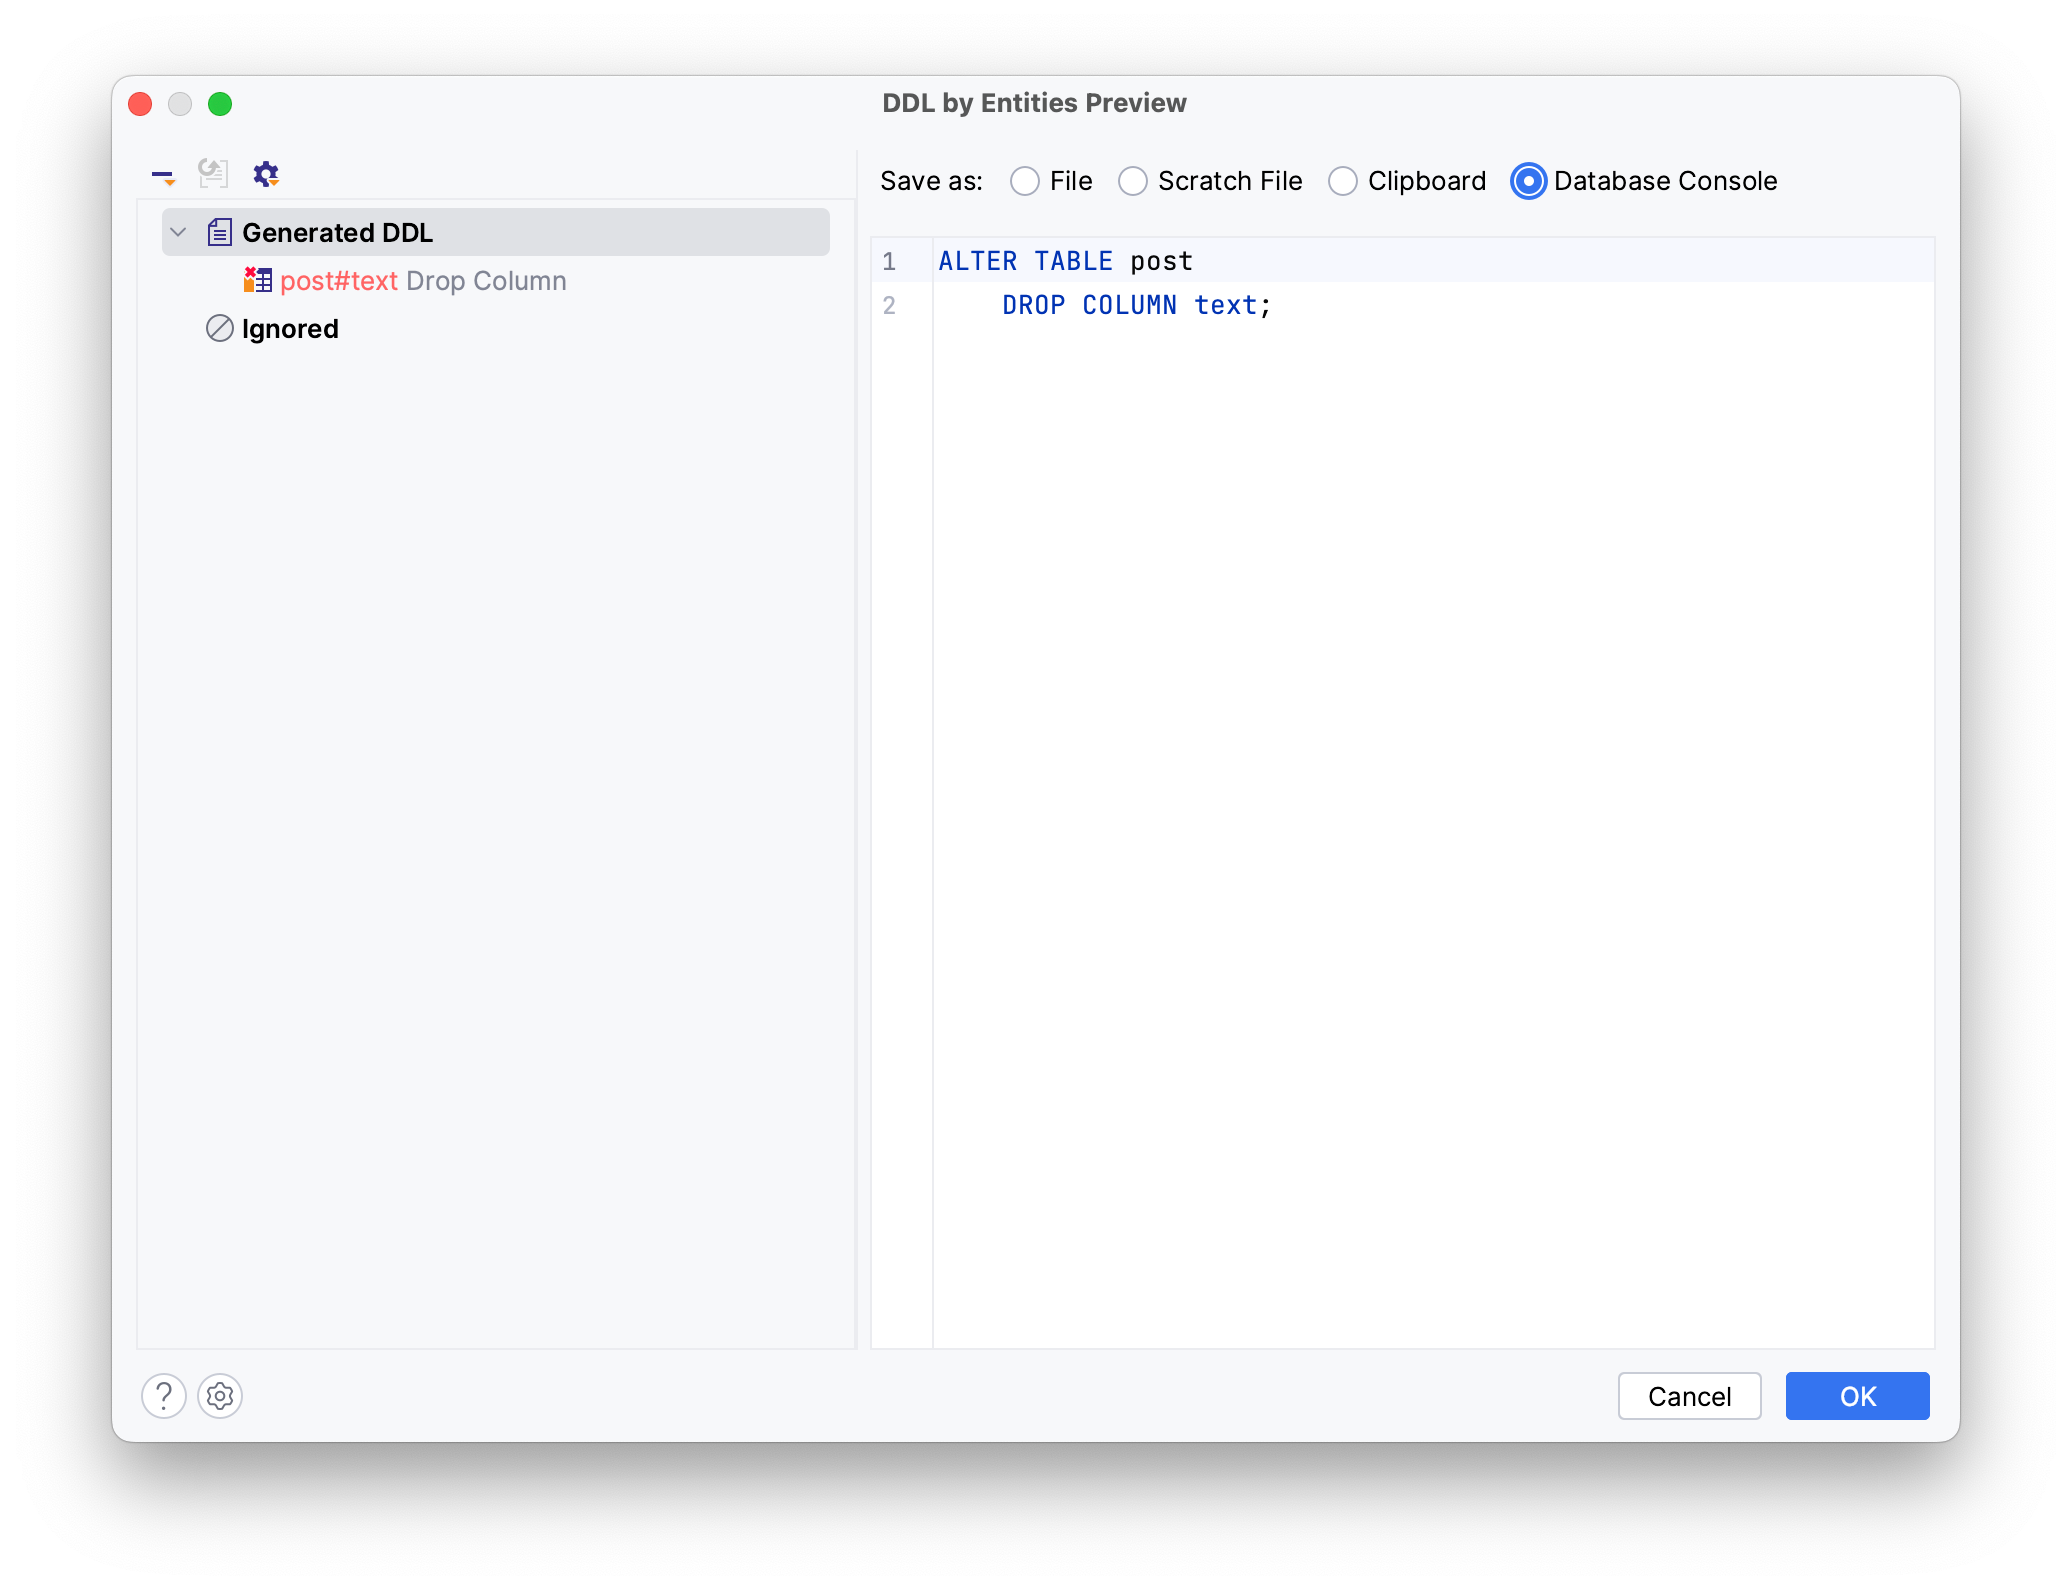
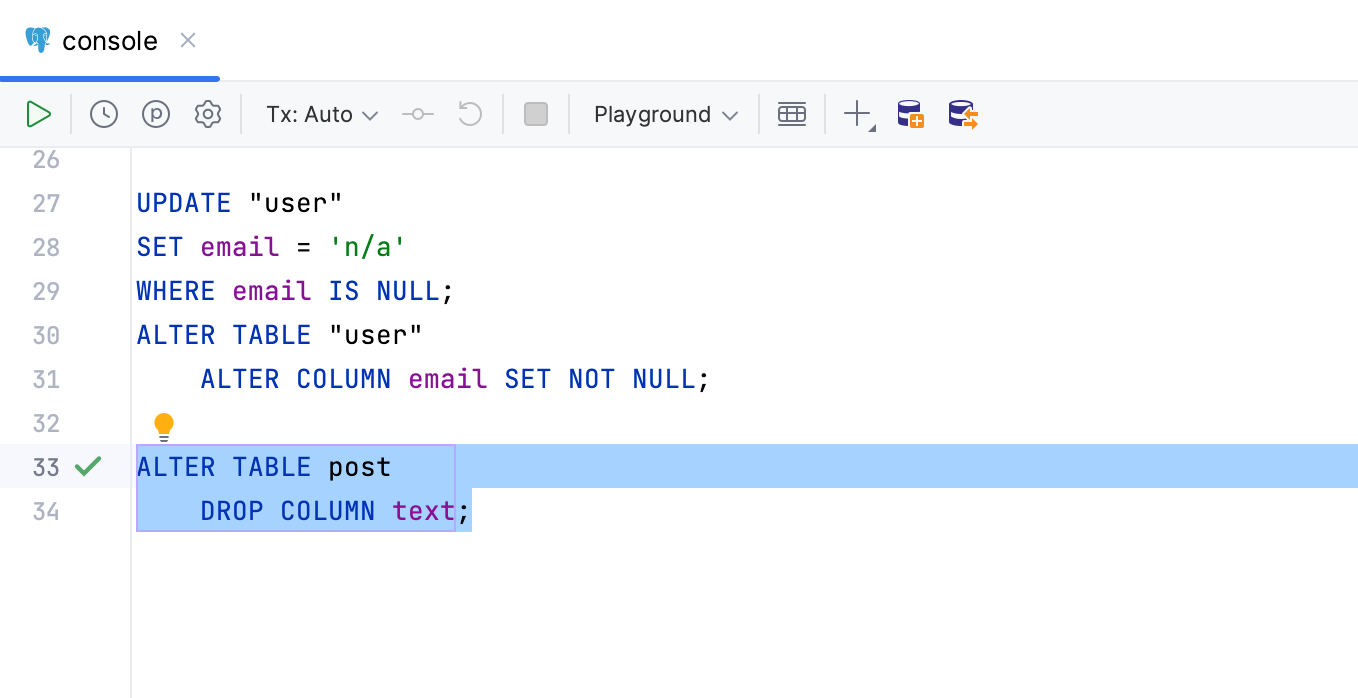
Choose the Database Console and click OK to generate a drop statement in the DB console. Highlight and execute the statement to drop the text column in the database.
Fixing Schema Mismatches
For optimal results with ddl-auto, set the property to validate. This allows Hibernate to compare the JPA model with the DB schema. If there's a mismatch, JPA Buddy can help sync it. In this section, you'll:
- Compare your schema using ddl-auto
- Use JPA Buddy to fix errors caused by validate
To explore Hibernate’s capabilities in validating the DB schema, change the ddl-auto property to validate in your application.properties:
spring.jpa.hibernate.ddl-auto=validate
Next, add a phoneNumber attribute to the User entity to test the application:
@Column(name = "phone_number")
private String phoneNumber;

public String getPhoneNumber() {
 return phoneNumber;
}

public void setPhoneNumber(String phoneNumber) {
 this.phoneNumber = phoneNumber;
}
Run the application.
As a result, Hibernate encounters a mismatch between the model and the database and fails with a schema-validation exception.
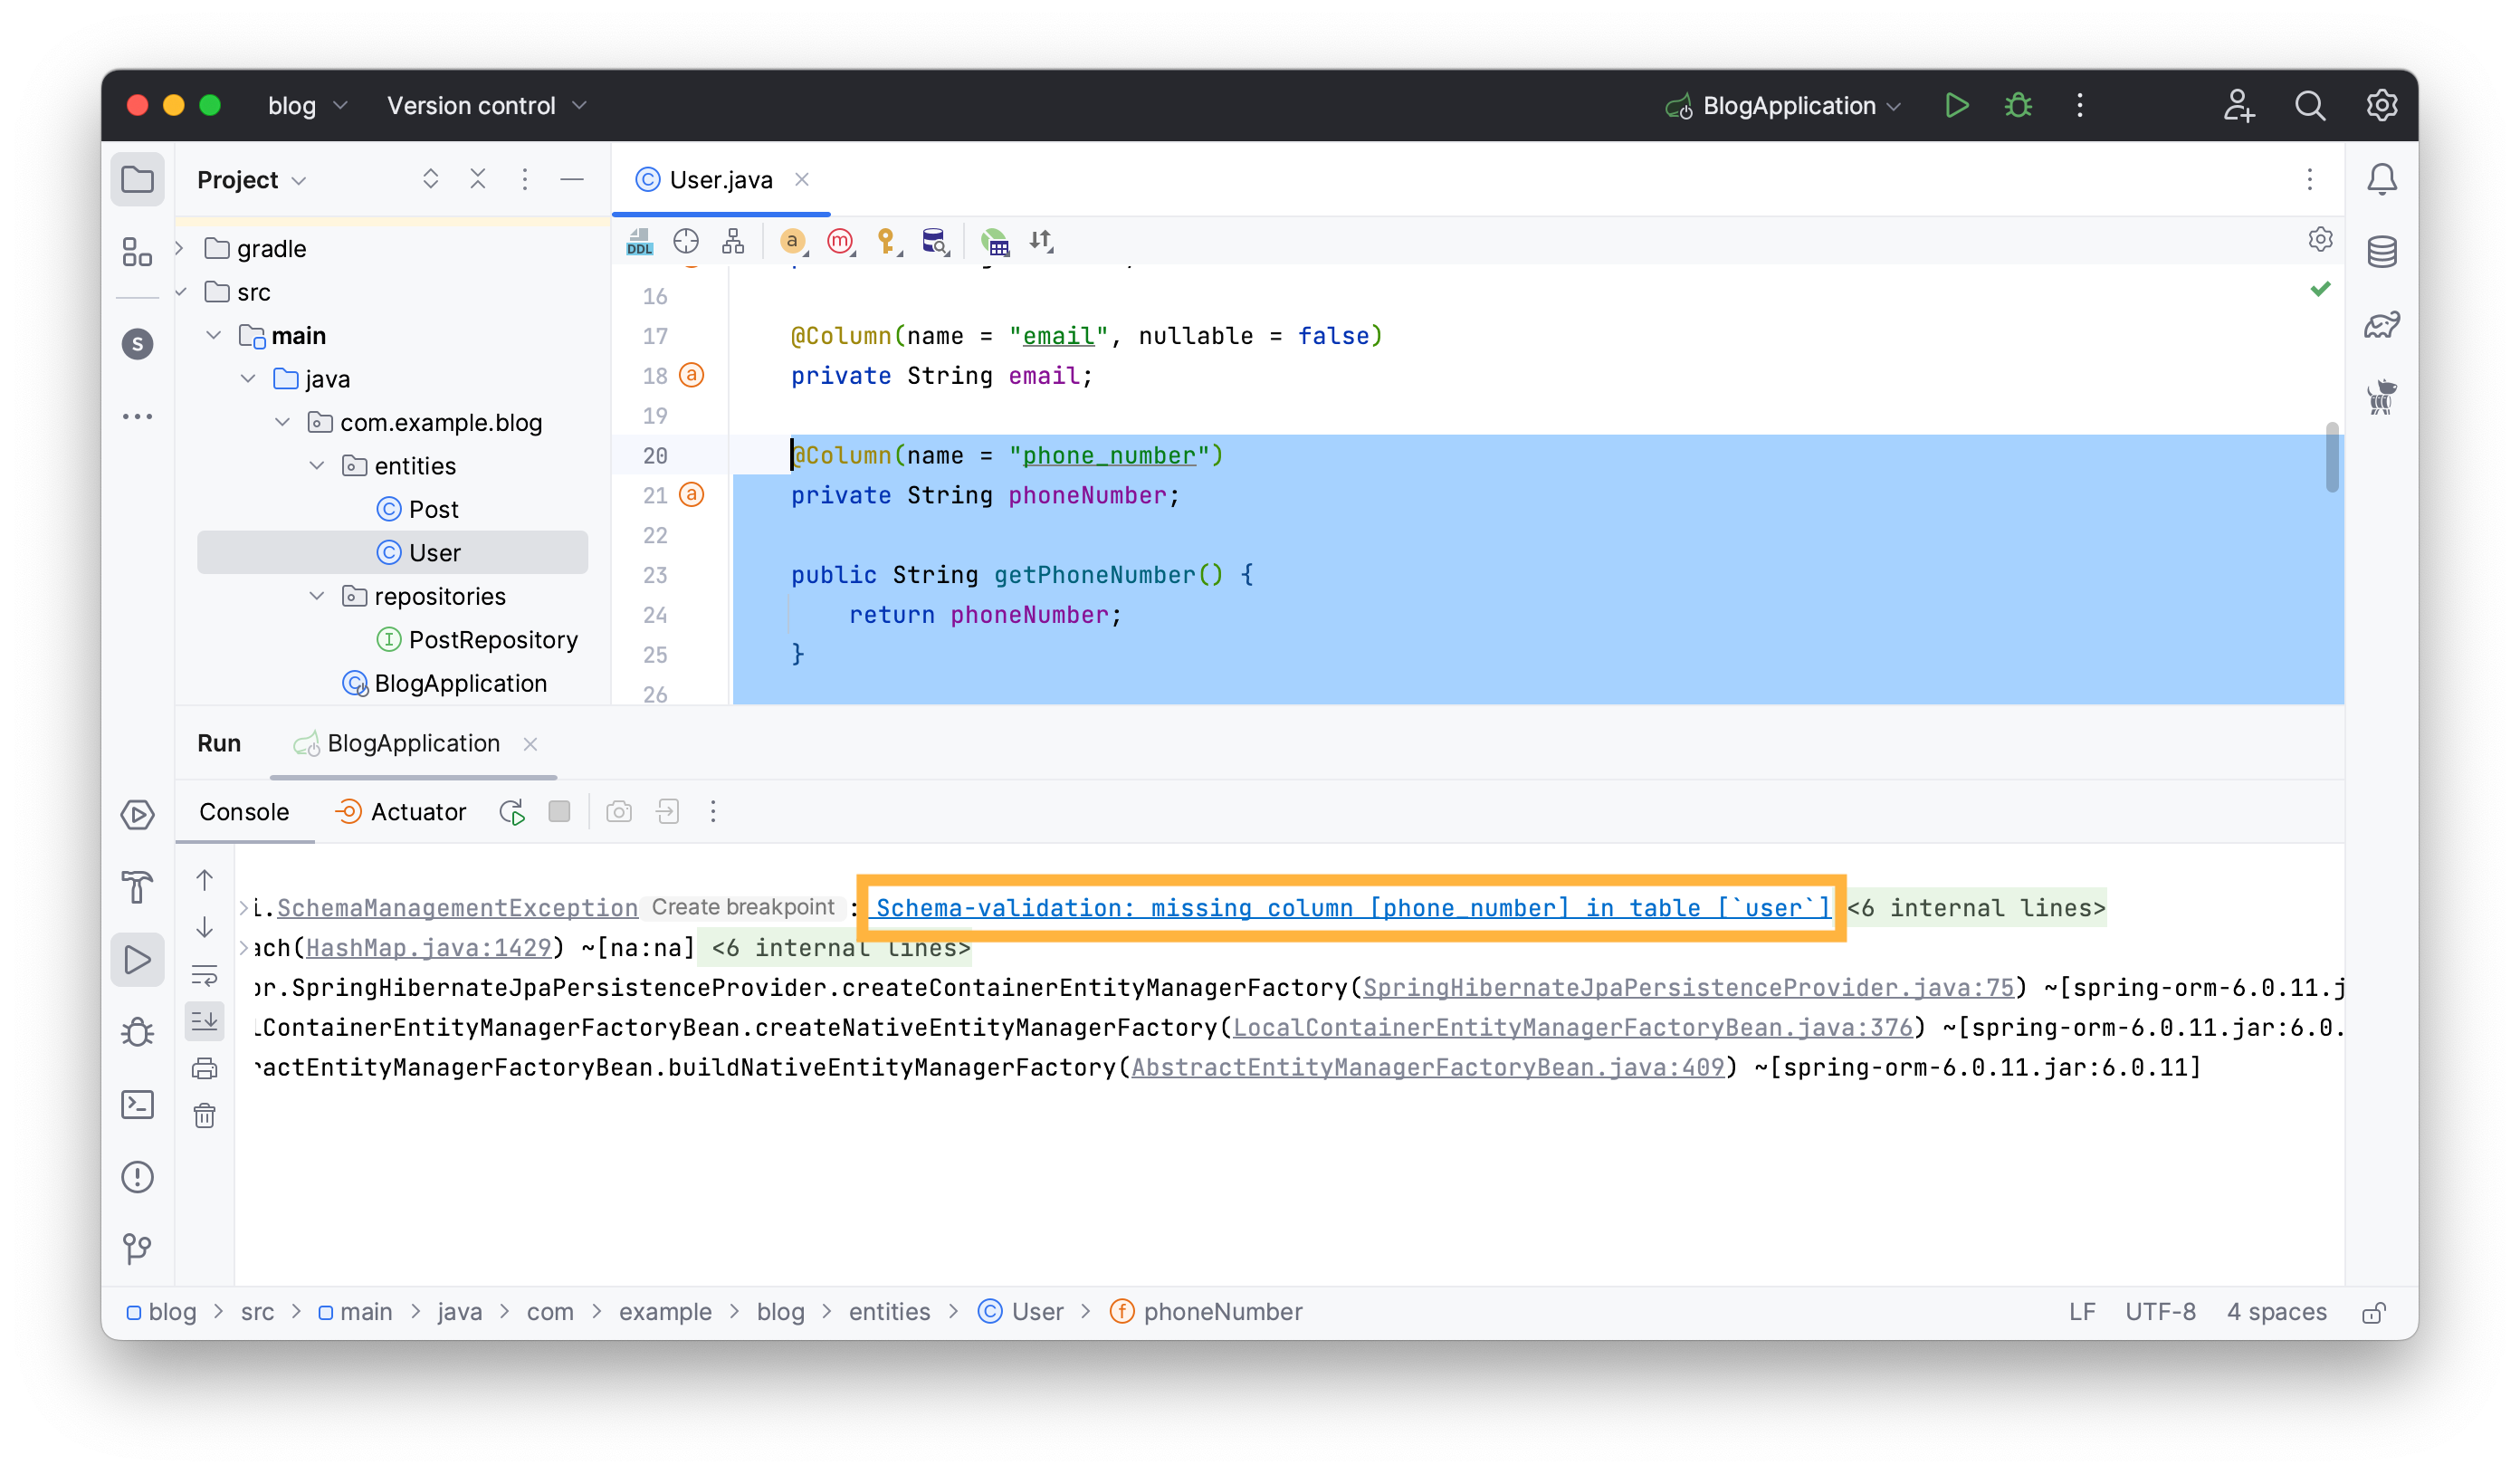
JPA Buddy provides a clickable error message in the stacktrace that invokes the necessary wizard to fix any JPA model-DB schema mismatch error it encounters. Click on the error message to invoke the Generate DDL by Entities and generate the necessary DDL statement.
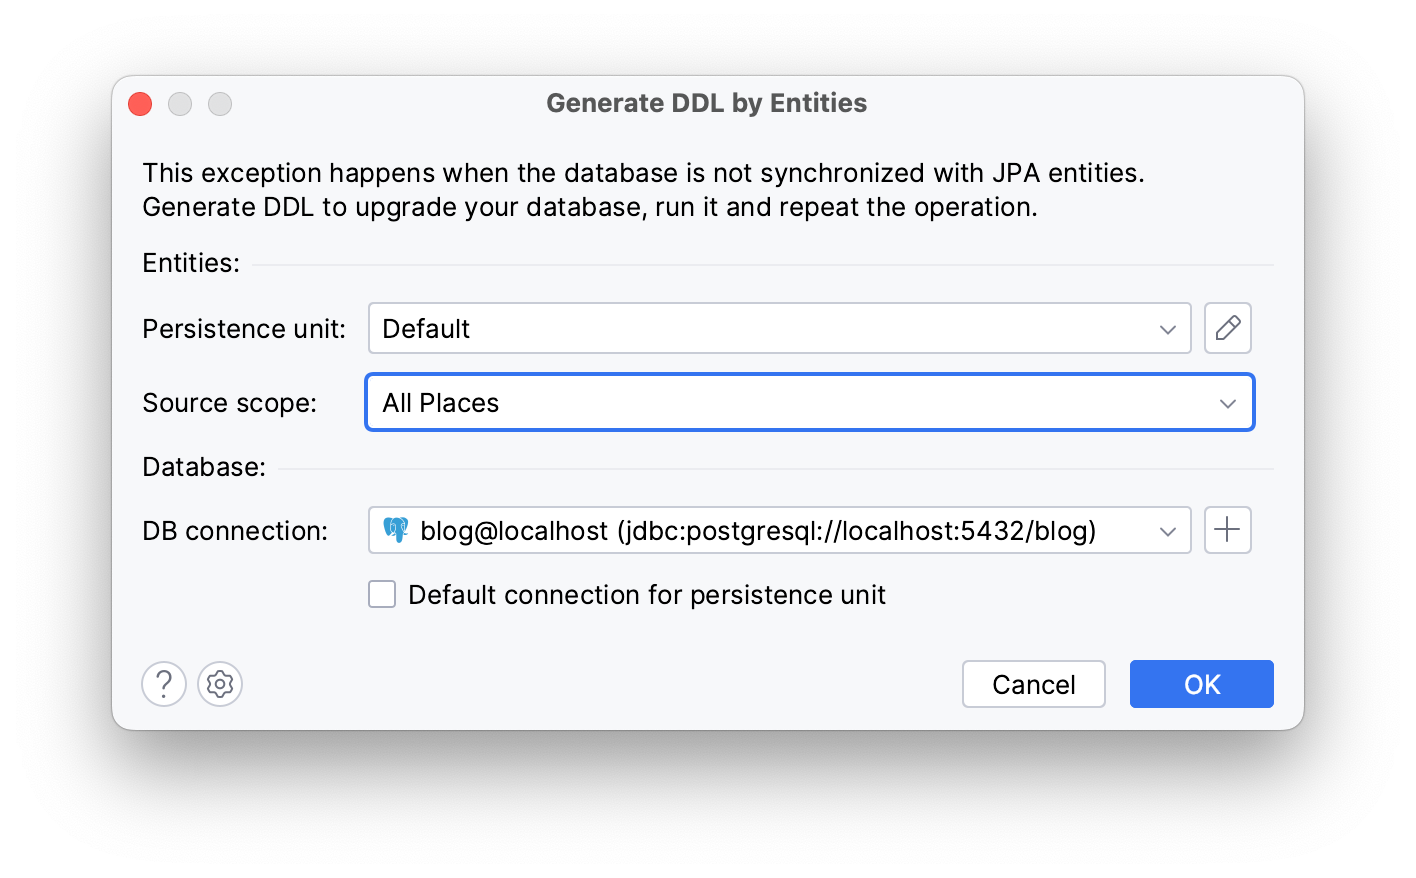
Click OK to view the DDL statement in the DDL by Entites Preview window and choose the Database Console option to generate the statement in the DB console.
Click OK.
Highlight and execute the statement to apply it.
Now you can restart the application, which will create the previously written code to create a Post instance.
Conclusion
In this guide, you went through some issues that you may encounter when using Hibernate’s ddl-auto update property and how to resolve them with JPA Buddy’s DDL generation. Here's why generating DDL statements manually is often preferable:
- Ddl-auto doesn't let you review the DDL before it runs
- It lacks a method for accurate Java to Database type mapping
- It doesn't support attribute converters or specific Hibernate types
Consequently, relying solely on ddl-auto's update property can often result in an incomplete database