Generate or synchronize JPA/Hibernate entities from existing DB tables in IntelliJ IDEA | JPA Buddy
Many prefer to design the database schema first and then synchronize corresponding JPA entities with DB tables. JPA Buddy supports such a DB-first approach. You can generate entities from existing tables with relations, convert individual columns to entity fields, set up preferable mapping rules and more!
Estimated Reading Time: 5 minutes
Introduction
Designing your database first then writing JPA entities to map tables is common practice in application development, especially when dealing with complex or pre-existing database schemas. However, it can be a time-consuming and error-prone task without the right tool in hand. That's where JPA Buddy and its Reverse Engineering feature come into play.
In this guide, you will create a database from scratch and build a simple blog application with two tables and one database view. JPA Buddy will generate entities from the created database and reflect any database updates in your entities following best practices.
Objectives
You will learn how to:
- Set up a new project
- Set up a database connection
- Create database tables
- Generate entities from an existing DB
- Update existing entities
- Create a database view
You can find the code of this application on github.
Setting up a New Project
First, you will go through a few steps to set up a new project. In this section, you will:
- Create a new project using Spring Initializr
- Load the project in IntelliJ IDEA
Start by creating a Spring Boot application using Spring Initializr.
- Visit Spring Initializr’s website.
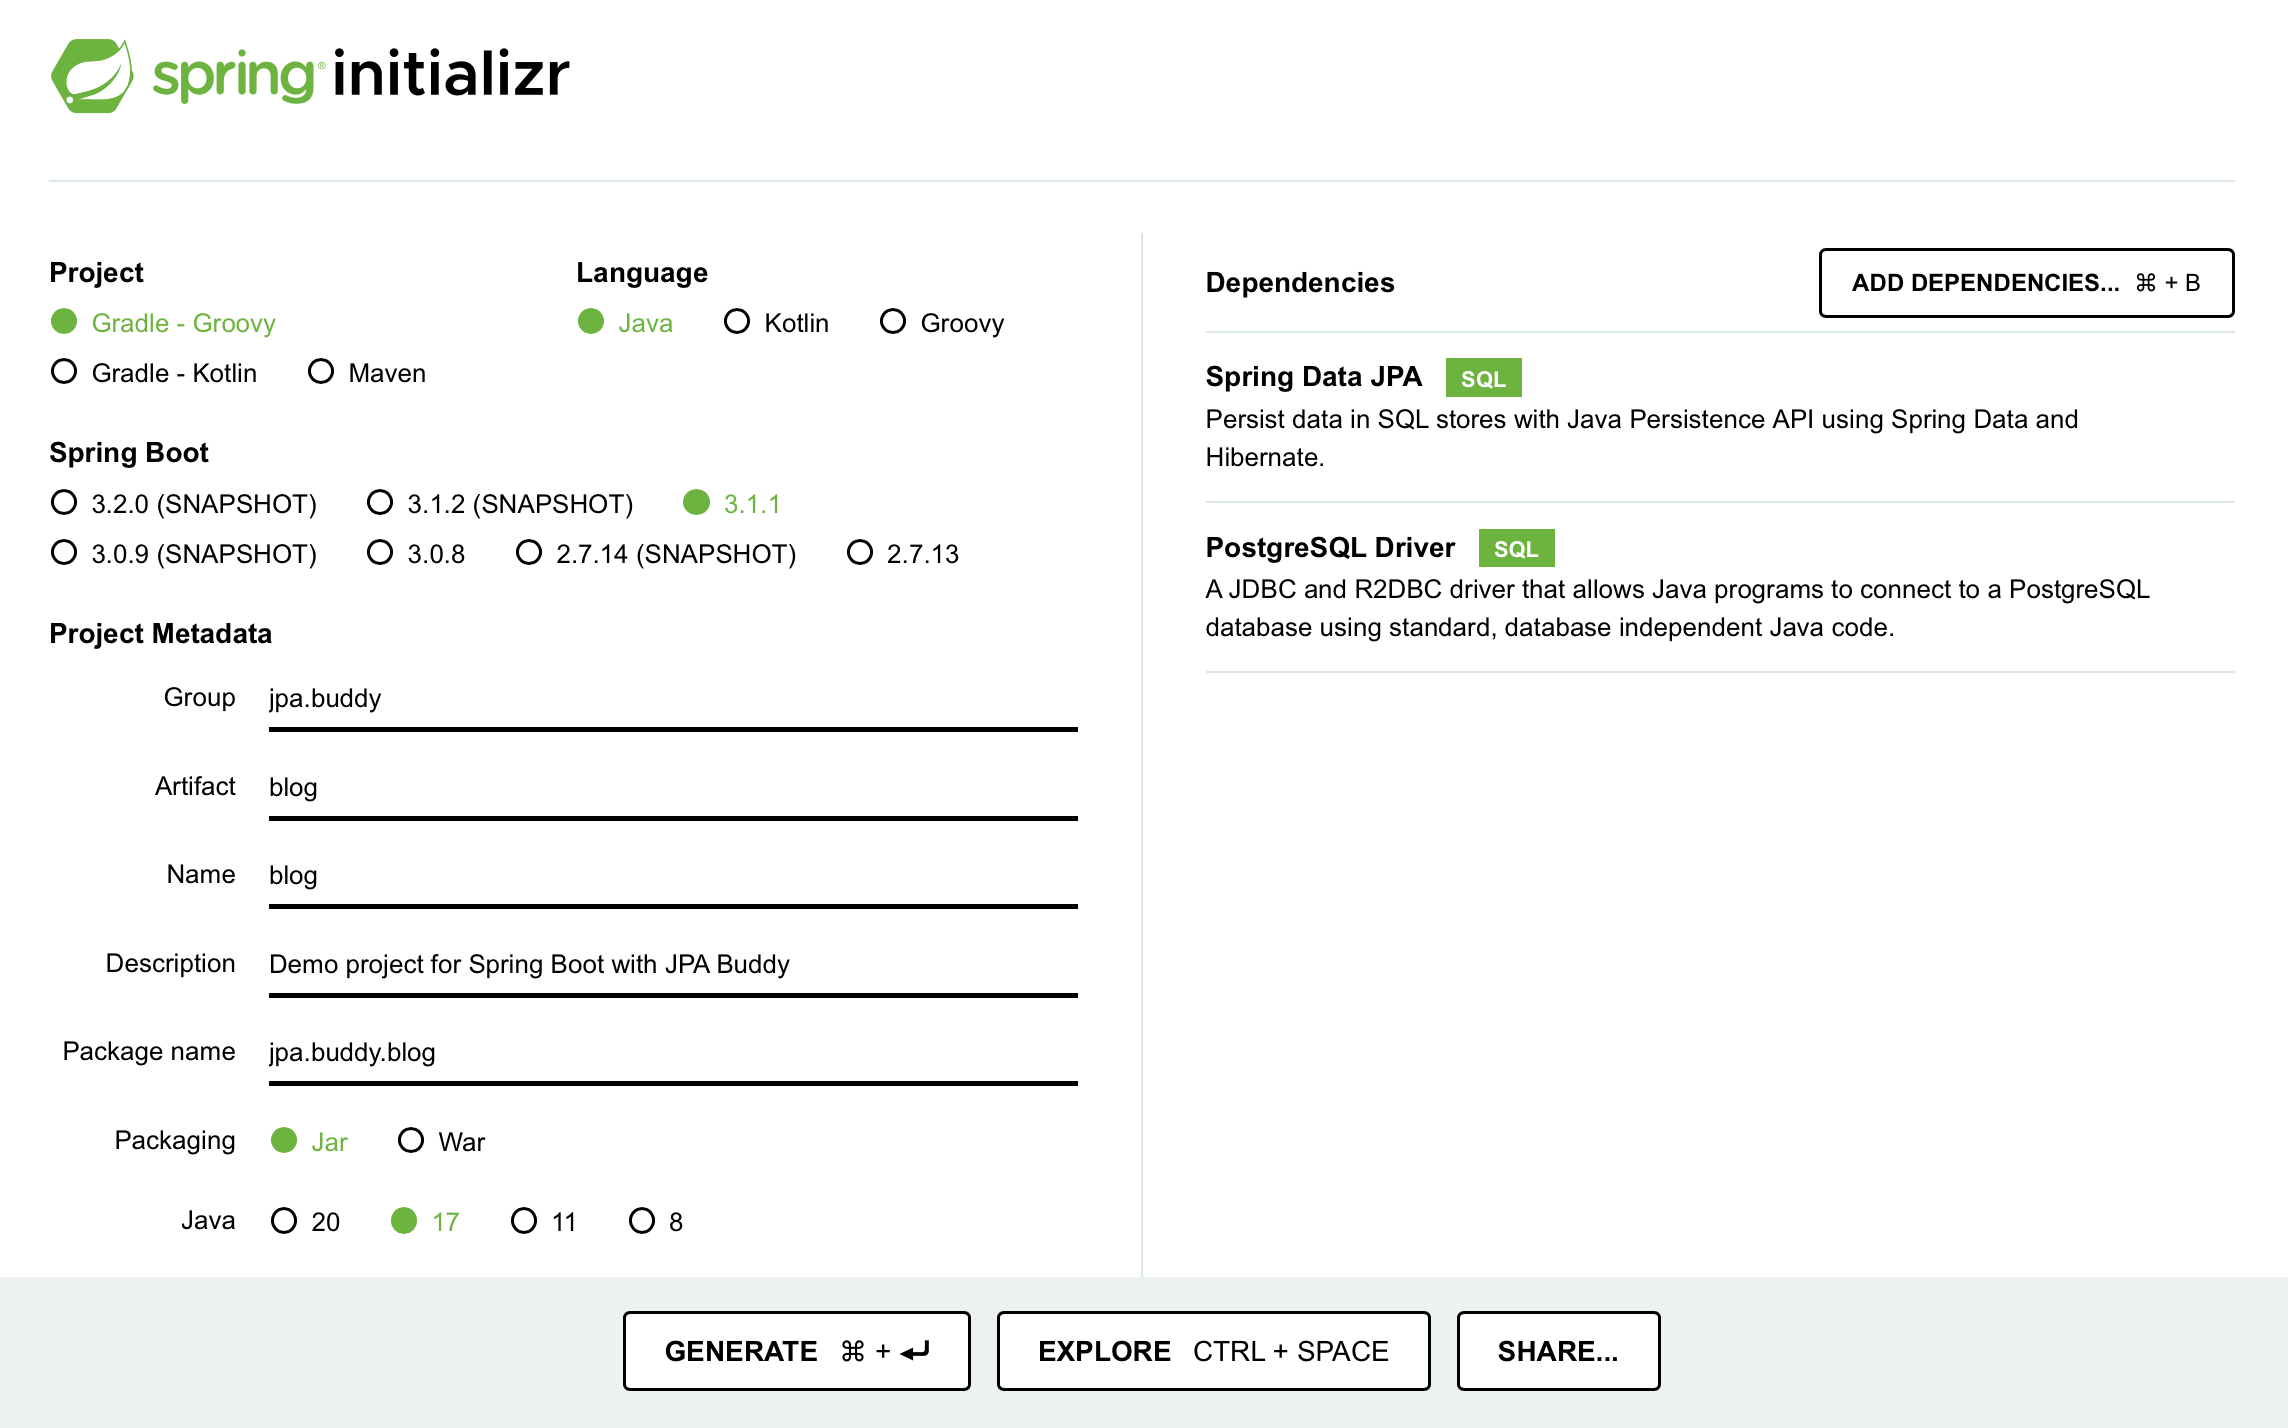
- Select the following settings:
- Java 17 as the programming language
- Gradle - Groovy as the build tool
- The latest stable version of Spring Boot
- The application will be packaged as a JAR file
- Add the following dependencies to your project:
- Spring Data JPA enables us to use JPA and Data Repositories
- PostgreSQL Driver provides database access
These dependencies enable you to use JPA Buddy’s functionalities and access a PostgresSQL database.
Here are the selected settings in Spring Initializr:
Download the created project and open it in Intellij IDEA by clicking on File → Open.
Setting up a Database Connection
To connect your application to the database, you need to:
- Set up a new connection
- Link the application to the datasource using a properties file
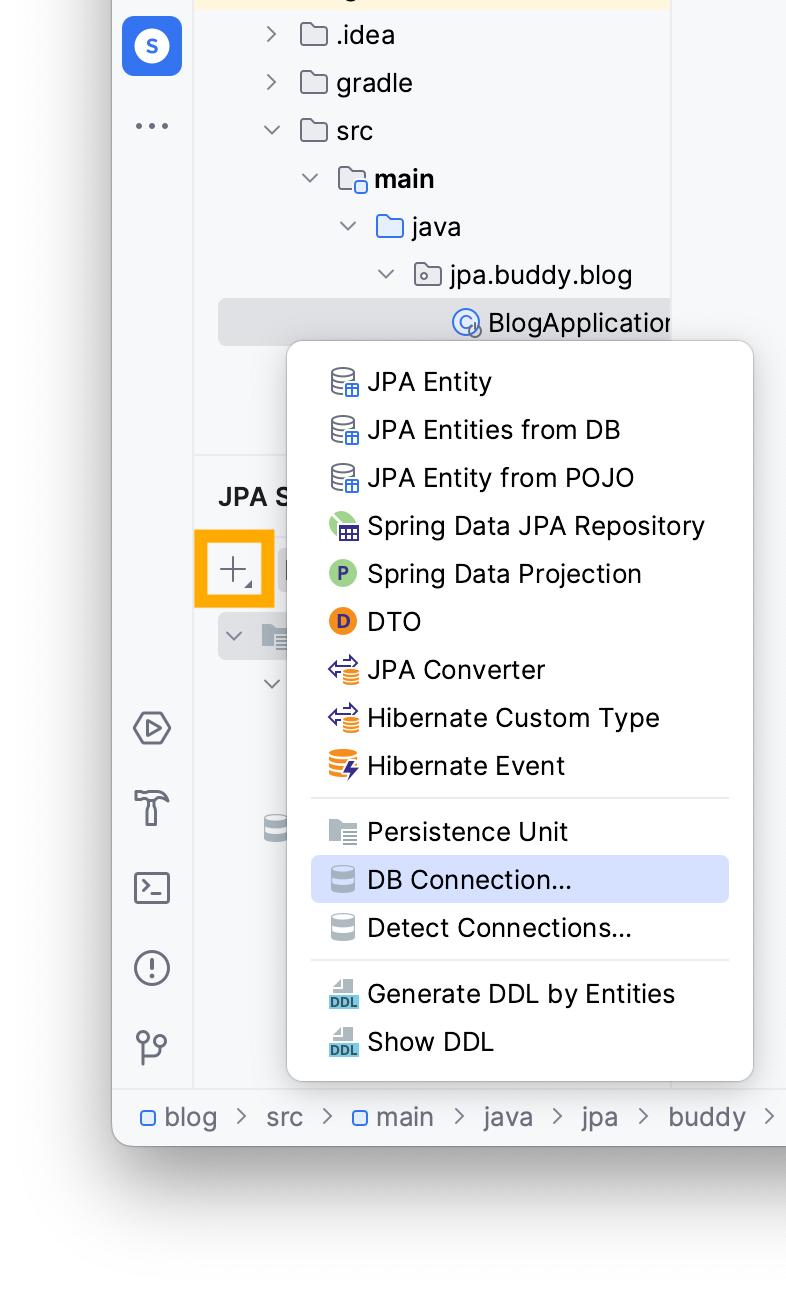
You can use JPA Buddy to set up a new connection through the JPA Structure tab:
- Navigate to the JPA Structure tab
- Click on the + button
- Click on DB Connection...
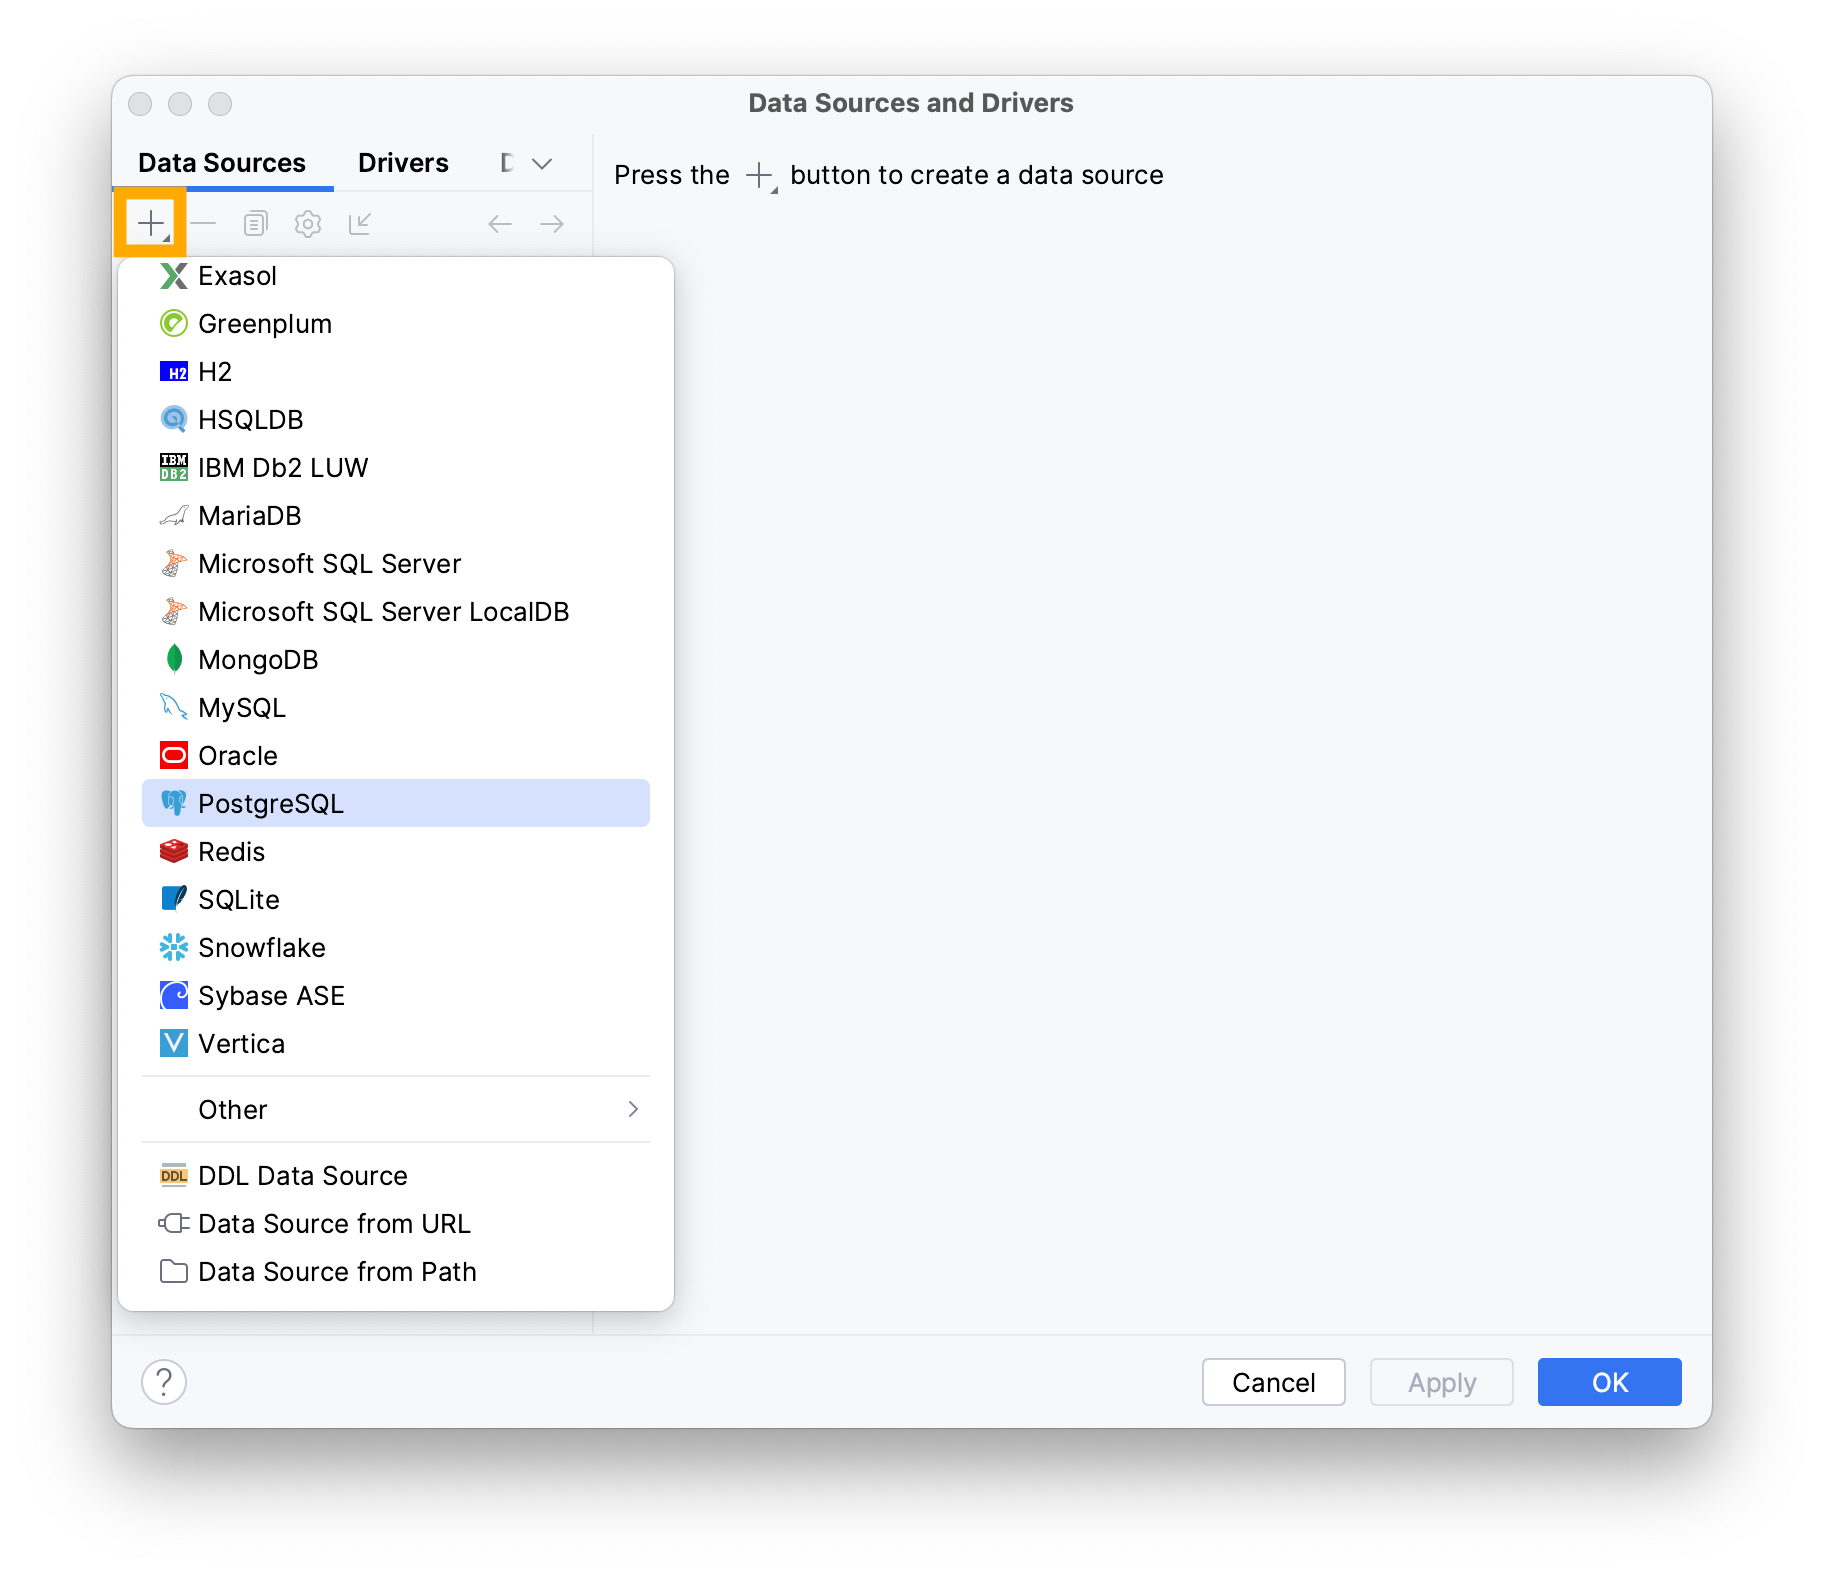
Add a new connection by clicking on the + button and choose PostgreSQL.
Type the following information in the invoked window:
- Username
- Password
- Name of the database
Note that your values may vary depending on your local environment.
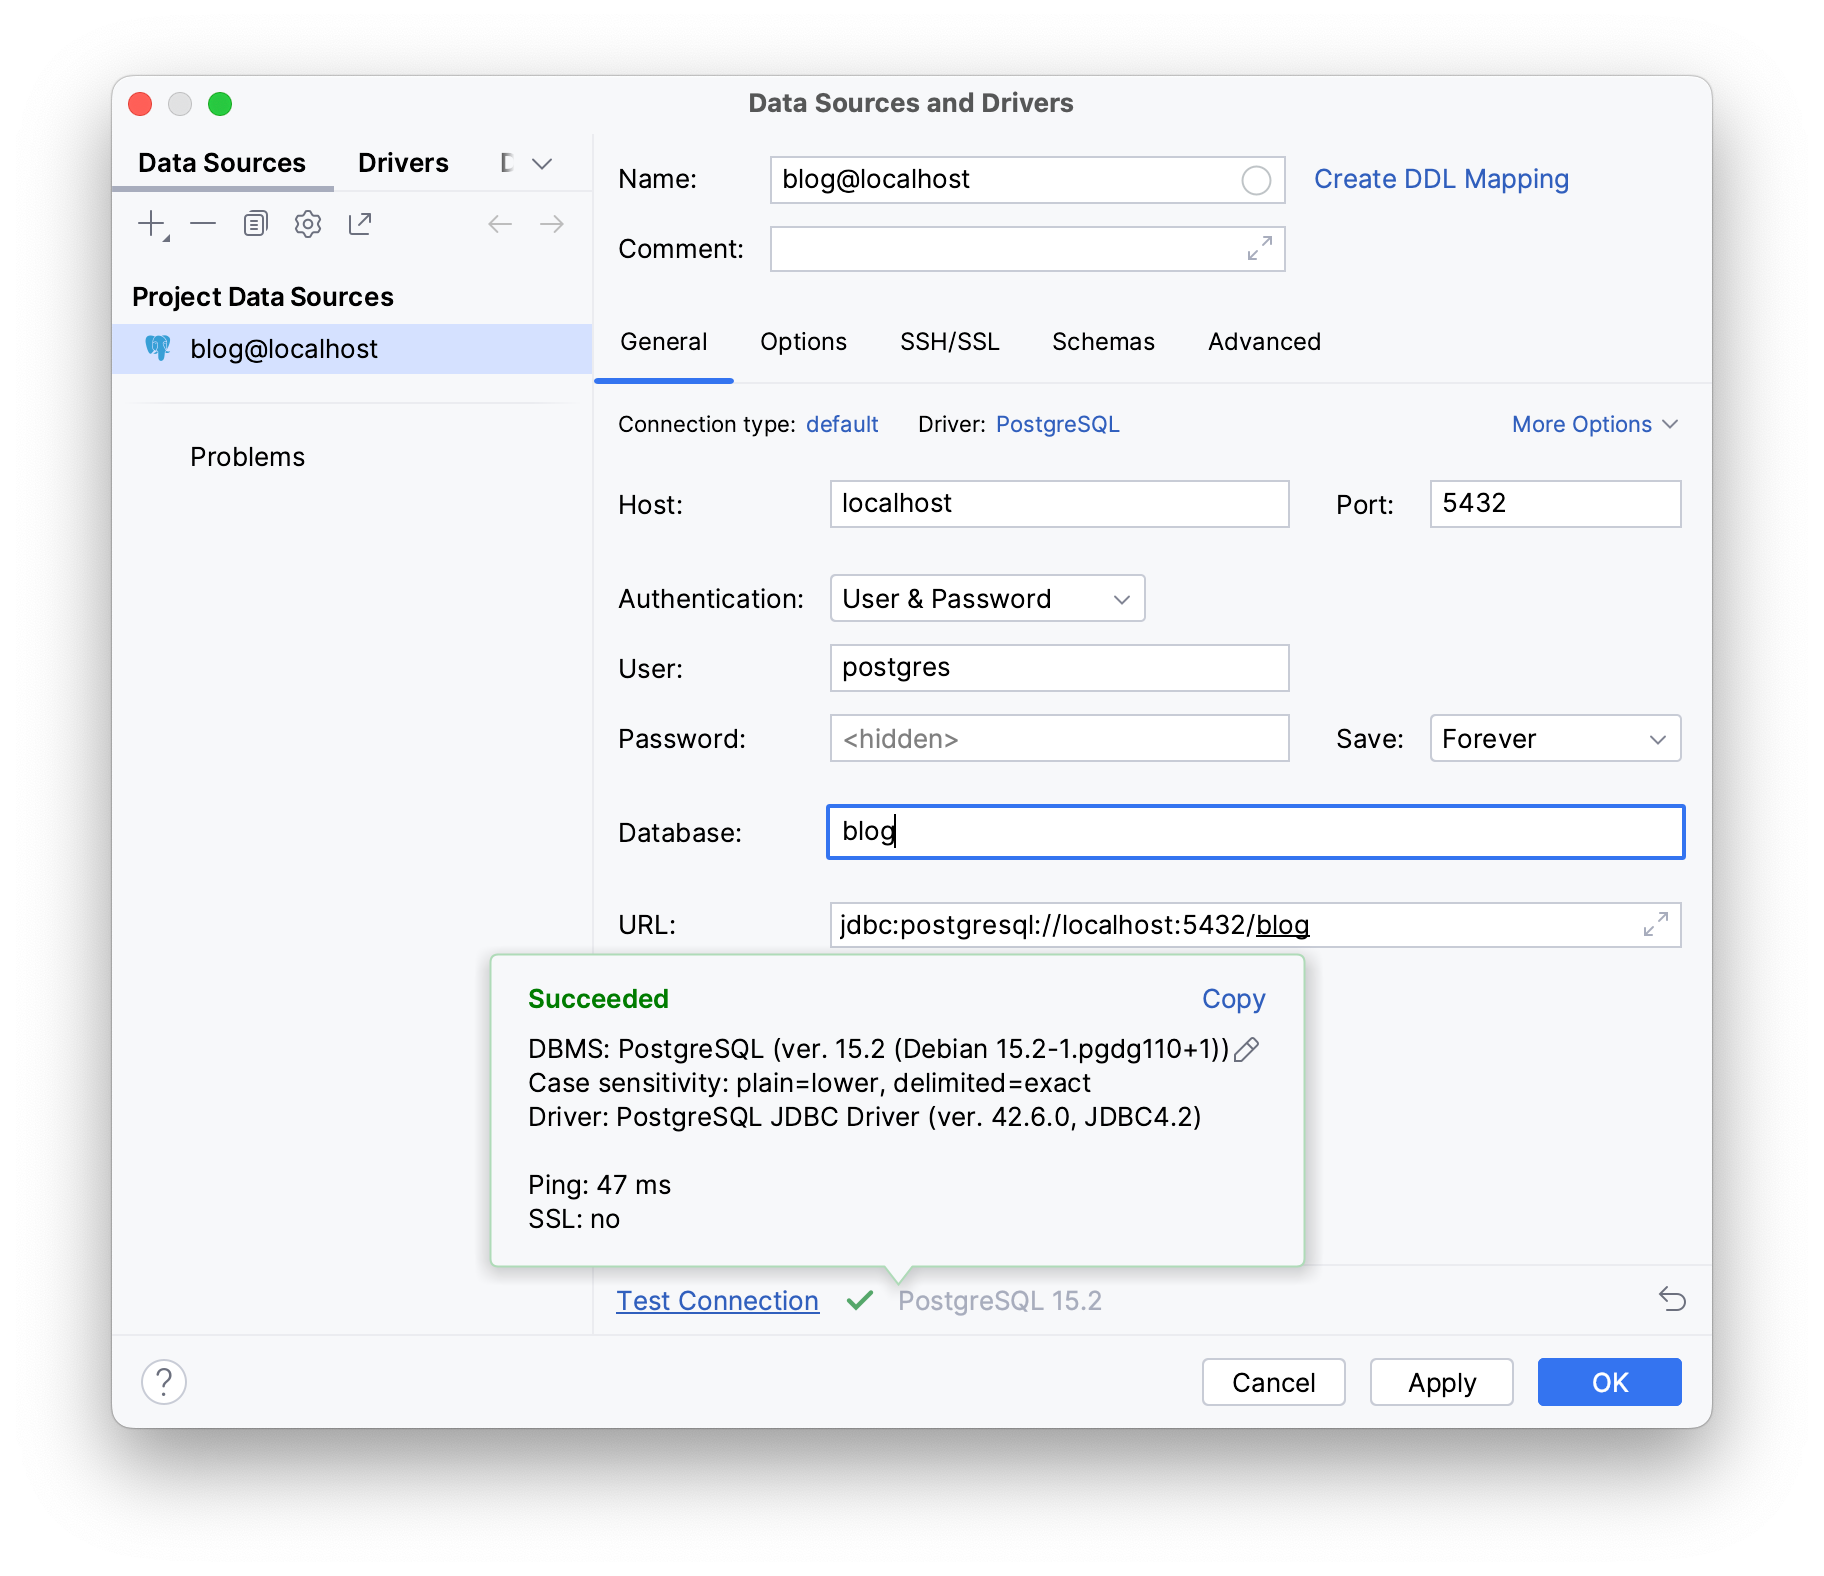
To check if your database works as intended, click on Test Connection, it should display Succeeded if your database is properly configured and actively listening on its assigned port.
Click OK.
Next, provide the necessary datasource details to your application in the application.properties file under the resources folder:
- Open your
application.propertiesfile - Use Intellij IDEA’s Generate shortcut (Command/Ctrl + N)
- Select the Data source option

JPA Buddy automatically detects the existing datasource.
Enable Hibernate to validate your schema with your entity mappings during startup by setting the Hibernate DDL-auto property to validate.
The Show/Format SQL options allow you to view formatted SQL logs on your terminal.
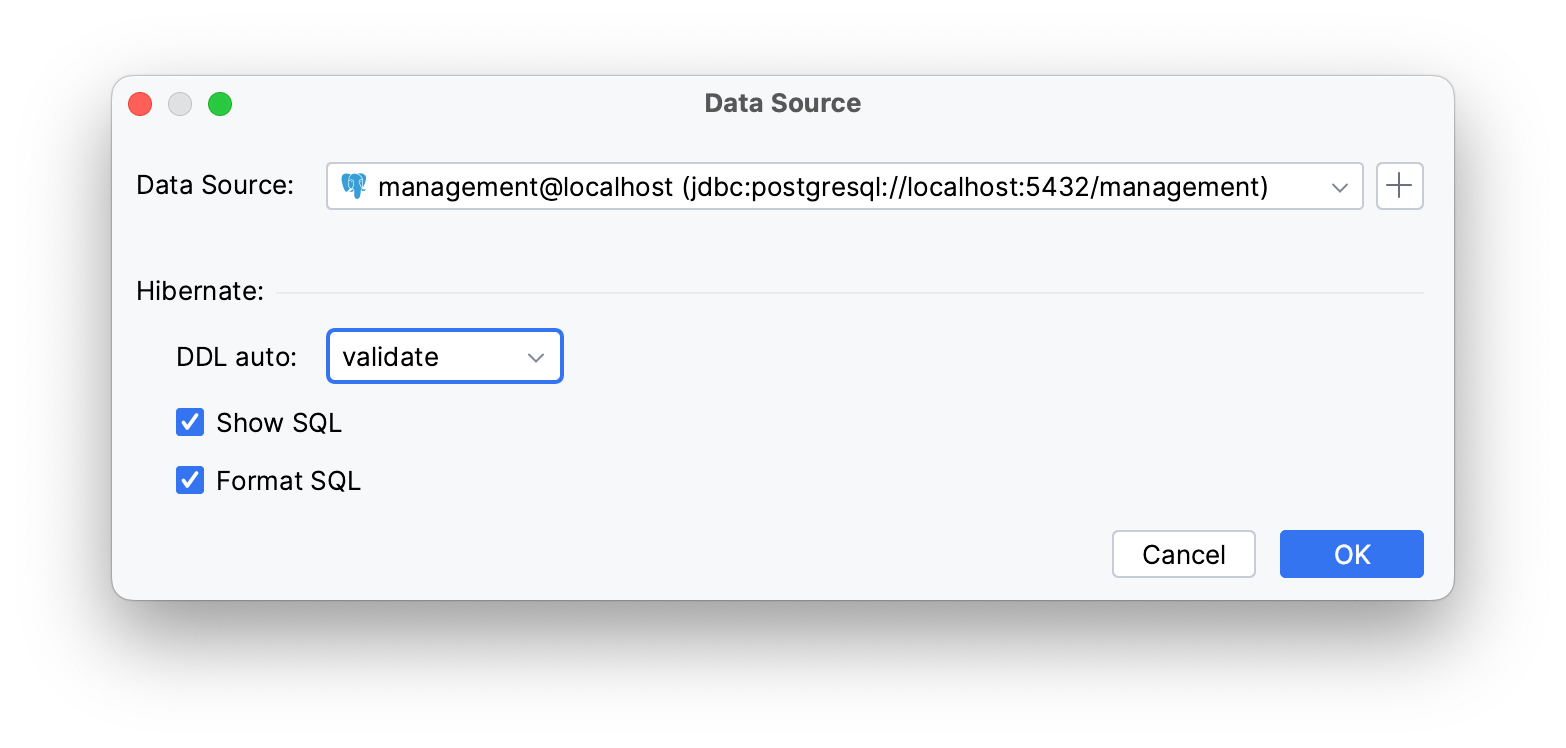
The mentioned settings generate the following properties:
spring.datasource.url=jdbc:postgresql://localhost:5432/blog
spring.datasource.username=postgres
spring.datasource.password=postgres
spring.datasource.driverClassName=org.postgresql.Driver
spring.jpa.hibernate.ddl-auto=validate
spring.jpa.show-sql=true
spring.jpa.properties.hibernate.format_sql=true
Creating Database Tables
Now that your application is connected to the database, it's time to create the database schema. In this blog application project, you will create two tables and one view:
user: table for storing blog user informationblog: table for storing blog postsuserStatistics: view for tracking each user’s number of posts
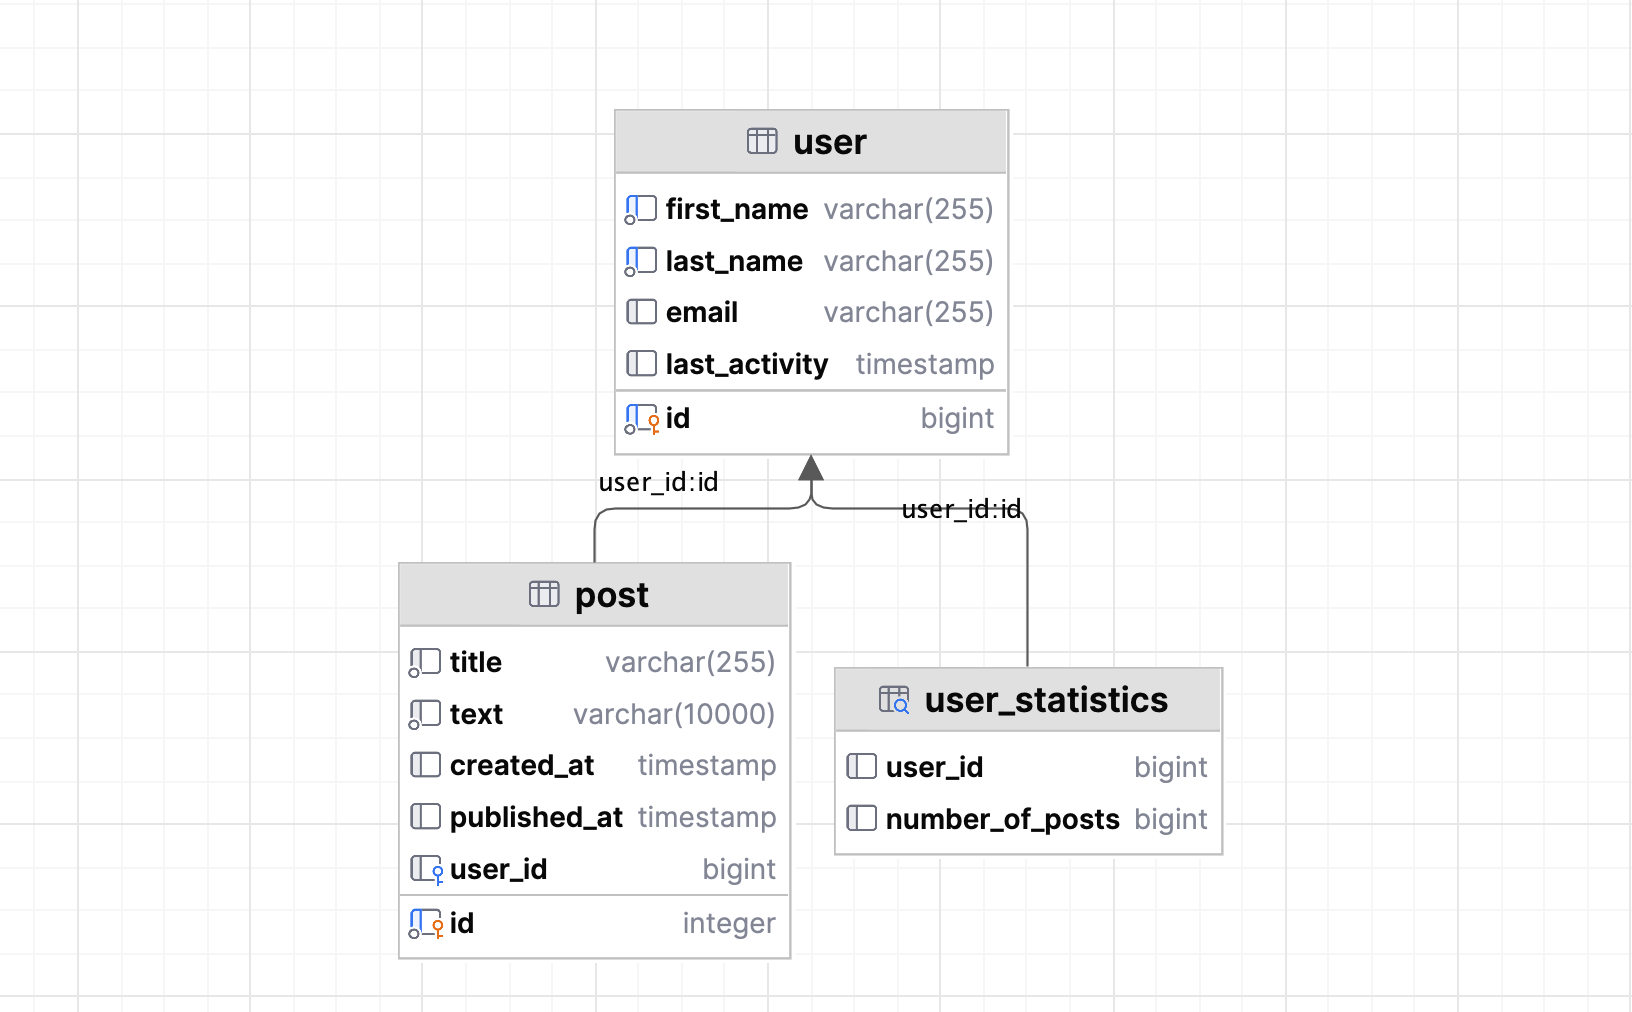
The relationship between post and user is many-to-one, meaning that multiple posts can be associated with a single user.
Let’s create those tables in the database first. Open your PostgreSQL console from the project panel under Scratches and Consoles/Databases and Consoles/blog@localhost.
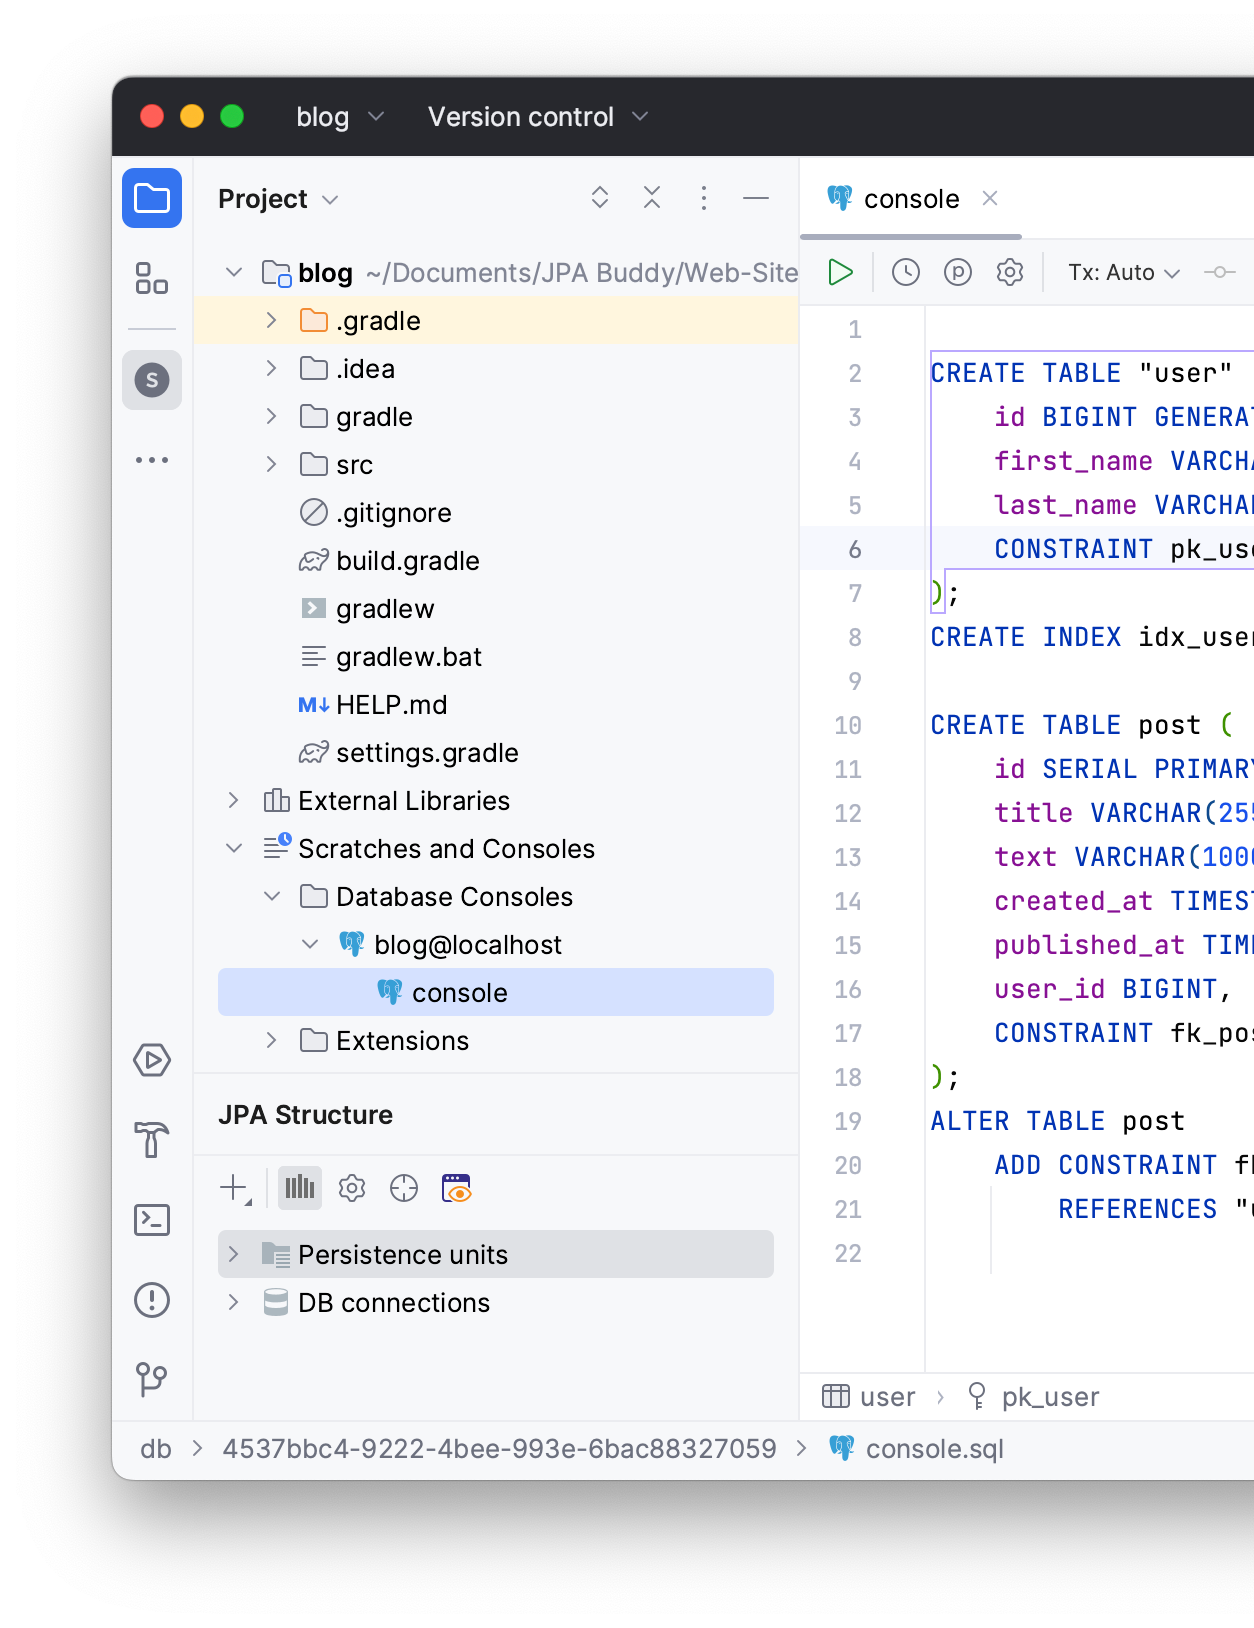
To create the user table, type the following SQL code:
CREATE TABLE "user" (
 id BIGINT GENERATED BY DEFAULT AS IDENTITY NOT NULL,
 first_name VARCHAR(255) NOT NULL,
 last_name VARCHAR(255) NOT NULL,
 CONSTRAINT pk_user PRIMARY KEY (id)
);
To speed up querying the first_name and last_name columns in the user table, add an index after creating the user table:
CREATE INDEX idx_user_name ON "user" (first_name, last_name);
To create the post table:
CREATE TABLE post (
 id SERIAL PRIMARY KEY,
 title VARCHAR(255) NOT NULL,
 text VARCHAR(10000) NOT NULL,
 created_at TIMESTAMP WITHOUT TIME ZONE,
 published_at TIMESTAMP WITHOUT TIME ZONE,
 user_id BIGINT REFERENCES "user" (id),
 CONSTRAINT fk_post_on_user FOREIGN KEY (user_id) REFERENCES "user" (id)
);
The user_id foreign key reflects the many-to-one relationship between the two tables.
Submit your changes to the database by clicking on the Execute button.
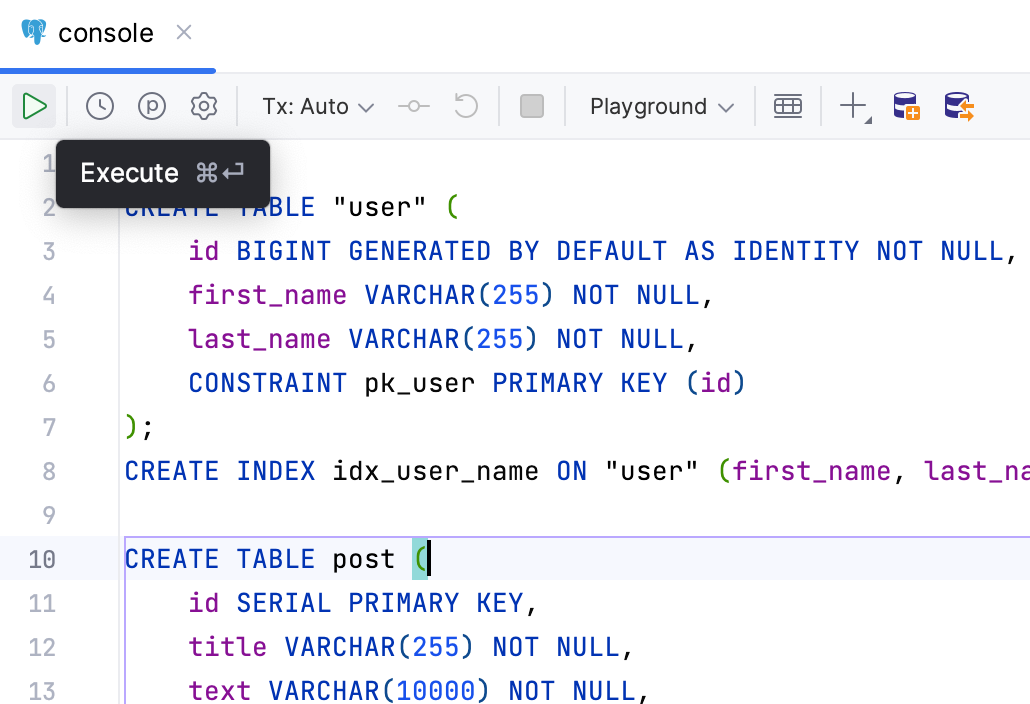
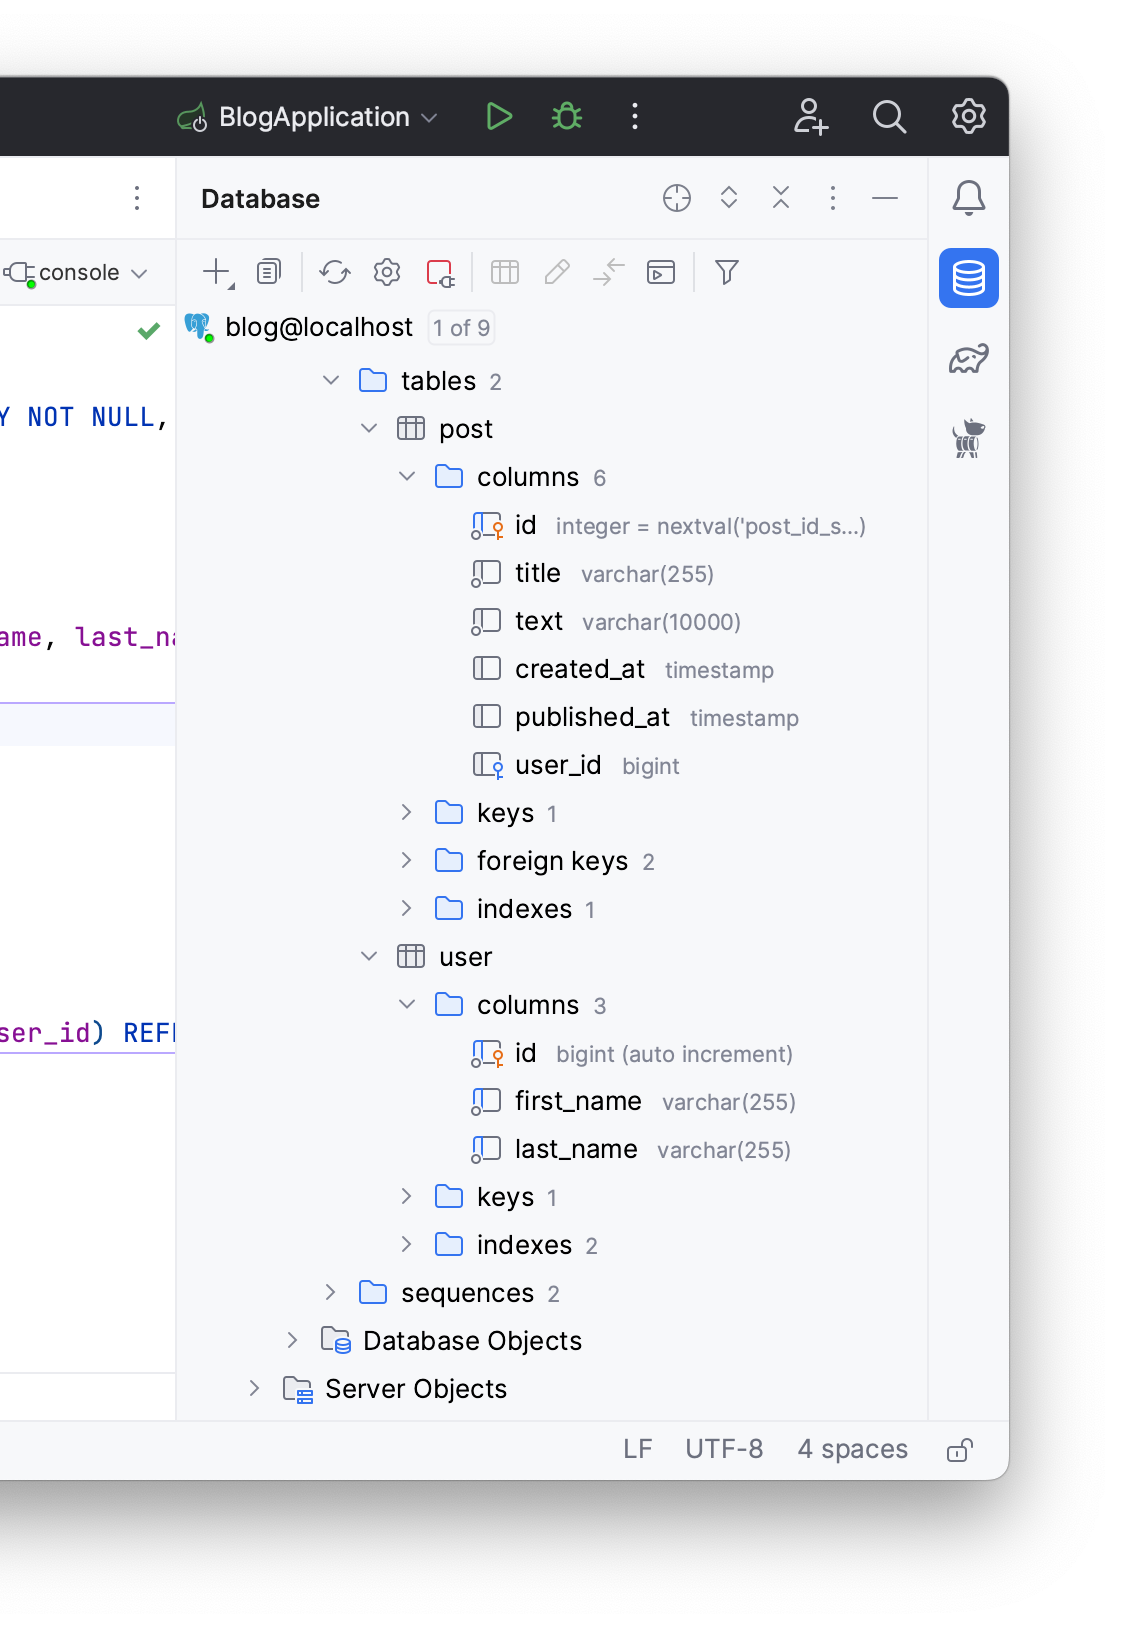
You can view all the created tables in the Database tab.
Generating entities from the database
The application needs entity classes to represent the database tables and interact with them. In this section, you will:
- Generate entities from an existing database
- Add a
OneToManyreference to theUserentity
To generate entities from an existing database, use the JPA Structure tab:
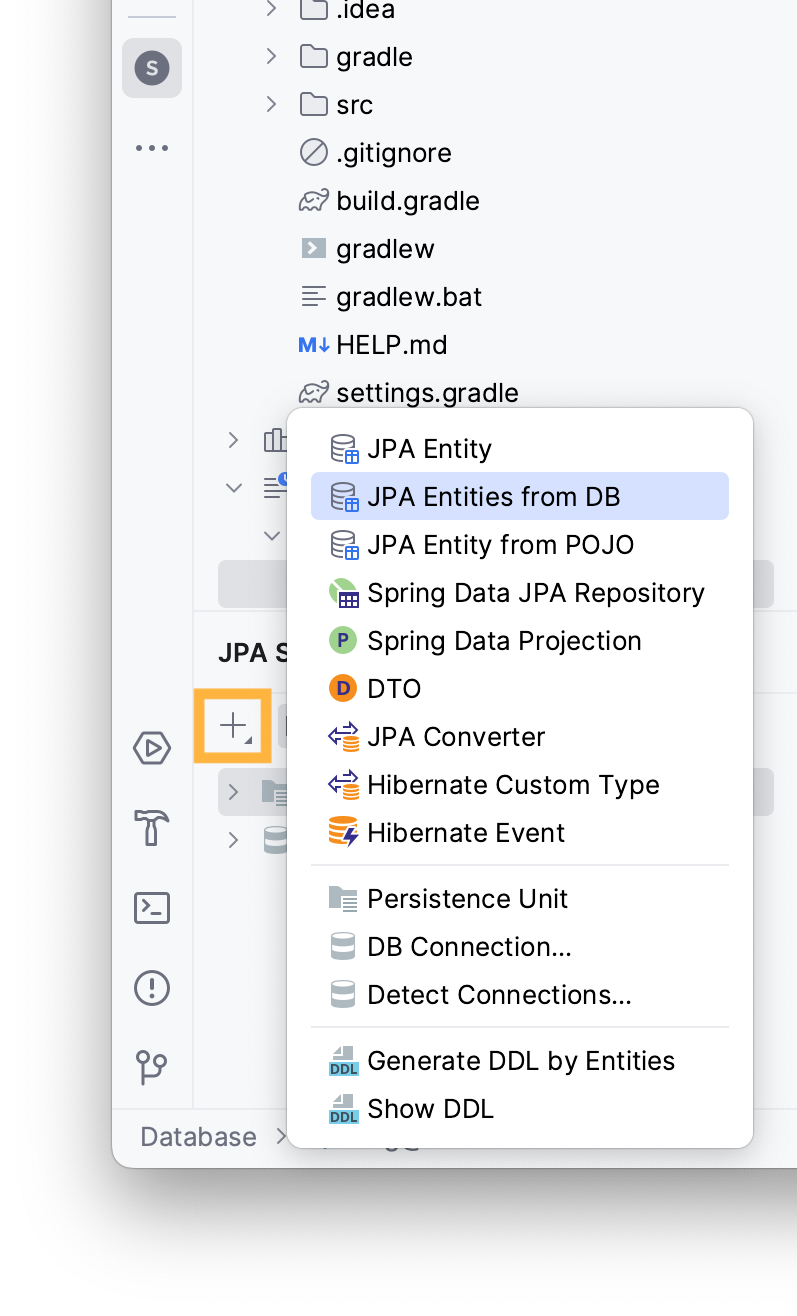
- Click on the + button in JPA Structure
- Choose JPA Entities from DB
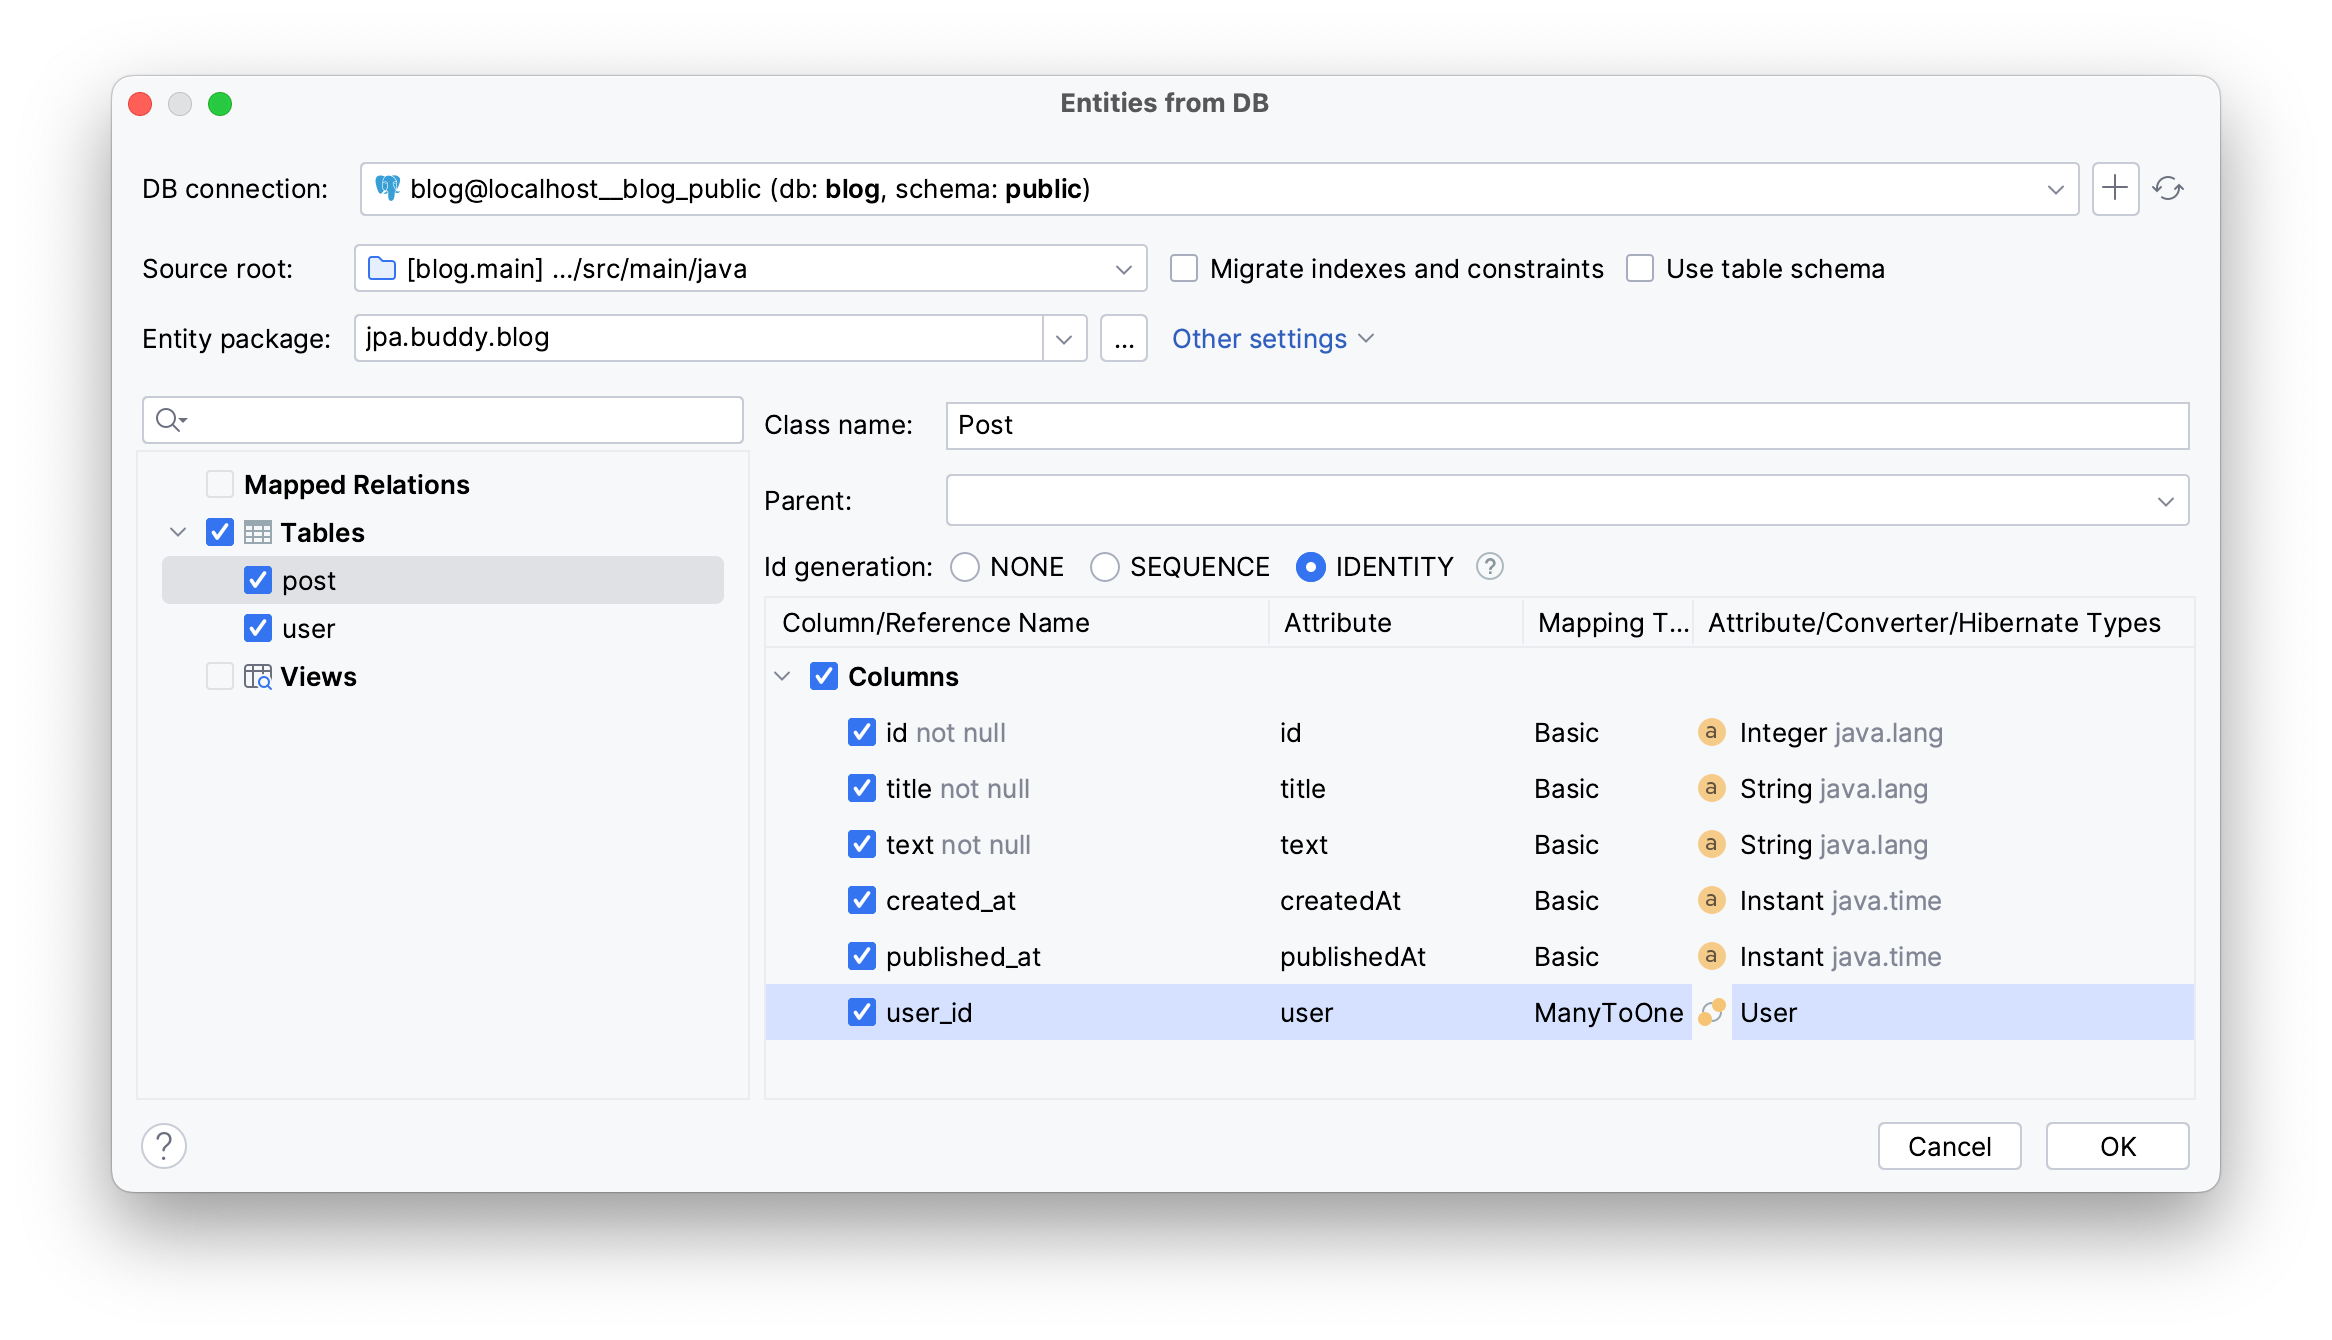
Choose the public schema as your DB connection to see your tables, then tick the post table.
JPA Buddy suggests attribute types based on your table’s column definition. To generate a ManyToOne relationship, click on the referenced user_id column, which will automatically pick the user table as well.
JPA Buddy allows you to create a OneToMany relationship to directly access the post’s data from the User entity. To create it, access the user tab → tick the References option.
Remember to check the Migrate indexes and conditions checkbox to import the indexes you created for your user table.
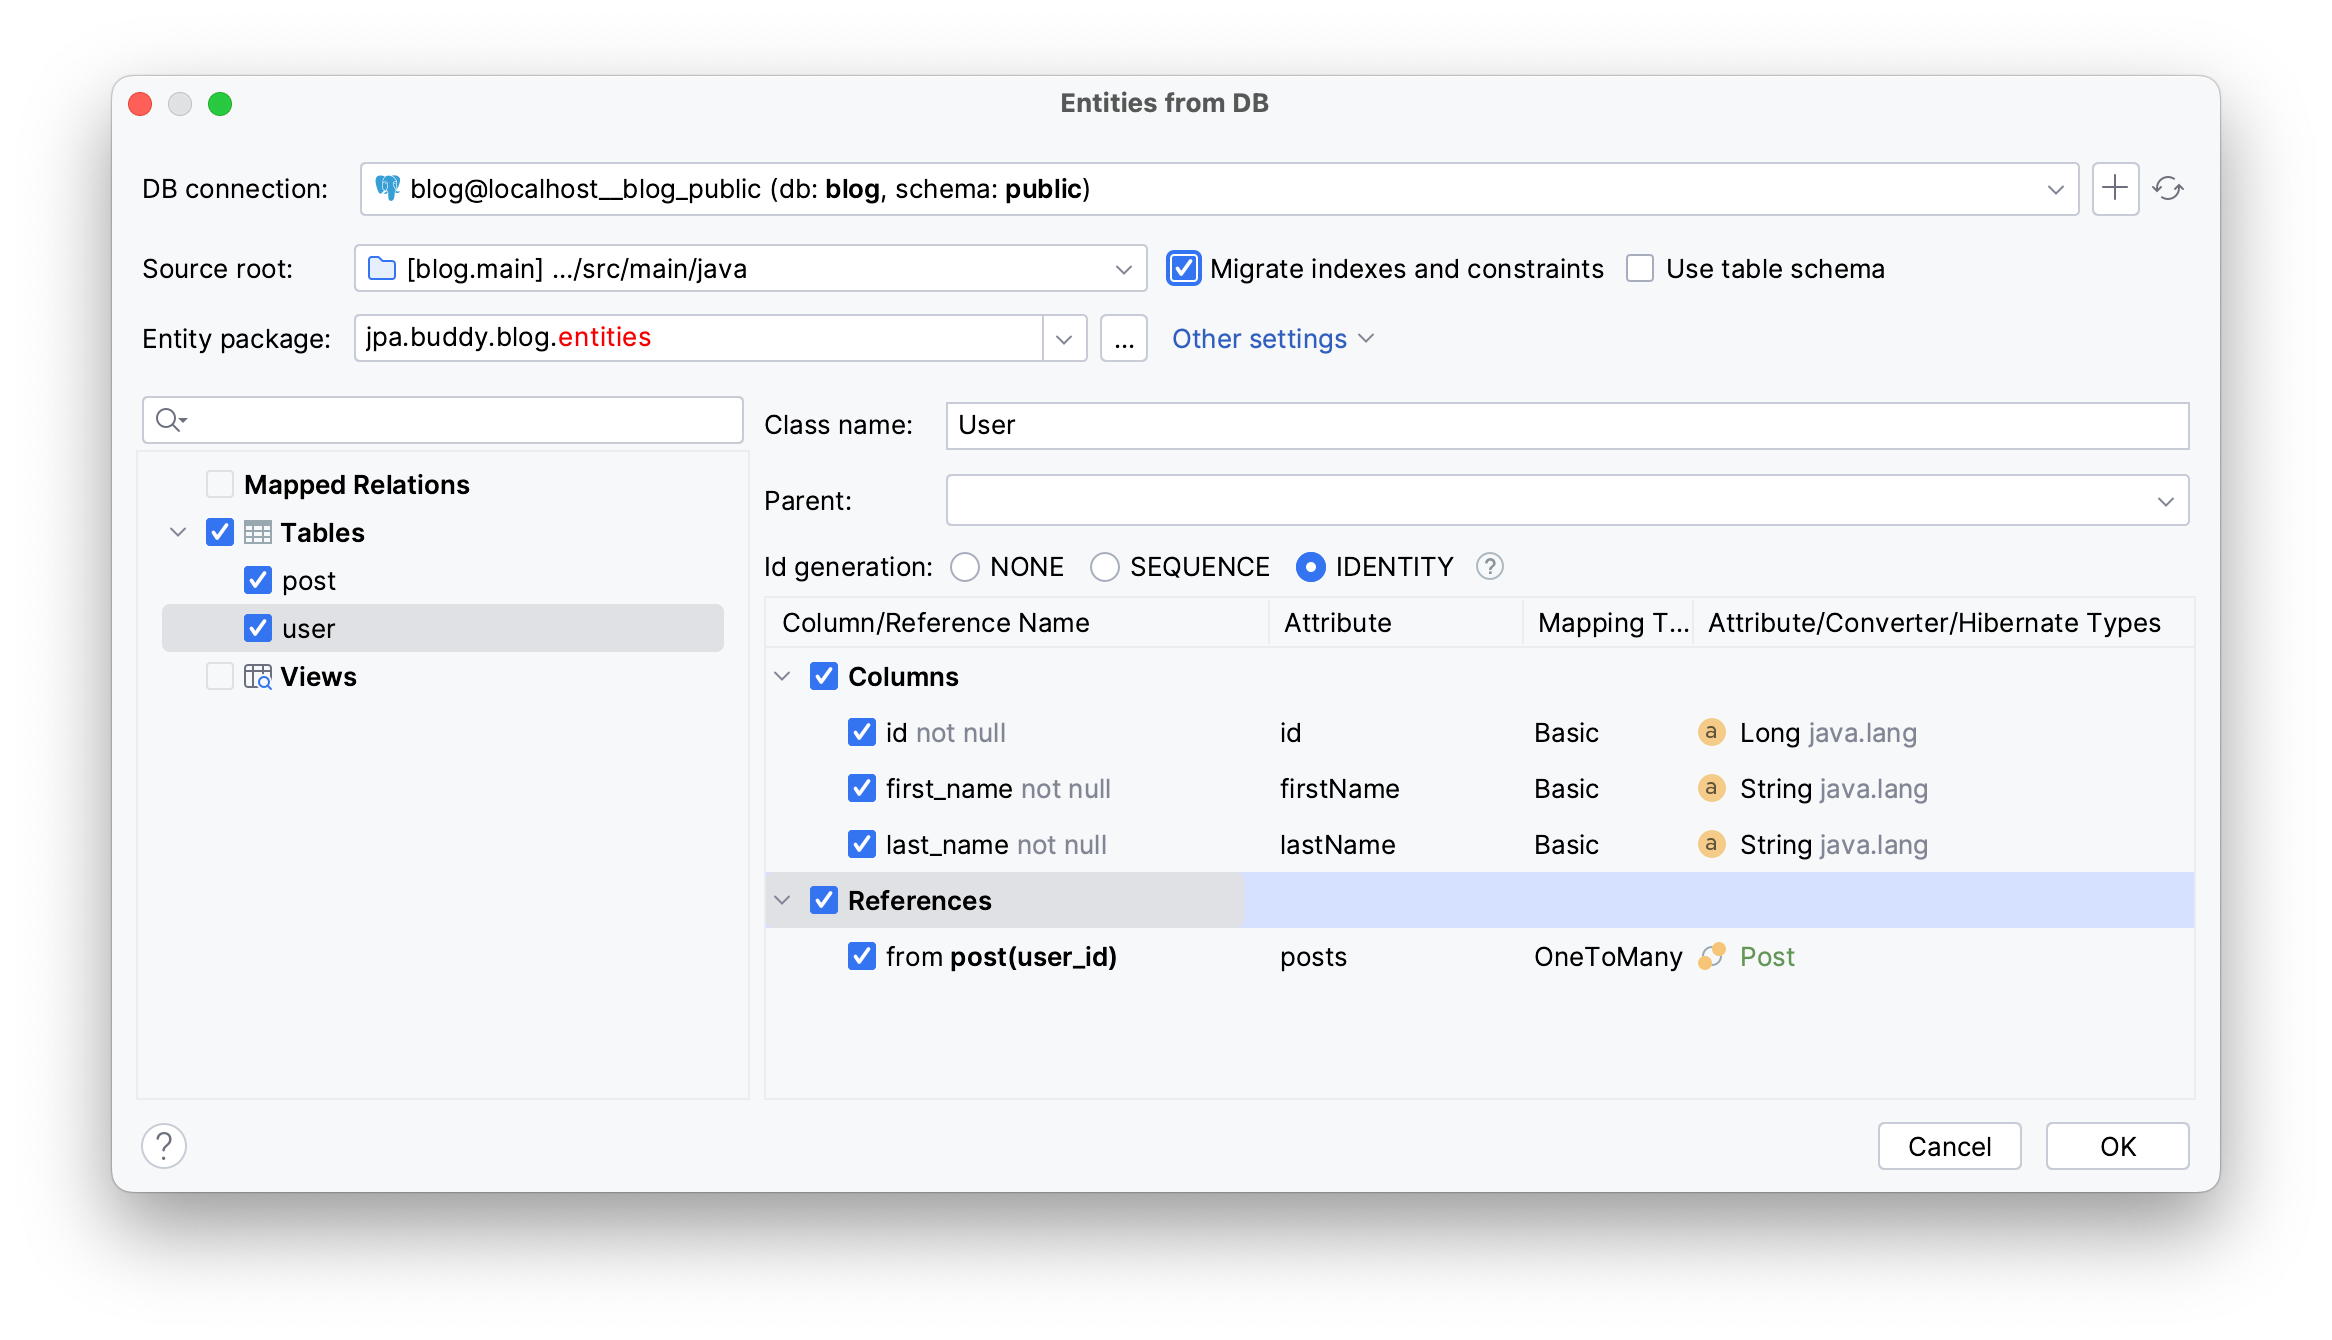
Finally, add an entities package to the Entity package name and click OK.
The mentioned instructions create an entities package with Post and User entities, along with their associated attributes.
Updating Existing Entities
JPA Buddy allows you to quickly modify your entities whenever you update your database. In this section, you will:
- Make changes to your entities’ attributes
- Reflect database updates in your entities
You can modify your entity attributes using the JPA Designer tab. Let’s change the length limit of the user’s first and last names to 50 characters:
- Open
User’s source code - Click on the
lastNameattribute - Locate the Length option
- Change
255to50

Repeat the same process for your user’s firstName.
Next, let’s add email and last_activity columns to the user table in the database. Open your console and enter the following code:
ALTER TABLE "user"
 ADD email VARCHAR(255);

ALTER TABLE "user"
 ADD last_activity TIMESTAMP WITHOUT TIME ZONE;
Execute your code to submit your changes.
Now, to update your User entity, use JPA Buddy’s JPA Designer tab:
- Return to
User’s source code - Click on Attributes
- Choose From DB
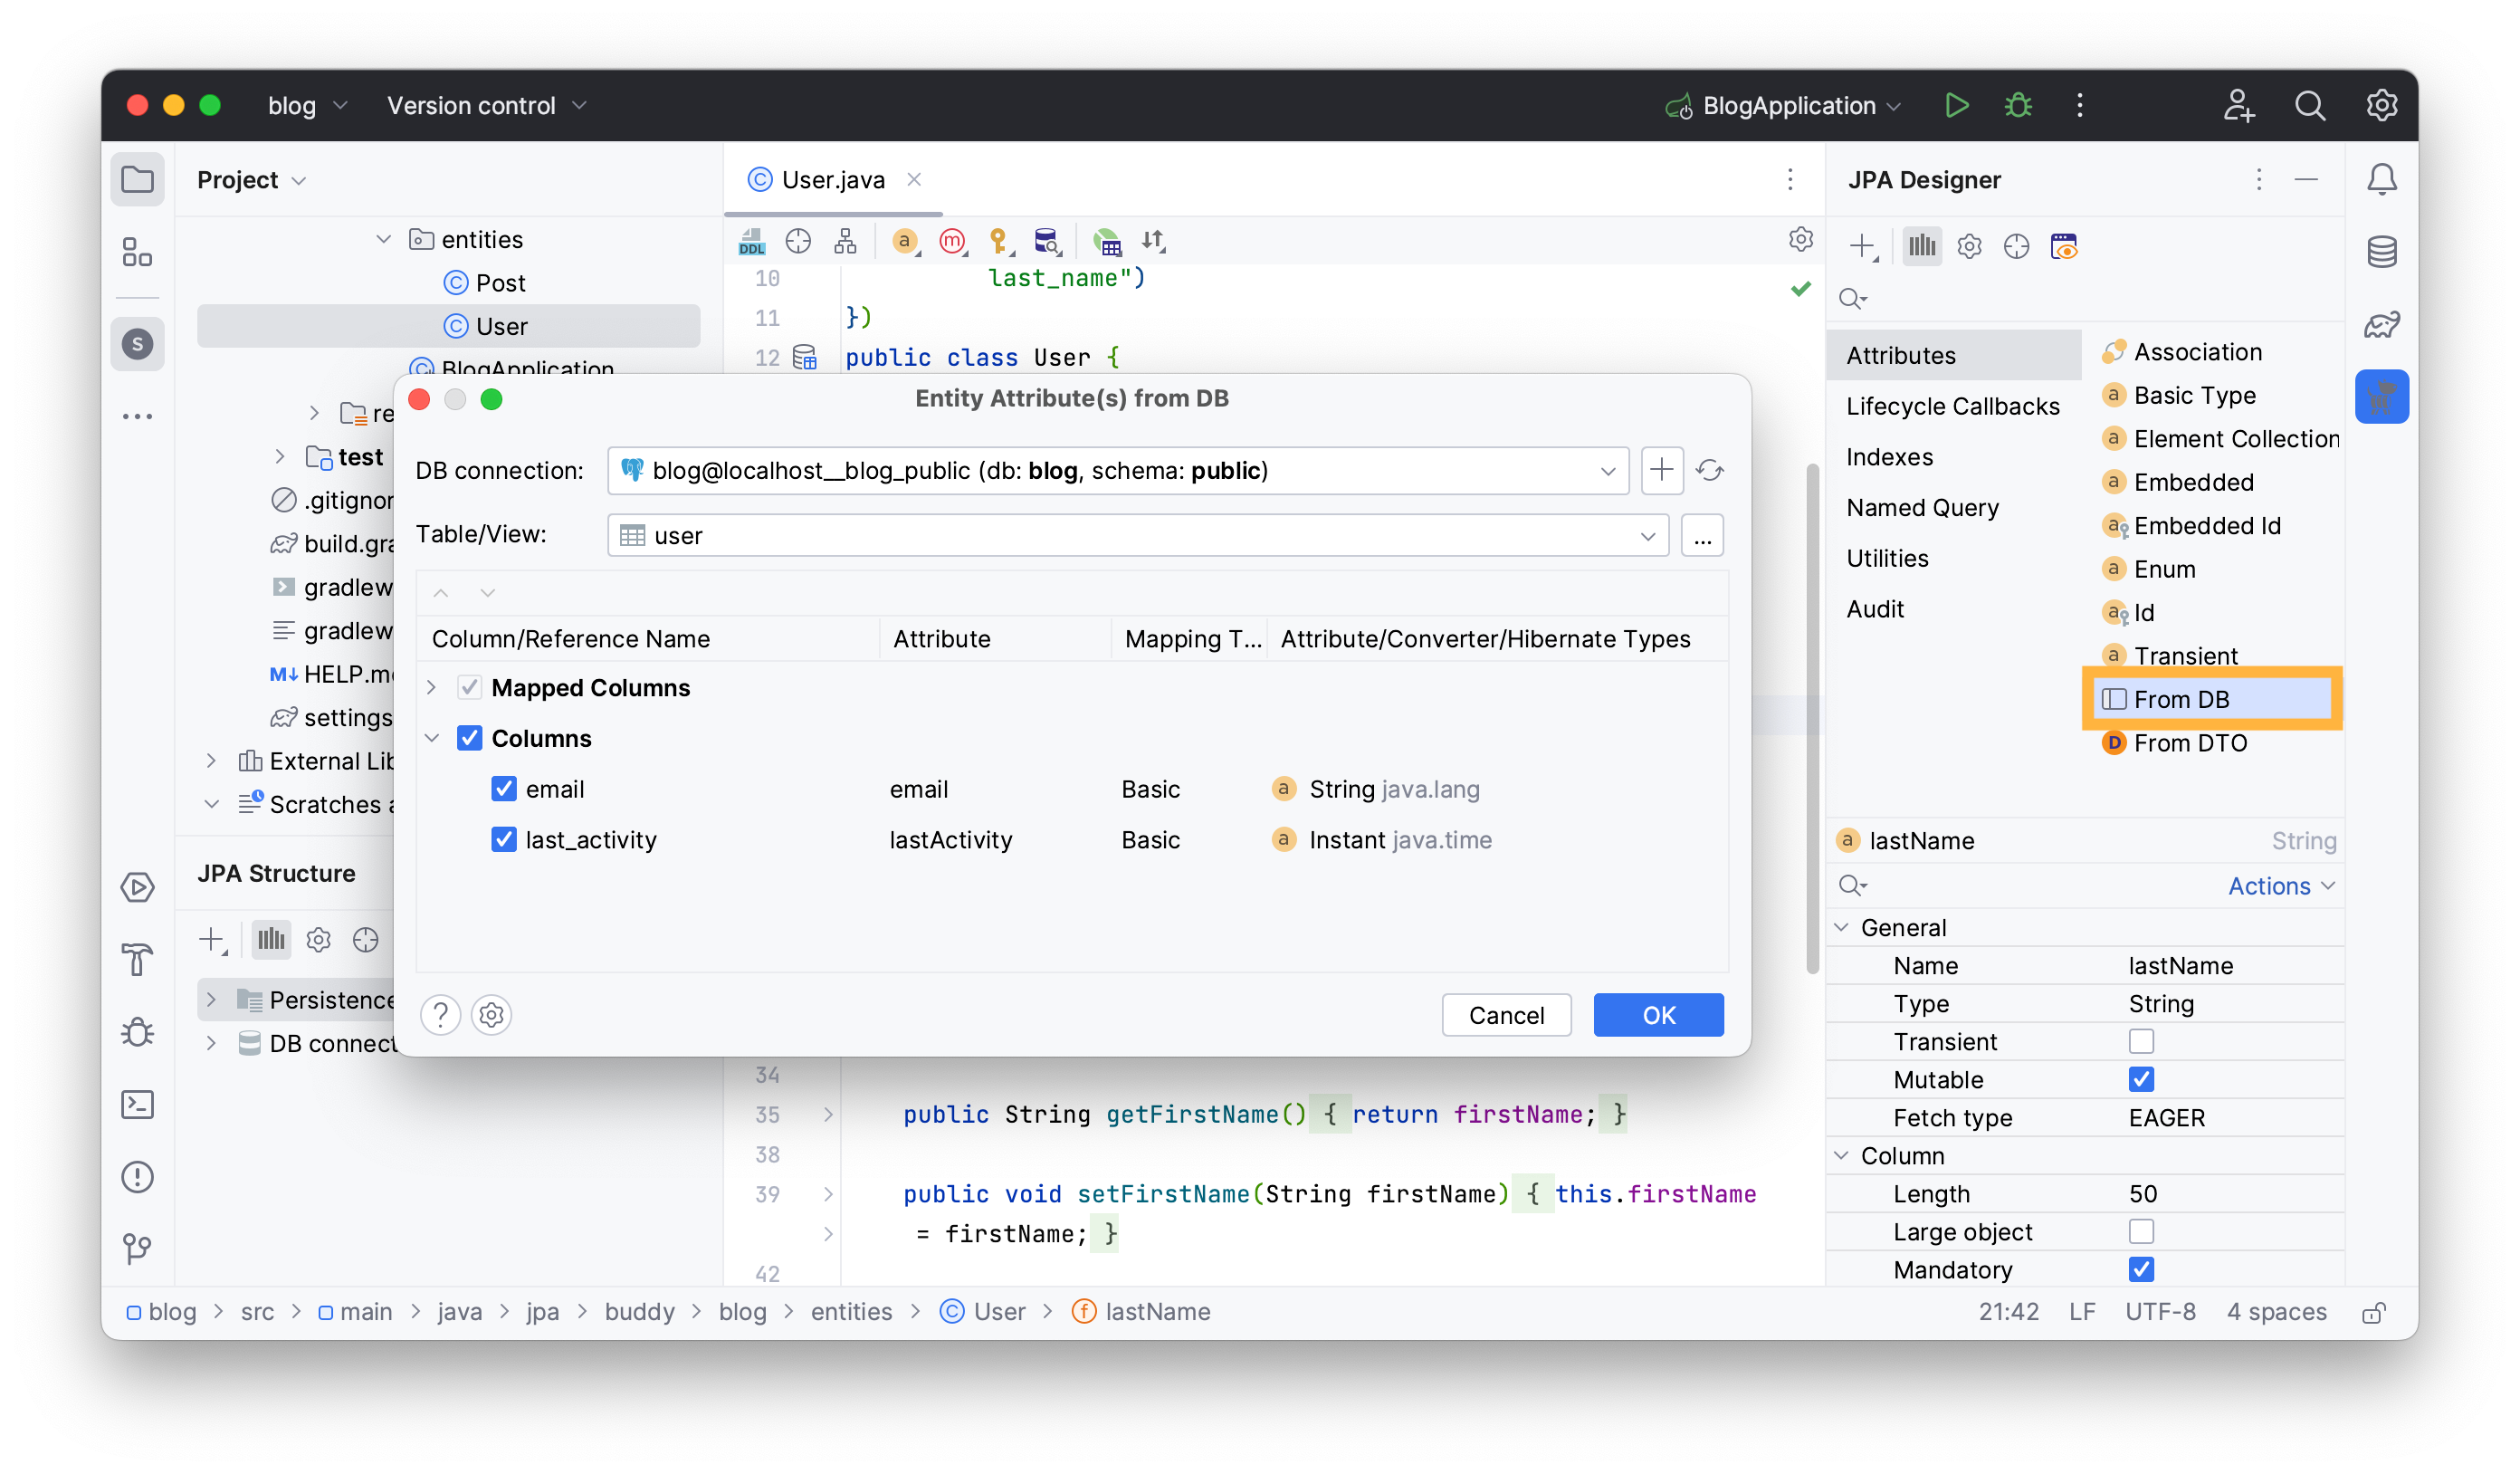
JPA Buddy will automatically select the newly added attributes and set their types according to coding conventions.
Click OK.
The following attributes will be added to your User entity:
@Column(name = "email")
private String email;

@Column(name = "last_activity")
private Instant lastActivity;
Creating a Database View
To avoid complex aggregation queries, use a database view to display user statistics. In this section, you will:
- Create a
user_statisticsdatabase view - Map an
@Immutableentity to the created view
First, let’s create a user_statistics database view, open your database console and execute the following SQL code:
CREATE VIEW user_statistics AS
SELECT u.id as user_id,
 count(p.id) as number_of_posts
FROM "user" u
 JOIN post p on u.id = p.user_id
GROUP BY u.id;
This view counts the number of posts for each user.
The next step is to create an entity to use the view in your application. Follow the same steps as with any entity generation, click on the + button in JPA Structure → choose JPA Entities from DB.

Choose the public schema as your DB connection and pick the created view.
Since DB views don't inherently have an id, you will need to choose a column as the primary key when creating a JPA entity. Click on Select columns to be used as primary key and pick user_id as your id column.
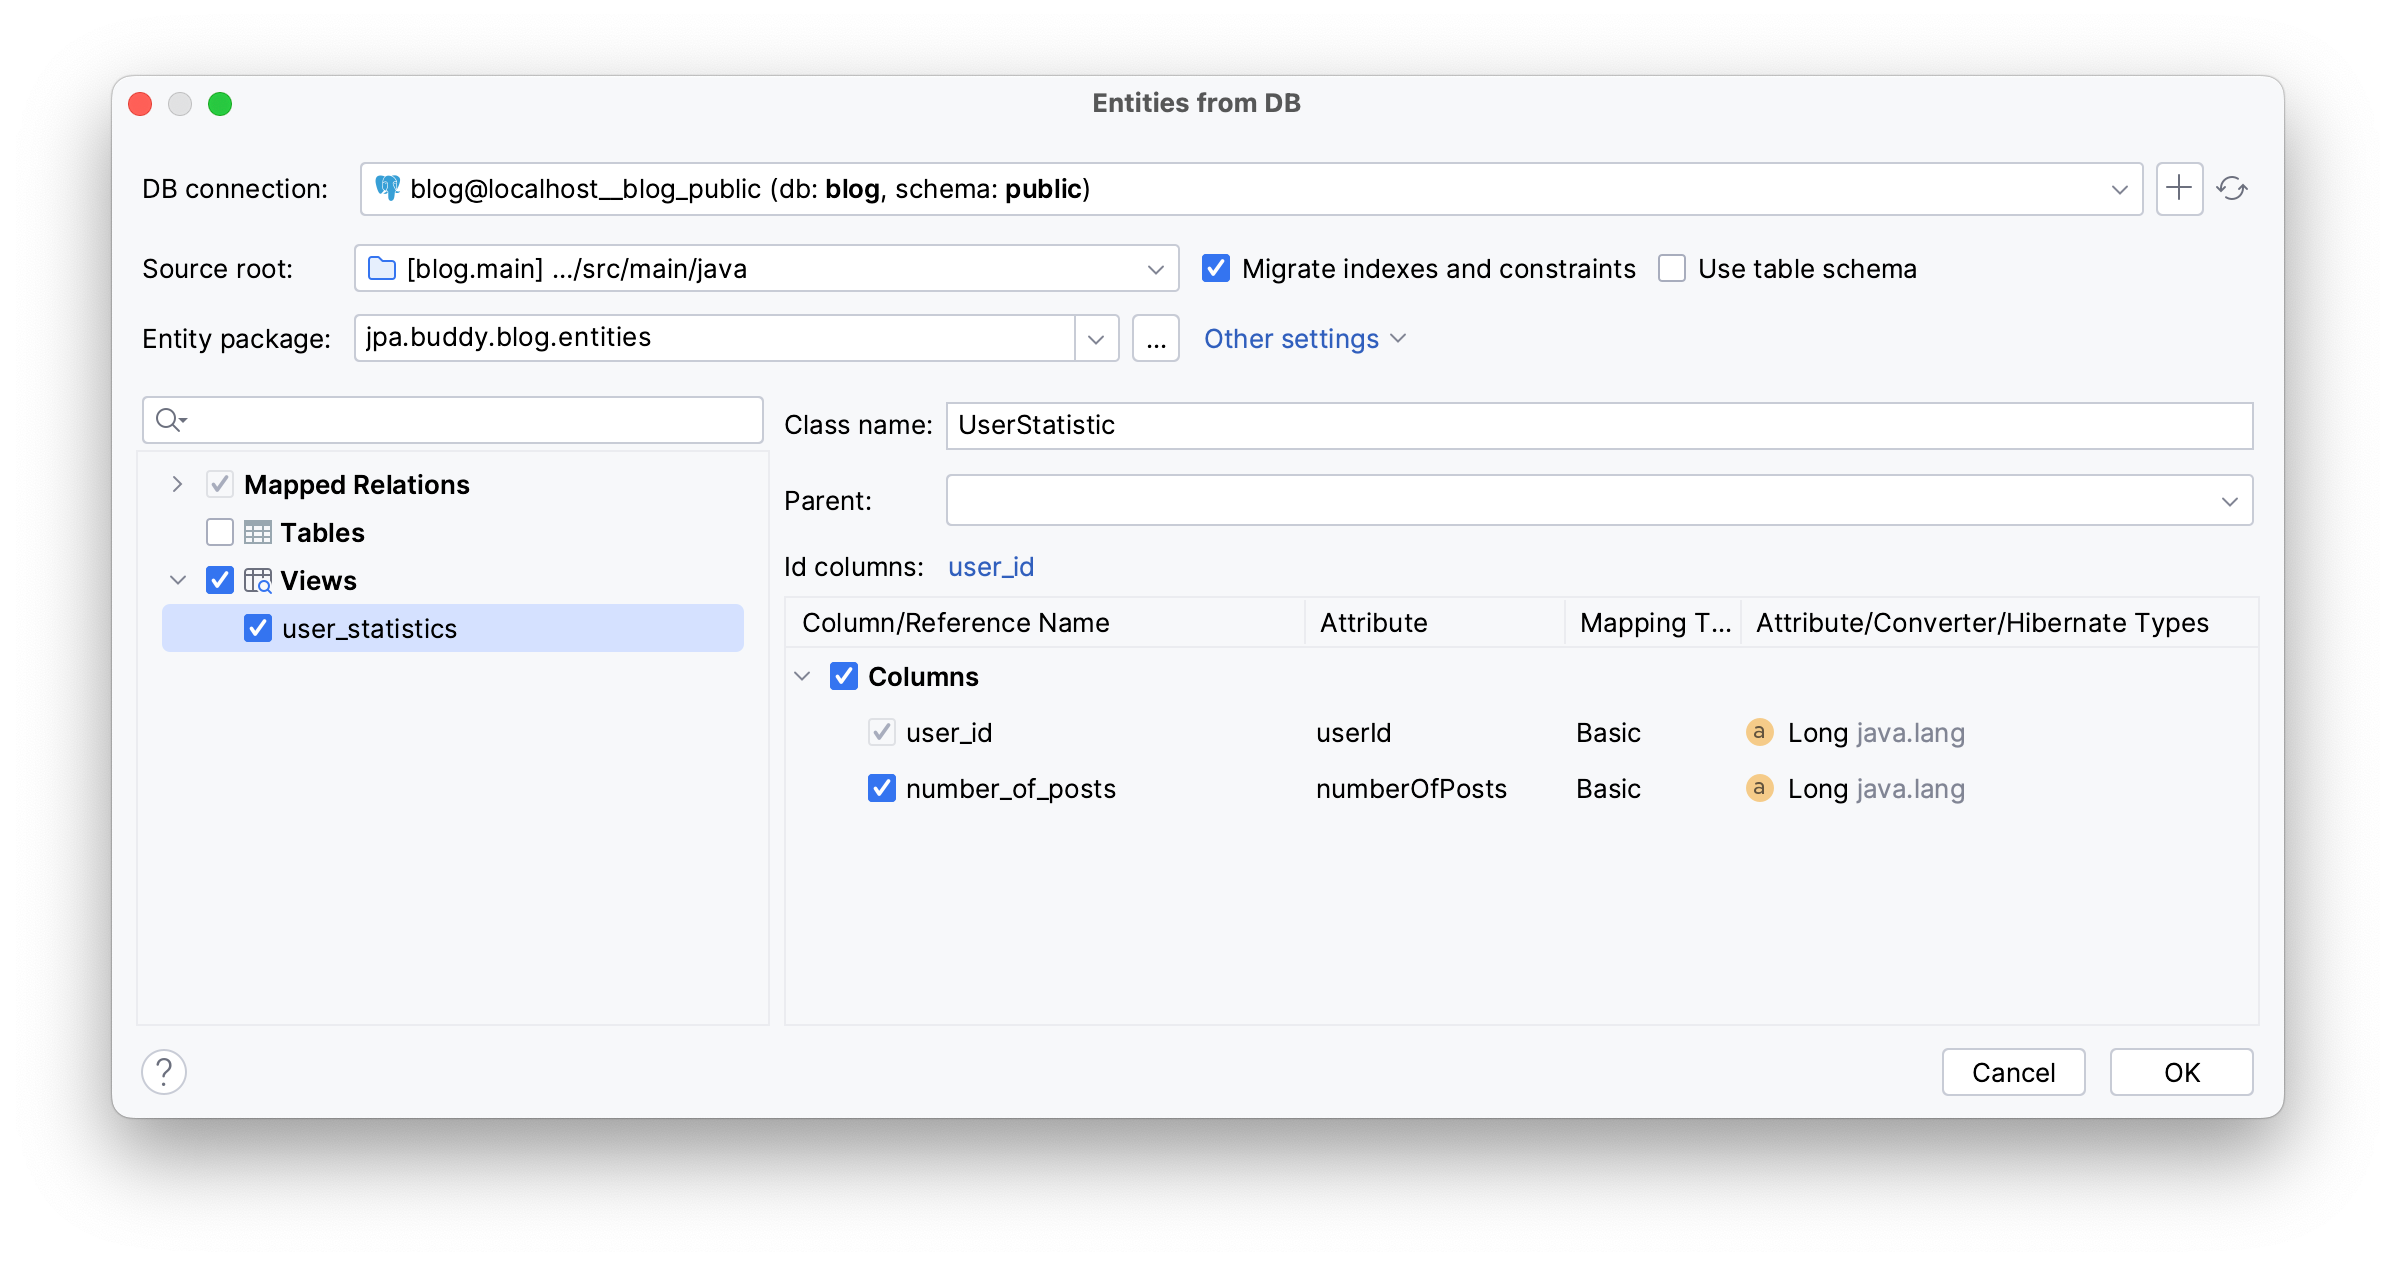
Click OK.
These options generate the following entity in the entities package:
@Entity
@Immutable
@Table(name = "user_statistics")
public class UserStatistic {
 @Id
 @Column(name = "user_id")
 private Long userId;

 @Column(name = "number_of_posts")
 private Long numberOfPosts;

 public Long getUserId() {
 return userId;
 }

 public Long getNumberOfPosts() {
 return numberOfPosts;
 }

 protected UserStatistic() {
 }
}
DB views are designed to retrieve data, so JPA Buddy creates an @Immutable entity with getters only. Furthermore, to prevent creating new instances of this entity, the entity's zero-arg constructor, required by JPA, is protected.
You can use this entity to easily select aggregated user statistics data for your application.
Conclusion
Whether you’re building your database from scratch or creating an application around an existing database schema, JPA Buddy’s Reverse Engineering feature can save you time and reduce potential errors in your development process.