Spring Boot RESTful CRUD Application with IntelliJ IDEA and JPA Buddy
Learn how to build data centric Spring Boot applications with JPA Buddy and IntelliJ IDEA Ultimate faster than ever. In this guide, we’ll build the application from scratch. You will see how to generate JPA entities and Spring Data repositories, create DTOs and MapStruct mappers in a couple of minutes and write Liquibase/Flyway scripts in a safer way.
Estimated reading time: 15 mins
Introduction
JPA Buddy makes it easier to get started with JPA and associated technologies, enhancing productivity for developers of all levels, and ensuring the generated code is reliable and follows best practices.
In this guide, we will demonstrate how to use JPA Buddy to create a fully working project management service in just 15 minutes. The service will store user tasks to projects and expose a REST API for searching and managing projects.
Overview
You will learn how to:
- Set up a new project
- Set up a DB connection
- Create entities
- Generate database migration scripts
- Work with Spring Data JPA
- Generate DTOs and mappers
- Create a REST controller
You can find the code of this application on github.
Setting up a New Project
This section guides you through the process of setting up a new project. To get a ready-to-develop project you will do the following:
- Create a new project using Spring Initializr
- Load the project in Intellij IDEA
- Add the necessary dependencies for the project
For starters you to lay the groundwork for building the CRUD application, for that create a Spring Boot application using Spring Initializr.
- Visit Spring Initializr Website
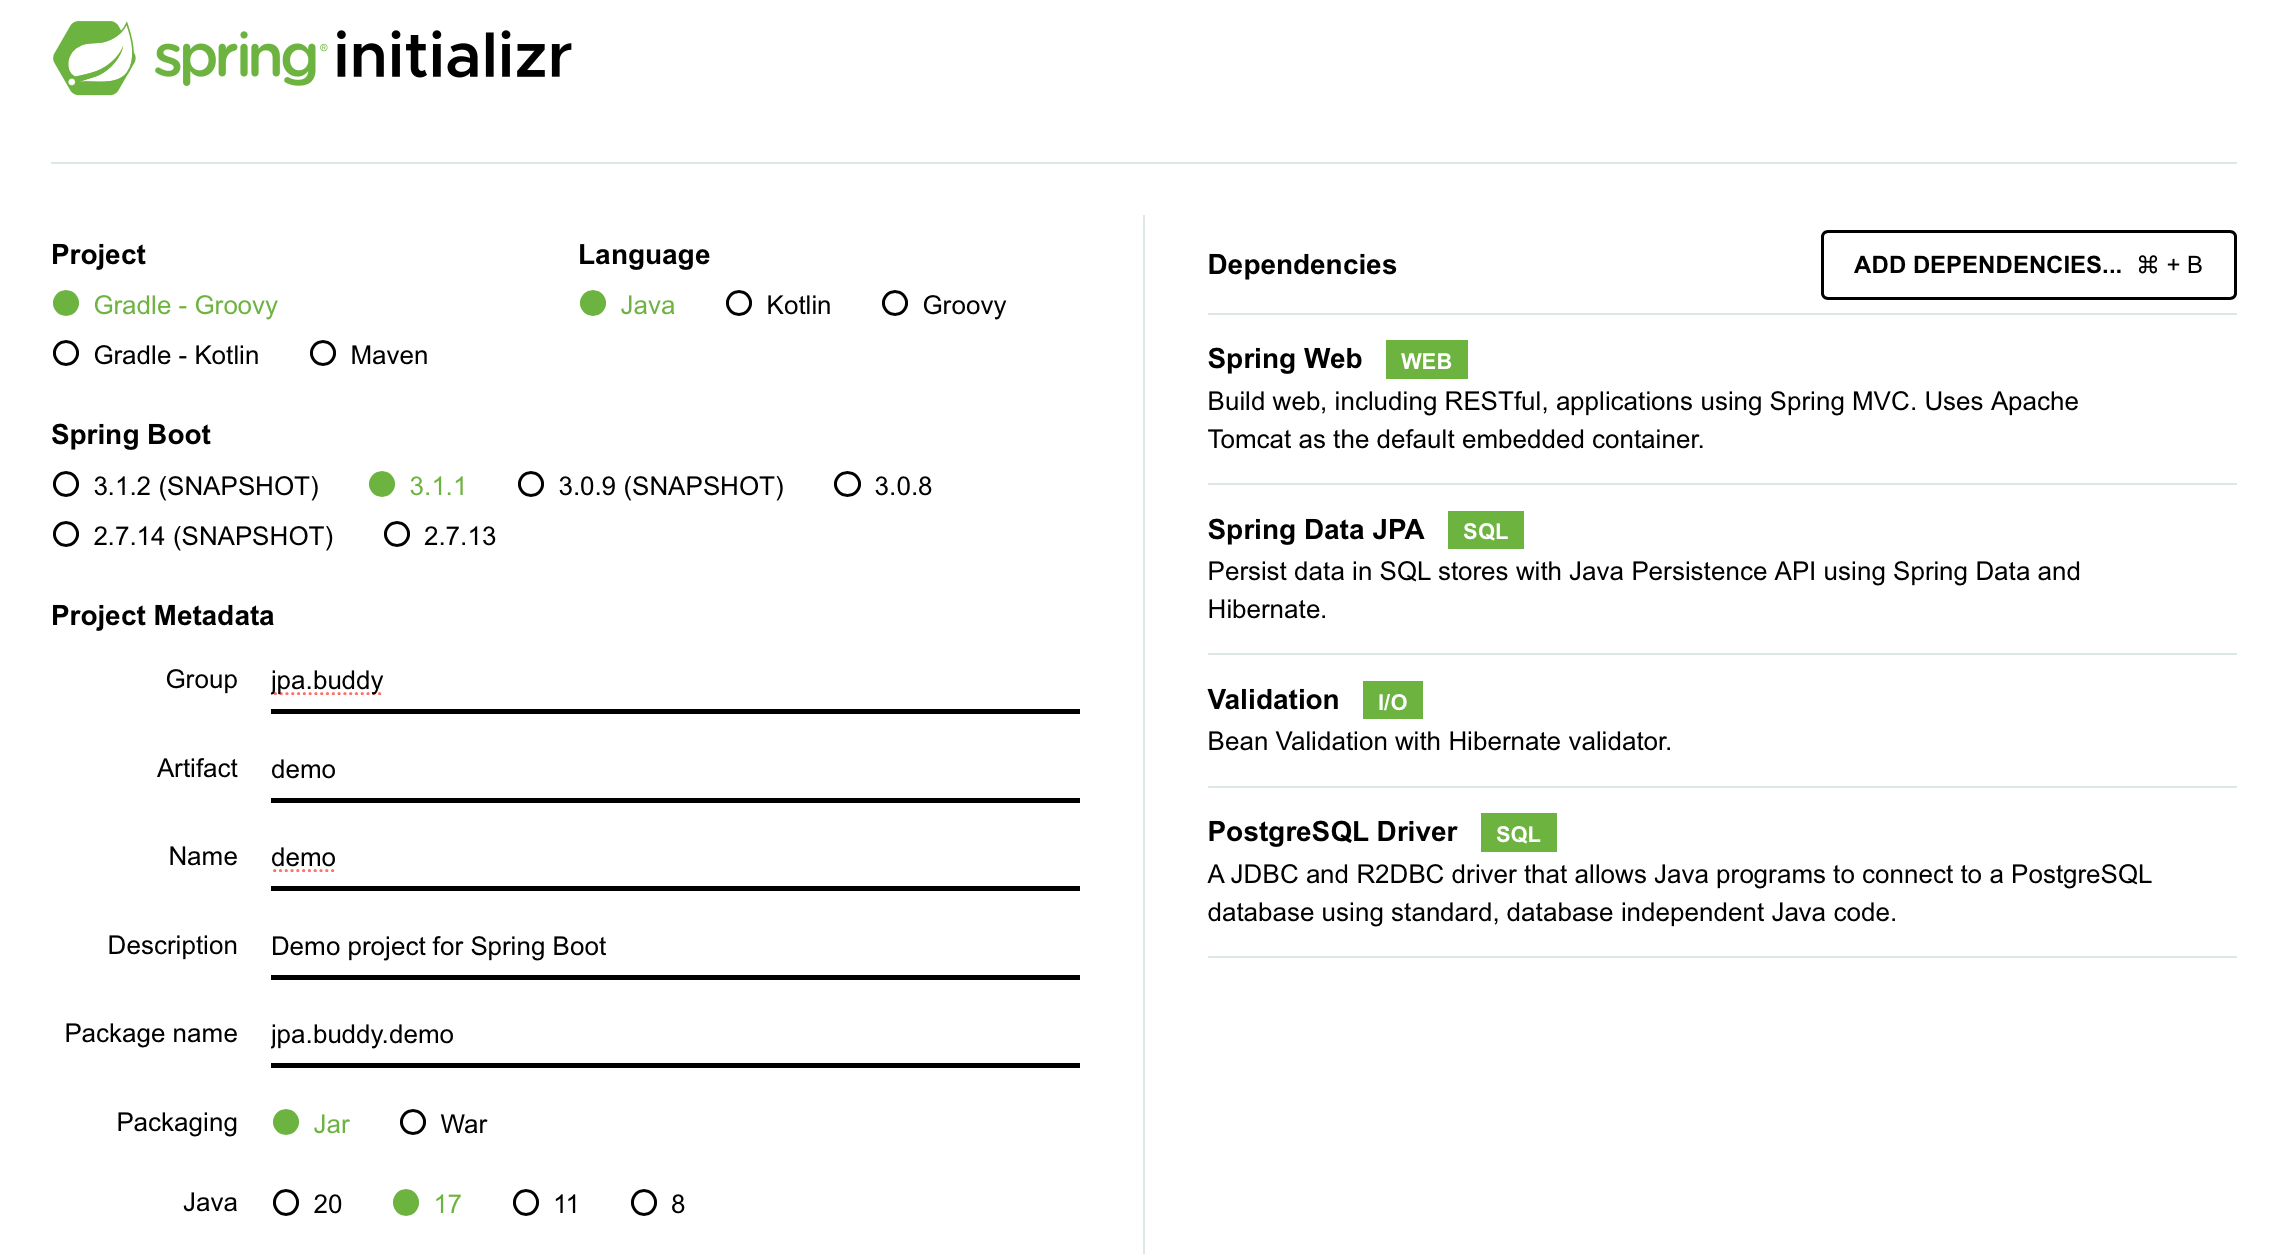
- Select the following settings:
- Java 17 as the programming language
- Gradle as the build tool
- The latest stable version of Spring Boot
- The application will be packaged as a JAR file
- add the required dependencies to your project:
- Spring Data JPA enables you to use JPA and Data Repositories
- Hibernate Validator provides data validation for our entities
- PostgreSQL Driver provides database access
- Flyway enables database versioning
- Spring Web allows you to create REST endpoints
Here are the selected settings in Spring Initializr:
Download the generated project, extract it and open it in IntelliJ IDEA with Open then select the extracted folder.

To easily convert entities to DTOs and vice versa, activate Mapstruct’s features in JPA Buddy by adding MapStruct’s dependency and annotation processor to your project. You can check the latest version here.
Open the gradle.build file and add the following lines to the dependencies section.
dependencies {
  // ...
  implementation 'org.mapstruct:mapstruct:1.5.5.Final'
  annotationProcessor 'org.mapstruct:mapstruct-processor:1.5.5.Final'
}
Setting up a Database Connection
In order to set up a database connection, you need to:
- Set up a new connection
- Link the application to the datasource via the properties file
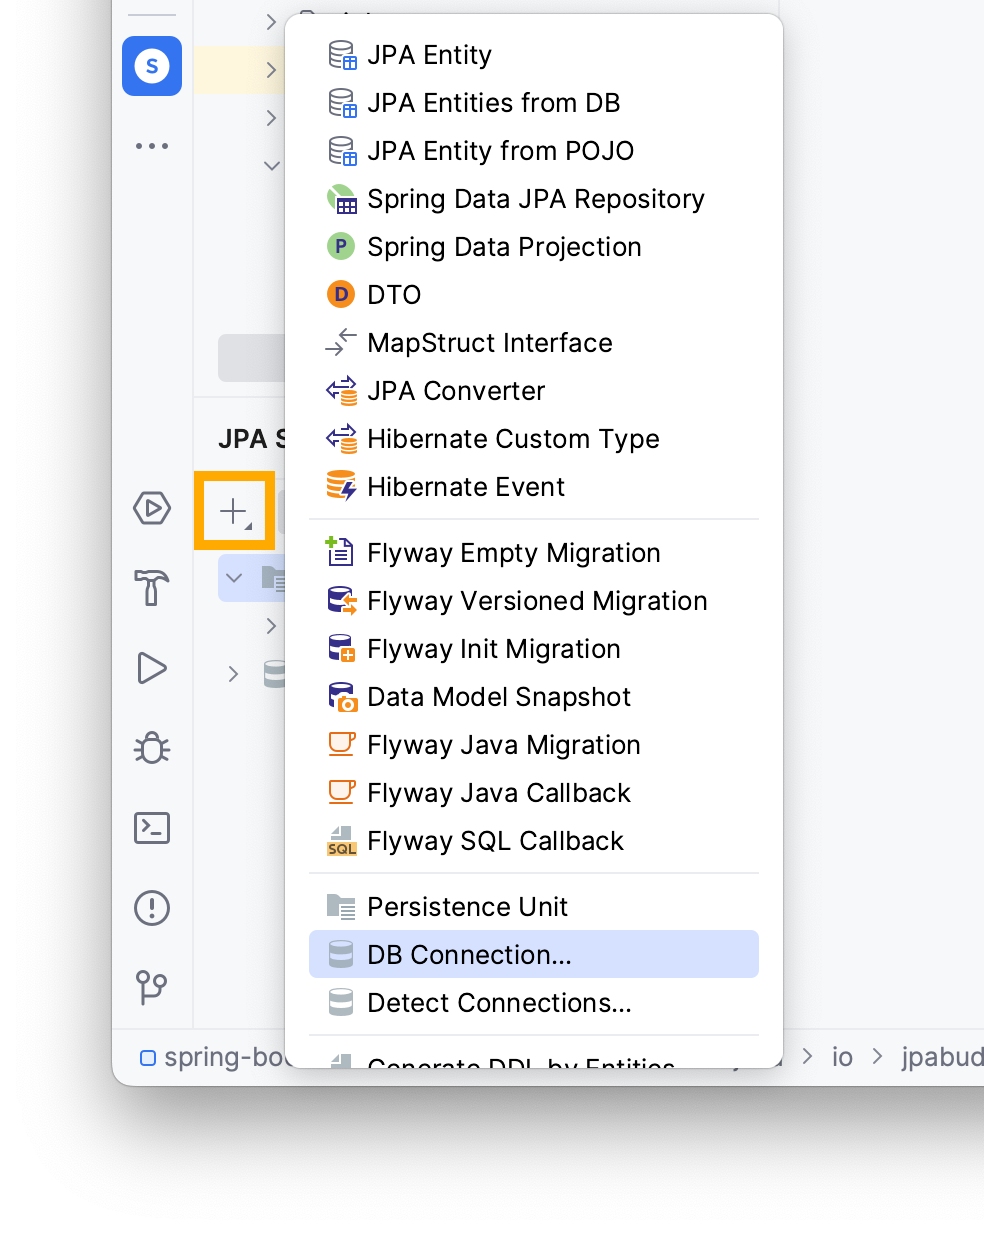
To set up a new connection with JPA Buddy through the JPA Structure tab.
- Navigate to the JPA Structure tab on the left corner of your IDE
- Click on the + button
- Click on DB Connection...
Add a new connection by clicking on the + button and type the following information:
- User name
- Password
- Name of the database
In this example, you can see the following values, however they may vary depending on your local environment.
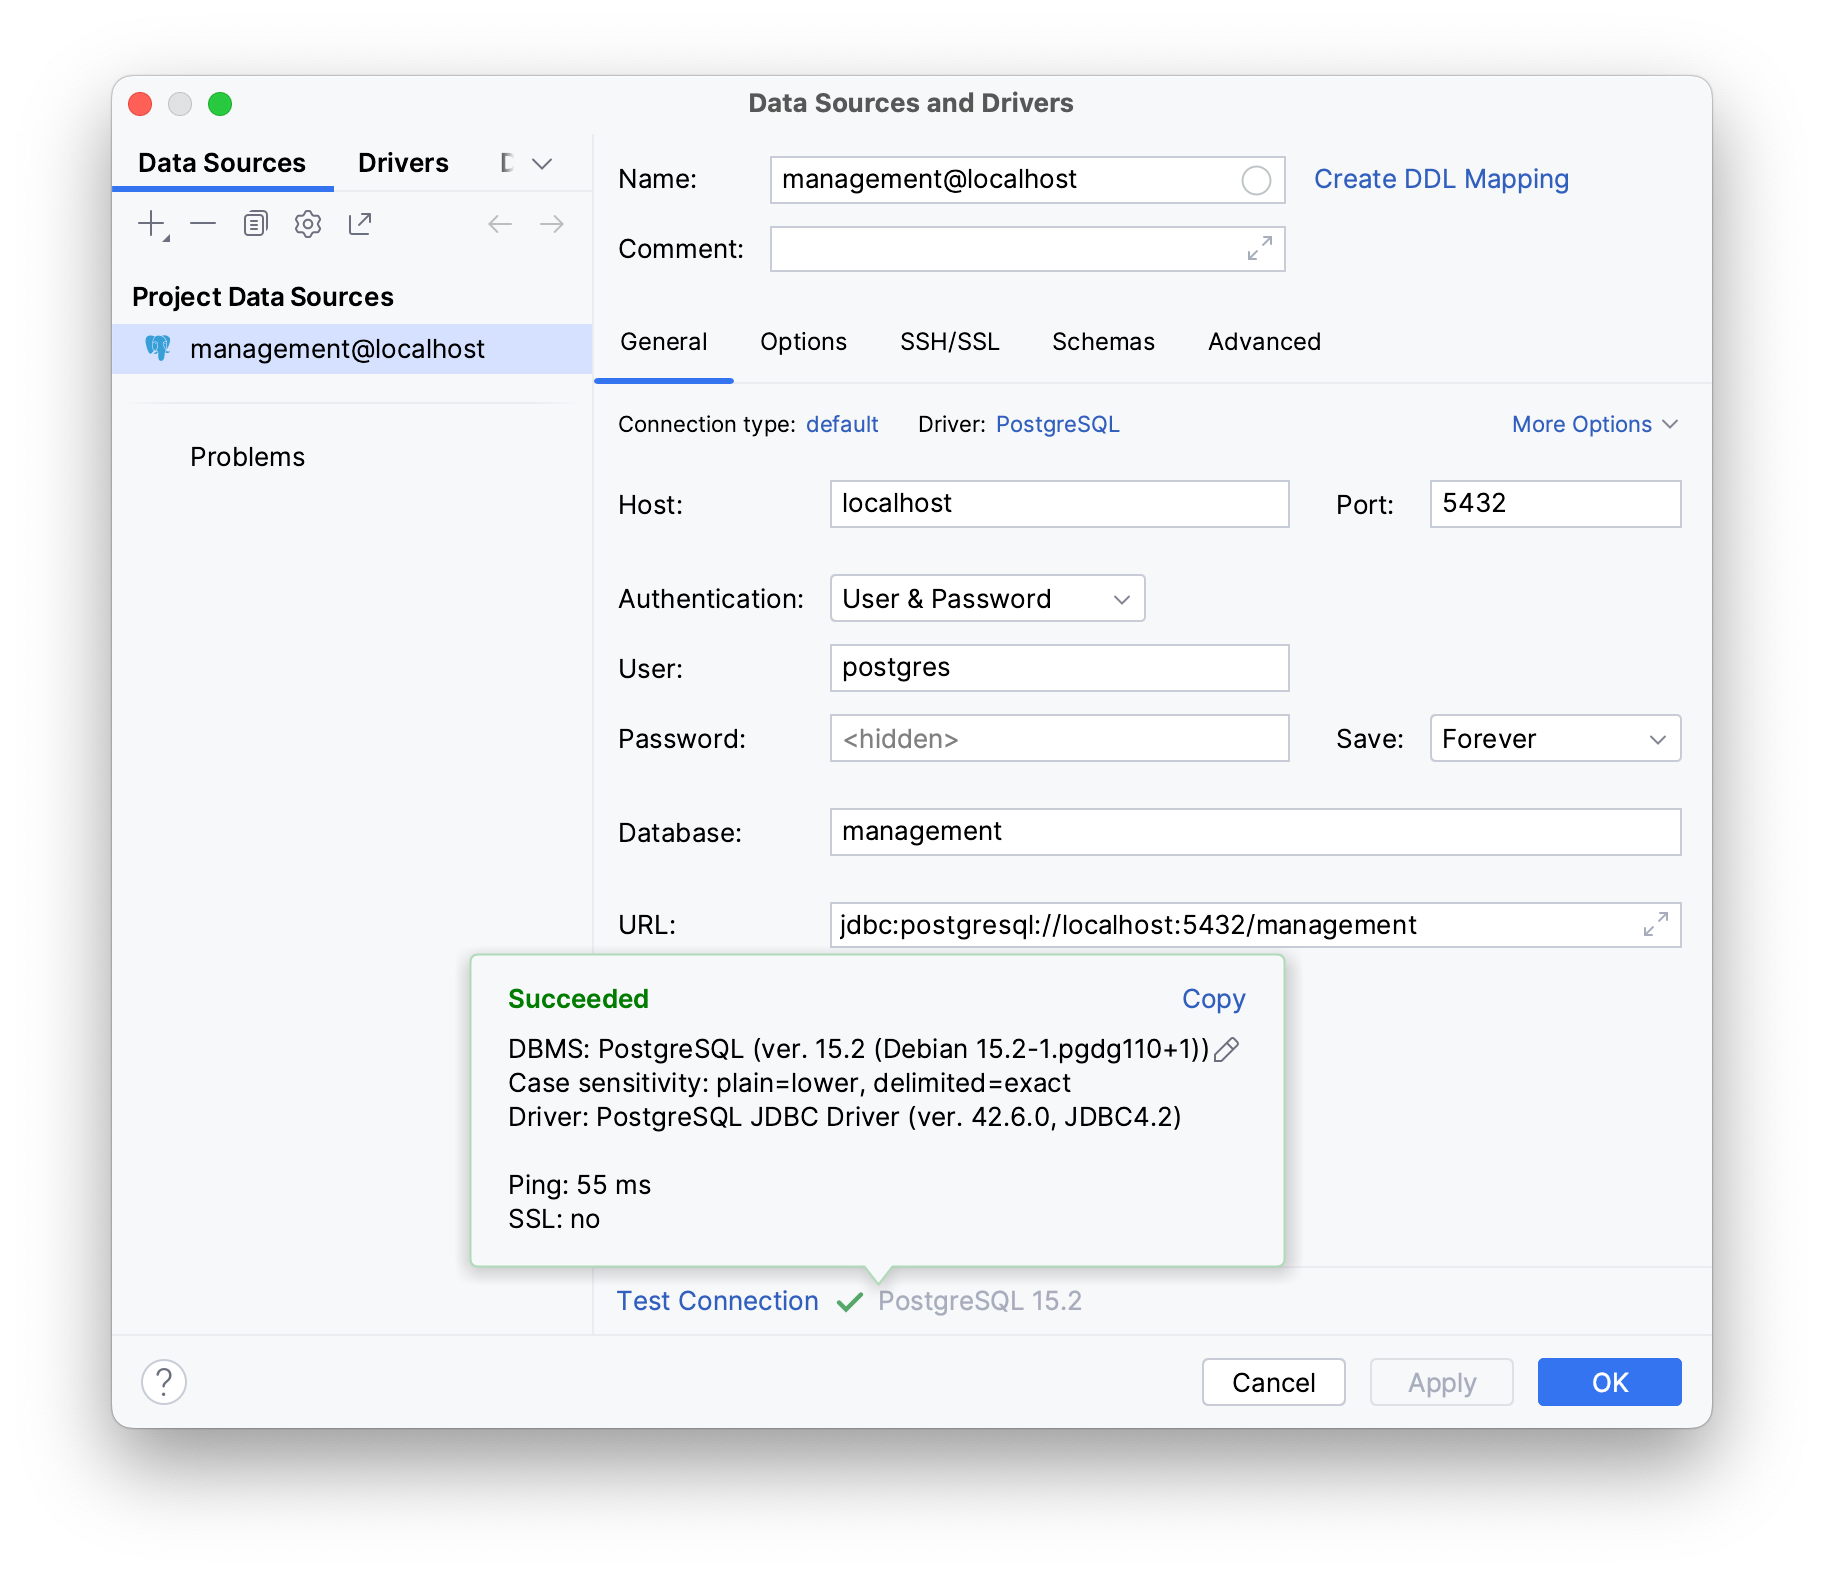
To check if your database works as intended click on Test Connection, it should display Succeeded if your database is properly configured and actively listening on its assigned port.
Next, it's important to supply the application with the datasource’s details to connect to the database.
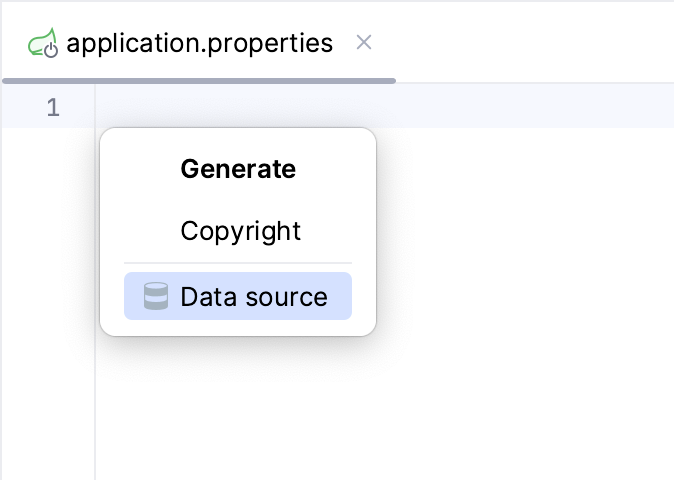
These details need to be added to the application.properties file, let’s do that using JPA Buddy.
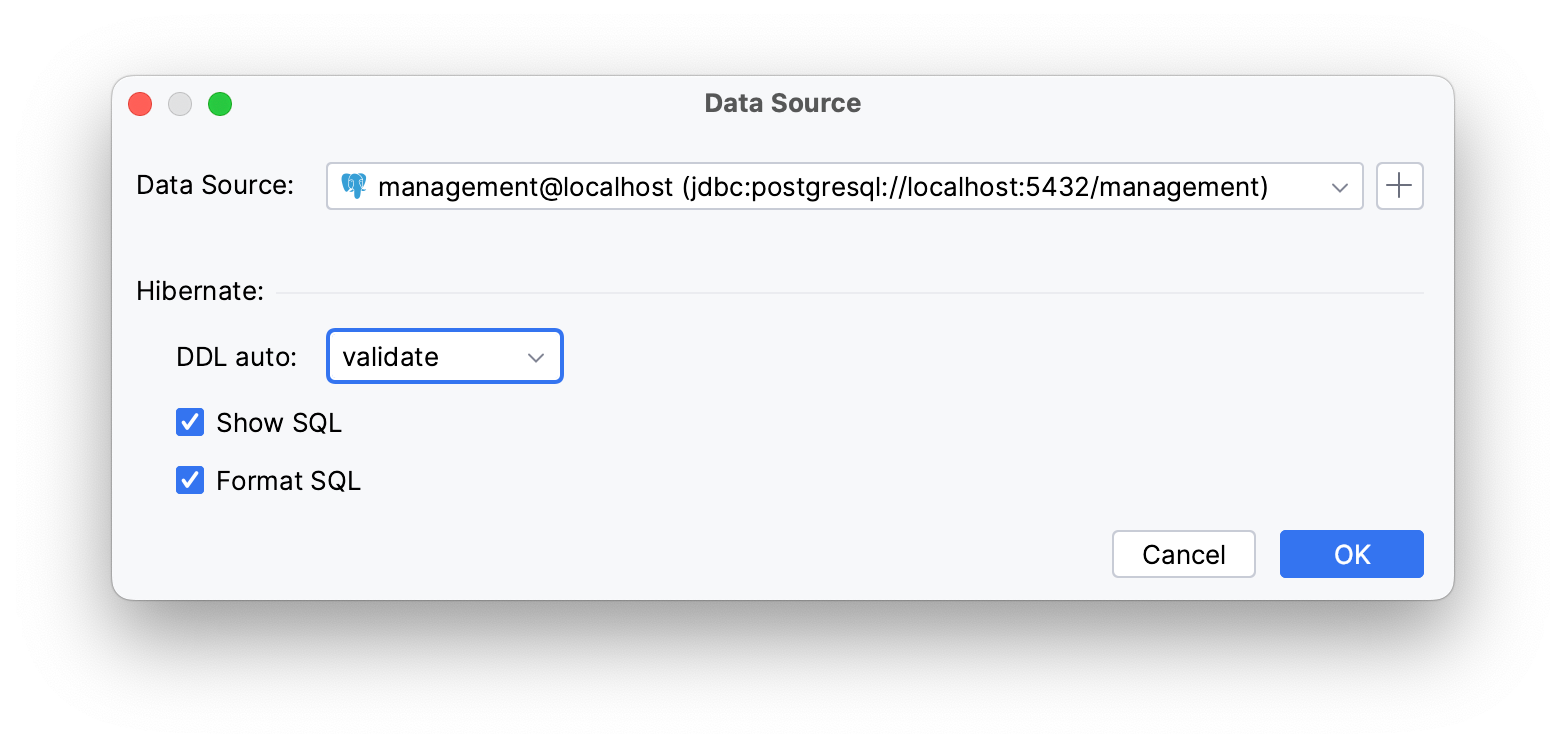
- Open the
application.propertiesfile - Use Intellij IDEA’s Generate shortcut (Command/Ctrl + N)
- Select the Data source option.
Once you generate the initial schema for your database, hibernate can check if it aligns with your entity mappings during startup by setting the Hibernate DDL-auto property to validate.
When working with a pre-existing database, Flyway might encounter issues when running the initial migration. To prevent that, add the baseline-on-migrate property to the application’s property file.
spring.flyway.baseline-on-migrate=true
By the end of the configuration process, your property file will contain the following code:
spring.datasource.url=jdbc:postgresql://localhost:5432/management
spring.datasource.username=postgres
spring.datasource.password=postgres
spring.datasource.driverClassName=org.postgresql.Driver
spring.jpa.hibernate.ddl-auto=validate

spring.flyway.baseline-on-migrate=true
Creating Entities
The application needs entity classes to represent the database tables and interact with them. In this section you will create three entities:
UserandProjectentities from the databaseTaskentity related to theProjectentity
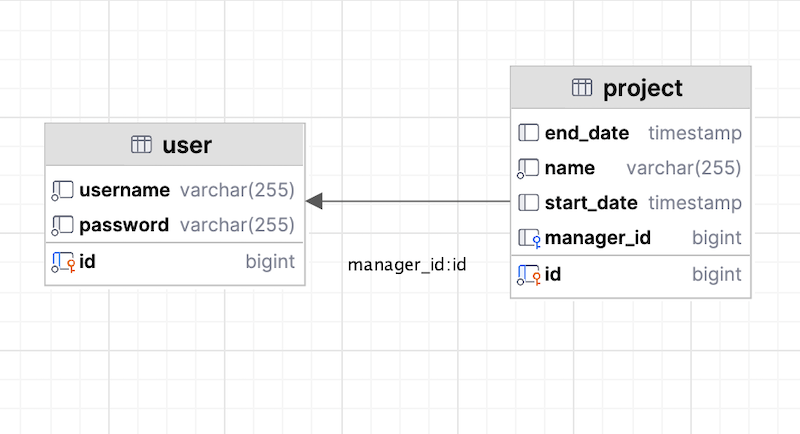
In the following example, you will reflect the pre-existing tables into JPA entities, the provided database includes two tables:
- user: the individual who will interact with the system
- project: the tasks or assignments that the user interacts with
Within the project table, the manager_id (User type) attribute refers to a ManyToOne relationship. This relationship indicates that multiple projects can be managed by a single user.
To generate entities from an existing database:
- Navigate to the Database tab on the upper-right corner
- Right-click on any table you want to generate
- Choose JPA Entities from DB
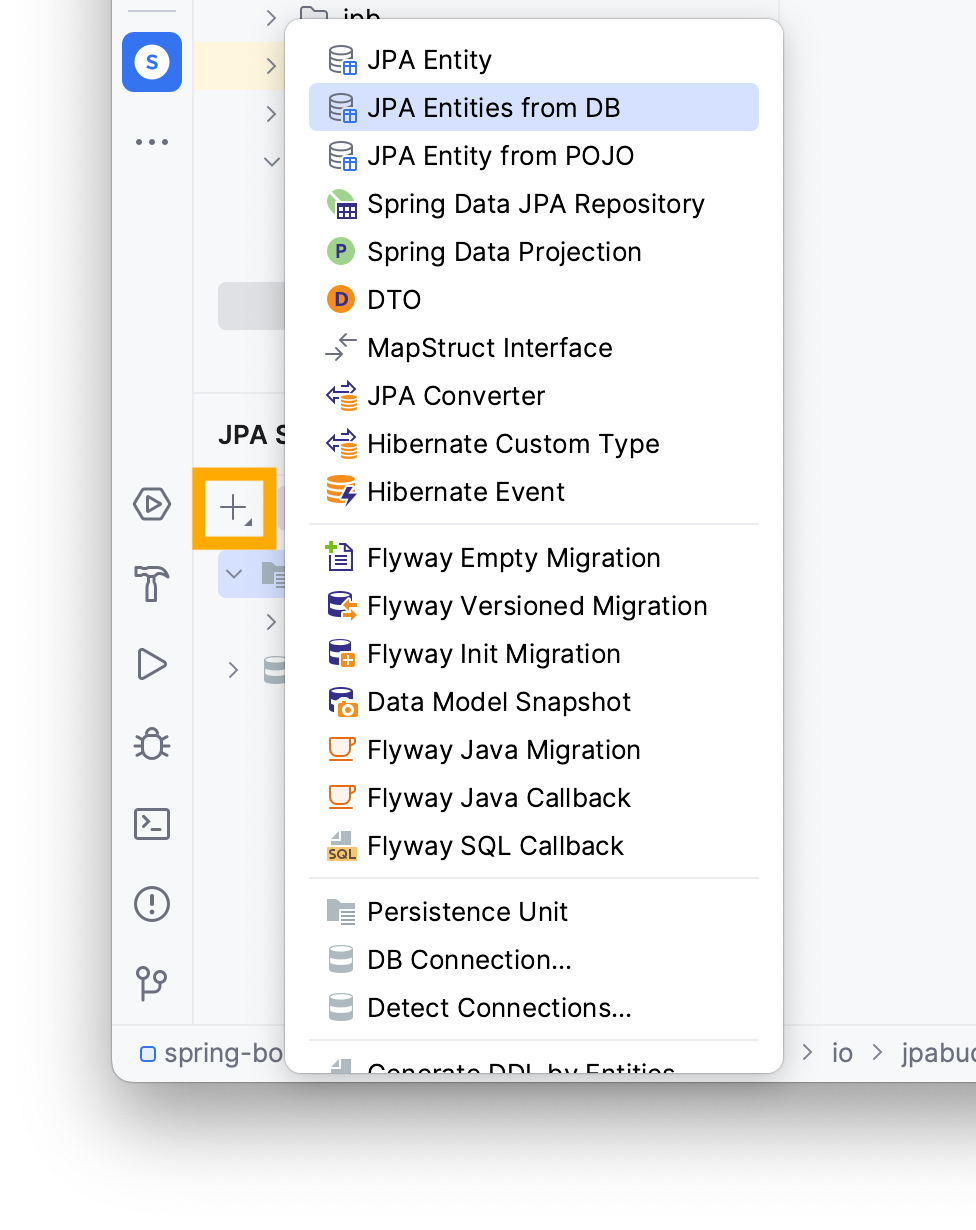
For Intellij IDEA Community Edition users: you can use JPA Structure to invoke the Entities from DB wizard, click on + → JPA Entities from DB.
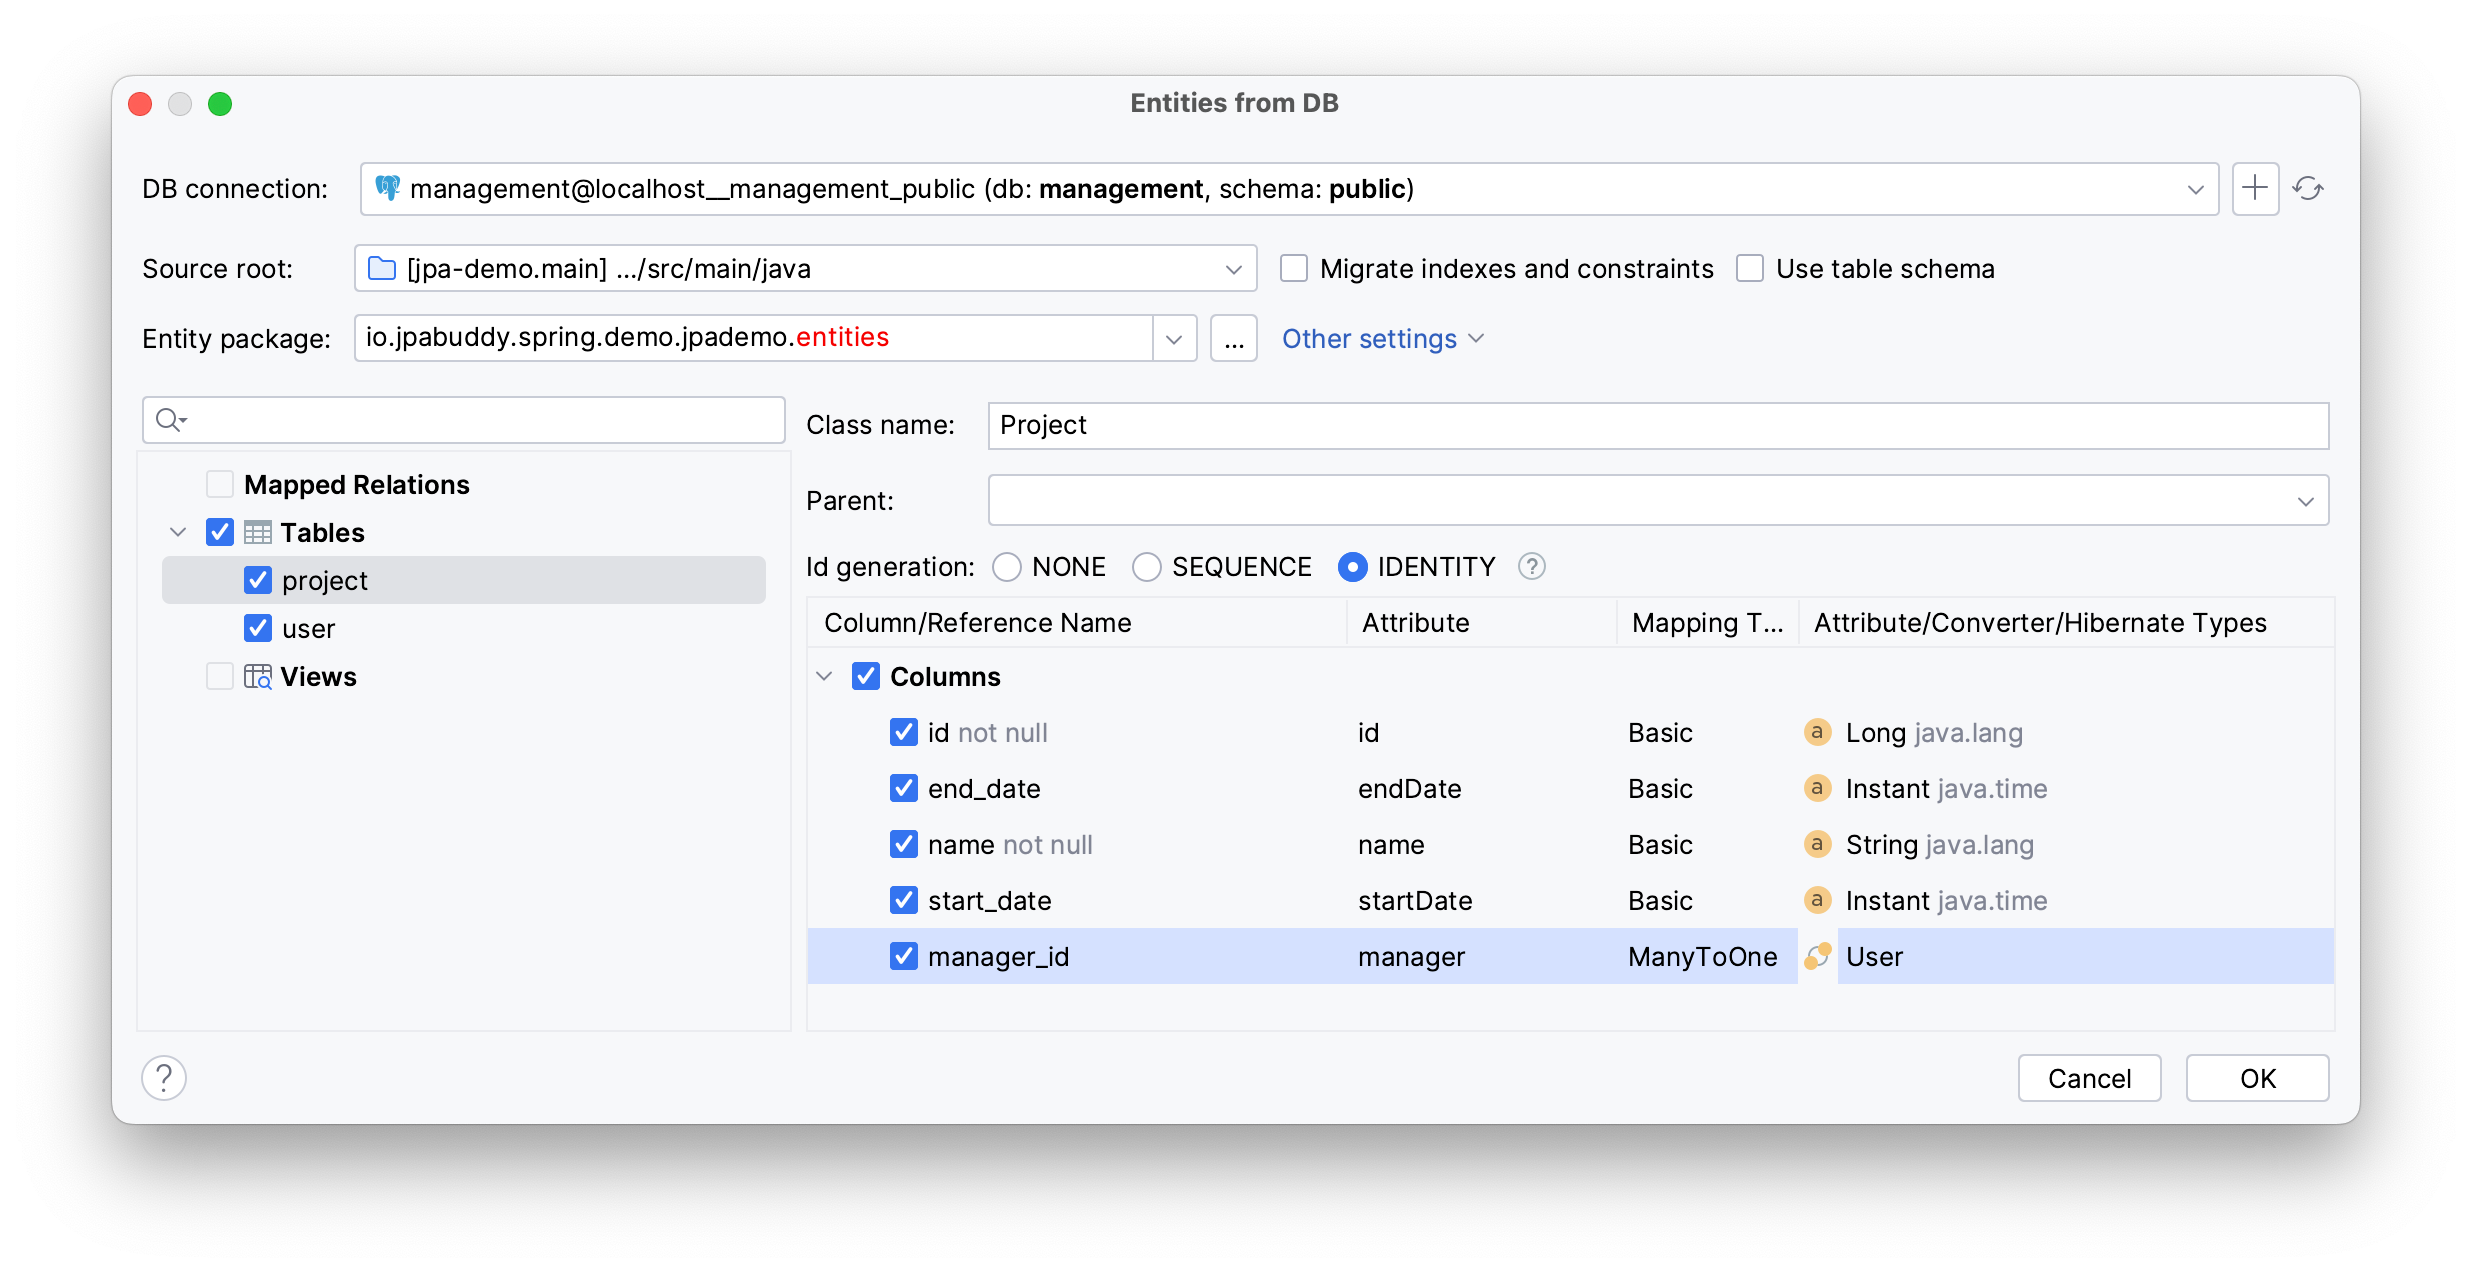
After invoking the Entities from DB wizard, you can configure the entities that you will generate.
- Define a new package named entities
- Select the
projecttable - Tick the necessary attributes
- Choose
manager_idto automatically include the related table (user)
JPA buddy allows you to create a back reference from users to their projects, it enables you to directly access the project’s data from the User entity. It's not defined in the database but fits the JPA data model well, to create it simply access the user tab → tick the References option.
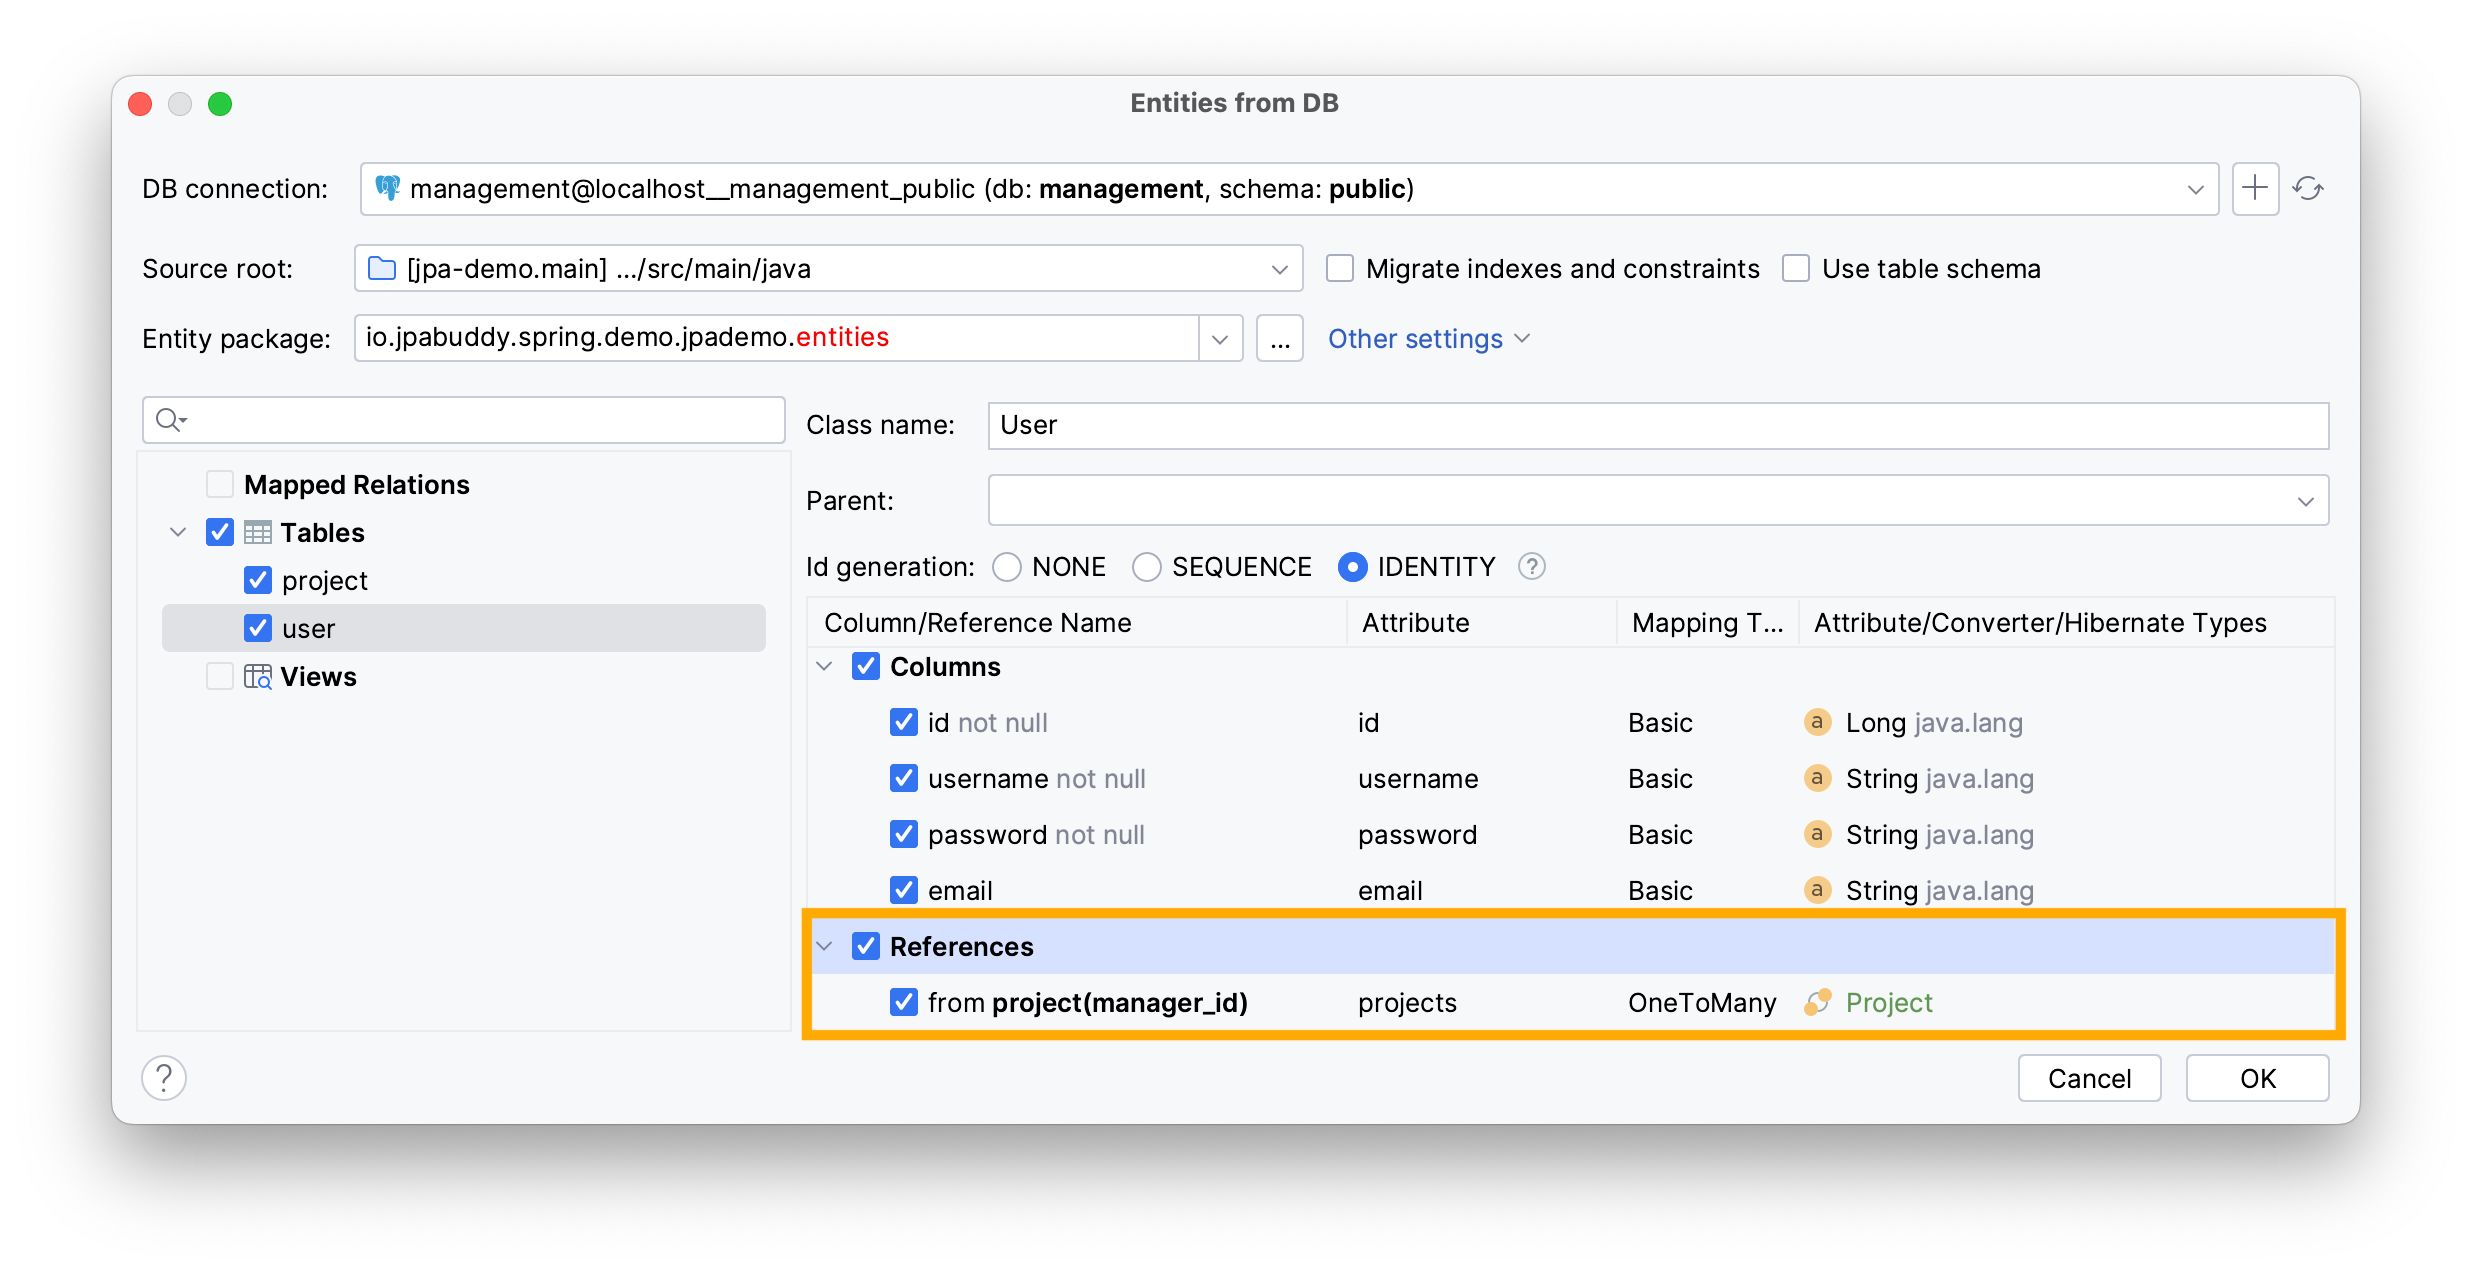
Click OK.
You have just created two entities with their corresponding attributes.
The back reference option will result in the following lines of code in the User entity:
@OneToMany(mappedBy = "manager")
private Set<Project> projects = new LinkedHashSet<>();
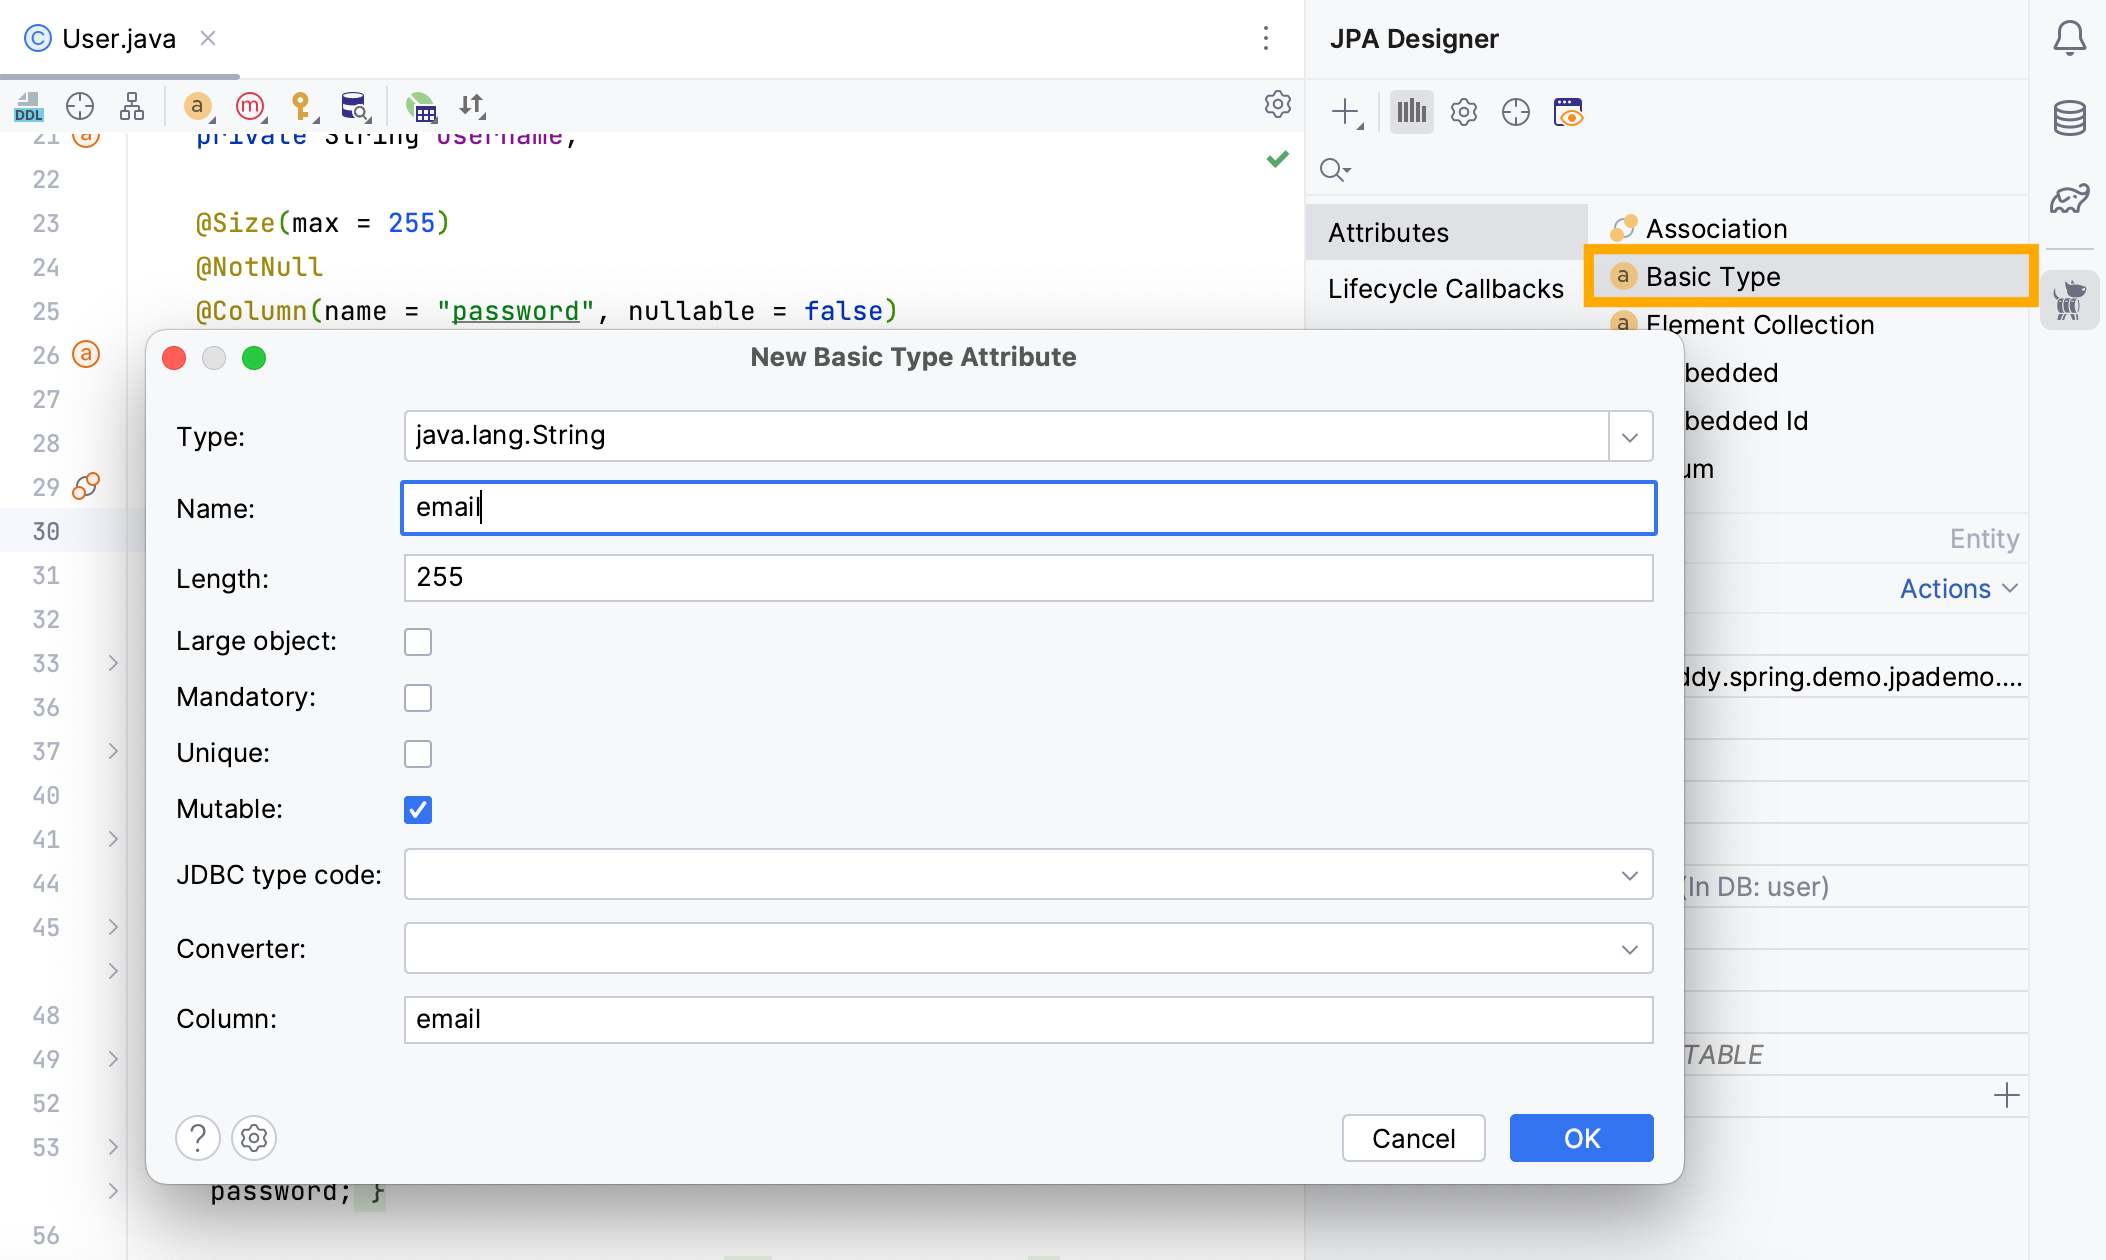
Next, add an email attribute to the User entity by following the steps below:
- Open
Userentity’s source code - Find the JPA Designer tab on the right
- Click on Basic Type
- Set the attribute’s name to
email - Click OK
Next, you can add properties to your email using the JPA Designer tab, let’s implement a validation rule:
- Click on the attribute
- Scroll down to the Validation section
- Tick the desired validation rule, in this case
Email
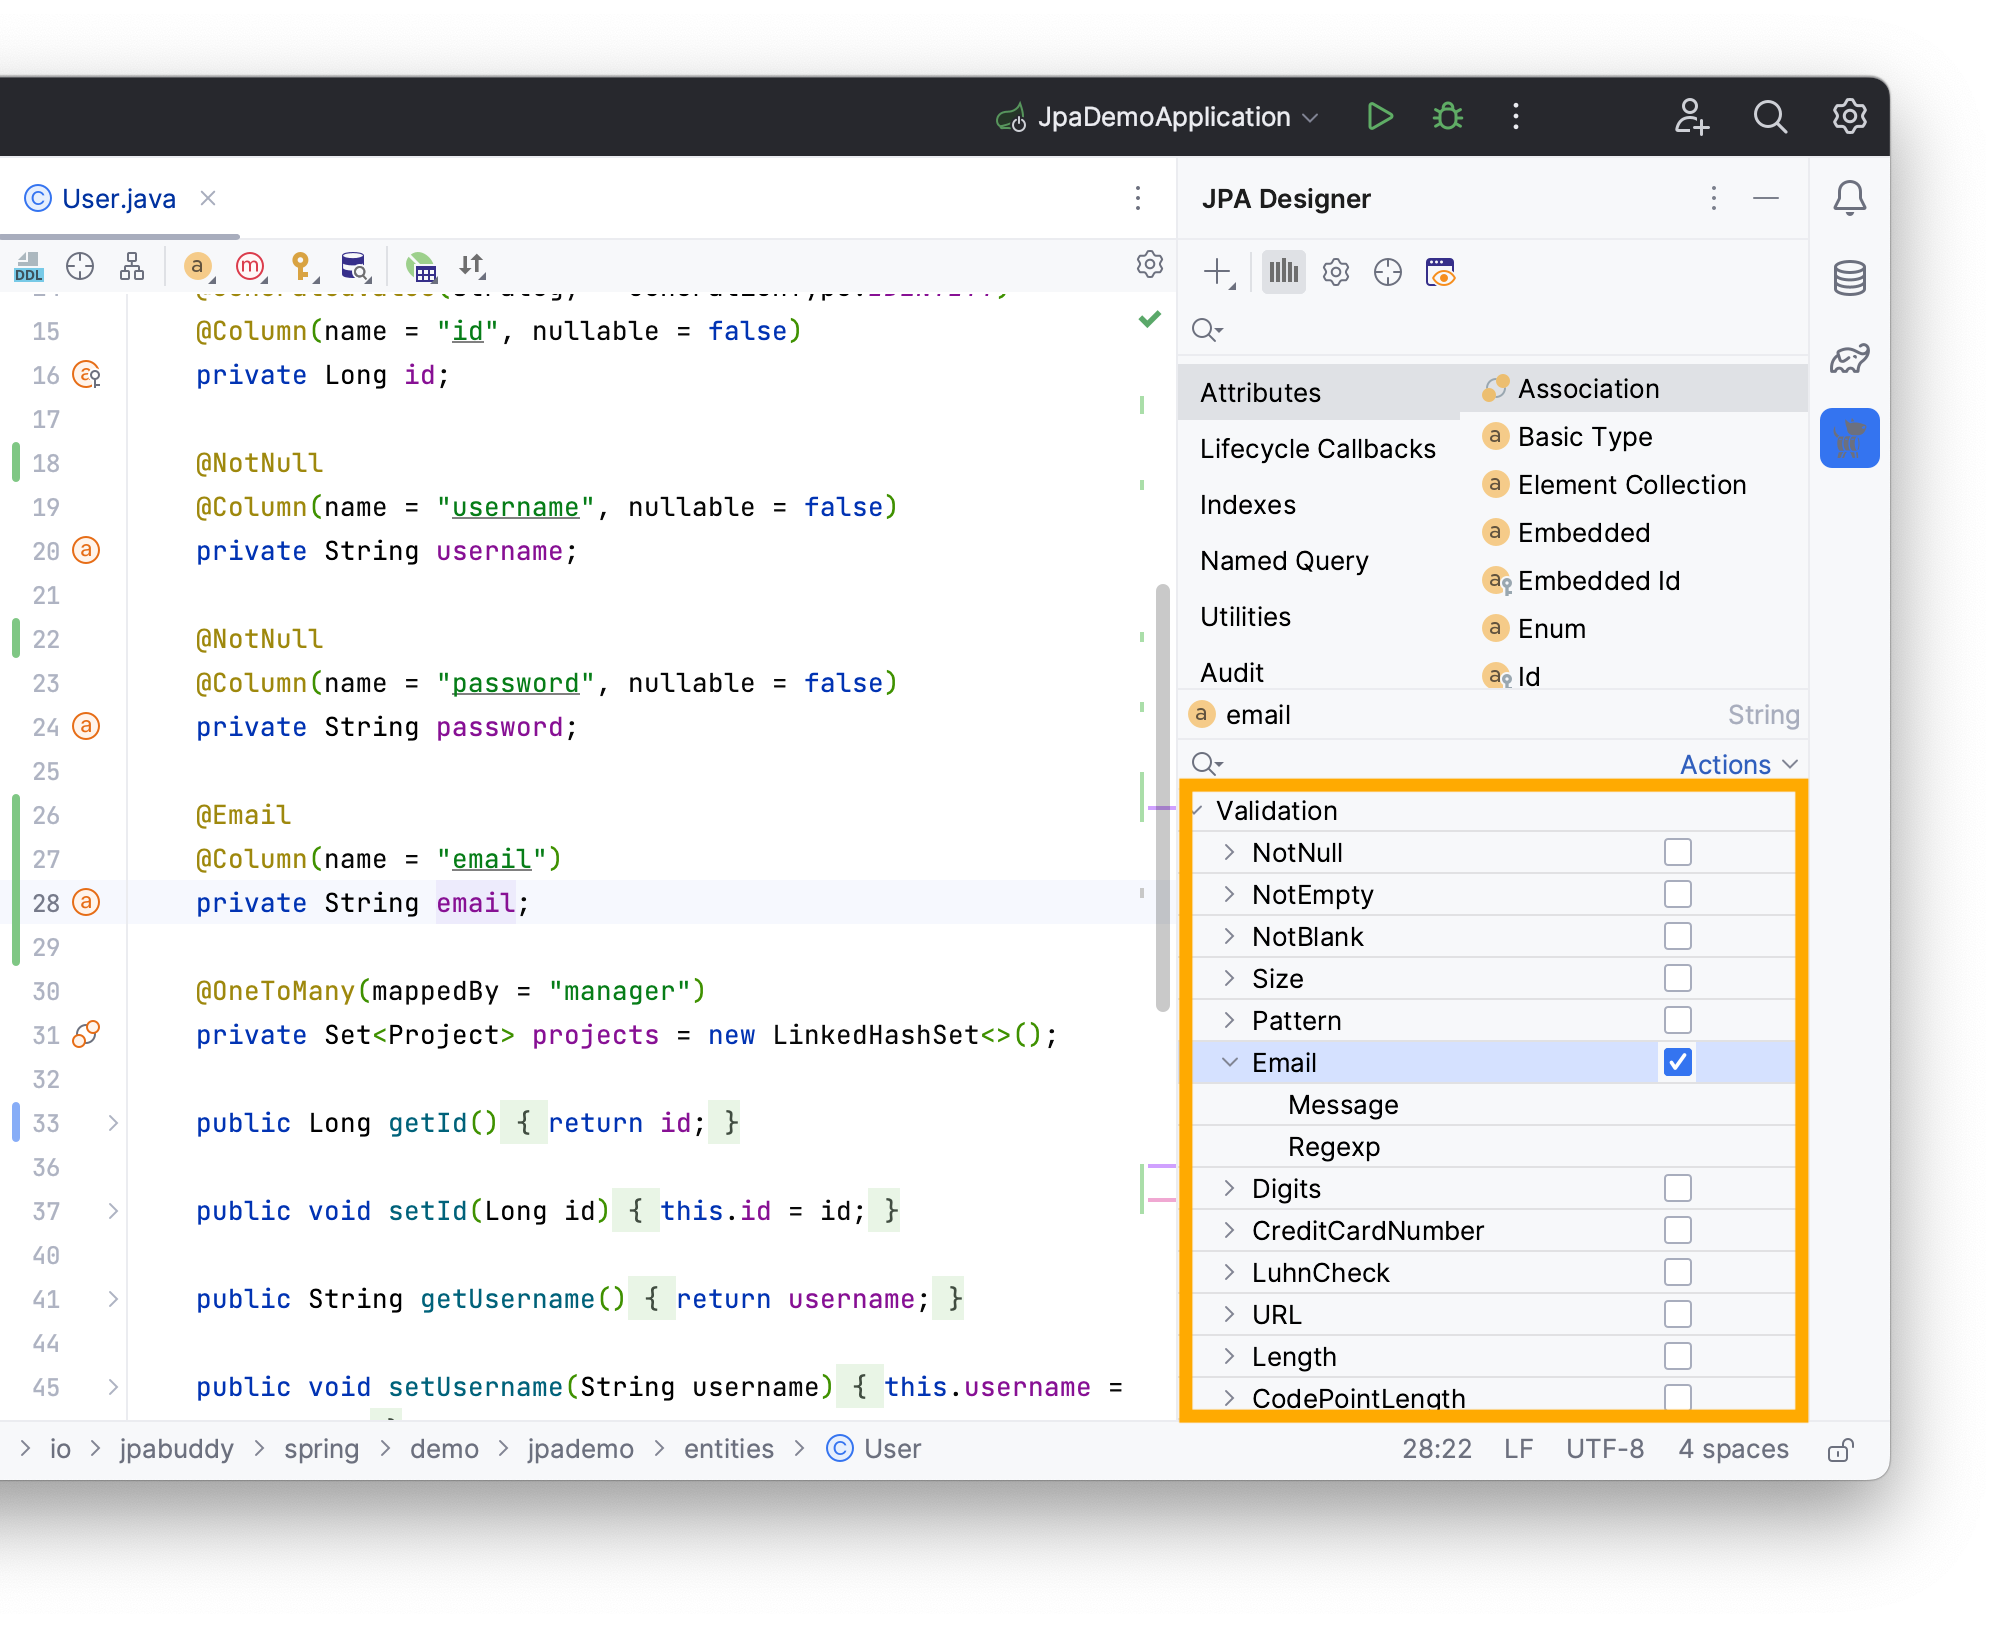
The instructions above will generate the following attribute in your User entity:
@Email(message = "Please provide a valid email")
@Column(name = "email", unique = true)
private String email;
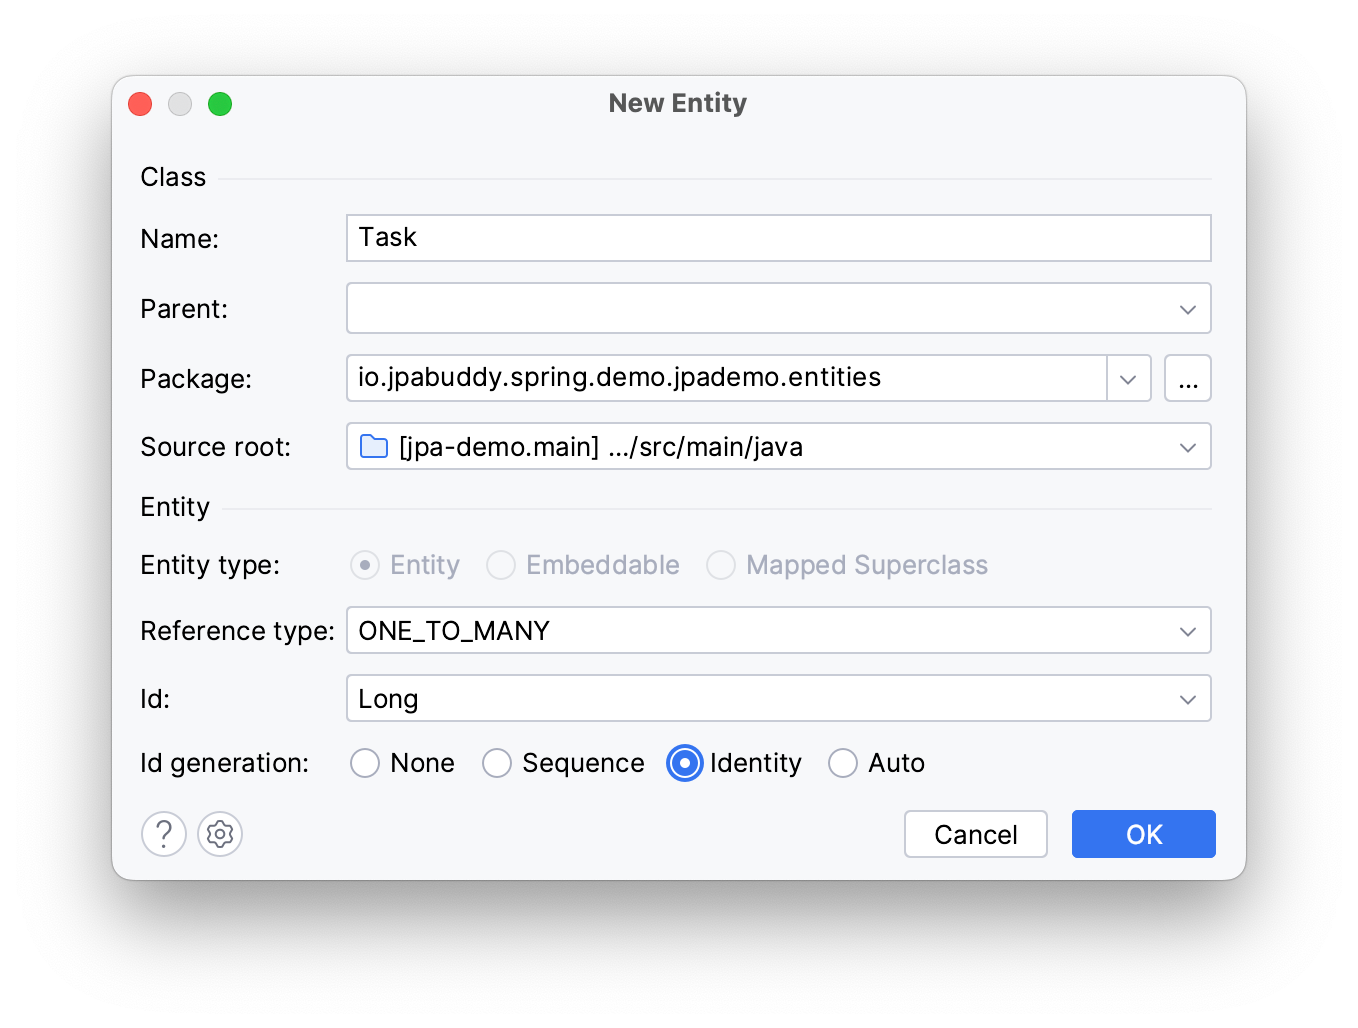
To create a new Task entity with Project being your aggregation root:
- Navigate to the
Projectentity - Invoke the Generate menu (Command/Ctrl + N)
- Select Create Referenced Entity
- Type the entity’s name
- Define the type of reference – in this case, a
OneToManyrelationship - The Id’s type and it’s generation type
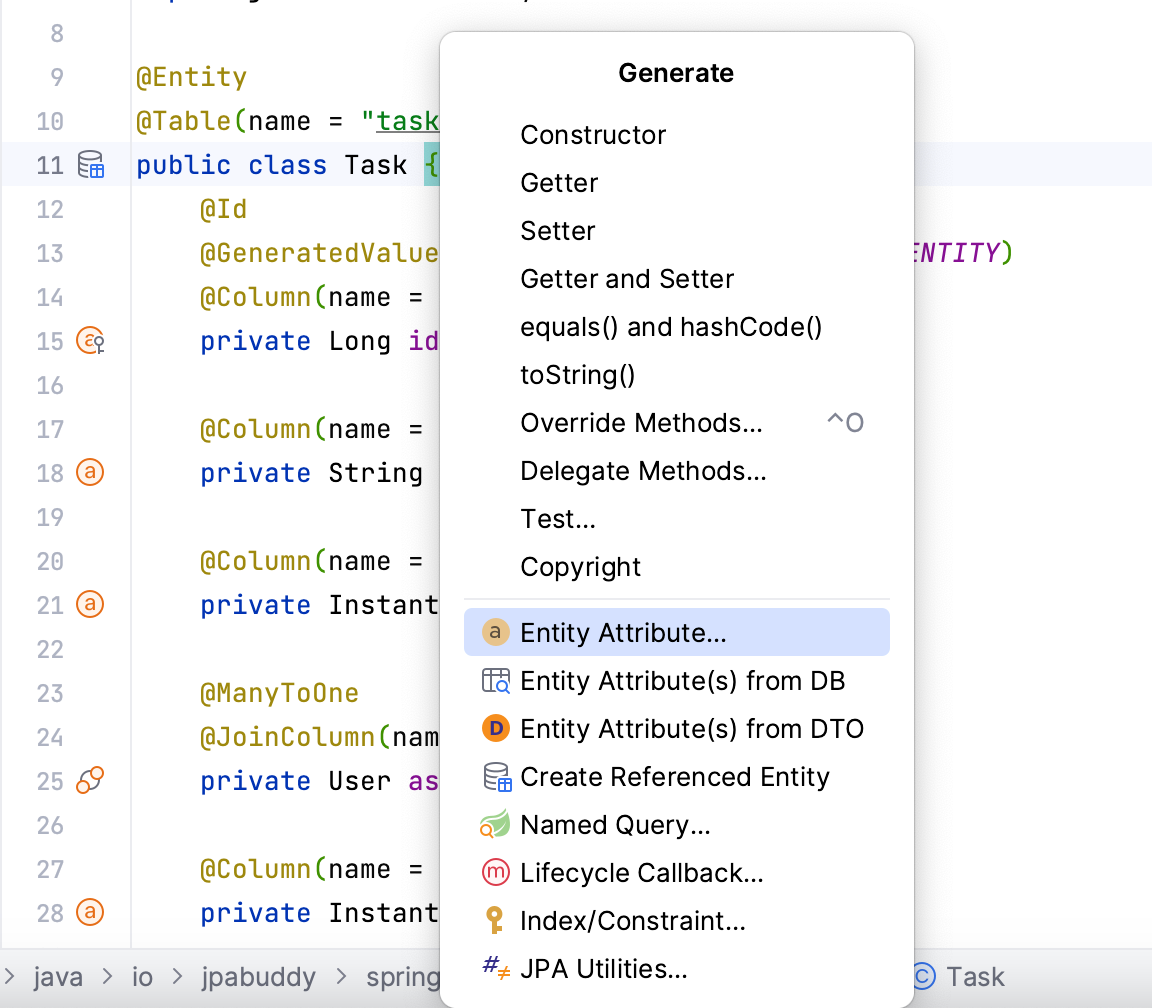
Now, navigate to the Task entity’s source code and generate its attributes like we did for the email attribute. Or you can do that through Generate (Command/Ctrl +N) → Entity attribute for the following attributes: name, start date, end date, and the assignee (User).
You should get the following code:
@Entity
@Table(name = "task")
public class Task {
 @Id
 @GeneratedValue(strategy = GenerationType.IDENTITY)
 @Column(name = "id", nullable = false)
 private Long id;

 @Column(name = "name")
 private String name;

 @Column(name = "start_date")
 private Instant start_date;

 @ManyToOne
 @JoinColumn(name = "assignee_id")
 private User assignee;

 @Column(name = "end_date")
 private Instant end_date;

 @ManyToOne
 @JoinColumn(name = "project_id")
 private Project project;

// getters and setters have been omitted for brevity
}
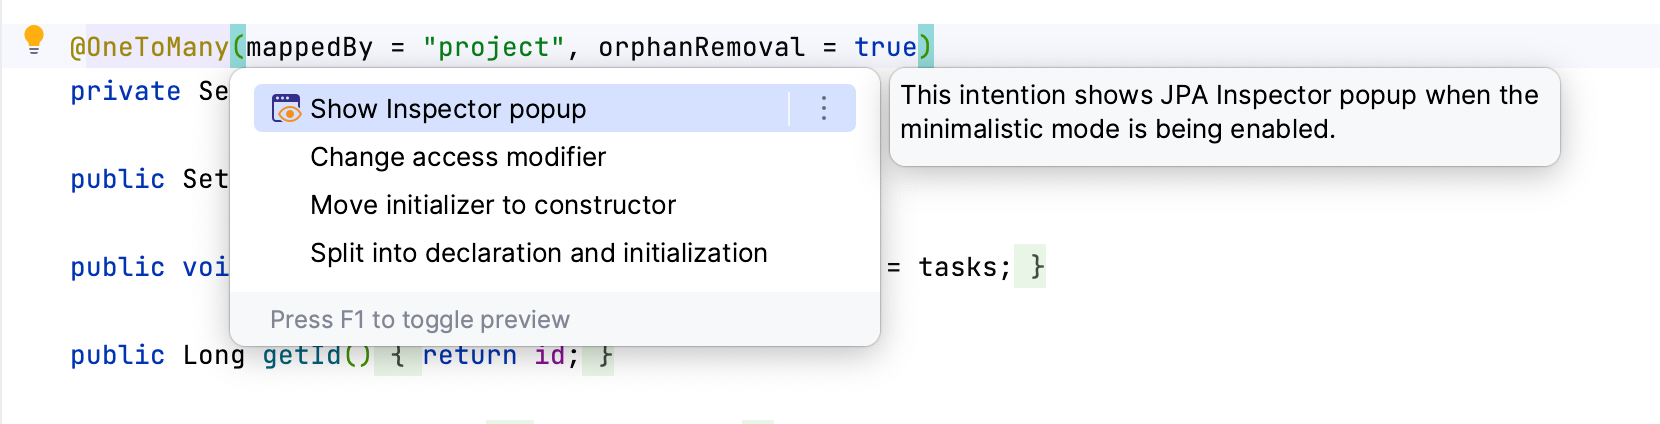
To automatically pass any changes made to the Project entity across the associated tasks you can enable cascade operations.
To do that, click on the @OneToMany annotation then open the Show Context Menu (Option/Alt + Enter) → inspector popup window as in the picture below:
Locate and switch the Cascade type option to ALL:
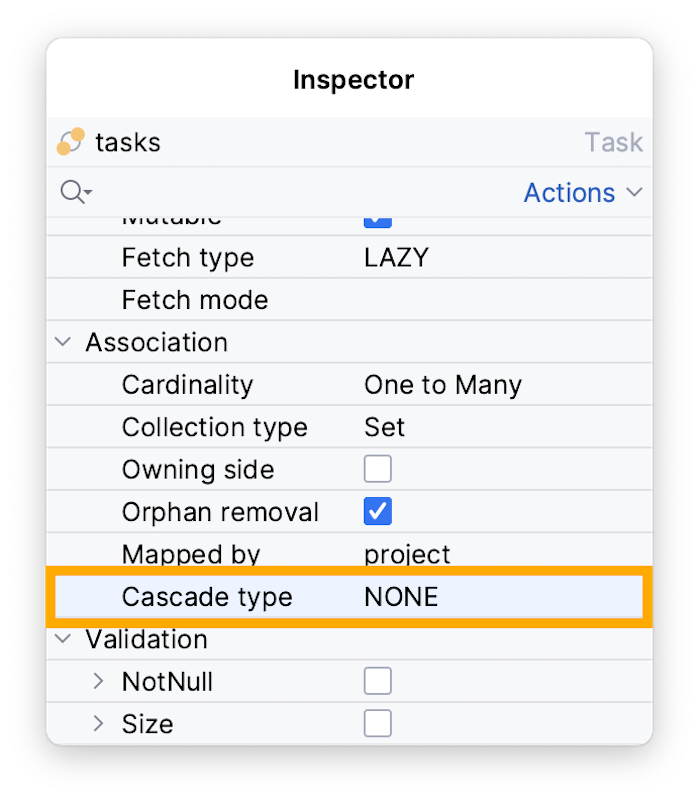
This will add a CascadeType.ALL to your attribute.
@OneToMany(mappedBy = "project", cascade = CascadeType.ALL, orphanRemoval = true)
private Set<Task> tasks = new LinkedHashSet<>();
Generating Database Migration Scripts
Versioning scripts help track changes between the current database schema and the JPA data model. In this section you will:
- Generate an init script based on the JPA model
- Generate migration scripts for any changes
- Generate DDL statements
To recreate the database from scratch, generate an initial migration script. Here's how to do it:
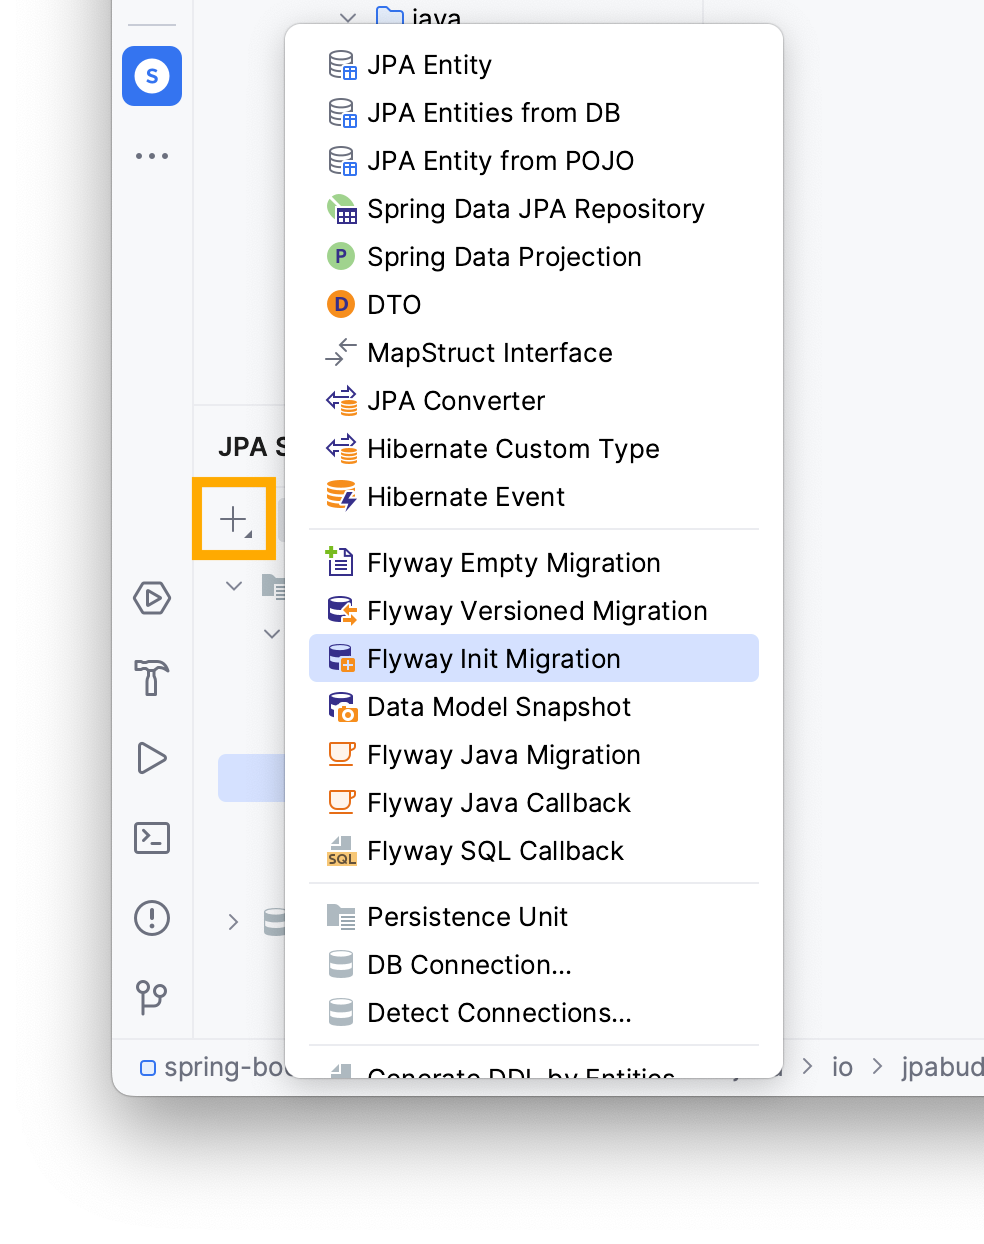
- Click on + in the JPA Structure panel
- Select Flyway Init Migration
- Choose DB as the Source Type
- Select the existing connection
The baseline on migrate property set earlier in the application.properties file instructs Flyway to baseline the database at version 1. That means, Flyway treats the existing state of the database as the baseline and only executes the first version if the database is empty.
That's why the initialization script should be named starting with "V1" as Flyway executes all subsequent migration scripts starting from version 2.
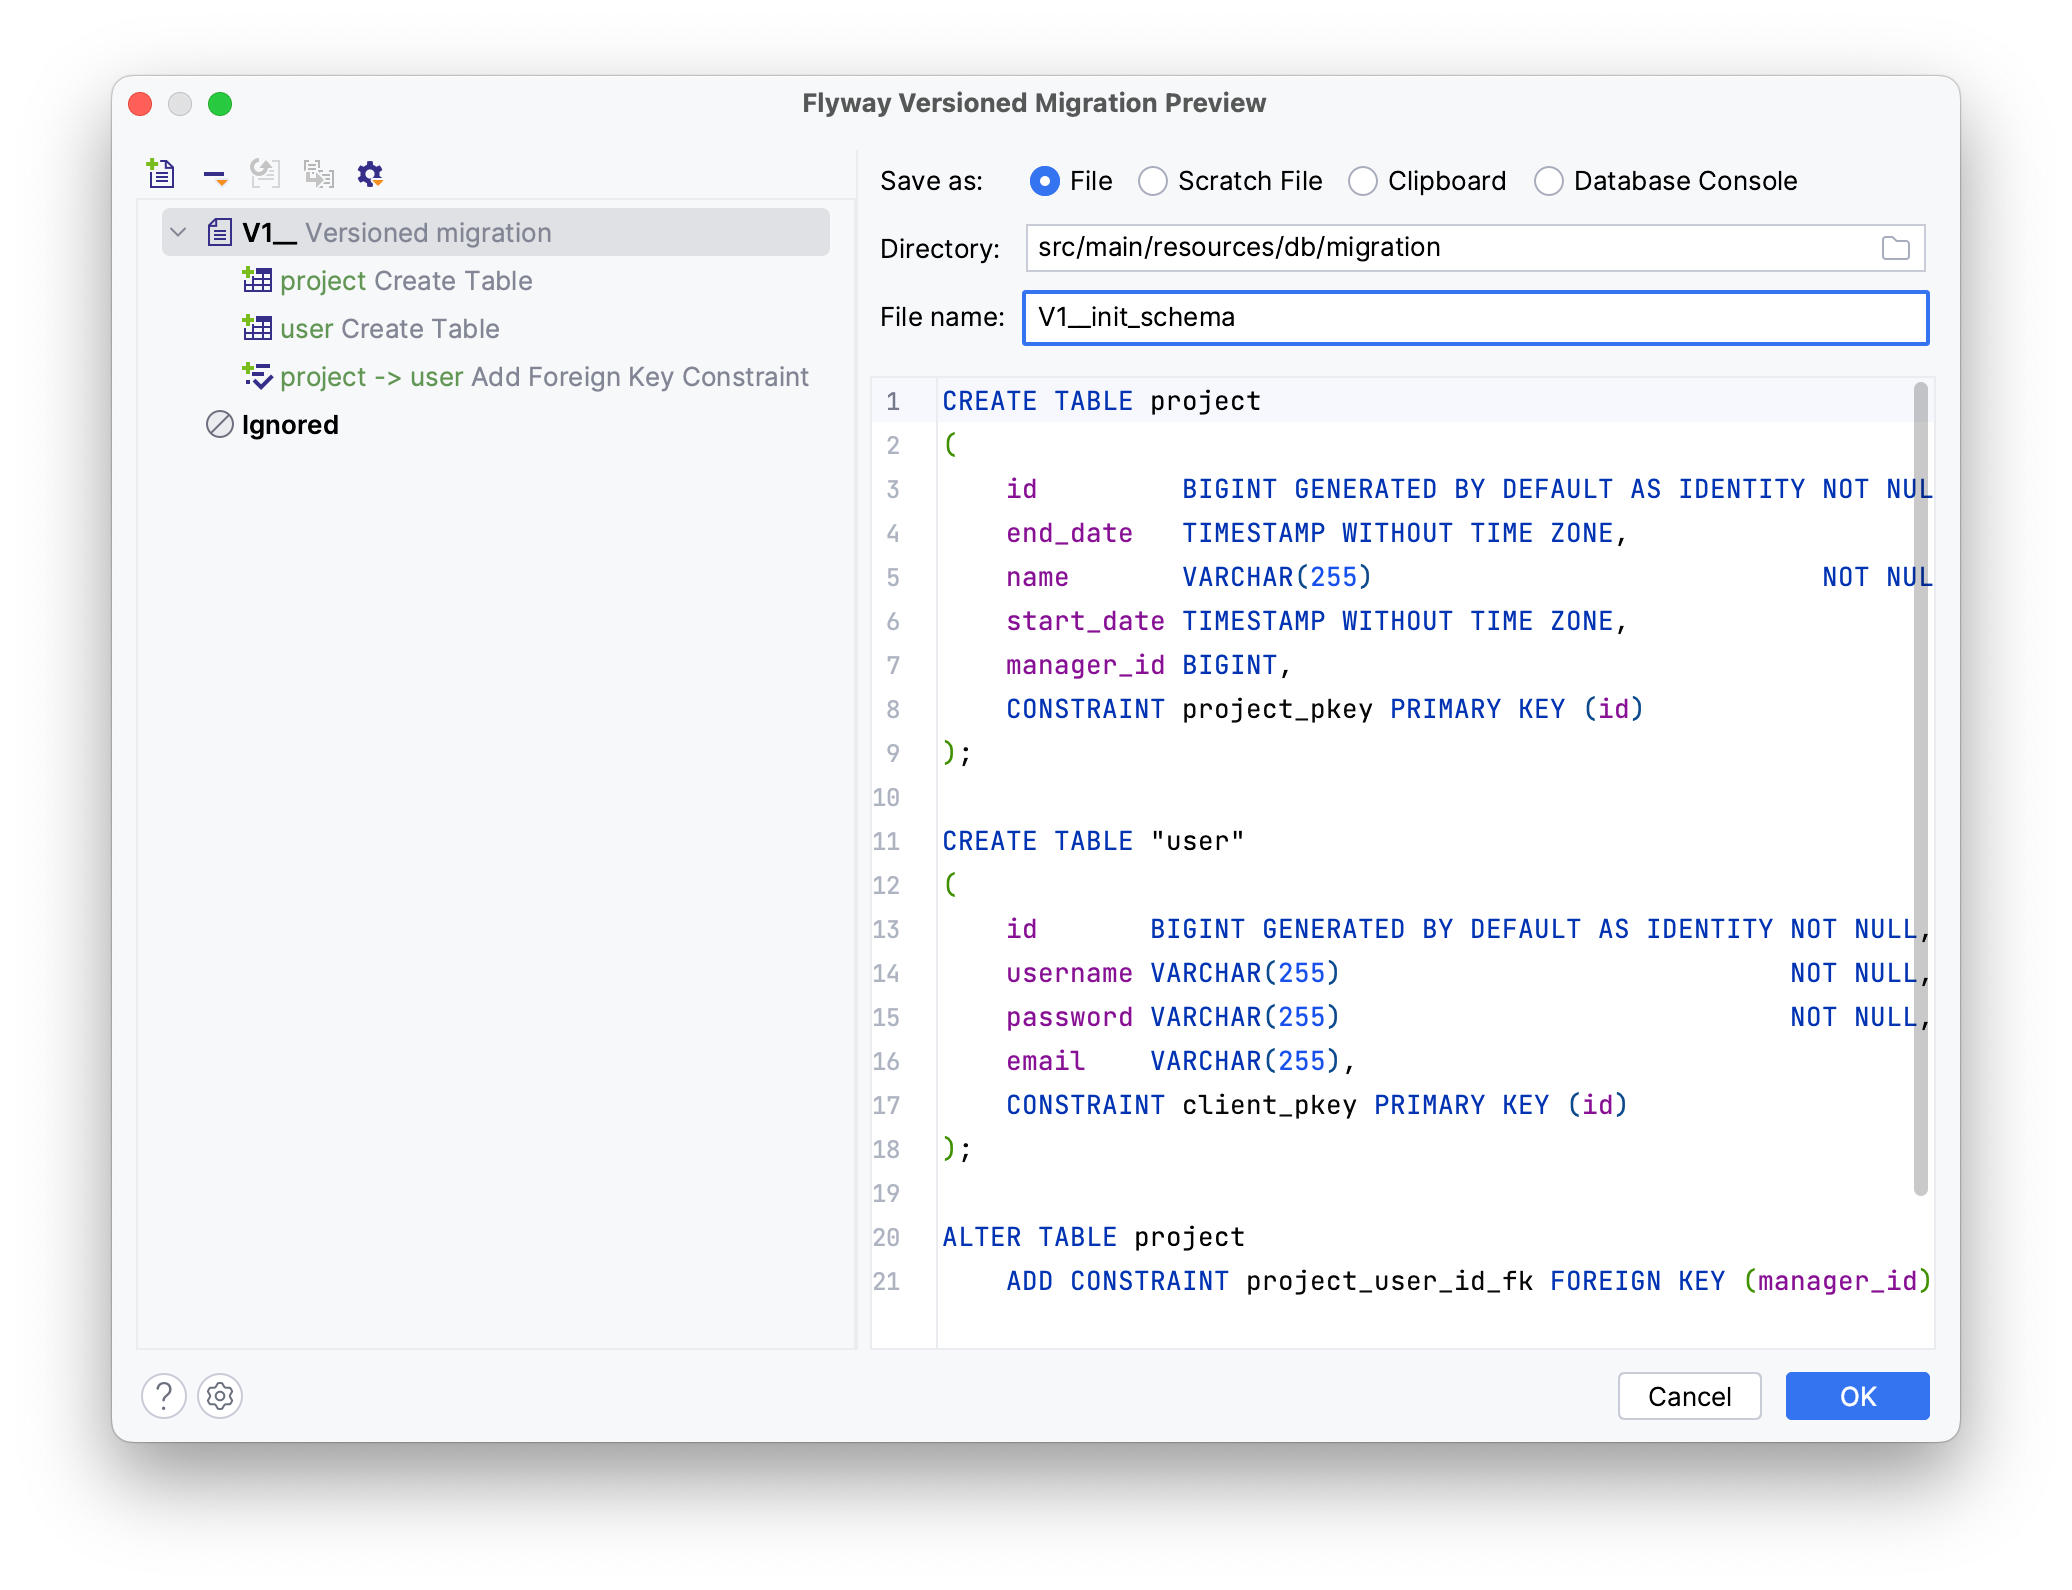
This will generate the following Init script in the db.migration folder:
CREATE TABLE project
(
 id BIGINT GENERATED BY DEFAULT AS IDENTITY NOT NULL,
 end_date TIMESTAMP WITHOUT TIME ZONE,
 name VARCHAR(255) NOT NULL,
 start_date TIMESTAMP WITHOUT TIME ZONE,
 manager_id BIGINT,
 CONSTRAINT project_pkey PRIMARY KEY (id)
);

CREATE TABLE "user"
(
 id BIGINT GENERATED BY DEFAULT AS IDENTITY NOT NULL,
 username VARCHAR(255) NOT NULL,
 password VARCHAR(255) NOT NULL,
 CONSTRAINT client_pkey PRIMARY KEY (id)
);

ALTER TABLE project
 ADD CONSTRAINT project_user_id_fk FOREIGN KEY (manager_id) REFERENCES "user" (id)
ON UPDATE NO ACTION ON DELETE NO ACTION;
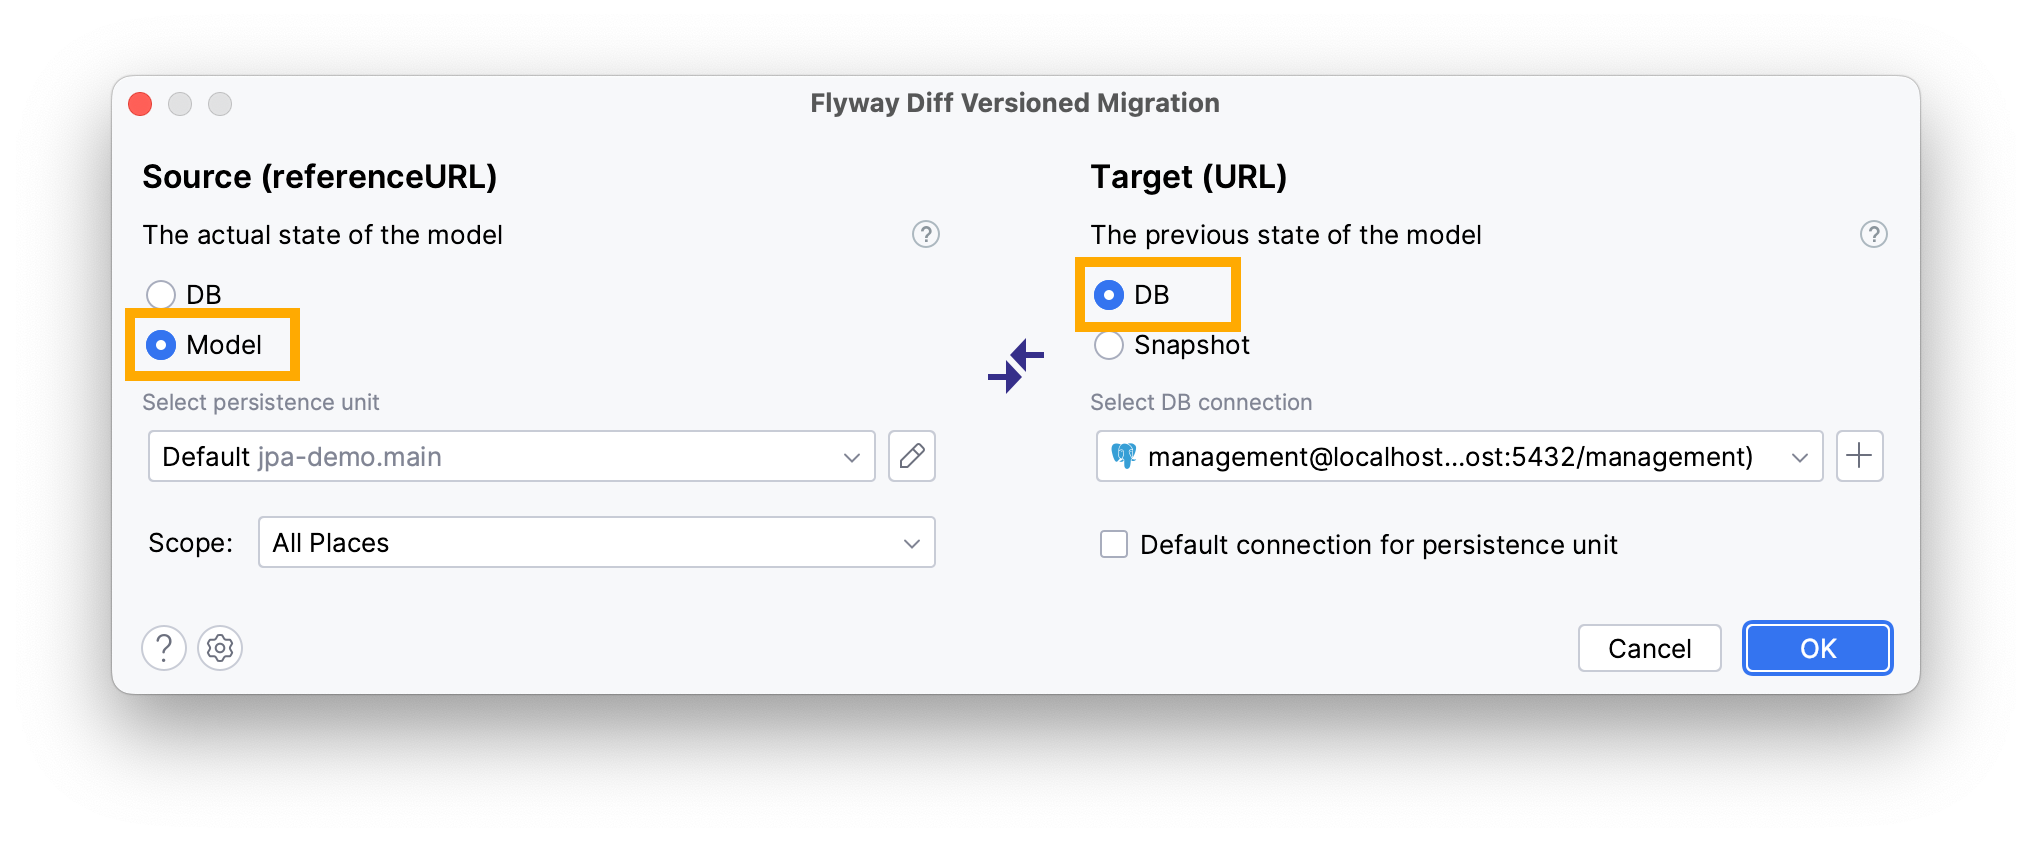
Migration scripts can also capture the difference between the existing database schema and the updated JPA model. This way your schema stays consistent with the JPA model everytime you change it.
Let’s generate a migration script for your JPA model changes.
- Select New → Flyway Versioned Migration in the Project panel
- Use Model as the source for comparison instead
- Review the generated SQL and exclude any unwanted migrations before saving
One way to fill the database with testing data is through DDL (Data Definition Language) statements. JPA Buddy provides visual editors for most of the SQL statements. For instance, let's create initial data for this application.
- Select New → Other → Flyway Empty Migration
- Invoke the Generate menu (Command/Ctrl + N)
- Choose the DDL/SQL Statement option
- Select insert in the DDL window
- Fill in the necessary tables with random data
- Click OK
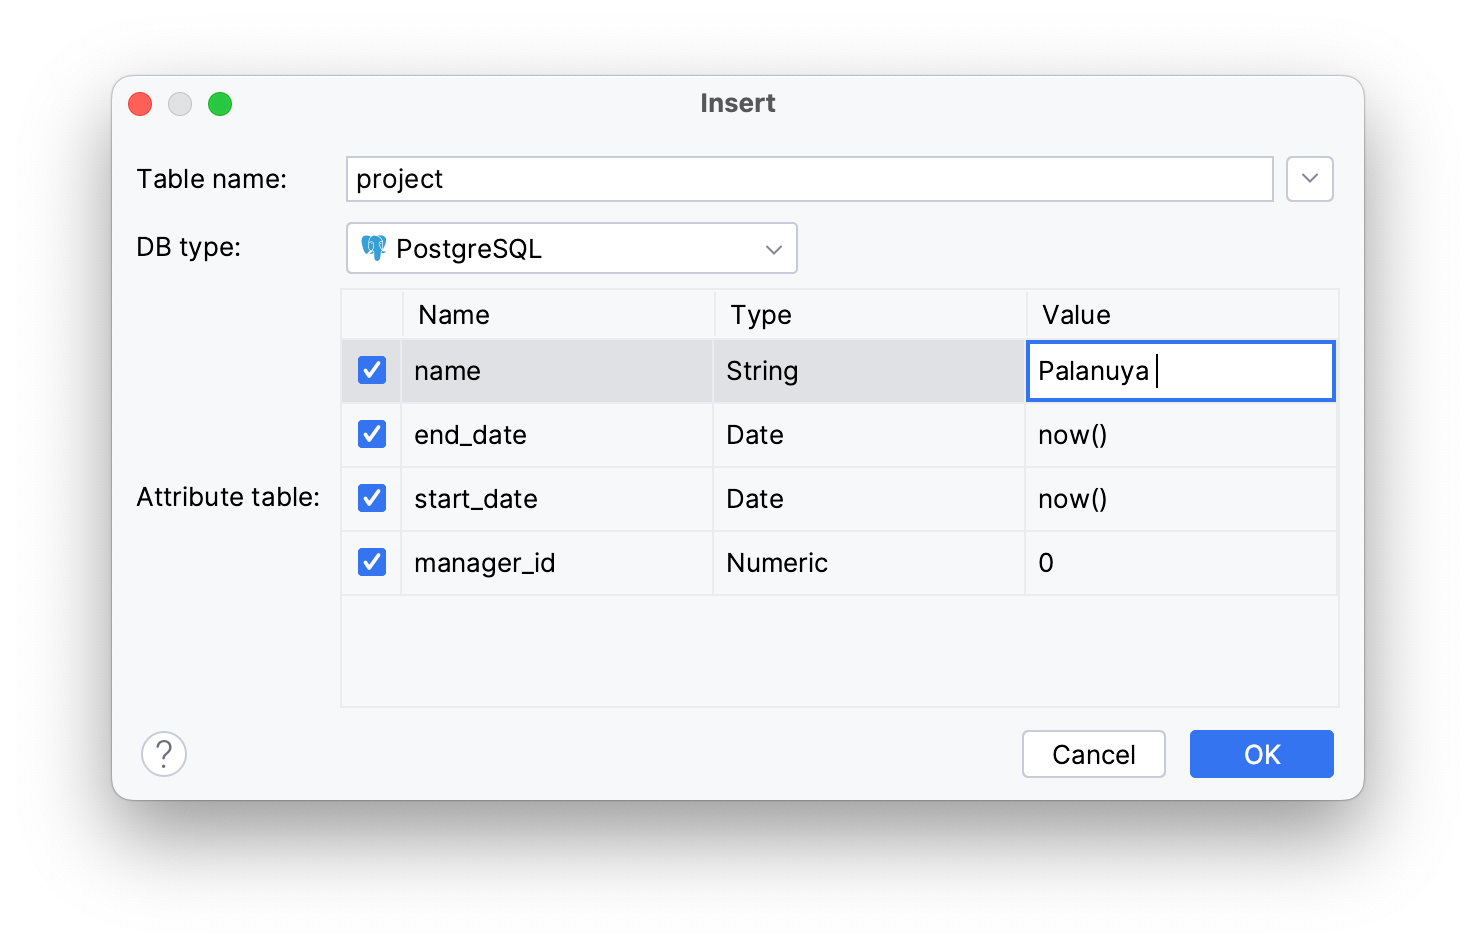
The values above result in the following script:
INSERT INTO project (name, end_date, start_date, manager_id)
VALUES ('Palanuya', NOW(), NOW(), 0);
Note: JPA Buddy supports all these features for Liquibase users as well.
Working with Spring Data JPA
JPA Buddy provides user-friendly wizards to create a CRUD repository to manage data through query derived methods. In this section you will do the following:
- Create a Spring Data JPA repository for your
Projectentity - Generate a
findmethod to search for a project by name - Generate another
findmethod to search for projects by unfinished tasks - Add an index to the
namecolumn
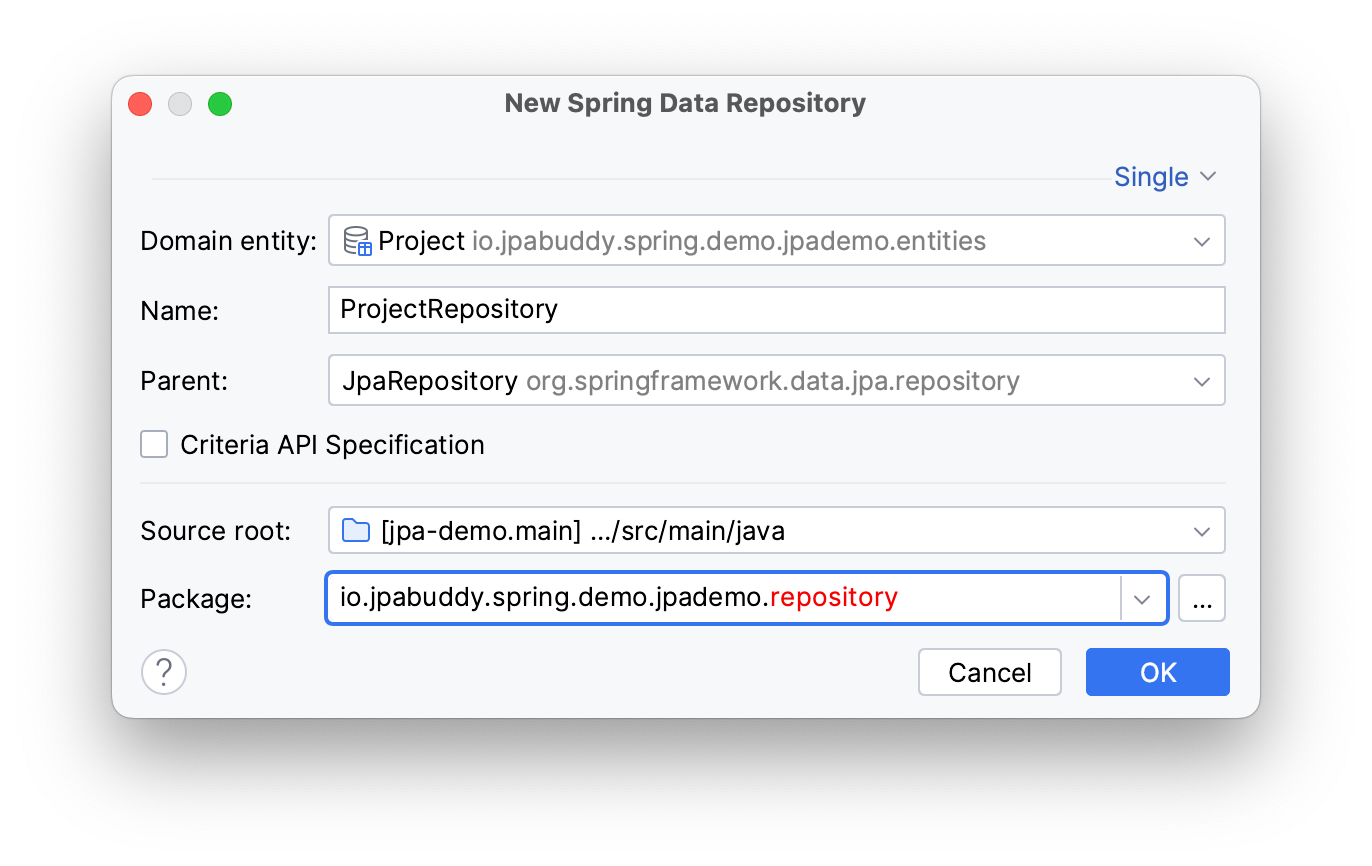
Let's start by creating a Spring Data JPA repository with JPA Buddy:
- Right-click on the Project entity in the project panel
- Select New → Spring Data JPA Repository
- Type the repository’s name
- Type the repository’s package
- Click OK
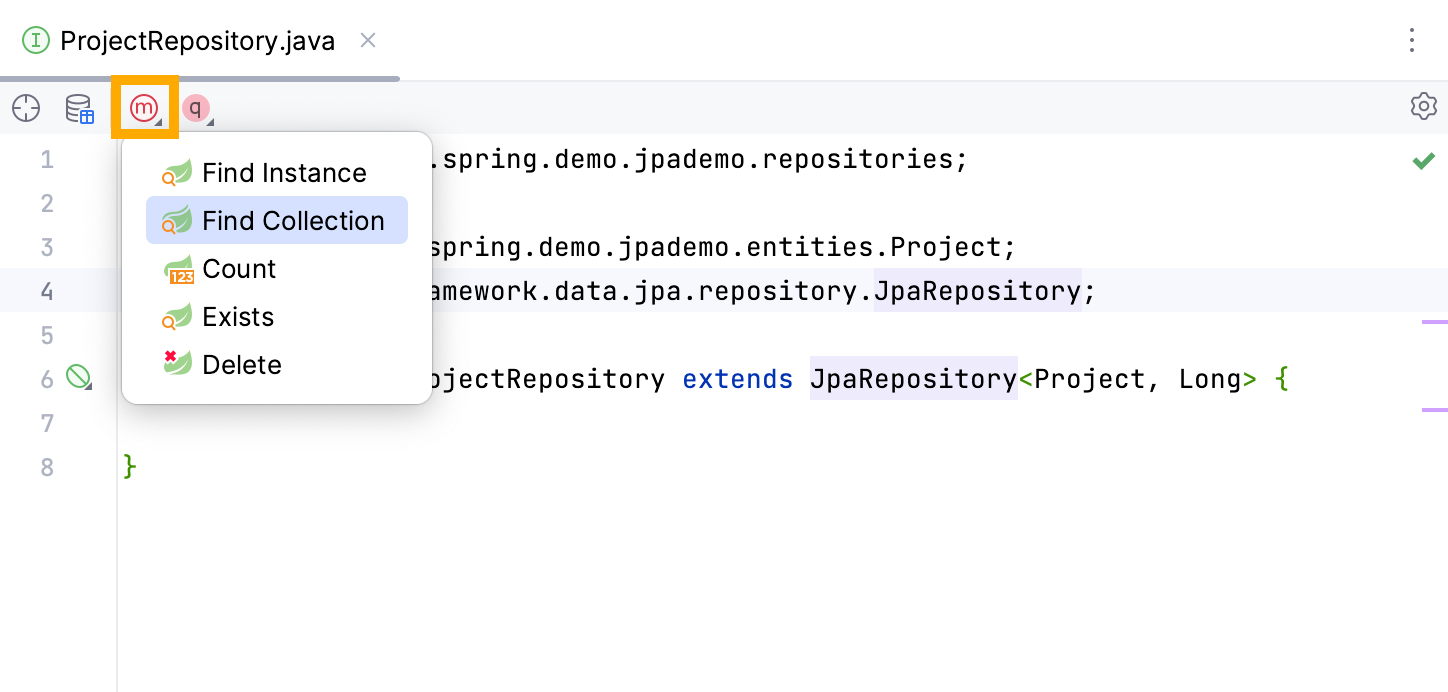
To search for projects by name, you will need to create a find method in the generated Interface:
- Open
ProjectRepositorysource code - Click on the Add Spring Repository Derived Method on the tool bar
- Choose Find Collection Method
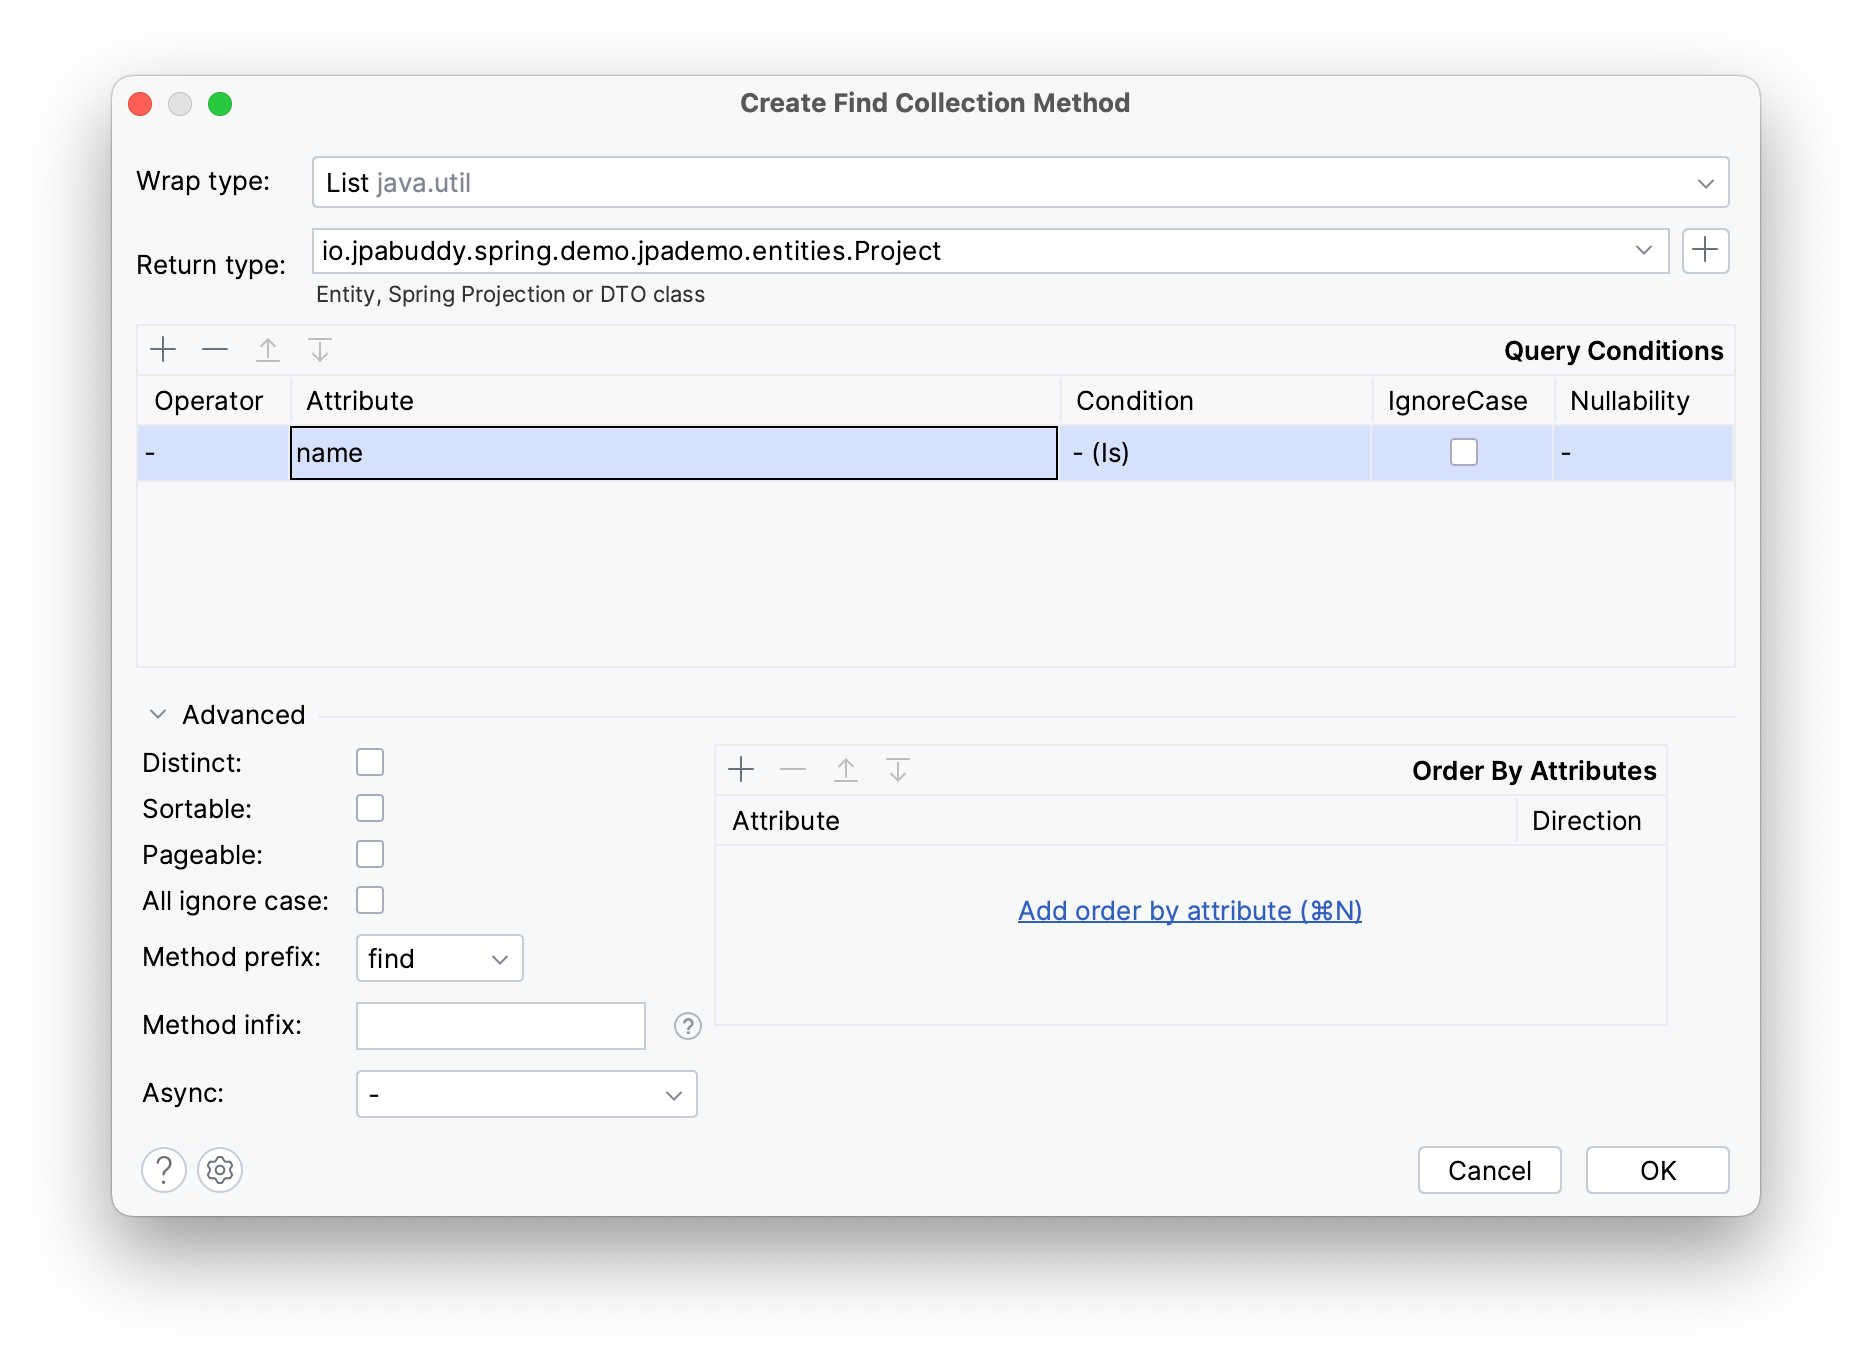
In this example, the find method should return a List of entities.
- Choose a
Listtype as your Wrap Type to return a list of projects - Select the
nameattribute to search by the project’s name - Choose the Is condition for exact name matches
After these steps, your repository will look like this:
public interface ProjectRepository extends JpaRepository<Project, Long> {
	List<Project> findByName(String name);
}
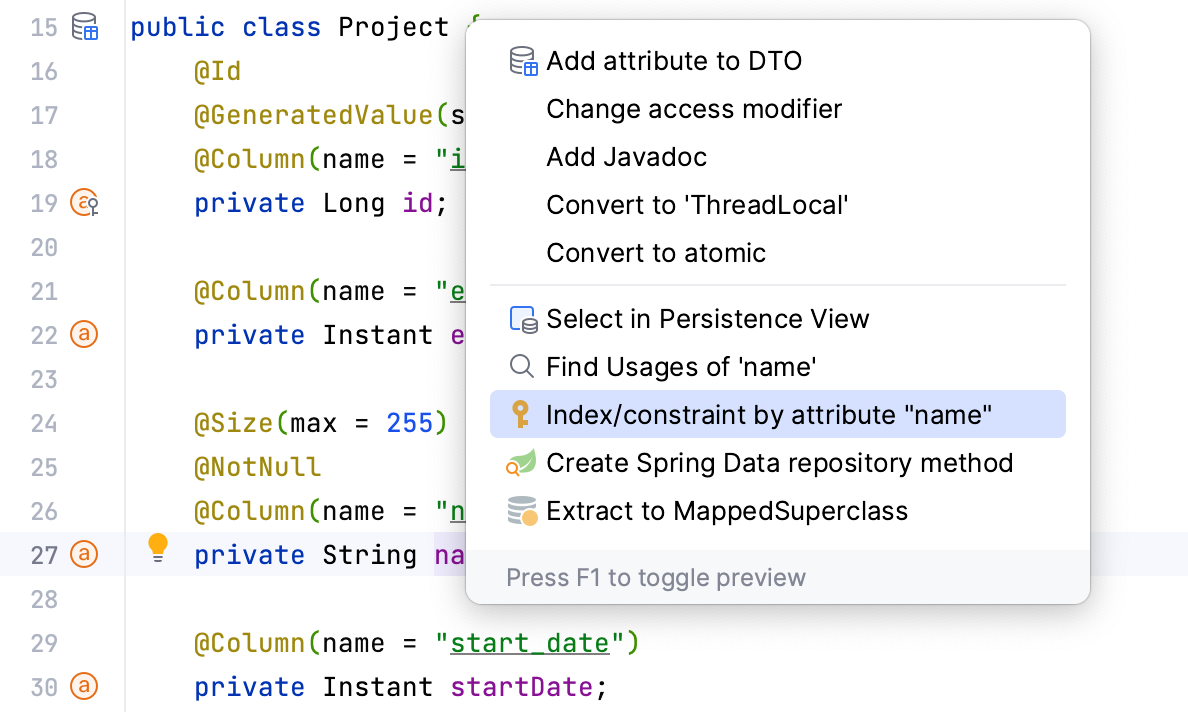
To speed up querying the name column in the project table, you can add an index following these instructions:
- Open the
Projectentity - Click on the
nameattribute - Access Show Context Menu
- Navigate to Index/constraint by attribute "name"
- Choose Create constraint by attribute "name"
This will add the following option to your table annotation:
@Entity
@Table(name = "project", indexes = {
 @Index(name = "idx_project_name", columnList = "name")
})
public class Project {
 @Id
 @GeneratedValue(strategy = GenerationType.IDENTITY)
 @Column(name = "id", nullable = false)
 private Long id;
//...
}
Remember to generate a migration script to ensure your changes propagate correctly to the database when you add the index. To do that:
- Open the last migration script after V1
- Access the Generate menu (Command/Ctrl + N)
- Select DDL/SQL Statement → Create Index
- Choose the table and column you want to index
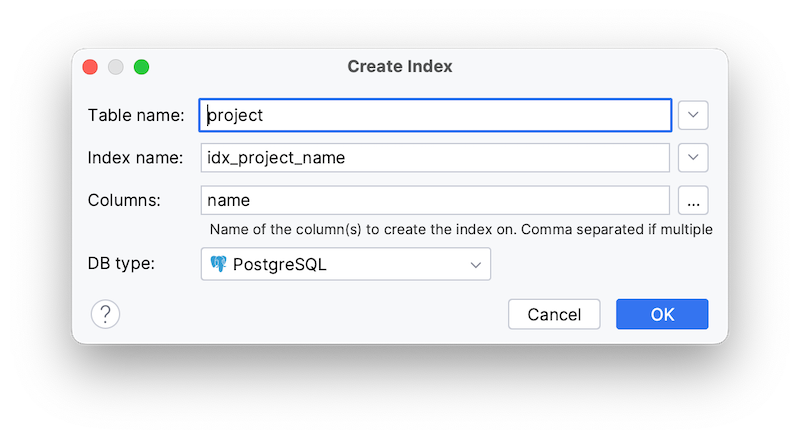
The script for the added index will look like this:
CREATE INDEX idx_project_name ON project (name);
Now add a method that will search for projects with unfinished tasks.
- Open
ProjectRepositoryfrom the project panel - Access the Generate menu (Command/Ctrl + N)
- Select Repository Method... → Query Find Collection
- Choose
endDateattribute with aNullcondition
You can generate it as a derived or query method. The only difference is that you can specify the query methods' name like in the picture below:
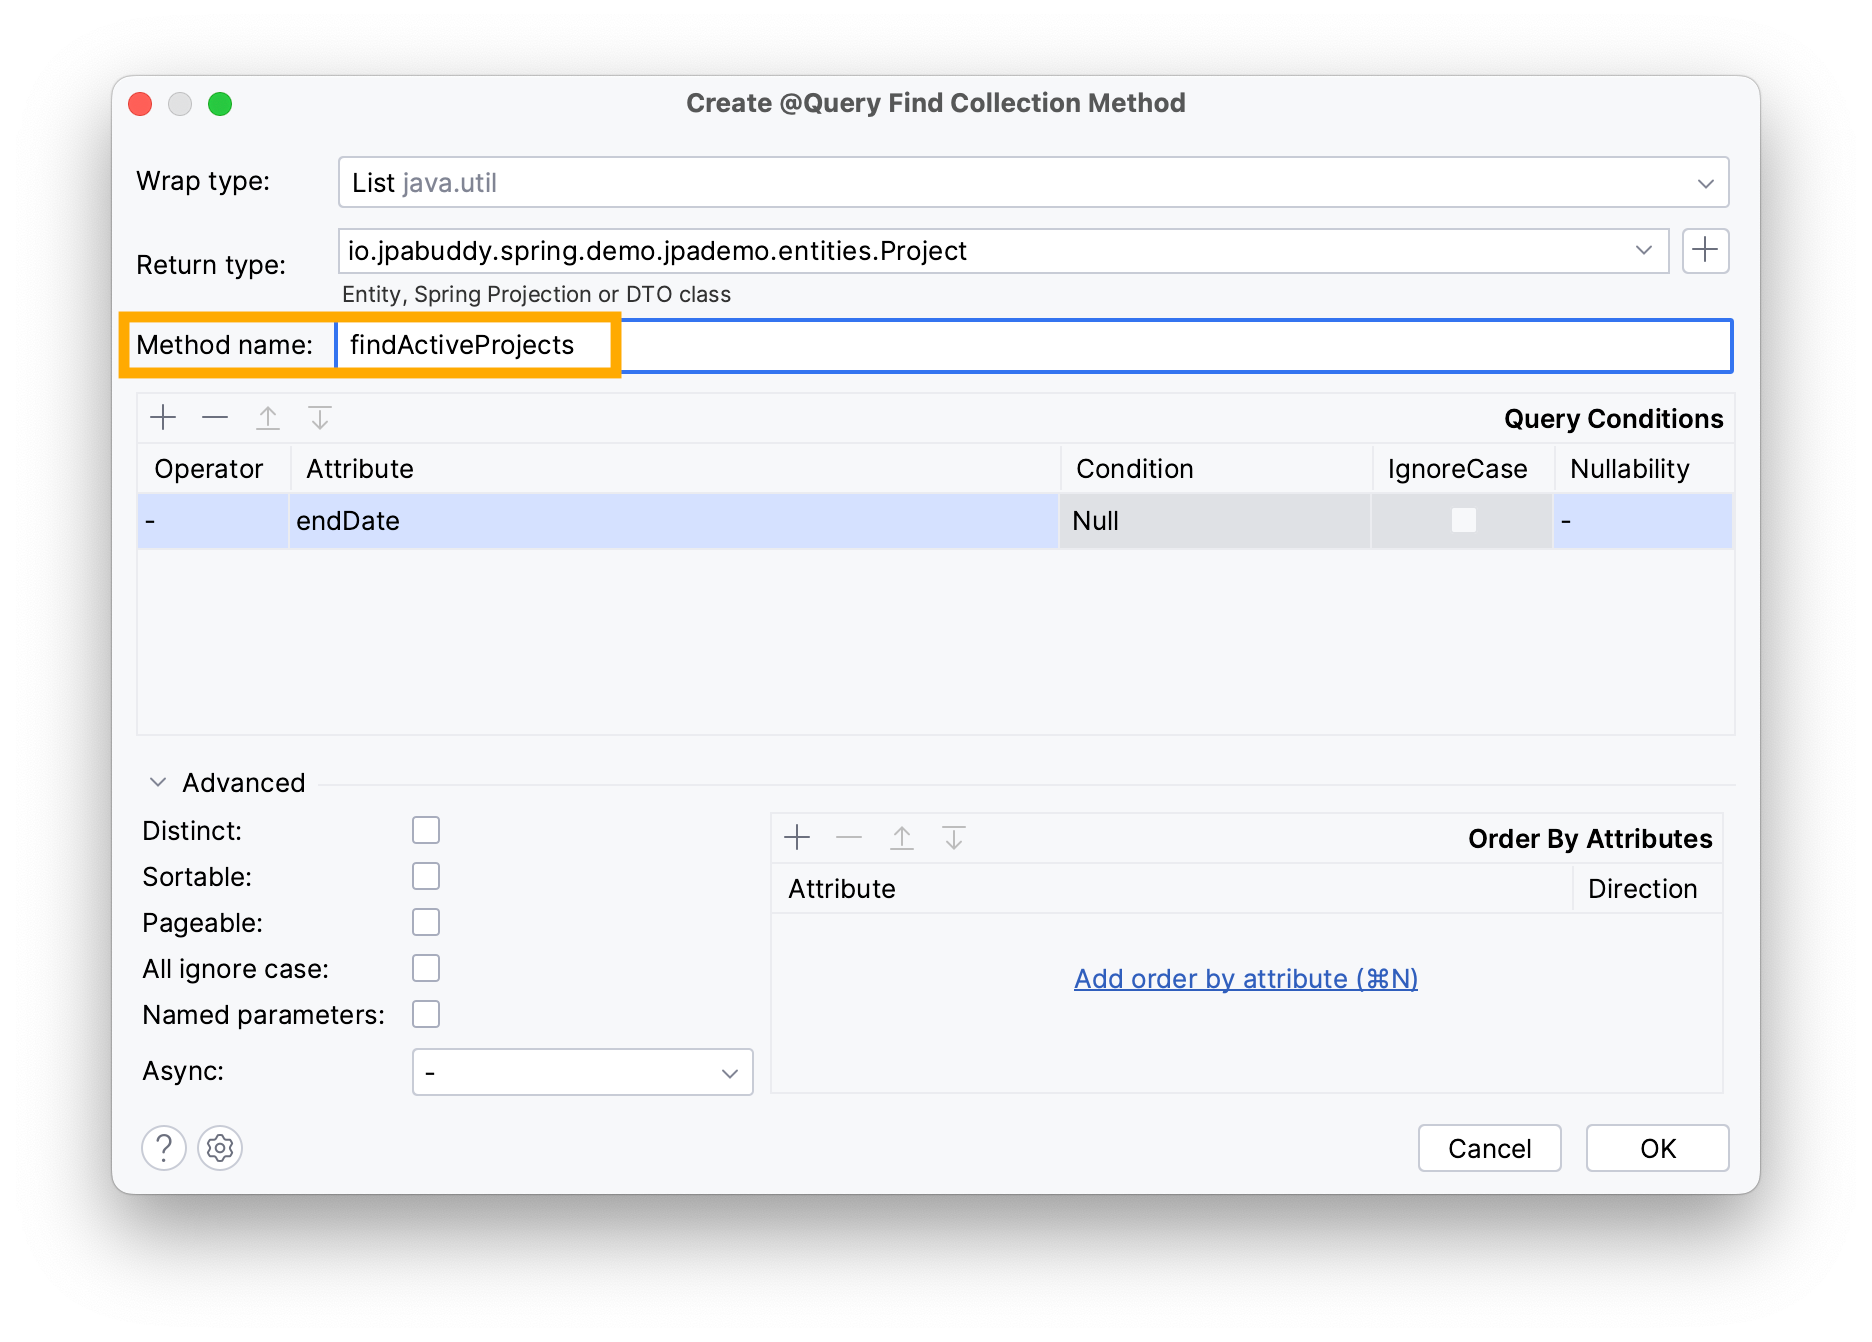
The Query Find Collection generates the following code:
@Query("select p from Project p where p.endDate is null")
List<Project> findActiveProjects();
Generating DTOs and Mappers
Exposing entities directly via REST API is discouraged because it can lead to unintended data exposure and tight coupling between your database and API structures. Instead, use DTOs (Data Transfer Objects) for greater control and security. In this section you will:
- Generate a DTO for the project entity
- Create a mapper interface for the generated DTO
To exchange only the necessary fields between your application and API consumers, you can use DTOs. With this in mind, let’s generate a DTO for the Project entity:
- Place the cursor over the entity’s name
- Open the Show Context Actions menu (Option/Alt + Enter)
- Select Create DTO
- Type the package name
- Select the desired attributes
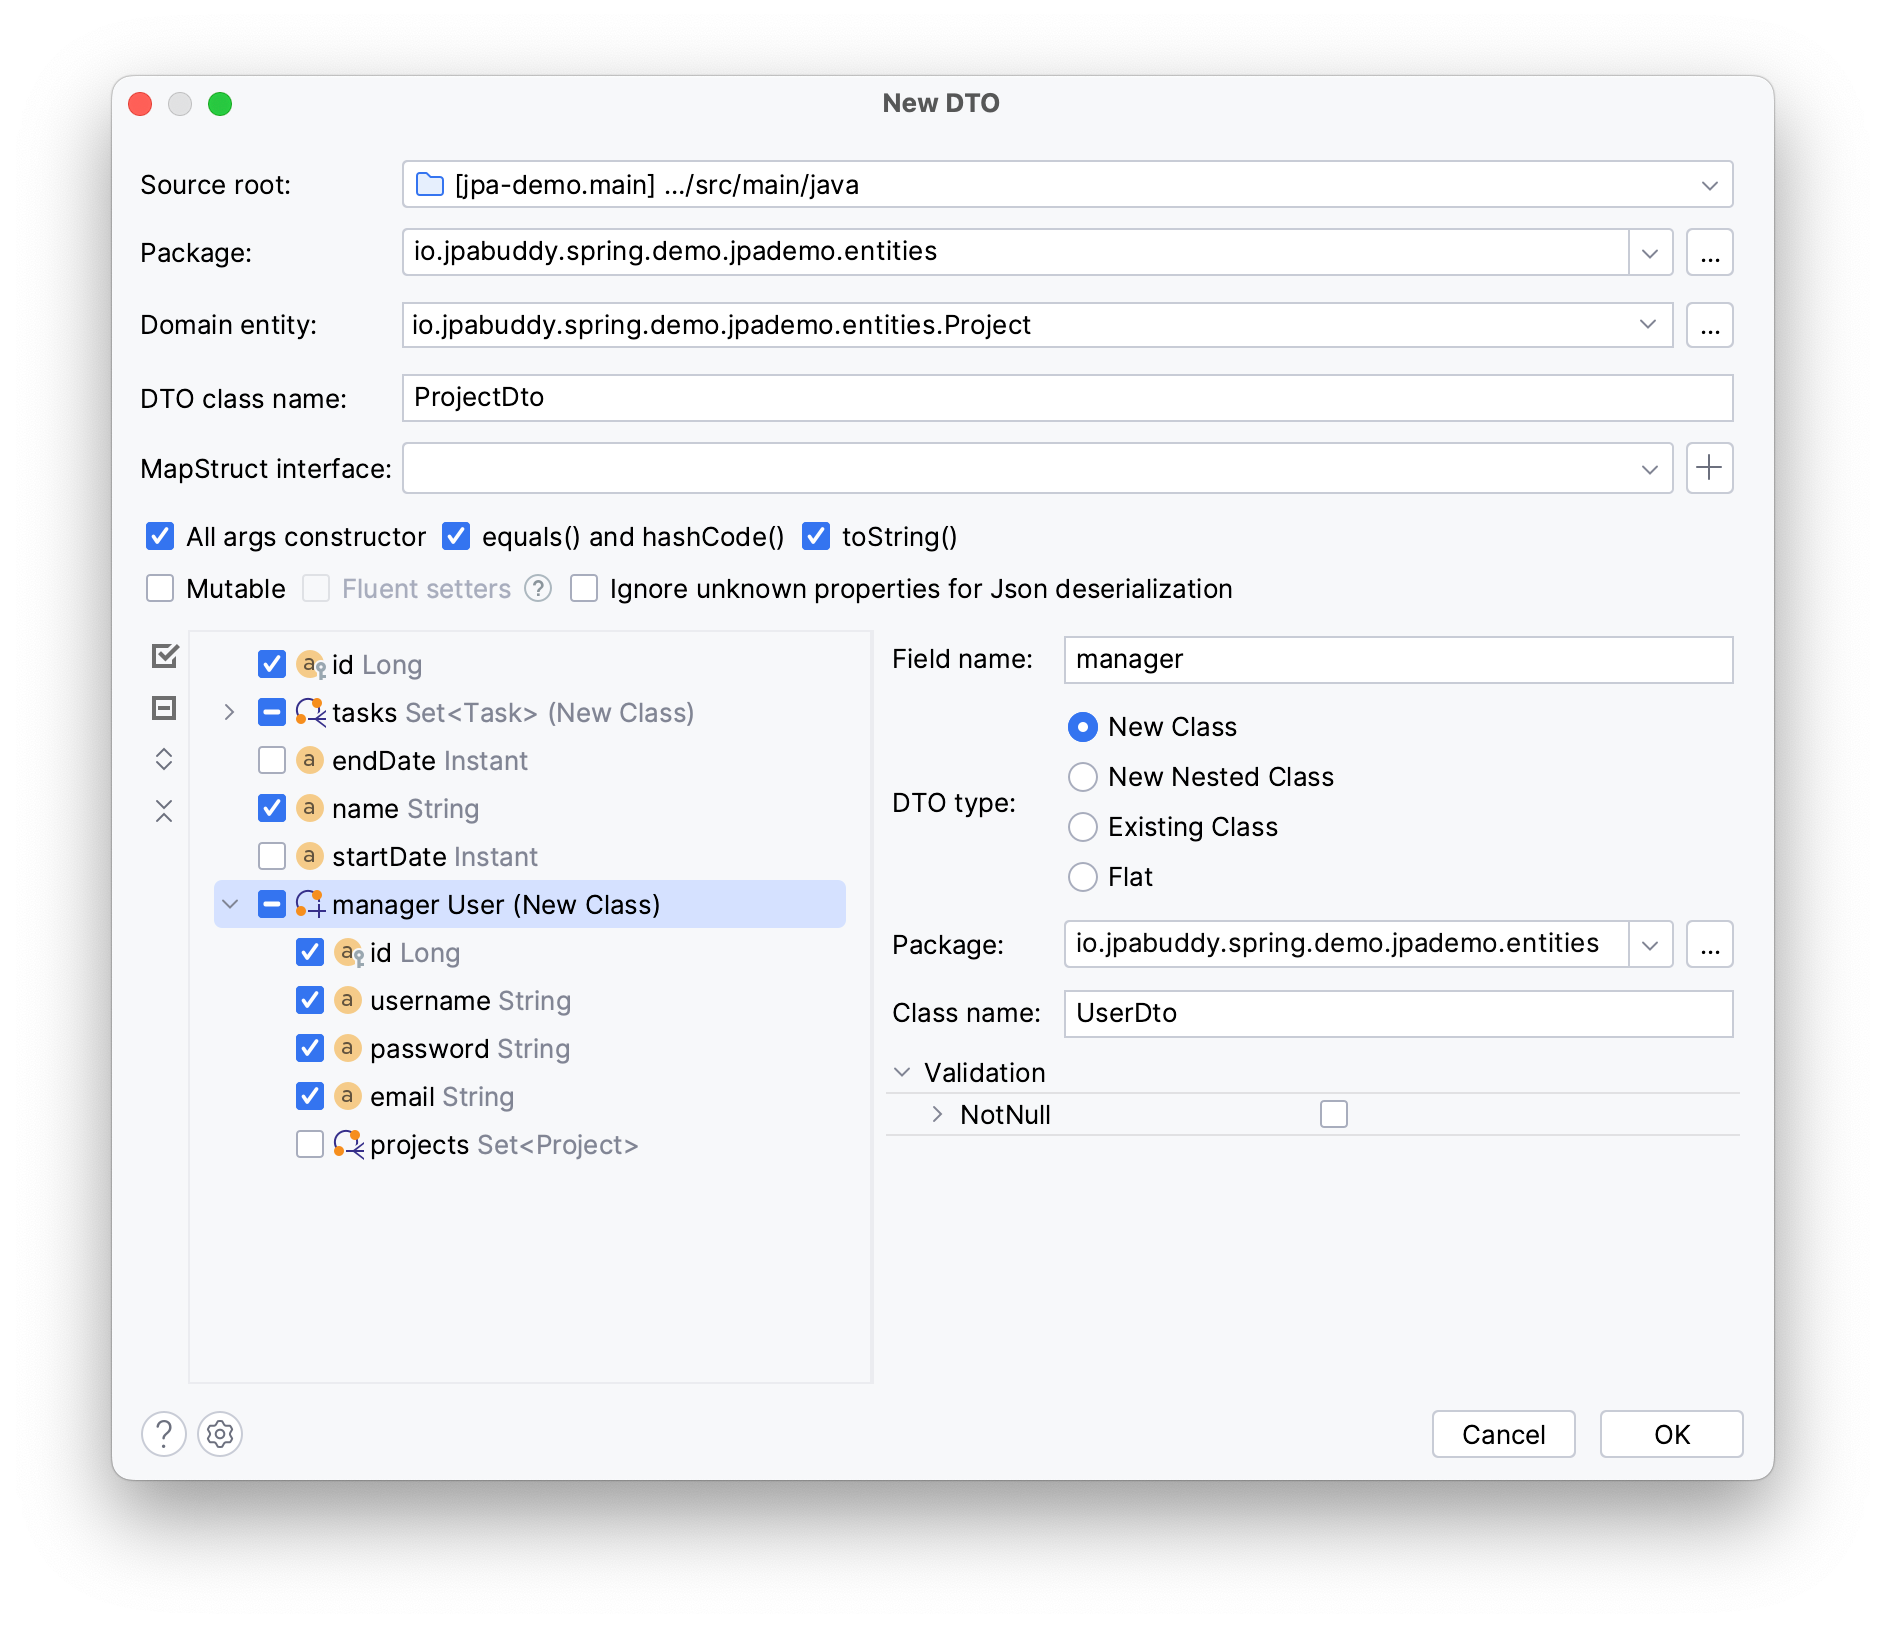
You can create separate DTO classes for manager and tasks attributes by choosing New Class, or change them into nested classes with New Nested Class.
Before finishing the DTO creation, you can generate mappers to convert entities into DTOs and vice versa in the same window.
- Click the plus button near MapStruct Interface in the New DTO window
- Specify your mapper’s name and package
- Click OK
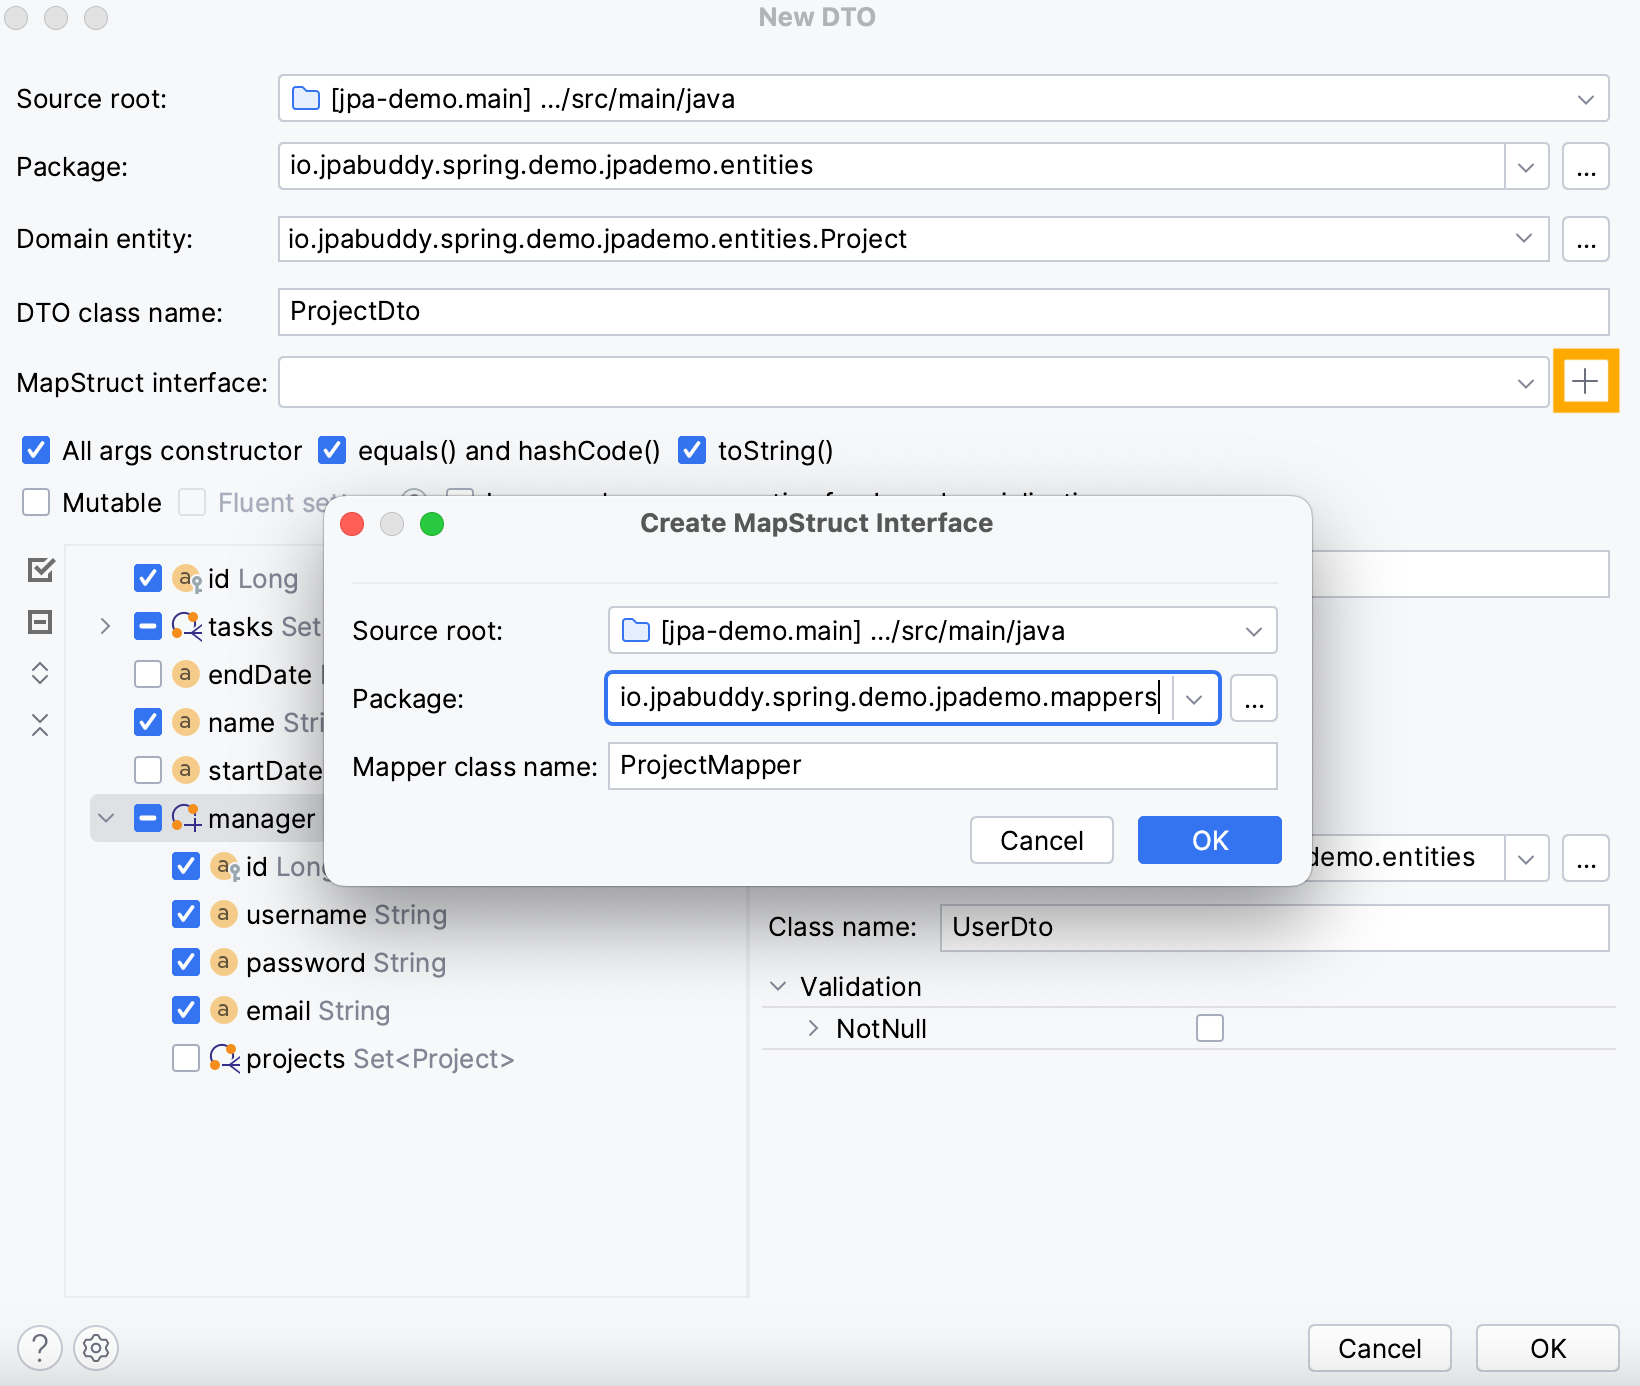
Now click OK to close the New DTO window and see the result of the mapper interface and the generated DTO in their corresponding packages.
Once the program starts, the mapper's methods will be auto-implemented in the specified target folder.
Note: you won’t be able to generate the mapper without the necessary dependencies mentioned in the Setting up a New Project section.
Building a REST Controller
Finally, it's time to develop the REST Controller, which handles HTTP requests and directs them to appropriate services.
Start by creating a new controllers package and a ProjectController class in it.
Annotate your class with the @RestController annotation to turn it into a REST controller.
@RestController
@RequestMapping ("/api/v1")
public class ProjectController {
}
Creating a GET handler
You need a GET method handler to find a project by its name and return the corresponding DTOs.
Define a new method inside your controller called findByName which returns a ProjectDto list. Annotate it with @GetMapping("/projects/{name}") to indicate that this method will respond to GET requests at the /projects/{name} endpoint.
Since the project name will be passed via the URL, annotate the String name parameter with @PathVariable, like in the code below.
@GetMapping("/projects/{name}")
public List<ProjectDto> findByName(@PathVariable String name)
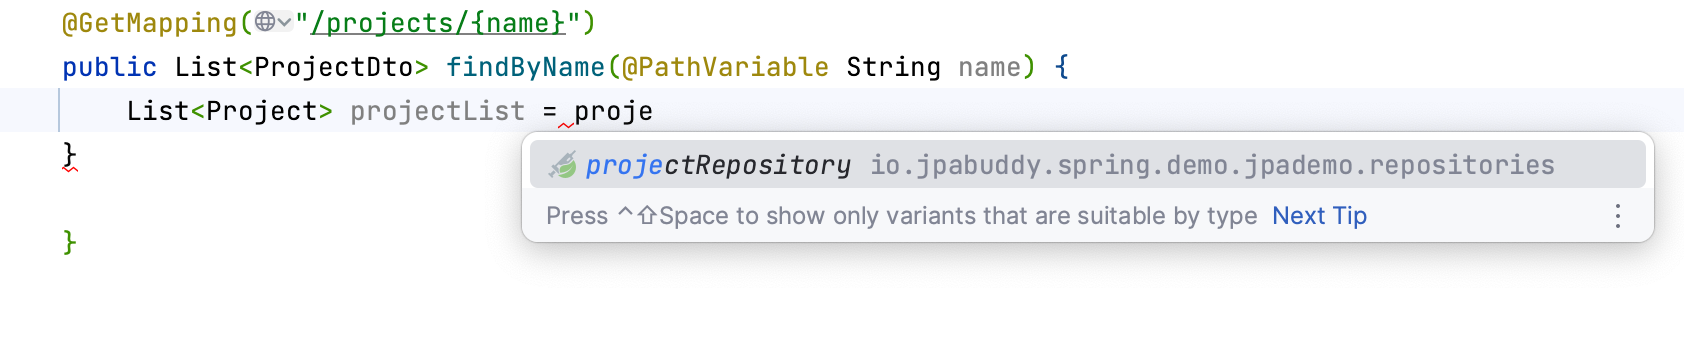
Next, define a new variable projectList of type List<Project> to hold the projects found by the repository’s derived method.
Note that you haven’t injected the ProjectRepository interface just yet, this is necessary for Spring to supply your controller with the correct implementation for data operations.
You can use JPA Buddy’s Coding Assistance to do that, begin typing the repository’s name and press enter once JPA Buddy suggests the appropriate repository.
These actions will create a constructor with the needed dependencies for your ProjectController class as in the code below:
private final ProjectRepository projectRepository;

public ProjectController(ProjectRepository projectRepository) {
 this.projectRepository = projectRepository;
}
Call the findByName method from the repository and pass the name variable as the parameter.
List<Project> projectList = projectRepository.findByName(name);
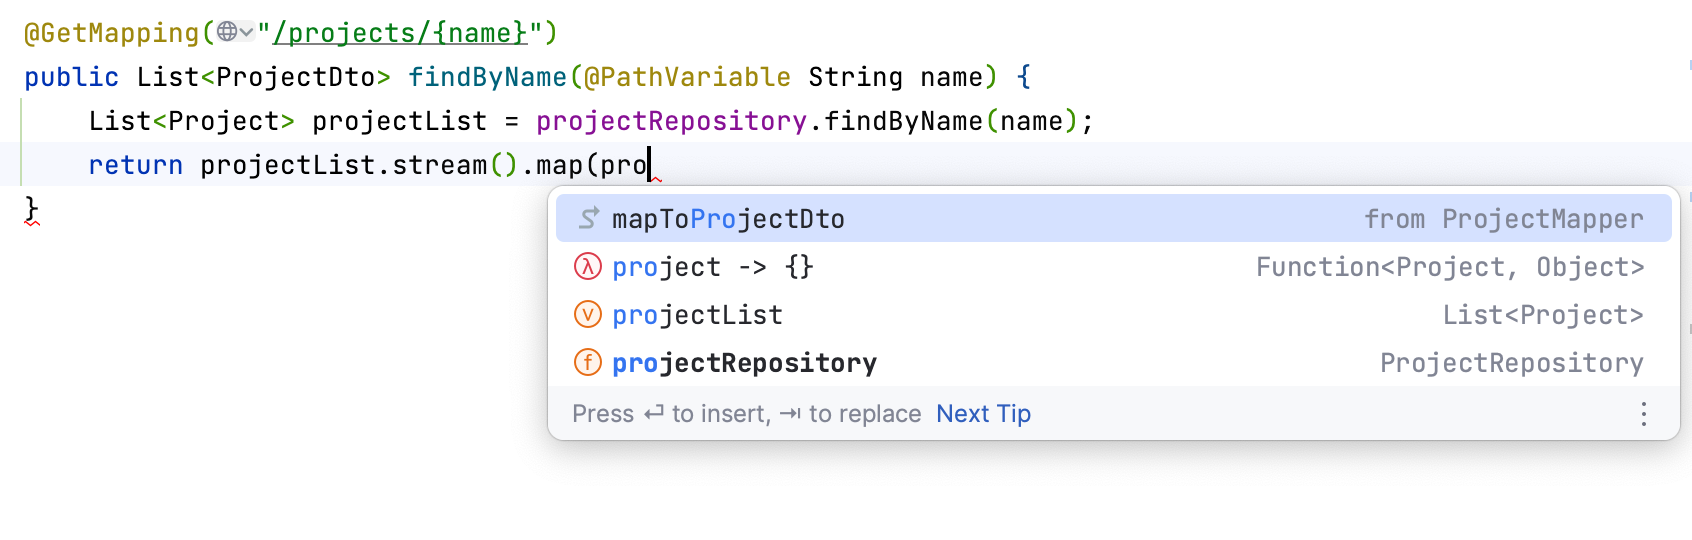
The final step is to transform the projectList List into a projectDto list.
To do that you can convert projectList into a stream using .stream(), then invoke the .map() method which takes the projectMapper::toDto method reference as a parameter. This will convert each Project entity into its corresponding ProjectDto representation.
Likewise, you can inject the ProjectMapper interface using JPA Buddy’s coding assistance.
Here is the code that you should get as your GET method.
@GetMapping("/projects/{name}")
public List<ProjectDto> findByName(@PathVariable String name) {
 List<Project> projectList = projectRepository.findByName(name);
 return projectList.stream().map(projectMapper::toDto).collect(Collectors.toList());
}
Creating a POST Handler
Now you need a POST method handler to save the project details and return the corresponding ProjectDto. Follow these steps to implement the handler:
Define a new method inside your controller called saveProject with the @PostMapping("/projects") annotation.
This method accepts a projectDto parameter, annotate it with @RequestBody, @NotNull, and @Valid. These annotations ensure that the request body is properly mapped to the ProjectDto object and validate its content.
Here is an example of the method’s signature:
@PostMapping("/projects")
public ProjectDto saveProject(@RequestBody @NotNull @Valid ProjectDto projectDto)
First you need to convert the retrieved projectDto and convert it into an entity.
Define a Project variable called projectEntity to hold the converted entity.
Convert the passed projectDto into an entity using projectMapper.toEntity(projectDto) and assign it to the projectEntity variable.
Project projectEntity = projectMapper.toEntity(projectDto);
To persist the projectEntity into the database, use the repository's save() method.
This method not only saves the entity but also returns the saved entity, which you will convert back into a DTO and return for further use or response purposes:
return projectMapper.toDto(projectRepository.save(projectEntity));
Your POST method will look like this:
@PostMapping("/projects")
public ProjectDto saveProject(@RequestBody @NotNull @Valid ProjectDto projectDto) {
 Project projectEntity = projectMapper.toEntity(projectDto);
 return projectMapper.toDto(projectRepository.save(projectEntity));
}
Creating a PATCH Handler
Lastly, you need a PATCH handler to update existing projects. This method checks if the project ID exists.
- If it doesn't, an exception is thrown
- If the project exists, it is updated with DTO’s data, which is then returned
The POST handler takes a projectDto as a request body and an id as a path variable.
Annotated the id with the @PathVariable annotation and the projectDto parameter with @RequestBody, @NotNull, and @Valid to ensure its content validity.
@PatchMapping("/project/{id}")
public ProjectDto updateProject(@PathVariable Long id, @RequestBody @NotNull @Valid ProjectDto projectDto)
Inside the method, use the id to search for the Project entity from the database. Invoke the projectRepository.findById() method and pass the id as an argument. If the entity is not found, it will throw EntityNotFoundException.
Project projectEntity = projectRepository.findById(id).orElseThrow(EntityNotFoundException::new);
Now you need performs a partial update, transferring the updated fields from projectDto to projectEntity. Pass the retrieved Project entity along with projectDto to the projectMapper.partialUpdate() method.
projectMapper.partialUpdate(projectDto, projectEntity);
Finally save the updated projectEntity back into the database using the projectRepository.save() method and converted the returned result into a ProjectDto using the projectMapper.toDto() method.
return projectMapper.toDto(projectRepository.save(projectEntity));
Now you can use this method to update your projects:
@PatchMapping("/project/{id}")
public ProjectDto updateProject(@PathVariable Long id, @RequestBody @NotNull @Valid ProjectDto projectDto) {
 Project projectEntity = projectRepository.findById(id).orElseThrow(EntityNotFoundException::new);
 projectMapper.partialUpdate(projectDto, projectEntity);
 return projectMapper.toDto(projectRepository.save(projectEntity));
}
Testing the Application
Now that your API methods are set, it's time to test the application using IntelliJ IDEA Ultimate's web client. Alternatively, you can use any other client such as Postman, for example. In this section of the guide you will:
- Create a new project
- Update the created project
- Retrieve infromation from the project
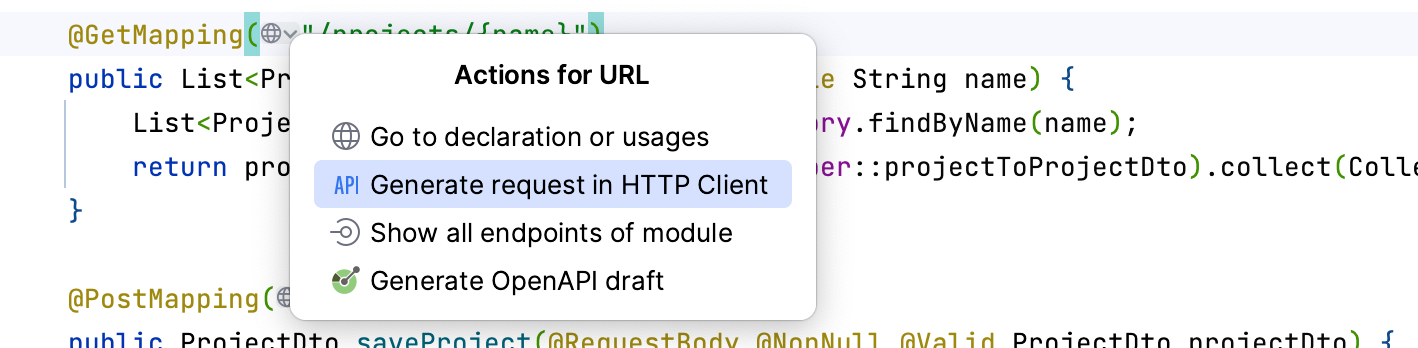
To start, generate a HTTP request by clicking on the globe icon next to your endpoint and selecting Generate request in HTTP Client.
Next, create a new project by sending a JSON object with specific fields to the corresponding endpoint. Here's an example of the request:
 ###
 POST http://localhost:8080/api/v1/projects
 Content-Type: application/json


    {
      "name": "Palanuya",
      "tasks": [
        {
          "name": "Prepare roadmap"
        },
        {
          "name": "Complete R&D"
        }
      ]
    }
In this example, a POST request is made to the /api/projects endpoint with a JSON payload containing the project details.
The name field represents the name of the project, and the tasks field contains an array of task objects.
Next, find the project you created with the search endpoint. Here's an example of the request:
###
GET http://localhost:8080/api/v1/projects/Palanuya
In this example, a GET request is made to the /api/v1/projects/Palanuya endpoint, where Palanuya is the name of the project you created. By sending this request, you can retrieve the details of the project from the server.
Next, update the project by sending a POST request to the update endpoint with the updated task details. Here's an example of the request:
###
POST http://localhost:8080/api/v1/projects/3
Content-Type: application/json

{
 	"id": 3,
	 "tasks": [
	 {
		 "id": 1,
		 "name": "Make some changes in the Roadmap",
		 "startDate": "2023-06-01T08:00:00Z",
		 "endDate": "2023-06-10T17:00:00Z"
 	}
 	]
}
To check the result, press command/ctrl + B on the generated JSON file.

You should get a 200 HTTP status code and the updated project details.
{
	 "id": 3,
	 "name": "Palanuya",
	 "manager": null,
	 "tasks": [
 	{
	 "id": 1,
	 "name": "Make some changes in the Roadmap",
	 "startDate": "2023-06-01T08:00:00Z",
	 "endDate": "2023-06-10T17:00:00Z"
 	}
 ]
}
Conclusion
Well done! You've successfully built a fully functional application with REST API and JPA. This guide showcased how these tools can simplify entity creation, DB migration, and API development. Thank you for following along!