Use DTOs and MapStruct mappers in IntelliJ IDEA most efficiently | JPA Buddy
DTOs are essential for web apps. However, they bring boilerplate: dozens of classes that nearly copy your entities... and each comes with a mapper. JPA Buddy provides features that reduce time on daily routine work. From DTOs and entity generation to smart code completion - it's all in your toolbox. Spend less time on creating mappers, building DTOs, and injecting repositories. Watch the video and figure it out!
Estimated Reading Time: 10 mins
Introduction
DTOs are important in web apps, but they create extra work with boilerplate code and a bunch of similar classes, each needing a mapper. JPA Buddy helps cut down on this work with its time-saving features.
In this guide, you will use JPA Buddy’s features to create a simple blog application, generate and manage DTOs, keep them in sync with your entities and create MapStruct mappers.
Overview
You will learn how to:
- Set up a new project
- Create entities
- Generate DTOs from entities
- Keep DTOs in sync with their entities
- Create entities from POJOs
- Write a controller with Coding Assistance
You can find the code for this application on github.
Setting up a New Project
First, you will go through a few steps to set up a new project. In this section, you will:
- Create a new project using Spring Initializr
- Load the project in IntelliJ IDEA
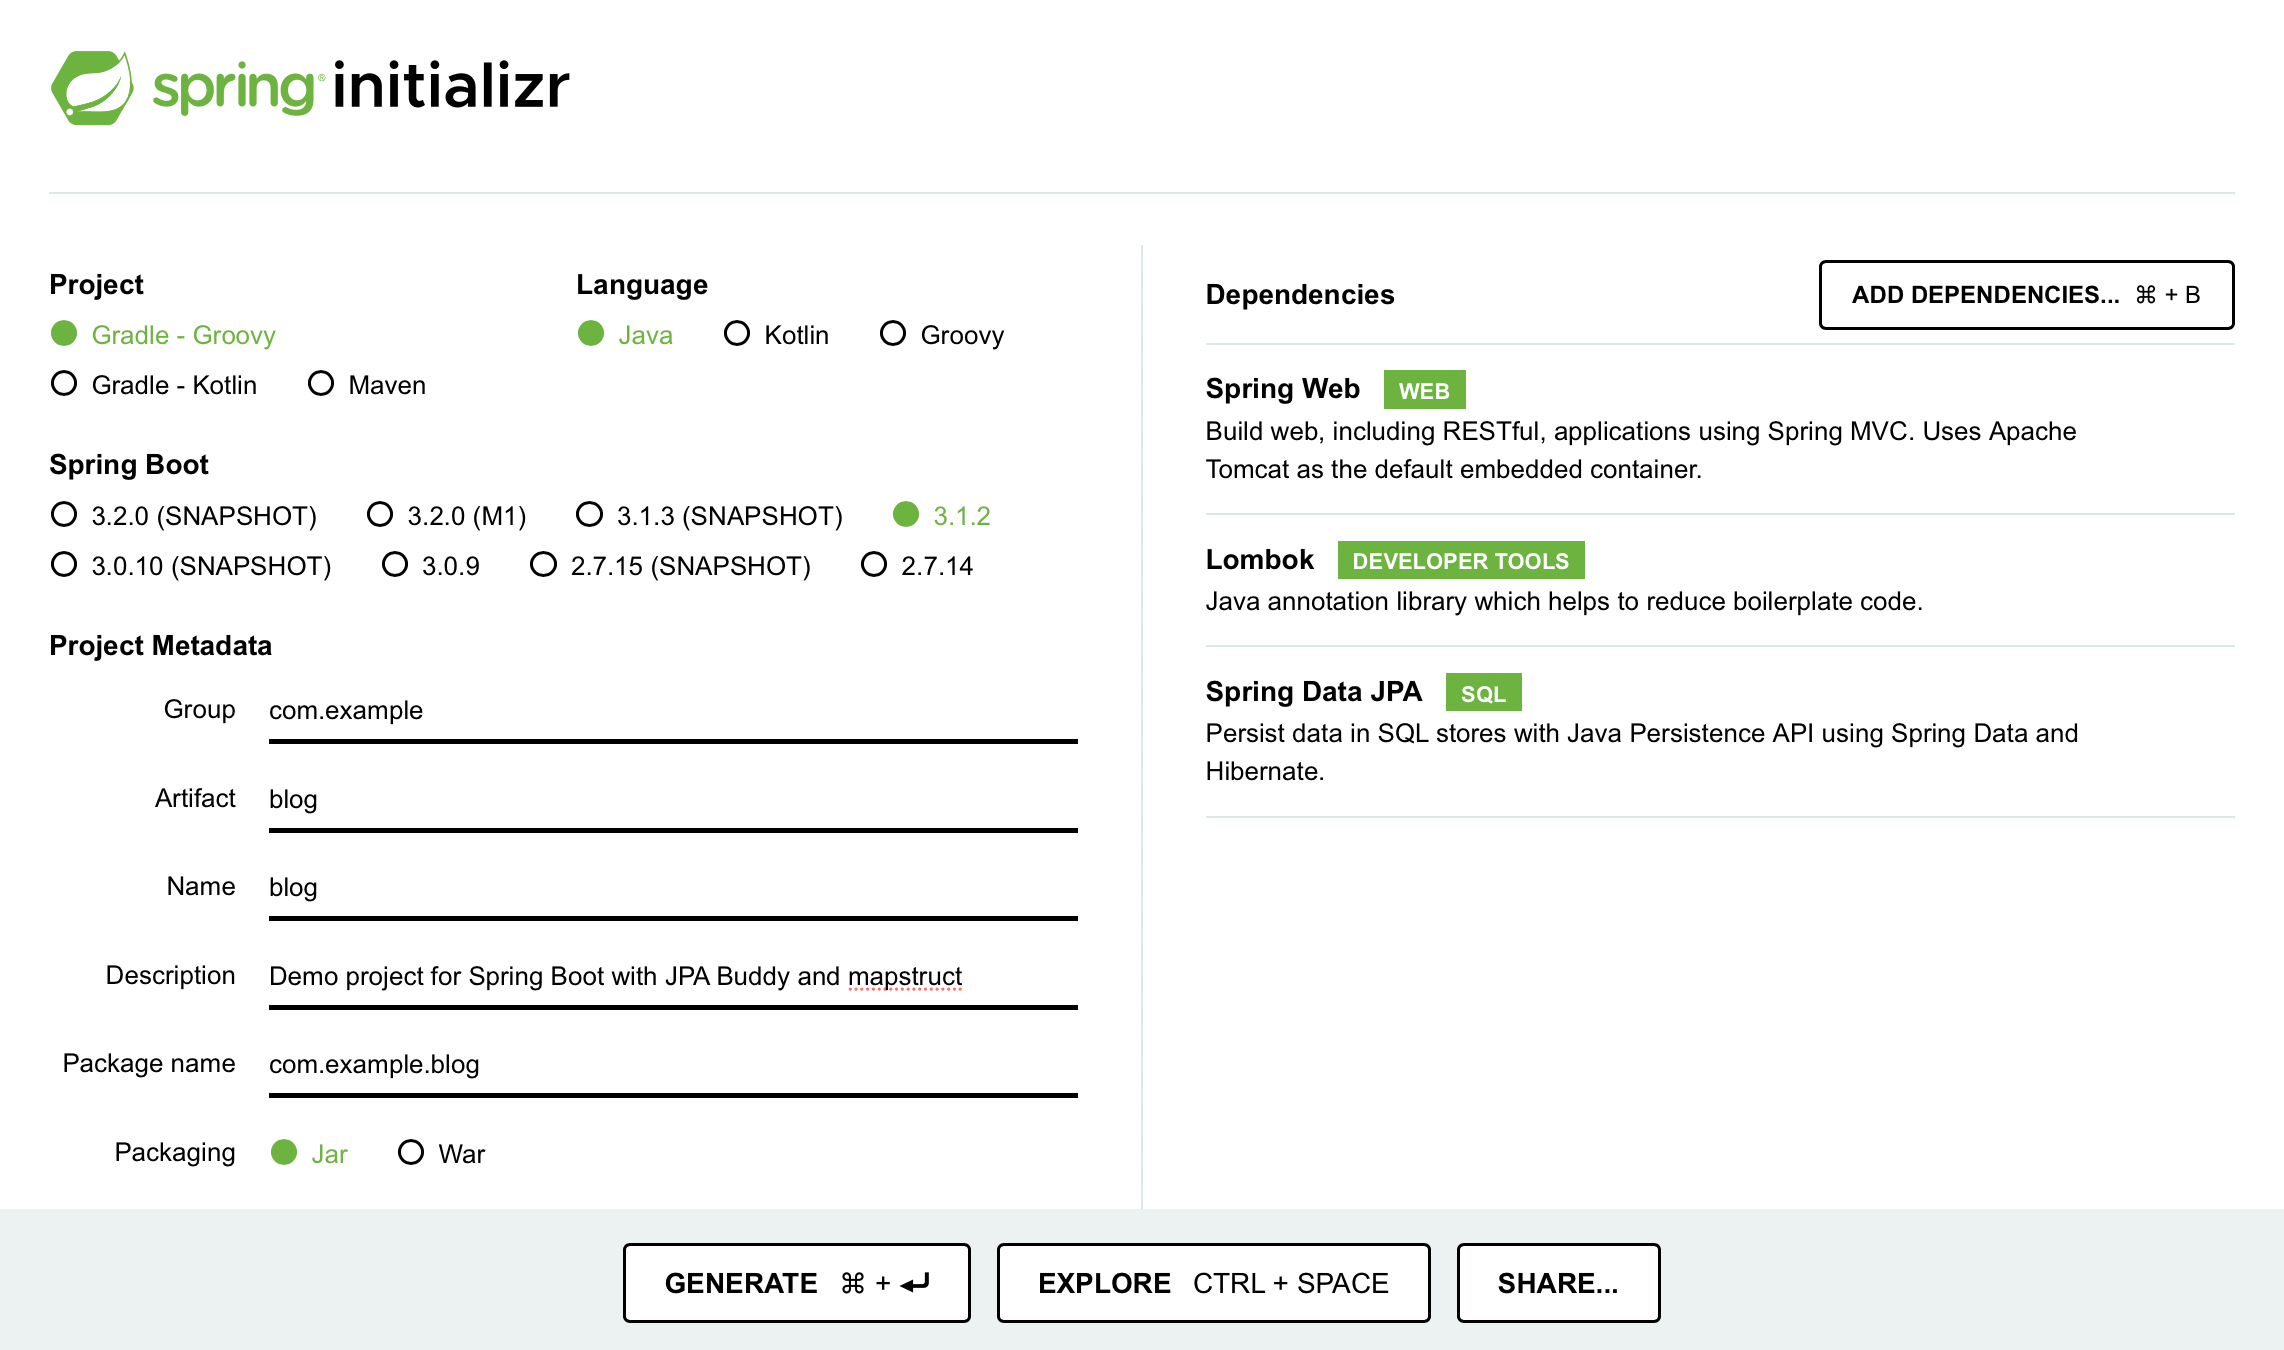
Start by creating a Spring Boot application using Spring Initializr.
- Visit Spring Initializr’s Website.
- Select the following settings:
- Java 17 as the programming language
- Gradle - Groovy as the build tool
- The latest stable version of Spring Boot
- The application will be packaged as a JAR file
- Add the following dependencies to your project:
- Spring Data JPA enables us to use JPA and Data Repositories
- Lombok helps reduce boilerplate code
- Spring Web allows you to create REST endpoints
These dependencies enable you to use JPA Buddy with JPA entities and enable Lombok annotations during code generation.
Here are the selected settings in Spring Initializr:
Download the created project and open it in IntelliJ IDEA by clicking on File → Open.
To use JPA Buddy with MapStruct, add the following dependencies to your build.gradle file:
dependencies {
...
implementation 'org.mapstruct:mapstruct:1.5.5.Final'
annotationProcessor 'org.mapstruct:mapstruct-processor:1.5.5.Final'
}
Make sure that you list Mapstruct dependencies after Lombok ones.
Click on the Load Gradle Changes icon to apply those changes to your project.
Creating Entites
The blog application you will build consists of two tables:
user: table for storing blog user informationpost: table for storing blog posts
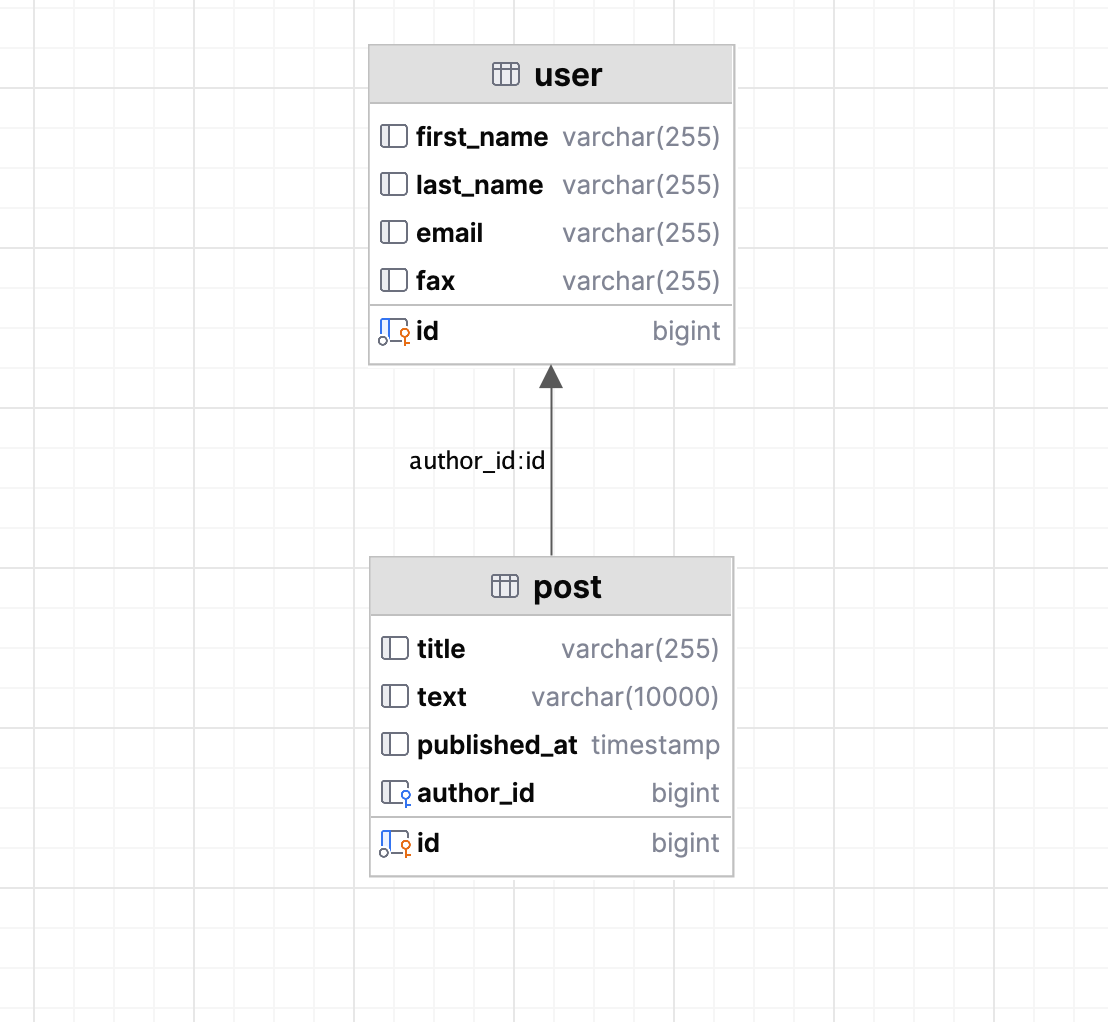
The relationship between post and user is OneToMany, meaning that multiple posts can be associated with a single user.
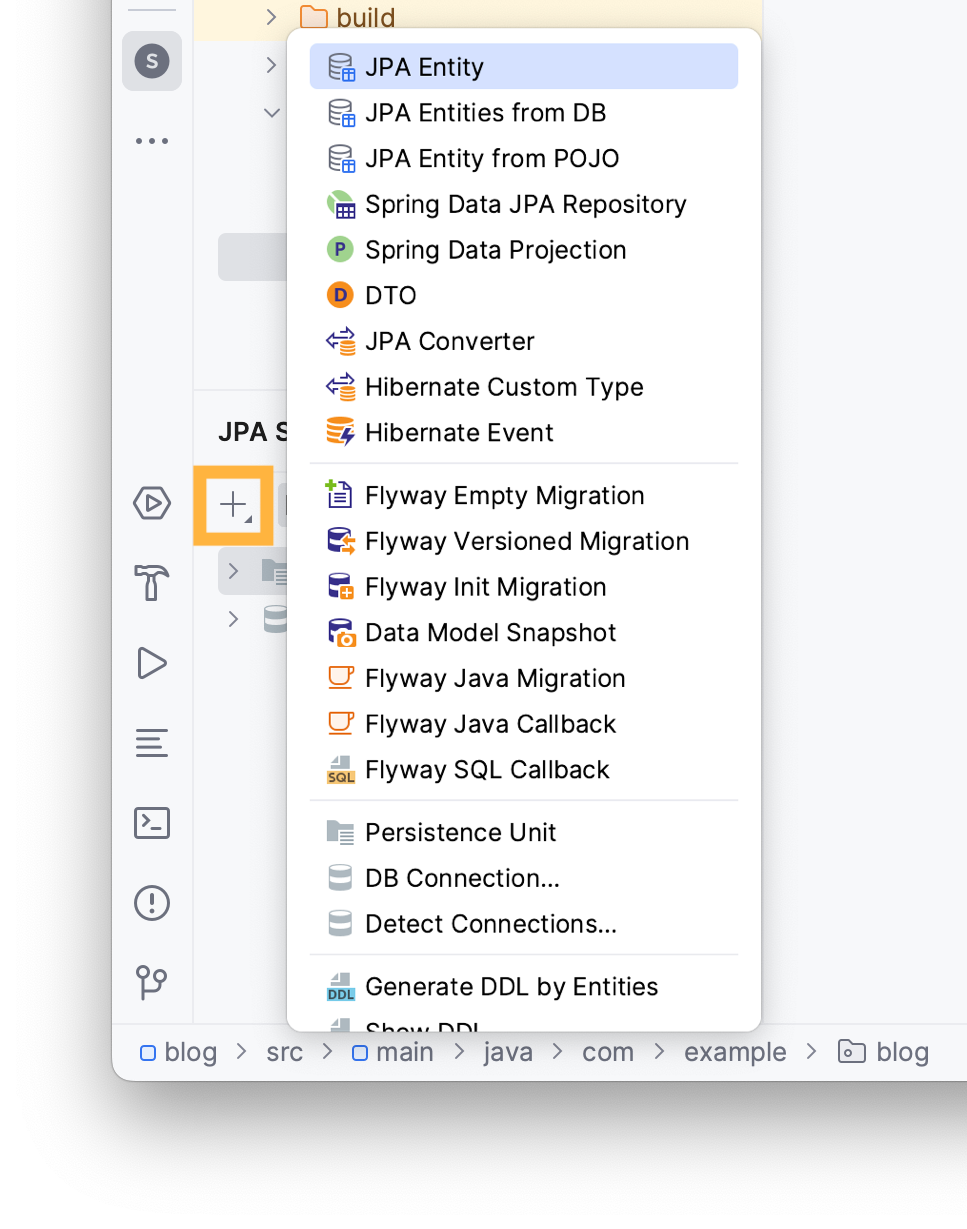
Let’s create the User entity using JPA Structure:
- Locate the JPA Structure tab
- Click on the + button
- Select the JPA Entity option
Type the name of your entity in the invoked window and add .entities to the package name then choose the Id type and your desired Id generation method.
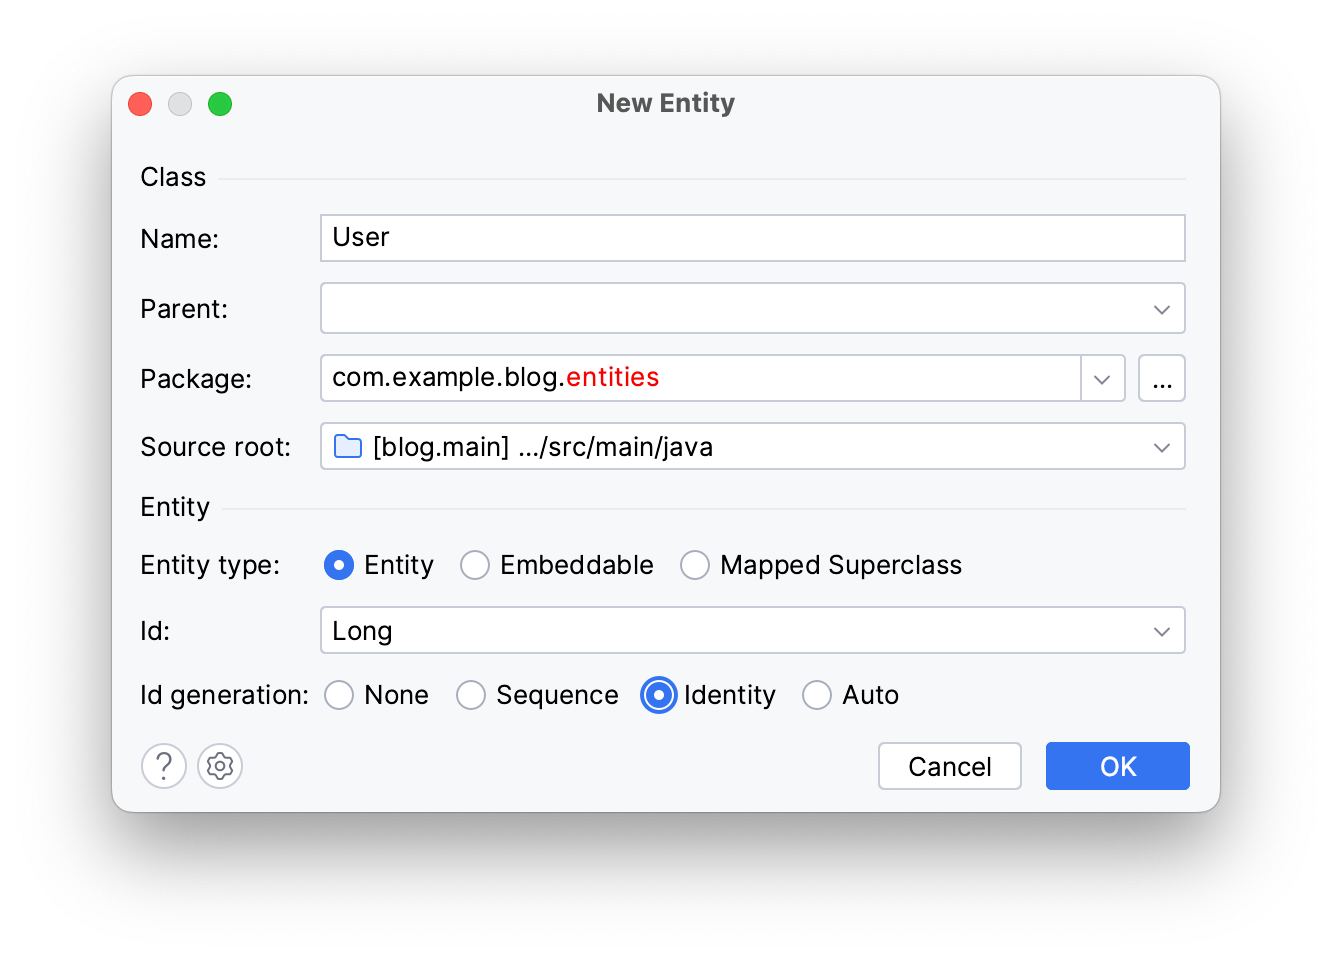
Click OK.
You can find your newly created entity in the entities package in your project panel.
You can use JPA Designer to create your entity’s attributes:
- Open
Usersource code from the project panel - Click on Basic Type in the JPA Designer tab
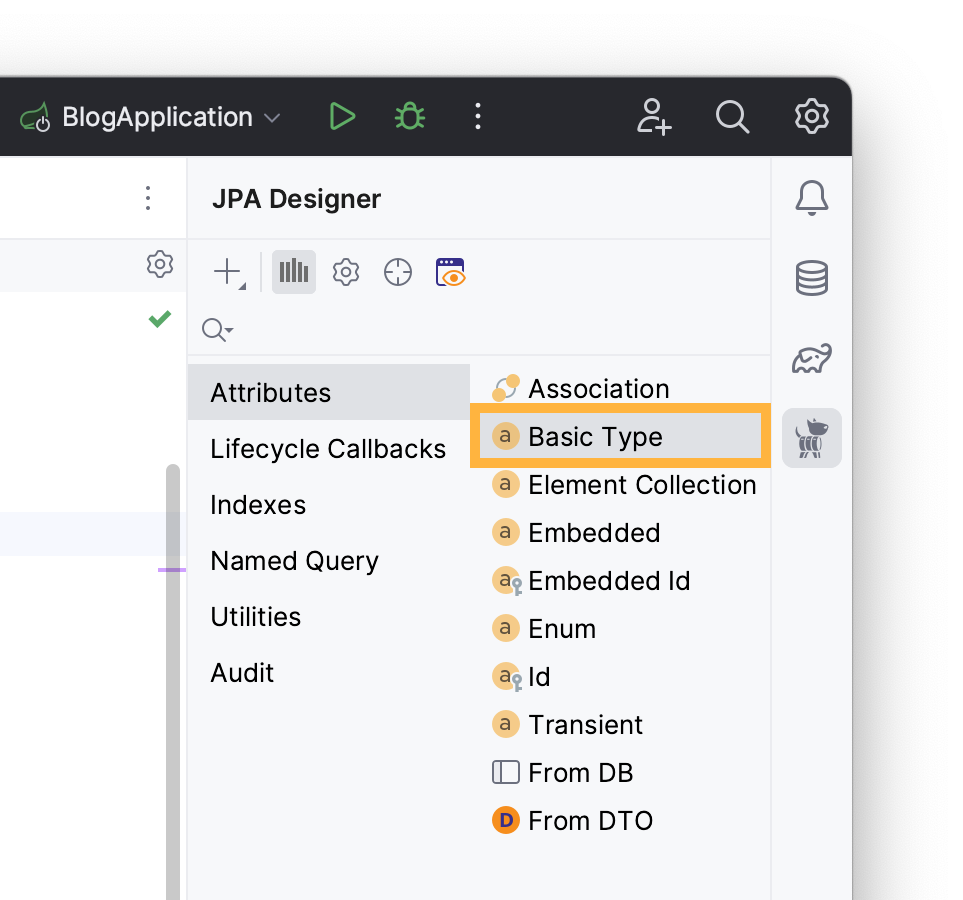
Pick your attribute's type, write its name, and JPA Buddy will automatically name your table’s column according to naming conventions.
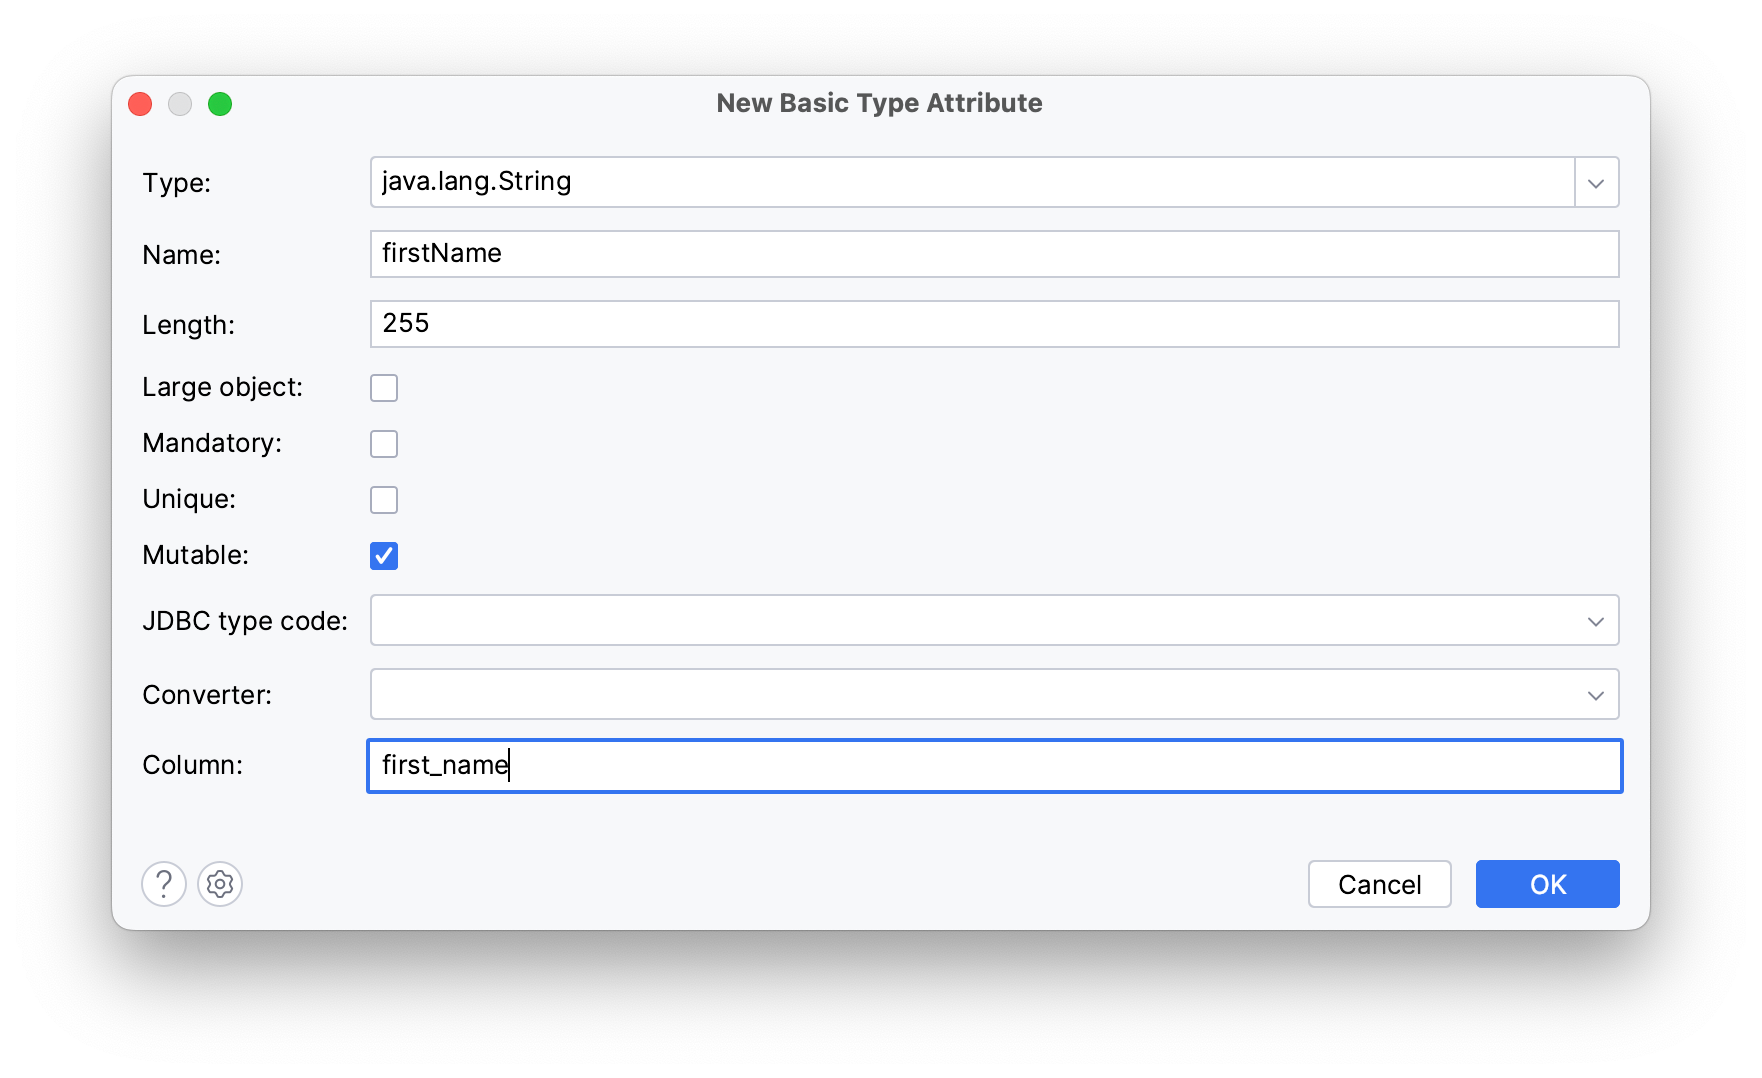
Click OK.
These instructions will create a firstName attribute.
Using these tools, you can create the following entities.
User entity:
@Getter
@Setter
@Entity
@Table(name = "user")
public class User {
 @Id
 @GeneratedValue(strategy = GenerationType.IDENTITY)
 @Column(name = "id", nullable = false)
 private Long id;
 @Column(name = "first_name")
 private String firstName;
 @Column(name = "last_name")
 private String lastName;
 @Column(name = "email")
 private String email;
 @Column(name = "fax")
 private String fax;
}
Post entity:
@Getter
@Setter
@Entity
@Table(name = "post")
public class Post {
 @Id
 @GeneratedValue(strategy = GenerationType.IDENTITY)
 @Column(name = "id", nullable = false)
 private Long id;
 @Column(name = "title")
 private String title;
 @Column(name = "text", length = 10000)
 private String text;
 @Column(name = "published_at")
 private Instant publishedAt;
}
You will need an author attribute in your Post entity to reference the User entity:
- Open
Postentity's source code - Choose Association from the JPA Designer tab
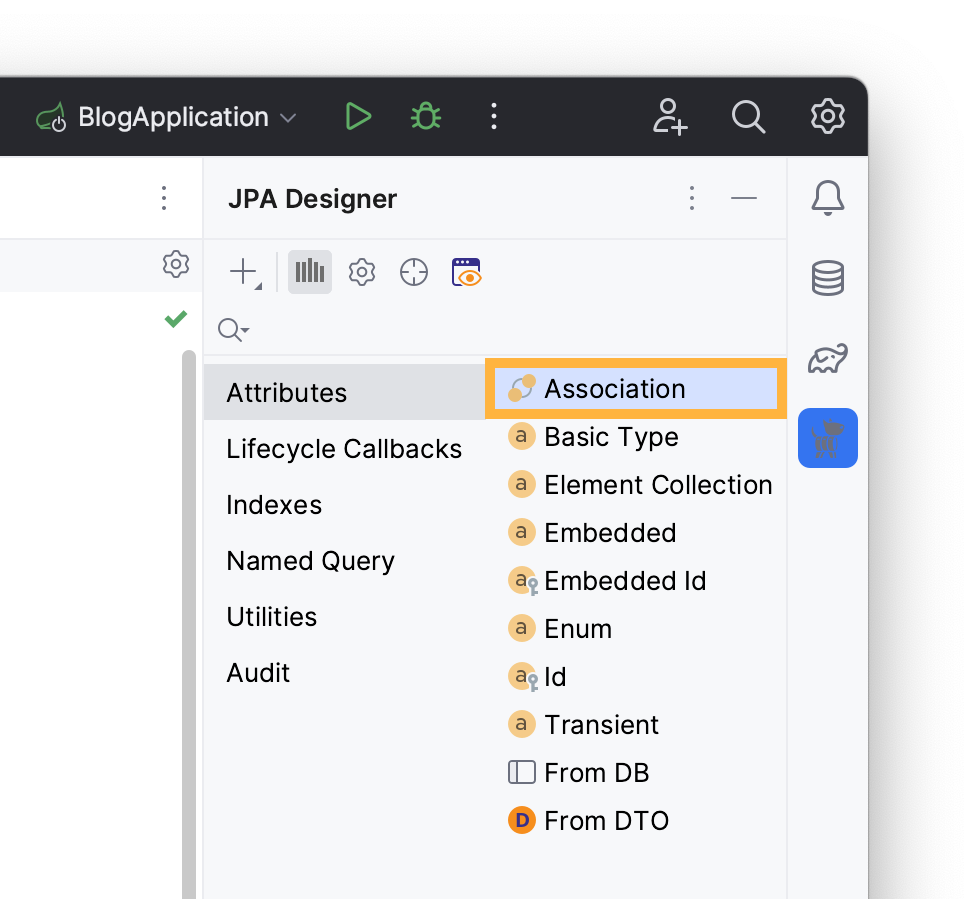
- Write
Useras the attribute’s type - Rename it to
author - Choose a
ManyToOnecardinality

Click OK.
The generated author attribute represents the linked User entity in the Post entity and should look as follows:
 @ManyToOne
 @JoinColumn(name = "author_id")
 private User author;
The @JoinColumn annotation indicates that the author_id column in the database is used as a foreign key.
Generating a DTO from an Entity
Data Transfer Objects (DTOs) and their mappers are useful for transferring data in a serialized manner, transforming data between different object models. In this section, you will:
- Create a DTO from the
Postentity - Set up a mapper for the DTO
You can use JPA Buddy’s toolbar to generate a DTO for your Post entity:
- Open
Postsource code from the project panel - Click on the DTOs and Spring Data Projections icon
- Choose Create DTO

Rename the DTO’s package to dtos and pick text, publishedAt and author attributes to reflect them in the DTO. JPA Buddy will automatically name the fields based on their entity attributes.
JPA Buddy lets you structure your associated DTO in several ways: as a separate or nested new DTO, as an existing DTO, or flat class. In a Flat DTO, all inner-class fields will be top-class fields.
Choose the New Nested Class option to create a new User class within PostDTO for the author attribute.
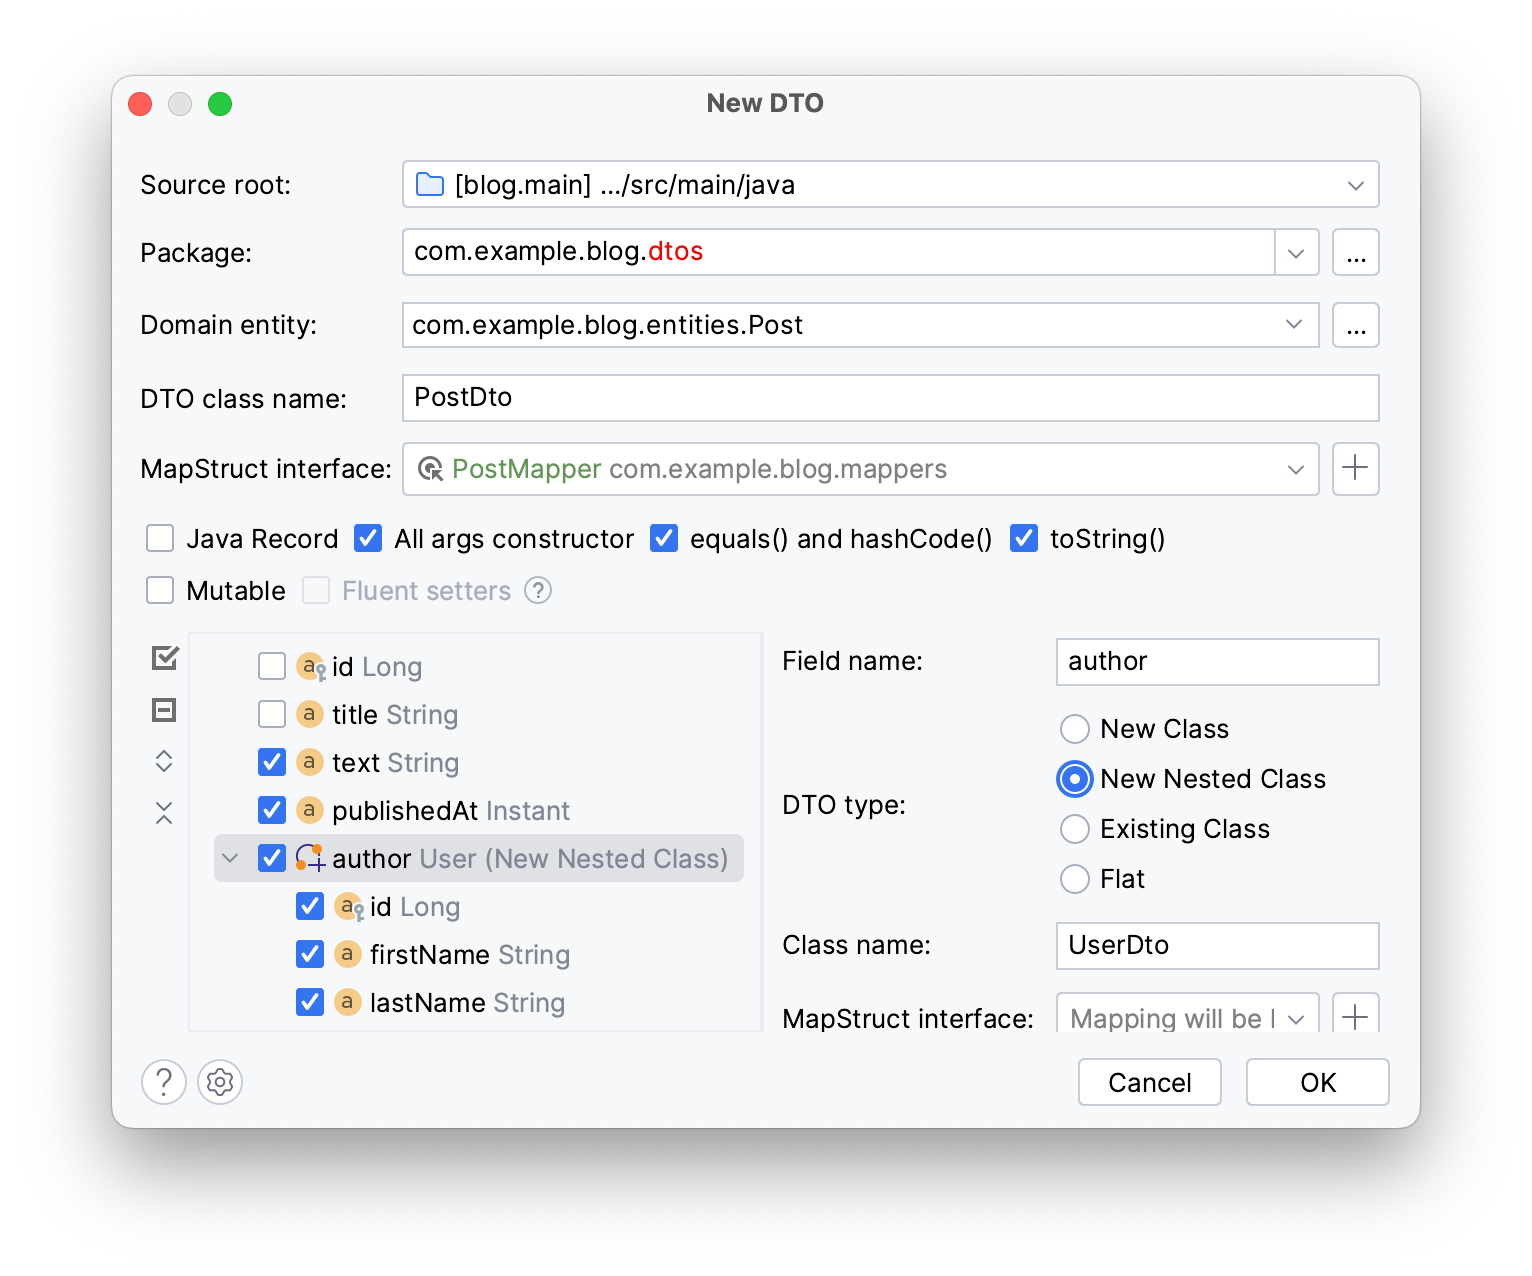
By default, JPA Buddy creates an immutable DTO, however you can choose the Mutable checkbox to generate a mutable DTO with setters or @Data annotation instead of @Value in case you’re using Lombok.
You can create a mapper in the same wizard:
- Click on the + button near the MapStruct interface field
- Rename the package to
mappersin the invoked dialog
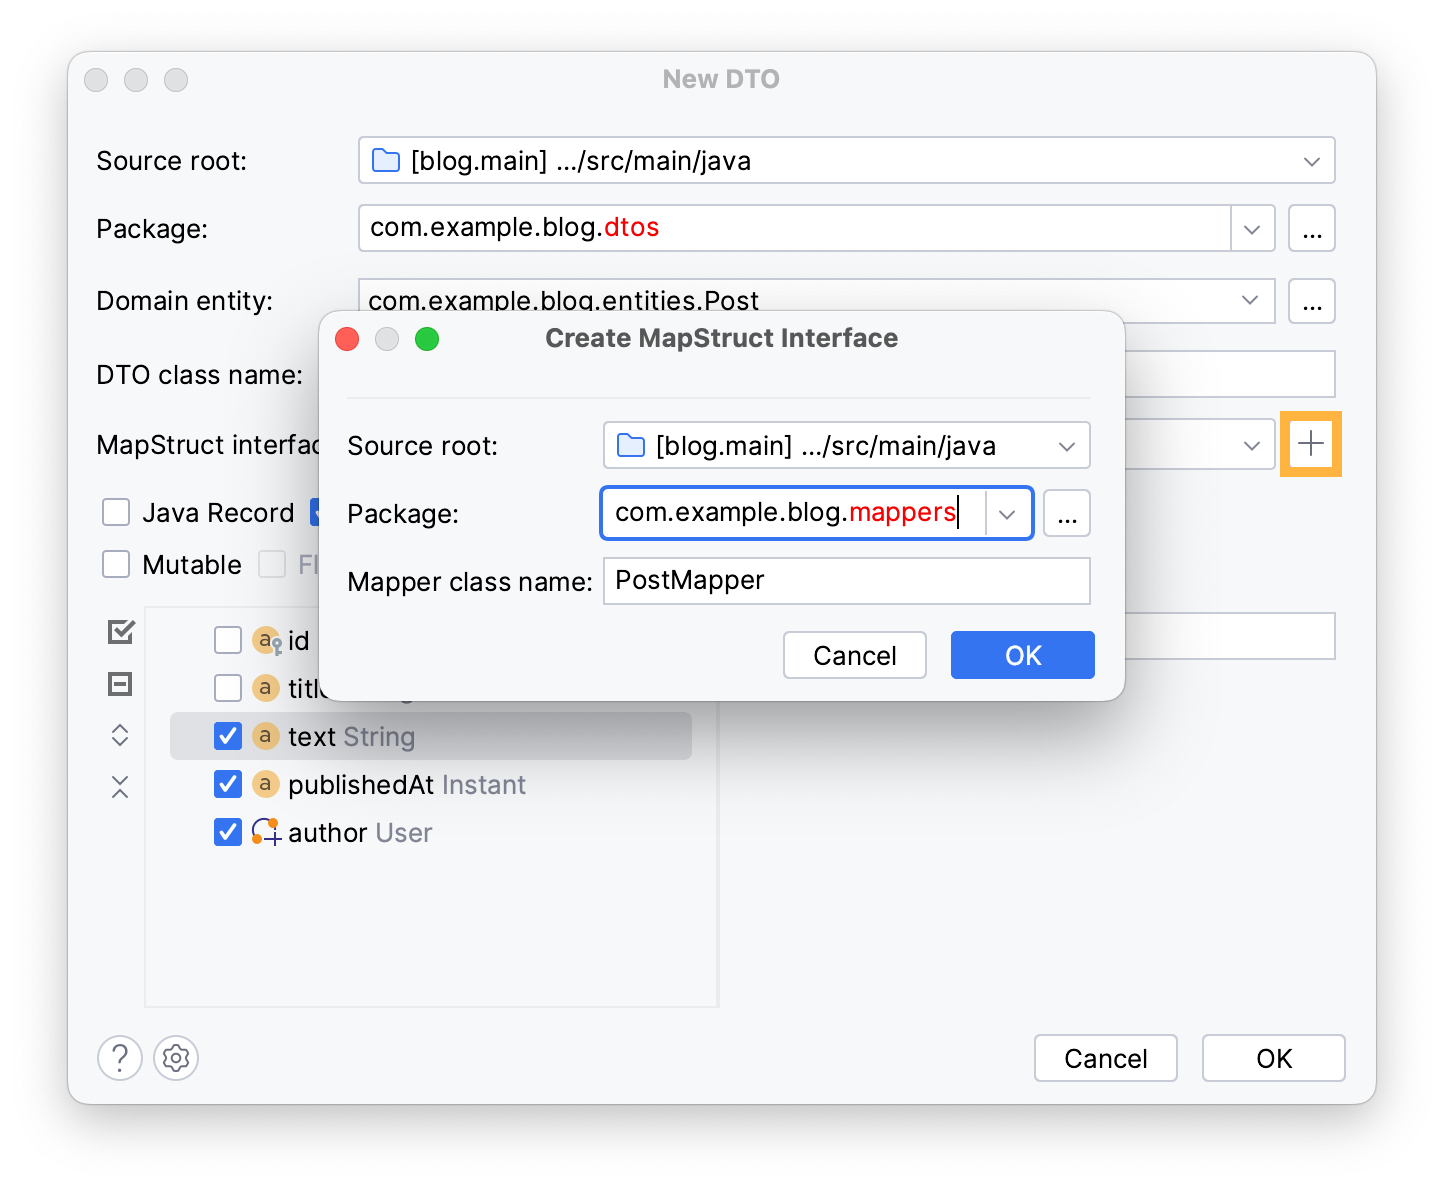
Click OK to close the Create MapStruct Interface dialog.
In the New DTO window, click OK to create a PostMapper interface and DTOs for the Post entity within mappers and DTO packages respectively.
The mentioned steps will create the following immutable DTO:
/**
* DTO for {@link Post}
*/
@Value
public class PostDto implements Serializable {
 String content;
 Instant publishedAt;
 UserDto author;

 /**
 * DTO for {@link User}
 */
 @Value
 public static class UserDto implements Serializable {
  Long id;
  String firstName;
  String lastName;
  String email;
  String fax;
 }
}
Keeping a DTO in sync with its entity
Changing your entity’s properties can lead to corrupted mapping logic. JPA Buddy helps keep track of any changes and refactor your entities along with their related DTO fields. In this section, you will:
- Make changes to the
Postentity along with its DTO - Add a new attribute to your DTO from the entity
- Add a new attribute to your entity from the DTO
Let’s rename the text attribute to content in both the Post entity and its DTO. We will use JPA Buddy’s extended refactoring dialog to do this:
- Open
Post’s source code - Click on the
textattribute - Invoke the rename... window (shift + F6)
- Rename
texttocontent - Click Refactor
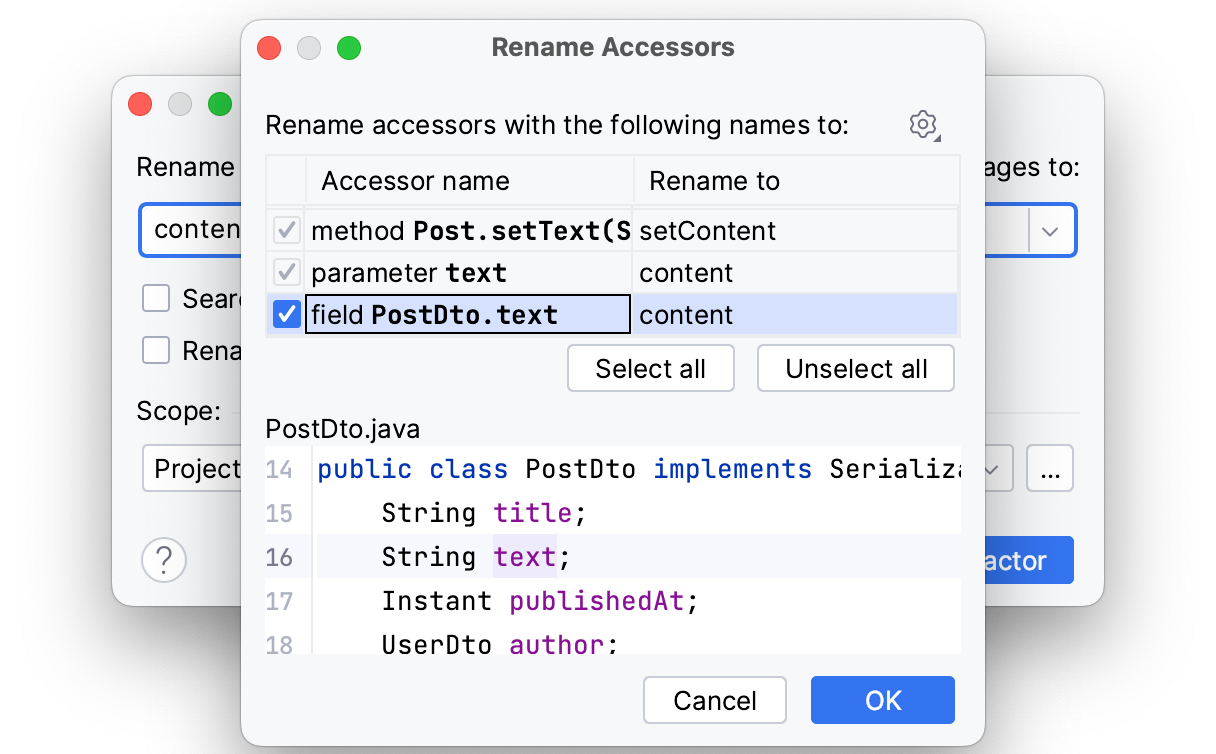
Click OK.
This will rename all fields in your entity and DTOs.
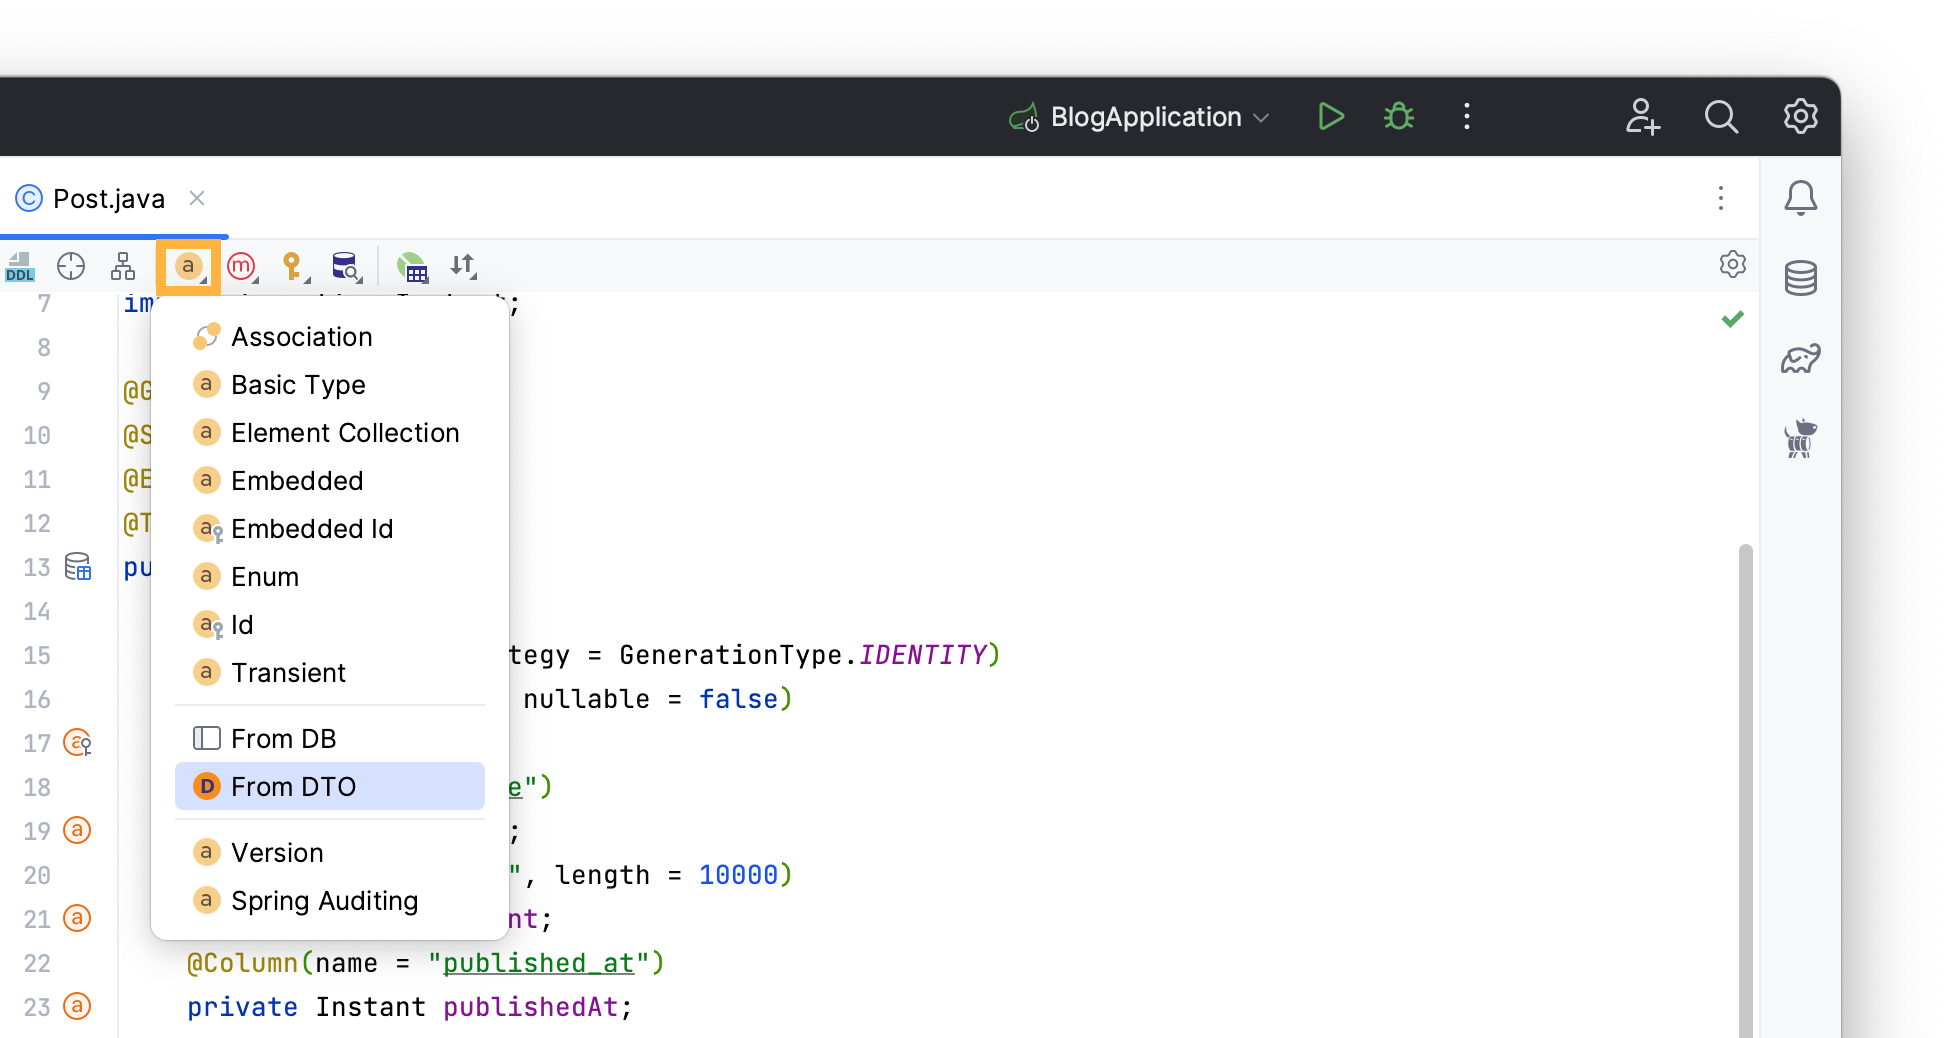
JPA Buddy allows you to reflect changes from entities to their corresponding DTOs if needed. Let’s add the title attribute to the PostDTO:
- Open
Post’s source code - Click on the DTOs and Spring Data Projections icon
- Select Add attributes to DTO
- Tick the
titlecheckbox
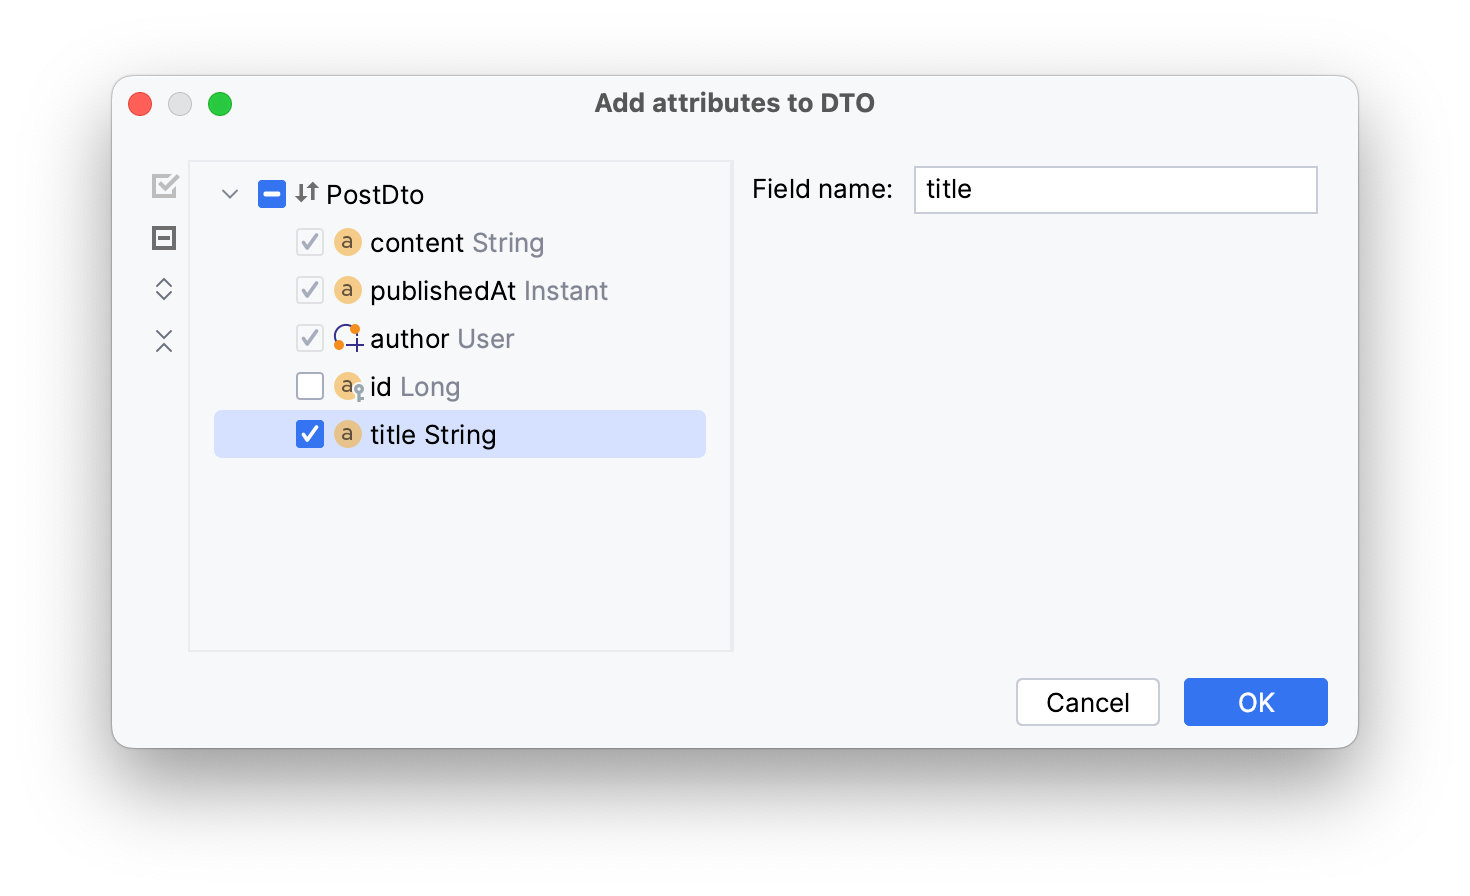
Click OK.
You can also do the same for your entities whenever you make any changes to your DTO. Let’s see how you can add an attribute to the entity from your DTO. First, create an upvote attribute in PostDTO as in the code below:
Integer upvote;
Now, to update your entity accordingly:
- Open
Postsource code - Click on the Add entity attribute in JPA Buddy’s toolbar
- Choose the From DTO option
Tick the newly created attribute and click OK.
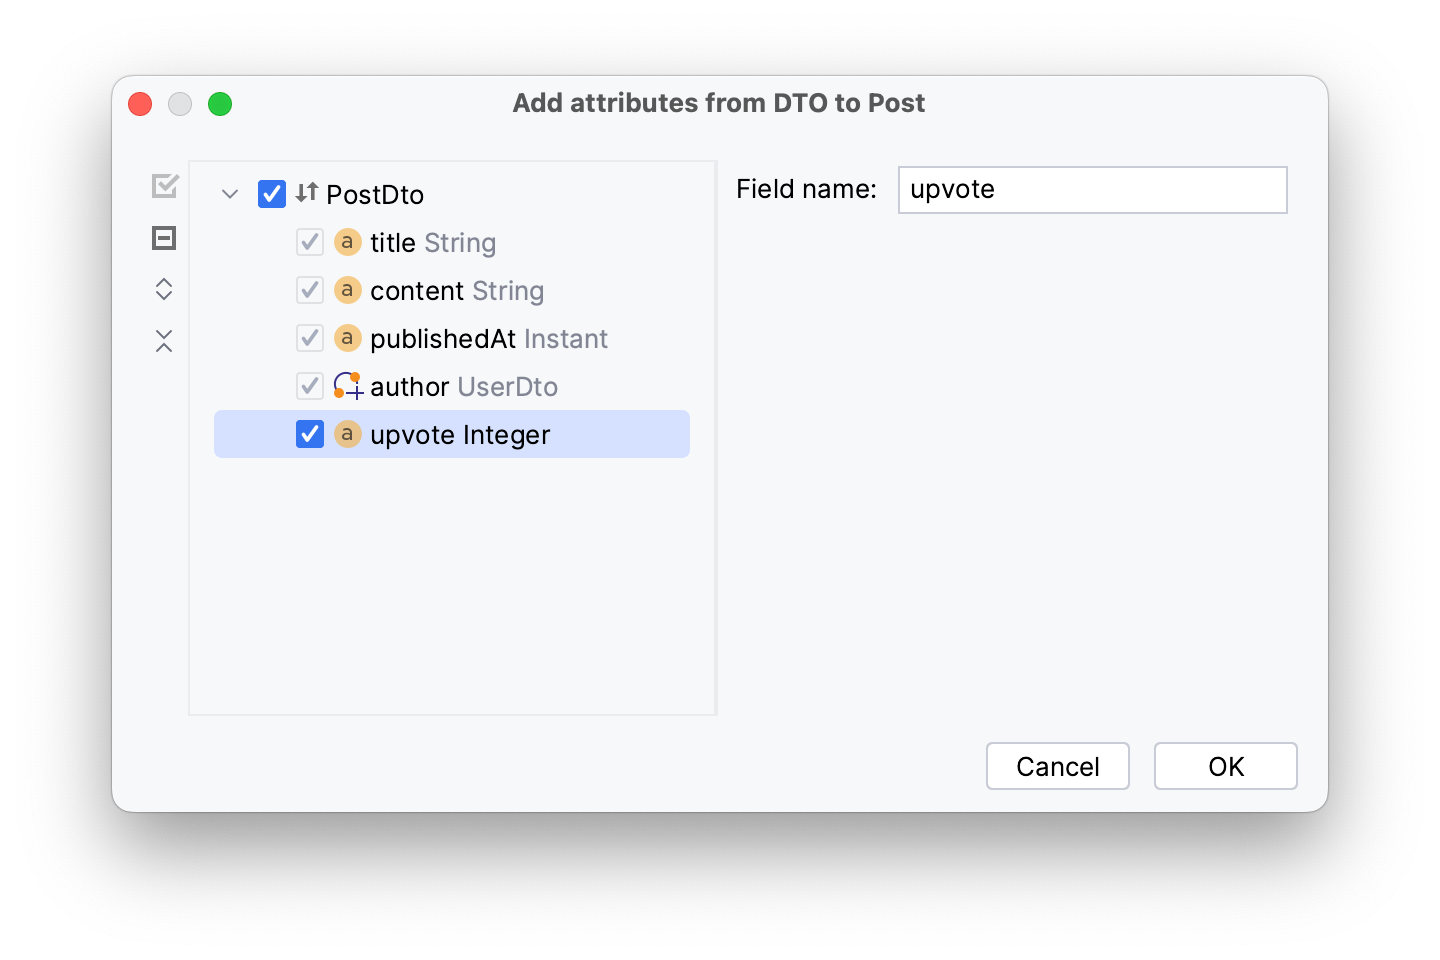
JPA Buddy will add the new upvote attribute to your entity:
 @Column(name = "upvote")
 private Integer upvote;
Generating MapStruct Interfaces
MapStruct helps reduce boilerplate code when converting entities to DTOs. You can use JPA Buddy’s visual designers to further simplify this process. In this section, you will:
- Generate a MapStruct mapper
- Generate an extended mapper
- Create methods to map a collection of entities
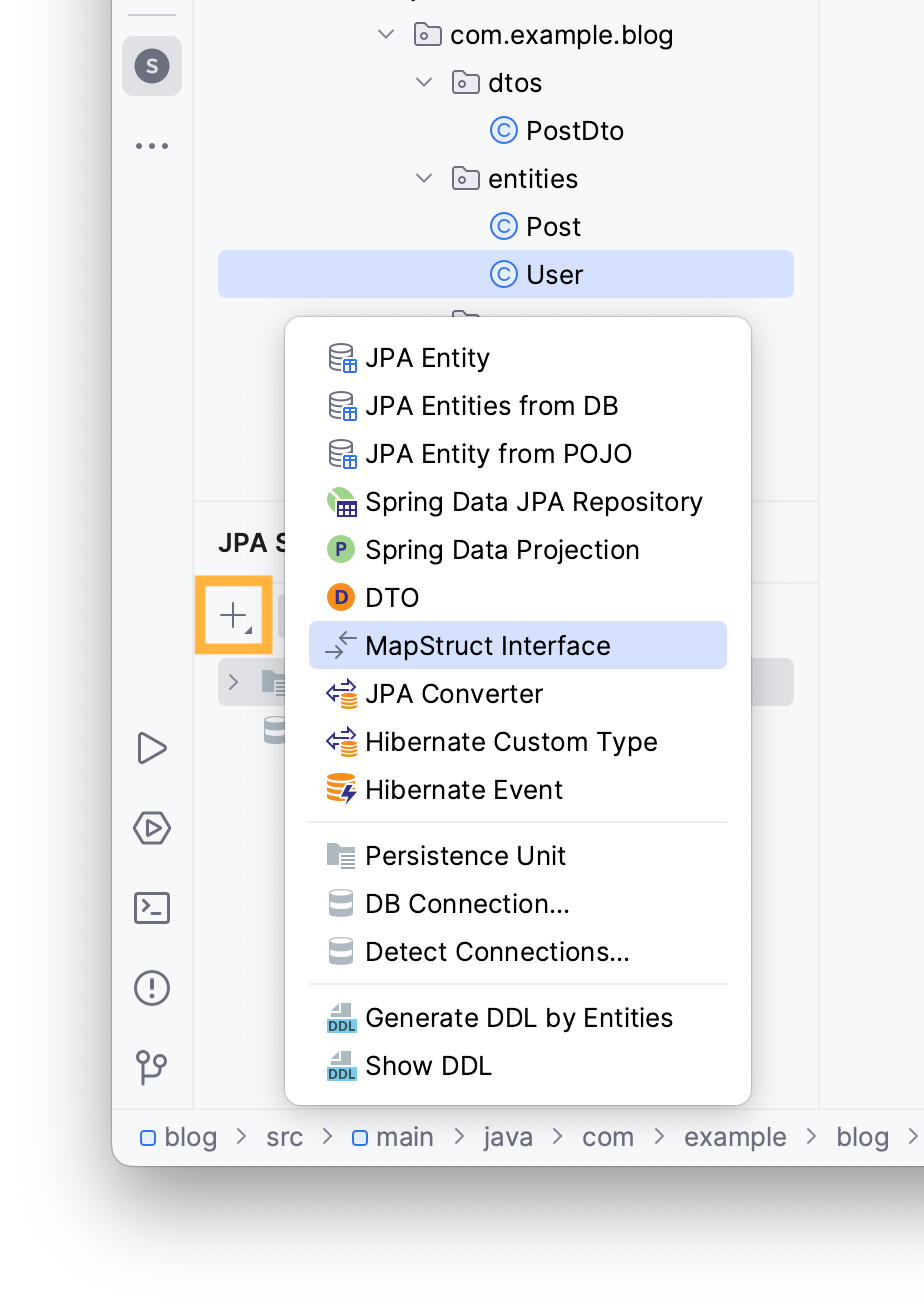
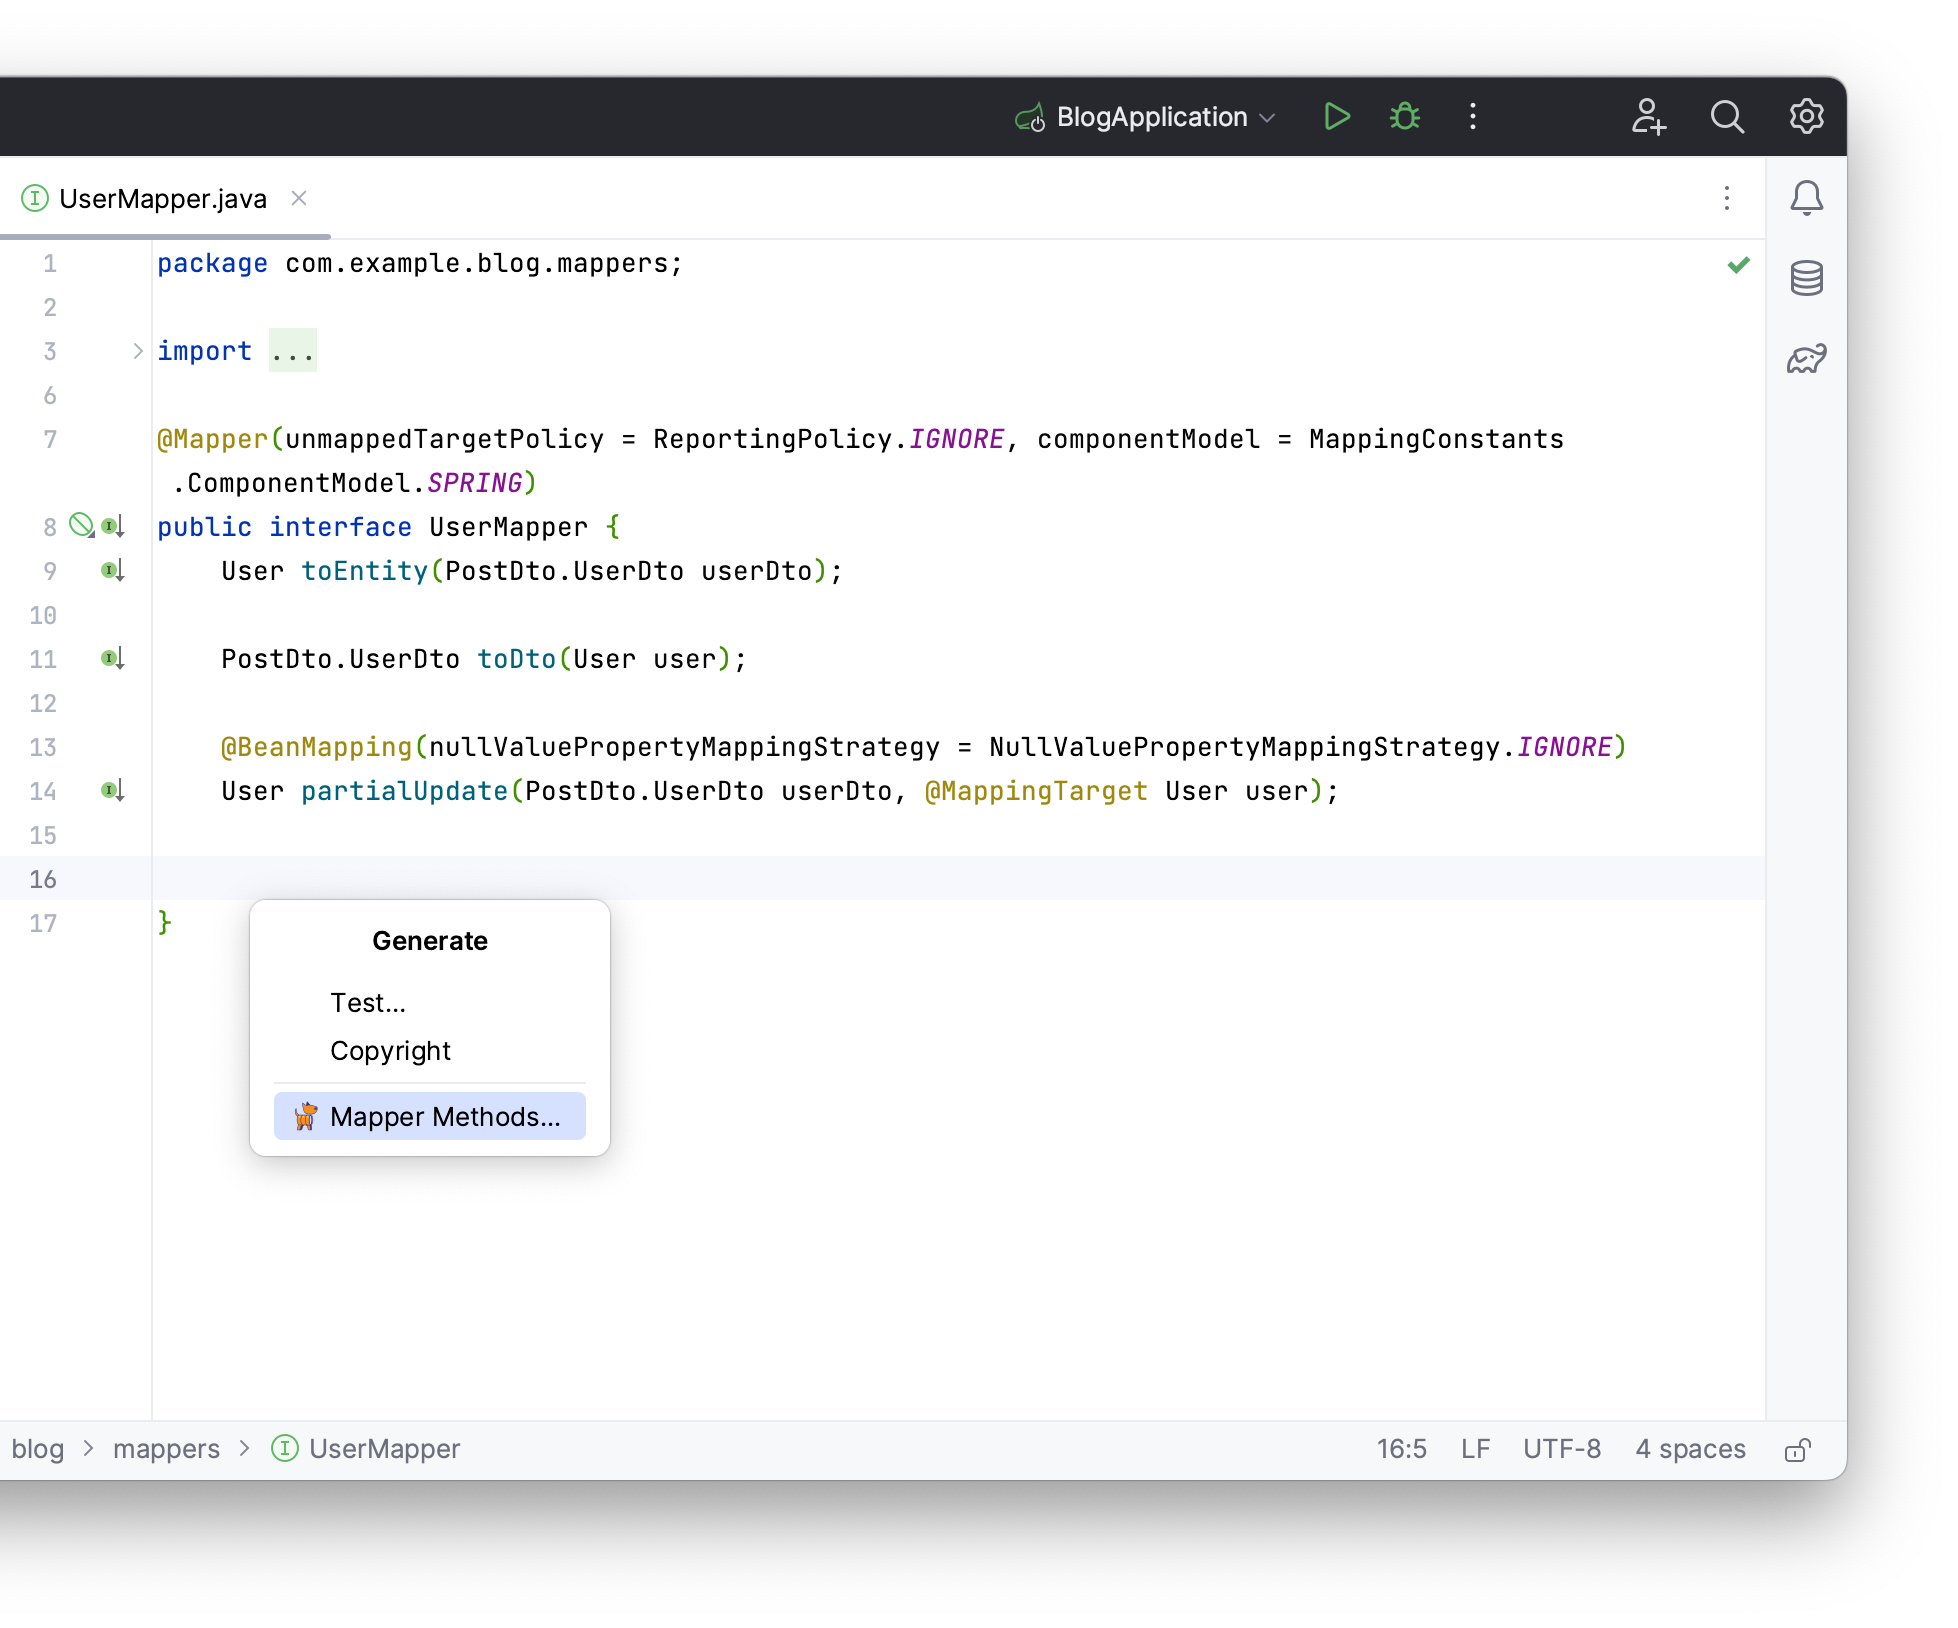
To convert User entities to UserDto DTOs, you need to generate a UserMapper interface. Click on the + button in JPA Structure → select MapStruct Interface.
Choose the User entity as your Domain entity. JPA Buddy detects the nested UserDTO class within PostDTO in the DTO class drop-down menu. Select it and type com.example.blog.mappers in the Package field.
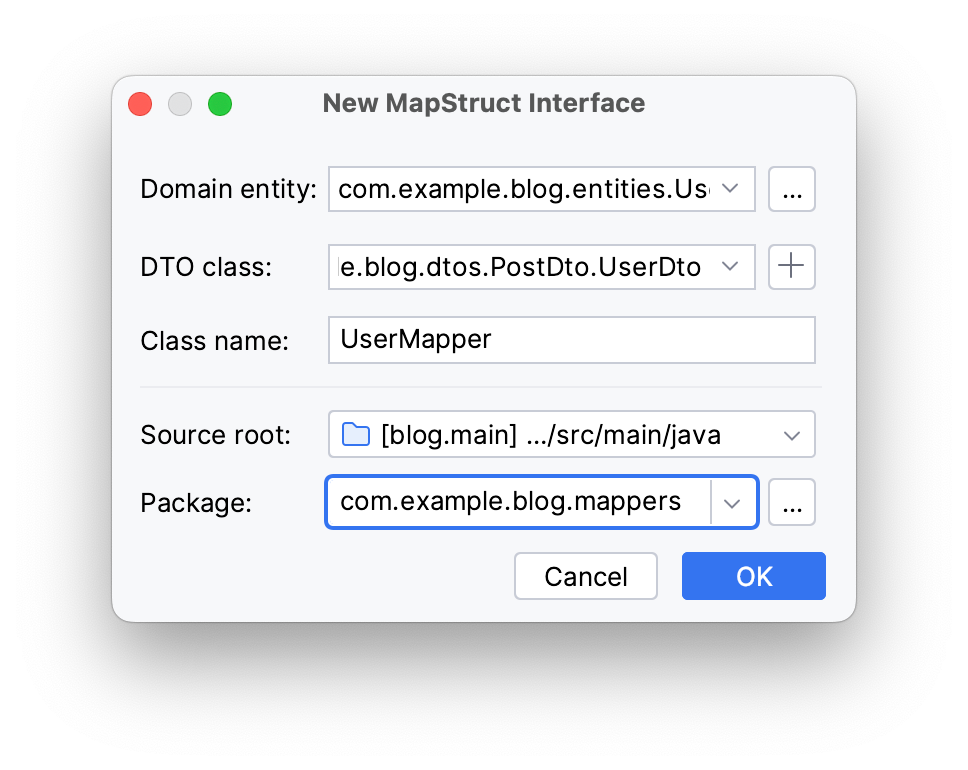
Click OK. This will create a UserMapper interface in the mappers package. MapStruct will generate its implementation during the compilation phase.
When designing RESTful APIs, endpoints often return collections of items. JPA Buddy can generate methods to map such entities/DTOs collections:
- Open
UserMappersource code - Invoke the Generate menu (Command/Ctrl + N)
- Select Mapper Method
Tick the preferred collection implementation for From Entity to DTO and vice versa.
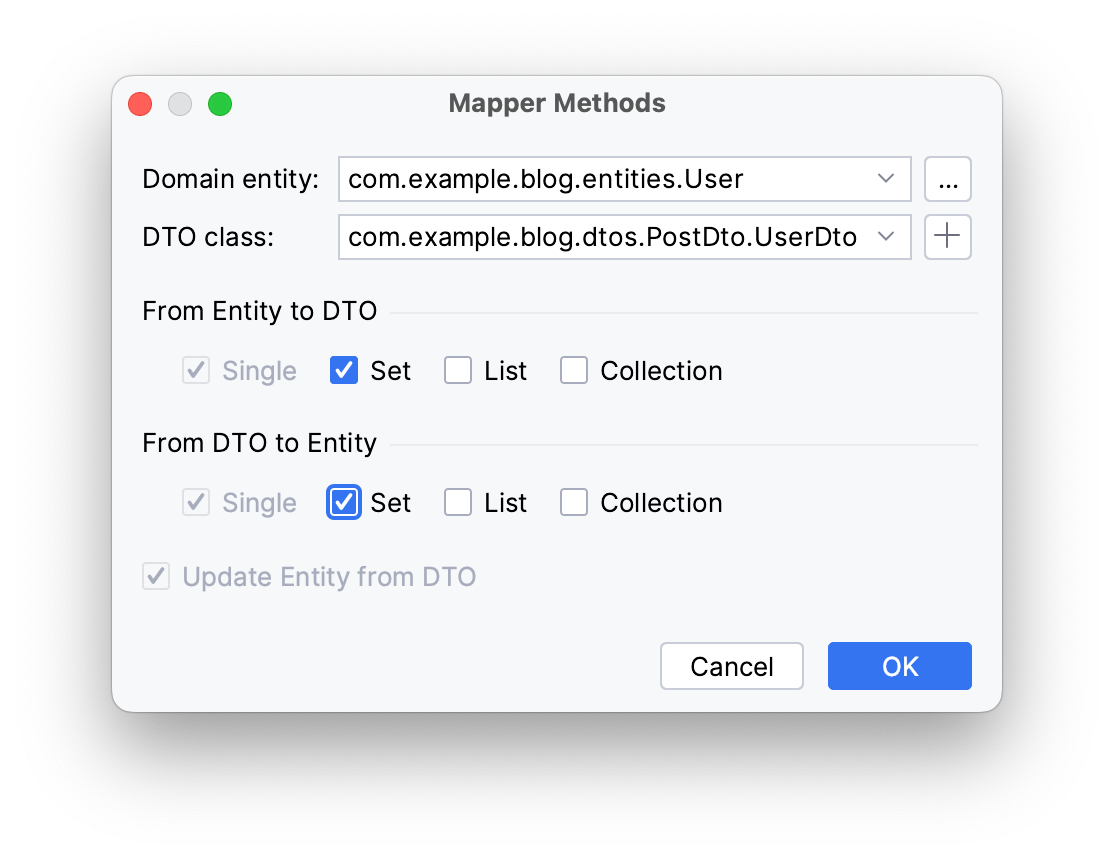
Click OK.
This will create two methods in the UserMapper interface:
Set<User> toEntity(Set<PostDto.UserDto> userDto);

Set<PostDto.UserDto> toDto(Set<User> user);
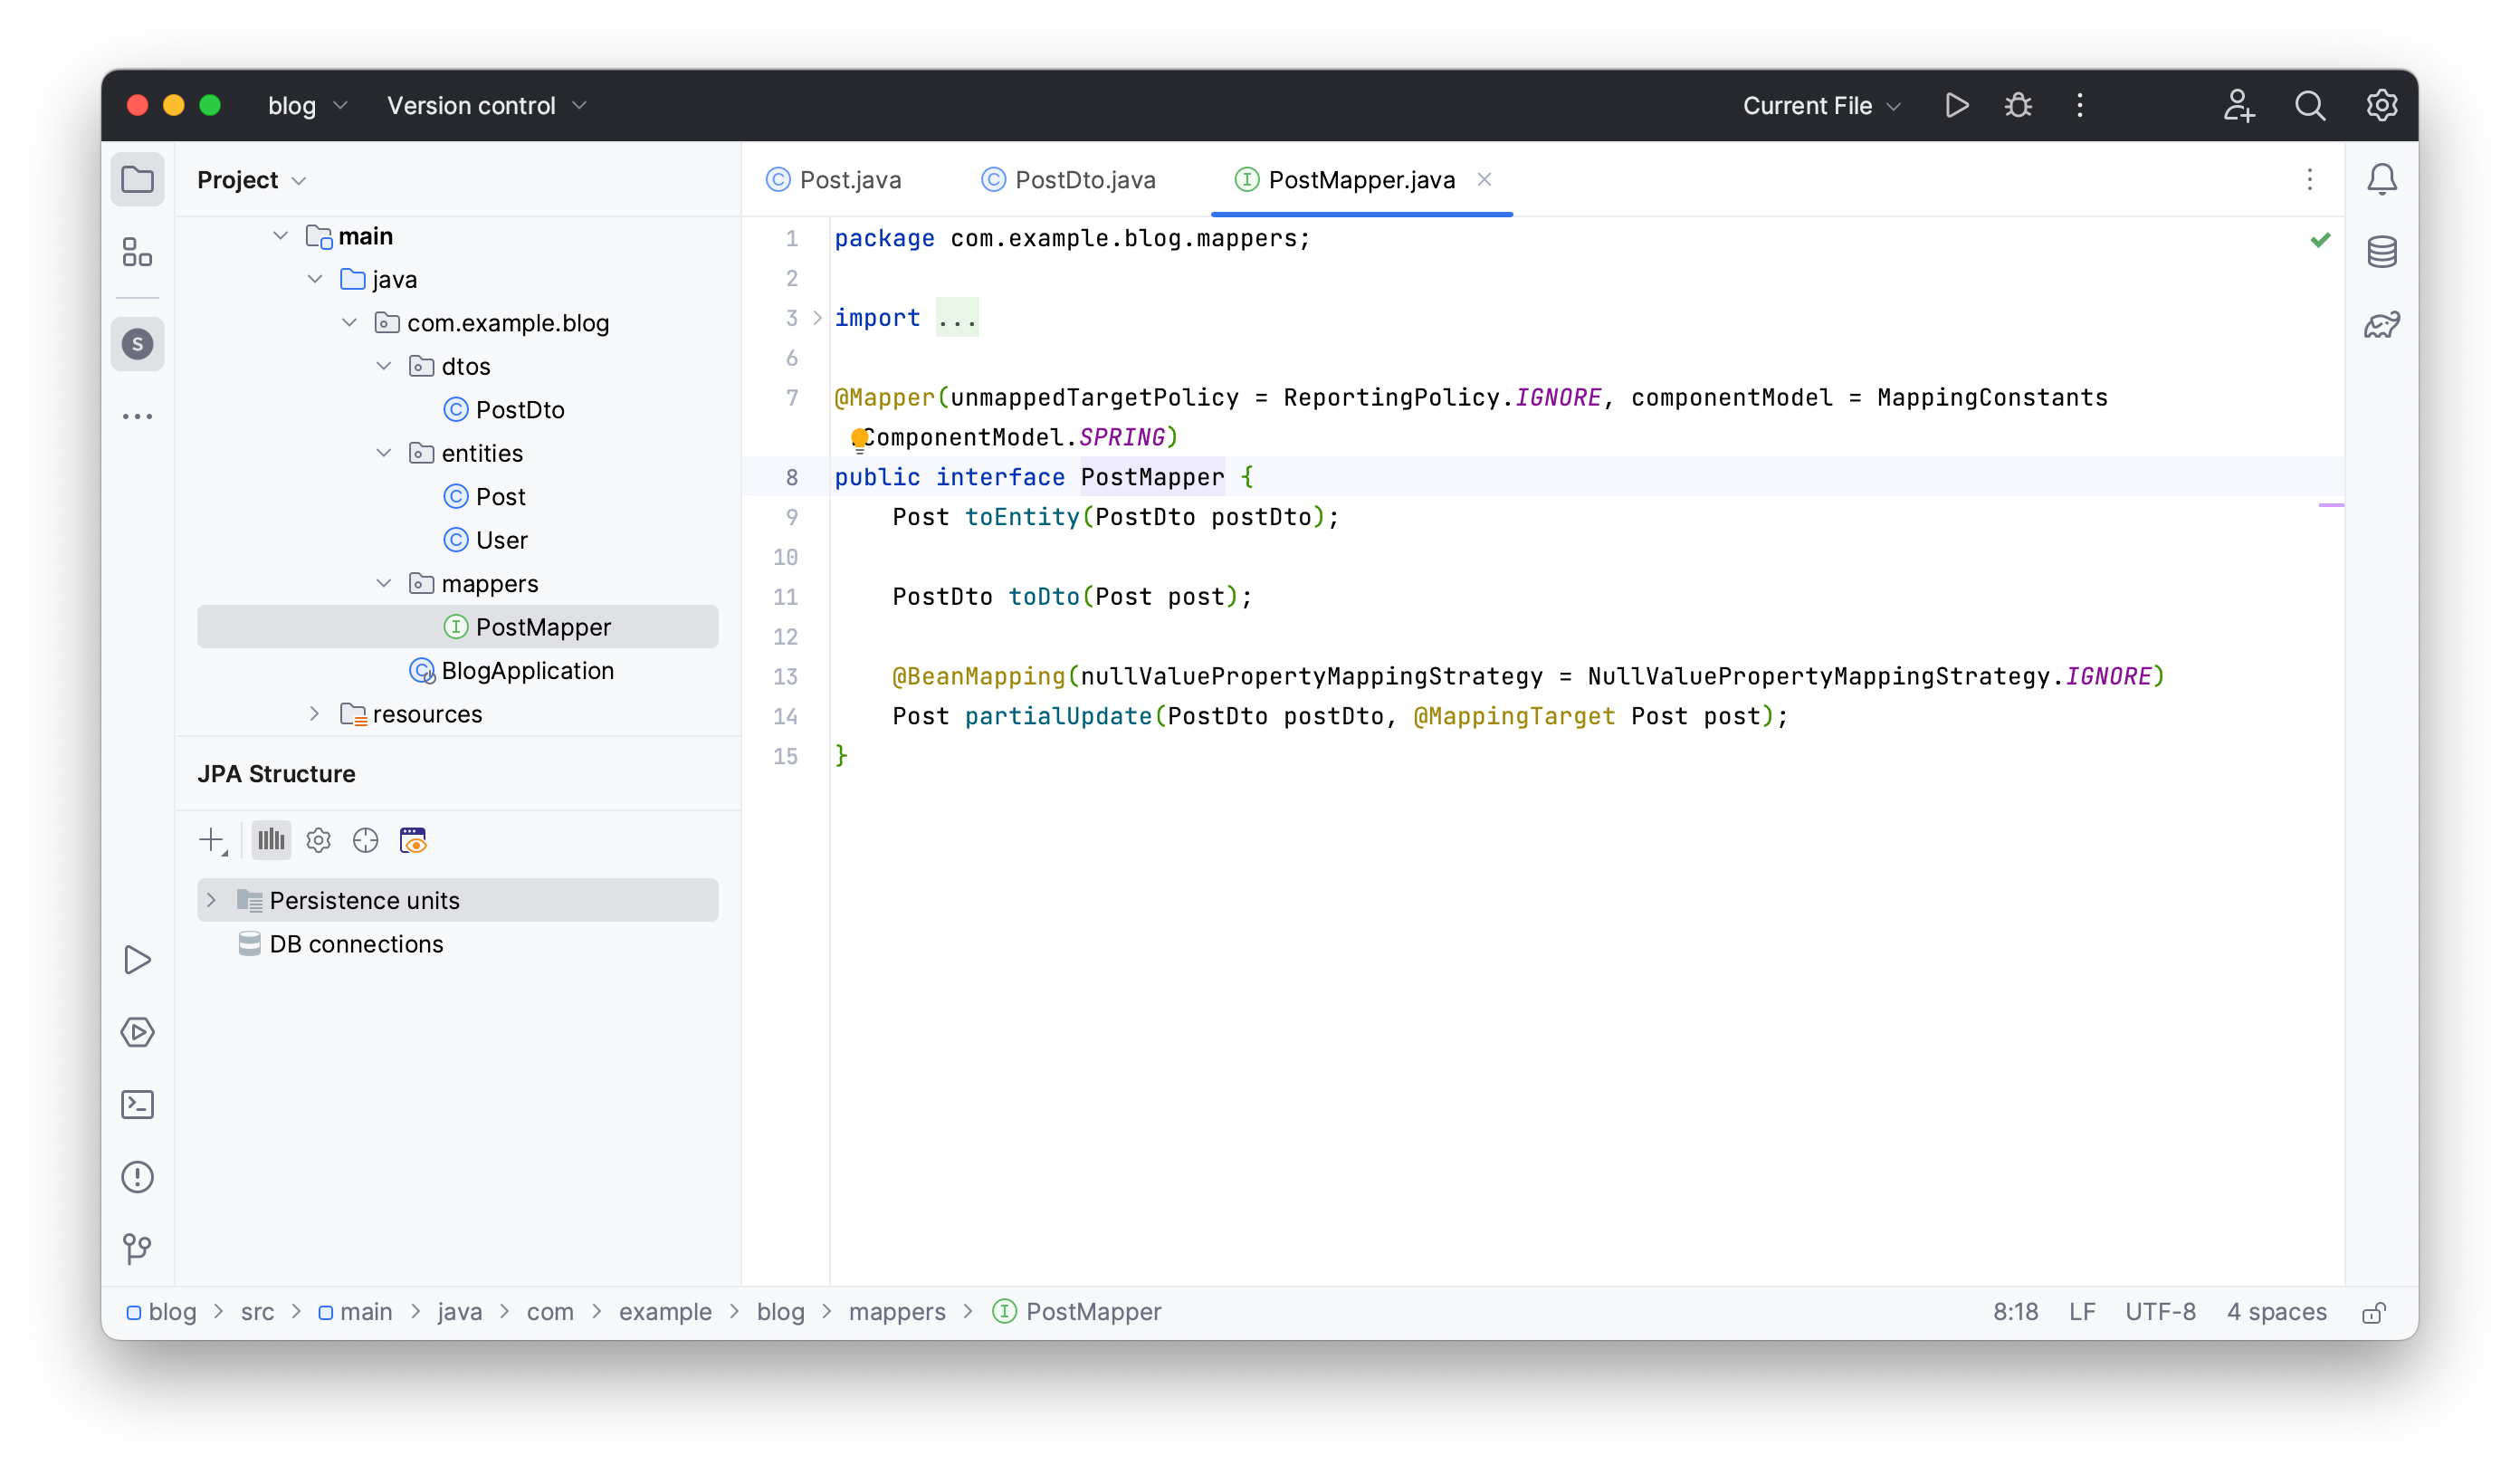
To eliminate boilerplate code, you can declare a generic mapper interface and inherit all other mappers from it. To do that, manually create an interface called EntityMapper:
public interface EntityMapper<D, E> {
 E toEntity(D dto);
 D toDto(E entity);

 List<E> toEntity(List<D> dto);
 List<E> toDto(List<D> entity);

 @Named("partialUpdate")
 @BeanMapping(nullValuePropertyMappingStrategy = NullValuePropertyMappingStrategy.IGNORE)
 void partialUpdate(@MappingTarget E entity, D dto);
}
JPA Buddy will detect this interface if you extend it at least in one mapper. Rewrite the UserMapper as in the code below:
@Mapper(componentModel = "spring")
public interface UserMapper extends EntityMapper<PostDto.UserDto,User> {
}
Now you can use JPA Buddy to generate a similar mapper for TagDto:
- Click on the + button in JPA Structure
- Choose MapStruct Interface
- Select
Tagas your Domain entity in the invoked window - Select
TagDtoas your DTO class - Choose the
mapperspackage
JPA Buddy will automatically choose the created parent mapper for the new Parent interface field. Click OK.
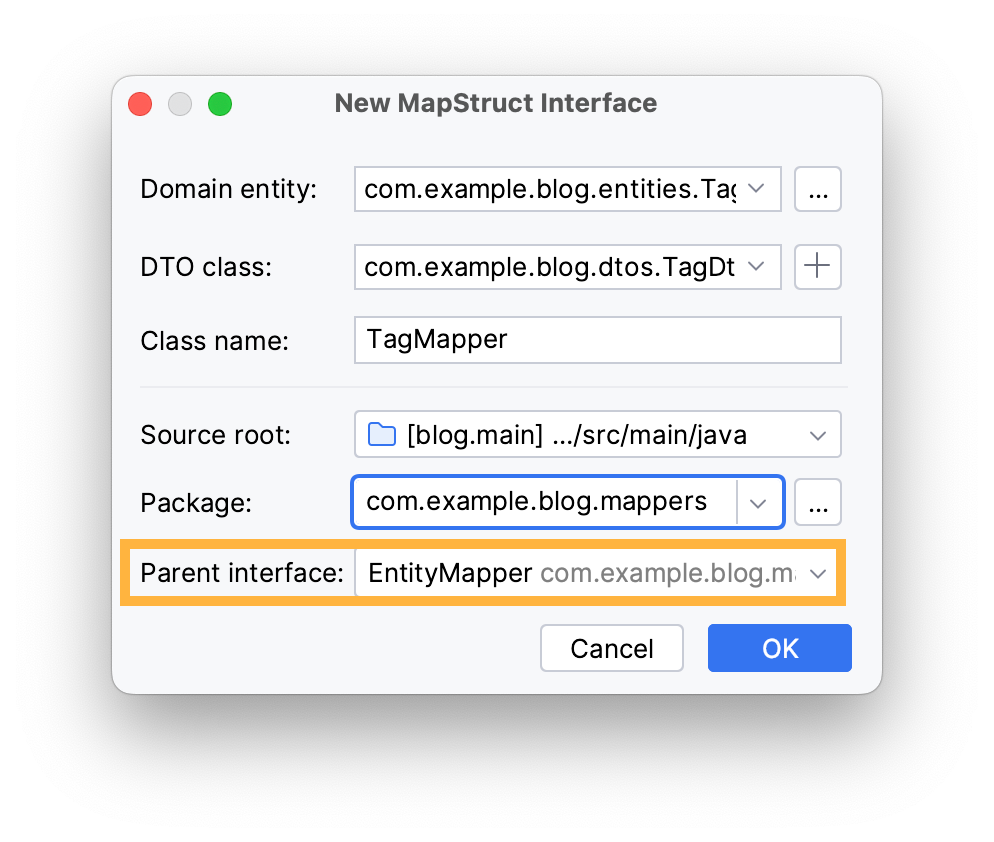
These steps will generate the following TagMapper interface:
@Mapper(unmappedTargetPolicy = ReportingPolicy.IGNORE, componentModel = MappingConstants.ComponentModel.SPRING)
public interface TagMapper extends EntityMapper<TagDto, Tag> {
}
Creating an Entity from a POJO
Another way to develop your app is by first defining DTOs for the API then creating the data model later. JPA Buddy provides an easy way to implement this approach. In this section, you will:
- Create a new DTO
- Generate an entity from the generated DTO
Let’s write a TagDto POJO with a list of PostDto objects to represent all the posts associated with the tag:
@Value
public class TagDto implements Serializable {
 Long id;
 String name;
 List<PostDto> posts;
}
To generate an entity from this DTO, click on the + button in the JPA Structure tab and choose JPA Entity from POJO.
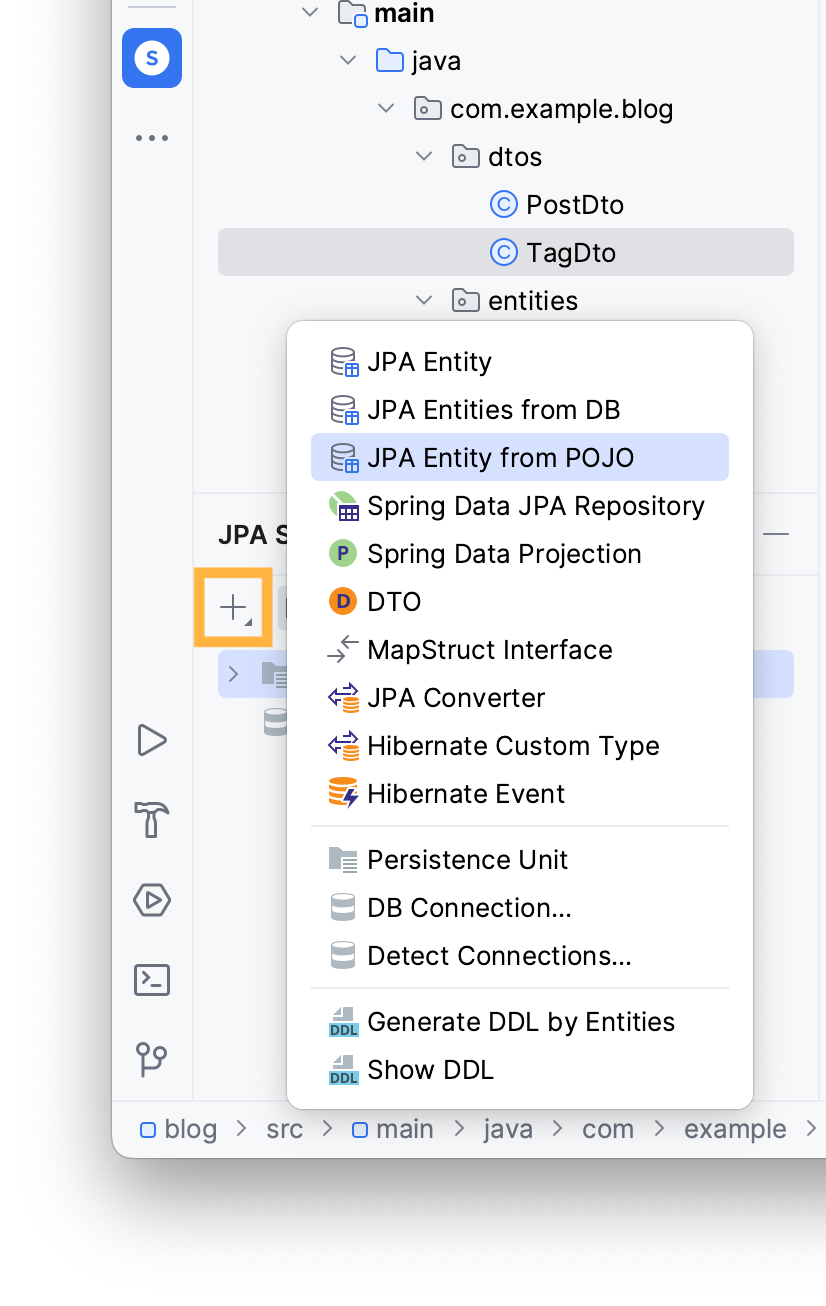
Choose the entities package, type the name of the POJO class, TagDto in this case, then tick all attributes to be generated in the entity. JPA Buddy picks the correct associated entity. Make sure to check the Many To Many cardinality, check all Cascade type and name the join table as tag_posts.
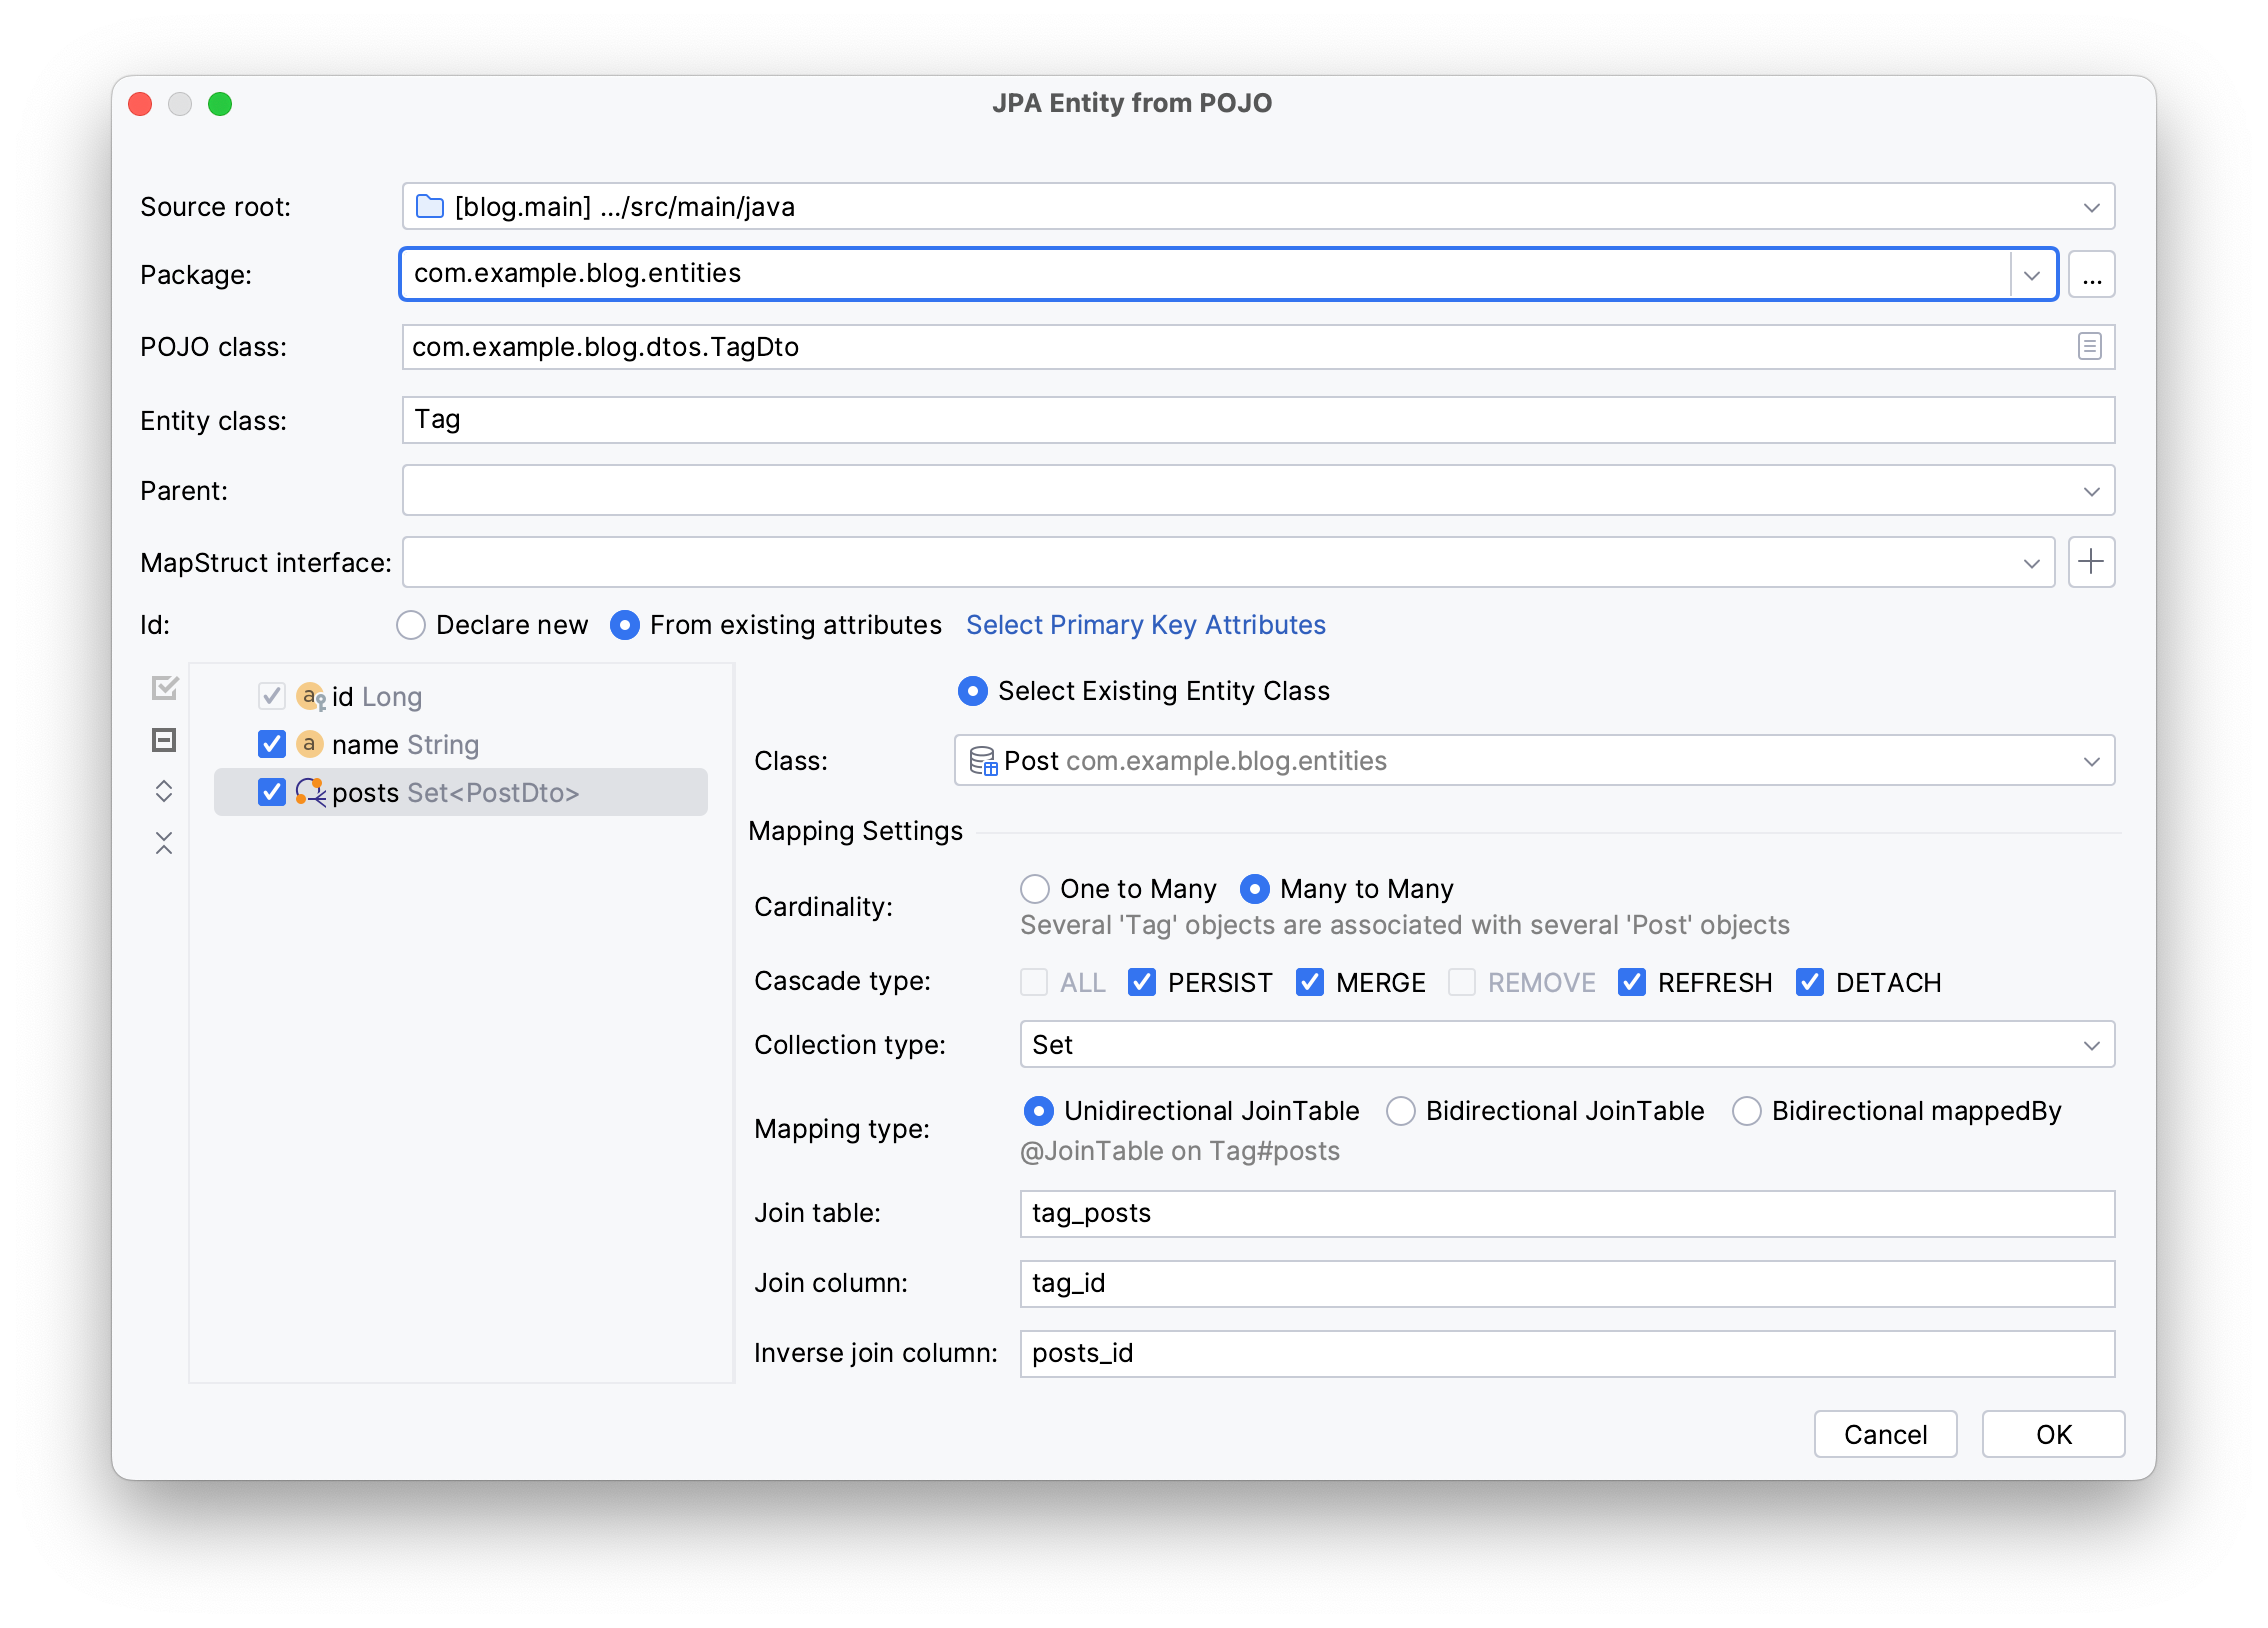
Click OK.
These steps generate the following entity:
@Getter
@Setter
@Entity
@Table(name = "tag")
public class Tag {
 @Id
 @Column(name = "id", nullable = false)
 private Long id;

 @Column(name = "name")
 private String name;

 @ManyToMany(cascade = {CascadeType.PERSIST, CascadeType.MERGE, CascadeType.REFRESH, CascadeType.DETACH})
 @JoinTable(joinColumns = @JoinColumn(name = "tag_id"))
 private Set<Post> posts = new LinkedHashSet<>();

}
Writing a Controller with Coding Assistance
JPA entities are typically anemic, their behavior is encapsulated in repositories, and while mappers transfer entities to DTOs, they add another layer, complicating the discoverability of entity behavior. JPA Buddy addresses this by offering smart postfix completions for entities and DTOs for a transparent development process. In this section, you will:
- Build a REST controller
- Use Coding Assistance in a GET method
First you need to build a REST controller, create a new controllers package and a UserController class in it. Annotate your class with the @RestController annotation to turn it into a REST controller.
@RestController
@RequestMapping ("/api/v1")
public class UserController {
}
Let's create a GET method handler to find a user by its last name and return the corresponding DTO.
Define a new method inside your controller called findByLastName which returns a UserDto list. Annotate it with @GetMapping("/users/{name}") to indicate that this method will respond to GET requests at the /users/{name} endpoint.
Since the user’s last name will be passed via the URL, annotate the String name parameter with @PathVariable, like in the code below.
@GetMapping("/users/{name}")
public List<PostDto.UserDto> findByLastName(@PathVariable String name)  {
}
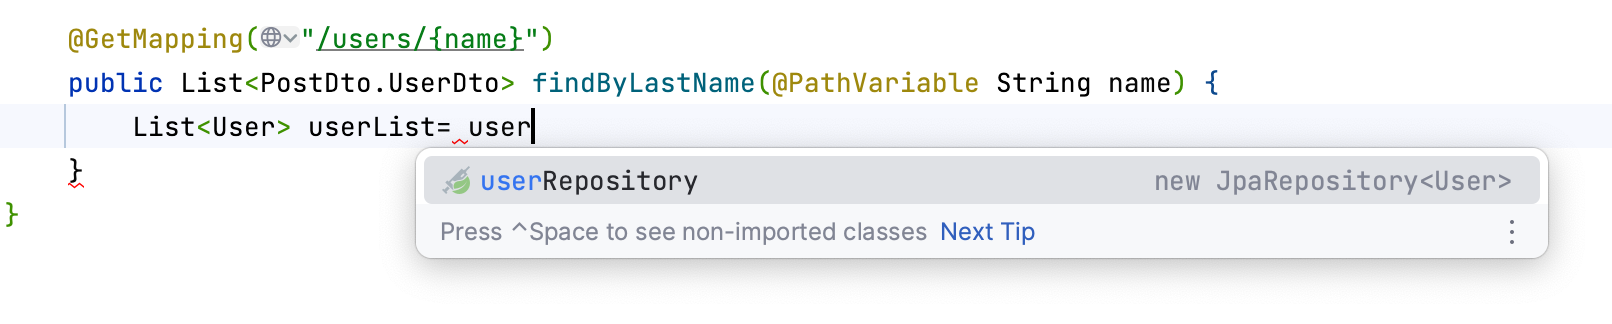
Next, define a new variable List<User> userList to hold the users found by the repository’s derived method.
Use JPA Buddy’s Coding Assistance to create and inject userRepository to supply your controller with the correct implementation for data operations. Begin typing the repository’s name and press enter once JPA Buddy suggests creating the repository.
Rename its package to repositories and click OK in the invoked wizard.
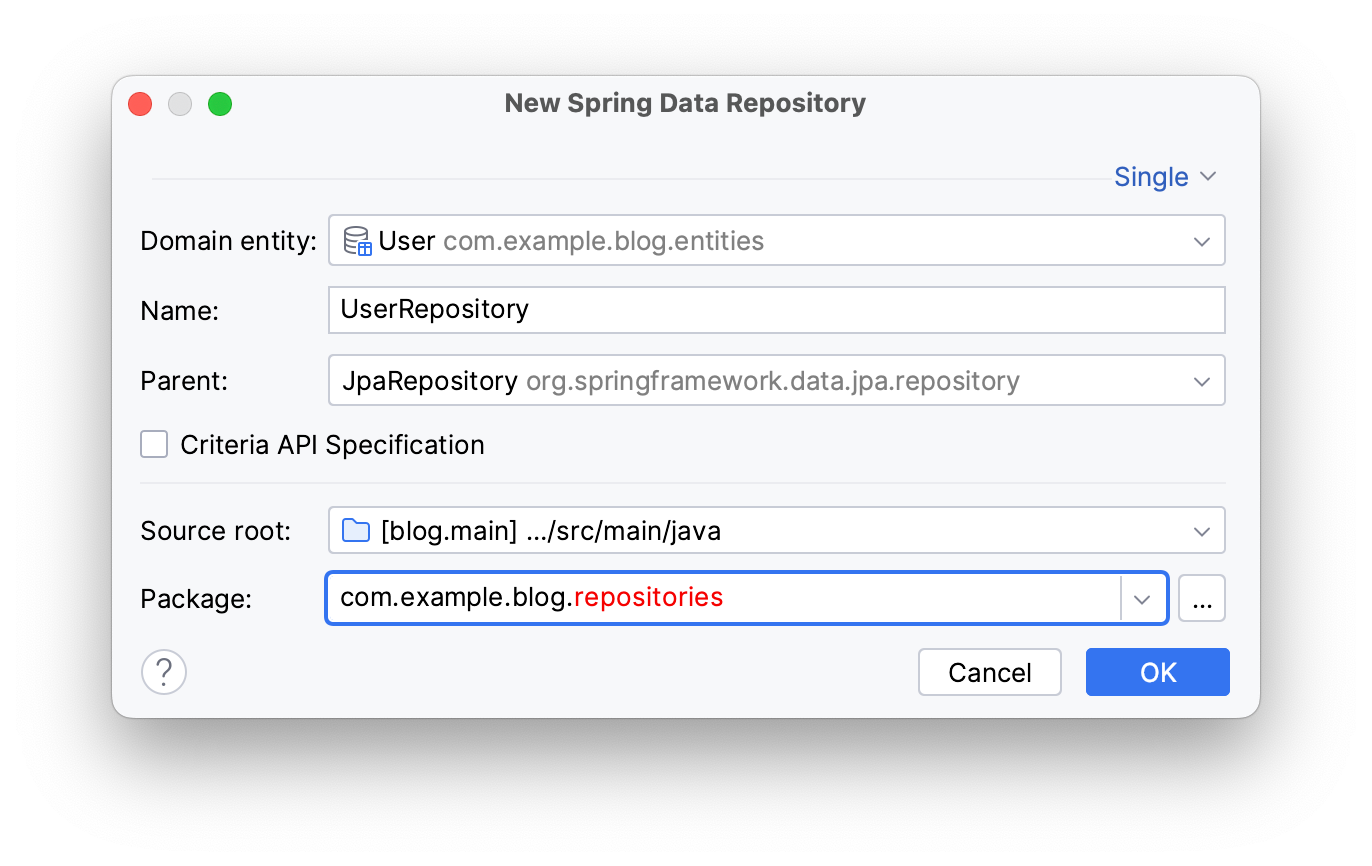
JPA Buddy will generate UserRepository in the created repositories package:
public interface UserRepository extends JpaRepository<User, Long> {
}
And create a constructor with the injected repository for your UserController class, as in the code below:
private final UserRepository userRepository;

public UserController(UserRepository userRepository) {
 this.userRepository = userRepository;
}
Use JPA Buddy’s method generation by typing find and clicking on the find... option.
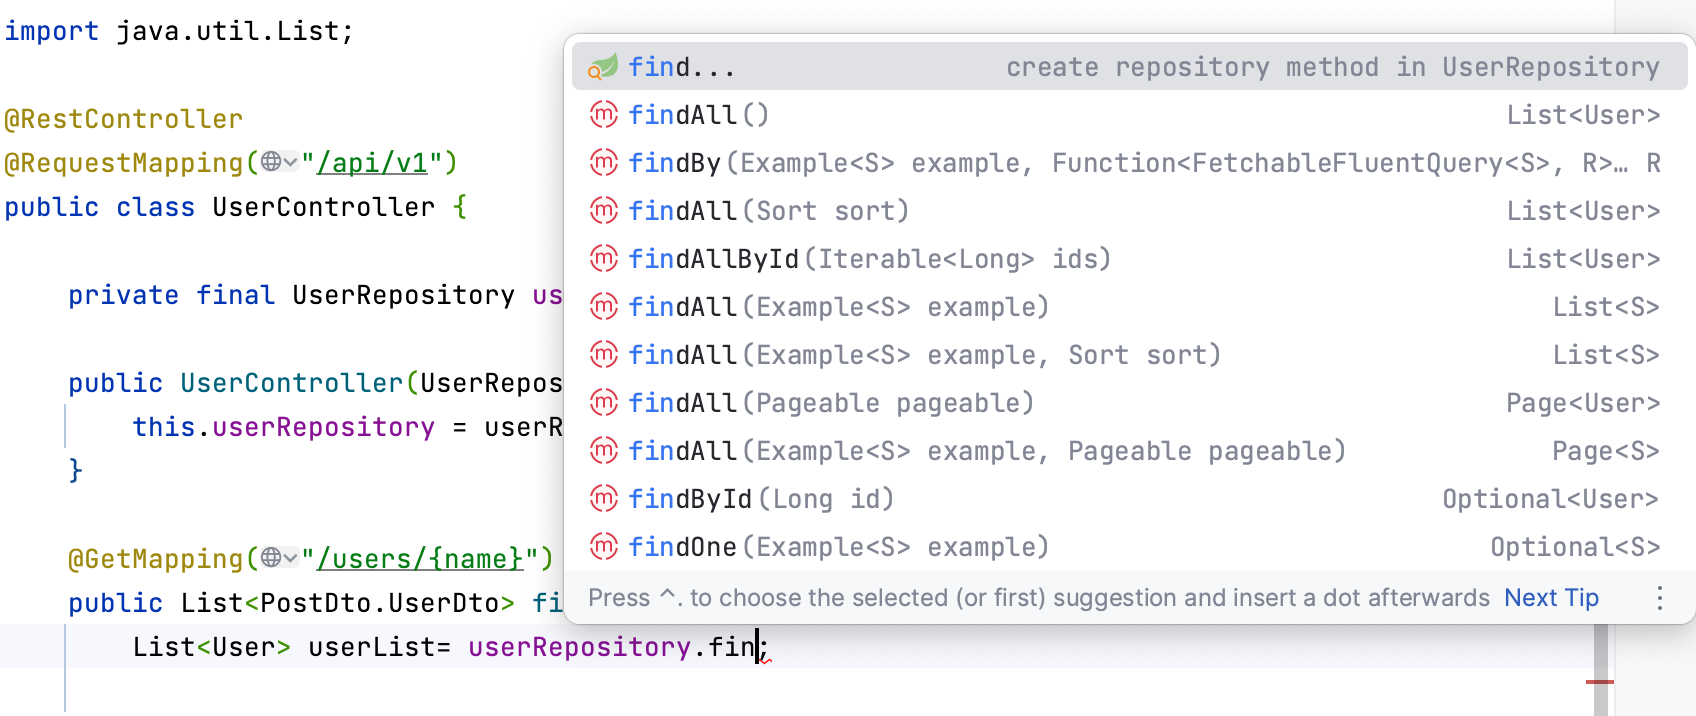
Choose Method Find Instance and pick the lastName attribute.
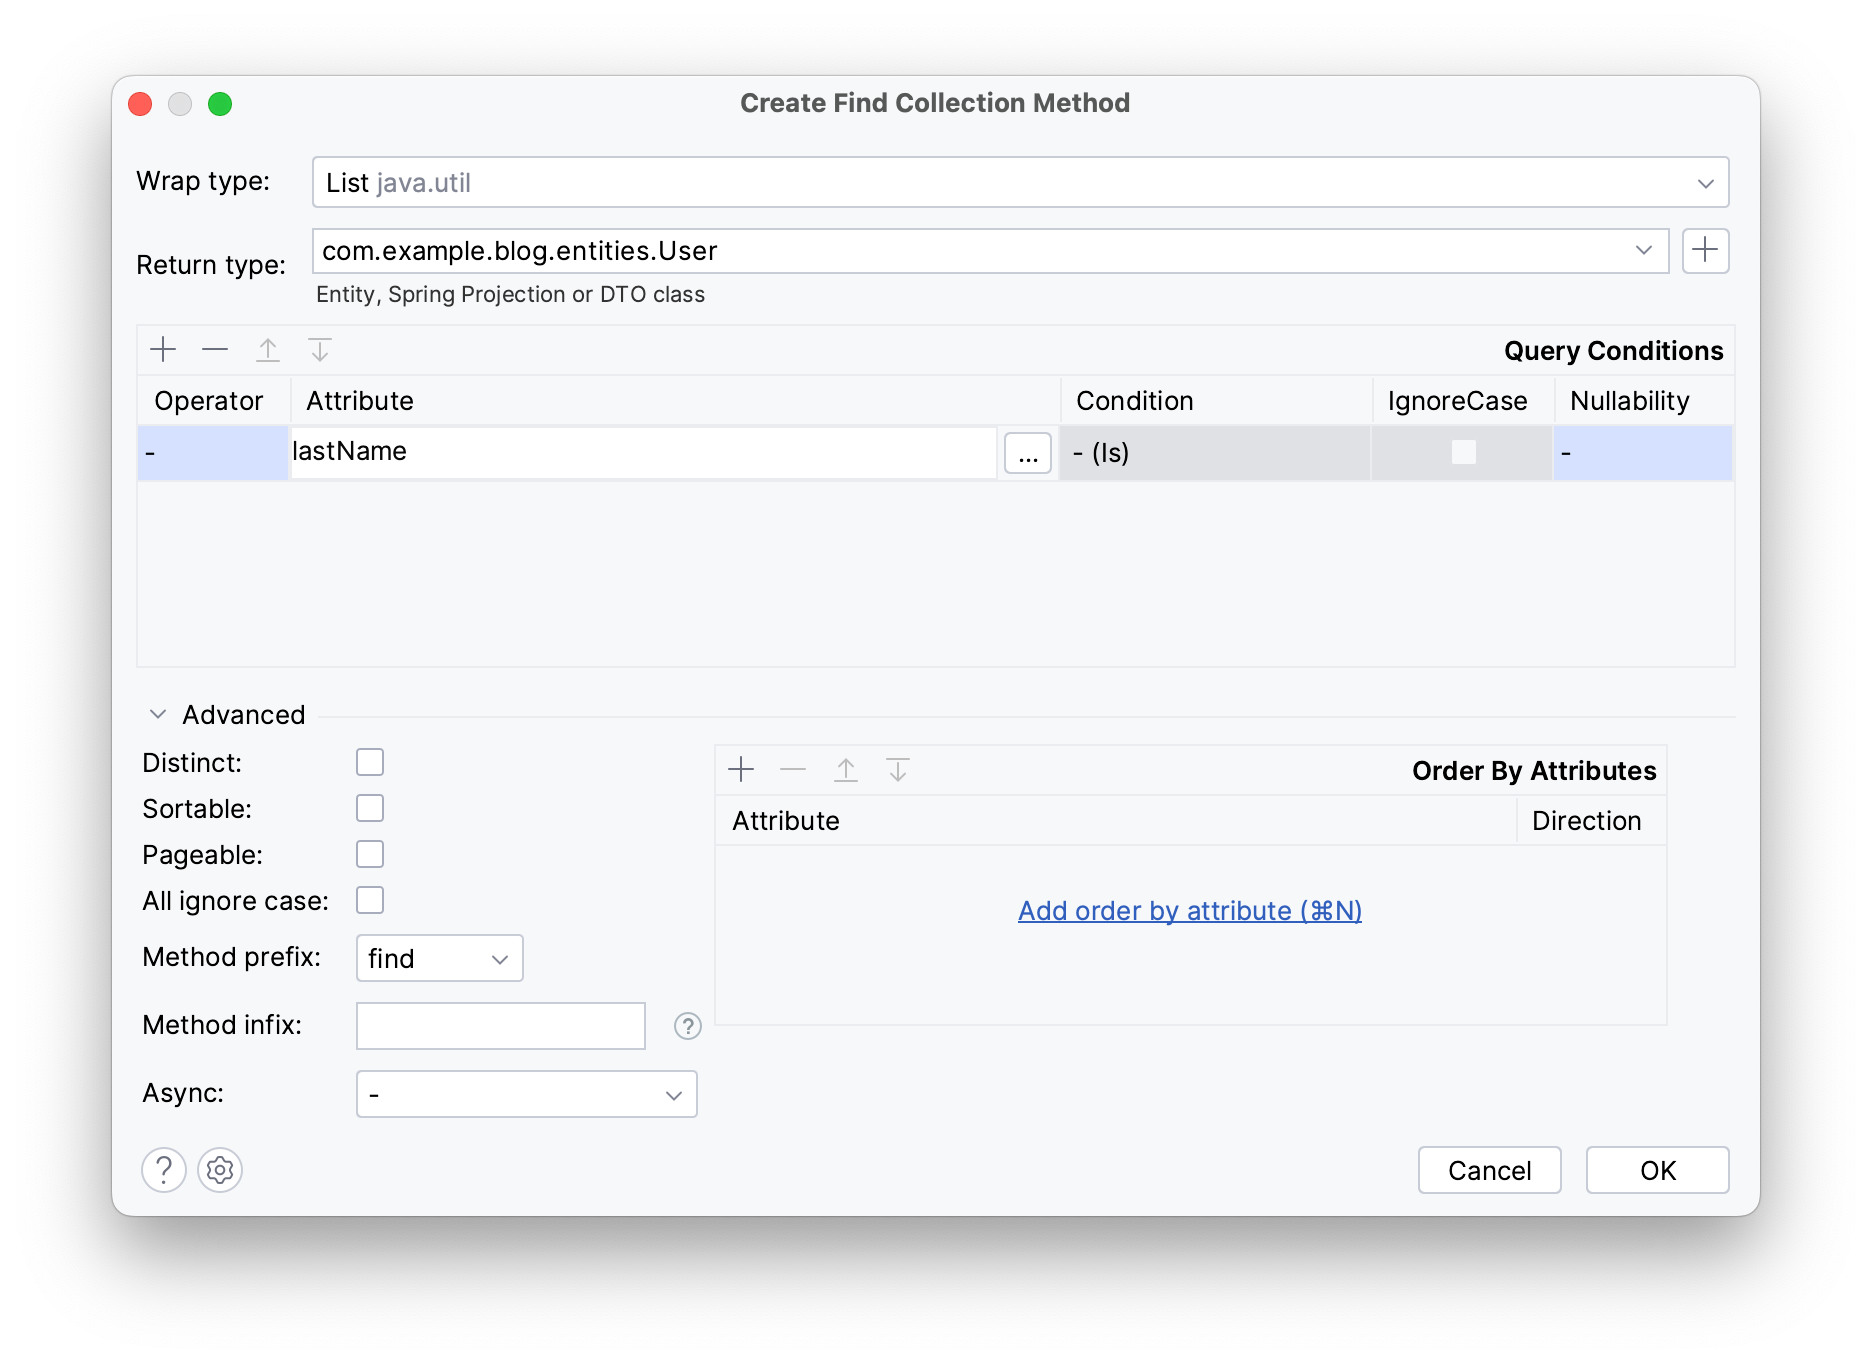
JPA Buddy will create a FindByLastName method and call it in the GET method.
List<User> userList = userRepository.findByLastName(name);
The final step is to transform the userList List into a userDto list.
To do that you can convert userList into a stream using .stream(), then invoke the mapToUserDto method using JPA Buddy’s coding assistance. This will convert each User entity into its corresponding UserDto representation and inject UserMapper’s interface.

To transform the result into a collection of DTOs, employ the .collect(Collectors.toList()) method. Finally, type .return to prompt JPA Buddy to use its postfix command to return the result.
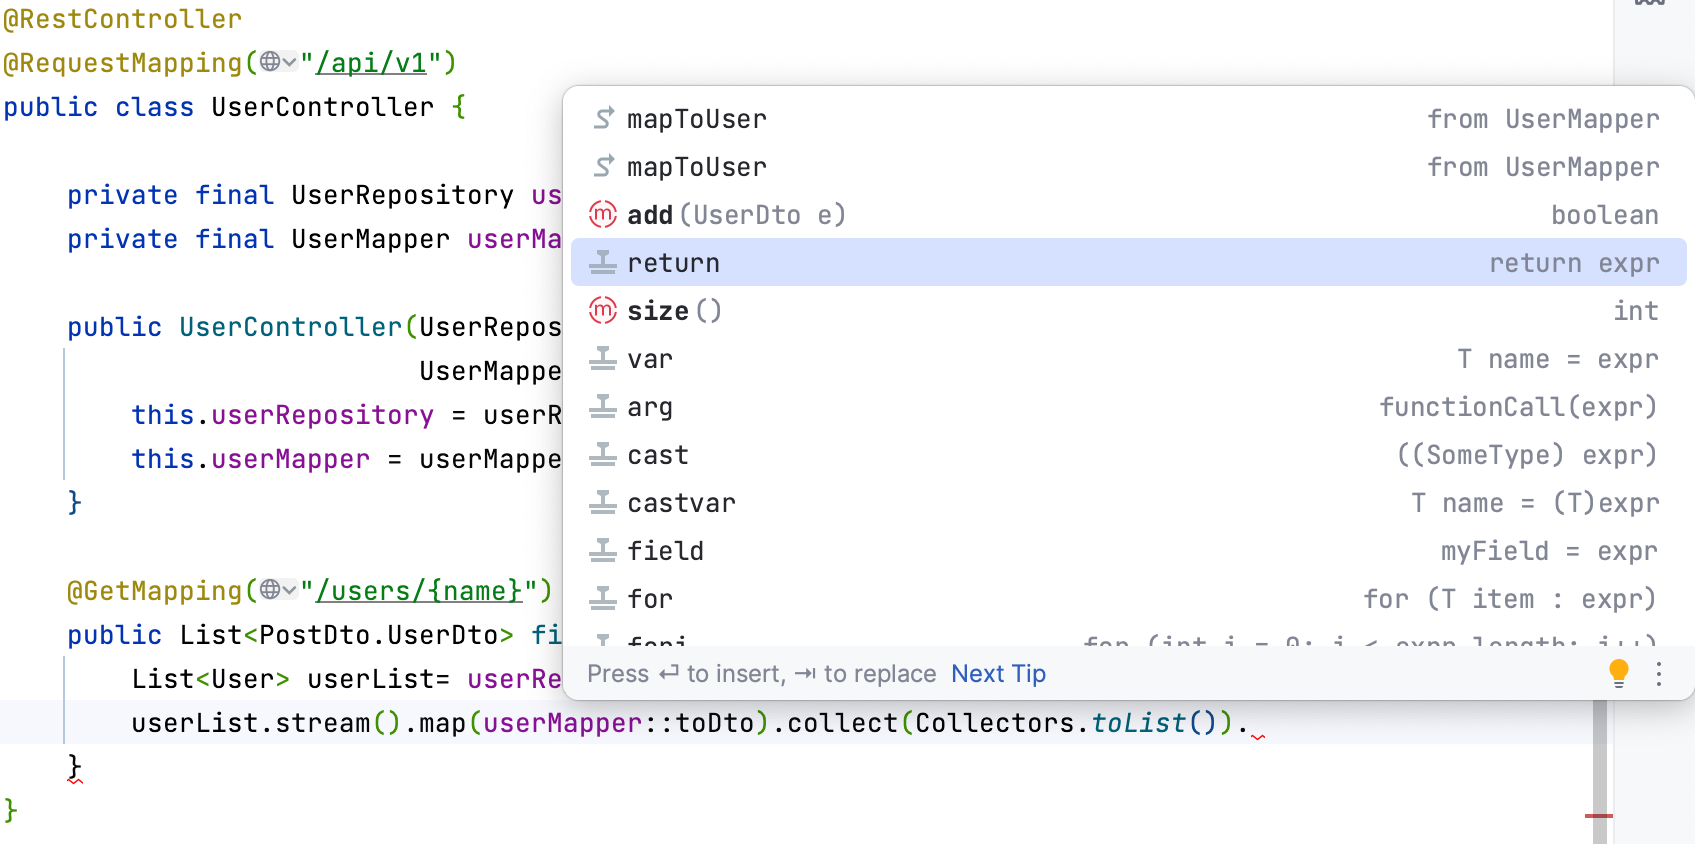
Here is the code that you should get as your GET method:
@GetMapping("/users/{name}")
public List<PostDto.UserDto> findByName(@PathVariable String name) {
 List<User> userList = userRepository.findByLastName(name);
 return userList.stream().map(userMapper::toDto).collect(Collectors.toList());
}
Conclusion
With JPA Buddy’s DTOs generation, MapStruct support, and coding assistance, you can reduce boilerplate code and enhance productivity. These tools not only simplify the complexities of data mapping and entity management but also ensure that your code remains clean, maintainable, and efficient.