Use IntelliJ IDEA and JPA Buddy Shortcuts to Become Extremely Productive
Accelerate your JPA development process with IntelliJ IDEA and JPA Buddy keyboard shortcuts! In this video, we'll show you how to leverage JPA Buddy features to write code faster. And if you're a Kotlin fan, don't worry - all the features we showcase in this video are also available in Kotlin. Don't miss out on this opportunity to streamline your JPA development process!
Estimated Reading Time: less than 10 mins
Introduction
JPA Buddy not only provides visual designers but also offers keyboard shortcuts for the most commonly used actions. It can save you hours and days in the long run.
In this guide, you'll take a closer look at the JPA Buddy features that feel even more powerful when writing code manually. You will write a sample blog application with one endpoint using MapStruct and JPA Buddy.
Overview
You will learn how to:
- Set up a new project
- Activate Minimalistic Mode
- Set up a database connection
- Generate entities from a database
- Modify attributes
- Generate DTOs from entities
- Write a controller with Coding Assistance
You can find the code of this application on github.
Setting up a New Project
First, you will go through a few steps to set up a new project. In this section, you will:
- Create a new project using Spring Initializr
- Load the project in IntelliJ IDEA
Start by creating a Spring Boot application using Spring Initializr.
- Visit Spring Initializr’s Website.
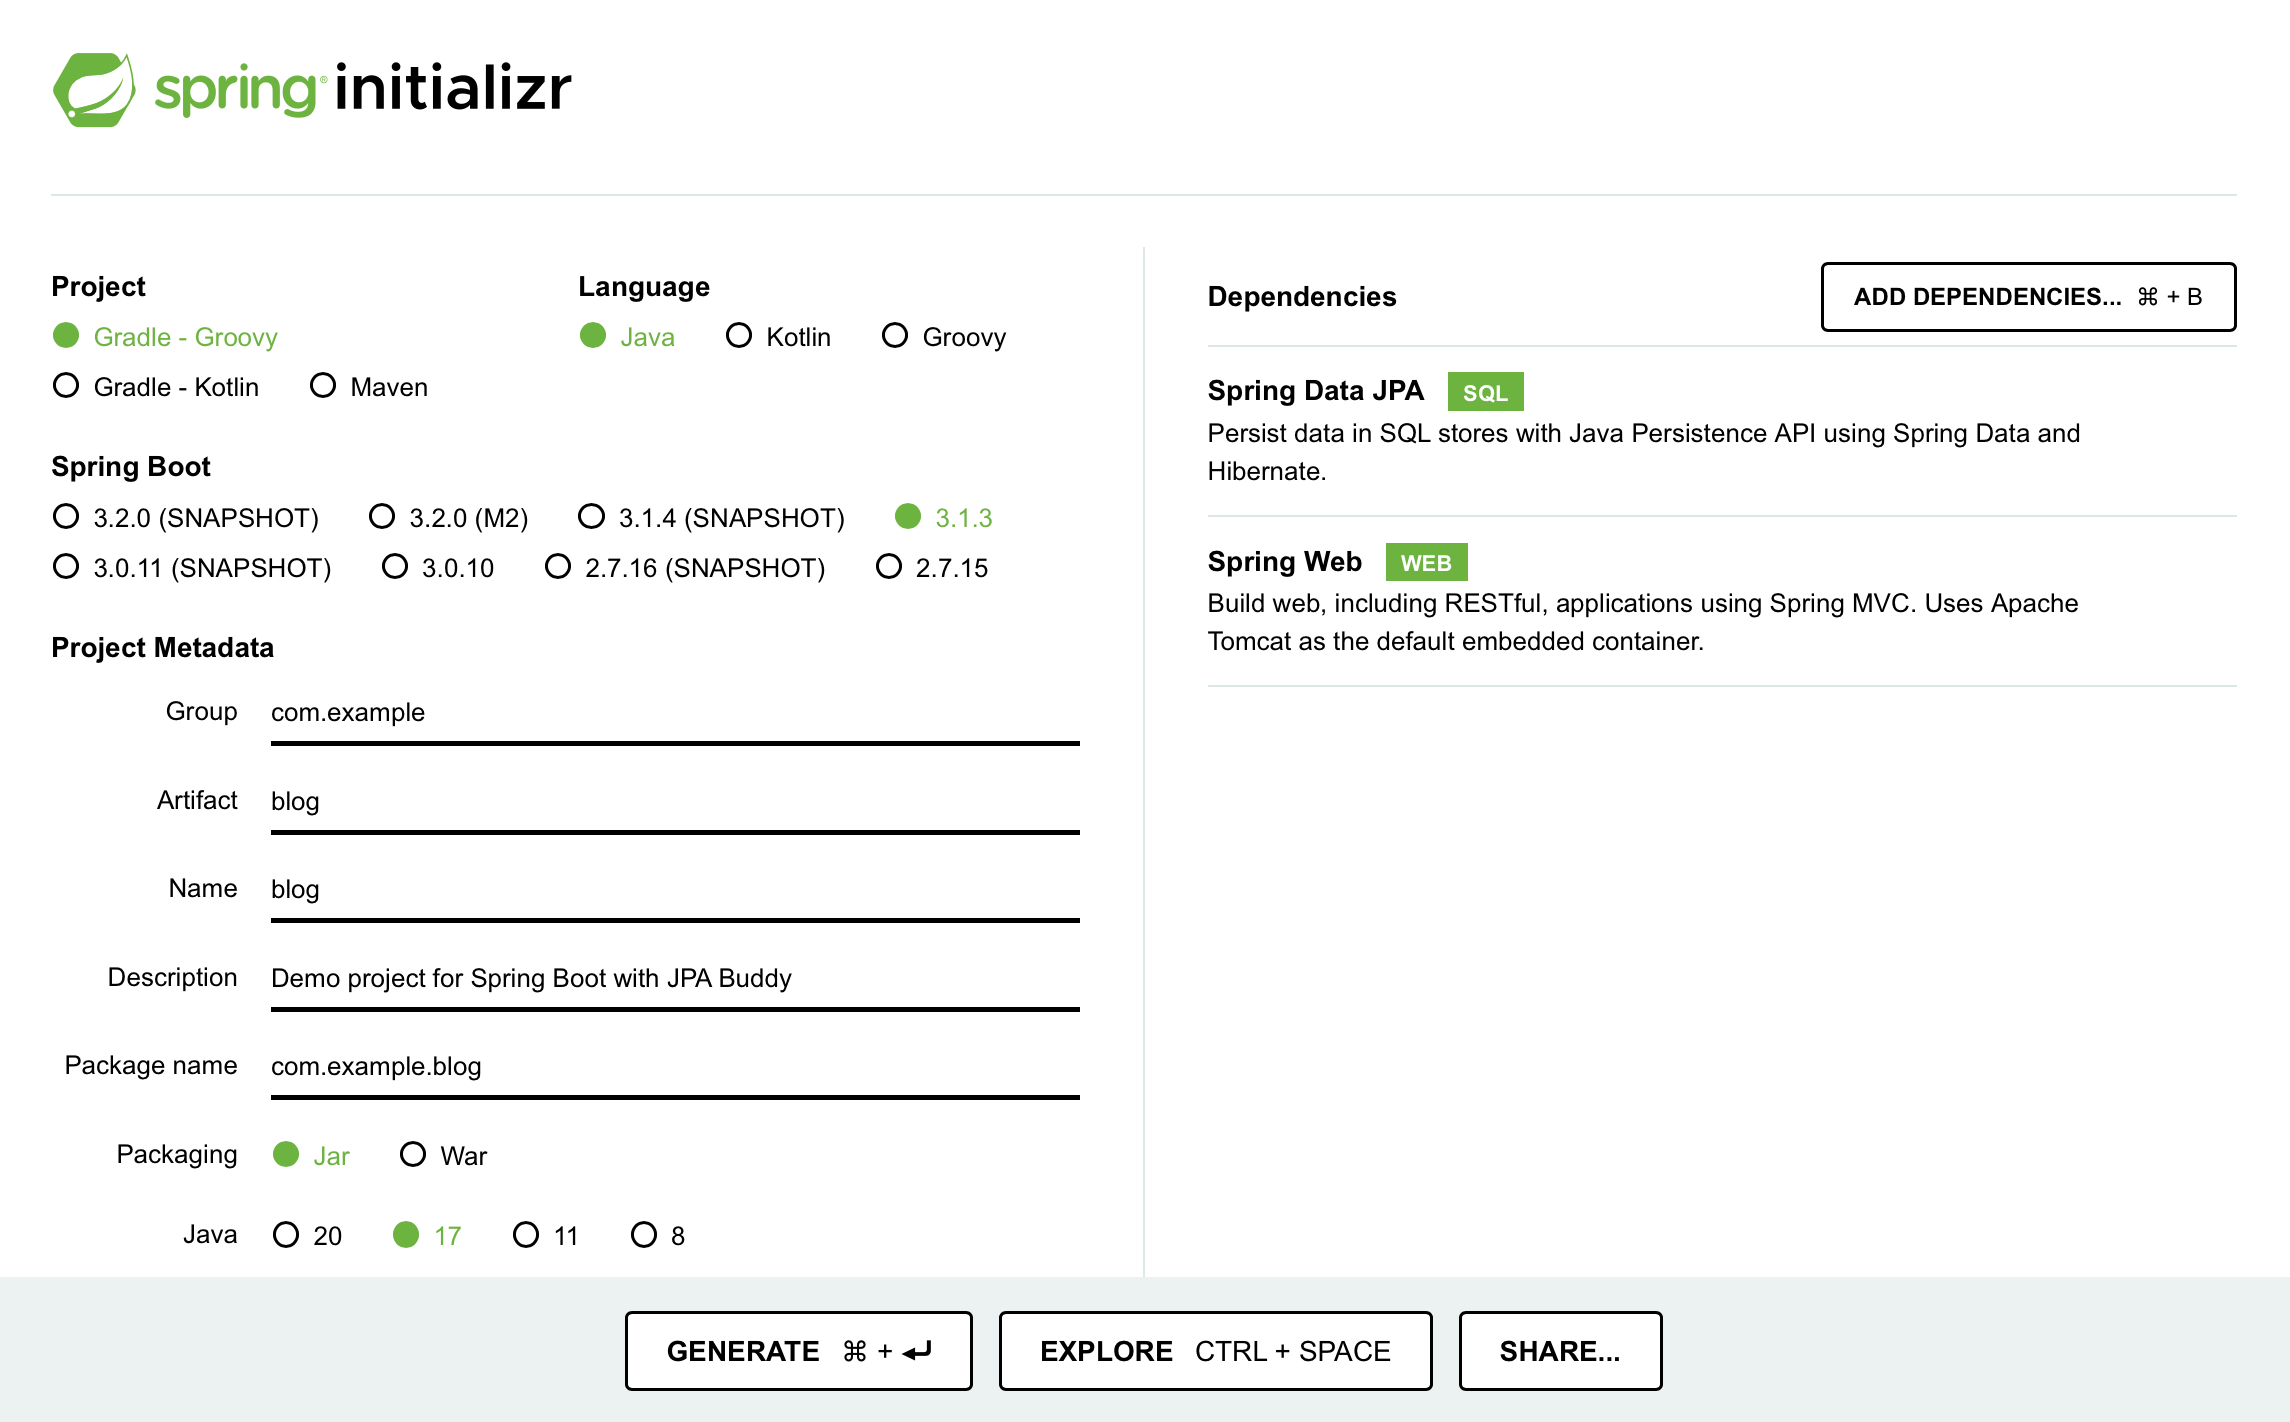
- Select the following settings:
- Java 17 as the programming language
- Gradle - Groovy as the build tool
- The latest stable version of Spring Boot
- The application will be packaged as a JAR file
- Add the following dependencies to your project:
- Spring Data JPA enables us to use JPA and Data Repositories
- Spring Web allows you to create REST endpoints
These dependencies enable you to use JPA Buddy’s functionalities.
Here are the selected settings in Spring Initializr:
Download the created project and open it in IntelliJ IDEA by clicking on File → Open.
To use Swagger MapStruct mappers in the project, add the following dependencies and plugins your pom.xml file:
dependencies {
 //...
 implementation 'org.mapstruct:mapstruct:1.5.5.Final'
 annotationProcessor 'org.mapstruct:mapstruct-processor:1.5.5.Final'
}
Click on the Load Gradle Changes icon to apply those changes to your project.
Activating Minimalistic Mode
To concentrate on coding, JPA Buddy provides a Minimalistic mode. This mode hides extra panels moving their features to standard IntelliJ IDEA windows like the Project panel and Generate menu. The Editor Toolbar stays visible by default.
To activate minimalistic mode:
- Access IntelliJ IDEA settings (Command + , on macOS/Ctrl + Alt + S on Windows)
- Select Tools
- Find the JPA Buddy tab
- Select Designer Settings
- Tick the Minimalistic option
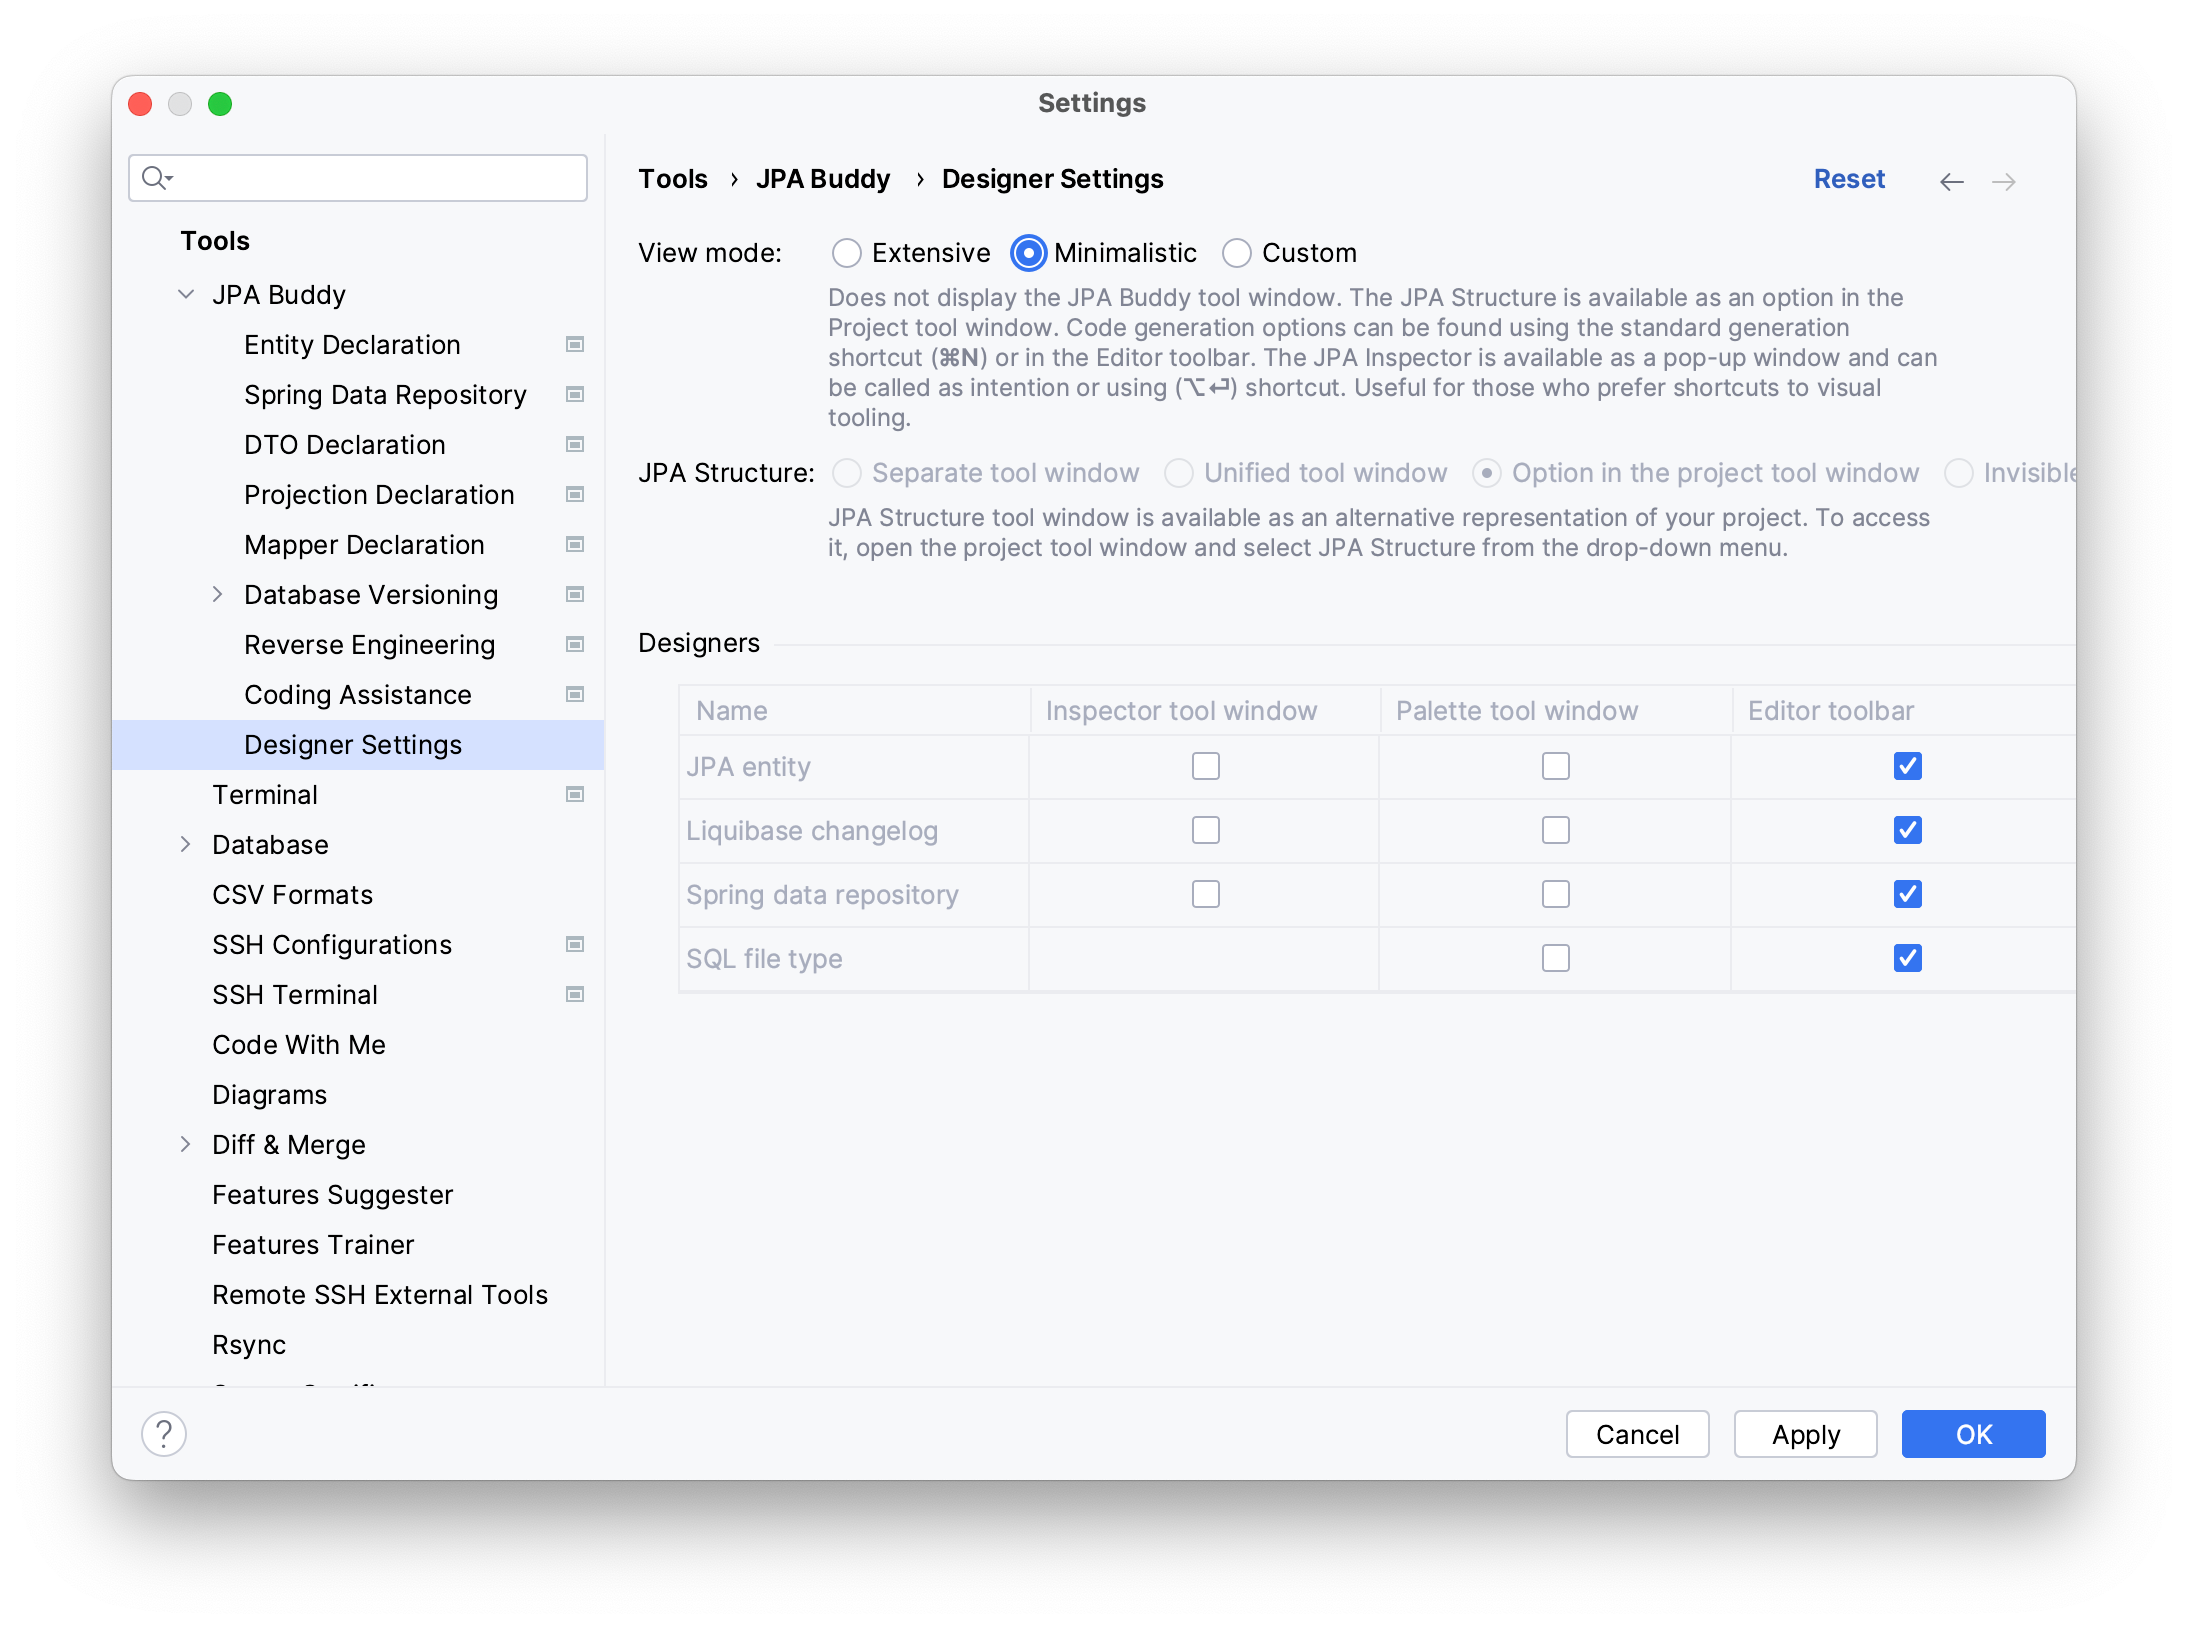
You can also adjust the visibility of all panels to fit your own needs, creating a personalized work setup. Regardless of the designer settings, all shortcuts, quick-fixes, and coding assistance options remain available.
Setting up a Database Connection
In order to set up a database connection, you need to:
- Set up a new connection
- Link the application to the datasource via the properties file
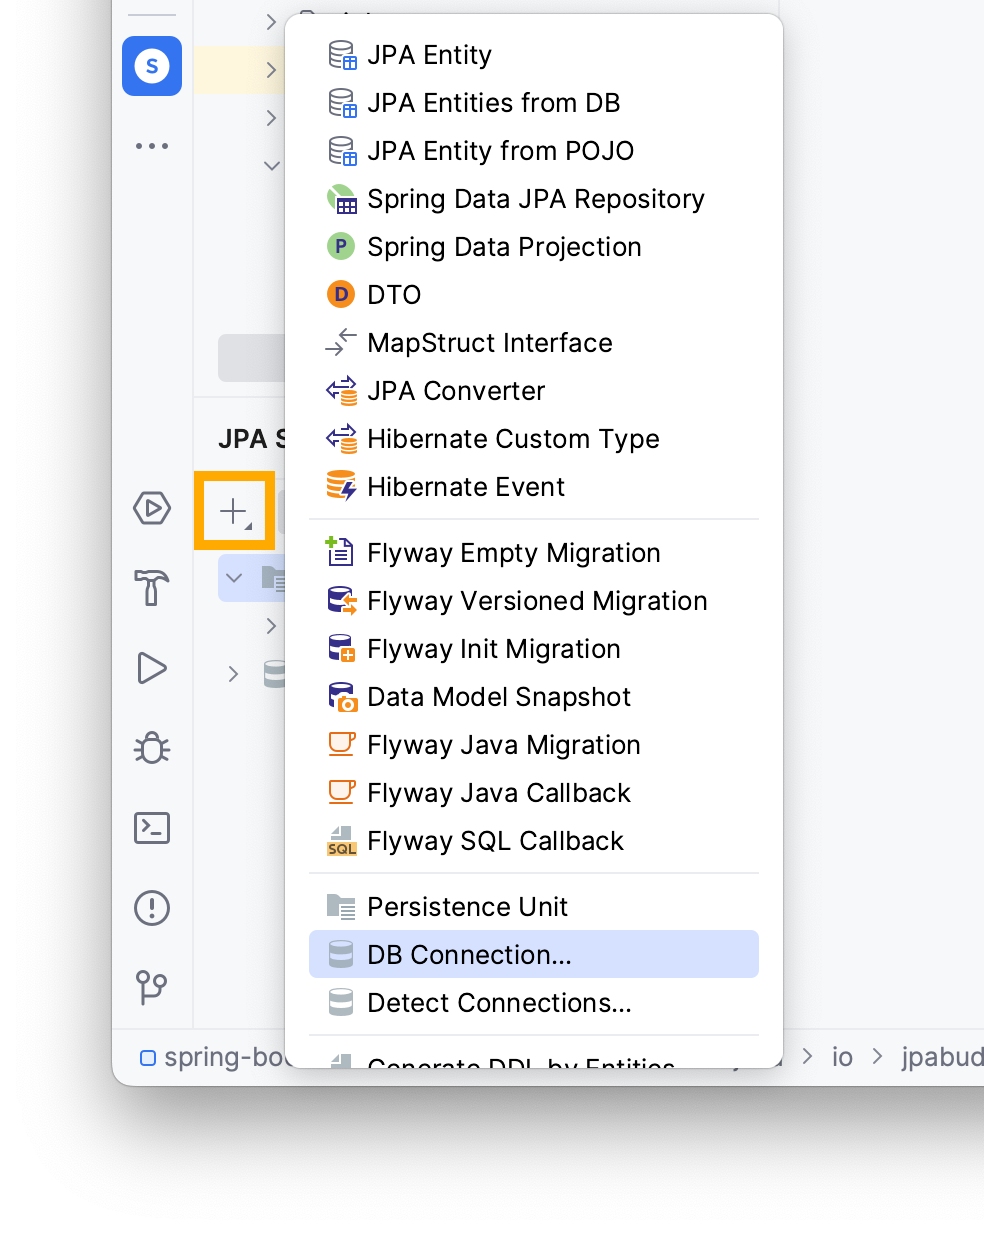
To set up a new connection with JPA Buddy through the JPA Structure tab.
- Navigate to the JPA Structure tab on the left corner of your IDE
- Click on the + button
- Click on DB Connection...
Add a new connection by clicking on the + button and typing the following information:
- User name
- Password
- Name of the database
In this example, you can see the following values; however, they may vary depending on your local environment.
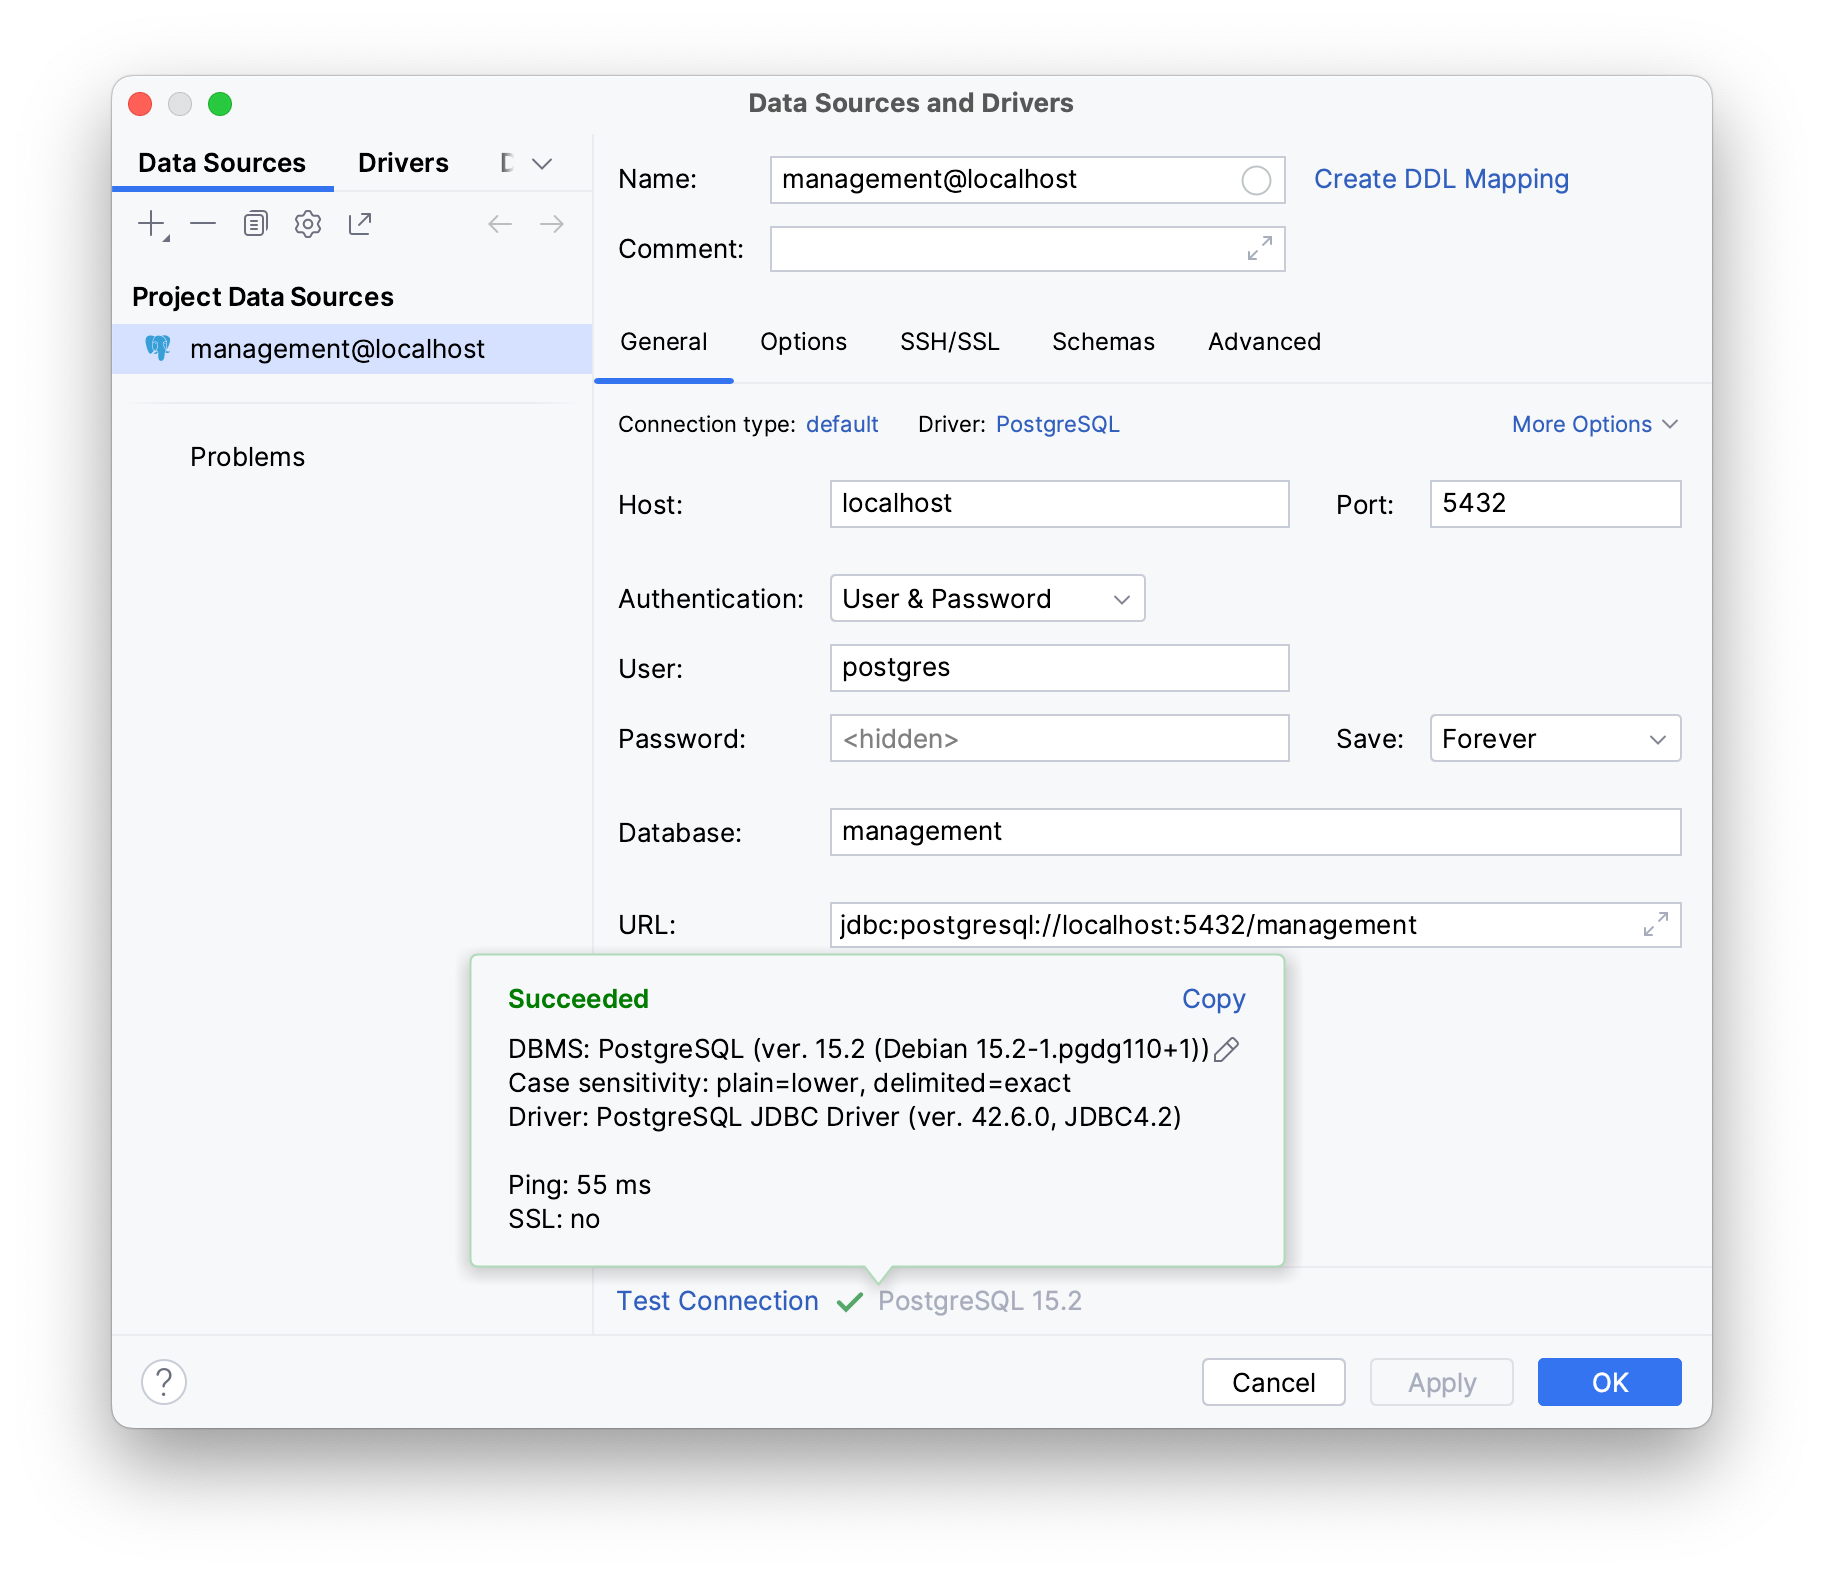
To check if your database works as intended, click on Test Connection; it should display Succeeded if your database is properly configured and actively listening on its assigned port.
Creating Entities
The blog application you will build consists of two tables:
user: table for storing blog user informationpost: table for storing blog posts
The relationship between post and user is OneToMany, meaning that multiple posts can be associated with a single user.
Assuming your database has a user table, JPA Buddy can help you generate it based on your database:
- Open the project view Command/Alt + 1
- Navigate to the main source files using the arrow keys
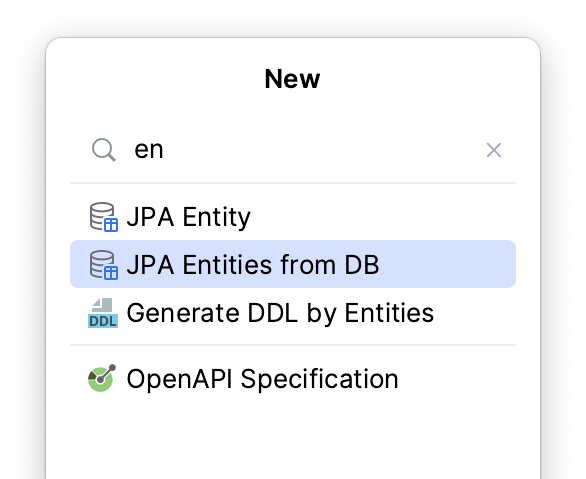
- Invoke the New window Command/Ctrl + N
- Type and choose JPA Entities from DB
Use tab to move forward to rename the package name to entities then navigate to the user table and press the Space key to select the checkbox. JPA Buddy will automatically include all the columns for you.

Press Command/Ctrl + Enter to generate a User entity in an entities package.
@Entity
@Table(name = "\"user\"")
public class User {
 @Id
 @GeneratedValue(strategy = GenerationType.IDENTITY)
 @Column(name = "id", nullable = false)
 private Long id;

 @Column(name = "firstname")
 private String firstname;

 @Column(name = "lastname")
 private String lastname;

 public Long getId() {
  return id;
 }

 public void setId(Long id) {
  this.id = id;
 }

 public String getFirstname() {
  return firstname;
 }

 public void setFirstname(String firstname) {
  this.firstname = firstname;
 }

 public String getLastname() {
  return lastname;
 }

 public void setLastname(String lastname) {
  this.lastname = lastname;
 }
}
To create a new Post entity:
- Open the project view with Command/Alt + 1
- Navigate to the main source files using the arrow keys
- Invoke the New window through Command/Ctrl + N
- Type and choose JPA Entity
- Type the entity name
- Use the Tab button to switch to the id field
- Use arrow keys to choose
Longas your id type
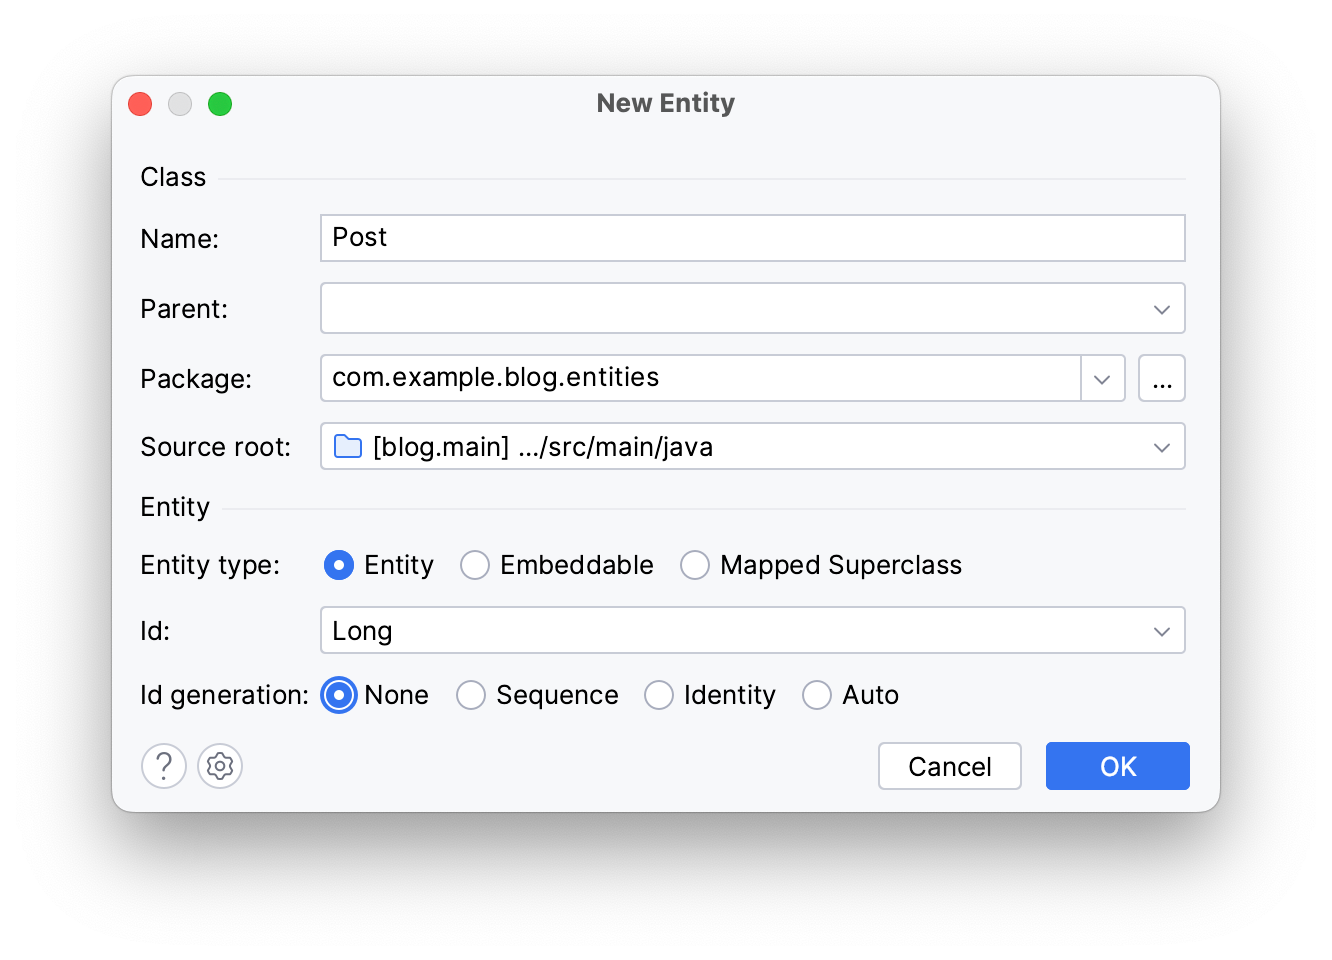
Press Enter to generate a Post entity.
To create entity attributes, call the Generate menu (Command/Ctrl + N) in Post’s source code and choose Entity Attribute....
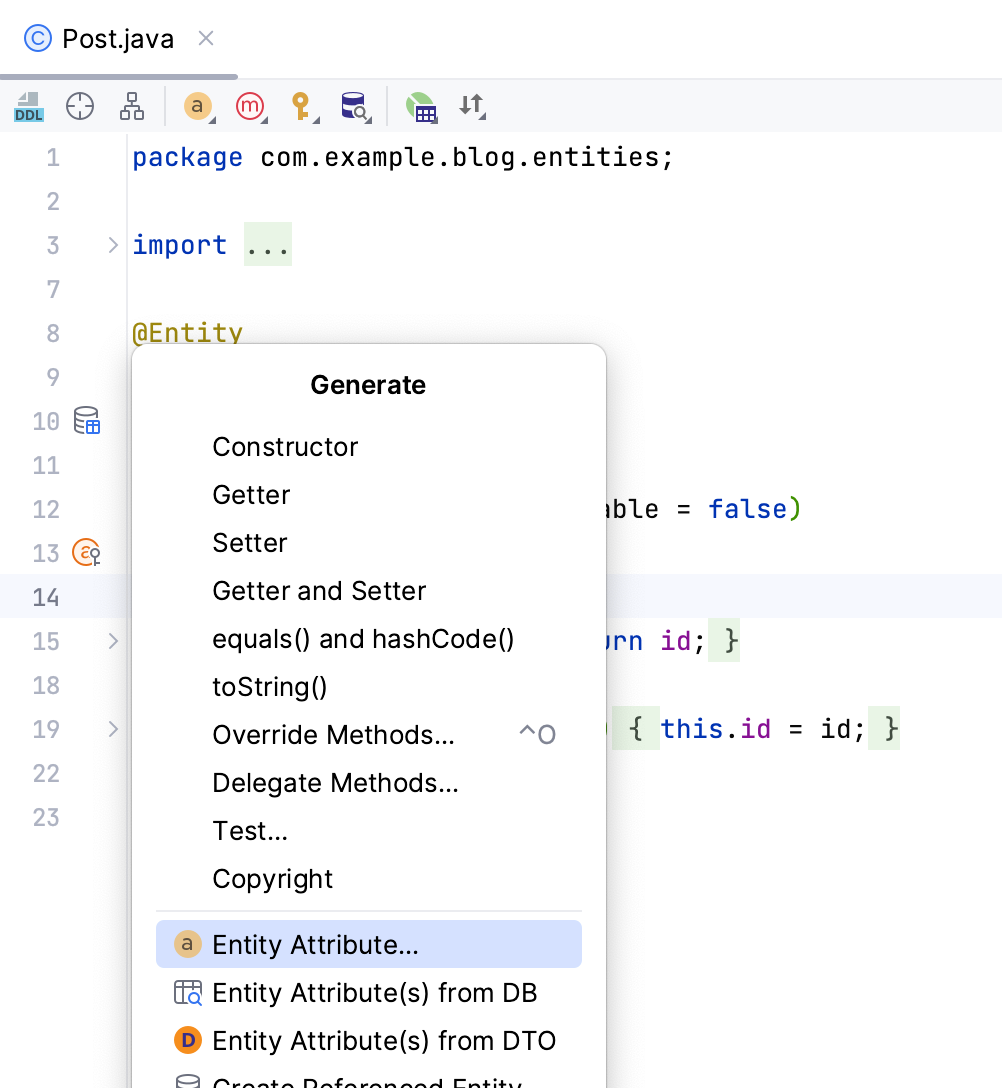
Select its type, press enter, and write the name of your attribute in the invoked window. Press Enter to generate the attribute along with its setter and getter.
@Entity
@Table(name = "post")
public class Post {
 @Id
 @Column(name = "id", nullable = false)
 private Long id;

 public Long getId() {
  return id;
 }

 public void setId(Long id) {
  this.id = id;
 }

 @Column(name = "title")
 private String title;

 public String getTitle() {
  return title;
 }

 public void setTitle(String title) {
  this.title = title;
 }
}
To create an association with the User entity, follow the same steps to select the Entity Attribute option and select User as the entity type. JPA Buddy will detect the selected class in the project and invoke the New Association Attribute. Press Space to select ALL as your Cascade type.

Press Enter to create the reference attribute in your Post entity:
@ManyToOne(cascade = CascadeType.ALL)
@JoinColumn(name = "user_id")
private User user;


public User getUser() {
 return user;
}

public void setUser(User user) {
 this.user = user;
}
To navigate through your project, you can place your cursor on the referenced class in the code and press Command/Ctrl + B, or use JPA Structure to change views in your project panel through Command + Shift + ] on Mac or ^ + Right Arrow key on Windows.
Modifying Attributes
JPA Buddy offers a JPA Inspector that helps you easily change and manage your code. In this section, you'll:
- Add a validation rule to
lastname - Create a Spring Data Repository
- Generate a derived query method
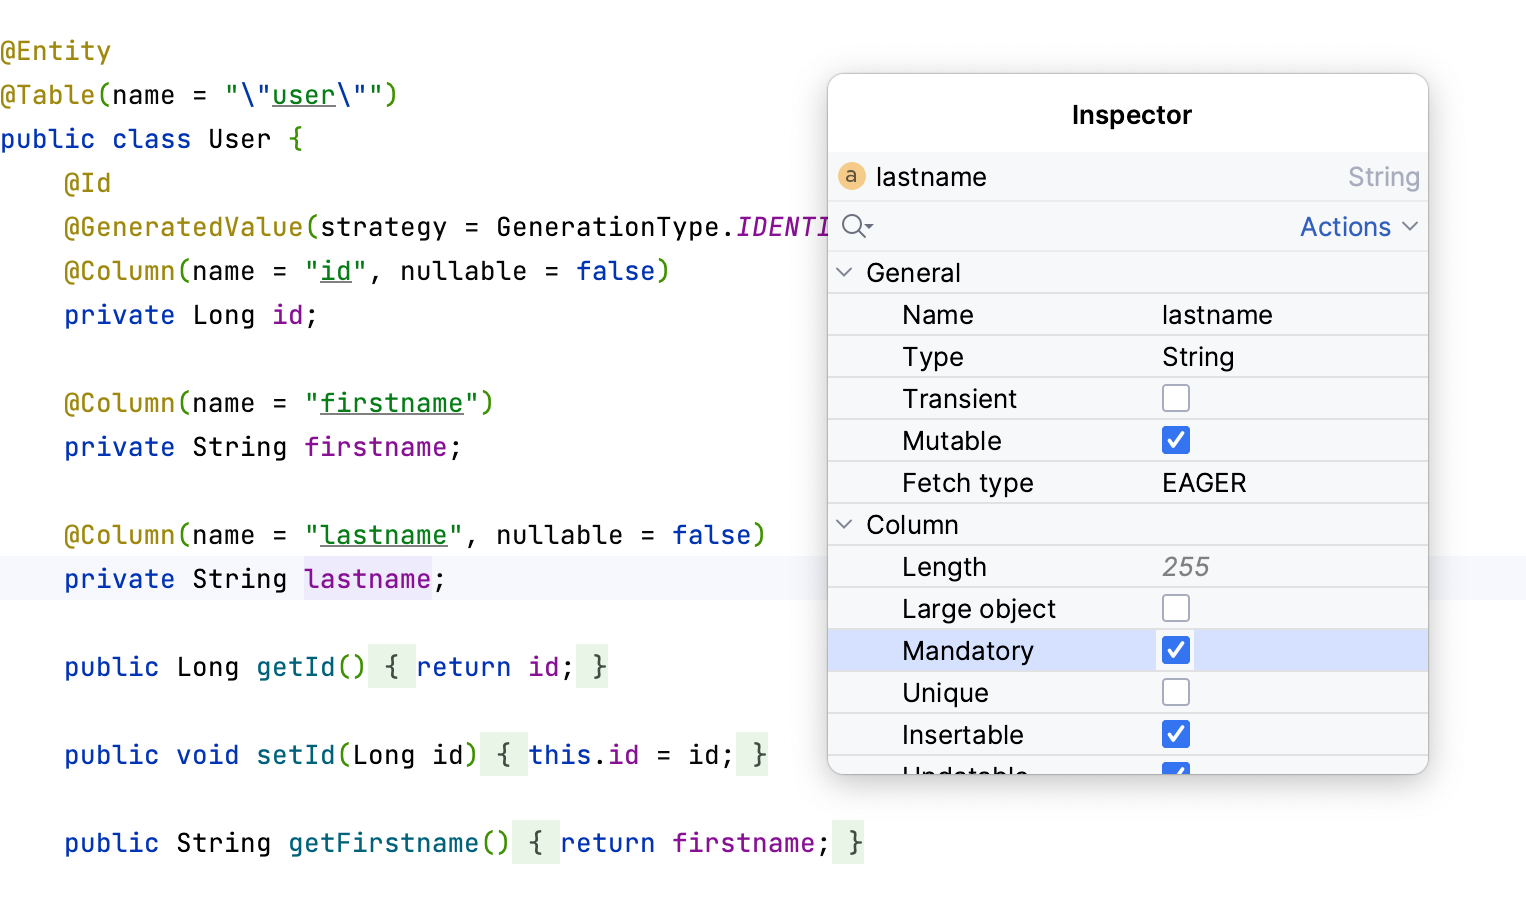
First, navigate to the User entity using Command/Alt + 1 to select the desired file, and press Enter to access the code. Let’s see how to make the lastname attribute mandatory.
To invoke the JPA Inspector menu, place your cursor on the desired attribute and call the Show Context Menu on it through Option/Alt + Enter. Next, choose Show Inspector popup.
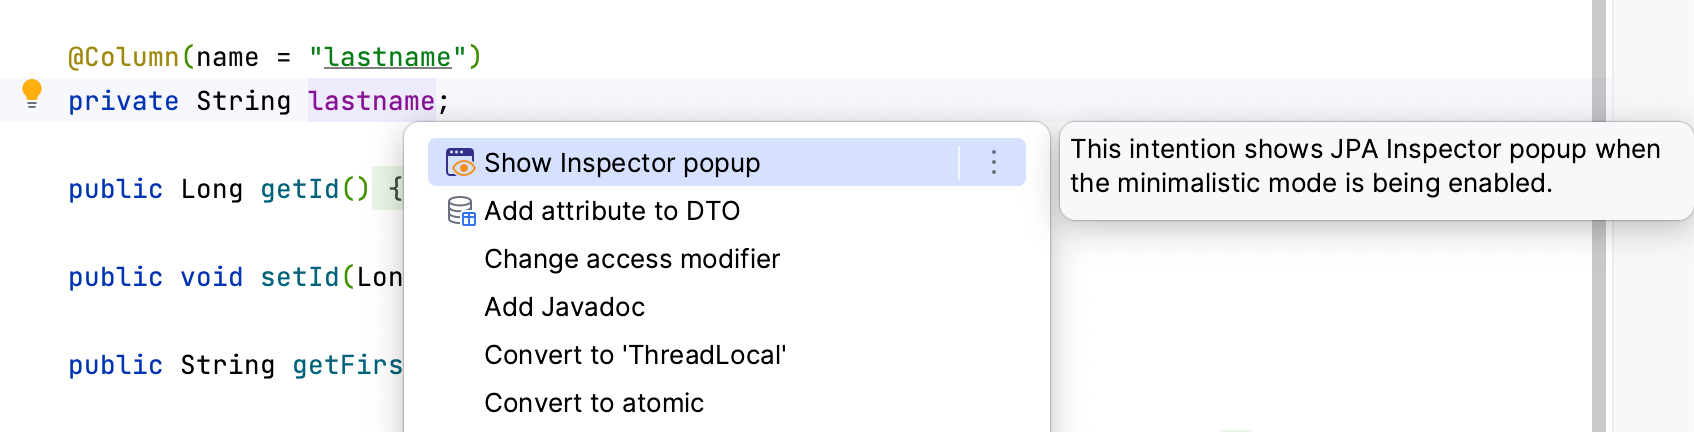
Use Arrow keys to switch between elements; press Space once you reach the Mandatory option to add a nullable = false constraint to the lastname attribute.
The inspector is also available for Spring Data JPA Repositories and Liquibase migrations. Let’s generate a User repository using JPA Buddy. Return to the project panel (Commend/Alt + 1), invoke the New menu, then type and choose Spring Data JPA Repository.
JPA Buddy names your repository, navigate to the package name and rename it to repositories.
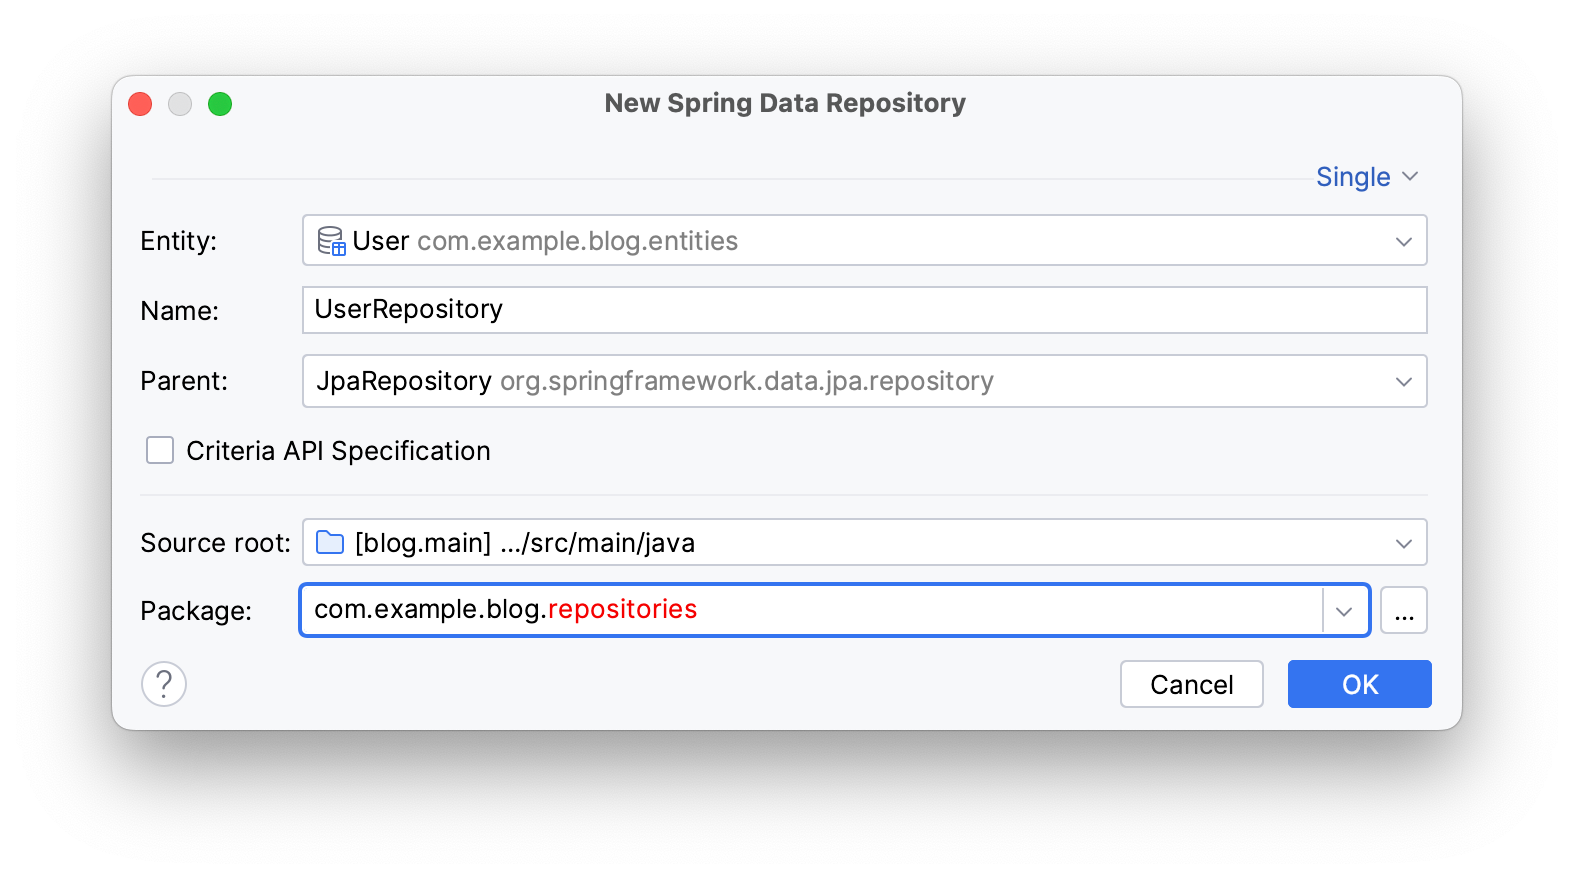
Press Enter.
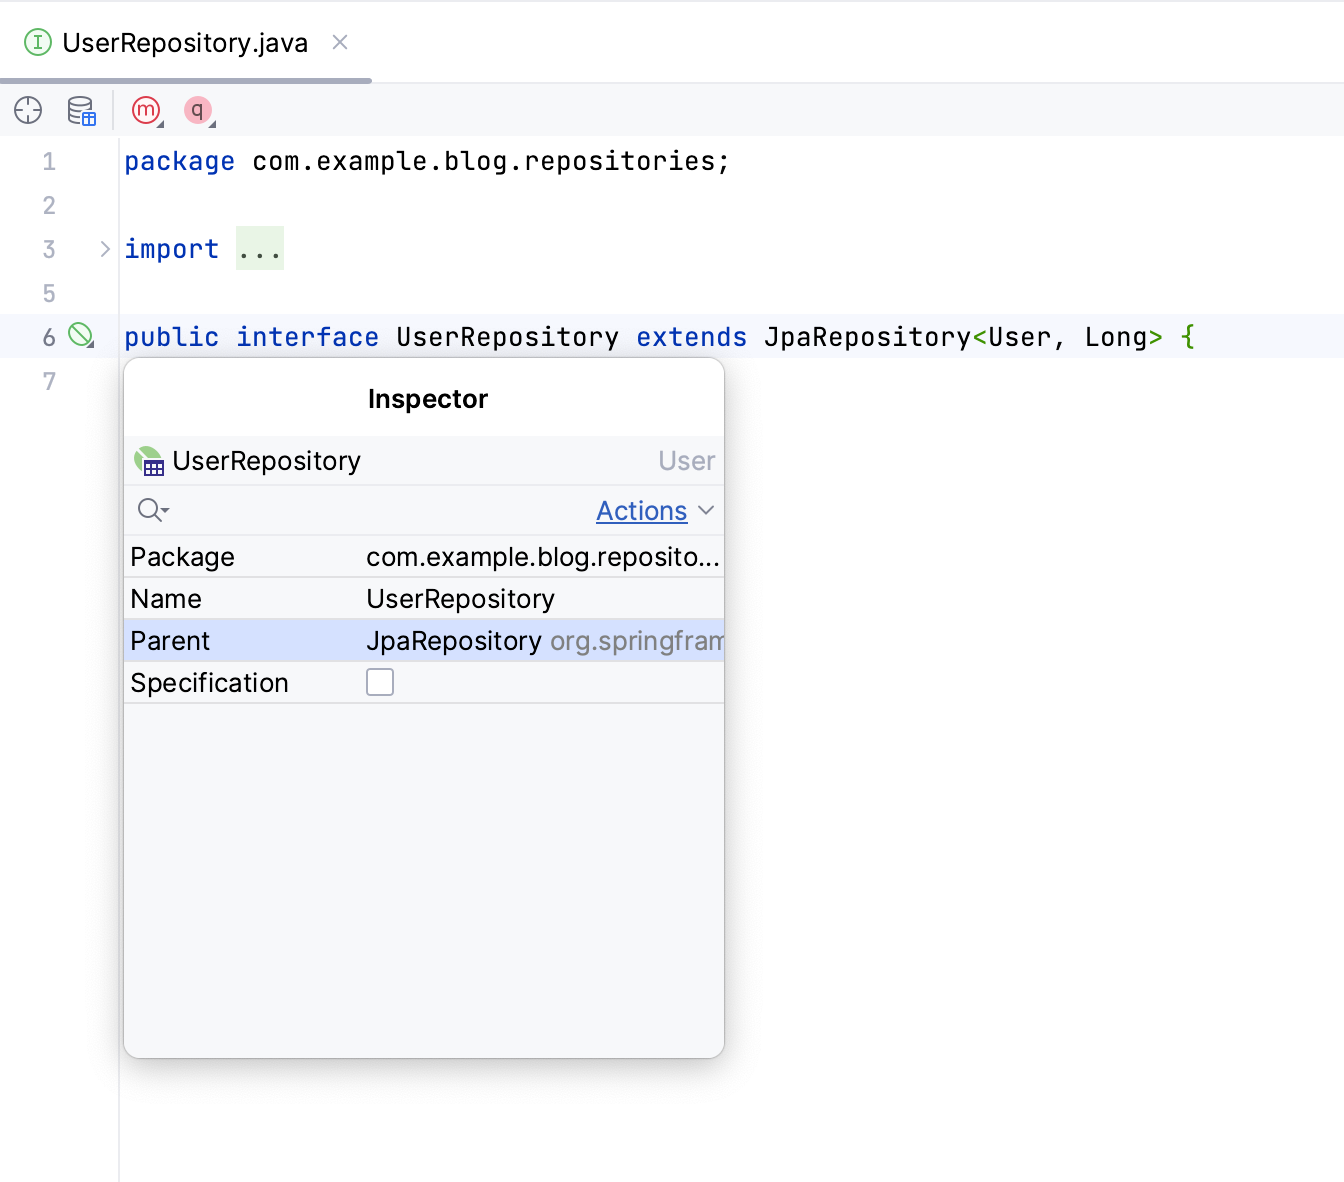
Invoke the JPA Inspector popup through Option/Alt + Enter in UserRespository source code and press Space on the Specification checkbox to extend your repository with JpaSpecificationExecutor<User>.
To create a find method that returns a collection of users based on their lastname, invoke the Generate menu (Command/Ctrl + N) in the UserRepository file and choose Repository Method... → Method Find Collection.
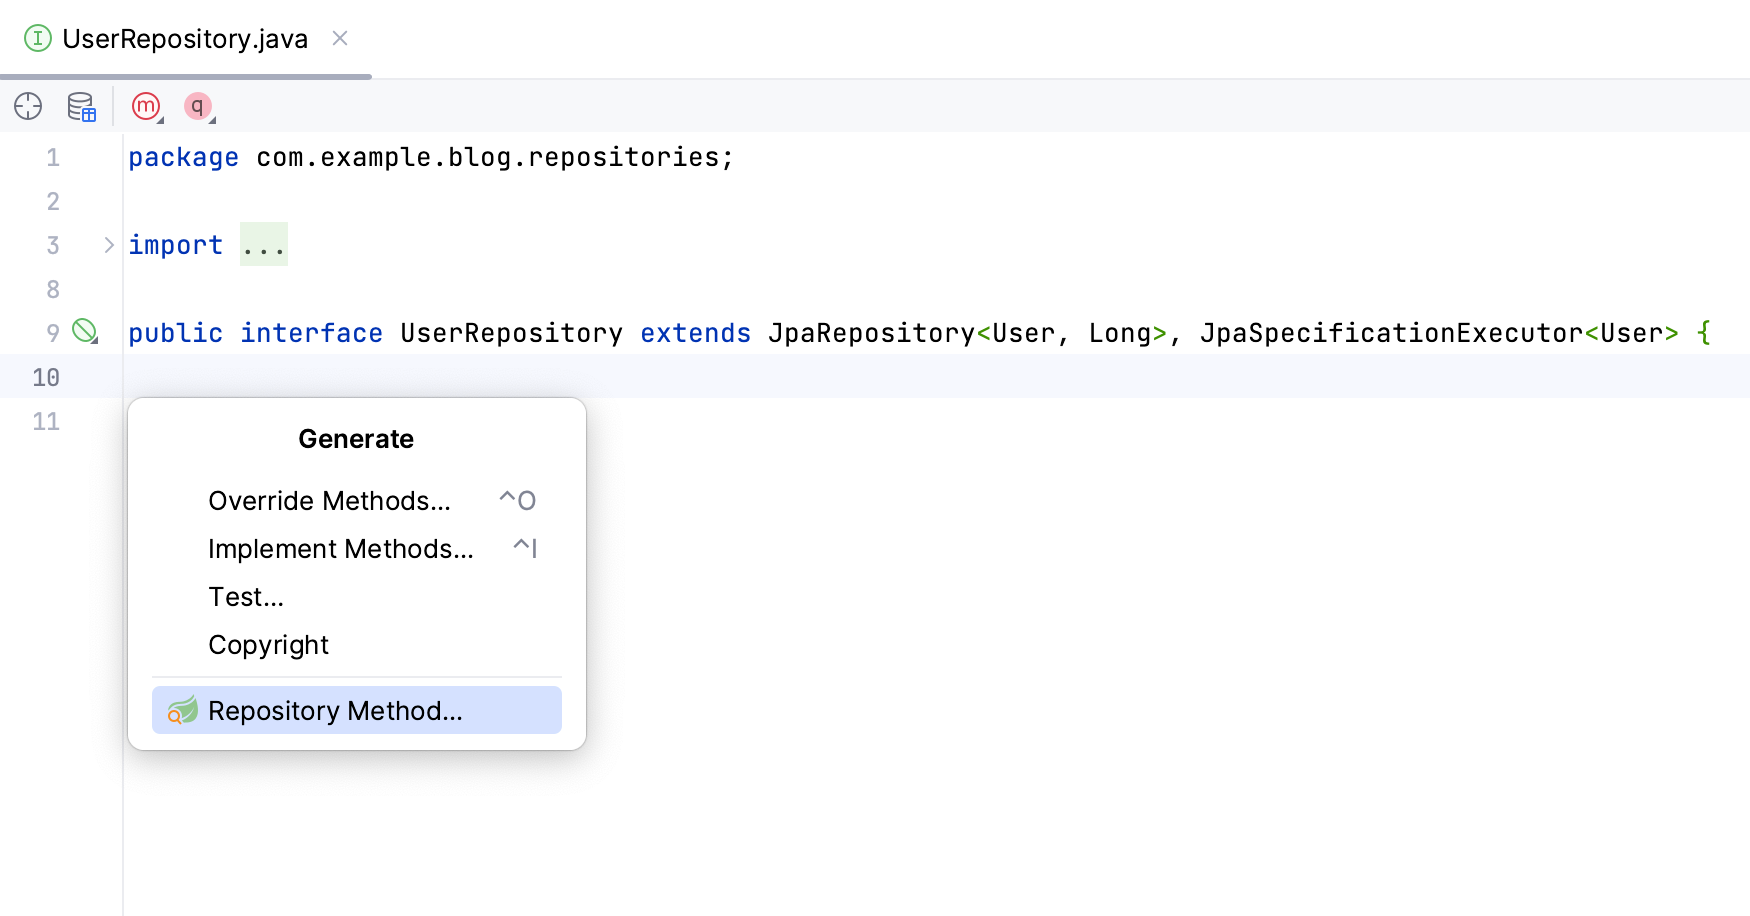
Press Command/Ctrl + N and type the attribute to search by, in this case lastname.
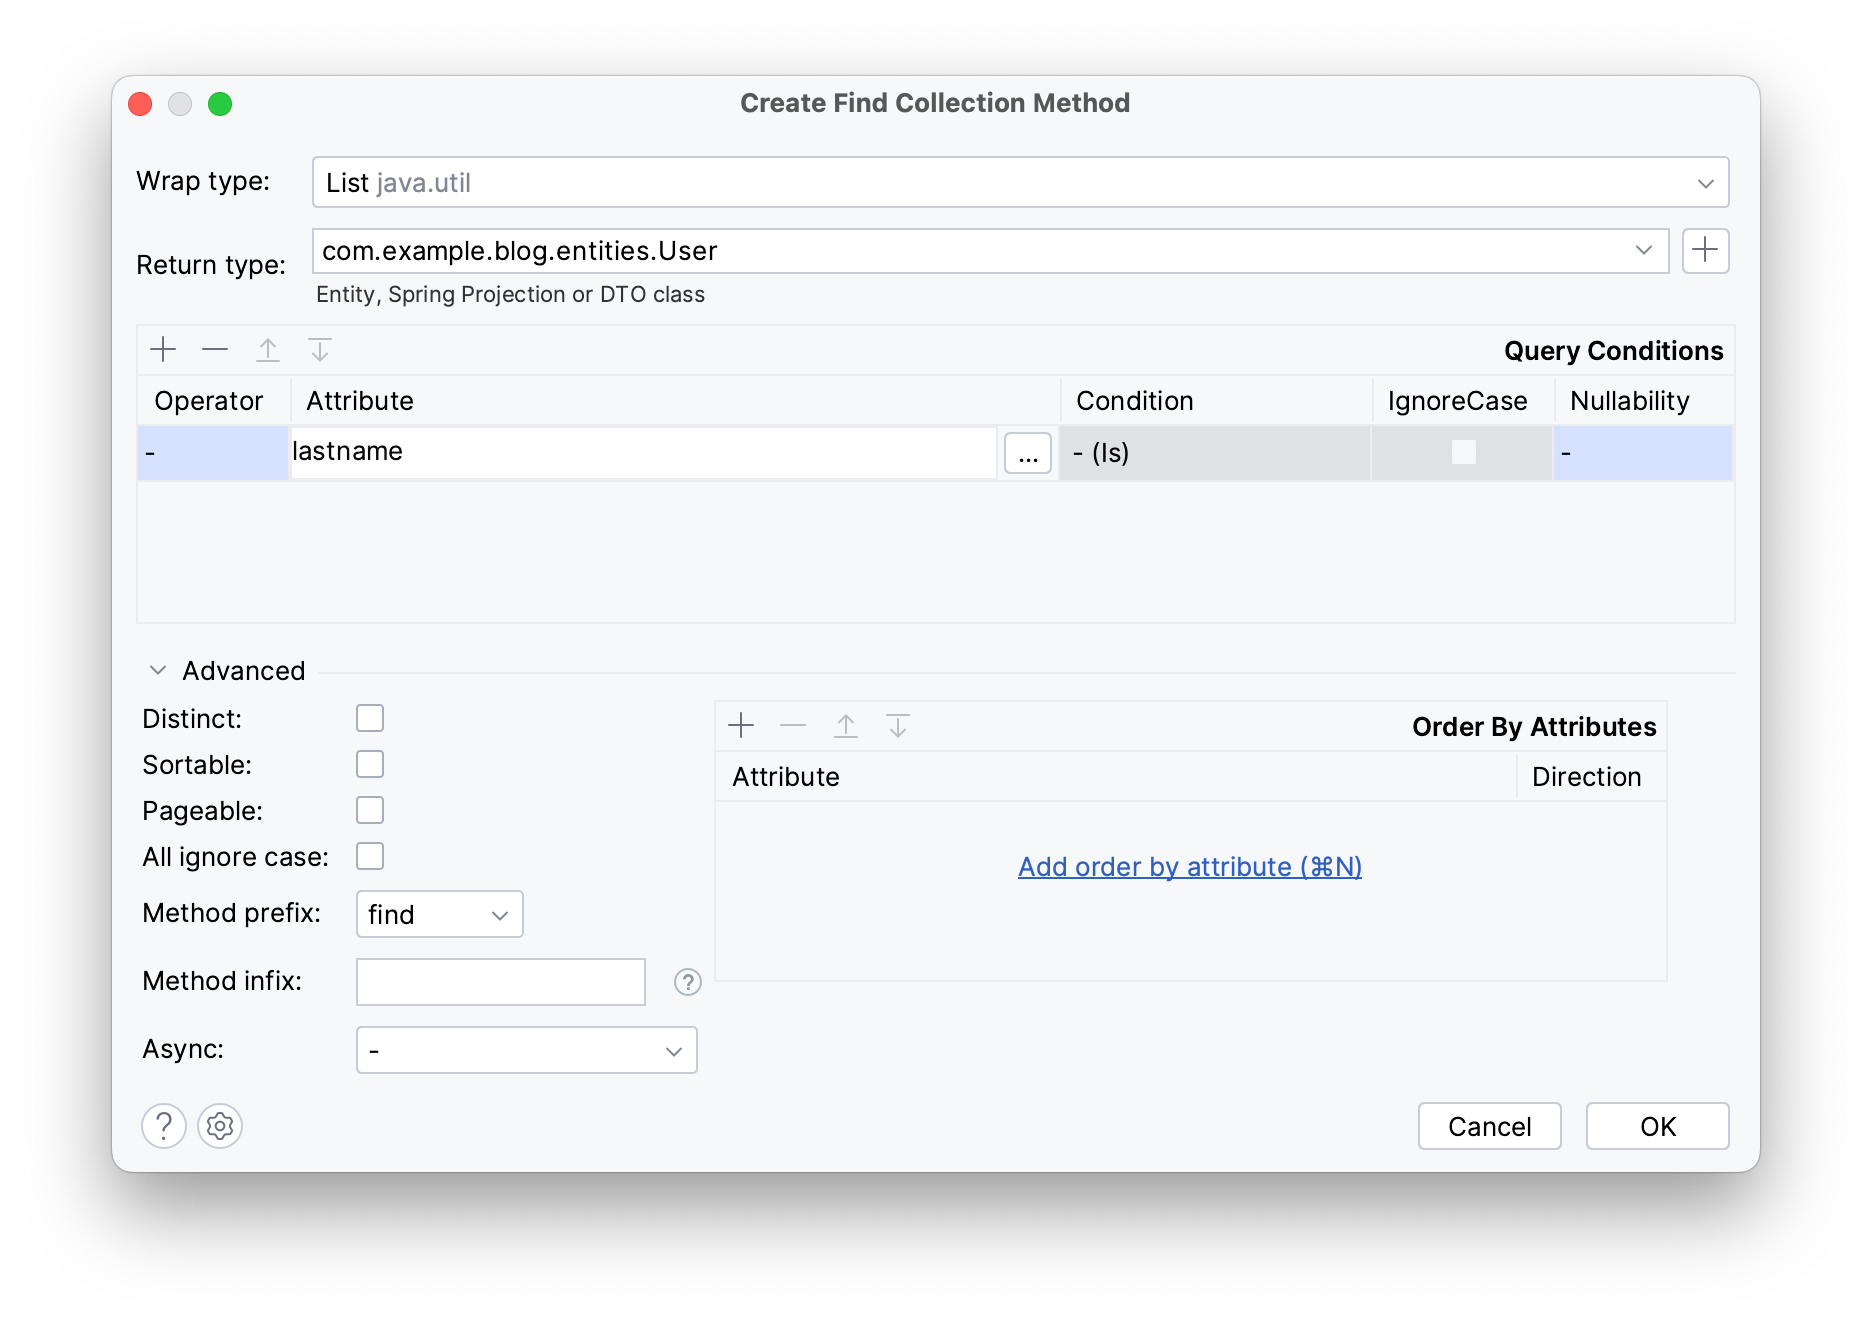
Press Command/Ctrl + Enter to generate a method that returns a user list as in the code below:
public interface UserRepository extends JpaRepository<User, Long>, JpaSpecificationExecutor<User> {
 List<User> findByLastname(String lastname);
}
Writing a Controller with Codding Assistance
JPA Buddy comes with many coding assistance features for JPA entities, Spring Data repositories, DTOs, and MapStruct mappers that make coding faster and clearer. In this section, you will:
- Generate a user DTO
- Create a mapper for your DTO
- Write a controller using Coding Assistance
Let’s create a UserController class with a GET handler to retrieve users by their lastnames. Start by creating a new controllers package and a new class through Command/Alt + 1 (Project Panel) → Command/Ctrl + N → choose Java Class and name it UserController.
Annotate your class with the @RestController and @RequestMapping annotations to turn it into a REST controller.
@RestController
@RequestMapping ("/api/v1")
public class UserController {
}
Define a new method inside your controller called findByLastname which returns a UserDto list. Annotate it with @GetMapping("/users/{lastname}") to indicate that this method will respond to GET requests at the /users/{name} endpoint.
Since the project name will be passed via the URL, annotate the lastname parameter with @PathVariable, as in the code below.
@GetMapping("/users/{lastname}")
public List<UserDto> findByName(@PathVariable String lastname){
}
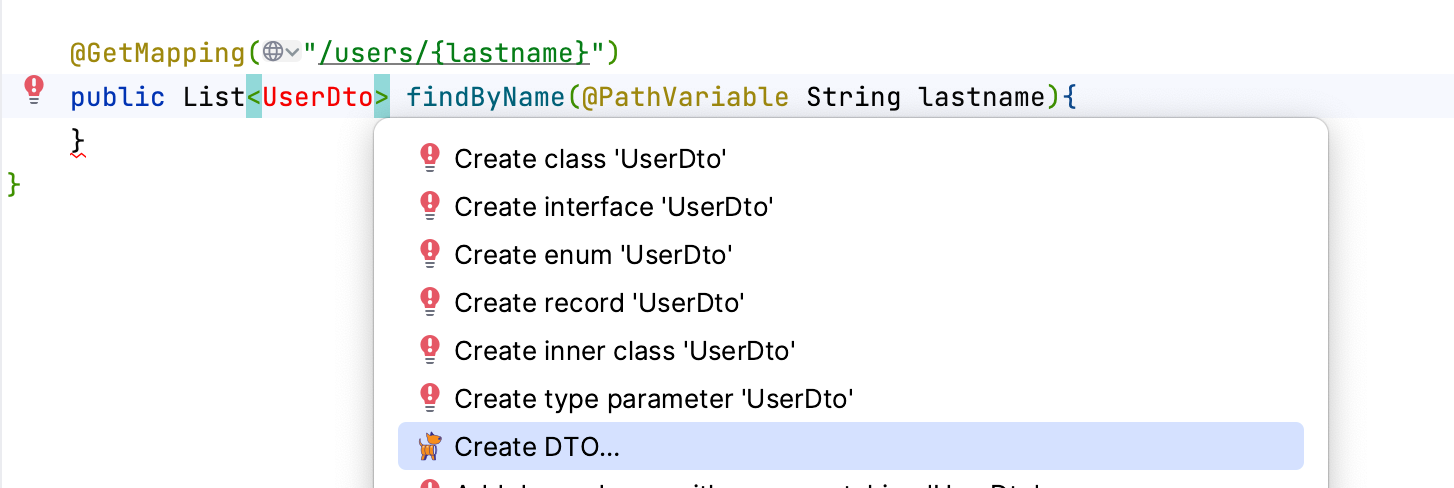
Note that you haven’t yet created a UserDto, with JPA Buddy you can create it without switching context. Invoke Open Action Menu on the undefined UserDTO object and choose Create DTO.
Rename the DTO’s package to dtos. If you’ve included the needed dependencies in your project, you can create a mapper in the same window as your DTO. click on the + button to create a UserMapper interface for your DTO mapper and rename its package to mappers. Finally, navigate to the attribute window and press Space on id and lastname to include them in the DTO.
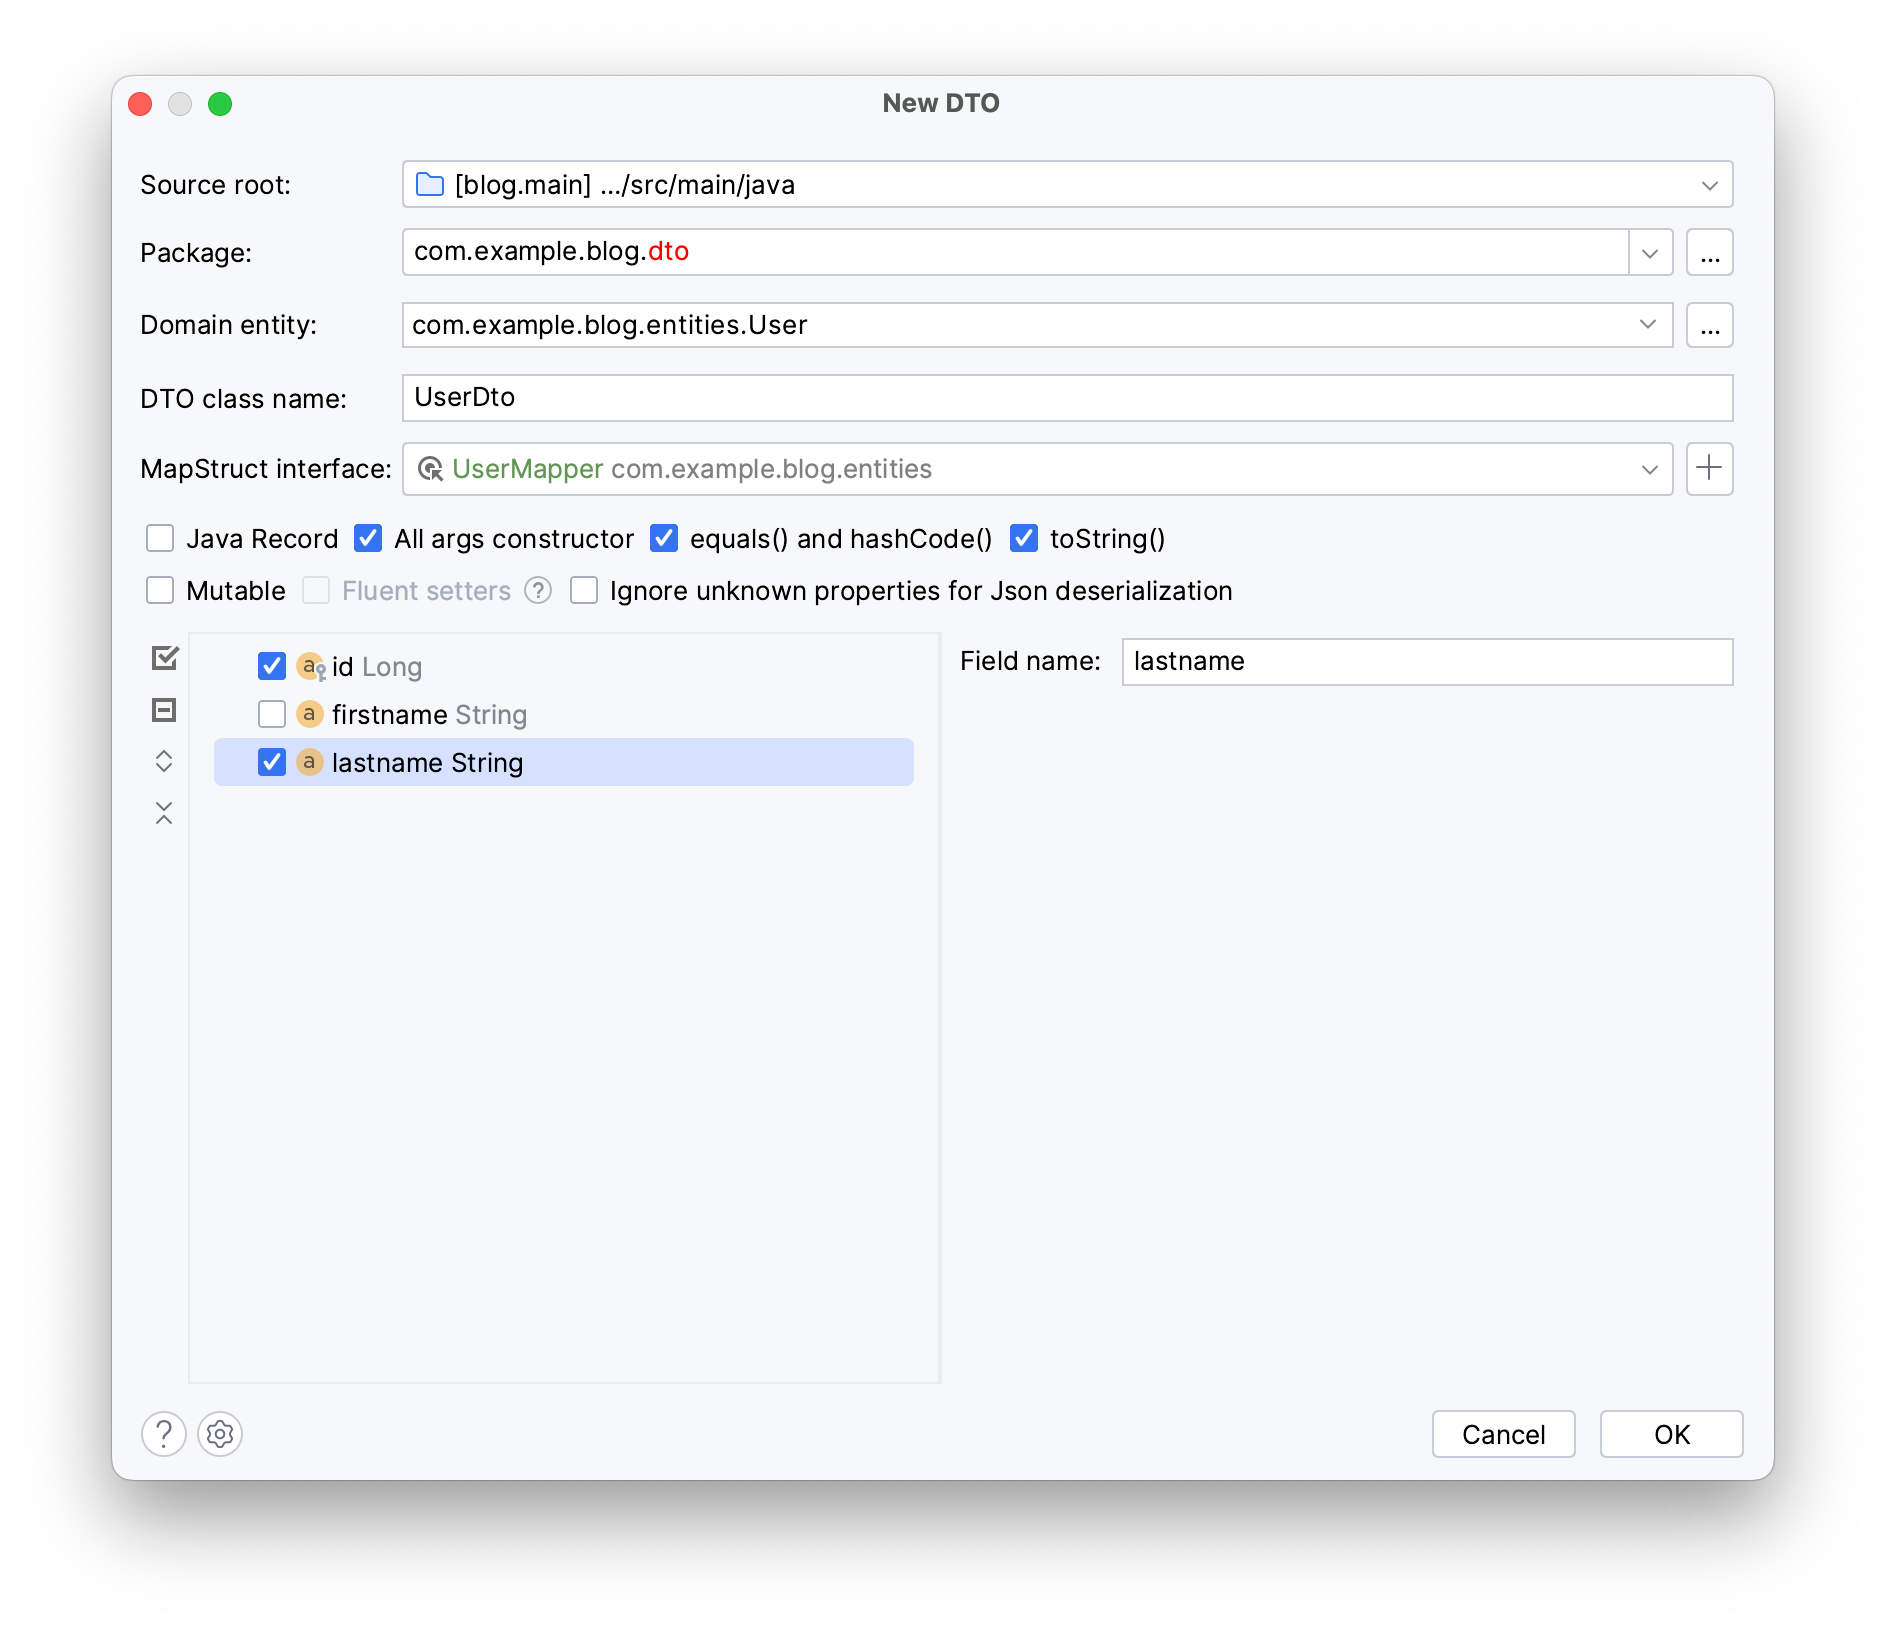
Press Command/Alt + Enter. These steps create a UserDto along with its constructor, getters and equals and hashcode methods:
public class UserDto implements Serializable {
 private final Long id;
 private final String lastname;

 public UserDto(Long id, String lastname) {
  this.id = id;
  this.lastname = lastname;
 }

 public Long getId() {
  return id;
 }

 public String getLastname() {
  return lastname;
 }

 @Override
 public boolean equals(Object o) {
  if (this == o) return true;
  if (o == null || getClass() != o.getClass()) return false;
  UserDto entity = (UserDto) o;
  return Objects.equals(this.id, entity.id) &&
  Objects.equals(this.lastname, entity.lastname);
 }

 @Override
 public int hashCode() {
  return Objects.hash(id, lastname);
 }

 @Override
 public String toString() {
  return getClass().getSimpleName() + "(" +
  "id = " + id + ", " +
  "lastname = " + lastname + ")";
 }
}
And a mapper class for the UserDto POJO:
@Mapper(unmappedTargetPolicy = ReportingPolicy.IGNORE, componentModel = MappingConstants.ComponentModel.SPRING)
public interface UserMapper {
 User toEntity(UserDto userDto);

 UserDto toDto(User user);

 @BeanMapping(nullValuePropertyMappingStrategy = NullValuePropertyMappingStrategy.IGNORE)
 User partialUpdate(UserDto userDto, @MappingTarget User user);
}
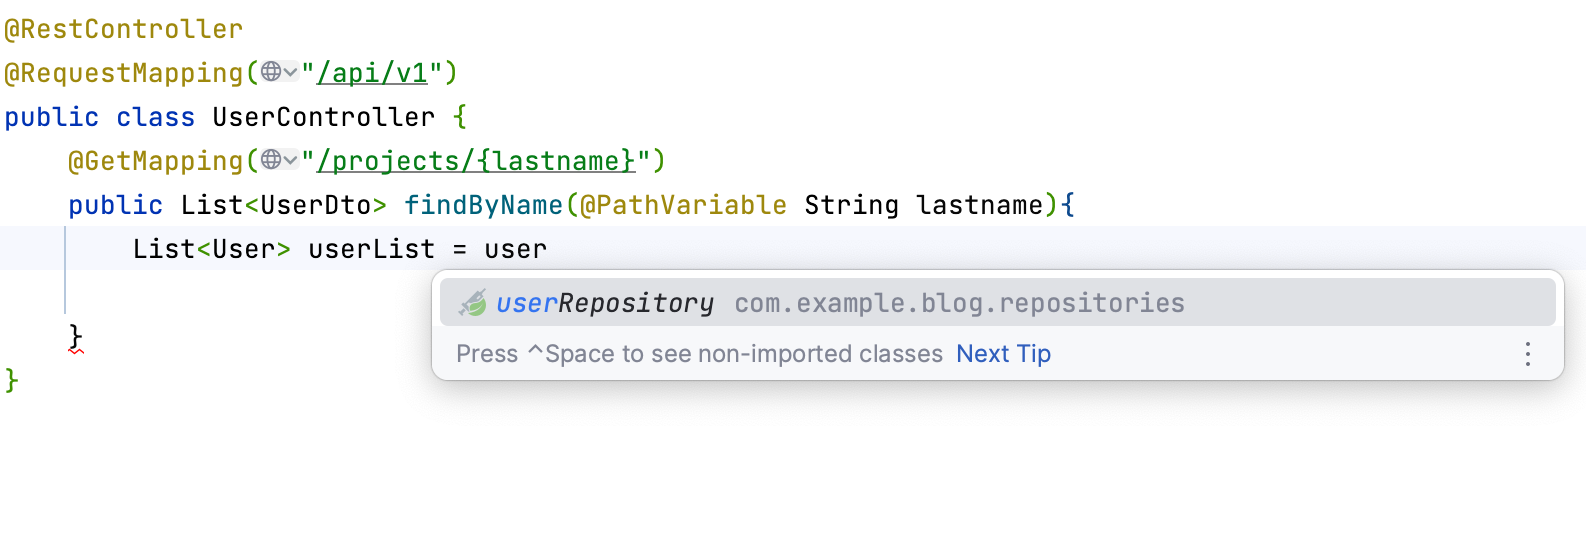
Next, define a new variable userList of type List<User> to hold the projects found by the repository’s derived method.
Note that you haven’t injected the UserRepository interface just yet; this is necessary for Spring to supply your controller with the correct implementation for data operations.
Use JPA Buddy’s Coding Assistance to do that; begin typing the repository’s name and press Enter once JPA Buddy suggests the appropriate repository.
These actions will create a constructor with the needed dependencies for your ProjectController class as in the code below:
private final UserRepository userRepository;

public UserController(UserRepository userRepository) {
 this.userRepository = userRepository;
}
Call the findByLastname method from the repository and pass the lastname variable as the parameter.
List<User> userList = userRepository.findByLastname(lastname);
The final step is to transform the userList List into a userDto list.
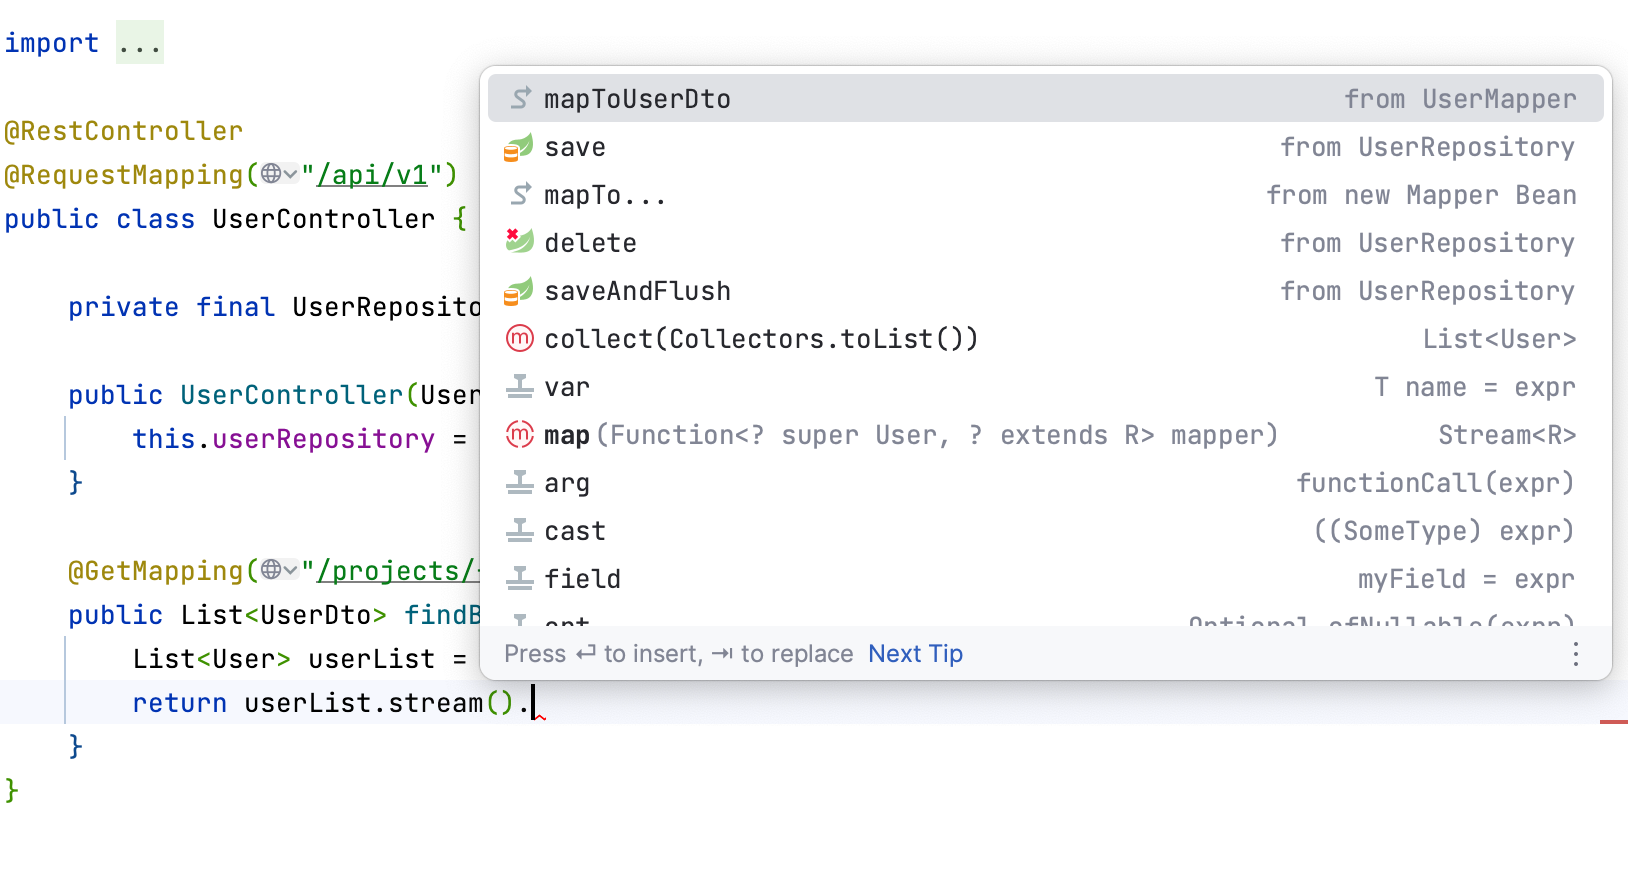
To do that, you can convert userList into a stream using .stream(), then invoke the .map() method which takes the userMapper::toDto method reference as a parameter. This will convert each User entity into its corresponding UserDto representation.
Likewise, inject the UserMapper interface using JPA Buddy’s Coding Assistance by selecting the mapToUserDto suggestion.
Here is the code that you should have as your GET method.
@GetMapping("/users/{lastname}")
public List<UserDto> findByName(@PathVariable String lastname){
 List<User> userList = userRepository.findByLastname(lastname);
 return userList.stream().map(userMapper::toDto).collect(Collectors.toList());
}
Conclusion
In this guide, you learned how to make the most of the tool's features by using the Minimalistic mode for focused coding and customizing the interface to match your own needs. You've explored how JPA Buddy streamlines coding tasks, from managing JPA entities to setting up Spring Data repositories and using them in your business logic using only shortcuts.