Writing Integration Tests in Spring Boot App with JPA using JUnit5, Testcontainers and JPA Buddy
Watch how to create tests for a Spring Boot application faster with Testcontainers and JPA Buddy. It will take a couple of minutes to set up a test database, create a schema, fill it with sample data and run the test.
Estimated Reading Time: less than 10 minutes
Introduction
Testing is a crucial part of any software development process. It ensures that your code works as expected and helps prevent bugs from making their way into the production environment. Whether you're new to testing Spring Boot applications or looking to improve your current testing process.
In this guide you will build a small Stock-management application to help you understand how to set up a testing environment using JUnit 5 and Testcontainers for a PostgreSQL database, manage your database schema and test data using JPA Buddy effectively.
Objectives
You will learn how to:
- Set up a new project
- Create entities
- Work with Spring Data JPA
- Create a service class
- Prepare a testing environment
- Set up a database container
- Implement the test
You can find the code of this application on github.
Setting up a New Project
First, you will go through a few steps to set up a new project. In this section, you will learn how to:
- Create a new project using Spring Initializr
- Load the project in IntelliJ IDEA
- Add the necessary dependencies for the project
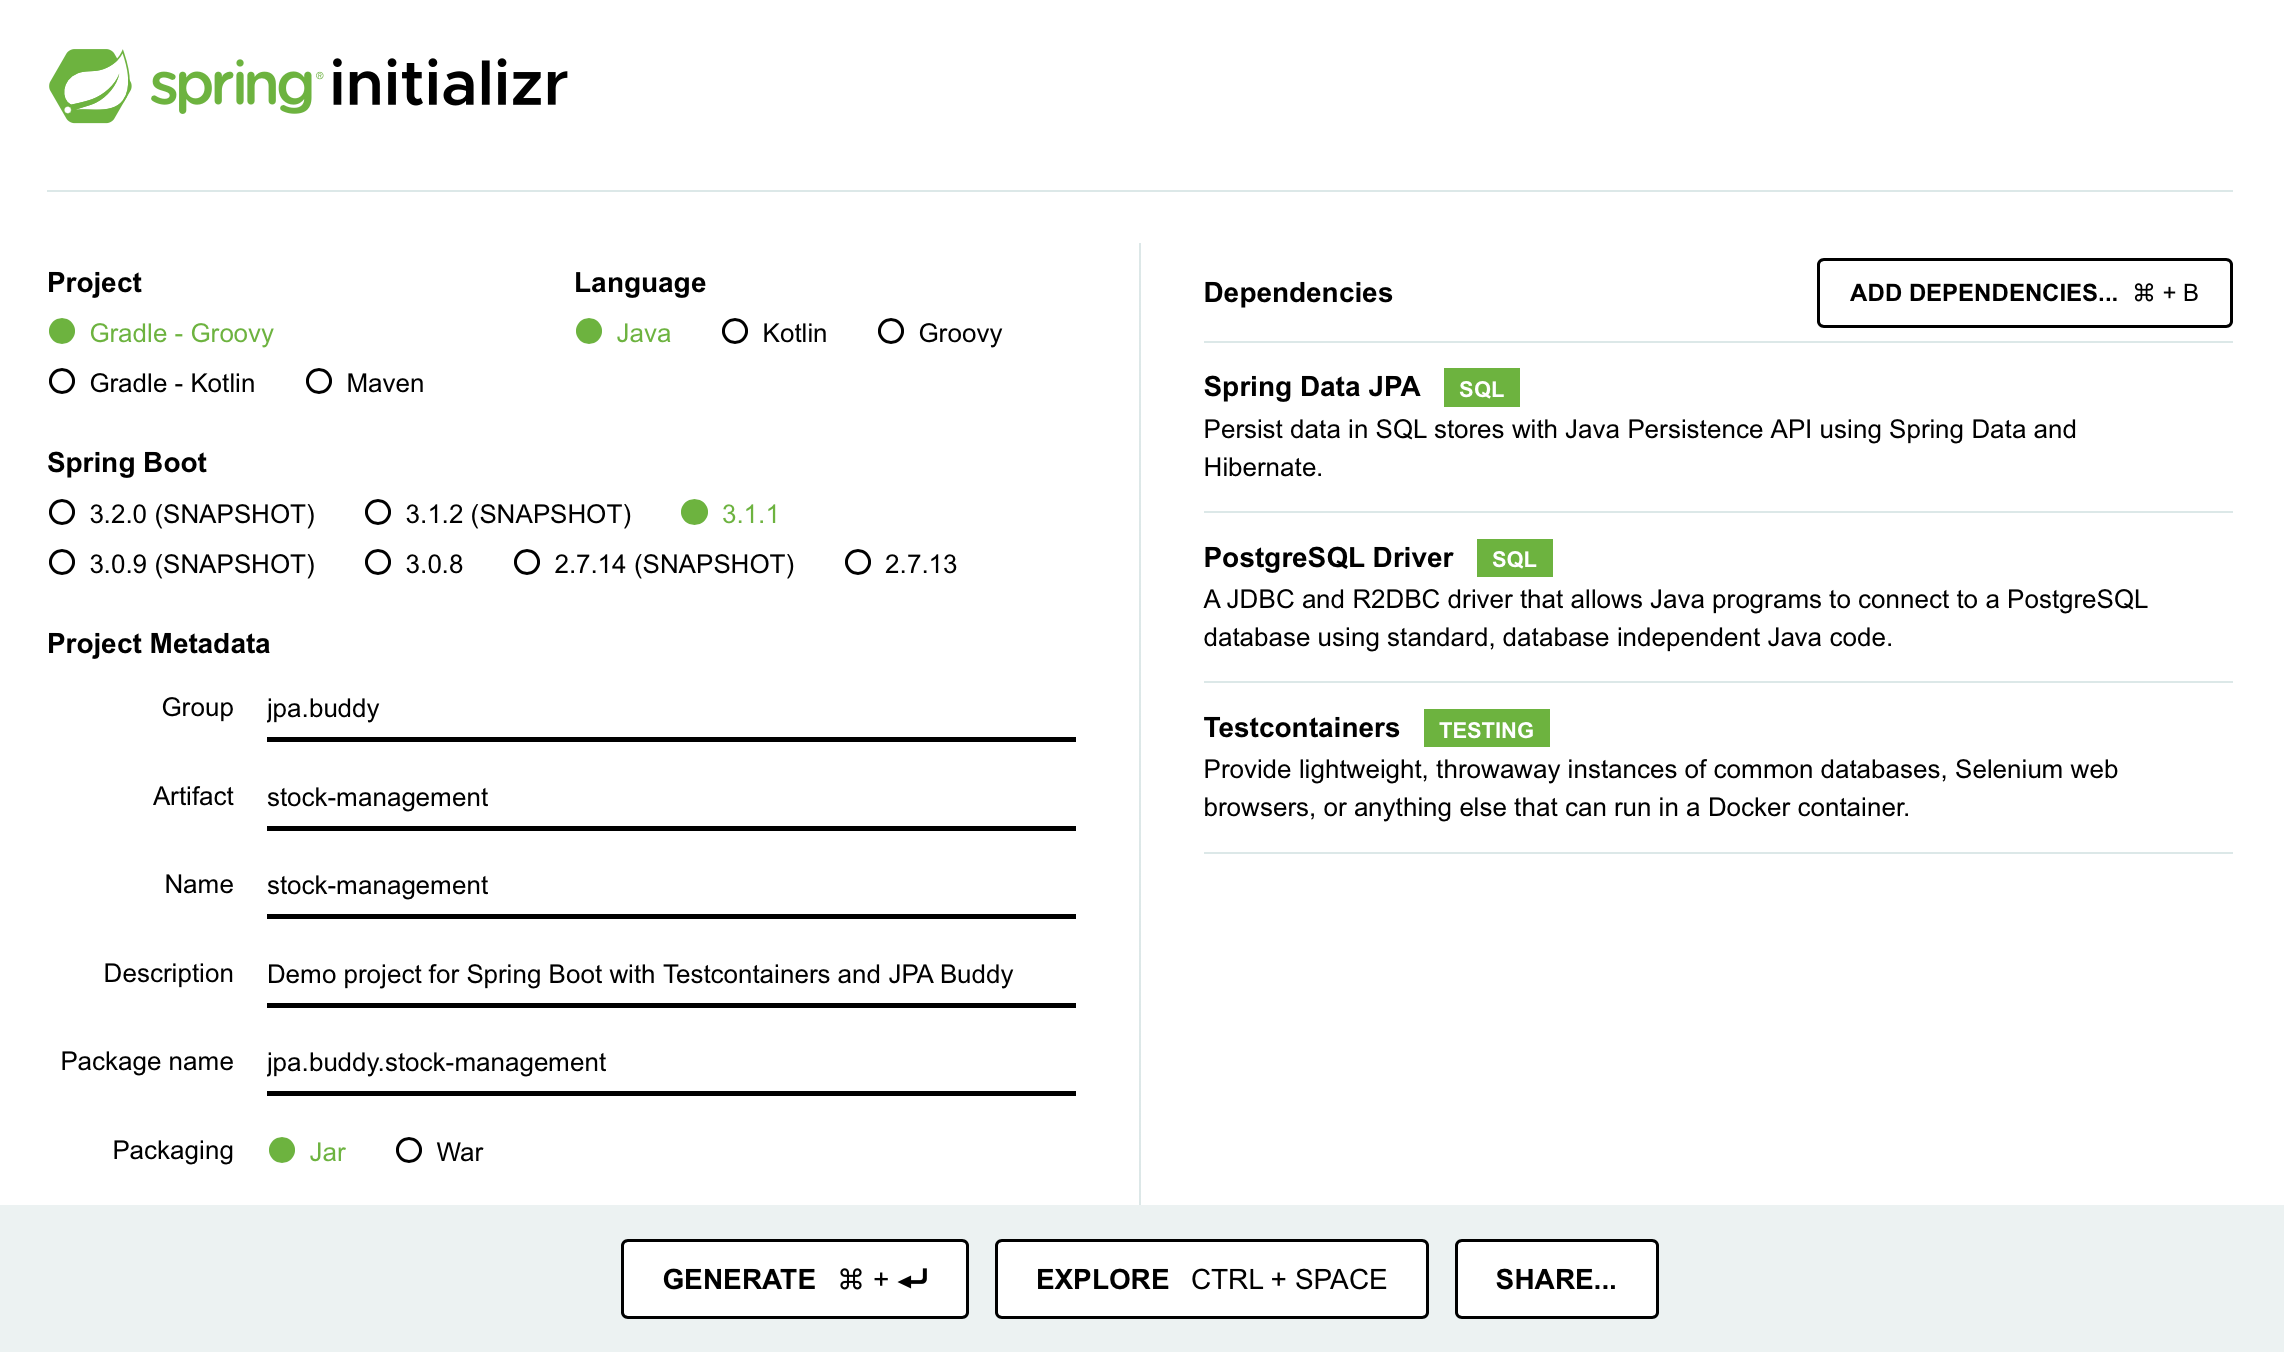
Start by creating a Spring Boot application using Spring Initializr:
- Visit Spring Initializr's Website
- Select the following settings:
- Java 17 as the programming language
- Gradle - Groovy as the build tool
- The latest stable version of Spring Boot
- The application will be packaged as a JAR file
- Add the following dependencies to your project:
- Spring Data JPA enables us to use JPA and Data Repositories
- PostgreSQL Driver provides database access
- Testcontainers provides disposable DB containers for testing
Here are the selected settings in Spring Initializr:
Next, download the project, extract the downloaded archive, and open it with IntelliJ IDEA through File → Open.
Creating Entities
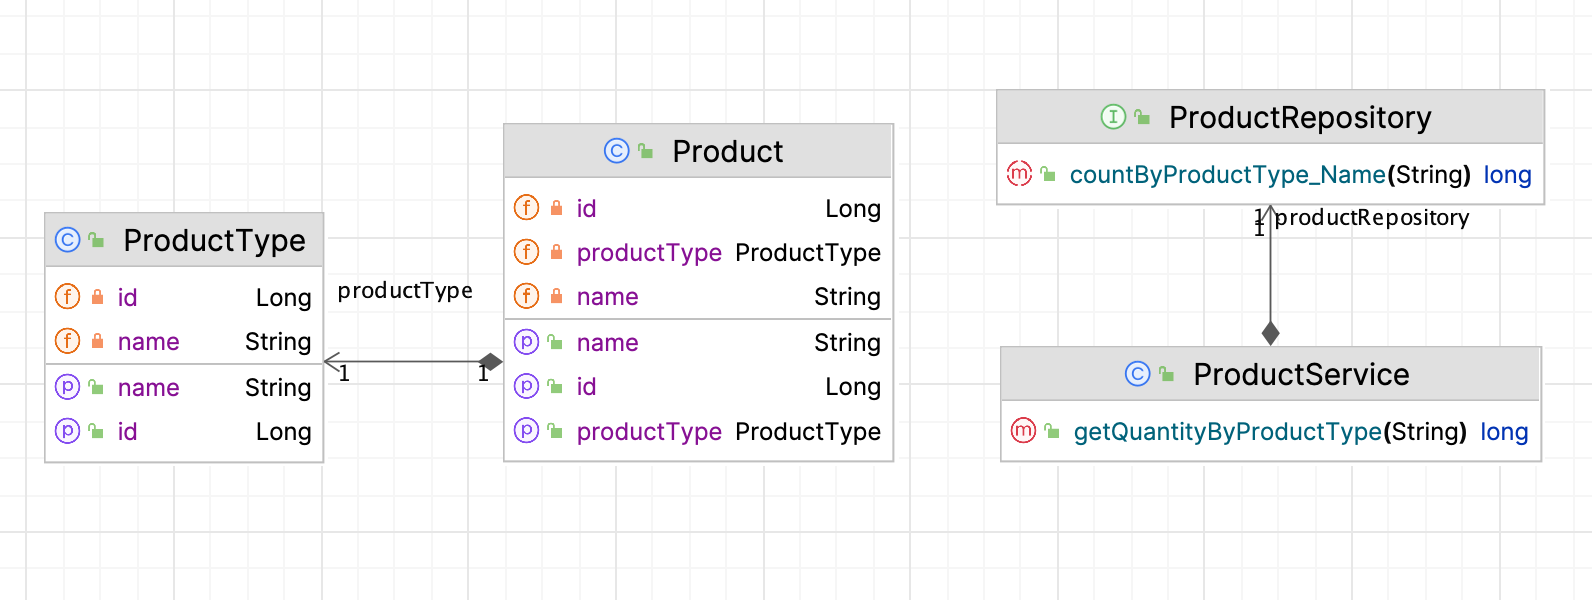
The stock-management application revolves around two core entities:
Product: represents a product within the applicationProductType: defines the type of the product
The Product entity refers to ProductType in a many-to-one relationship, meaning that multiple products can be of the same type.
The business logic of your application will be made of:
ProductRepository: this interface is responsible for retrieving your product data and its associated typeStockService: this component's method calculates the quantity of products for a given type by invokingProductRepositoryto retrieve the required data
Entities in JPA enable the application to work with data in an object-oriented manner.
To create entities from scratch, use the JPA Structure tab. Follow these steps:
- Click on + in JPA Structure
- Choose JPA Entity

There you will type your entity's name, package and ID type.

Click OK.
This will generate the following entity:
@Entity
@Table(name = "product")
public class Product {
 @Id
 @Column(name = "id", nullable = false)
 private UUID id;
 public UUID getId() {
  return id;
 }

 public void setId(UUID id) {
  this.id = id;
 }
}
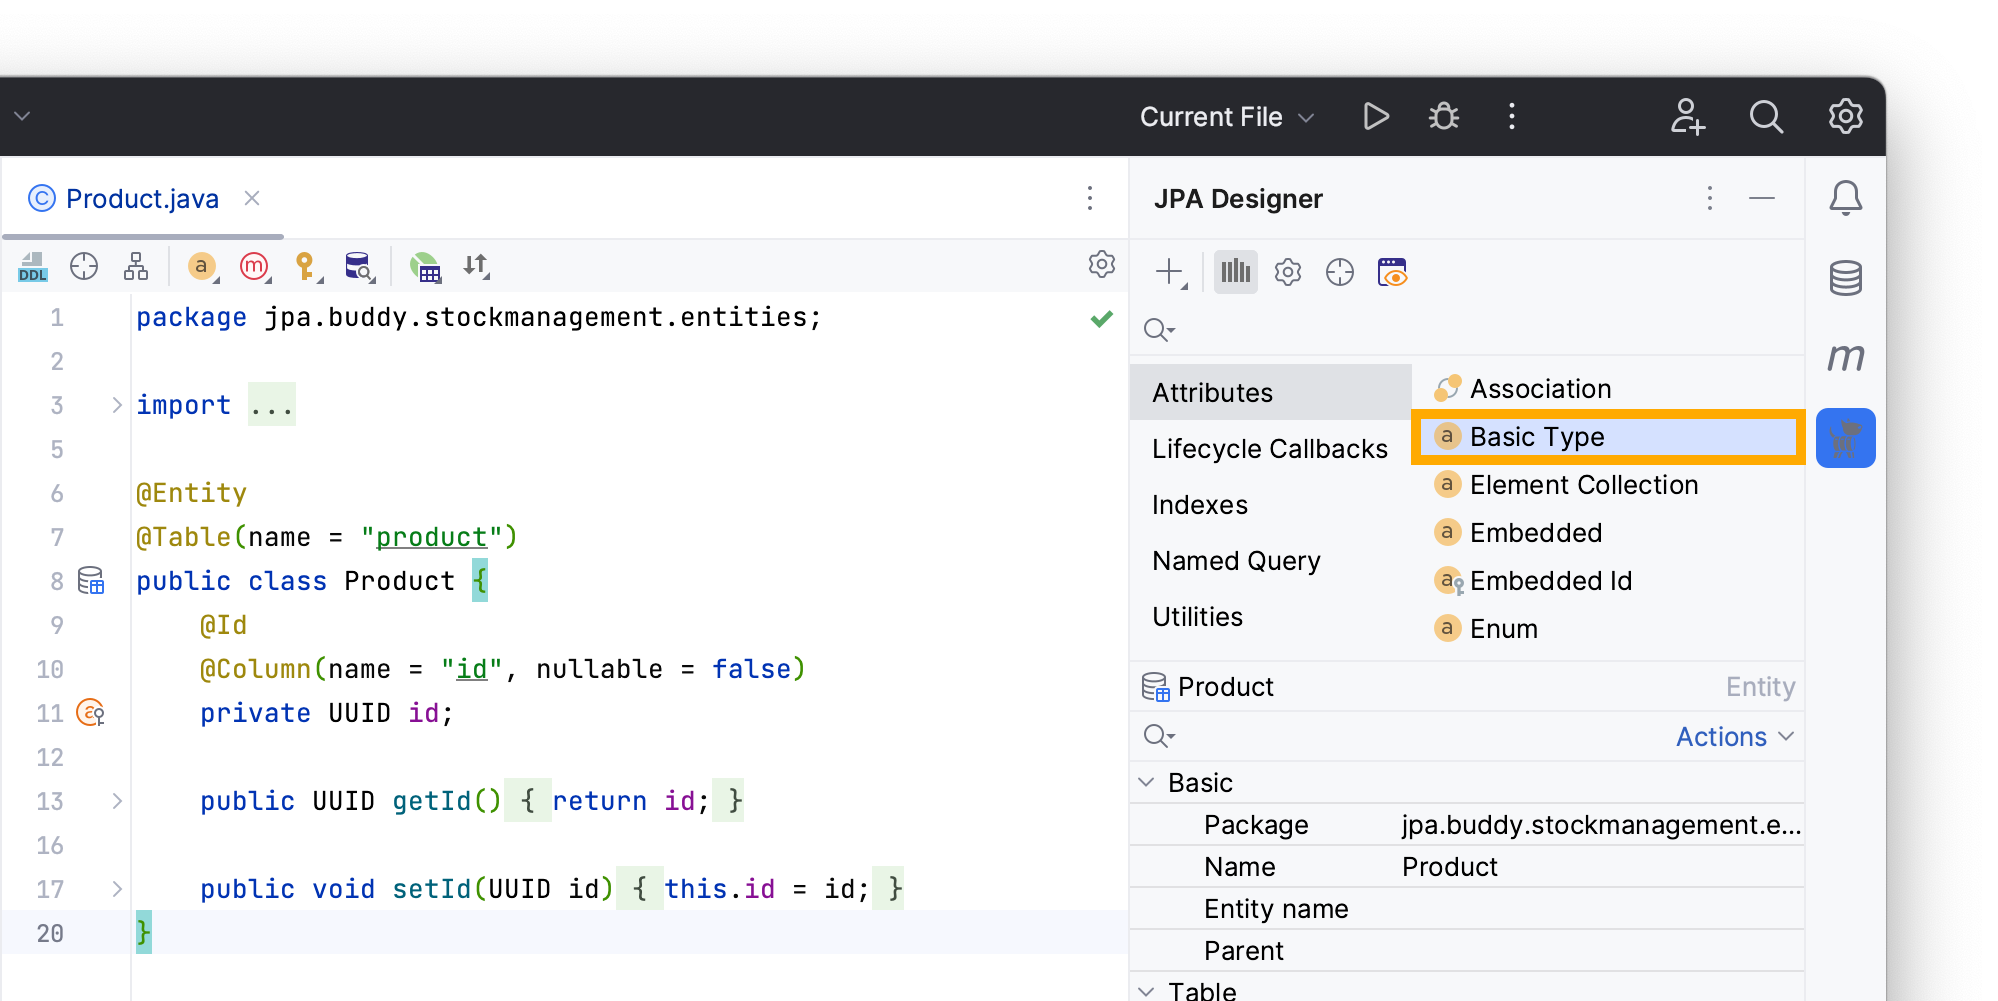
To add a name attribute to your entity:
- Open the
Productentity source code - Find the JPA Designer tab in the upper right corner
- Click on Basic Type
- Write the attribute's type
- Set the attribute's name to
name
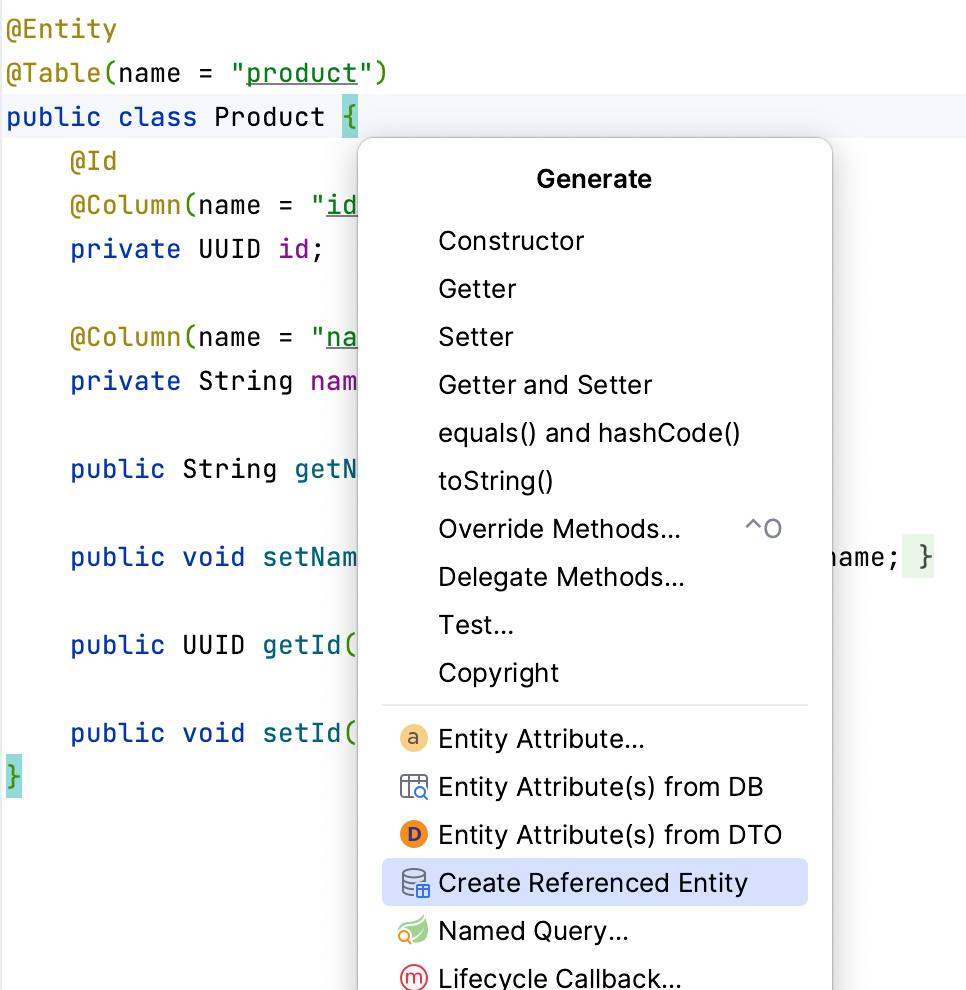
Create a ProductType entity that references the Product entity:
- Invoke the
generatemenu (Command/Ctrl + N) in yourProductentity - Select Create Referenced Entity
- Type the entity's name
- Define the type of reference – in this case, a OneToMany relationship
- The Id's type and its generation type
These actions will generate a ProductType class and a productType attribute in the Product entity as a reference, like in the code below.
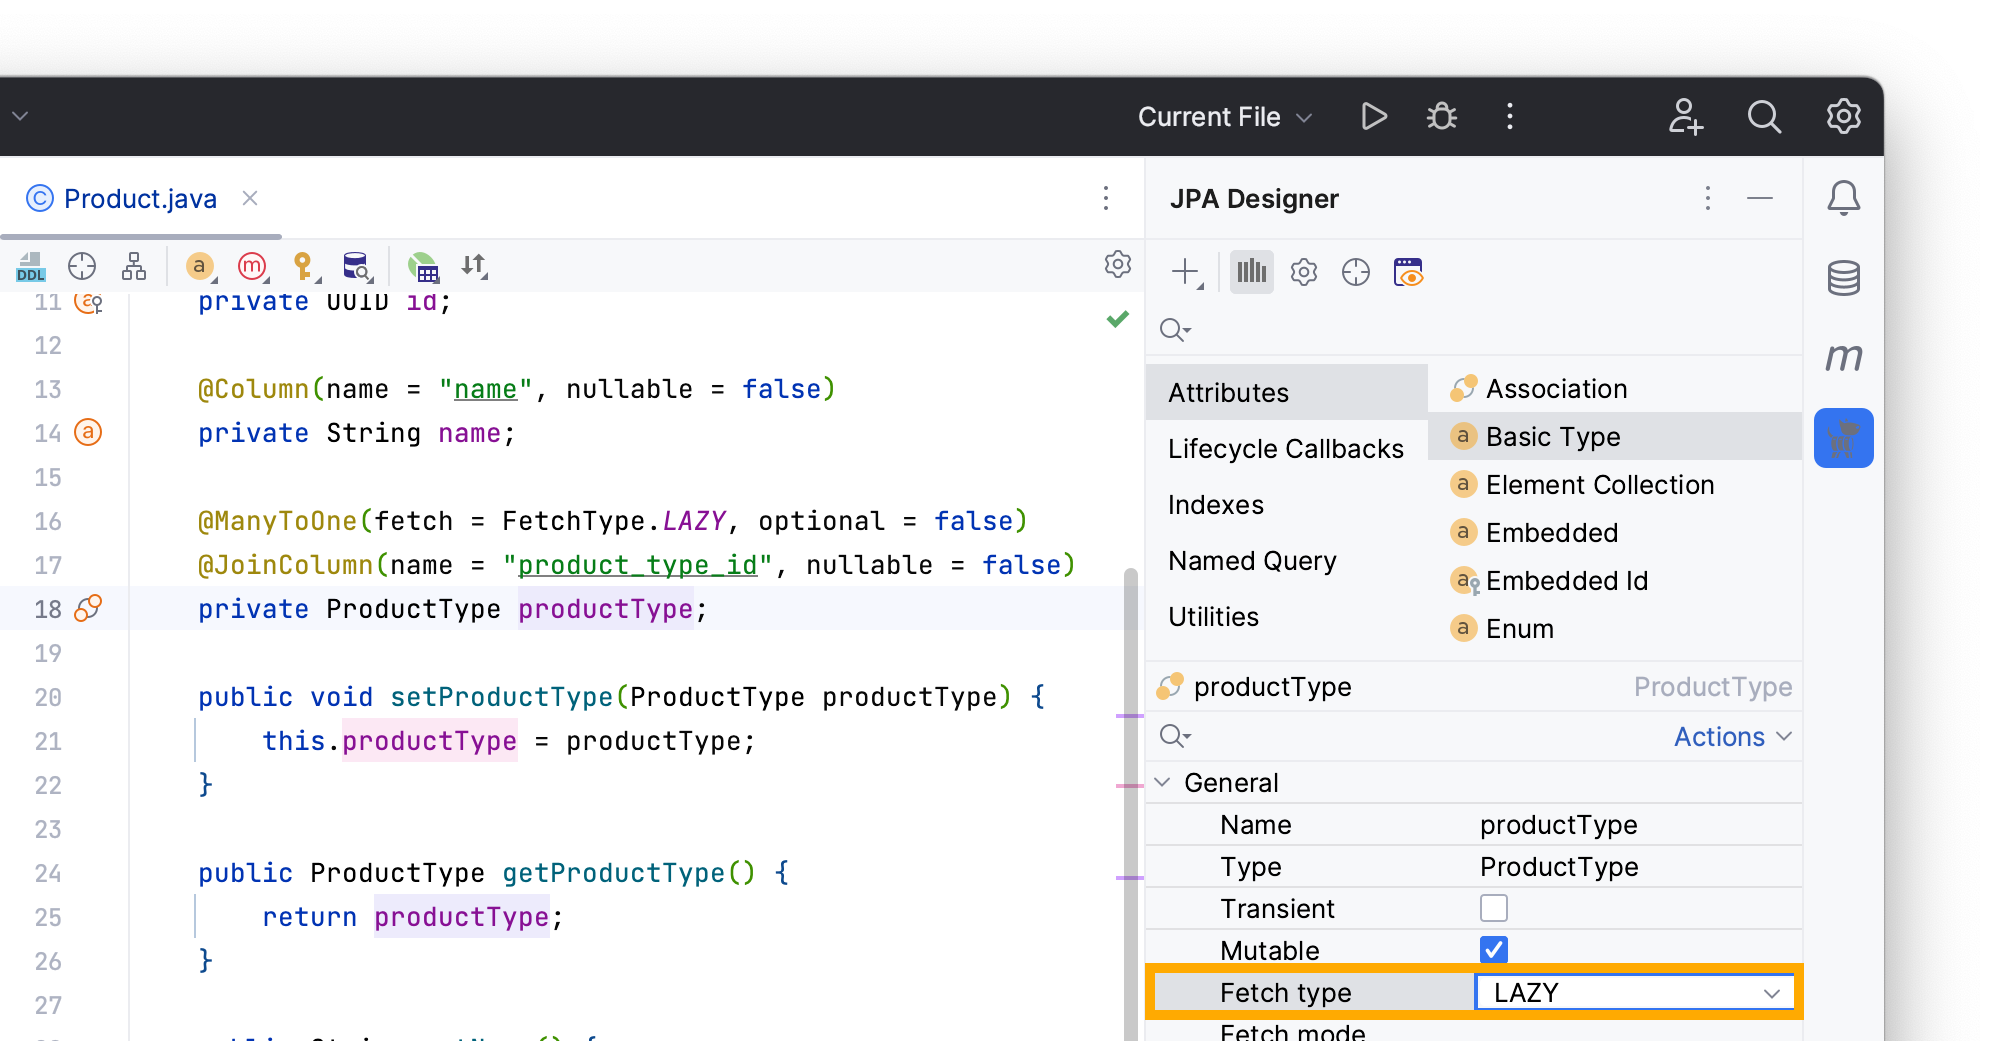
@ManyToOne(optional = false)
@JoinColumn(name = "product_type_id", nullable = false)
private ProductType productType;
To avoid loading unnecessary data, change productType’s to LAZY from the JPA Designer tab:
- Click on the
productTypeattribute - Find the JPA Designer tab
- Switch
EAGERtoLAZYin the fetch type option
Working with Spring Data JPA
JPA Buddy simplifies the creation of CRUD (Create, Read, Update, Delete) repositories for your entities. In this section, you will:
- Create a Spring Data JPA repository for the
Projectentity - Generate a
countBymethod to count products by type
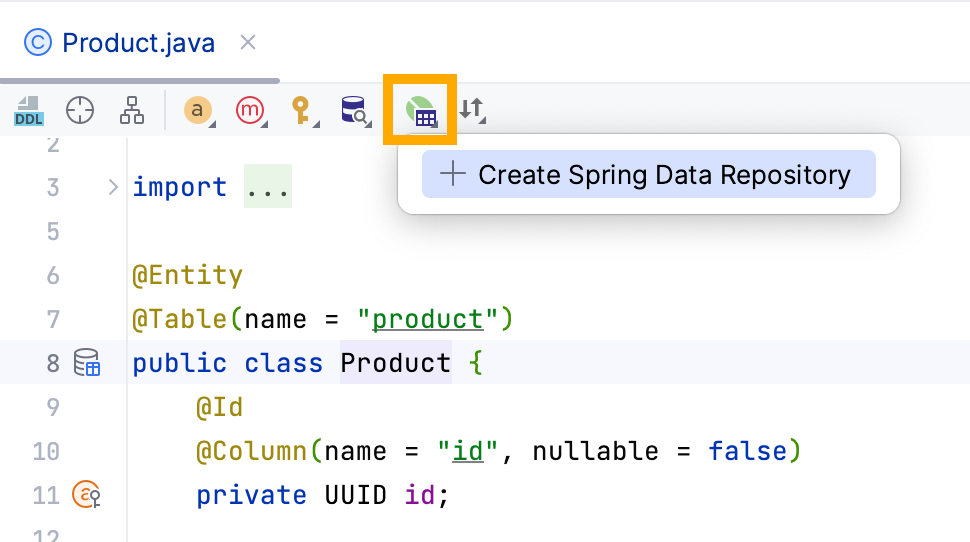
Start by creating a repository to manipulate data. Invoke the New Spring Data Repository by clicking on the Create Spring Data Repository from the editor's toolbar in Product's source code.
Then type the repository name and package.
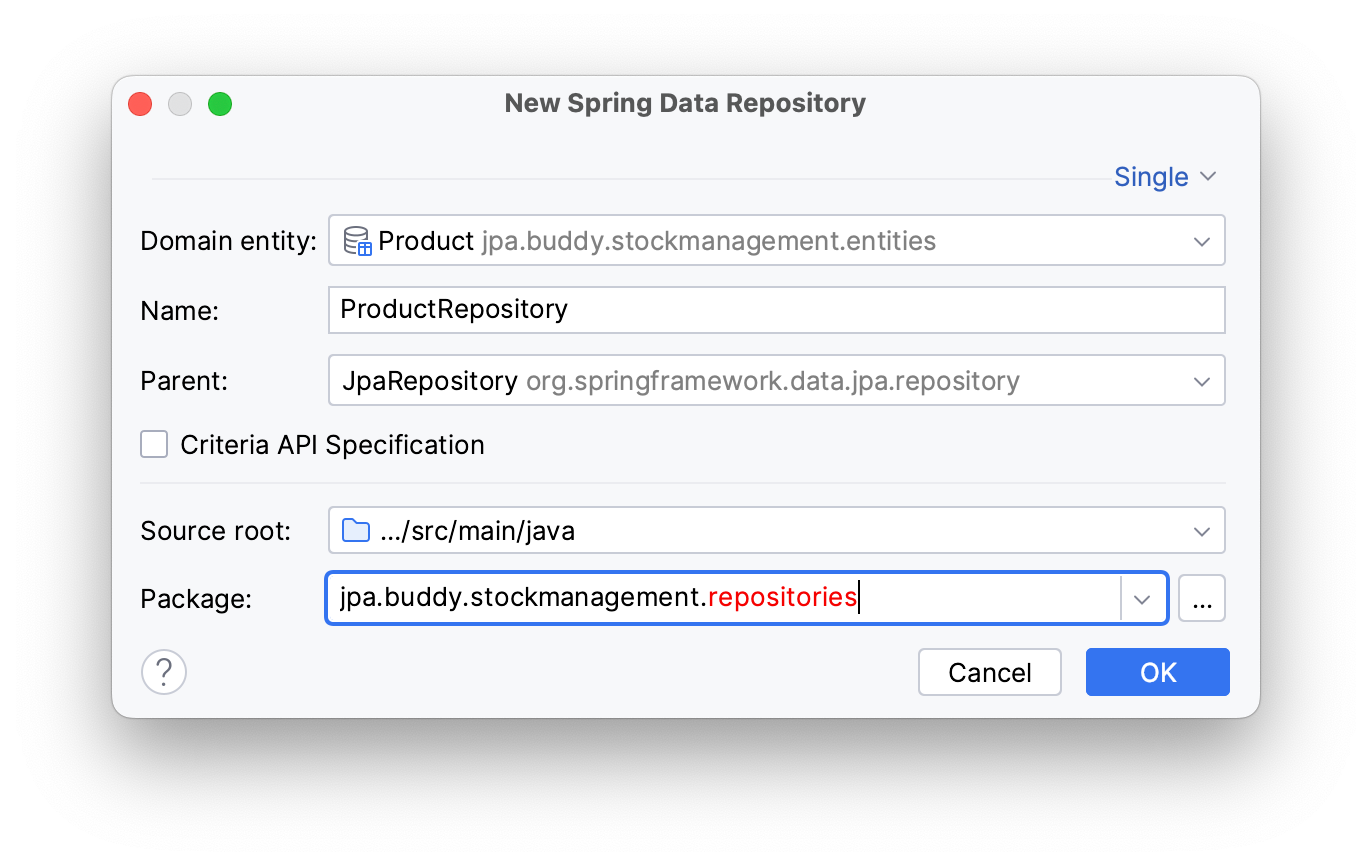
Click OK.
JPA Buddy will create a repositories package and generate ProductRepository in it.
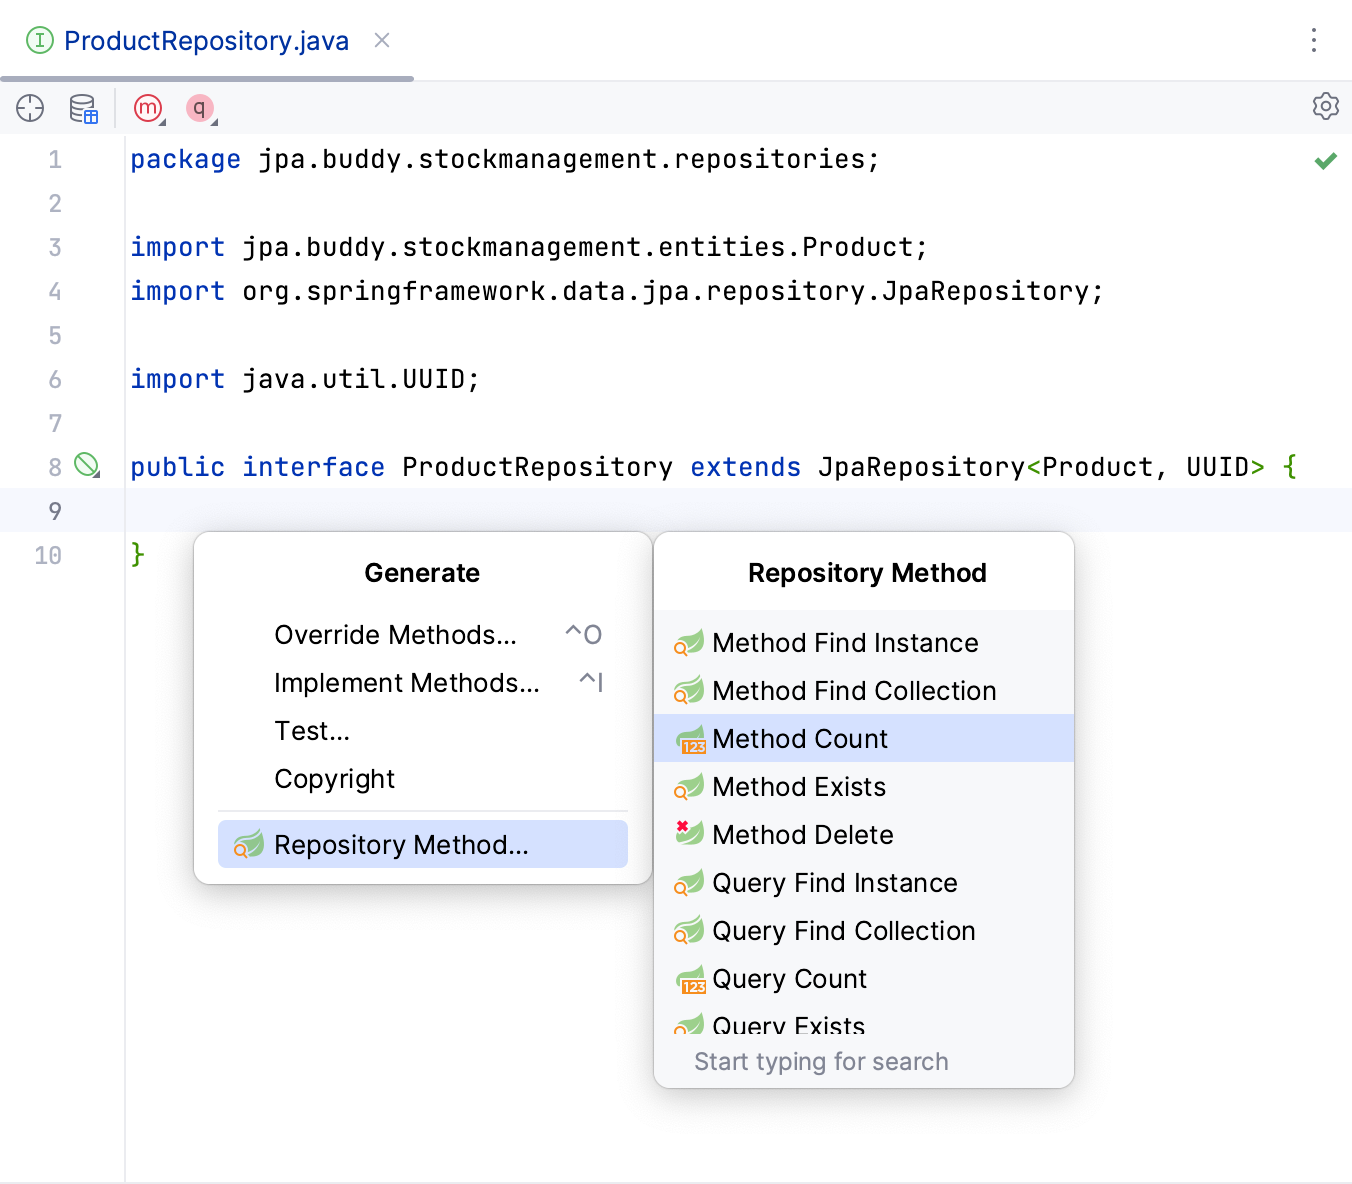
Next, you need to generate a countBy method to calculate the number of products by their ProductType name in the generated repository:
- Switch to the
ProductRepositoryclass - Open the Generate menu (Command/Ctrl + N)
- Select Repository Method
- Choose Method Count
Pick the attribute it will count by, in this case productType’s name. The Is condition will search the repository for an exact match with name.
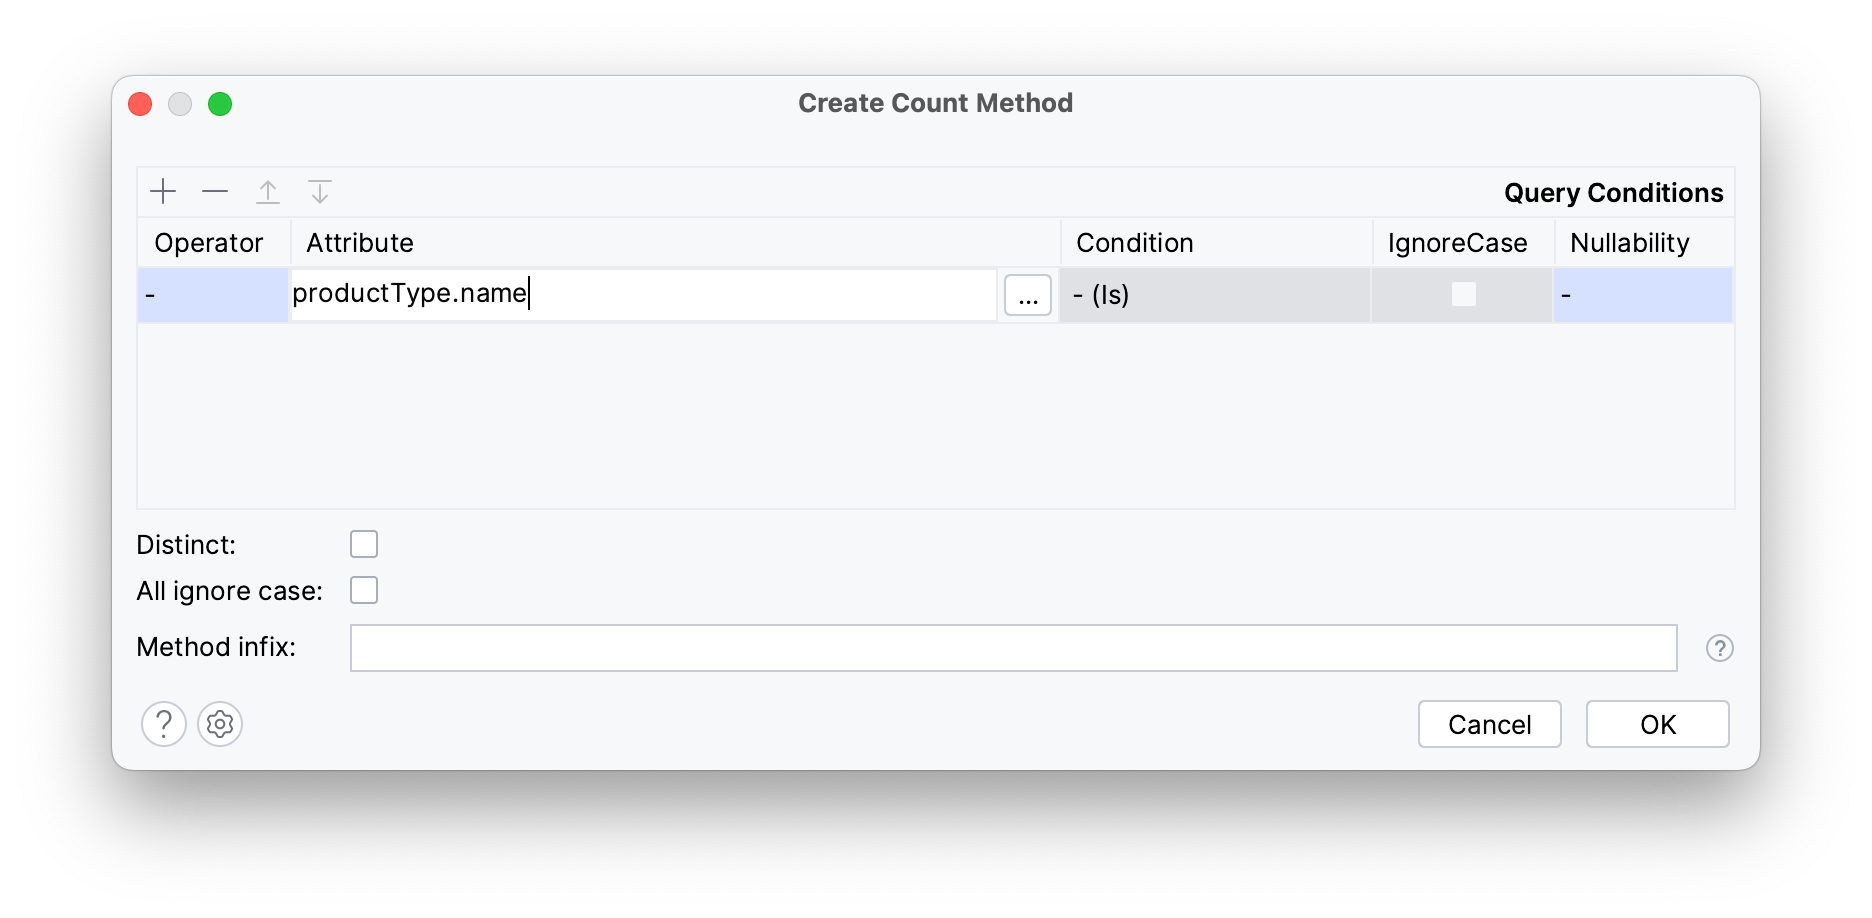
Click OK.
The generated method below will return the number of products that match the given ProductType name as long:
long countByProductType_Name(String name);
Creating a Service Class
In this section, you will write a service to test your application. This service will return the output from the repository method and update it.
Create a services package and a StockService class in it. To inform Spring that it's a bean, annotate the class with @Service.
@Service
public class StockService {
}
Your method will use ProductRepository to return the number of products by their type. Let's write a long getQuantityByProductType(String name) method that returns a long and accepts the type's name as a parameter.
Next, you need to inject the repository to let your service use its methods. Start by typing productRepository and let JPA Buddy inject it for you, navigate to the suggested option and press Enter.
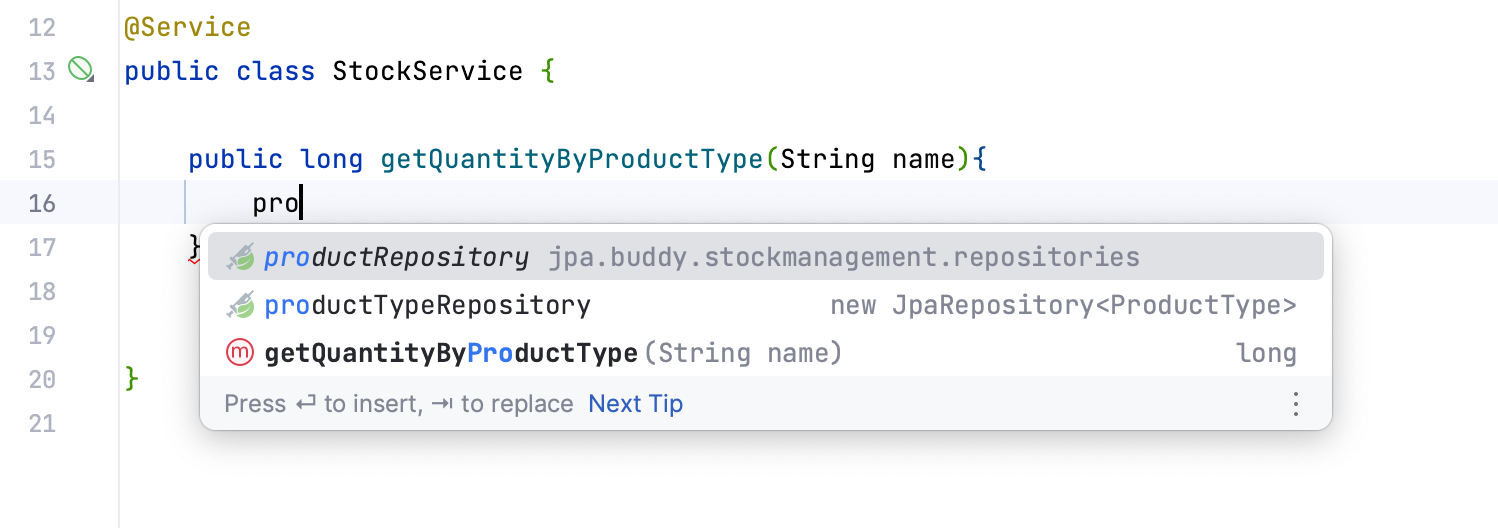
This will generate a constructor with the injected repository. Now you can use its method countByProductType_Name(name) to return the product's quantity by its type.
public long getQuantityByProductType(String name){
 return productRepository.countByProductType_Name(name);
}
Preparing Testing Environment
Before writing the tests, you need to set up your database connection. In this section you will:
- Configure hibernate in a separate properties file
- Create a schema for the existing entities and sample data records for testing
To set up the application context, create a separate property file for testing by adding an application-test.properties file in the resources folder under the test sources' section, like in the structure below:
project-root
 …
📁 test
 📁 java
  📦 jpa.buddy.stockmanagement
   StockManagementApplicationTests.java
   TestStockManagementApplication.java
  📁 resources
   application-test.properties
This file configures Hibernate and contains additional settings for logging and SQL initialization.
Let's configure Hibernate to validate the database schema to match the entity structure, this option ensures that the application fails fast in case of any inconsistencies
spring.jpa.hibernate.ddl-auto=validate
The configurations below log Hibernate's SQL statements in the terminal in a formatted way.
spring.jpa.properties.hibernate.show_sql=true
spring.jpa.properties.hibernate.format_sql=true
Finally, instruct Spring Boot to execute SQL scripts needed to add sample data into the database during application startup by adding the following line:
spring.sql.init.mode=always
To help your test class locate this property file you must annotate the StockManagementApplicationTests class with @TestPropertySource(locations = "classpath:application-test.properties").
Now that your application can connect to the database, let’s move on to database initialization.
First, you need a schema to map the data model into the corresponding database structure, you can generate it using JPA Buddy:
- Create a new file called
schema.sqlin theresourcesfolder - Open the Generate menu (Command/Ctrl + N)
- Choose DDL init schema
- Set your Source type to Model then pick PostgreSQL as your DB type
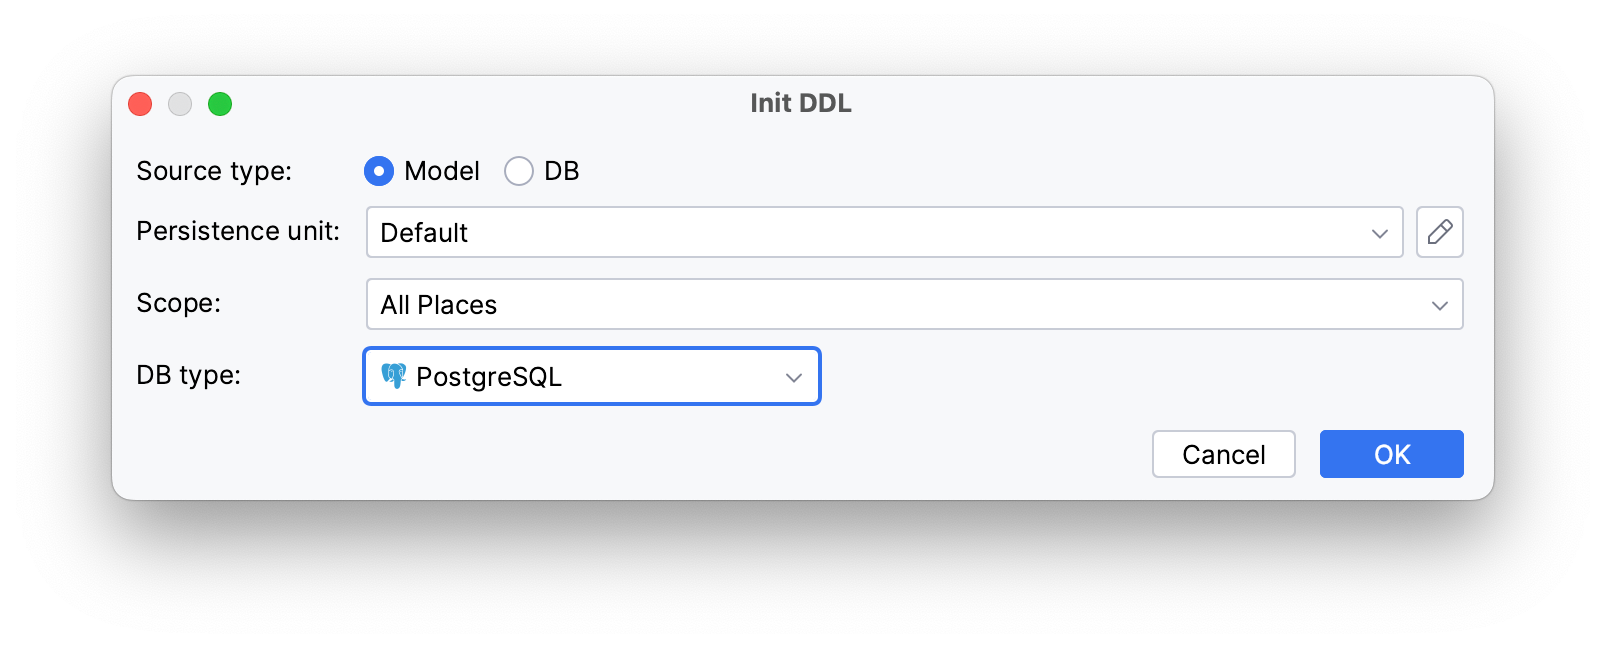
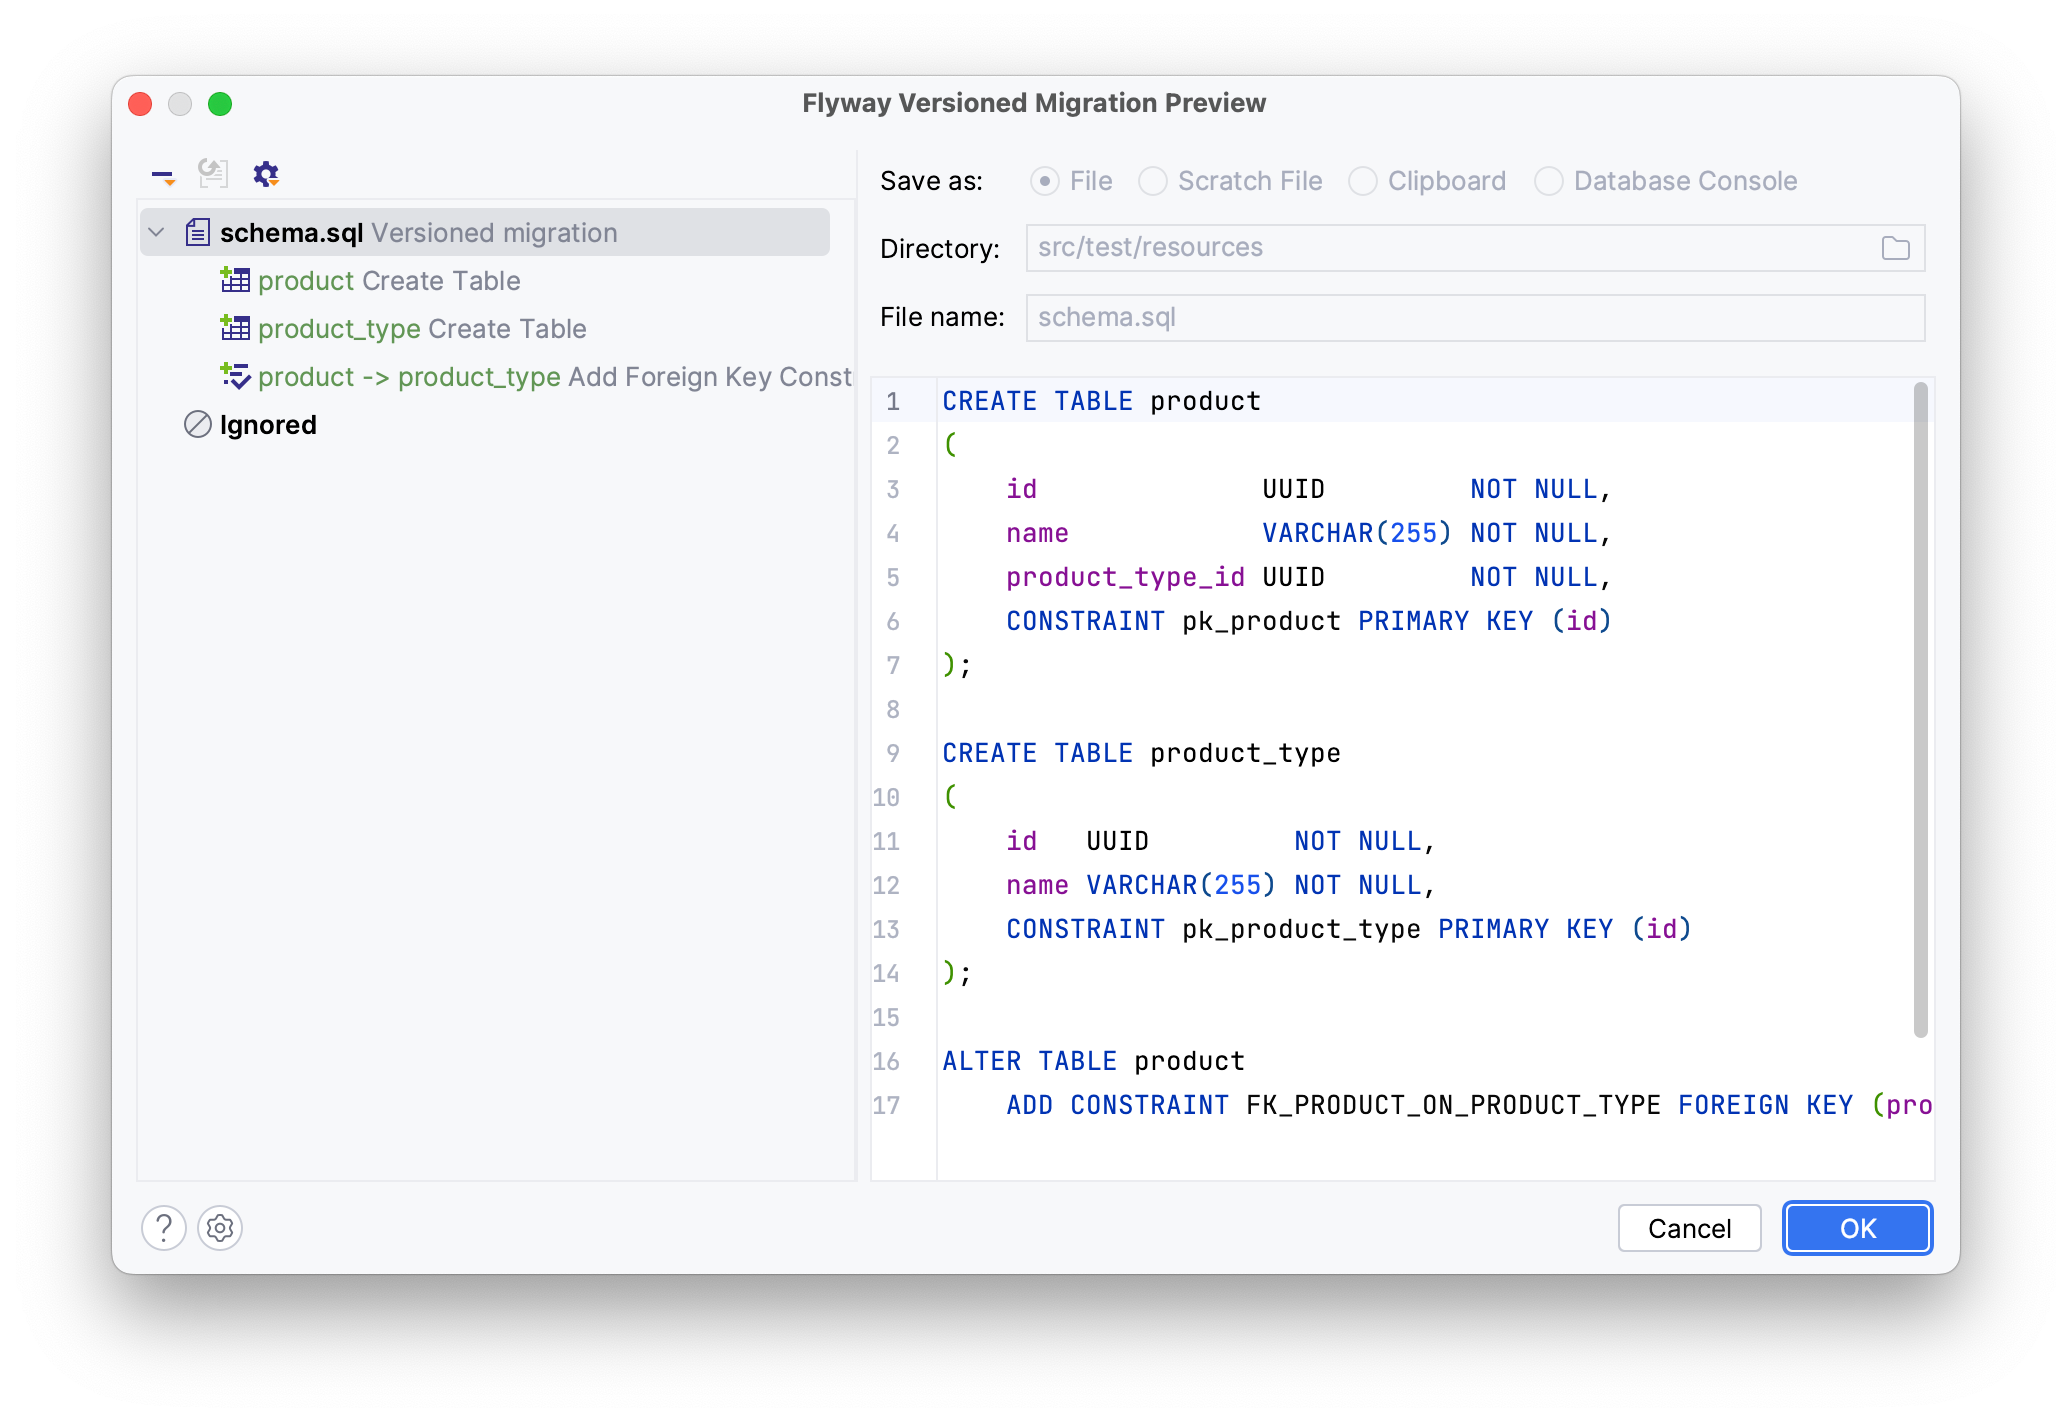
Click OK.
Check that all changes to the model have been applied and click OK again to generate the schema.
JPA Buddy can help you create sample data for testing. Let's create a product type first:
- Create a
data.sqlin theresourcesfolder - Open the Generate menu (Command/Ctrl + N) in
data.sql - Start typing Insert and choose it
Pick the product_type table, JPA Buddy will generate the UUID Id attribute for you, all you need to do is write the desired type name, "Perfume", for example.

Click OK.
This will generate the following code:
INSERT INTO product_type (id, name)
VALUES ('bb4dfa2c-40df-417d-af5b-ecdc104a18f7', 'Perfume');
Setting up Testcontainers
To avoid setting up the database on your local machine, use Testcontainers library to create and run database instances using Docker containers.
If your Spring Boot version is older than 3.1.0, you can specify the following URL in application-test.properties:
spring.datasource.url=jdbc:tc:postgresql:alpine:///shop
This enables your application to connect to a PostgreSQL database named "shop" running in an Alpine Linux container.
However, since Spring Boot 3.1.0, Spring Initializr generates a TestStockManagementApplication class in the .../test/java/jpa/buddy/stockmanagement/ package to set up the necessary container and connection details.
The main(String[] args) method in this class is used to launch the application using the defined container during development.
However, since you will use this class only for integration tests to configure your PostgreSQL container, you can safely delete the main method and rename the class to TestContainersConfiguration. After these modifications, your configuration class should look as follows:
@TestConfiguration(proxyBeanMethods = false)
public class TestContainersConfiguration{

 @Bean
 @ServiceConnection
 PostgreSQLContainer<?> postgresContainer() {
  return new PostgreSQLContainer<>("postgres:latest");
 }
}
The @ServiceConnection annotation establishes a connection to the PostgreSQL container, prioritizing the connection details within the annotated method over any connection configured using properties.
To apply this configuration, import this class into your test class by annotating StockManagementApplicationTest with @Import(TestContainersConfiguration.class), as in the code below:
@SpringBootTest
@TestPropertySource(locations = "classpath:application-test.properties")
@Import(TestContainersConfiguration.class)
class StockManagementApplicationTests {
 //...
}
Note: To use Testcontainers, you will need to install and launch Docker on your machine.
Implementing the Test Class
Now that everything is ready for testing, you will:
- Set up sample data for a particular test
- Write a test for the repository method
In the StockManagementApplicationTests class, create a void quantityByProductTypeTest() method that will test the repository’s method you created earlier. Don't forget to annotate the method with @Test for JUnit to run the method as a test case.
The data.sql file is exectued once you run a test class. You can apply the @Sql(scripts = "insert-products.sql", executionPhase = Sql.ExecutionPhase.BEFORE_TEST_METHOD) and @Sql(scripts = "delete-products.sql", executionPhase = Sql.ExecutionPhase.AFTER_TEST_METHOD) annotations to your test method to run insert-products.sql before this test and delete-products.sql afterward.
@Test
@Sql(scripts = "insert-products.sql", executionPhase = Sql.ExecutionPhase.BEFORE_TEST_METHOD)
@Sql(scripts = "delete-products.sql", executionPhase = Sql.ExecutionPhase.AFTER_TEST_METHOD)
void quantityByProductTypeTest() {
}
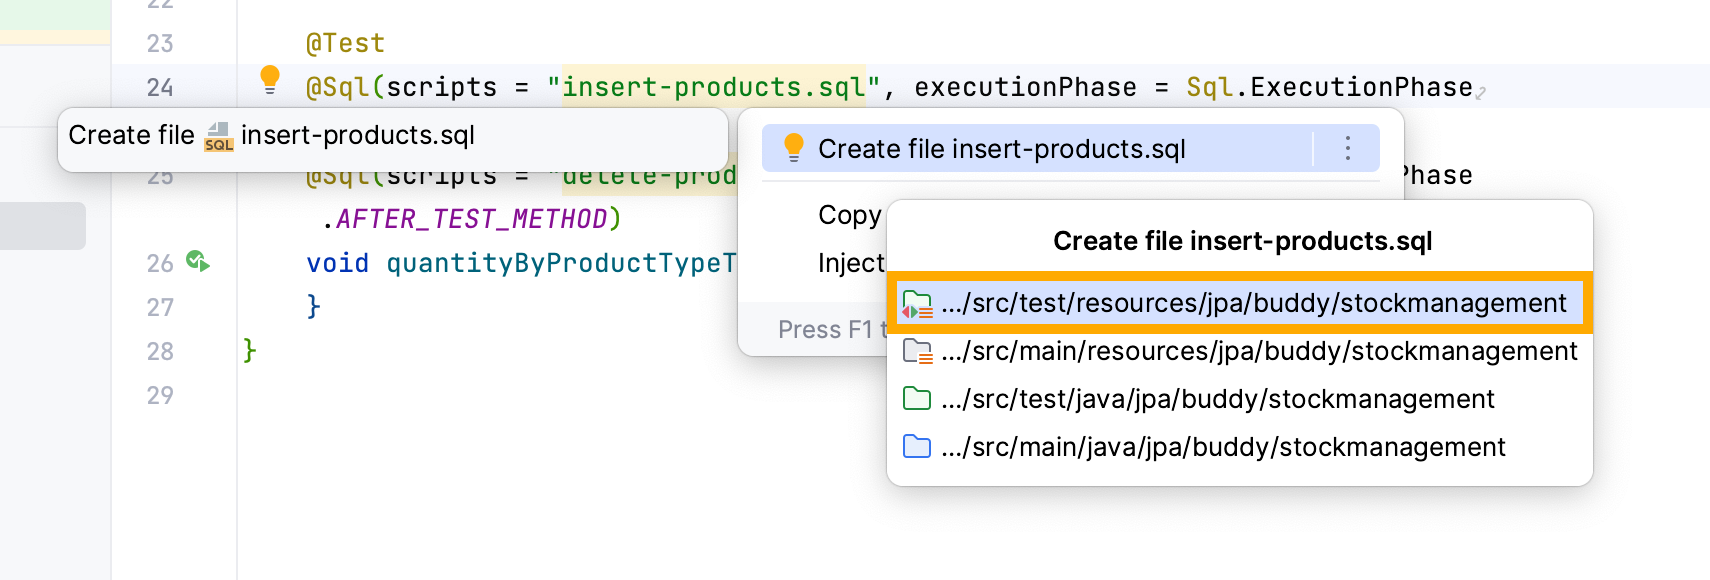
To create insert-products.sql, hover your cursor over insert-products.sql and invoke the Show Context Actions menu (Option/Alt + Enter) then choose to place it in the .../src/test/resources/jpa/buddy/stockmanagement folder.
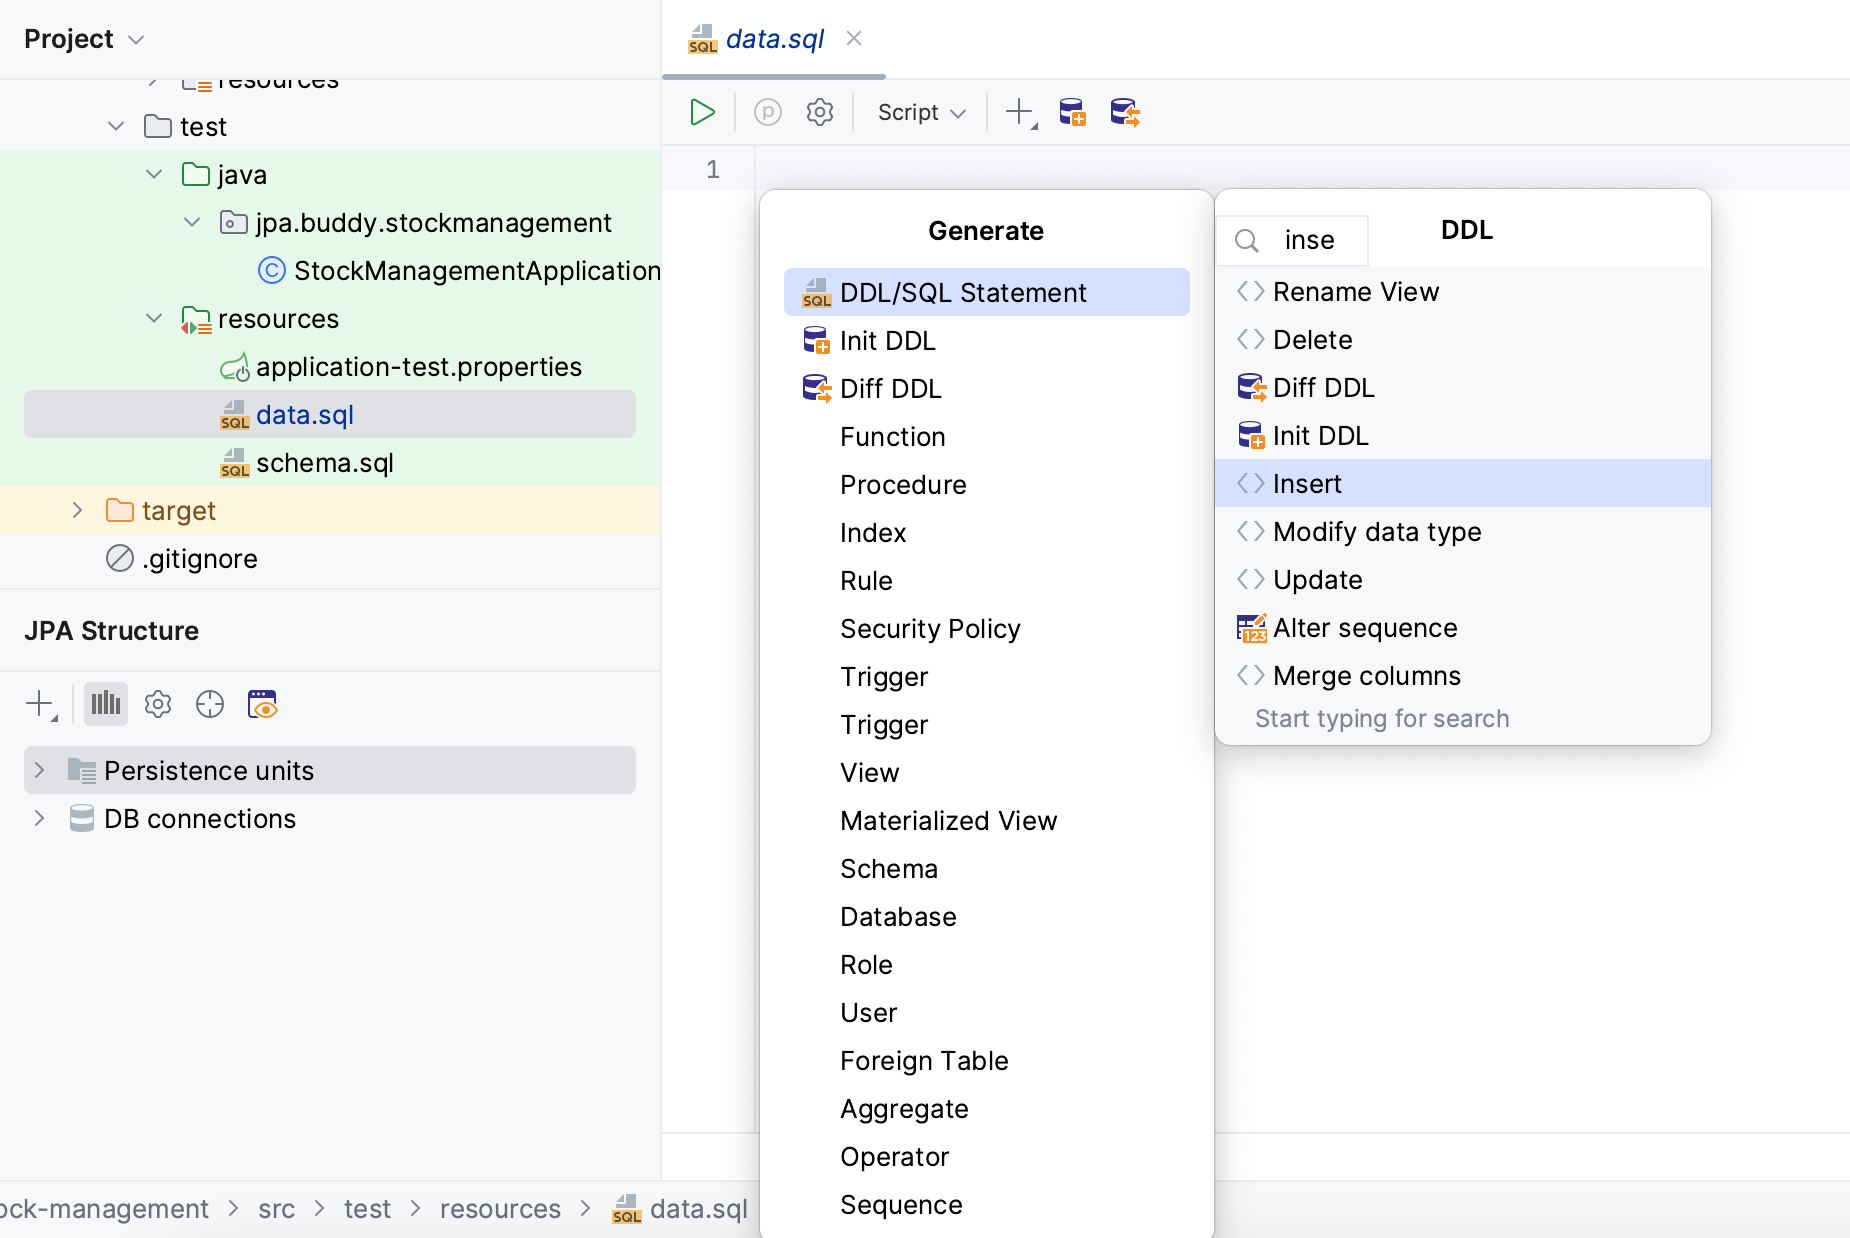
To generate an insert SQL Statement in insert-products.sql, open the Generate menu (Command/Ctrl + N) in the file -> DDL/SQL Statement -> type and choose Insert. Write the product's name and copy-paste the product_type_id from data.sql.
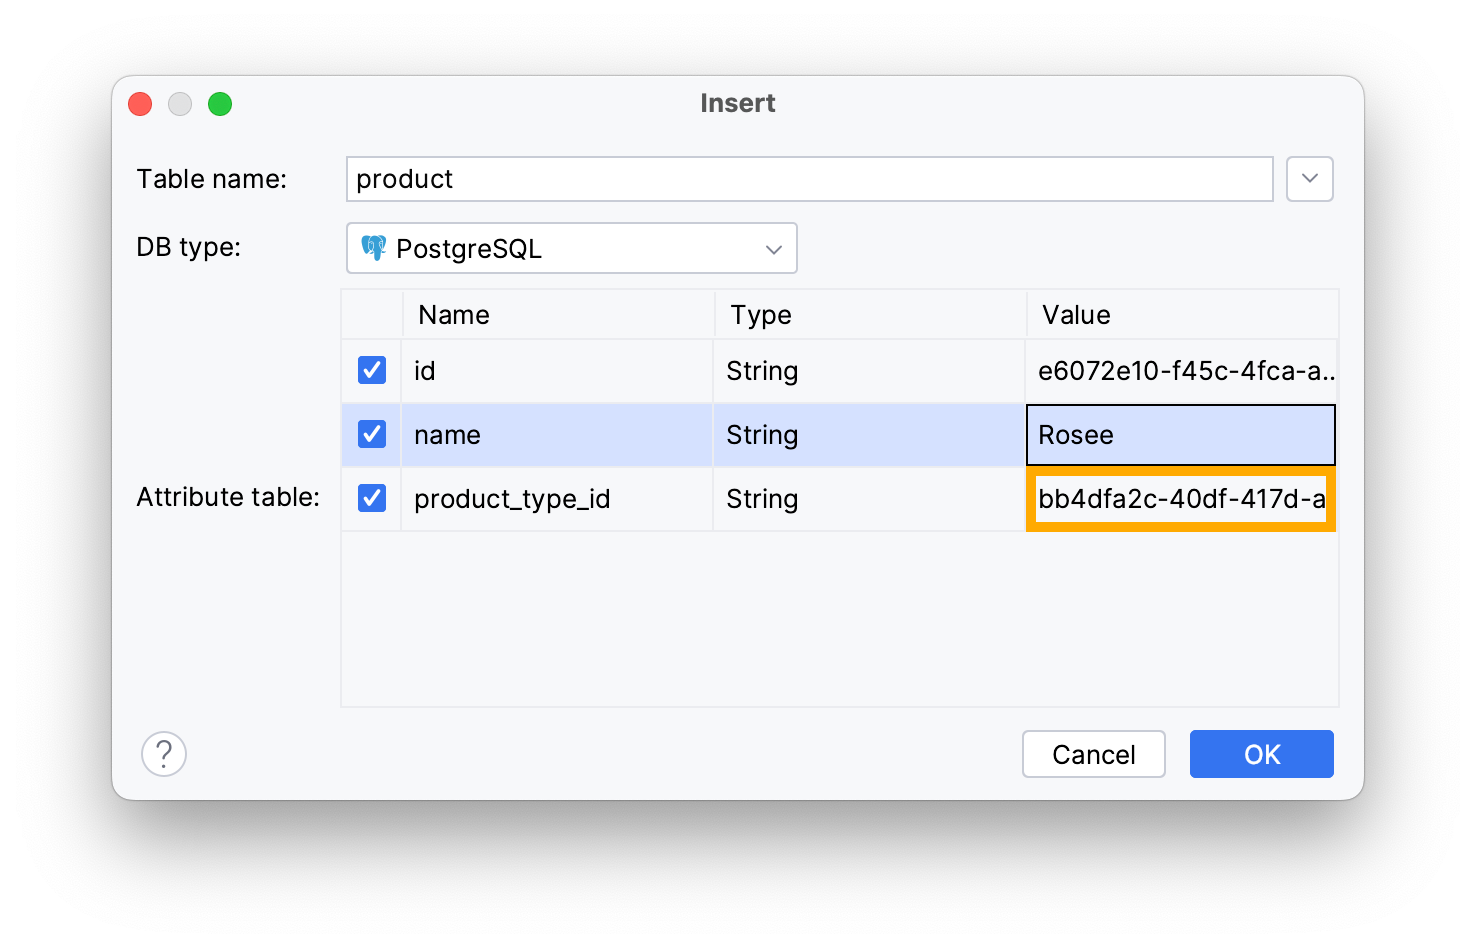
Click OK.
For a better test result create two more insertions following the same process or copy the following code, replacing product_type_id accordingly.
INSERT INTO product (id, name, product_type_id)
VALUES ('e6072e10-f45c-4fca-a00d-38a6f06cf7cf', 'Rosee', 'bb4dfa2c-40df-417d-af5b-ecdc104a18f7');
INSERT INTO product (id, name, product_type_id)
VALUES ('e01bd0a8-736d-4d28-87ce-dd2ac4301e38', 'Cream&Cookies', 'bb4dfa2c-40df-417d-af5b-ecdc104a18f7');
INSERT INTO product (id, name, product_type_id)
VALUES ('55698dea-a11d-4102-868f-28aa92329427', 'Vanilla', 'bb4dfa2c-40df-417d-af5b-ecdc104a18f7');
To delete this data after running your test, create a delete-products.sql file in the same folder as your inserts. This is how your structure should look like so far:
project-root
 …
 📁 test
  📁 java
   📦 jpa.buddy.stockmanagement
    StockManagementApplicationTests.java
   📁 resources
    📁 jpa.buddy.stockmanagement
     insert-products.sql
     delete-products.sql
    application-test.properties
    schema.sql
    data.sql
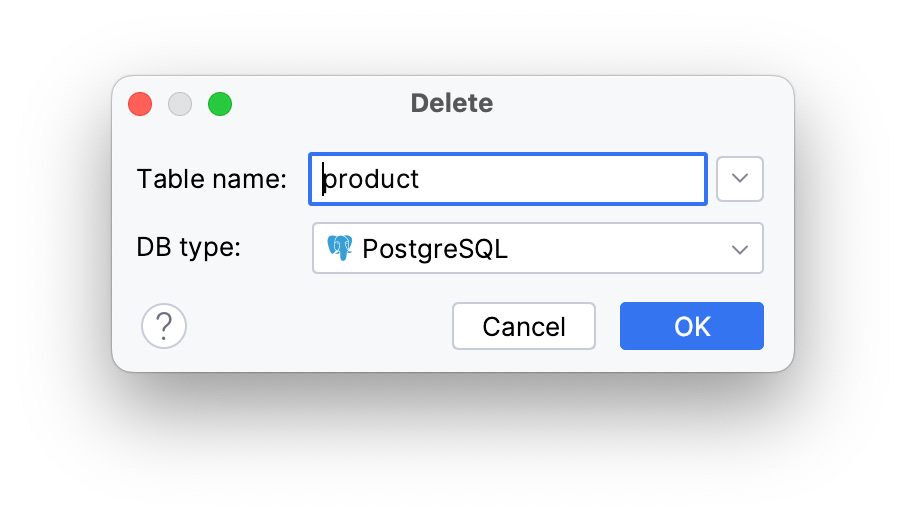
You can use JPA buddy to generate delete statements too. In your delete-products.sql file, open the Generate menu (Command/Ctrl + N) → DDL/SQL Statement → type and choose Delete.
Choose the product table and click OK.
This will generate a statement that deletes all data records in the table. To delete only the ones you inserted before the test, add WHERE id IN () to the statement. Inside the parentheses, list the product IDs separated by commas, as shown in the code below:
DELETE
FROM product
WHERE product.id IN ('e6072e10-f45c-4fca-a00d-38a6f06cf7cf',
 'e01bd0a8-736d-4d28-87ce-dd2ac4301e38',
 '55698dea-a11d-4102-868f-28aa92329427');
Now with all preparations done, let's dive into the test itself.
Open your StockManagementApplicationTests test class. To use stockServices methods, you need to inject a stockService object first. Open the Generate menu (Command/Ctrl + N) in the test class → pick @Autowired Dependency → type and choose stockService.
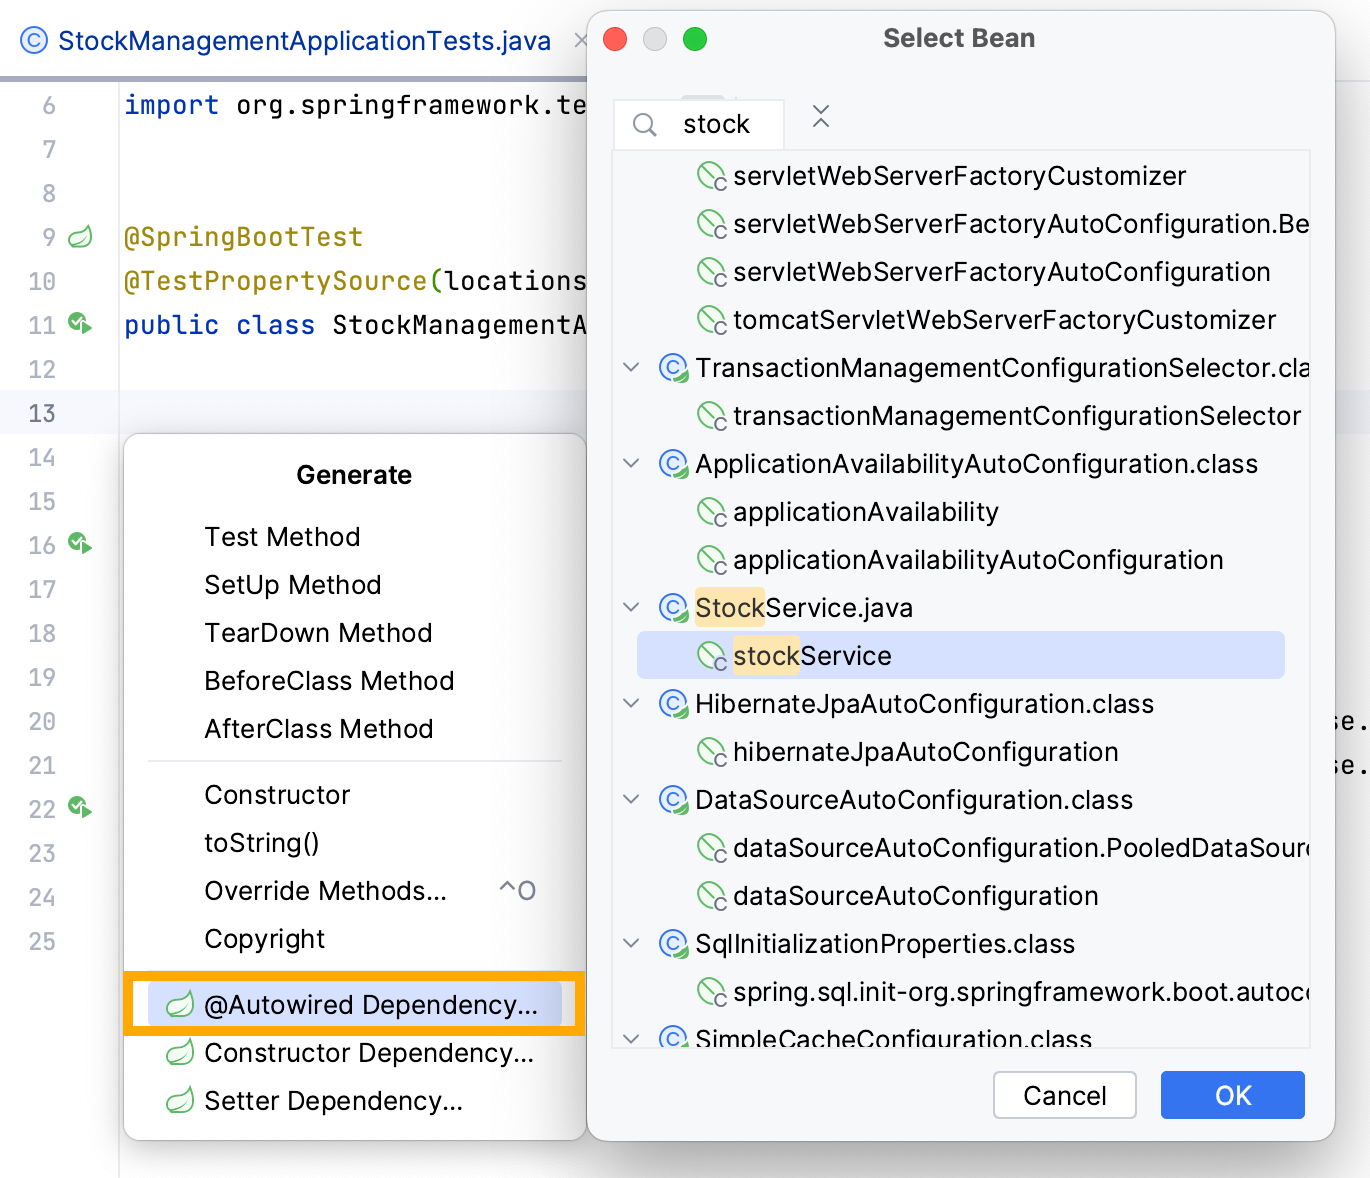
Click OK.
Intellij IDEA will generate the following code:
@Autowired
private StockService stockService;
To compare the result of the stockService.getQuantityByProductType("Perfume") method with an expected value, use the assertThat() static method from the org.assertj.core.api.Assertions library within void quantityByProductTypeTest(). This is how your test method will look like:
@Test
@Sql(scripts = "insert-products.sql", executionPhase = Sql.ExecutionPhase.BEFORE_TEST_METHOD)
@Sql(scripts = "delete-products.sql", executionPhase = Sql.ExecutionPhase.AFTER_TEST_METHOD)
void quantityByProductTypeTest() {
 assertThat(stockService.getQuantityByProductType("Perfume")).isEqualTo(3L);
}
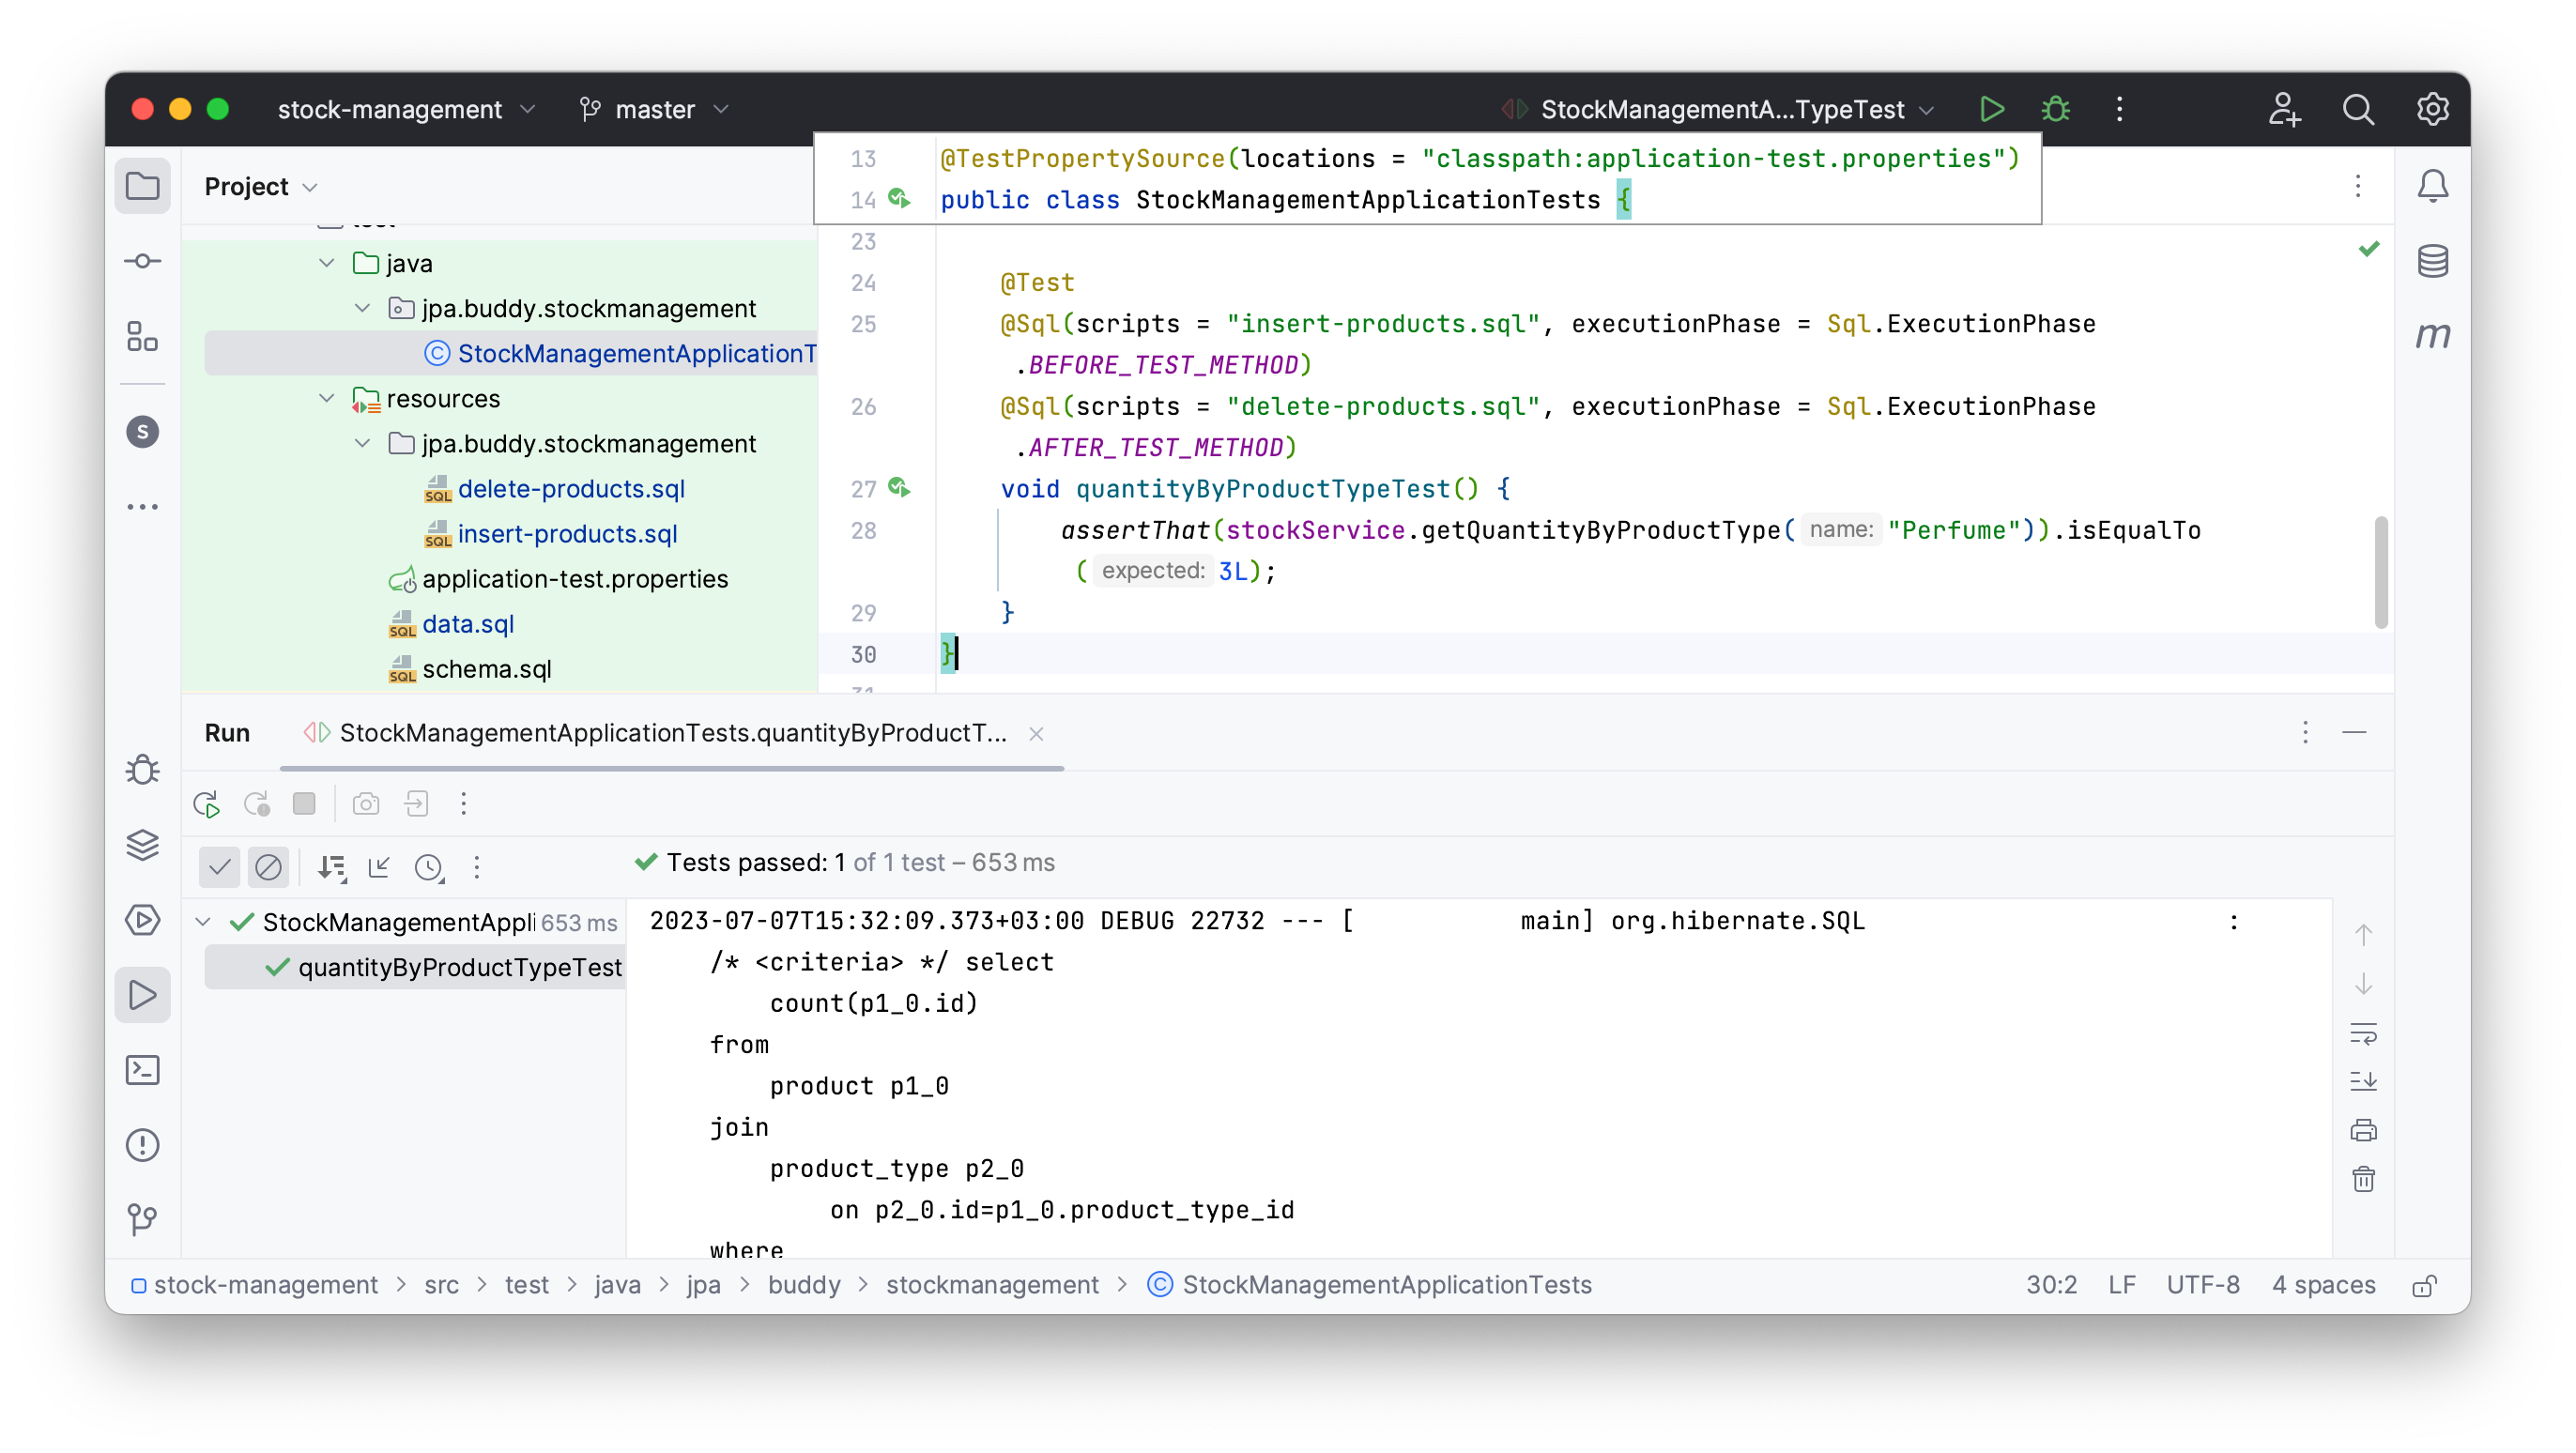
This test checks whether the quantity of products with the "Perfume" type is equal to 3. if you have inserted three products with the same product_type_id as the productType named "perfume", the assertion should return true.
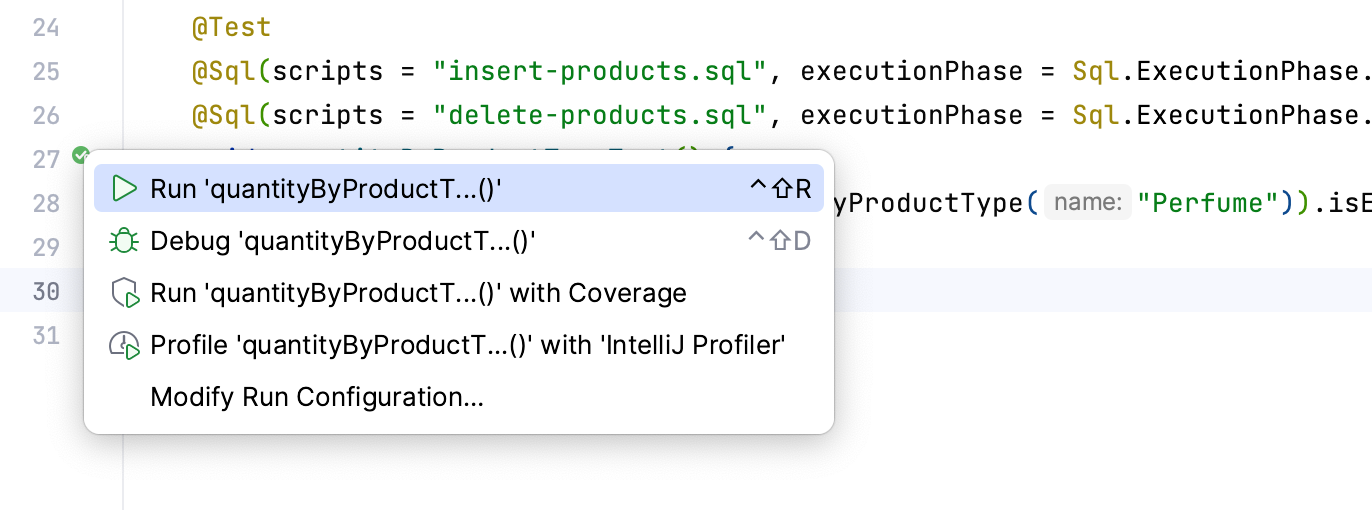
To run the test, locate the Run Test gutter icon (usually a green arrow or triangle) next to the quantityByProductTypeTest() method → select Run ‘quantityByProduct...()’.
After IntelliJ IDEA finishes running your tests, you should get a successfully passed test in the Test Runner with its executed SQL query details in the terminal.
Conclusion
Testcontainers provide isolated and reproducible tests, simplified test data setups, and effortless integration with popular test frameworks. Throughout this guide, you used Testcontainers and JPA Buddy to develop and test a database-driven application.