Testing is a cornerstone of any application lifecycle. Integration testing is a type of testing that helps to ensure that an application is functioning correctly with all of its external services, such as a database, authorization server, message queue, and so on. With Testcontainers, creating such an environment for integration testing becomes easier. However, setting just the environment is not enough for proper testing. Preparing test data is also an essential task. In this article, we will review the process of preparing application business logic tests. We will see how to set up Testcontainers for the application and explain some challenges we can meet during test data preparation.
This article also has a companion video that guides through the process of application testing with Testcontainers and JPA Buddy.
Introduction: application to test
Let’s review a small application allowing users to manage product stock. The application uses a “standard” technology stack: Spring Boot, Spring Data JPA, and PostgreSQL as a data store. It also contains a simple business logic: we can count a product amount for every product type. The project source code layout follows the default layout used by Gradle:
project-root
📁 src
  📁 main
   📁 java
   📁 resources
  📁 test
   📁 java
   📁 resources
We will refer to this layout later in the article. The data model consists of two entities and looks like this:
@Entity
@Table(name = "product_type")
public class ProductType {
    @Id
    @Column(name = "id", nullable = false)
    private UUID id;

    @Column(name = "name", nullable = false)
    private String name;

    //Getters and setters removed for brevity
}

@Entity
@Table(name = "product")
public class Product {

    @Id
    @Column(name = "id", nullable = false)
    private UUID id;

    @Column(name = "name", nullable = false)
    private String name;

    @ManyToOne(fetch = FetchType.LAZY, optional = false)
    @JoinColumn(name = "product_type_id", nullable = false)
    private ProductType productType;

    //Getters and setters removed for brevity
}
The test data will consist of one product category (Perfume) and three products for this category. For this data, we create a simple test to verify business logic:
@Test
void quantityByProductTypeTest() {
    assertThat(stockService.getQuantityByProductType("Perfume")).isEqualTo(3L);
}
Business logic testing and data access layer
For business logic testing, we have two options:
- Implement mocks for the data access layer (Spring Data repositories for our case)
- Perform “proper” integration testing using a test database or similar setup with Testcontainers.
Mocking is faster to execute, does not require infrastructure setup, and allows us to isolate business logic from the other components of our application.
On the other side, mocking requires much coding to prepare and support sample data to simulate the response. In addition, if we use JPA, we won’t be able to catch some edge case issues. For instance, the @Transactional annotation becomes useless in case of mocks, so we won’t get LazyInitException in tests but can get it in production. Mocked data differs from “live” JPA entities with all these proxies, etc.
Integration testing with a test database is closer to the real world; we use the same data access layer code that will run in the production. To perform the testing, we need to set up the test environment and prepare test data. As was said before, Testcontainers greatly simplify environment setup; this is what we will demonstrate later. As for the test data, we’ll use SQL scripts (or something similar) to add test data to the database. Let’s go through the preparation process and see how we can set up the environment for testing.
Environment setup: database and connection
We are going to use JUnit5 and Testcontainers for our PostgreSQL database. Let's add the required dependencies.
testImplementation 'org.junit.jupiter:junit-jupiter:5.9.2'
testImplementation 'org.testcontainers:postgresql:1.18.0'
testImplementation 'org.testcontainers:junit-jupiter:1.18.0'
testImplementation 'org.testcontainers:testcontainers:1.18.0'
We will use the test class usually generated by the start.spring.io utility as a base. We can find it in the root package in the test sources folder.
@SpringBootTest
public class StockManagementApplicationTests {

    @Test
    void contextLoads(){
    }

}
To set up the application context, Spring Boot uses application.properties/.yml files. Creating separate files for different contexts (prod and test) is feasible; it allows us to separate production and test environments explicitly. Hence, our tests will use a dedicated properties file named application-test.properties. This file is usually located in the resources folder in the test sources section.
project-root
…
  📁 test
   📁 java
      📦 com.jpabuddy.example
         StockManagementApplicationTests.java
   📁 resources
      application-test.properties
Now we can set up the rest of the application environment, namely the PostgreSQL database. There are several options to do it using Testcontainers.
First, we can do it implicitly by specifying a particular DB connection URL in the application-test.properties file:
spring.datasource.url=jdbc:tc:postgresql:alpine:///shop
This URL instructs Testcontainers to start a database using the postgres:alpine image. Then Spring will connect to this database and use this connection for the datasource. This option allows using one shared container for all tests in the class. We do not need to specify anything but the URL in the application settings file and this file name in the test annotation. The database container will start automatically and be available for all tests specified in the class.
@SpringBootTest
@TestPropertySource(locations = "classpath:application-test.properties")
public class StockManagementApplicationTests {

    @Test
    void contextLoads(){
    }

}
If we need to fine-tune the container, we can use another option – create the container explicitly in the test code. For this case, we do not specify the connection URL for the datasource in the properties file but get it from the container in the code and put it into the Spring context using the @DynamicPropertiesSource annotation. The test code will look like this:
@SpringBootTest
@Testcontainers
@TestPropertySource(locations = "classpath:application-test.properties")
public class StockManagementApplicationTests {

    @Container
    static PostgreSQLContainer<?> postgreSQLContainer =
   		new PostgreSQLContainer<>("postgres:alpine");

    @DynamicPropertySource
    static void setProperties(DynamicPropertyRegistry registry) {
        registry.add("spring.datasource.url", postgreSQLContainer::getJdbcUrl);
        registry.add("spring.datasource.username", postgreSQLContainer::getUsername);
        registry.add("spring.datasource.password", postgreSQLContainer::getPassword);
    }
    @Test
    void contextLoads(){
    }
}
Note that the container instance is static. It means that one container will be used for all tests specified in this class. If we need the container created for every test, we must make this property non-static. Creating a separate container for each test allows us to isolate tests from each other properly, but it dramatically affects test execution time. So, if we have many tests in one class, it would be preferable to run one container for all tests.
As we can see, creating a test database instance can be a simple setup process, containerization solves this problem for us.
Environment setup: DB schema
Now we need to initialize our database: create the schema for JPA entities and insert some data. Let's start with the schema.
HBM2DDL
The simplest option is to add the spring.jpa.hibernate.ddl-auto property in the application-test.properties file and set its value to create-drop. Hibernate will recreate the schema every time in this case. However, this solution is far from ideal and very limited.
First, with Hibernate 5, you cannot control what types will be generated for your columns; and these may differ from what you have in the production environment. Hibernate 6 solves this problem, but its adoption rate for production systems is not very high.
Secondly, this solution will not work if you use non-standard mapping types with Hibernate Types or JPA Converters.
Finally, you may need to generate other database objects like triggers or views for your test, which is obviously impossible.
However, using the validate value for spring.jpa.hibernate.ddl-auto is always a good idea. For this case, Hibernate will check if your model is compatible with tables in the database. Hence, we can add it to our ‘application-test.properties’ file and continue to other options for the DB schema creation.
spring.jpa.hibernate.ddl-auto=validate
Spring Data init script
Spring Boot provides us with an additional way to define the database schema. We can create a schema.sql file in the resources root location, which will be used to initialize the database.
project-root
…
  📁 test
   📁 java
      📦 com.jpabuddy.example
         StockManagementApplicationTests.java
   📁 resources
      application-test.properties
      schema.sql
To execute this script during the context bootstrap, we need to set the spring.sql.init.mode property to always to tell the application to execute this script.
spring.datasource.url=jdbc:tc:postgresql:alpine:///shop
spring.sql.init.mode=always
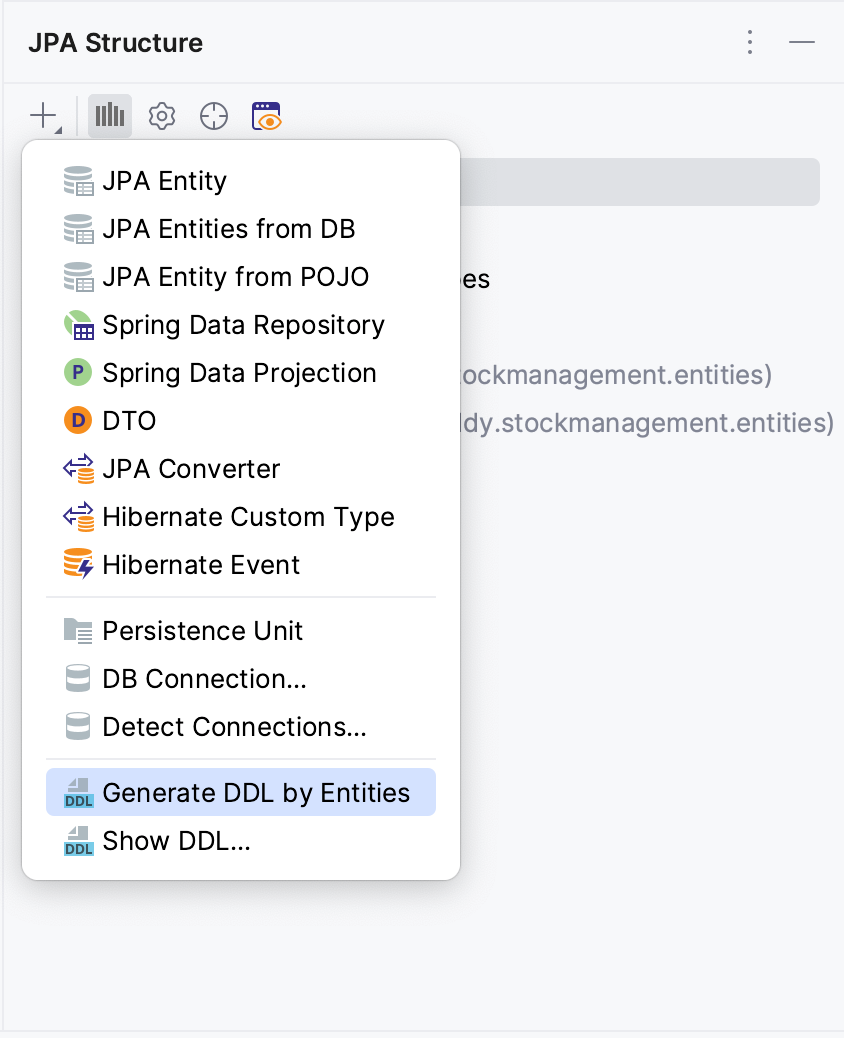
To create a proper DDL script to initialize the database, we can use JPA Buddy.
In the JPA Structure tool window, select + action and then invoke the Generate DDL by entities menu as shown in the picture:
After that, select DB schema initialization as the DDL type and PostgreSQL as the target database.
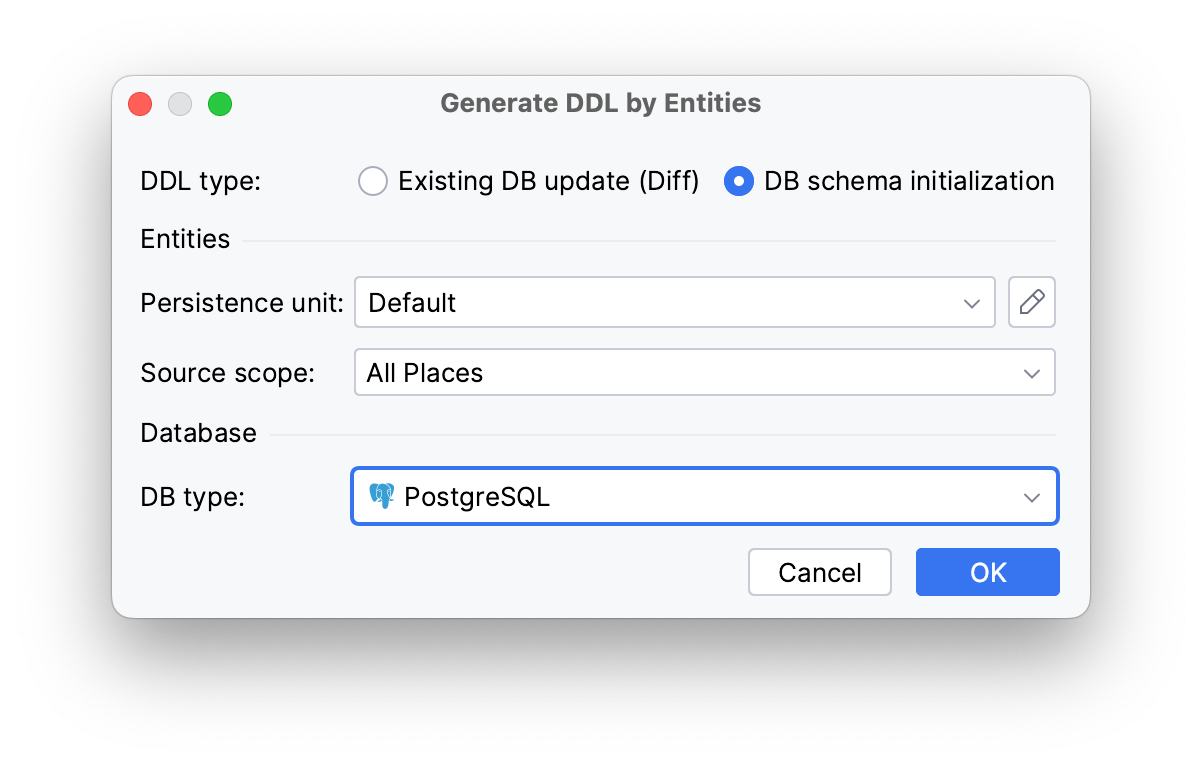
That’s it. We can review the generated SQL in the window and save it to the file schema.sql or copy it to the clipboard.

There is more information on init scripts generation in the JPA Buddy documentation.
Database Testcontainer init script
We can also use Testcontainers to initialize the DB as described in the Testcontainers manual. In this case, we need to disable Spring Data's automatic script execution and specify the path to the script in the JDBC URL in the application-test.properties file:
spring.datasource.url=jdbc:tc:postgresql:11.1:///shop?TC_INITSCRIPT=schema.sql
spring.jpa.database-platform=org.hibernate.dialect.PostgreSQLDialect
spring.sql.init.mode=never
As for the script itself, we can generate it in the same way we did in the previous section.
DB versioning tools
The final option to create a test database schema is to use DB versioning tools (Liquibase/Flyway). This approach makes our test database identical to what we will have in production. Also, Spring Boot will execute all migration scripts automatically on test context startup, so no additional configuration is required. However, applying all migrations may be time-consuming compared to previous options. We do not need all migrations; we need a final schema to perform tests. There is an article showing how to “squash” DB migrations for Testcontainers and which gains we can get. The squashing process requires some additional coding, and we are not going to discuss it here.
In general, by using DB versioning tools, we won’t get any advantages over Spring Data init script or Testcontainers init script, but test execution takes more time.
DB Schema setup: conclusion
When we need a DB schema for tests, running all DB migrations for each test class and container startup is unnecessary. All we need to do is to get the final DB initialization script and execute it. To do it, we have the following options:
- Spring Data built-in engine, a.k.a. “init.sql”
- Testcontainers “init script” parameter
Think twice before deciding to use the other options:
- Liquibase/Flyway is a good option, but it is time-consuming due to the sequential execution of all migrations
- HBM2DDL is not recommended due to its inaccuracy, as described before.
So, we have a test DB schema created one way or another. The next step – is the test data.
Environment setup: Test Data
When implementing tests, we need to consider the following:
- Tests should be repeatable. It means they should return the same result if the input data is kept the same.
- Tests should be isolated. It is essential if we use a database with test data. Tests should spoil other tests’ data.
- Tests execution order should not affect test results.
All above means that we should prepare test data carefully, considering all operations that can be performed during test execution. Also, we need to clean up (or fully recreate) test data after the test run to ensure that our test does not affect others.
Test data can be split into two parts: common data like cities, countries, or product categories, in our case. This referenced information is usually static and shared between tests. On the other hand, we have data required by the test itself, which can be changed during test execution. For our test, it will be a list of products for a particular category.
Adding common test data
If we keep a single container running until all tests in a class are executed, it makes sense to create the shared data once before all tests are started.
If we use Spring Data to create the test database, we need to add the data.sql file with INSERT statements with the shared data right next to the schema.sql in the test resources root folder. This script will be executed after the schema creation once the spring.sql.init.mode property is set to always. That’s it.
project-root
…
  📁 test
   📁 java
      📦 com.jpabuddy.example
         StockManagementApplicationTests.java
   📁 resources
      application-test.properties
      schema.sql
      data.sql
If we use the Testcontainers init script, we’ll need to add this shared test data into the DB schema init script schema.sql after schema creation DDL. So, Testcontainers will create both schema and shared data on the container and start by executing the script.
Regarding DB versioning tools, it is essential to separate test data from the production one. For Liquibase, we can use contexts. For every test changeset, we can append a context tag enabled for test execution only, as described in the corresponding article. In the migration scripts, this test data will look like this.
<changeSet id="1" author="jpabuddy" context="test-data-common">
    <sql>
        INSERT INTO product_type (id, name) VALUES ('7af0c1a4-f61d-439a-991a-6c2c5d510e14', 'Perfume');
    </sql>
</changeSet>
We can specify the context tag in the application-test.properties file similar to this:
spring.liquibase.contexts=test-data-common
The only problem with this approach is separating Liquibase scripts with test data from ones containing prod data. If we move changesets with test data into test resources, we need to create and support an additional Liquibase master file in test resources that will include schema creation script from the main codebase and test data creation from the test one. For example, consider the following application resources layout:
project-root
  📁 main
   📁 java
   📁 resources
    📁 db.changelog
      db.changelog-master.xml
      db.changelog-create-schema.xml
      db.changelog-production-data.xml
  📁 test
   📁 java
   📁 resources
    📁 db.changelog
       db.changelog-test-master.xml
       db.changelog-common-test-data.xml
    application-test.properties
So, we need to keep two master files in sync: in the main folder and test one. Other than that, Liquibase contexts work fine.
With Flyway, we can use different paths to versioning scripts for the test and production databases. We should use different .properties files to run various scripts and enable them using profiles or @TestPropertySource annotation. For example, in the application.properties file, we can have this entry:
spring.flyway.locations=classpath:db/migration,classpath:db/data
For tests, we can use other paths in our application-test.properties:
spring.flyway.locations=classpath:db/migration,classpath:db/test-data
So, we can put schema creation and prod data to the src/main/resources/db/migration and src/main/resources/db/data, respectively, but test data is stored in src/test/resources/db/test-data.
project-root
  📁 main
   📁 java
   📁 resources
    📁 db
     📁 migration
       V0__create_schema.sql
     📁 data
       V1__add_prod_data.sql
  📁 test
   📁 java
   📁 resources
    📁 db
     📁 test-data
       V1__add_test_data.sql
    application-test.properties
Again, like Liquibase, the support process for these scripts is critical; there are yet to be tools to help you with proper test data script arrangement. We must track migration version numbers carefully and prevent prod data from leaking to tests and vice versa.
In conclusion: Spring Data’s data.sql or Tectcontainers’ init script adds the minimum maintenance work to add “common” test data. Suppose we decide to use DB versioning tools solely. In that case, we’ll need to remember about Liquibase contexts or keep tracking Flyway DB versions for different databases (test/prod), which is mundane and error-prone work.
Adding test-specific data
Creating test data for every test in the class is even more challenging. We should insert test data before every test and delete it after test execution to prevent test data contamination. Of course, if we put all required data into the same script as test data and recreate a container after every test, it will resolve the problem, but we’ll spend more time on test execution. So, which options do we have?
In JUnit 5, the “standard” way to do an action before a test is to put it into a method annotated with @BeforeEach and @AfterEach. With test data, this may do the trick, but we need to remember the following:
@Transactionalannotation does not work for test lifecycle methods as stated in the documentation. So, we need to useTransactionTemplateor something similar for transaction management while creating test data before each test.- Adding
@Transactionalon a class level won’t help much. In this case, all data manipulations will be executed in a single transaction, so Hibernate will use its L1 cache and won’t even flush data to the DB. For example, the@DataJpaTestannotation works this way. It is a meta-annotation. Among many others, it is marked with the@Transactionalannotation. So, all tests marked with@DataJpaTestwill open a single transaction for the whole test class. - Methods annotated with
@BeforeEachare executed before each test method, obviously. It means we need to know which exact method is executed and initialize its data set. It means a lot of “if” statements in the method and problems with supporting them.
Also, we can try using the @BeforeAll and @AfterAll methods to initialize all test data at once. This approach also has some disadvantages:
- These methods are static, so that Spring annotation-based injection won’t work for them. It means that we’ll need to get required beans like EntityManager manually.
- Transactions still won’t work properly
- We’ll need to design test data for all tests in the test suite so that it won’t interfere. It is challenging, especially if we have several tests checking contradicting cases.
@Before* and @After* methods work fine if we use DB migration tools to apply test-specific scripts. For example, for the Flyway, we can write something like this:
@Autowired
private FlywayProperties flywayProperties;

@Autowired
private DataSource dataSource;

@BeforeEach
void setUp(TestInfo testInfo) {
    String testMethodName = testInfo.getTestMethod().orElseThrow().getName();

    List<String> locations = flywayProperties.getLocations();
    locations.add("classpath:db/%s/insert".formatted(testMethodName));
    Flyway flyway = Flyway.configure()
                          .dataSource(dataSource)
                          .locations(locations.toArray(new String[0]))
                          .load();
    flyway.migrate();
}
In this code snippet, we create an empty Flyway bean and add the path to test-specific migrations into its configuration. Please note that DB schema and “common” test data should be created beforehand. So, in the application-test.properties, we still need to provide paths to these migration scripts as stated in the previous section:
spring.flyway.locations=classpath:db/migration,classpath:db/test-data
To delete test data, we’ll need to write a similar code in the @AfterEach method and execute migrations to remove test data. As mentioned before, these methods would be executed for all tests in a test class, so we’ll need to specify the exact script based on the current method name.
Spring framework provides another way to create test data for one test - the @Sql annotation. We can add it to a test method and specify the path to a desired script that should be executed. In addition to this, we can set the execution time for each script. It means it is possible to define data insert and cleanup scripts and use them for every test. The test code will look like this:
@Test
@Sql(scripts = "insert-products.sql", executionPhase = Sql.ExecutionPhase.BEFORE_TEST_METHOD)
@Sql(scripts = "delete-products.sql", executionPhase = Sql.ExecutionPhase.AFTER_TEST_METHOD)
void quantityByProductTypeTest() {
    assertThat(stockService.getQuantityByProductType("Perfume")).isEqualTo(3L);
}
This approach does not require special transaction management or “if” statements. As a downside, we’ll need to manage and support many small SQL scripts for every test. For the code above, every script should be placed in the same package as the test class.
Using Spring Data JPA, Hibernate or EclipseLink and code in IntelliJ IDEA? Make sure you are ultimately productive with the JPA Buddy plugin!
It will always give you a valuable hint and even generate the desired piece of code for you: JPA entities and Spring Data repositories, Liquibase changelogs and Flyway migrations, DTOs and MapStruct mappers and even more!
Conclusion
With Testcontainers, integration testing becomes much easier. There is no need to mock external services like database to test business logic. When we need to do this, we can simply set up the database test container by specifying a particular URL or right in the test class.
Creating test data is a bit more challenging process. The simplest option is to recreate a test container with all test data for every test, but this approach increases test execution time.
If we want to share one test container between different tests, we need to create test data and clean it up after tests. It looks like the most efficient way to do this is as follows:
- Create DB schema using Spring Data
schema.sqlor Testcontainers init script. - Insert shared data that is not changed by tests using Spring Data
data.sqlor Testcontainers init script. - Add test-specific data create and cleanup scripts using
@Sqltest annotation.
To generate schema initialization scripts, we can use JPA Buddy – it dramatically simplifies this job. Also, do not forget to enable schema validation for hibernate. It will let us be sure that we have the latest DB version used for our tests.
Managing DB versioning scripts to create test data for the shared container looks a bit more complex than the one described above. Although possible to implement, it is easy to mix prod and test data or get confused with migration scripts execution orders. Also, it requires additional code (hence support) in unit tests.