Database Versioning
Introduction
To ensure the data model in the source code matches the relational databases, it's crucial to keep them synchronized. There are two commonly used methods to tackle this challenge.
Database first
In this approach, the database takes precedence over data model classes (POJOs or JPA entities), which are generated from the database schema through code generation, also known as "Database reverse engineering." It's essential to avoid altering the generated classes since they can be regenerated at any time, and any changes made in the source code will be lost. However, this approach does not eliminate the need for migration script generation, as they are necessary for upgrading existing installations to the latest version.
Source code first
This is the opposite approach, here the data model classes serve as the single source of truth. Hence, the database gets modified by changes made in the data model. To update the database, migration scripts must represent the changes between the outdated database state and the current state of the data model classes in any format, such as Flyway SQL migrations or Liquibase changelogs.
JPA Buddy provides convenient tools to help developers proceed with each of these two scenarios. This guide shows how JPA Buddy can save a lot of time for differential update scripts generation.
Database Connection
The first thing you need to do to use the database versioning features is to create a DB connection. A separate documentation describes how to do this correctly and mentions any possible problems you may encounter. Check it out to learn more.
Library Support
JPA Buddy supports two popular solutions that are often used in Java applications along with JPA: Flyway and Liquibase. However, there is an option to obtain DDL scripts for your JPA entities even if none of these are used in the project.
If you would like to see a short overview and practical examples of using Flyway or Liquibase you can use the following links:
- https://www.baeldung.com/database-migrations-with-flyway
- https://www.baeldung.com/liquibase-refactor-schema-of-java-app
Make sure that the project contains the right maven dependencies to enable the corresponding features:
<dependency>
 <groupId>org.liquibase</groupId>
 <artifactId>liquibase-core</artifactId>
 <version>4.4.3</version>
</dependency>
Or:
<dependency>
 <groupId>org.flywaydb</groupId>
 <artifactId>flyway-core</artifactId>
 <version>7.15.0</version>
</dependency>
General Differential Scripts Generation Flow
The general path of the diff scripts generation for both frameworks is nearly the same. However, there are some differences which are also highlighted in this guide. To avoid repetition, we will call both Liquibase changelogs and Flyway versioned migrations "migration scripts".
To generate a differential migration script with JPA Buddy, right-click on the desired folder and select New -> Liquibase -> Diff Changelog or New -> Flyway -> Diff Versioned Migration. Alternatively, click the Plus button on top of the JPA Structure tool window and select the corresponding item there.
In the opened dialog select source (the desired state of the data model) and target (the old state of the data model).
Resulting migration script(s) = Current State (Source) – Previous State (Target).
In other words, JPA Buddy will generate the resulting migration script for upgrading the target database to the source's state.
You can choose between the following source options:
- DB — should be used in case you have an up-to-date database and would like to generate migration scripts for updating another DB to the same state.
- Model — use it to generate migration scripts representing the difference between the current state of the entity relationship model (JPA entities) and the old (target) state.
The target can be set to:
- DB — target DB with an older version of the schema.
- Snapshot — use this option in case you have the desired state stored in a data model snapshot. It can be generated by JPA Buddy as well.
Click OK to proceed further. JPA Buddy will analyze the difference between Source and Target and show the Preview dialog to enable fine tuning for the resulting migration script. Click Save to add the new script to the project or to append an existing one.
Differential Migration Scripts Generation Options
Using a Database
It makes sense to comparing a database with another database/snapshot, if you have a source database already synchronized with your data model. There are two popular approaches for keeping a database in accordance with JPA entities:
- using schema auto-generators (Hibernate and EclipseLink provide their own implementations).
Note, that even Hibernate documentation warns against using this way beyond prototyping or testing reasons. - applying changes in JPA entities over the database schema manually.
This approach may appear to be too laborious, especially for early development stages when the data model is being changed frequently.
Using a Data Model
An application uses JPA entities to represent the data model, including entities, associations, indexes, and other related elements, in accordance with JPA principles. In other words, it already contains sufficient information about the database schema. So, your source code is the only point of truth, which represents the up-to-date (source) schema. This is why it's preferable to compare your data model with a database/snapshot for generating differential changelogs.
JPA Buddy scans all JPA objects, compares them with a target database or a snapshot and generates a differential migration script.
When a data model serves as the source for the current schema state, it causes the selection of a persistence unit. Following the documentation:
A persistence unit defines a set of all entity classes that are managed by EntityManager instances in an application. This set of entity classes represents the data contained within a single data store.
Effectively this means that if your application uses multiple data stores, you will need to generate migration scripts separately for each of them, specifying corresponding persistence units.
To configure a new persistence unit, click on the plus button in the JPA Structure tab and choose "Persistence Unit". In the opened window, you can define the persistence unit name, the default DB connection and select the required entities. For entity selection, you have two possibilities:
- You can scan the needed package, and all entities located in it will be added automatically
- You can manually select entities from the project
Using a Data Model Snapshot
JPA Buddy allows using a data model snapshot as the target of the comparison. Sometimes, it is impossible or difficult to obtain a database for a certain state of the model, for example, when merging changes into some earlier application version. It may be simply unfeasible to keep a database dump for each release. JPA Buddy lets you checkout the required version of the application and generate a JSON snapshot based on the JPA entities, eliminating the need for a database when producing differential migration scripts.
To generate a snapshot, open JPA Buddy panel and click on the Plus button. Then, select the Data model snapshot item.
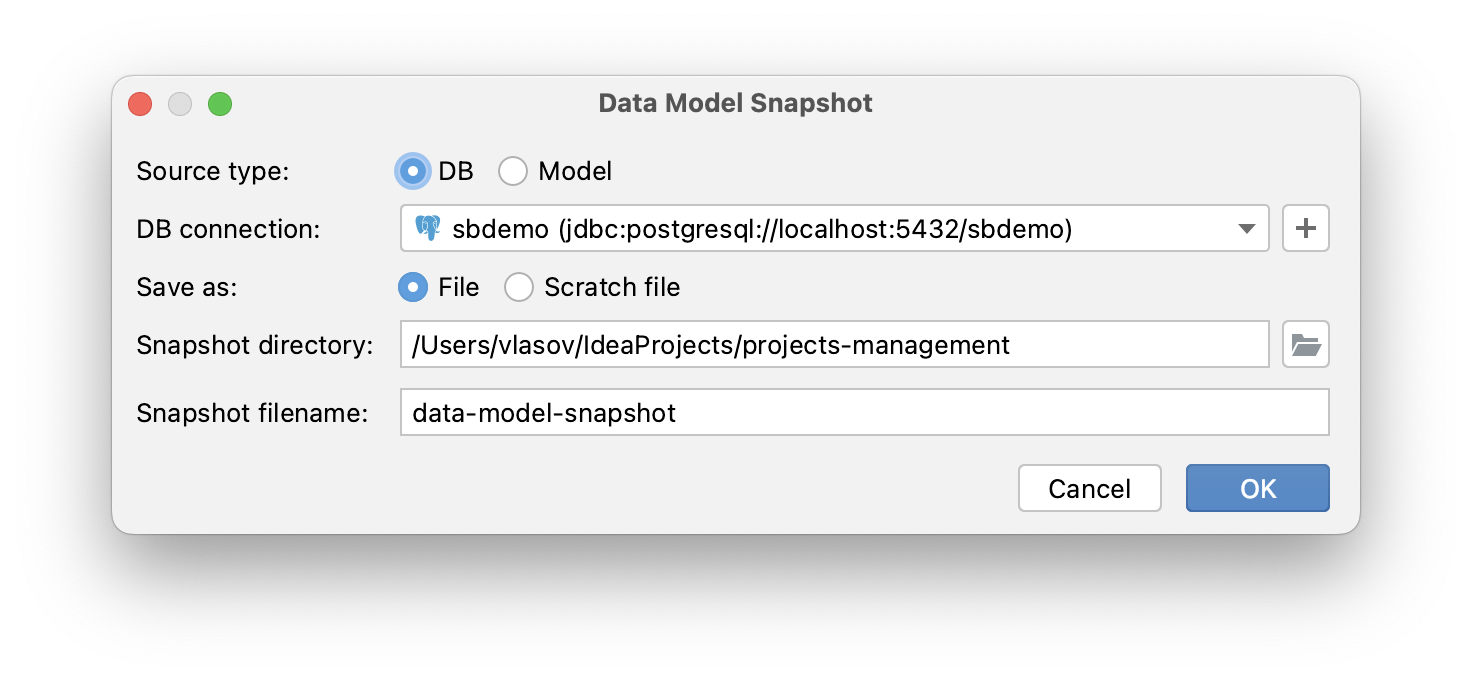
This allows you to capture the state of the data model at some older point, so that you can create a diff migration script describing all the modifications that happened from that point until now.
For example, you have been working in a feature branch and modified the model. Before merging, it is necessary to create a diff changelog describing the changes in this branch only.
Depending on the setup, there might be no DB that is always in sync with the main branch. Things get even more complicated when you need to merge changes into a state of the application other than the main branch, such as a release branch. Maintaining a database dump for each release may not be practical. JPA Buddy offers a simpler alternative:
- Checkout the target branch (for example, main or release)
- Create a snapshot of the model in that branch
- Checkout the feature branch
- Generate a diff migration script by comparing the model and the snapshot you created in step 2.
In four simple steps you get a migration script that describes the changes between the current branch and the target branch.
Init Schema
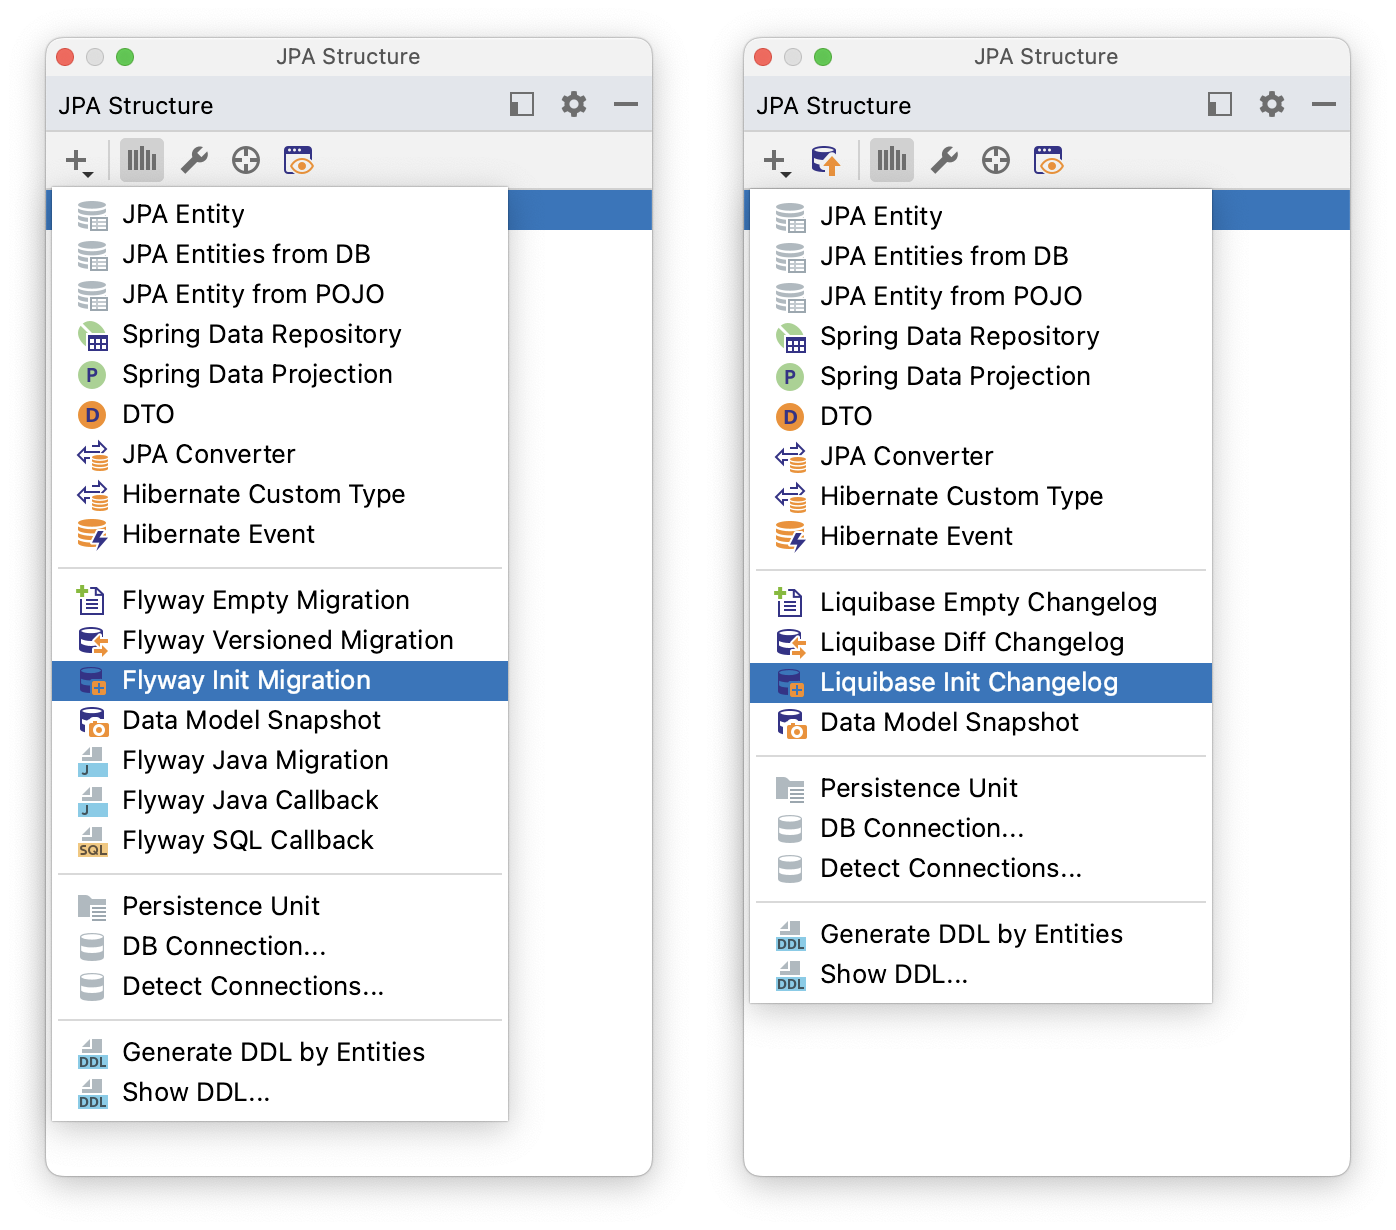
For both Liquibase and Flyway, JPA Buddy provides an action to generate an initialization script for your schema. Once you select this action from the JPA Structure tab, the corresponding window will appear:

To generate the DDL script based on the data model you will need to specify the corresponding persistence unit, scope and one of the supported DB types.
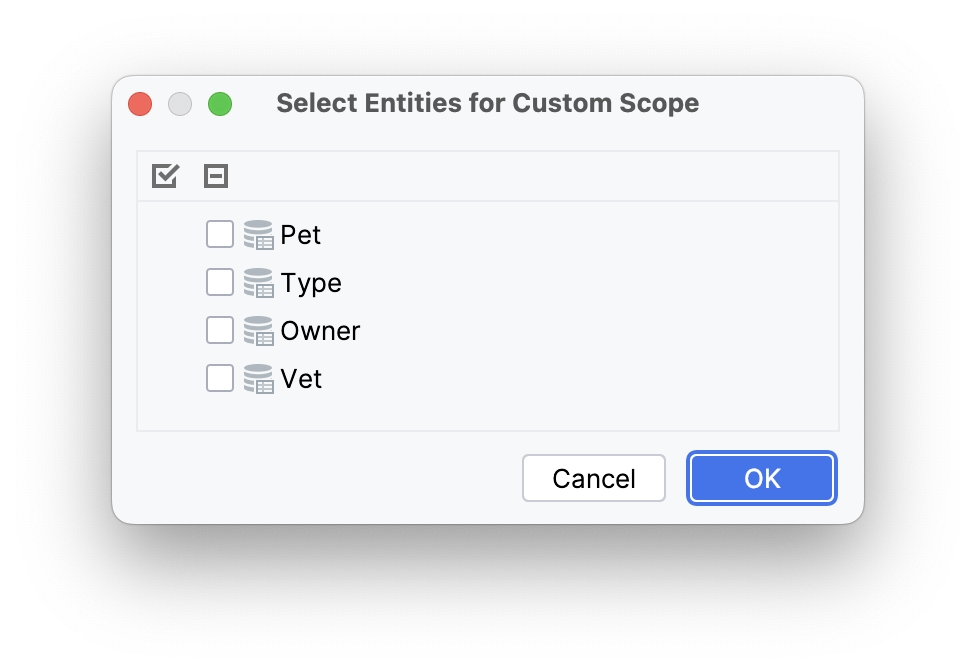
Additionally, JPA Buddy provides an option to create migration scripts specifically for selected entity changes as a custom scope. This can be done by clicking on the Scope drop-down menu, selecting "Selected Entities", and choosing the relevant entities in the "Select Entities for Custom Scope" window.
In case you want to compare two databases, you will need to choose one of the existing connections for both of them.

Preview Window
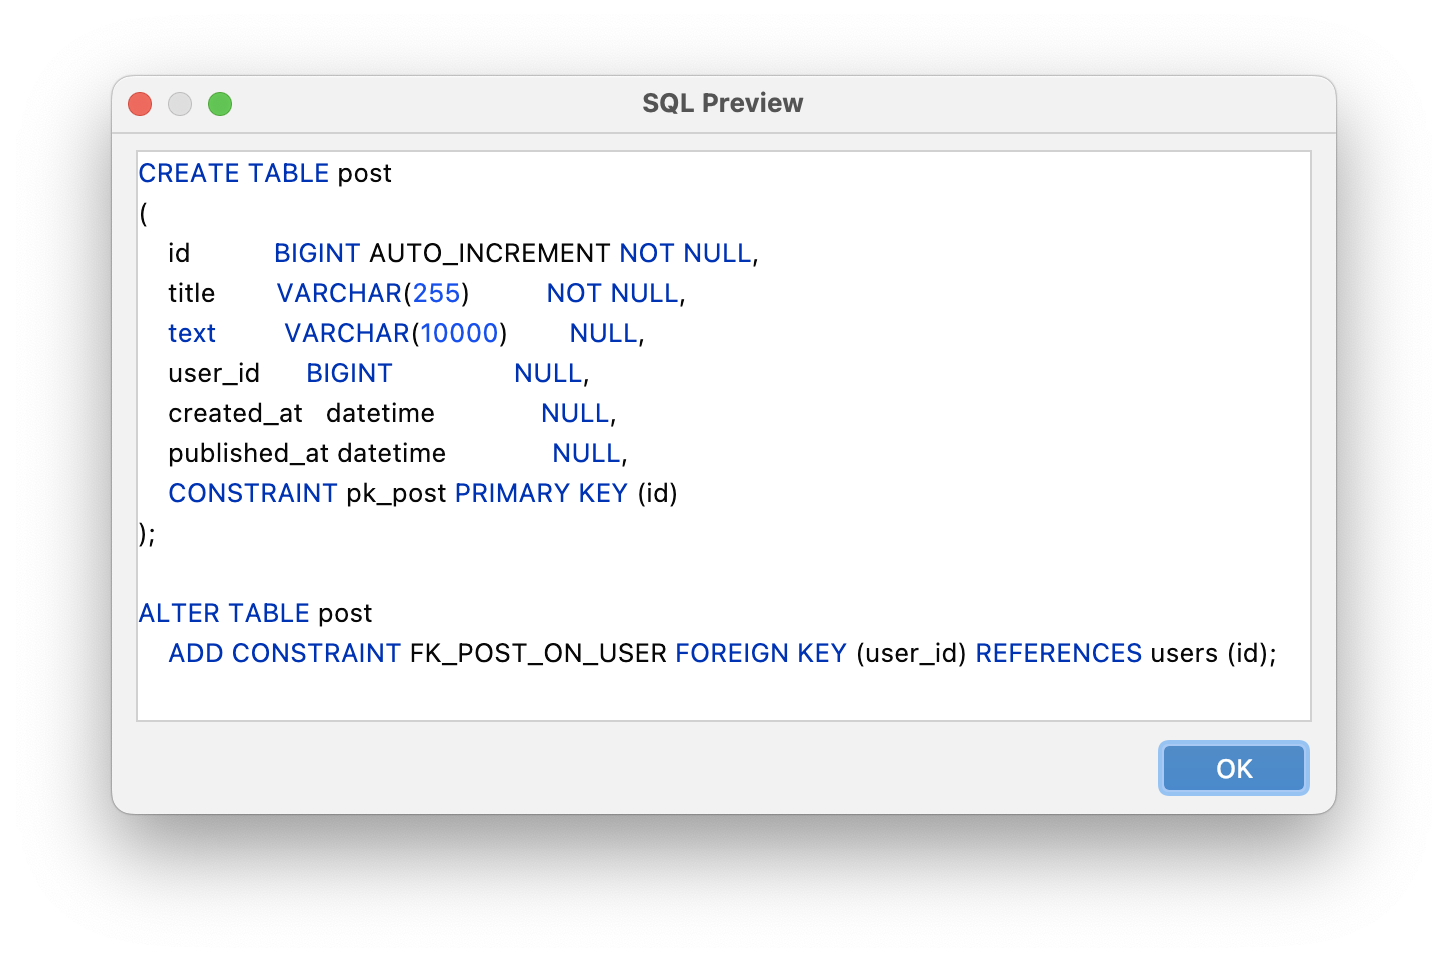
Click OK to proceed to the preview window of the migration script. The preview window for Liquibase looks like this (Flyway preview window is slightly different):
Some types of changes have custom fields in the preview window. For example, "add not null constraint" change allows you to replace all existing NULL values in the DB with a specified value:

Each change type is color-coded according to its danger level: green for SAFE, yellow for CAUTION and red for DANGER. SAFE operations are the ones that cannot cause loss of data in any way, for example, adding a column does not affect the existing data. Operations marked with CAUTION are generally safe but require your attention: for instance, adding a NOT NULL constraint can fail if there are null values in the column. DANGER operations can cause loss of data, for example, dropping a column or modifying a data type.
The danger levels can be customized in the plugin preferences in JPA Buddy -> Database Versioning -> Diff Changes:
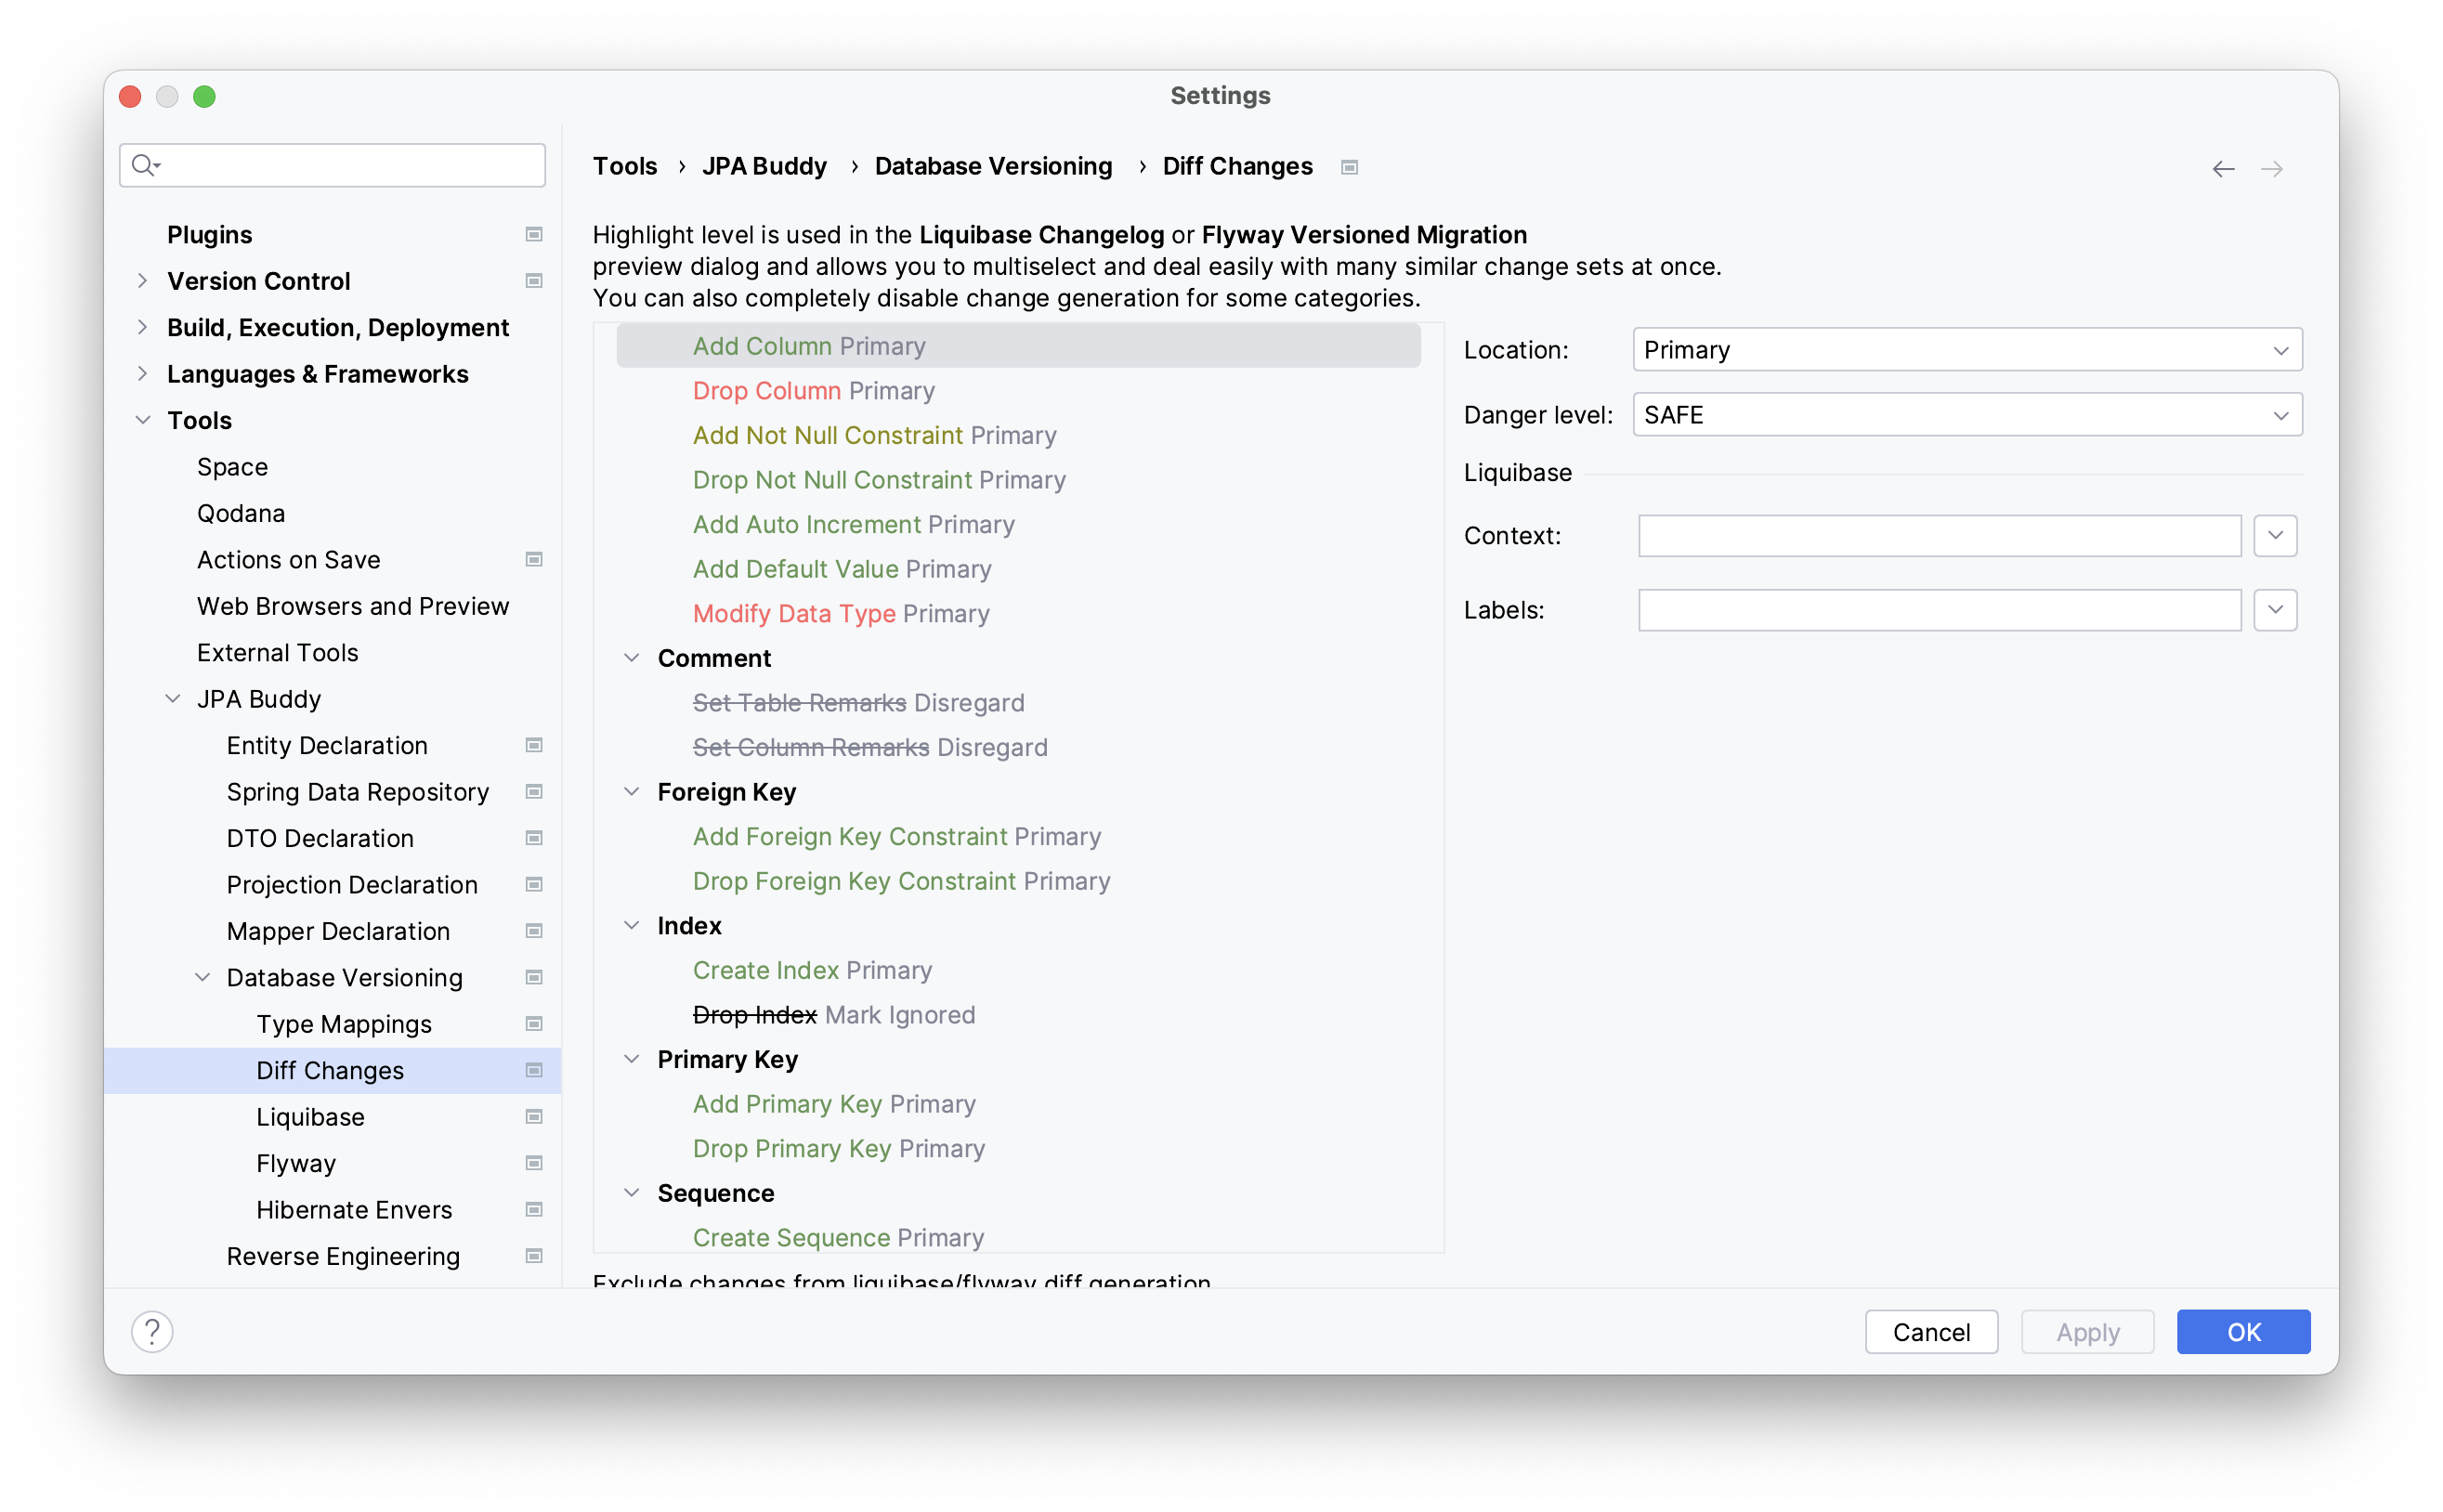
You can configure the location of each change type, either in the primary or secondary location, or ignore it altogether. By default, newly generated migration scripts will exclude ignored changes but display them in the "Ignored" section during preview so that they can be added back manually. For Liquibase, you can also set the context and labels to use for each change type.
Merging statements
Basically, renaming schema elements, such as table name, column name, etc., leads to two statements:
- Drop an existing value
- Add a new one
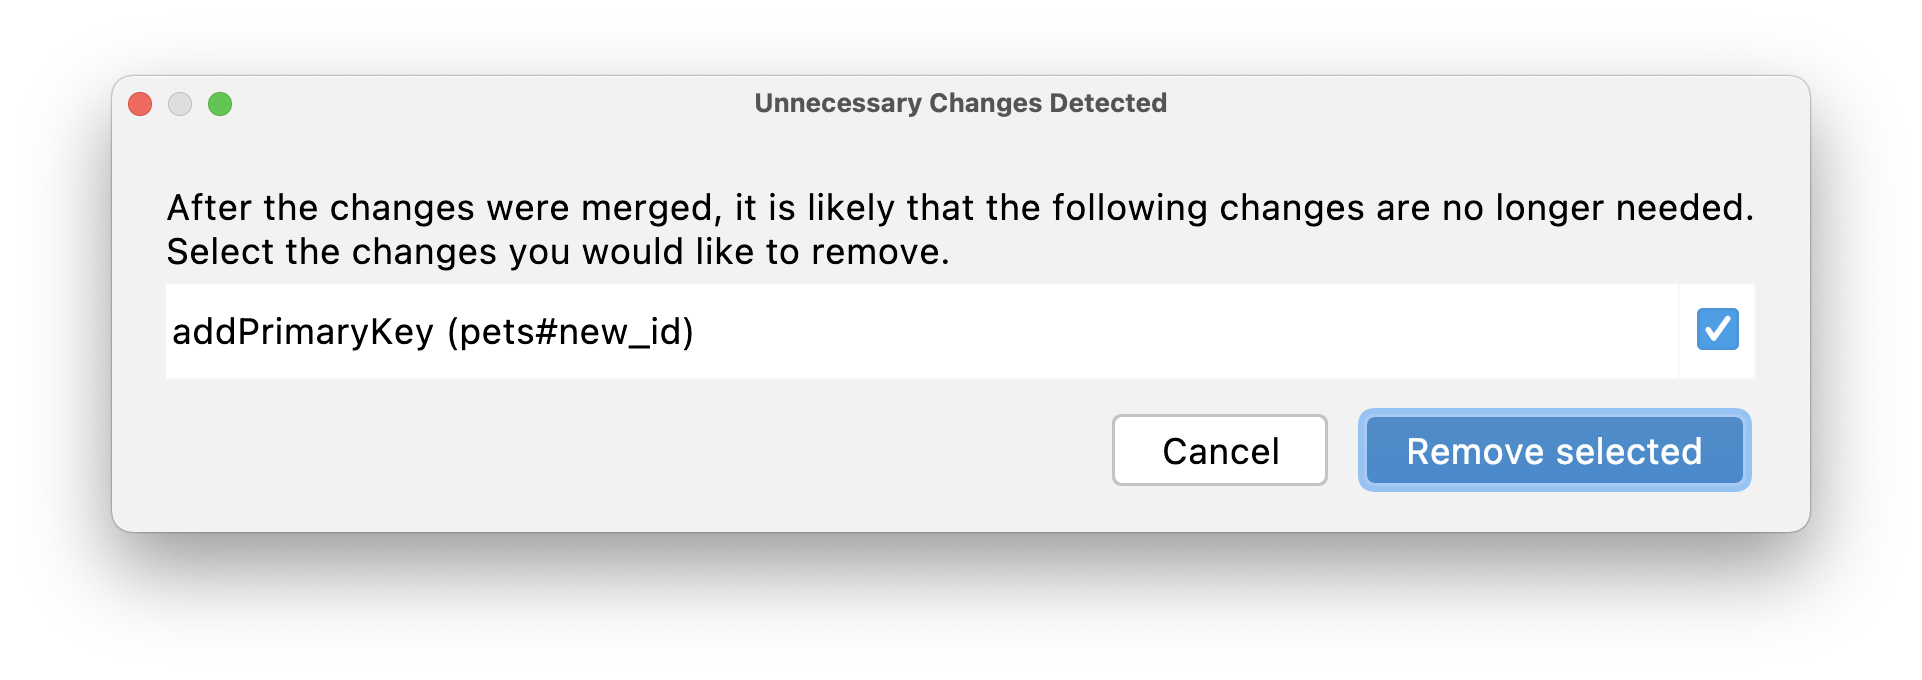
But JPA Buddy can replace such statements with a single rename or modify statement. For example, you will see two statements in the preview window after renaming a column/table/sequence or changing a column type. But by choosing any of the related statements, you can merge them:
After the merge, drop statements may be irrelevant. You can choose the changes that you want to remove from the migration scripts. For example, after renaming an id column (rather than dropping an old value and adding a new one), there is no need to add a new primary key for it:
Liquibase Support
Changelog Preview Window
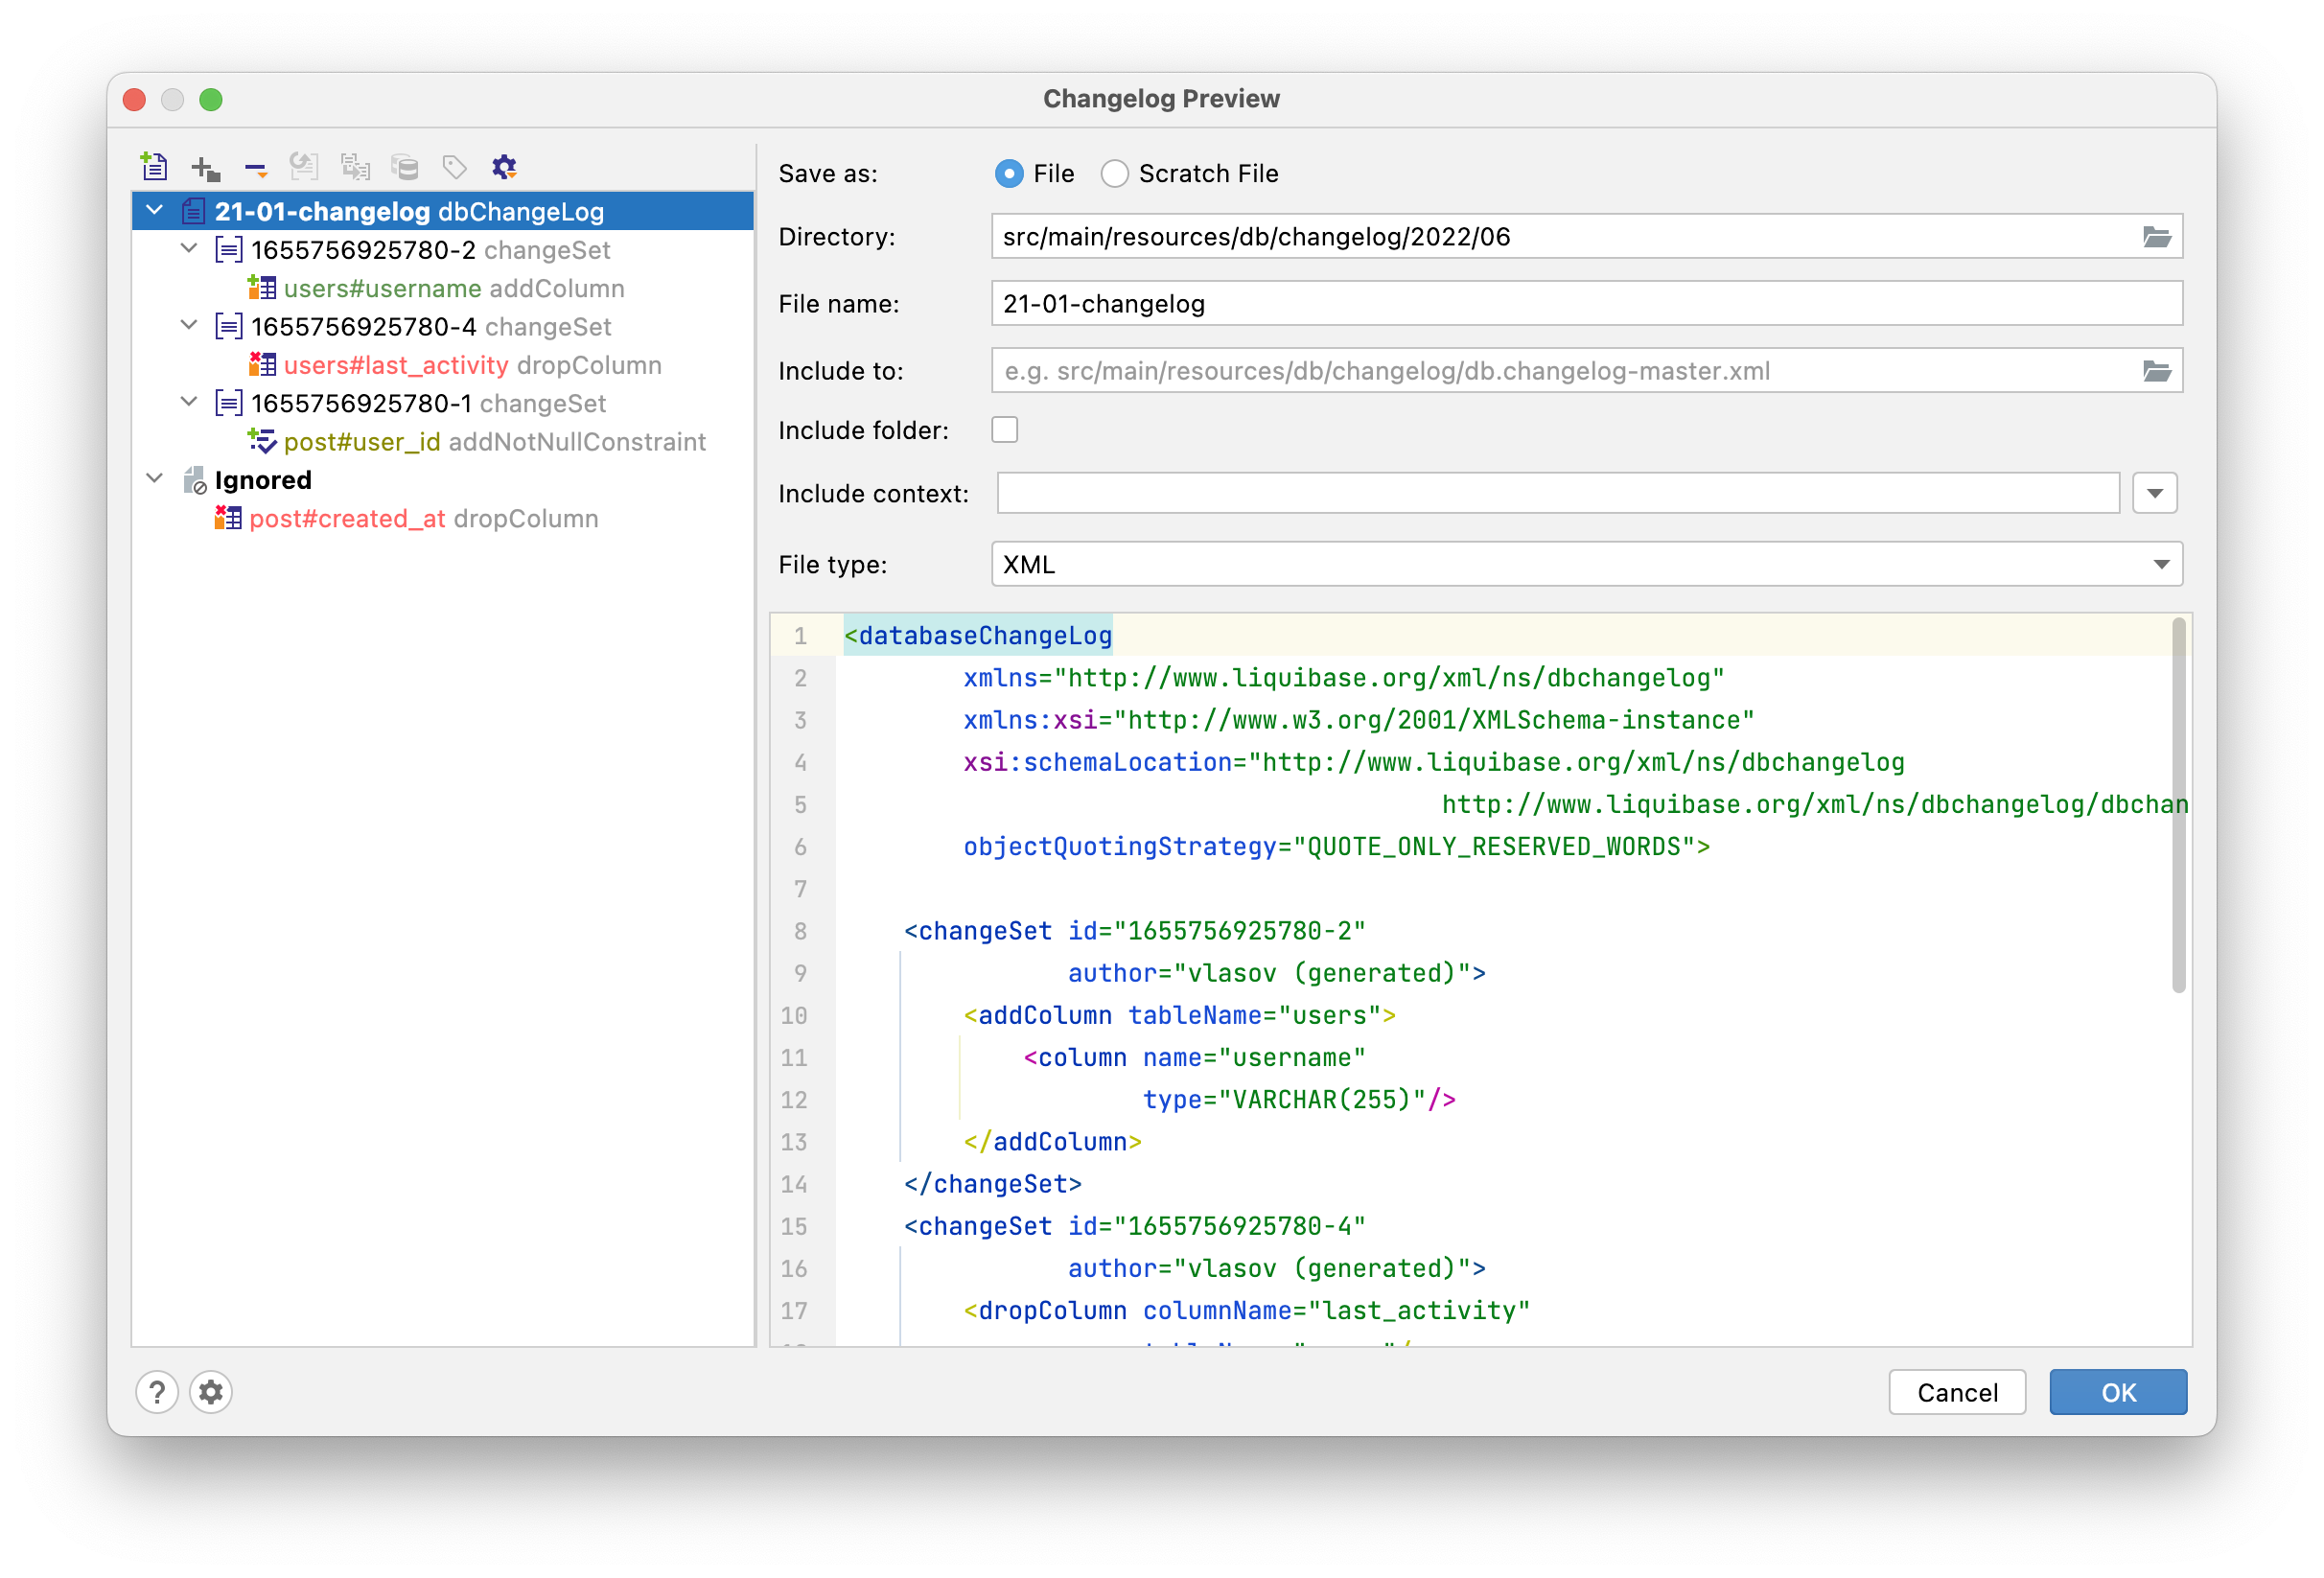
If you want to save the changelog as a regular file, then the following configuration options will be available:
- "Directory" and "File name" fields are responsible for configuring the location of the generated changelog. If a changelog with the specified name already exists, you will be prompted with a warning, after which the changes will be appended to that changelog.
- You can use "Include to", "Include folder", and "Include context" to specify whether a changelog should be included in another changelog. If you check the "Include folder" box, it generates the include statement for the entire folder, not just the current changelog.
- From the "File type" drop-down list, you can choose one of the four file types (YAML, JSON, SQL, XML) supported by Liquibase , in which JPA Buddy will generate the changelog.
If you want to save the changelog as a scratch file, then you can configure only its name and type.
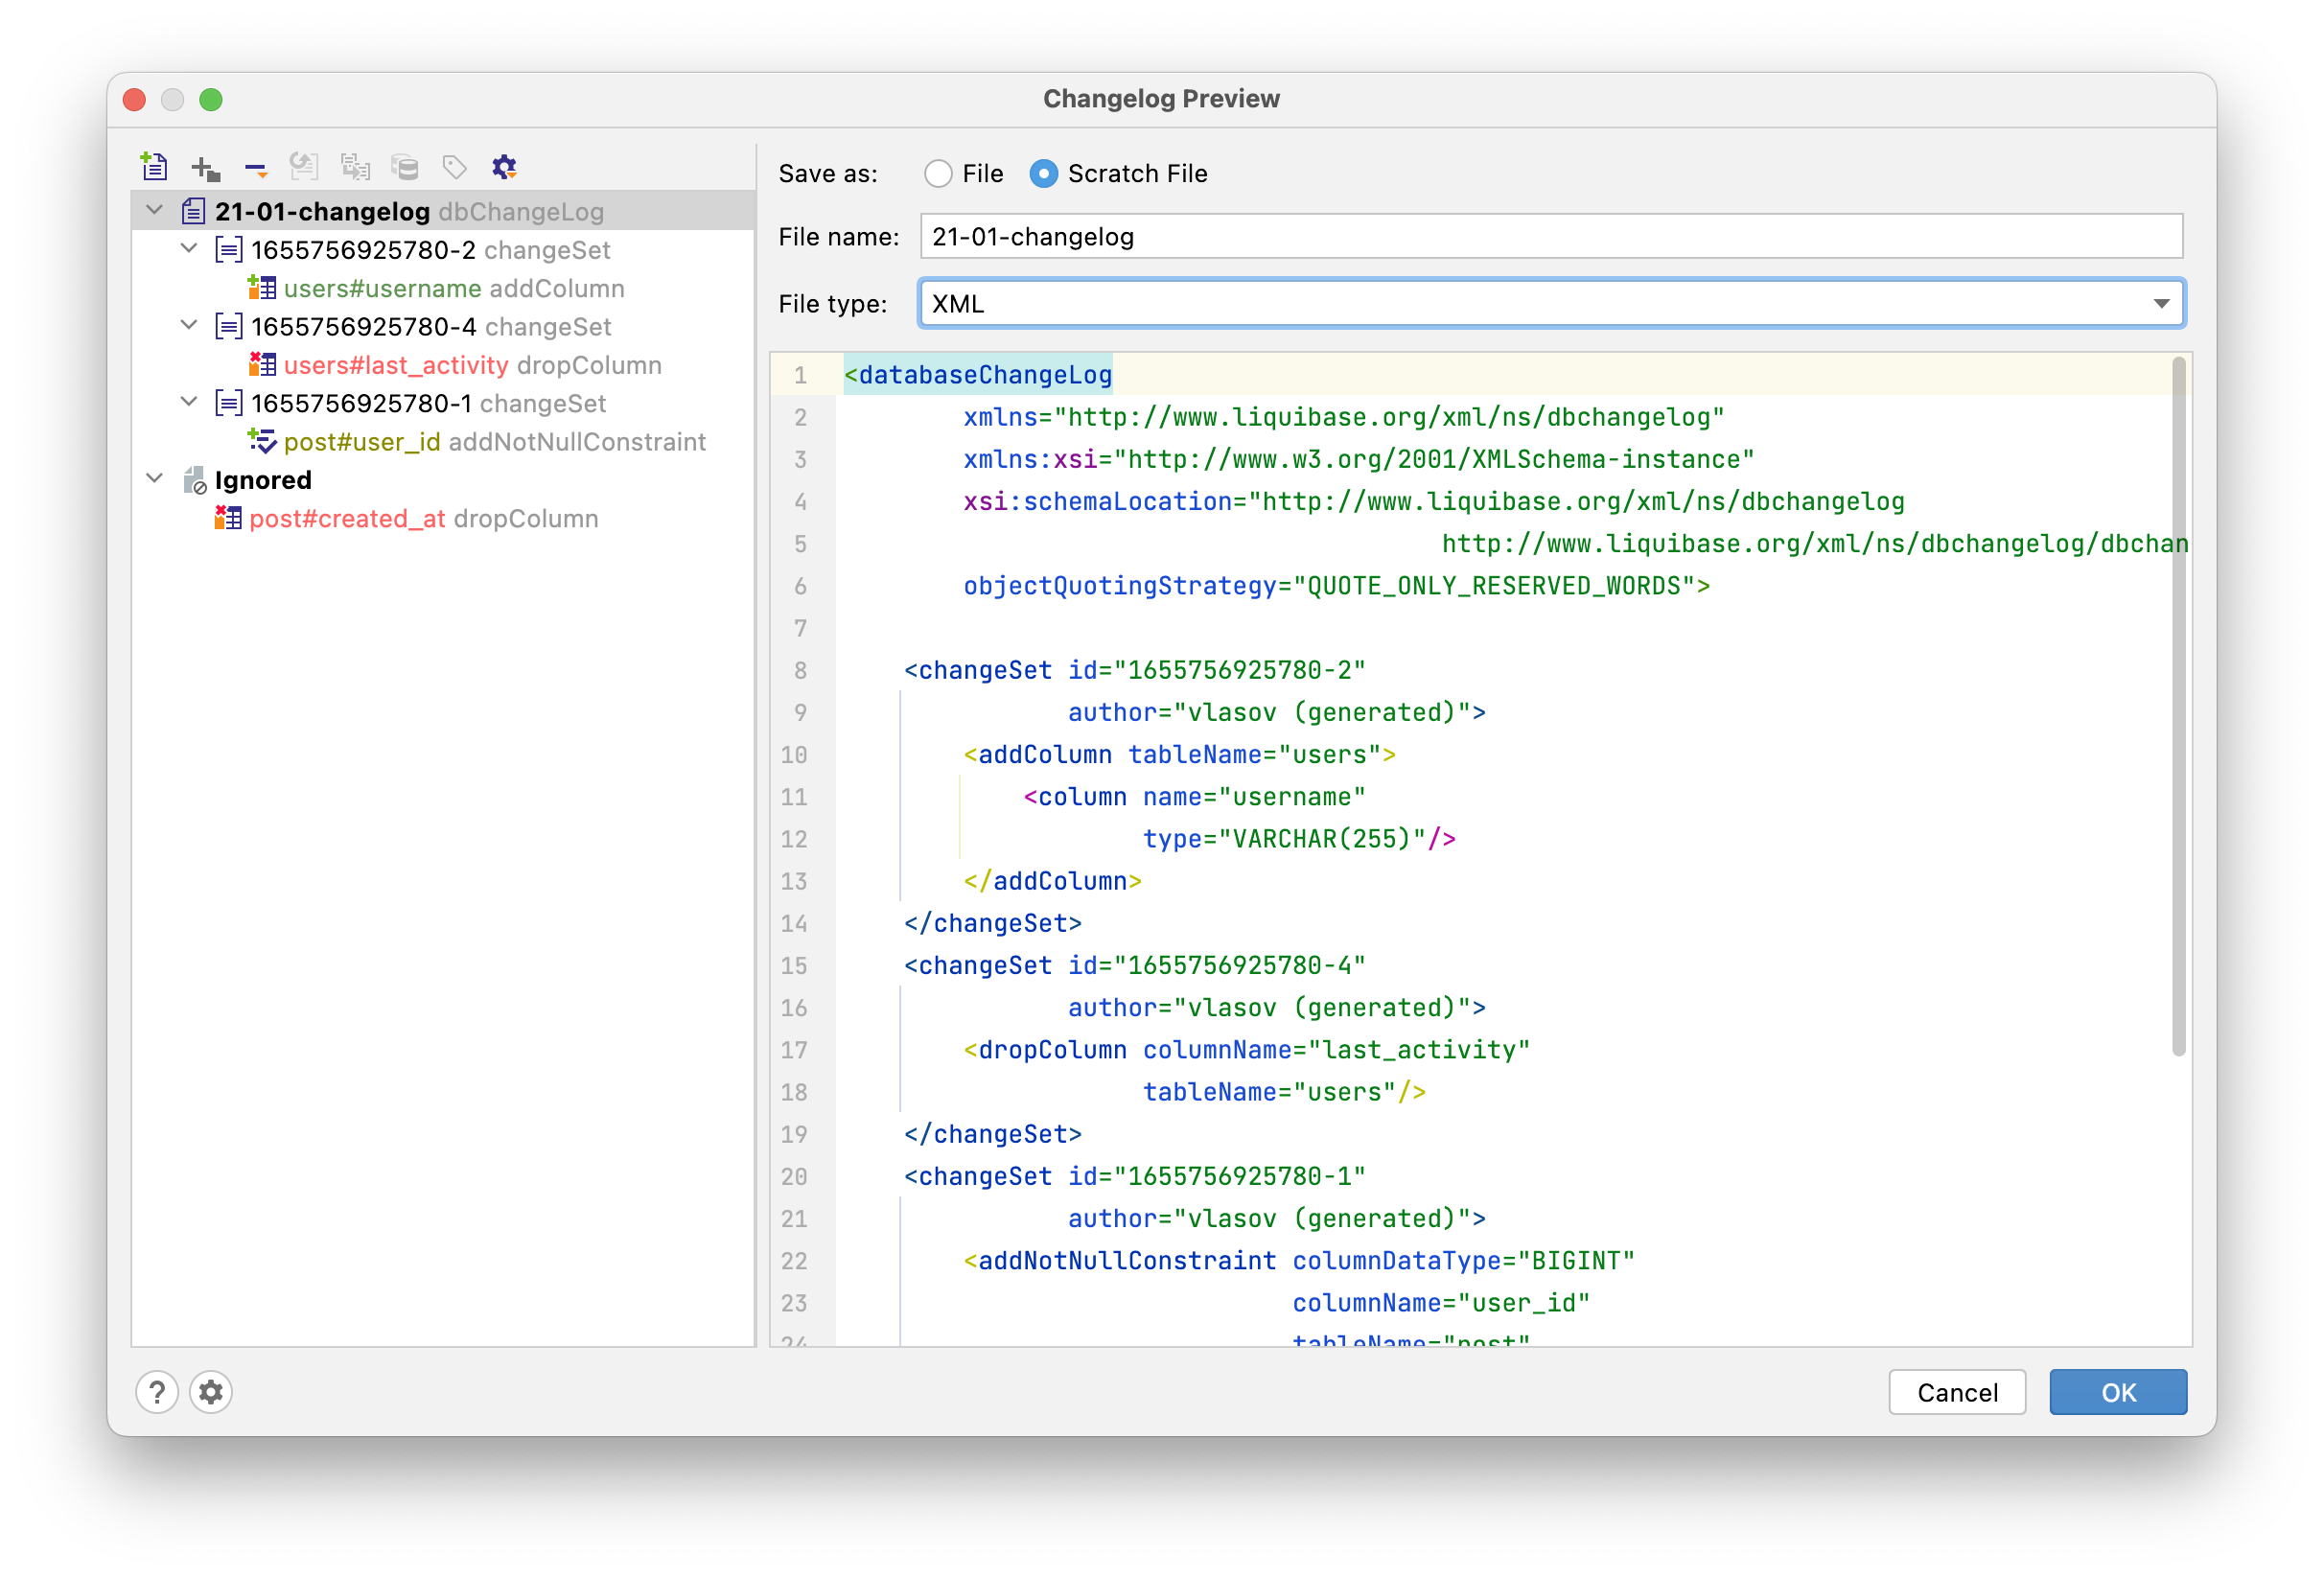
The left side of the window shows a preview of the changesets that will be generated. You can click on each change to see what it will look like. To combine several changes into one changeset or to ignore them, simply drag and drop them. The top left corner of the preview window contains various actions to modify the resulting changelog:

The following actions are provided:
- Add Changelog — create a secondary changelog
- Add Change Set — create a new changeset in the selected changelog
- Remove from Changelog with options:
- Remove from Changelog — simply remove the changes from the current changelog
- Remove and Ignore — remove the changes and add them to "Ignored", so they are excluded from future changesets too
- Restore from Ignored — move the changes from "Ignored" to the changelog
- Set Context (for changesets)
- Set Labels (for changesets)
- Show Other Actions — select all changes based on the danger level, expand/collapse all changes
Primary and Secondary Changelogs
JPA Buddy lets you put the changes into two types of changelogs: Primary and Secondary. One use case for this is separating safe changes that can be run automatically and changes that require your attention and need to be run manually.
The changes can be separated automatically by their type (in Settings -> Diff Change Types). Alternatively, you can create a secondary changelog manually in the Preview window using the "Add Changelog" action. Then you can simply drag the desired changesets into the new changelog.
By default, Primary and Secondary changelogs are generated in separate directories, which can be customized in the plugin settings. Read more in the Settings -> Database Versioning -> Liquibase section.
Creating and Modifying Changelogs
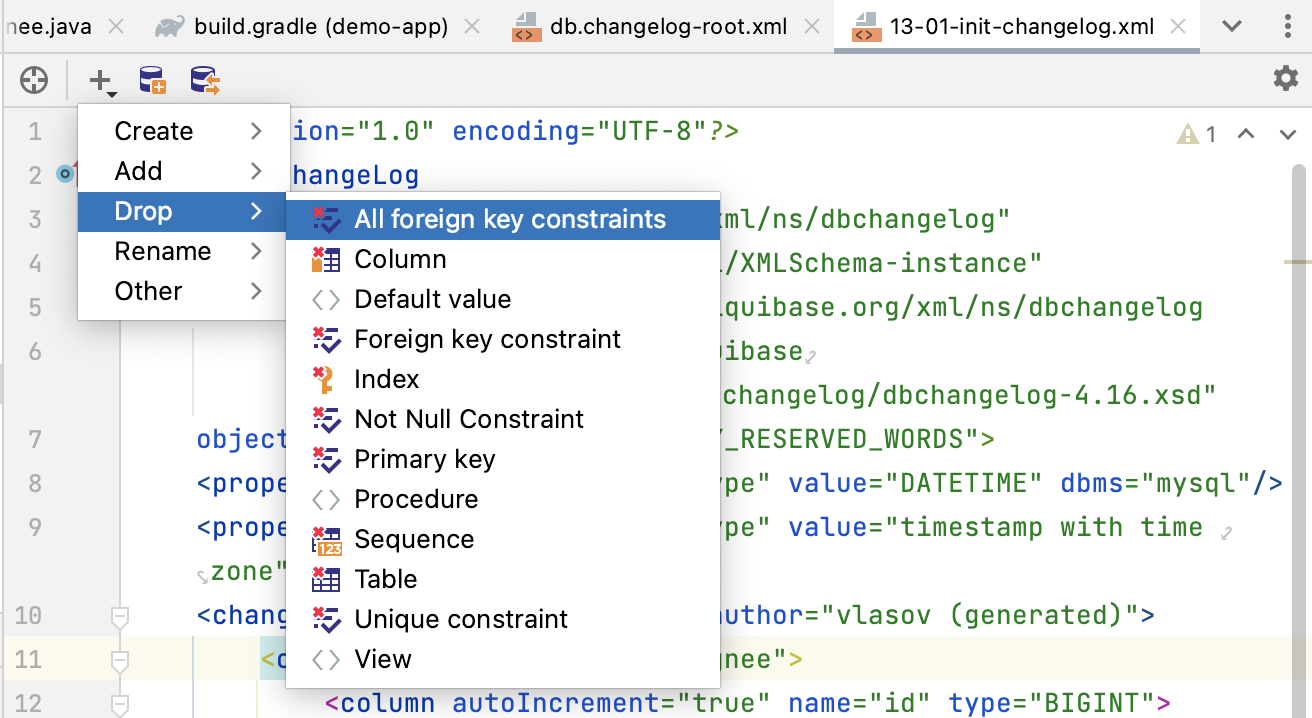
JPA Buddy also offers tools for viewing, creating and modifying changelogs by hand. It adds additional UI elements to IntelliJ IDEA.
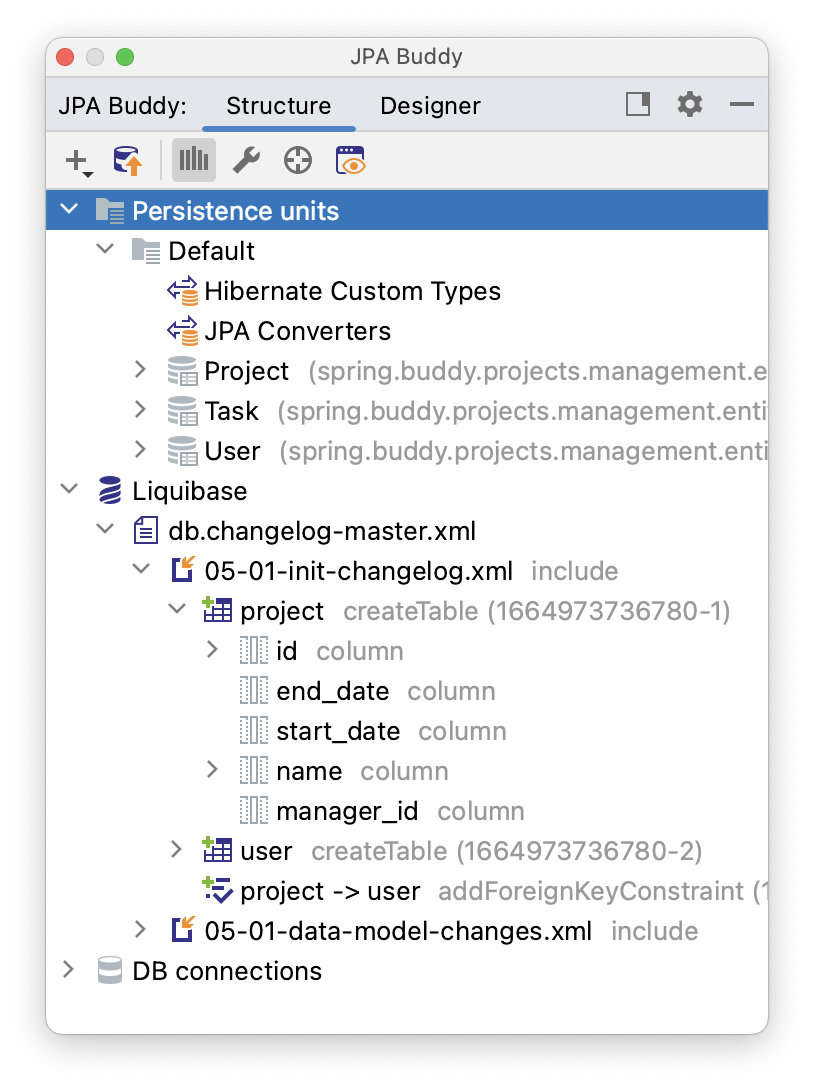
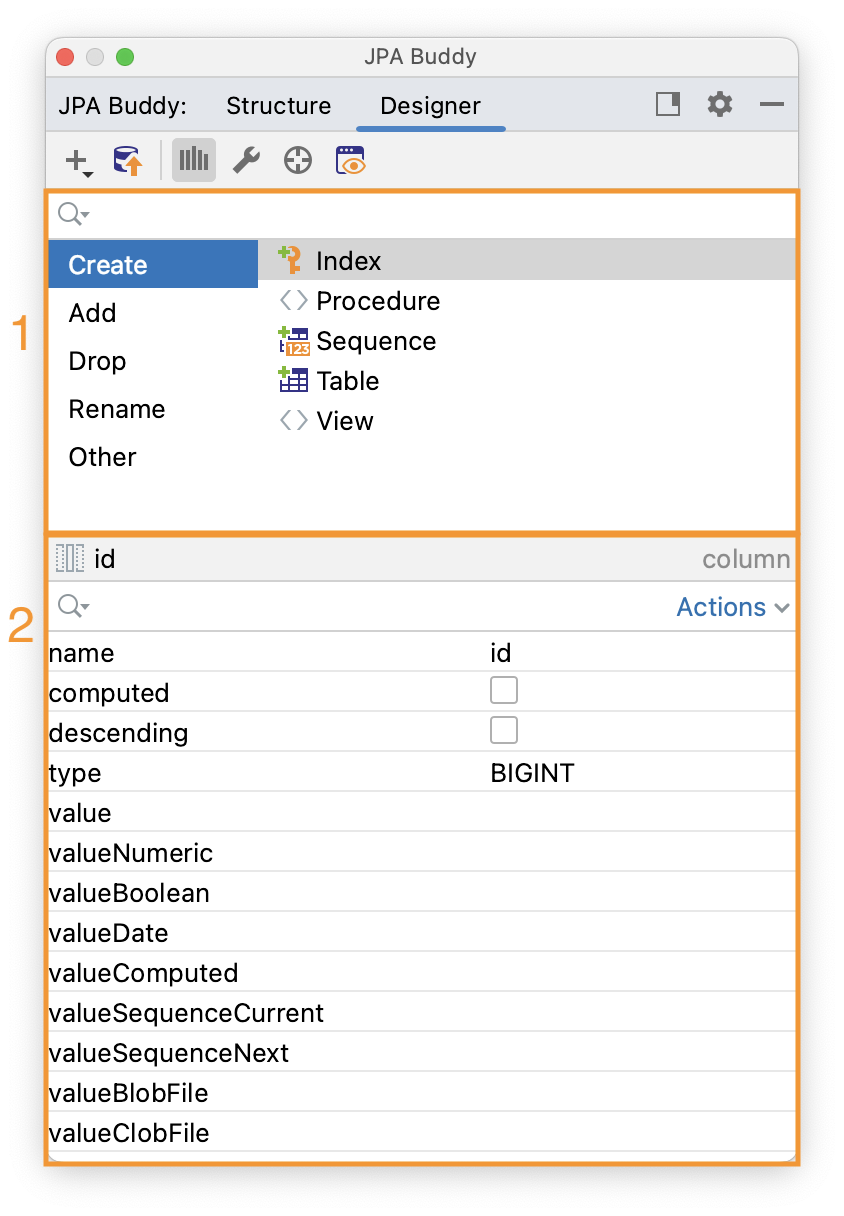
JPA Structure displays everything that JPA Buddy knows about the project. For Liquibase changelogs, it shows their hierarchy and contents:
To create a new changelog, right-click the desired folder in the project tree and select New -> Liquibase -> Empty Changelog. Or click the "plus" button in the top-left corner of the JPA Structure tab:
![]()
JPA Designer tab lets you generate and modify code. This tab is context-dependent, and displays options available for the opened file type. This tab splits into two parts: JPA Palette (1) and JPA Inspector (2). JPA Palette is used for code generation, and JPA Inspector for code modification.
Editor Toolbar provides fast access to relevant actions. It includes:
- An action to select the opened file in JPA Structure
- All actions from JPA Palette
- Init Schema Changelog action
- Diff Changelog action
JPA Buddy understands your data model and prefills the changesets as much as possible. And with the help of JPA Inspector you can explore the attributes of each changelog element:

JPA Buddy also makes writing code by hand easier by providing code completion based on the JPA data model:
Running Liquibase changelogs/previewing SQL without Gradle/Maven plugins
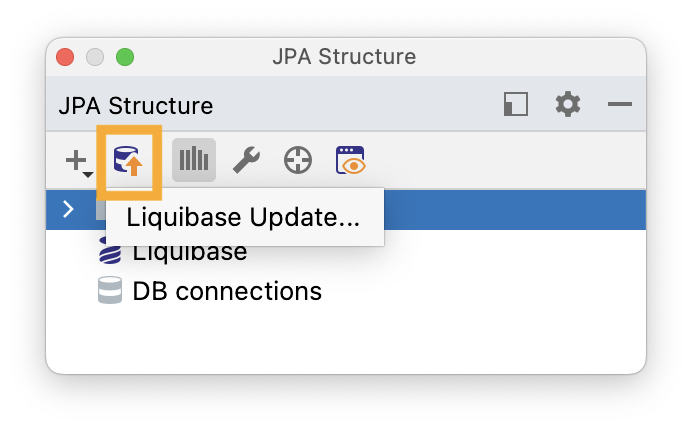
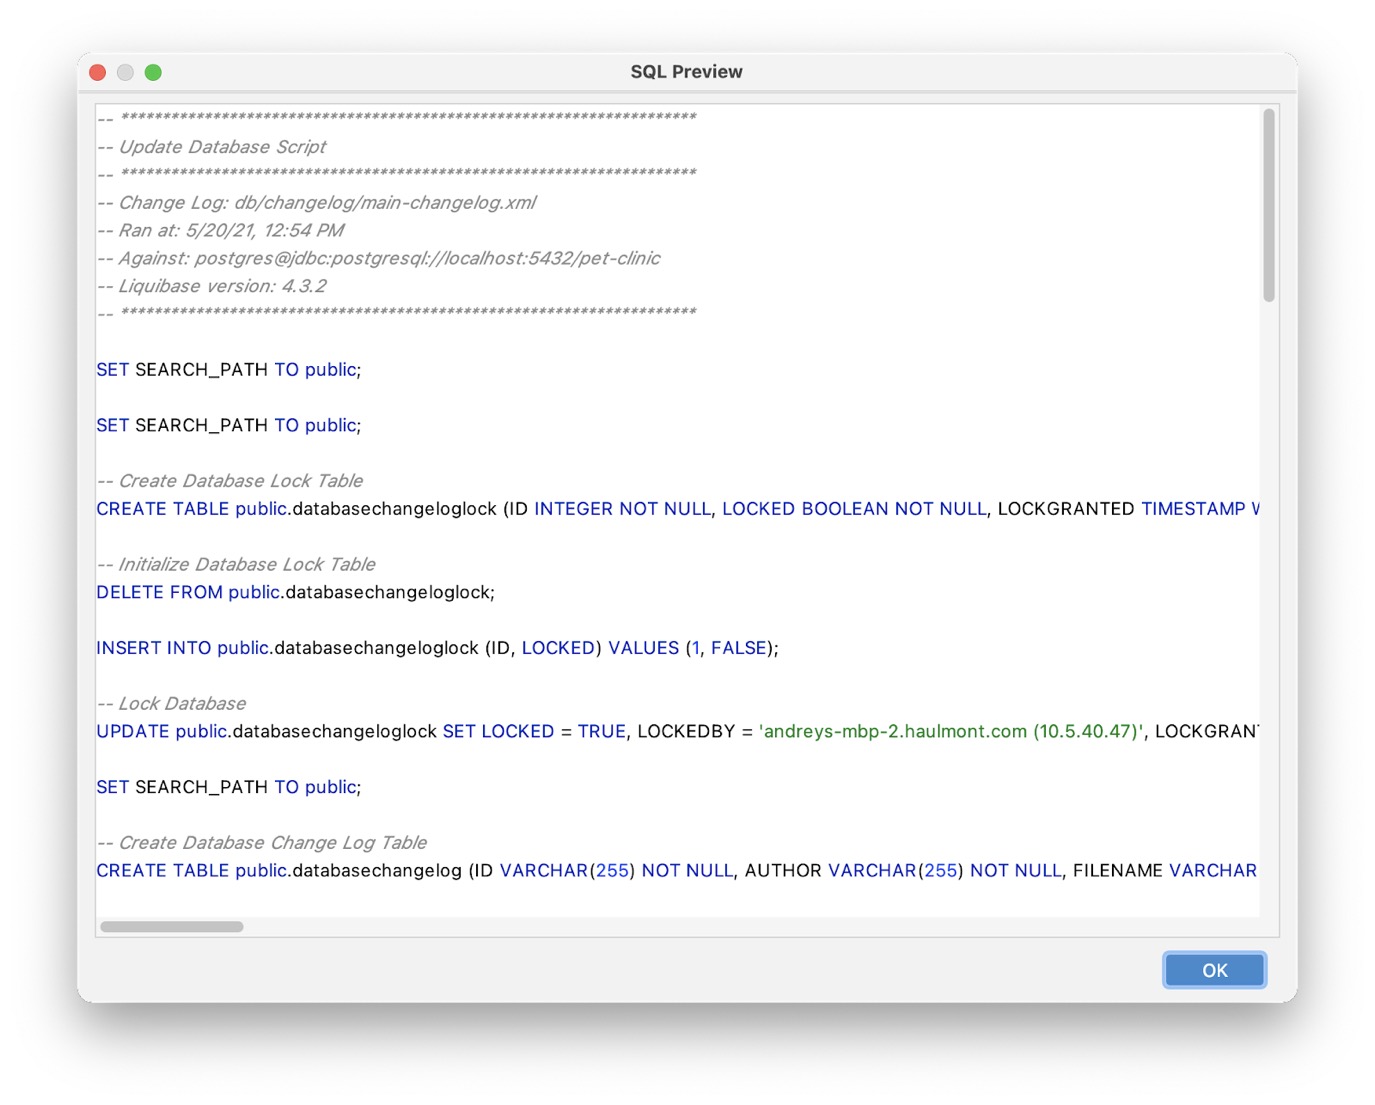
The JPA Structure tab also offers a way to run Liquibase updates and preview SQL. To run an update, click the "Liquibase Update" button:
The Liquibase Update window will open with configuration options:
- the path to the changelog file
- which DB connection to use
- Liquibase context and labels
- the log level of the operation
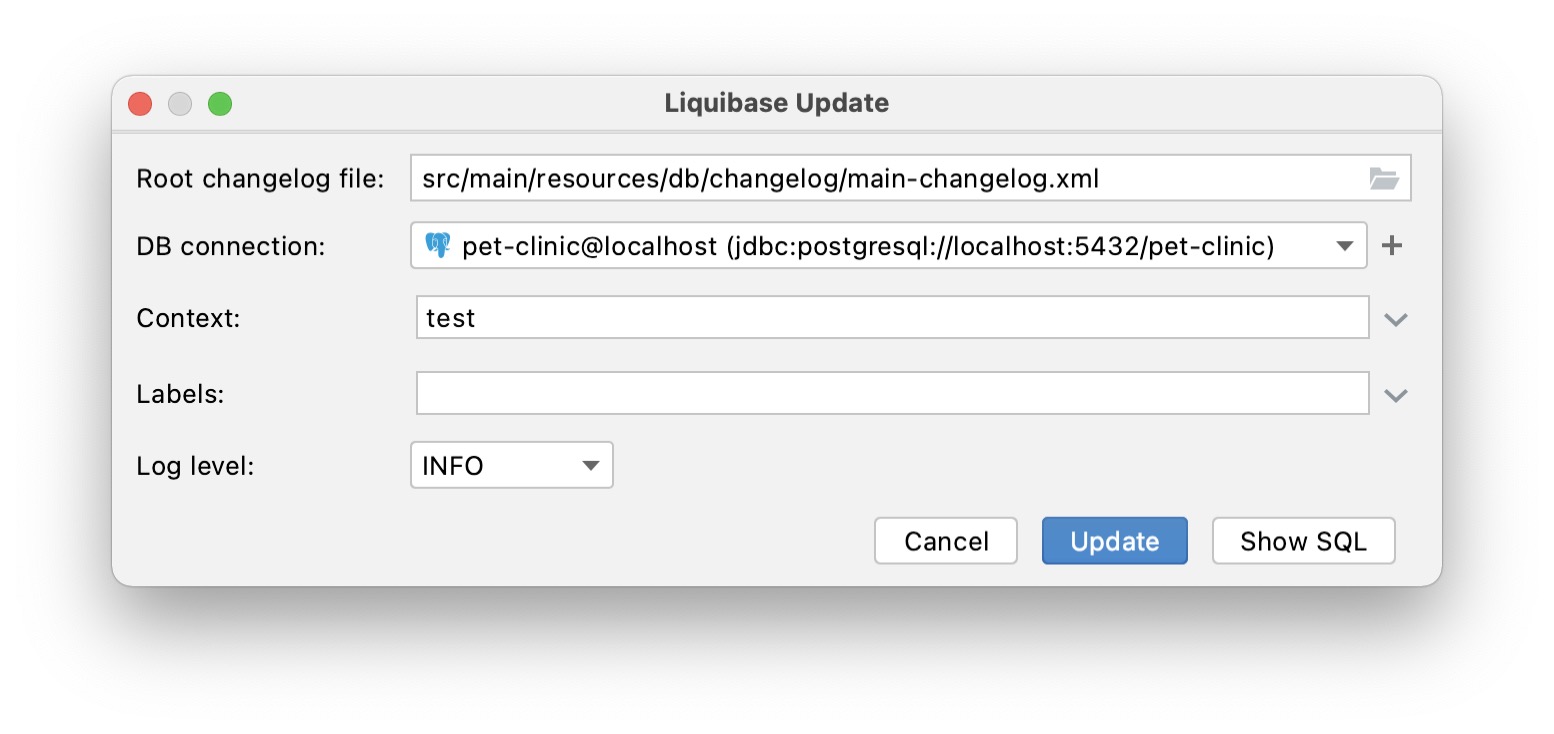
Clicking "Update" runs the Liquibase update command with the configured options. Clicking "Show SQL" displays a preview window:
Liquibase Settings
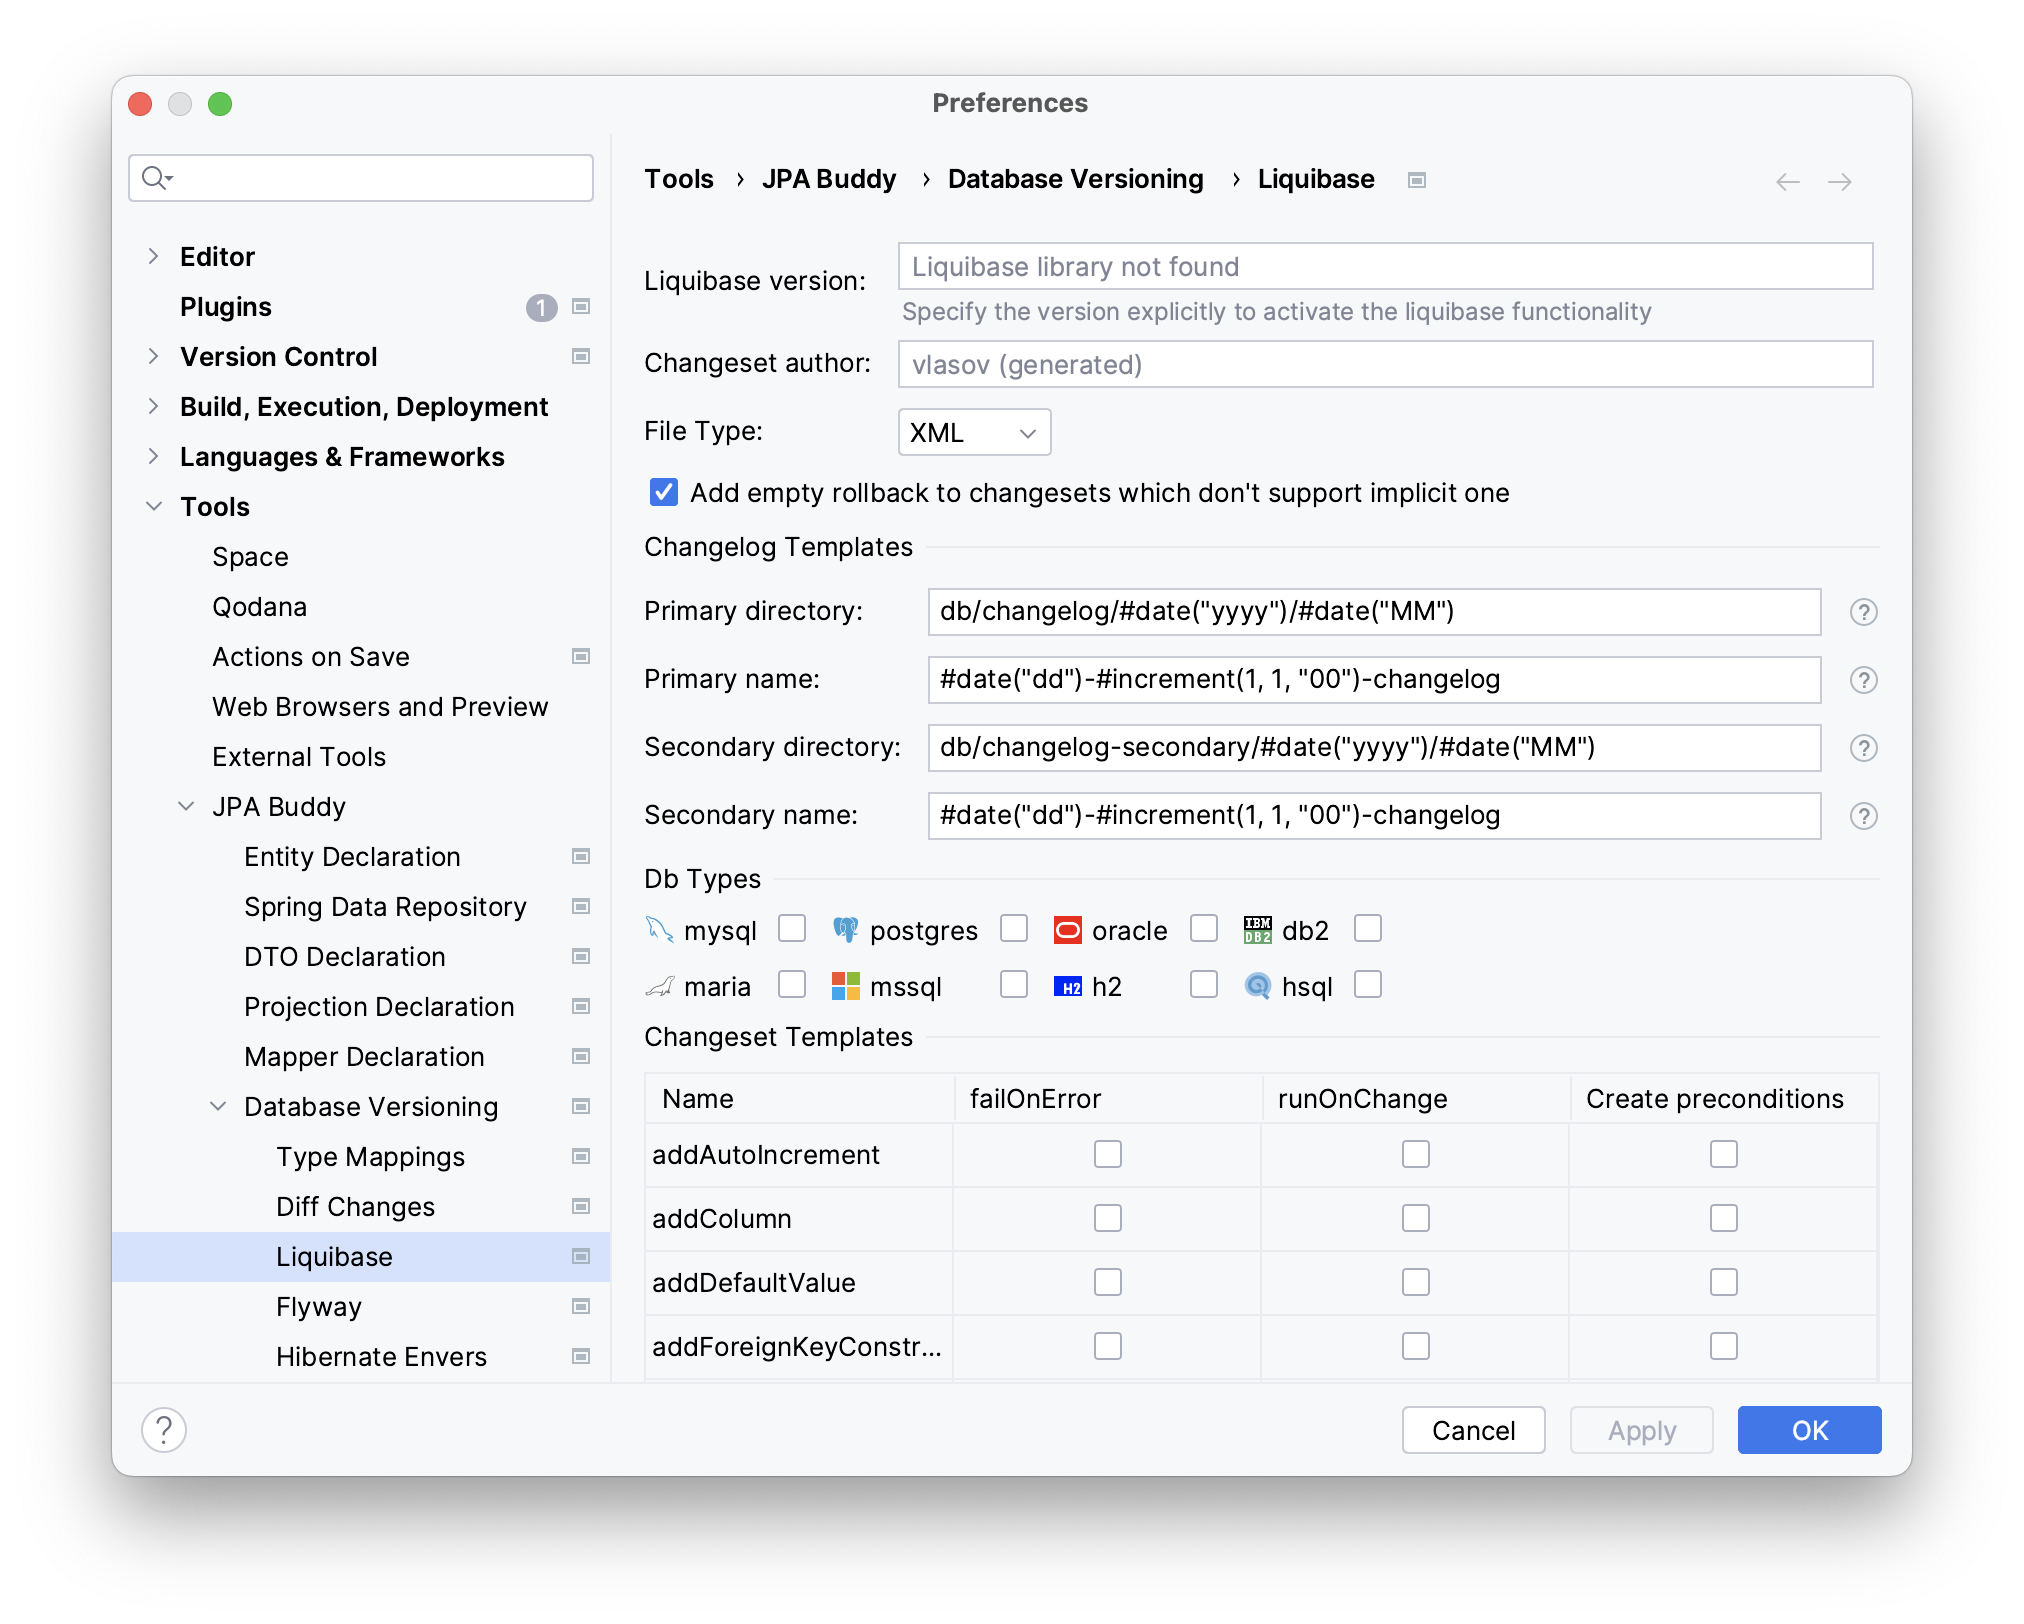
Base Settings
JPA Buddy allows you to specify:
- Liquibase version that you want to use;
- Changeset author name;
- The default file type. The following 4 file types are supported:
- XML
- SQL
- YAML
- JSON
Changelog Templates
Whenever an empty or differential Liquibase changelog is created, JPA Buddy generates the file name based on the templates. You can configure primary/secondary directory and name of the changelogs.
The following variables and macros are available for the precise configuration:
#date([format])– the current system date in the specified SimpleDateFormat. For example,#date(\"yyyy-MM-dd\")returns the date formatted as 2020-12-31.#increment([start], [step], [decimalFormat])— a number that is used to keep the name unique.startvalue is used for the first file and is incremented by step for each next file.decimalFormatparameter specifies the DecimalFormat of the number. For example,#increment(1.0, 0.1, \"#.0\")returns the value formatted as 1.1, 1.2, 1.3, etc.semVer— semantic version of the project (aka SemVer), is a widely adopted version scheme that uses a sequence of three digits (Major.Minor.Patch), an optional pre-release tag and optional build meta tag. The object contains the following methods (the full version in the examples is 1.2.3-SNAPSHOT+meta):${semVer.getRawVersion()}: 1.2.3-SNAPSHOT${semVer.getMajor()}: 1${semVer.getMinor()}: 2${semVer.getPatch()}: 3${semVer.getPreRelease()}: SNAPSHOT${semVer.getMeta()}: meta
DB Types
Sometimes software must provide support for a few DBMS types. In this case, Liquibase is the best choice, as it offers a cross-DB solution to declare DDL modifications. JPA Buddy supports this solution as well. When generating cross-DB changelogs, it uses Liquibase properties to specify correct data types for each DBMS:
<property name="string.type" value="varchar" dbms="postgresql"/>
<property name="string.type" value="nvarchar" dbms="mssql"/>
<changeSet id="1622118750064-2" author="jpa-buddy">
  <createTable tableName="owners">
     <column autoIncrement="true" name="id" type="INT">
        <constraints nullable="false" primaryKey="true" primaryKeyName="PK_OWNERS"/>
     </column>
     <column name="first_name" type="${string.type}(255)"/>
     <column name="last_name" type="${string.type}(255)"/>
     <column name="address" type="${string.type}(255)"/>
     <column name="city" type="${string.type}(255)"/>
  </createTable>
</changeSet>
Therefore, there is no need to create separate changelogs for different DBMSes.
Changeset Templates
Changeset templates are pre-defined structures that provide a standardized format for specifying database schema changes using Liquibase. These templates serve as a foundation for creating consistent and reusable changesets, ensuring uniformity and ease of maintenance across database deployments.
JPA Buddy provides an ability to apply templates while generating changesets from the JPA Palette. This feature provides the ability to include various customizable elements in it:
- Add empty rollback to changesets which don't support implicit one – this option automatically adds an empty rollback tag with a TODO comment to any new changeset lacking an implicit rollback.
- failOnError and runOnChange: JPA Buddy supports the commonly used attributes within the changeSet tag, allowing users to set default values for
failOnErrorandrunOnChange. - Create preconditions – each changeset can have specific preconditions. For example,
tableExistsandcolumnExistsprecondition tags will be added for theaddColumnstatement:
<changeSet id="1685085536452-1" author="jpa-buddy">
  <preConditions>
    <tableExists tableName="customer"/>
    <not>
      <columnExists tableName="customer" columnName="id"/>
    </not>
  </preConditions>
  <addColumn tableName="customer">
    <column name="id" type="BIGINT">
      <constraints nullable="false" primaryKey="true" primaryKeyName="pk_customer"/>
    </column>
  </addColumn>
</changeSet>
It is important to note that certain Liquibase changesets may not offer this option. For example, the tag procedureExists is not available for the createProcedure statement.

Here is an example showcasing all four features enabled for a drop table changeset:
<changeSet id="1680594632747-1" author="jpa-buddy" runOnChange="true" failOnError="true">
    <preConditions>
        <tableExists tableName="customer"/>
    </preConditions>
    <dropTable tableName="customer"/>
    <rollback><!--TODO--></rollback>
</changeSet>
Flyway Support
Migration Preview Window
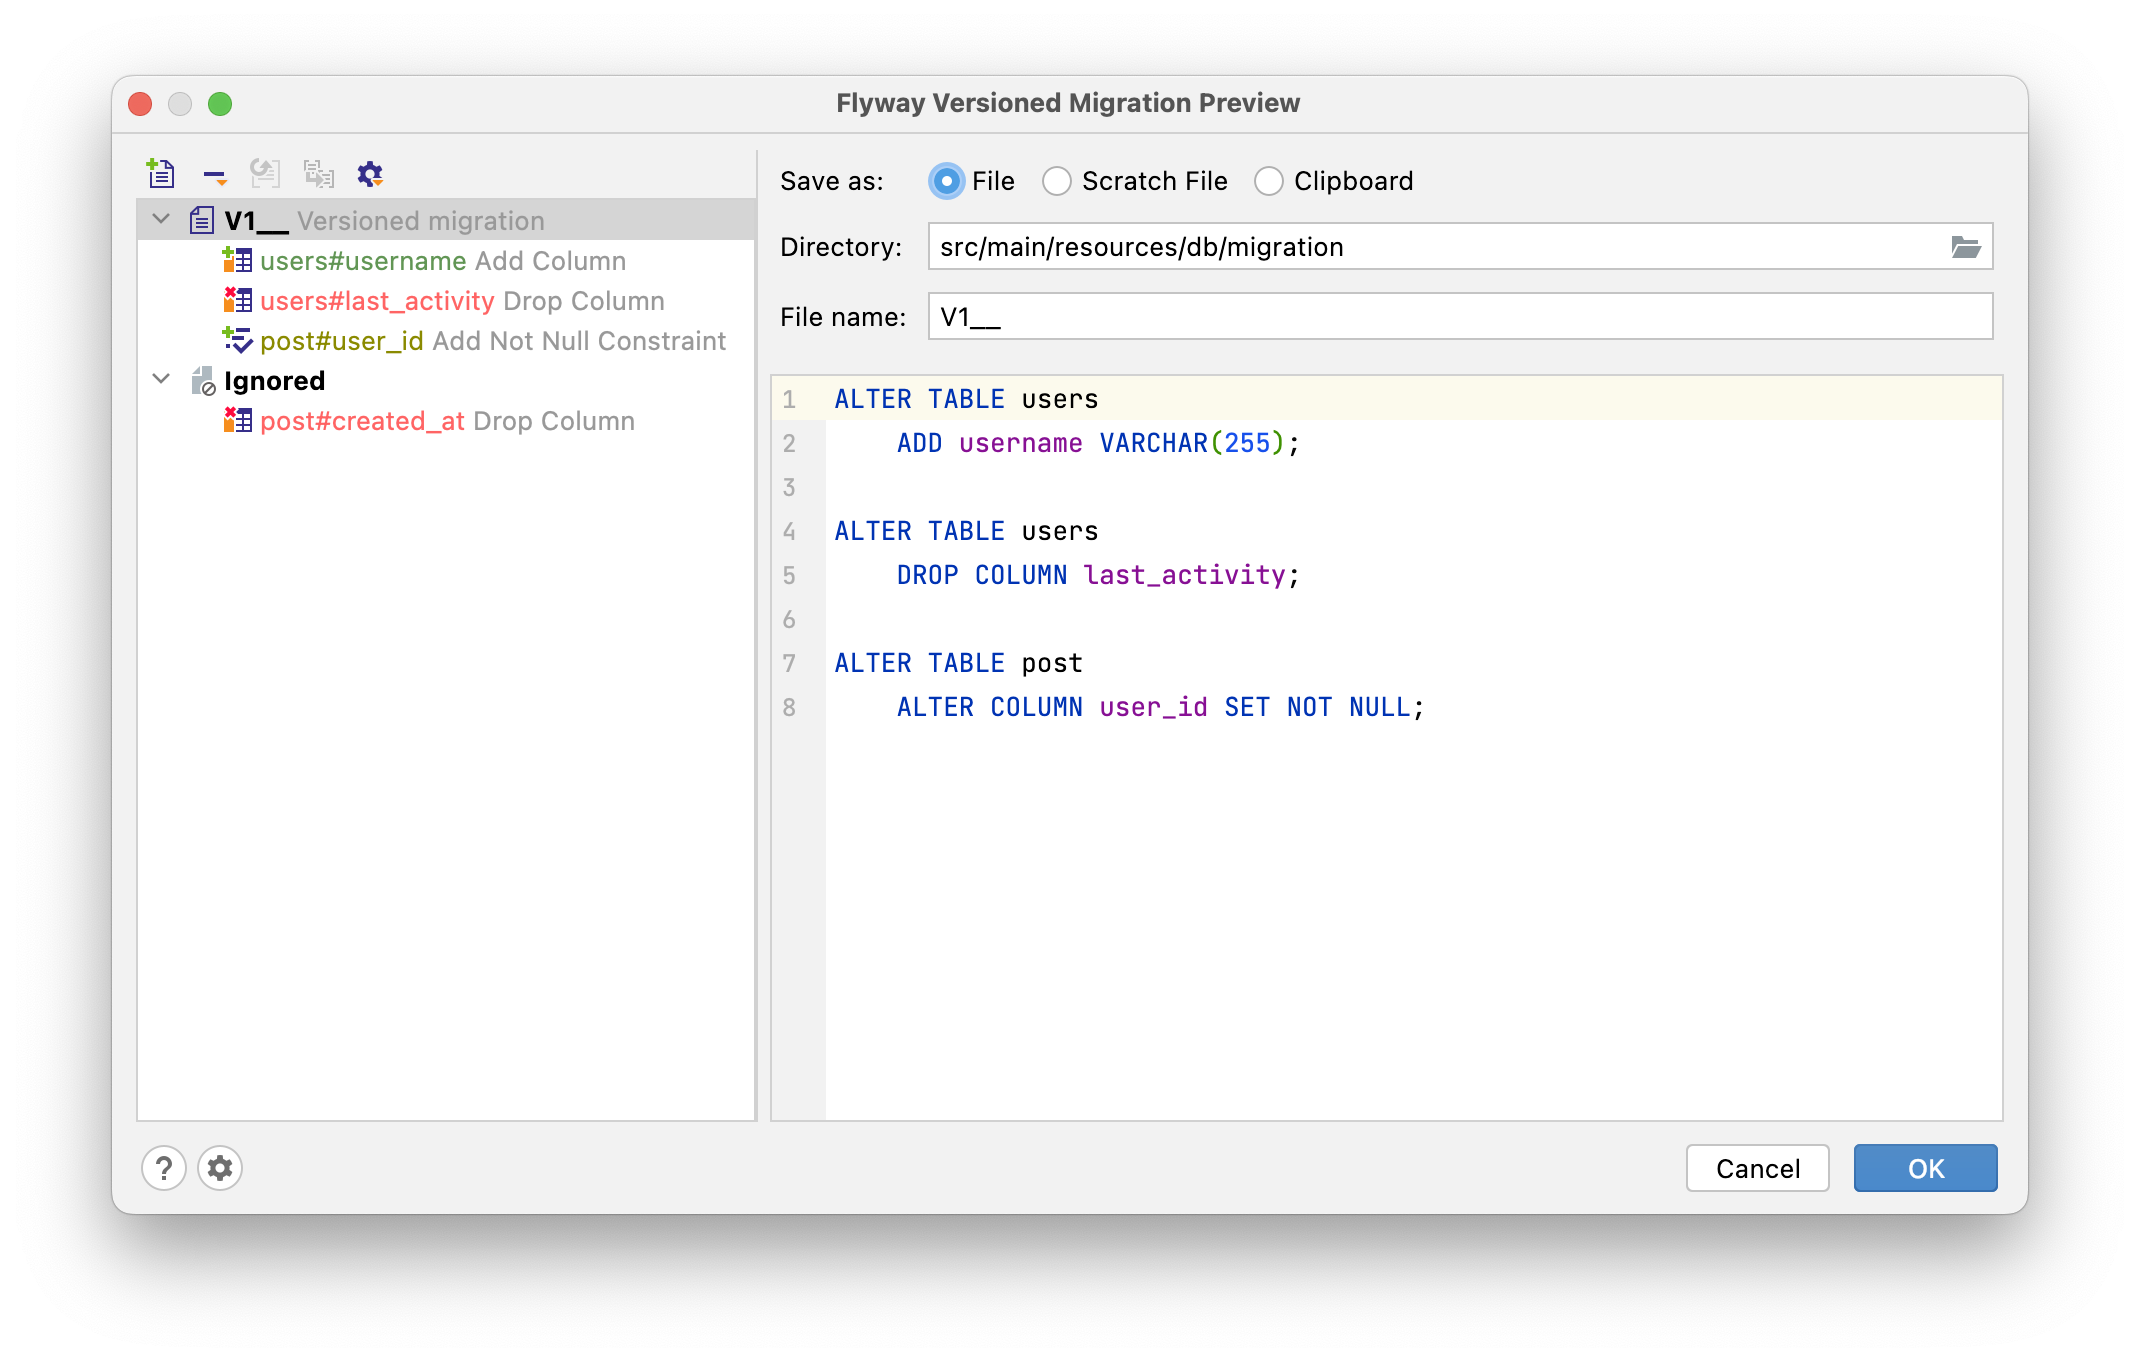
JPA Buddy allows you to select the place where to store the generated script: you can choose a file, scratch file in the IDE or clipboard.
"Directory" and "File name" fields are responsible for configuring the location of the generated migration. If a migration with the specified name already exists, you will be prompted with a warning, after which the changes will be appended to that migration.
On the left of the window, there is a preview of the actual changes to be generated. You can see what each change is going to look like by clicking on them.

Above the list of changes, there is a buttons panel with the following actions:
- Add Versioned Migration— create a secondary versioned migration.
- Remove from Versioned Migration with options:
- Remove from Versioned Migration — to remove the changes from the current migration.
- Remove and Ignore — to remove the changes and add them to the "Ignored" section, so they are excluded from future migrations too.
- Restore from Ignored — move the changes from "Ignored" to the migration.
- Move to Another Versioned Migration — by default, a single migration script is created on each diff generation with all the changes. This action lets you move a change to another migration file.
- Show Other Actions — This button will help you to conveniently interact with a large number of changes in the migration files:
- "Select all ..."
- "Expand/collapse all"
To combine several changes into one migration file or to ignore them, drag them around.
Java Migration
Java-based migrations are a great fit for all changes that can not easily be expressed using SQL. These migrations represent java classes that implement the JavaMigration interface or inherit from the BaseJavaMigration class. JPA Buddy follows the second option and generates the class name according to Flyway's default naming convention. This enables Flyway to automatically extract the version and the description from the class name.
To generate java migration, press the plus button in the JPA Structure tab and choose the corresponding item.
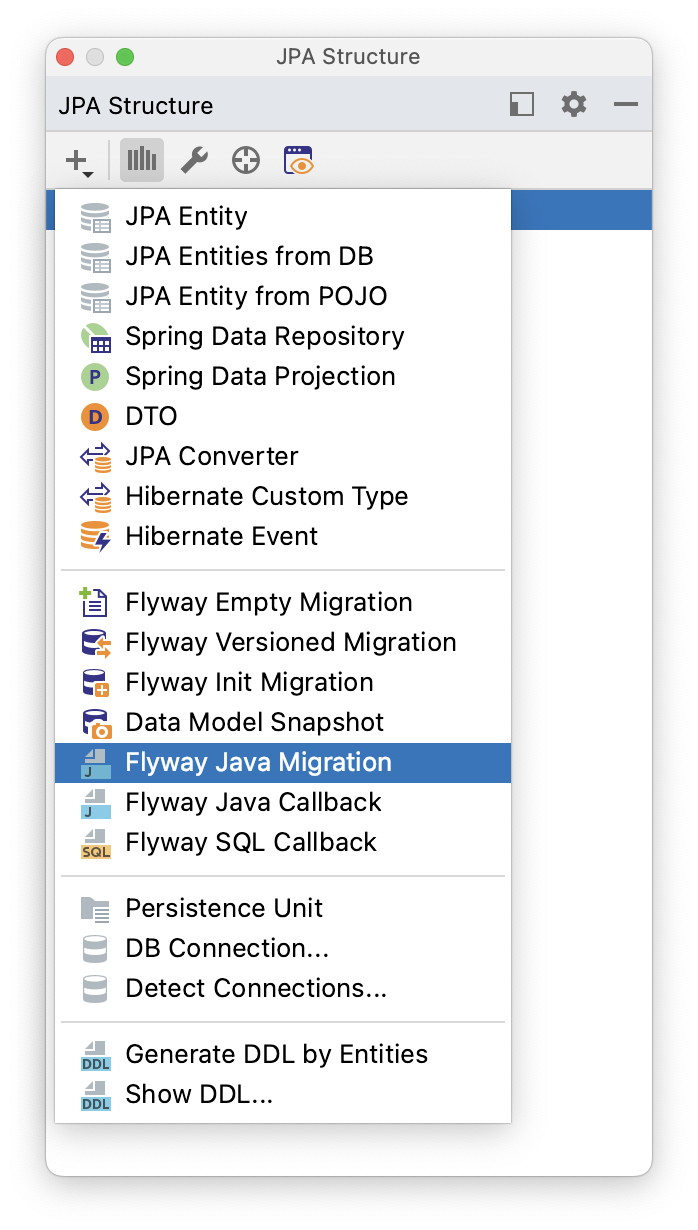
In the opened window, you can set class name, source root and package name:
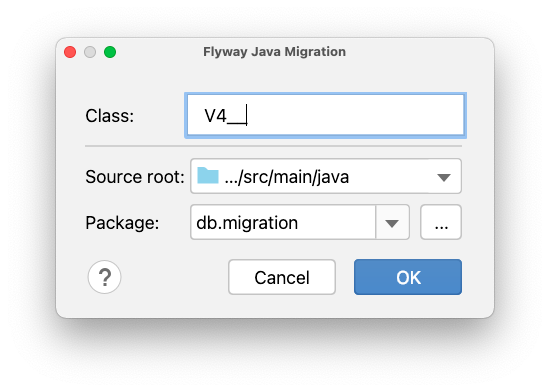
After that, the following java class will be generated:
public class V4__ extends BaseJavaMigration {

   @Override
   public void migrate(Context context) {
      new JdbcTemplate(new SingleConnectionDataSource(context.getConnection(), true))
         .execute("");
   }
}
Flyway Callbacks
While migrations are sufficient for most needs, certain situations require you to execute the same action over and over again. With the help of JPA Buddy, you can generate all events that Flyway supports. To generate SQL or java callbacks, press the plus button in the JPA Structure tab and choose the corresponding item.

SQL Callbacks
JPA Buddy provides Flyway SQL Callback window, with the following fields:
-
"Source root" and "Directory" fields are responsible for the location of the generated file:
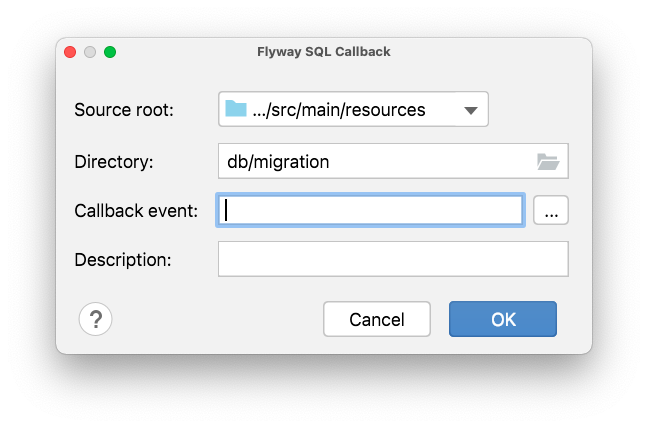
-
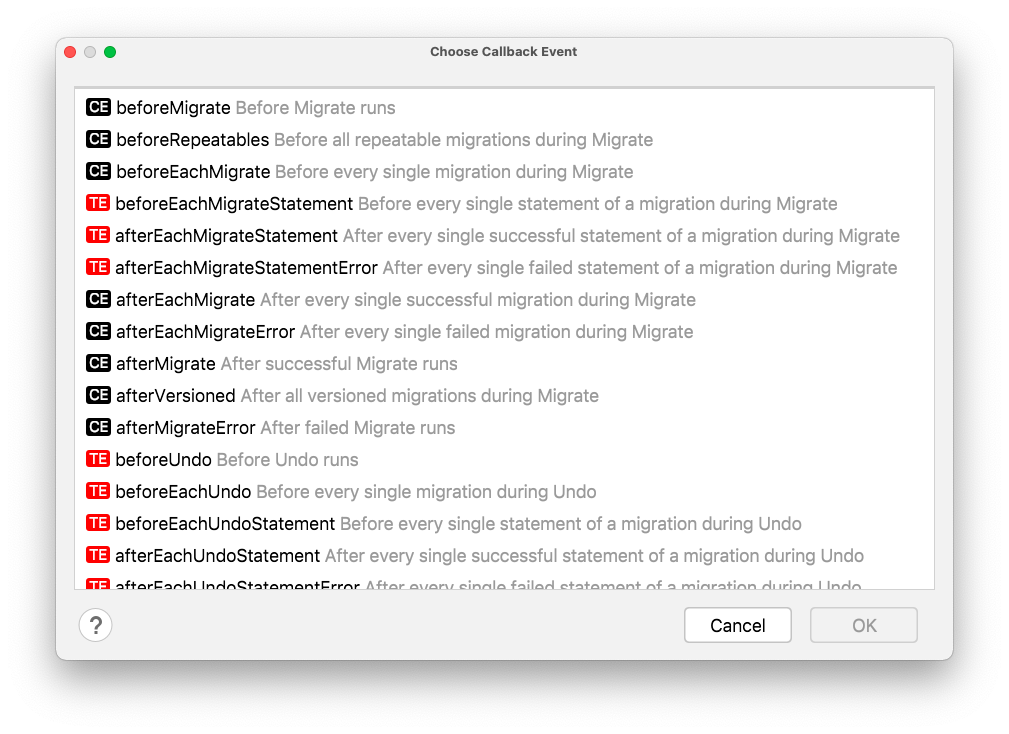
"Callback event" field allows you to choose one of the events that Flyway supports:
- Optionally the callbacks may also include a description. The value in the "Description" filed will be appended along with the separator to the callback name.
Java Callbacks
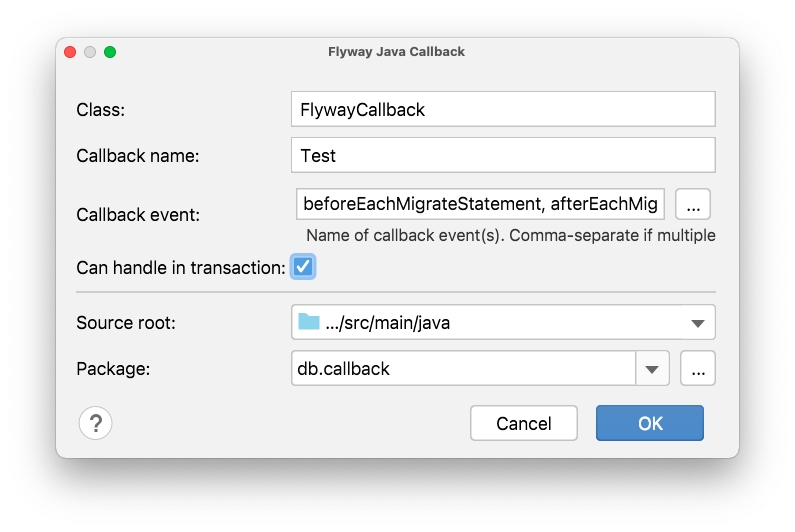
If SQL Callbacks aren't flexible enough for you, flyway supports Java Callbacks. JPA Buddy provides Flyway Java Callback window, with the following fields:
-
"Class" and "Class name" these fields are responsible for configuring corresponding values for generated java-class.
-
"Callback event" field allows you to choose several events that Flyway supports:
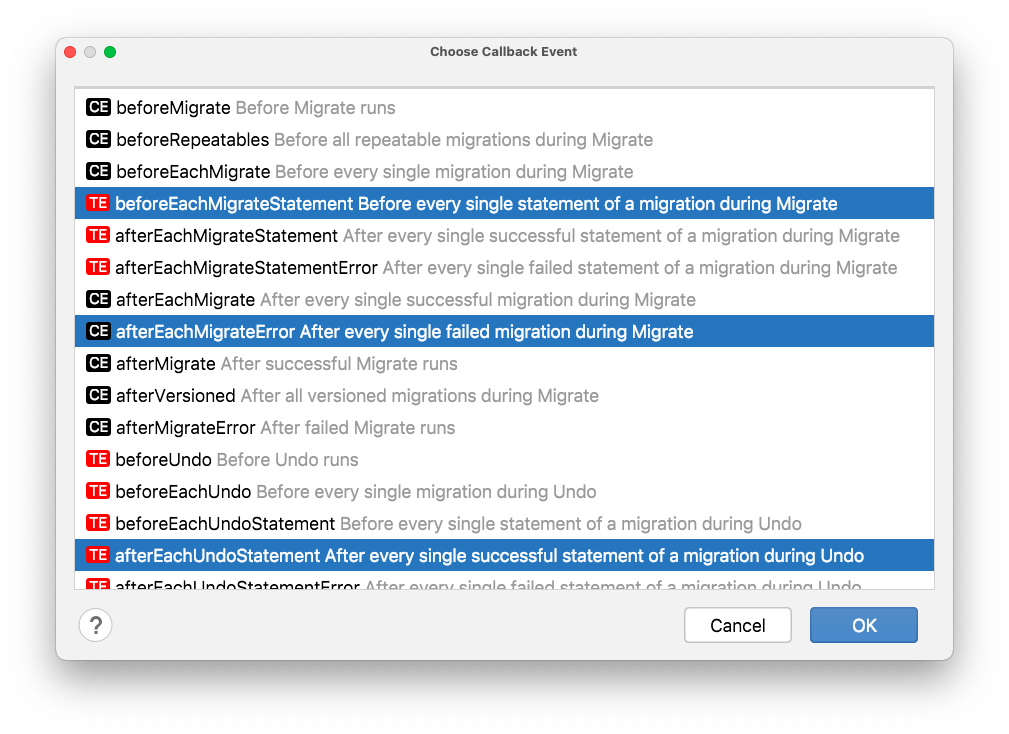
-
"Can handle in transaction" checkbox defines whether true or false will return the canHandleInTransaction overridden method from the Callback interface.
-
"Source root" and "Directory" fields are responsible for the location of the generated file.
  public class TestCallback implements Callback {

  @Override
    public boolean supports(Event event, Context context) {
        return event.equals(Event.*BEFORE_EACH_MIGRATE_STATEMENT*) ||
      event.equals(Event.*AFTER_EACH_MIGRATE_ERROR*) ||
      event.equals(Event.*AFTER_EACH_UNDO_STATEMENT*);
    }

    @Override
    public boolean canHandleInTransaction(Event event, Context context) {
        return true;
    }

    @Override
    public void handle(Event event, Context context) {
        *//**TODO handle logic...*
    }

    public String getCallbackName() {
        return "Test";
    }

}
Flyway Settings
Whenever an empty or differential Flyway migration is created, JPA Buddy generates the file name based on the flyway naming pattern. In plugin settings you can configure following values for name generation:
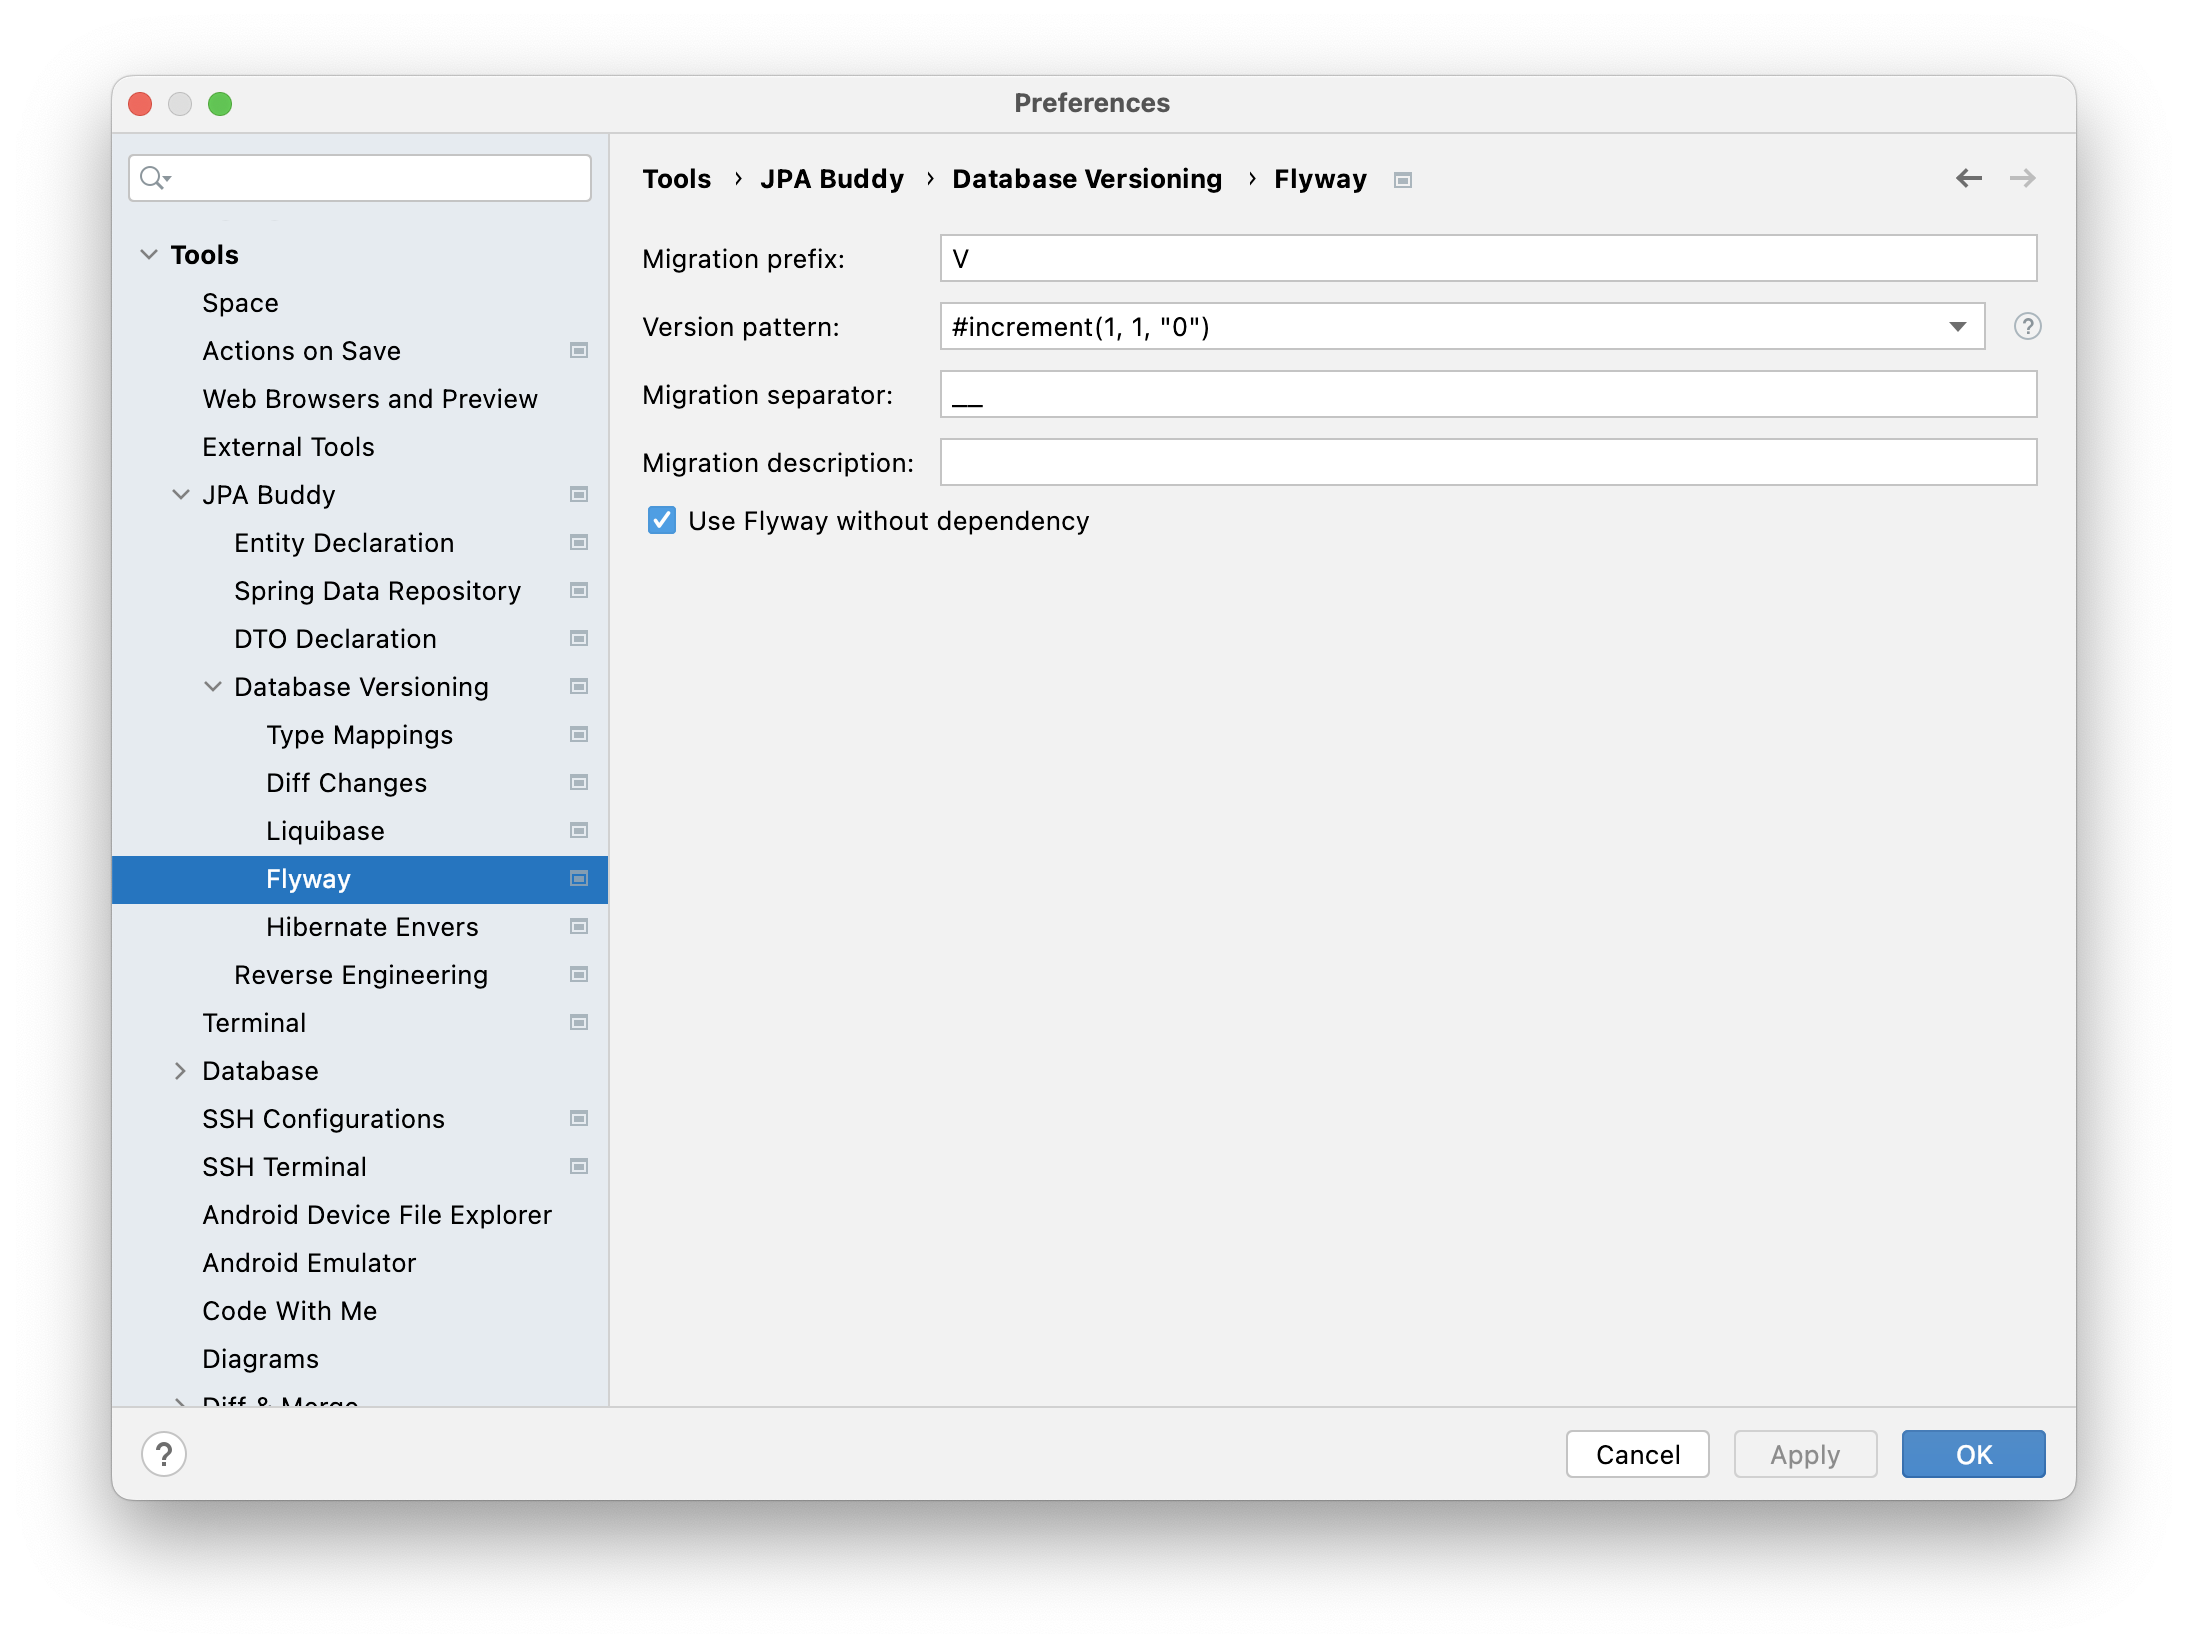
- Migration prefix. The default value is
V. - Version pattern. After the hyphen, an example of the generated sequence is presented.
- Migration separator. The default value is "_".
- Migration description.
The following variables and macros are available in the templates:
#date([format])– the current system date in the specified SimpleDateFormat. For example,#date(\"yyyy-MM-dd\")returns the date formatted as 2020-12-31.#increment([start], [step], [decimalFormat])— a number that is used to keep the name unique.startvalue is used for the first file and is incremented by step for each next file.decimalFormatparameter specifies the DecimalFormat of the number. For example,#increment(1.0, 0.1, \"#.0\")returns the value formatted as 1.1, 1.2, 1.3, etc.semVer— semantic version of the project (aka SemVer), is a widely adopted version scheme that uses a sequence of three digits (Major.Minor.Patch), an optional pre-release tag and optional build meta tag. The object contains the following methods (the full version in the examples is 1.2.3-SNAPSHOT+meta):${semVer.getRawVersion()}: 1.2.3-SNAPSHOT${semVer.getMajor()}: 1${semVer.getMinor()}: 2${semVer.getPatch()}: 3${semVer.getPreRelease()}: SNAPSHOT${semVer.getMeta()}: meta
DDL By Entities
Generate DDL by Entities action allows developers to convert entities into DDL statements in a couple of clicks. It can generate:
- Initialization scripts to create a database schema from scratch;
- Differential DDL to update the already existing database to the valid state in accordance with JPA entities.
Also, this feature is extremely useful if we want to avoid using the automatic scripts generation enabled by hbm2ddl or ddl-auto properties. By using the JPA Buddy action, you can fully control DDL before execution, setup proper Java -> DB types mapping, map fields with attribute converters and Hibernate types, generate drop statements, and many more.
Resolve SchemaManagementException Automatically
If you stumble upon SchemaManagementException on the application startup, it means you have the ddl-auto property set to validate and Hibernate couldn't properly map JPA entities to your database tables. JPA Buddy allows you to generate DDL to fill up the difference between JPA entities and the database right from the stack trace!
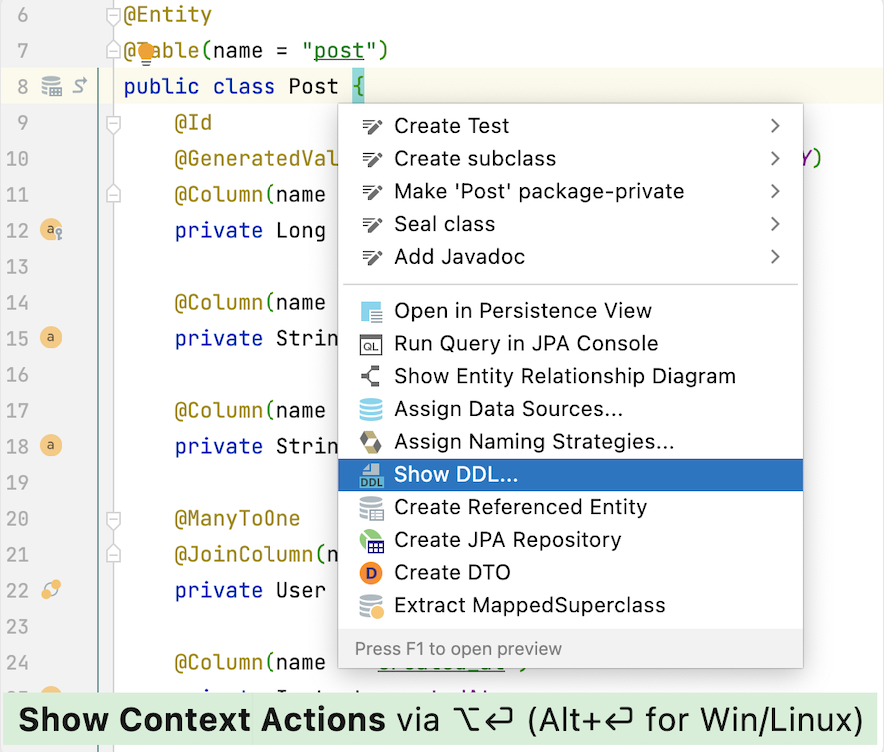
Show DDL Action
JPA Buddy provides the action to generate DDL statements for only one specific entity. To see the DDL, hover the cursor over the class name and call the action from the IntelliJ IDEA Context Actions menu or JPA Inspector. Also, you can call this action from the Project panel and JPA Structure tab: just right-click on the target entity.
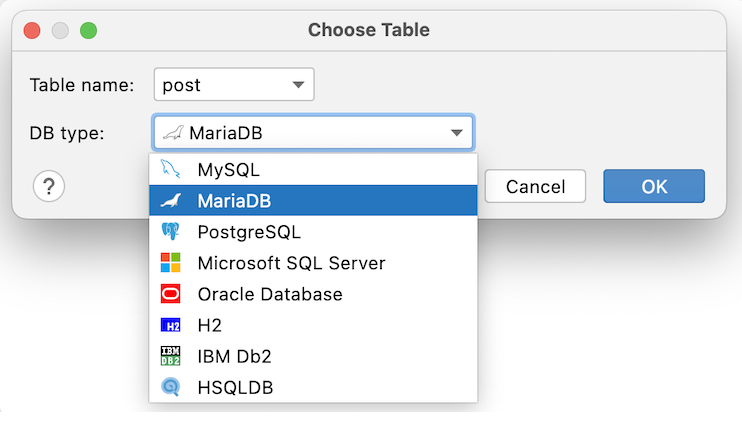
Next, choose which for which database you need a script and click OK:
SQL Visual Designer
In some cases, it's useful to have SQL scripts for the JPA data model, especially when you need to quickly set up a fresh database. JPA Buddy can generate a wide range of SQL statements via JPA Palette or Editor Toolbar. For each statement, there is a corresponding window that allows you to configure the statement:
Hibernate 6 Support
Before Hibernate 6, the Hibernate Types library or @Type/@Converter annotations were commonly used to map non-standard SQL types to Java types. With Hibernate 6, new annotations for mapping are available, allowing for the elimination of numerous Hibernate types and JPA converters. Currently, JPA Buddy supports these new mapping annotations:
@JdbcType,@JdbcTypeCode&@JdbcTypeRegistration
@Type,@JavaType&@JavaTypeRegistration
@TimeZoneStorage&@TimeZoneColumn
Hibernate Envers Support
Hibernate Envers is a module that facilitates entity auditing in a database. JPA Buddy can generate all the required tables for Hibernate Envers to function correctly. This includes audit tables for entities marked with the @Audited annotation and a revision table for the entity annotated with the @RevisionEntity annotation. Check out how it works in action:
JPA Buddy offers flexible settings for Hibernate Envers. For more details, refer to the corresponding section.
Settings
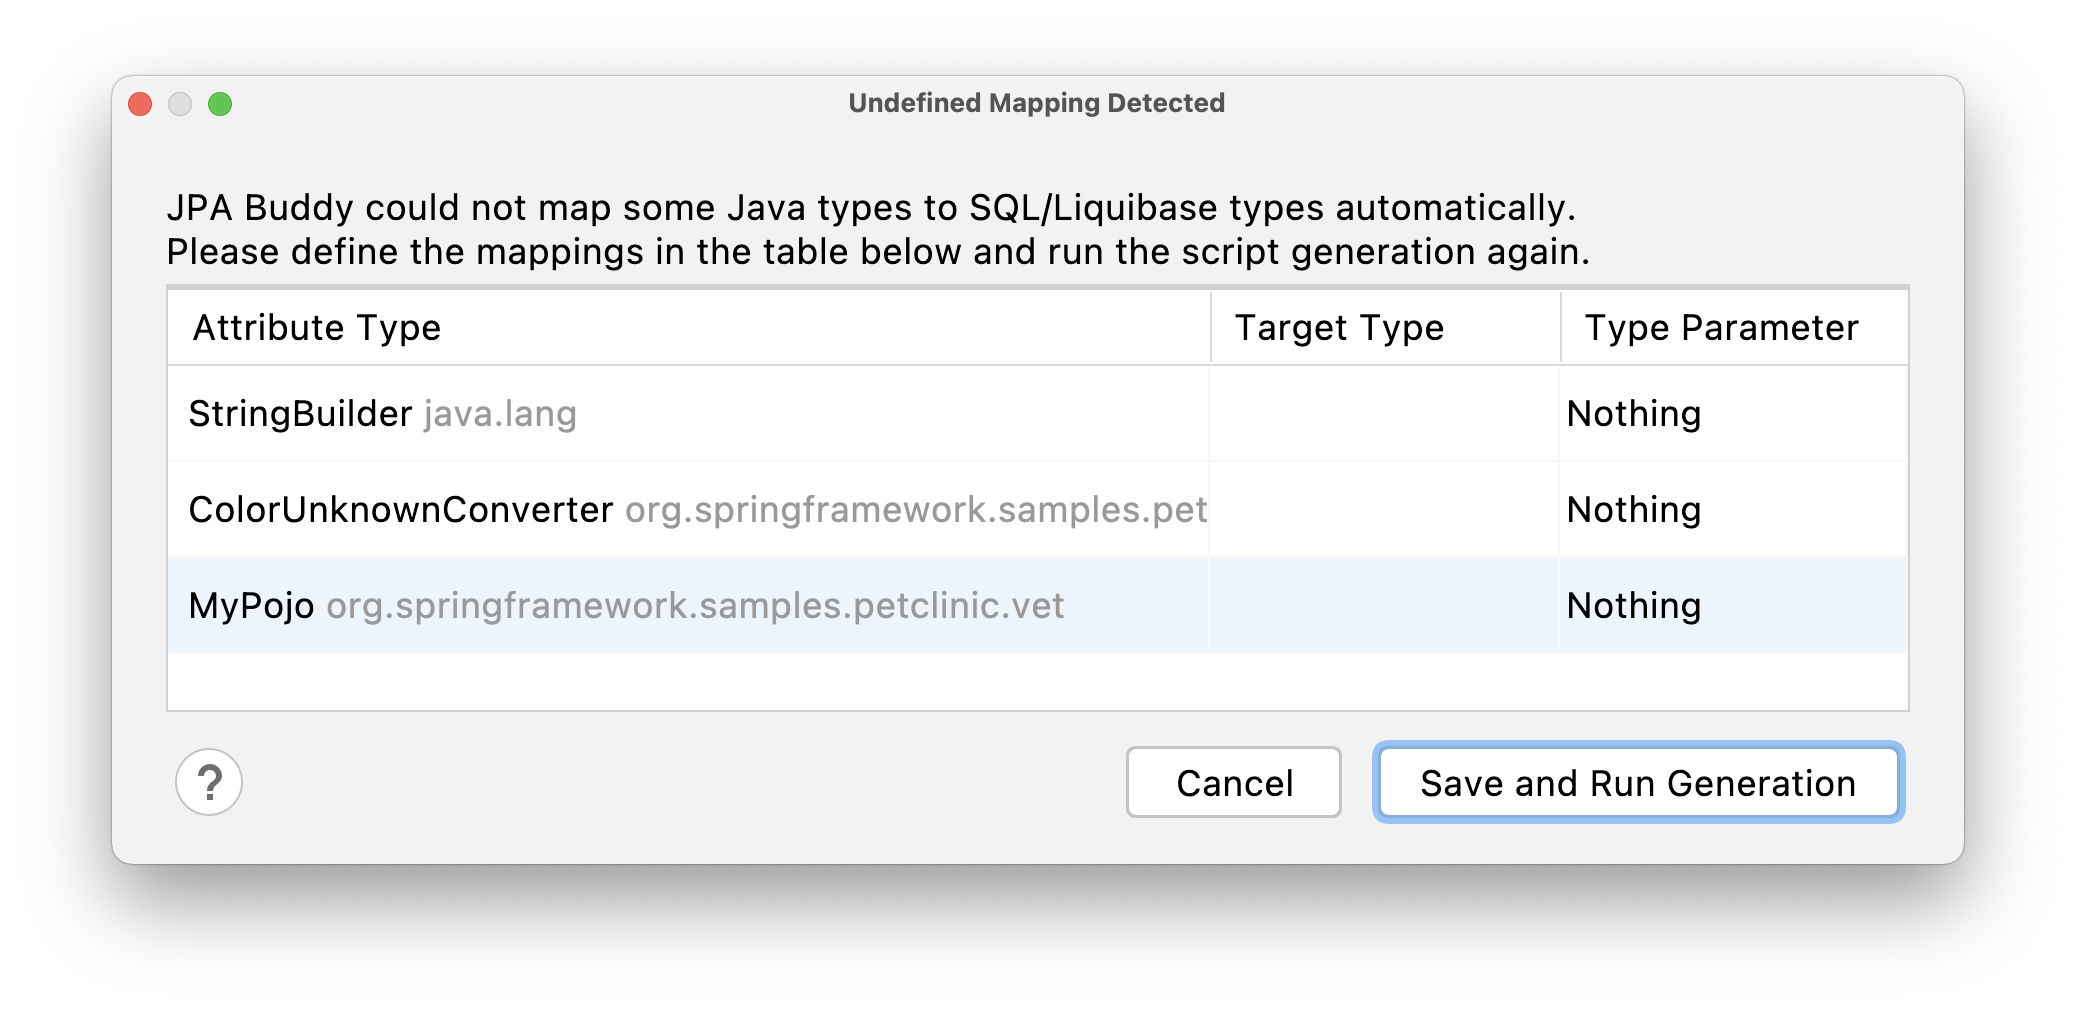
Custom Type Mappings
There is no generic way to automatically map custom Java types to the SQL/Liquibase types. That's why you will need to define the target type manually for those attributes. If such attributes exist in your project, after Liquibase or Flyway script generation actions call, JPA Buddy will show you the following window:
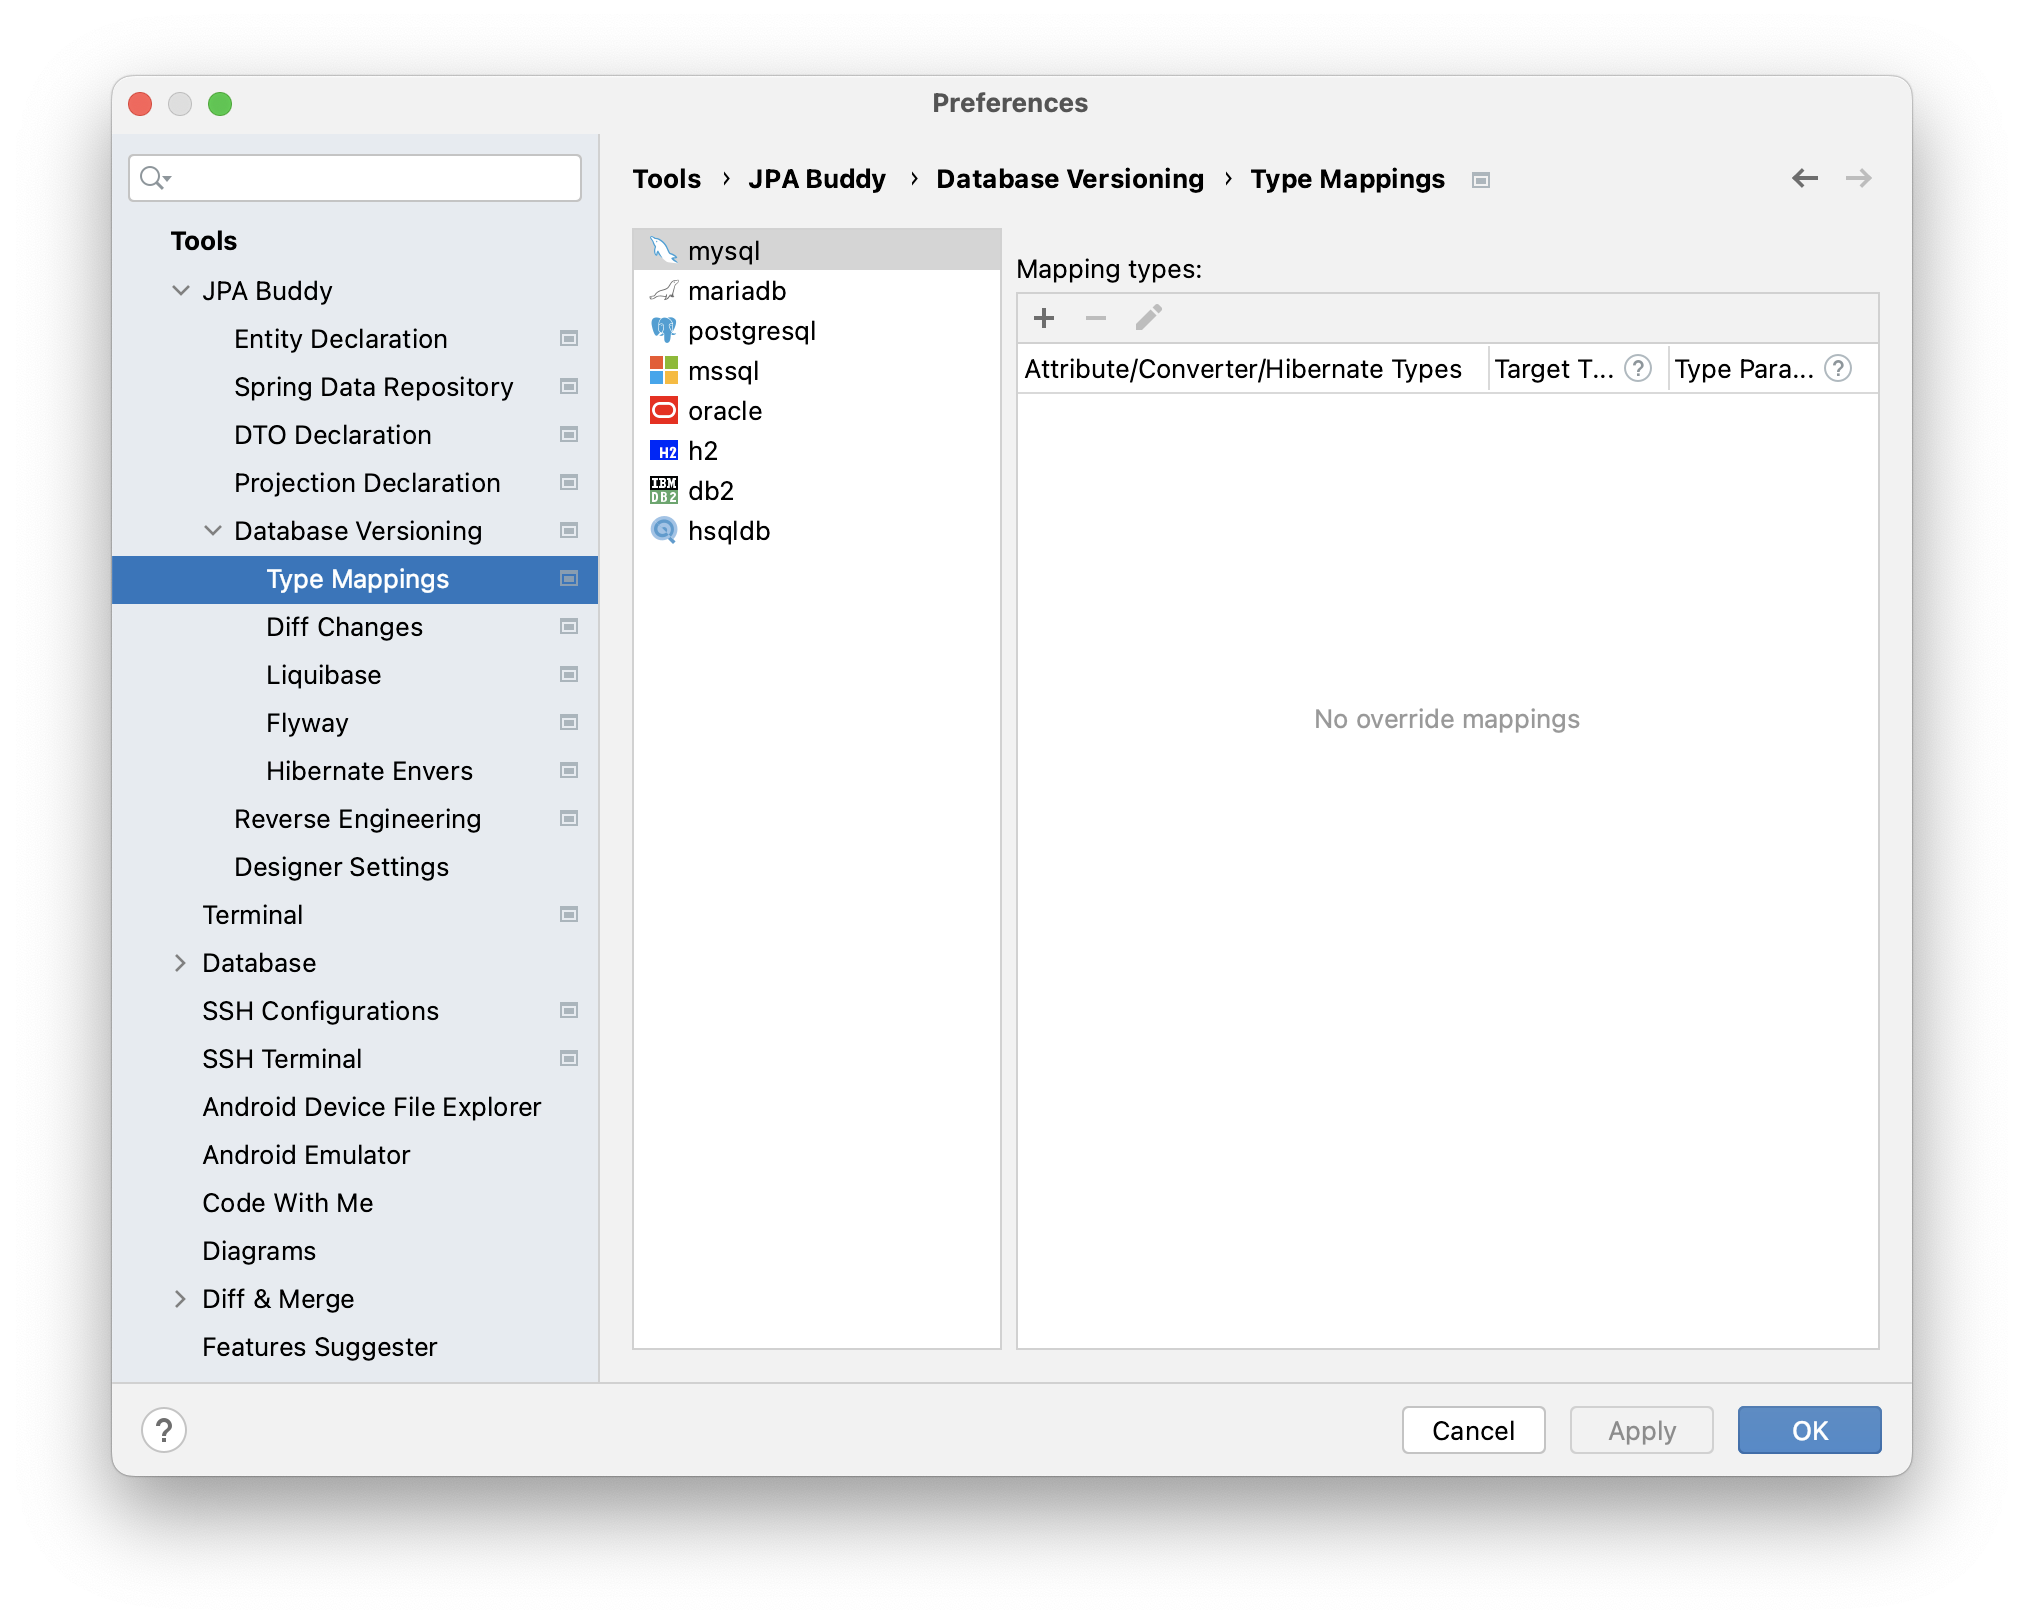
You can change the saved mapping configuration at any time from Tools -> JPA Buddy -> Database Versioning -> Type Mappings.
Also, it may be helpful when the application works with databases from different vendors. In this case, your schema might have slightly different data types for each of them.
Let's say the application needs to support both PostgreSQL and MS SQL. And you want to store Unicode characters in your strings. PostgreSQL supports Unicode chars in VARCHAR, but MS SQL has a separate NVARCHAR data type for it.
JPA Buddy lets you specify type mappings for each DBMS. It is also possible to set mappings for JPA Converters and Hibernate Types:
Converters
In order to simplify type mapping, JPA Buddy introduces DB-agnostic SQL types, that are transformed into the DB-specific type. For example, "varchar" is transformed into "varchar2" for Oracle DB and left as "varchar" for PostgreSQL.
Each DB-agnostic type has a set of aliases (for example, "java.sql.Types.VARCHAR" or "character varying"), which in most cases are interchangeable. Unknown types are used as is without any transformations. Check out the full list of aliases in the table:
| Name | Aliases | Liquibase class |
|---|---|---|
| bigint |
java.sql.Types.BIGINT java.math.BigInteger java.lang.Long integer8 bigserial serial8 int8 |
liquibase.datatype.core.BigIntType |
| blob | longblob longvarbinary java.sql.Types.BLOB java.sql.Types.LONGBLOB java.sql.Types.LONGVARBINARY java.sql.Types.VARBINARY java.sql.Types.BINARY varbinary binary image tinyblob mediumblob |
liquibase.datatype.core.BlobType |
| boolean | java.sql.Types.BOOLEAN java.lang.Boolean bit bool |
liquibase.datatype.core.BooleanType |
| char | java.sql.Types.CHAR bpchar |
liquibase.datatype.core.CharType |
| clob | longvarchar text longtext java.sql.Types.LONGVARCHAR java.sql.Types.CLOB nclob longnvarchar ntext java.sql.Types.LONGNVARCHAR java.sql.Types.NCLOB tinytext mediumtext |
liquibase.datatype.core.ClobType |
| currency | money smallmoney |
liquibase.datatype.core.CurrencyType |
| function | liquibase.statement.DatabaseFunction | liquibase.datatype.core.DatabaseFunctionType |
| datetime | java.sql.Types.DATETIME java.util.Date smalldatetime datetime2 |
liquibase.datatype.core.LiquibaseDataType |
| date | java.sql.Types.DATE java.sql.Date |
liquibase.datatype.core.DateType |
| decimal | java.sql.Types.DECIMAL java.math.BigDecimal |
liquibase.datatype.core.DecimalType |
| double | java.sql.Types.DOUBLE java.lang.Double |
liquibase.datatype.core.DoubleType |
| float | java.sql.Types.FLOAT java.lang.Float real java.sql.Types.REAL |
liquibase.datatype.core.FloatType |
| int | integer java.sql.Types.INTEGER java.lang.Integer serial int4 serial4 |
liquibase.datatype.core.IntType |
| mediumint | liquibase.datatype.core.MediumIntType | |
| nchar | java.sql.Types.NCHAR nchar2 |
liquibase.datatype.core.NCharType |
| number | numeric java.sql.Types.NUMERIC |
liquibase.datatype.core.NumberType |
| nvarchar | java.sql.Types.NVARCHAR nvarchar2 national |
liquibase.datatype.core.NVarcharType |
| smallint | java.sql.Types.SMALLINT int2 |
liquibase.datatype.core.SmallIntType |
| timestamp | java.sql.Types.TIMESTAMP java.sql.Types.TIMESTAMP_WITH_TIMEZONE java.sql.Timestamp timestamptz |
liquibase.datatype.core.TimestampType |
| time | java.sql.Types.TIME java.sql.Time timetz |
liquibase.datatype.core.TimeType |
| tinyint | java.sql.Types.TINYINT | liquibase.datatype.core.TinyIntType |
| uuid | uniqueidentifier java.util.UUID |
liquibase.datatype.core.UnknownType |
| varchar | java.sql.Types.VARCHAR java.lang.String varchar2 character varying |
liquibase.datatype.core.VarcharType |
| xml | xmltype java.sql.Types.SQLXML |
liquibase.datatype.core.XMLType |
Hibernate Envers
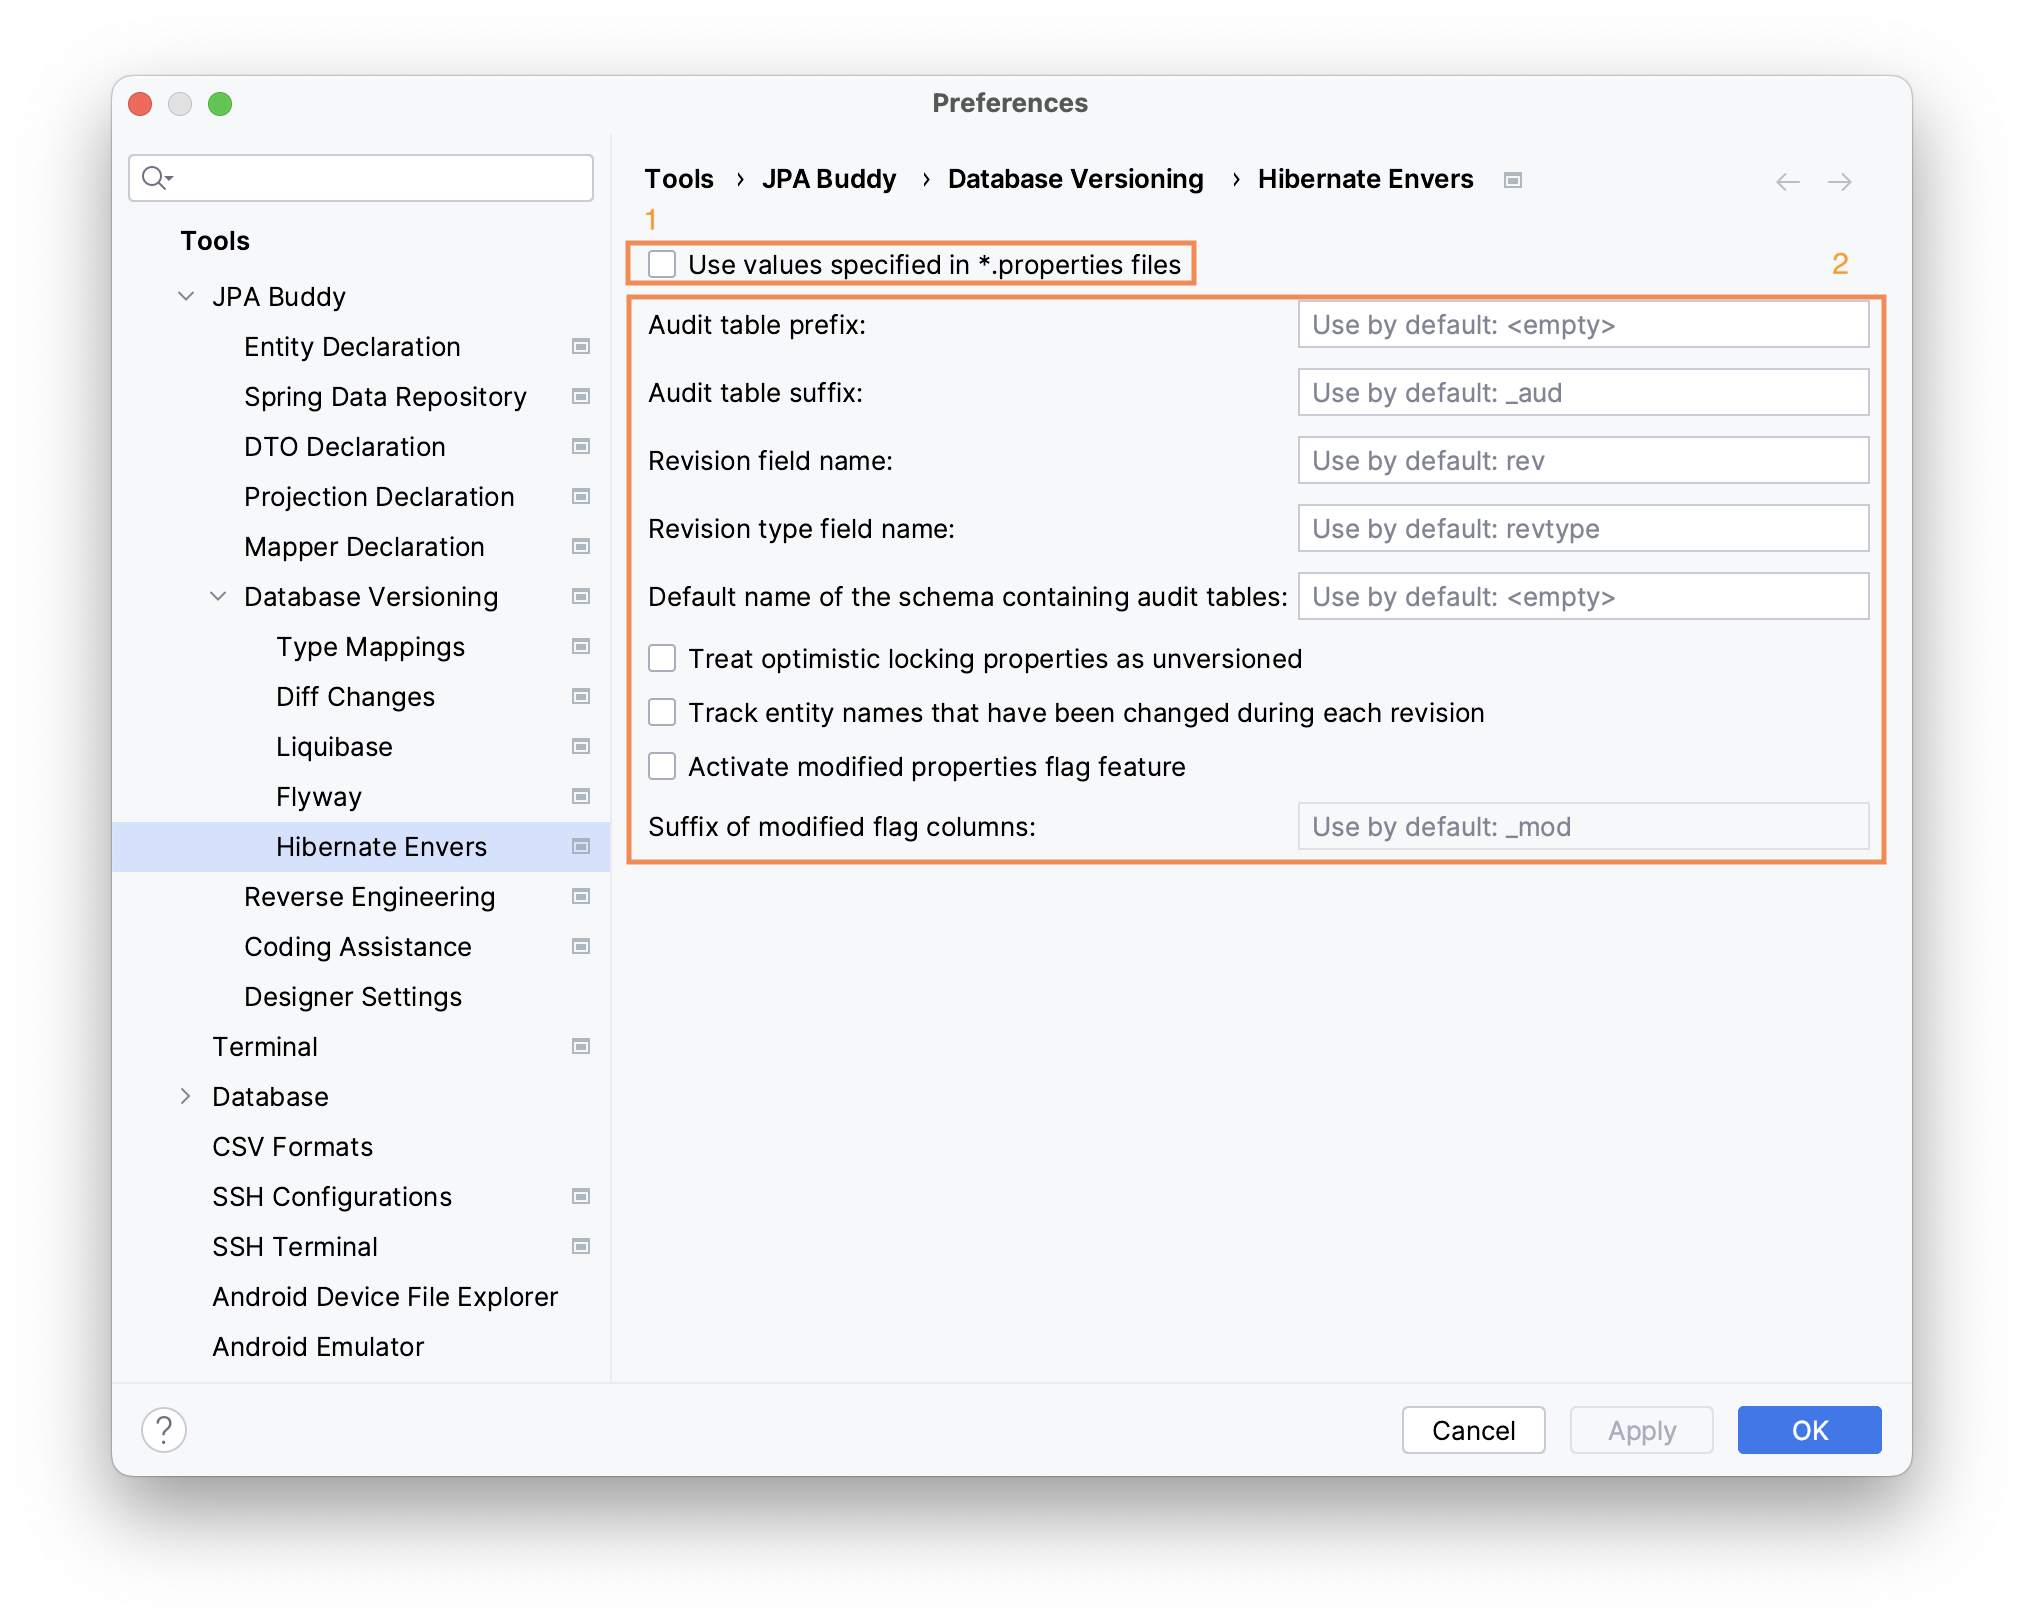
Hibernate Envers offers various customization options. You can specify the desired configuration in the JPA Buddy settings (2), or let JPA Buddy read the existing settings from .properties files automatically (1).
Naming Strategy
By default, Spring Boot configures the physical naming strategy with SpringPhysicalNamingStrategy. This implementation generates all table names in lower case separated by underscores. For example, a TelephoneNumber entity is mapped to the telephone_number table. Even if you annotate the entity with @Table(name = "TelephoneNumber"). The same names must be used in the migration scripts, so JPA Buddy also applies a physical naming strategy to all names during script generation.
The following strategies are supported:
SpringPhysicalNamingStrategy– the default optionPhysicalNamingStrategyStandardlmplCamelCaseToUnderscoresNamingStrategy(only for projects with Hibernate 6 and later versions)
To learn more about naming strategies, you can check out our article.
Custom Naming Strategy
Sometimes, the default behavior for naming strategy in a project changes. JPA Buddy can help you with that too! Once it detects a class in the project that implements org.hibernate.boot.model.naming.PhysicalNamingStrategy (or one of its successors), an additional "custom" section with the corresponding class will appear in the naming strategy dropdown menu.
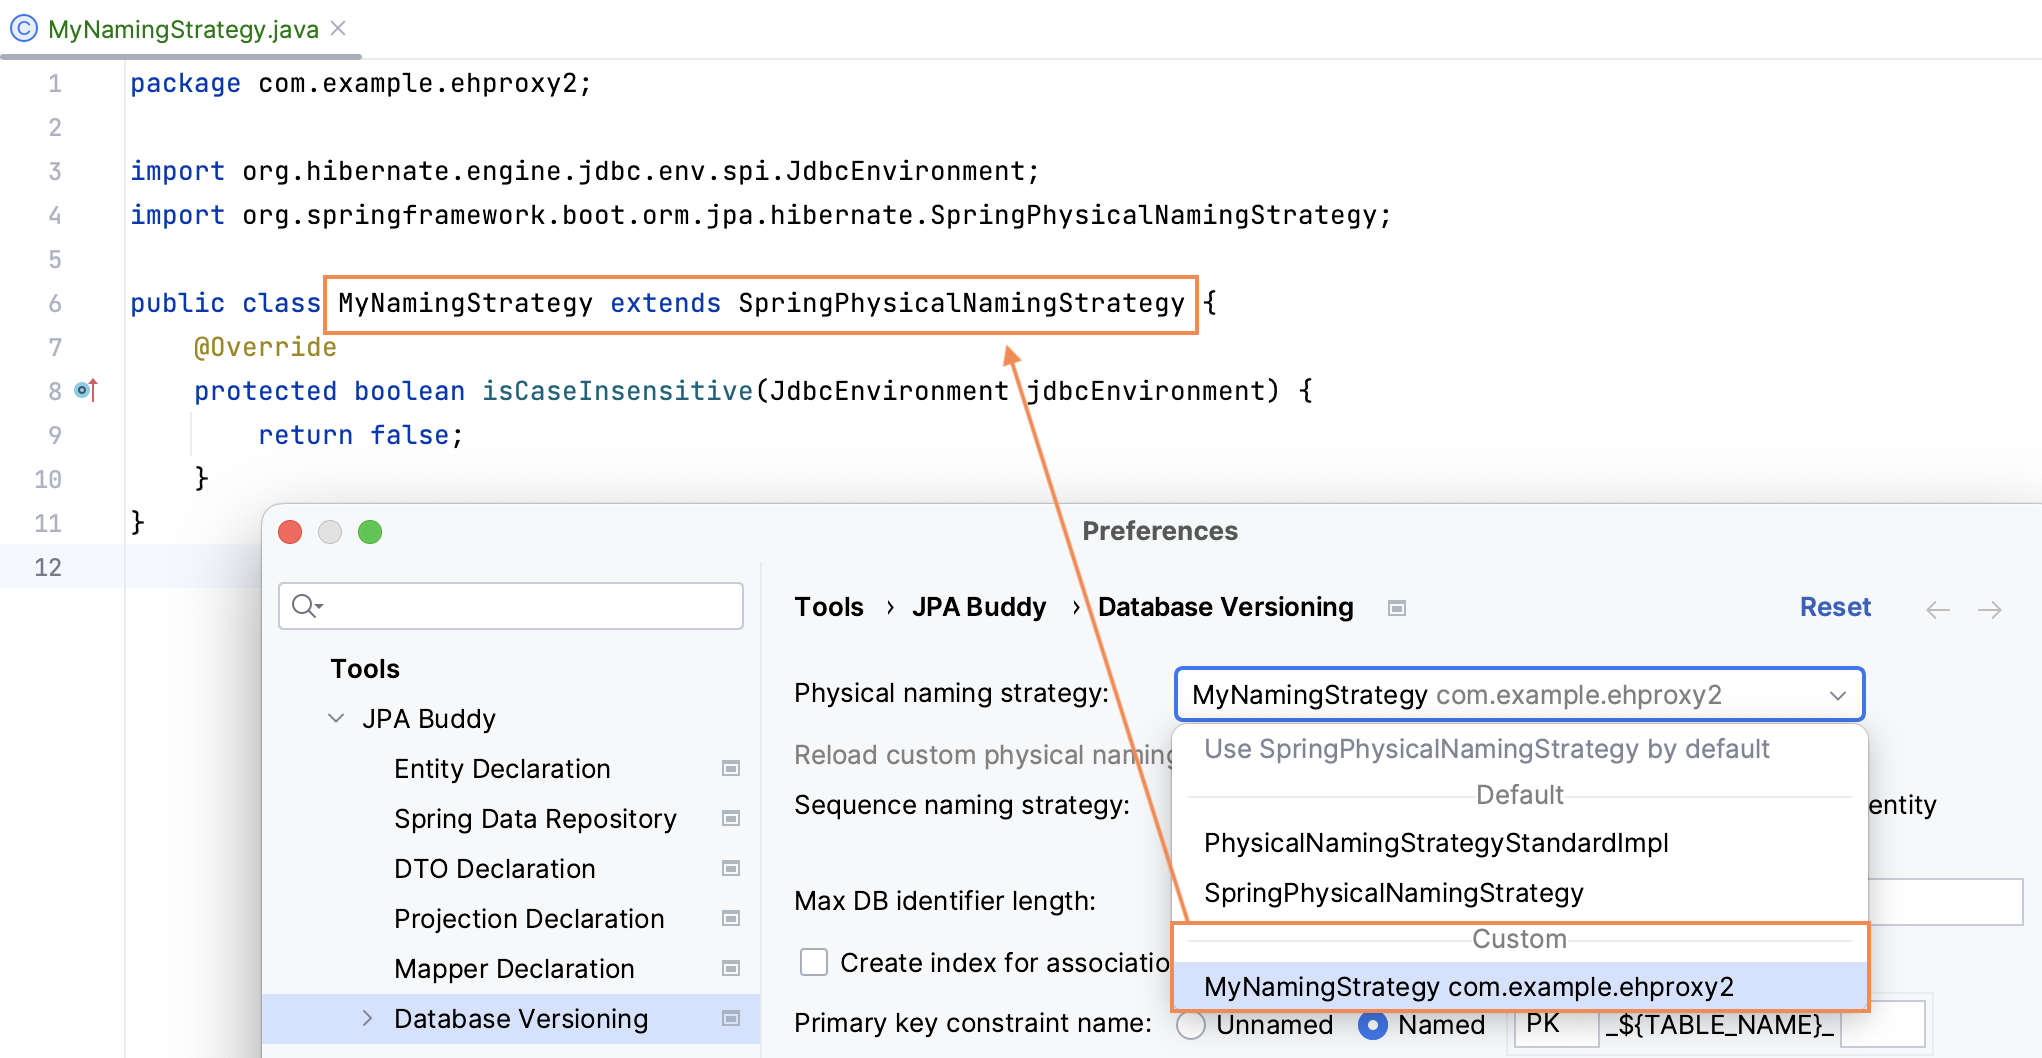
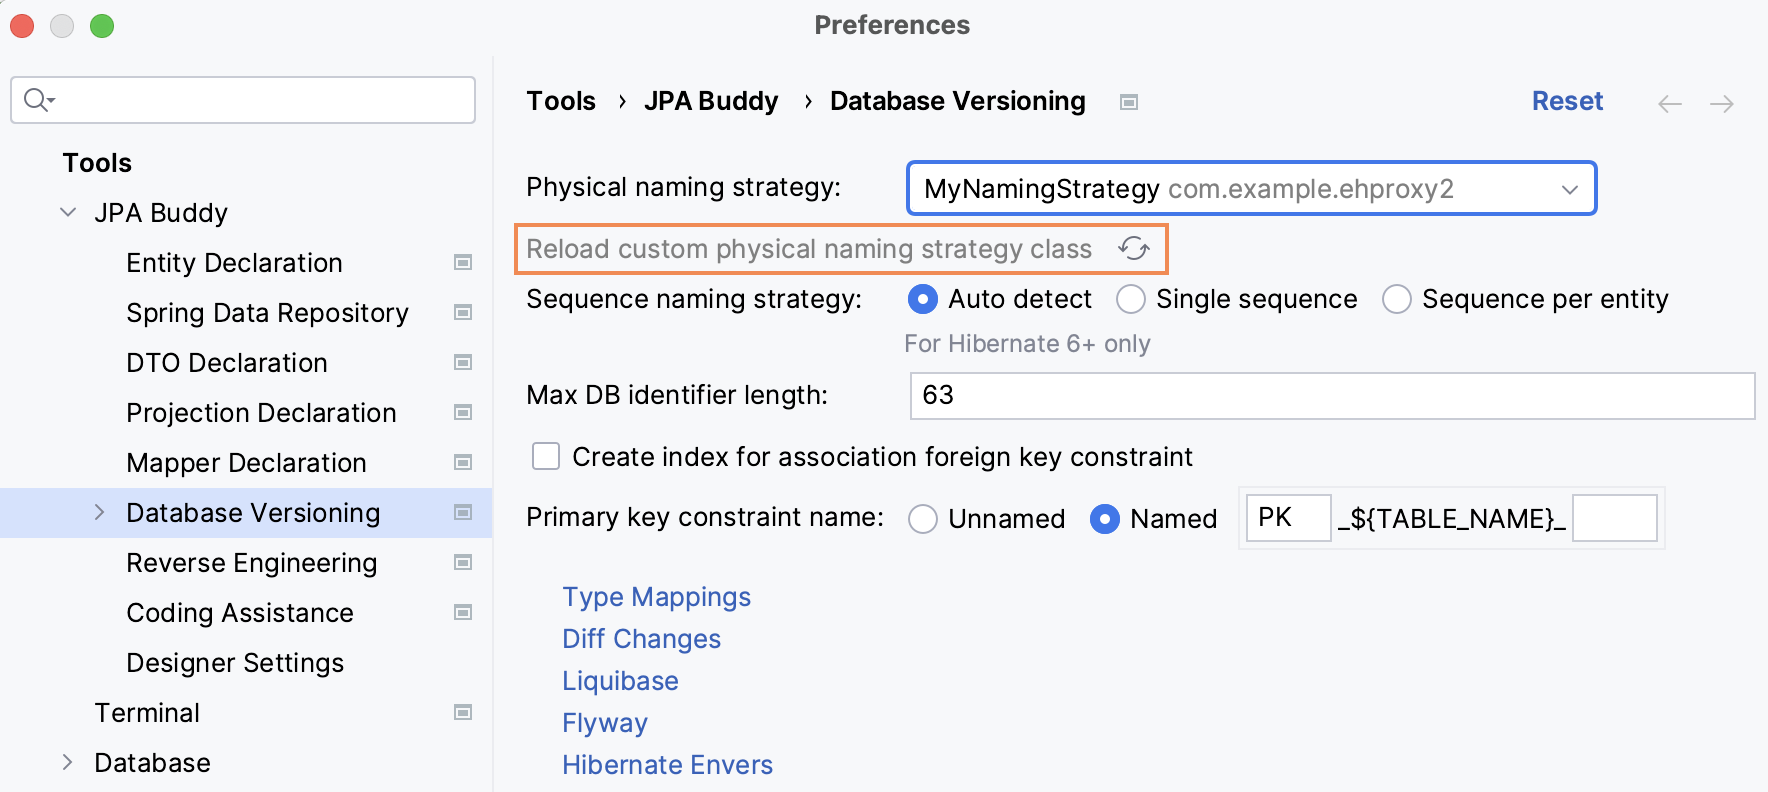
Once you select this class from the dropdown menu, JPA Buddy will use this strategy when generating migration scripts. It's important to note that JPA Buddy doesn't update the class changes automatically, so if you modify your strategy code, you need to either click the refresh button or restart IntelliJ IDEA.
Max Identifier
RDBMSs have their own limitations. For example, table names for OracleDatabase earlier than 12.1 version are limited to 30 bytes. To avoid problems with versioning scripts, you can limit table names:
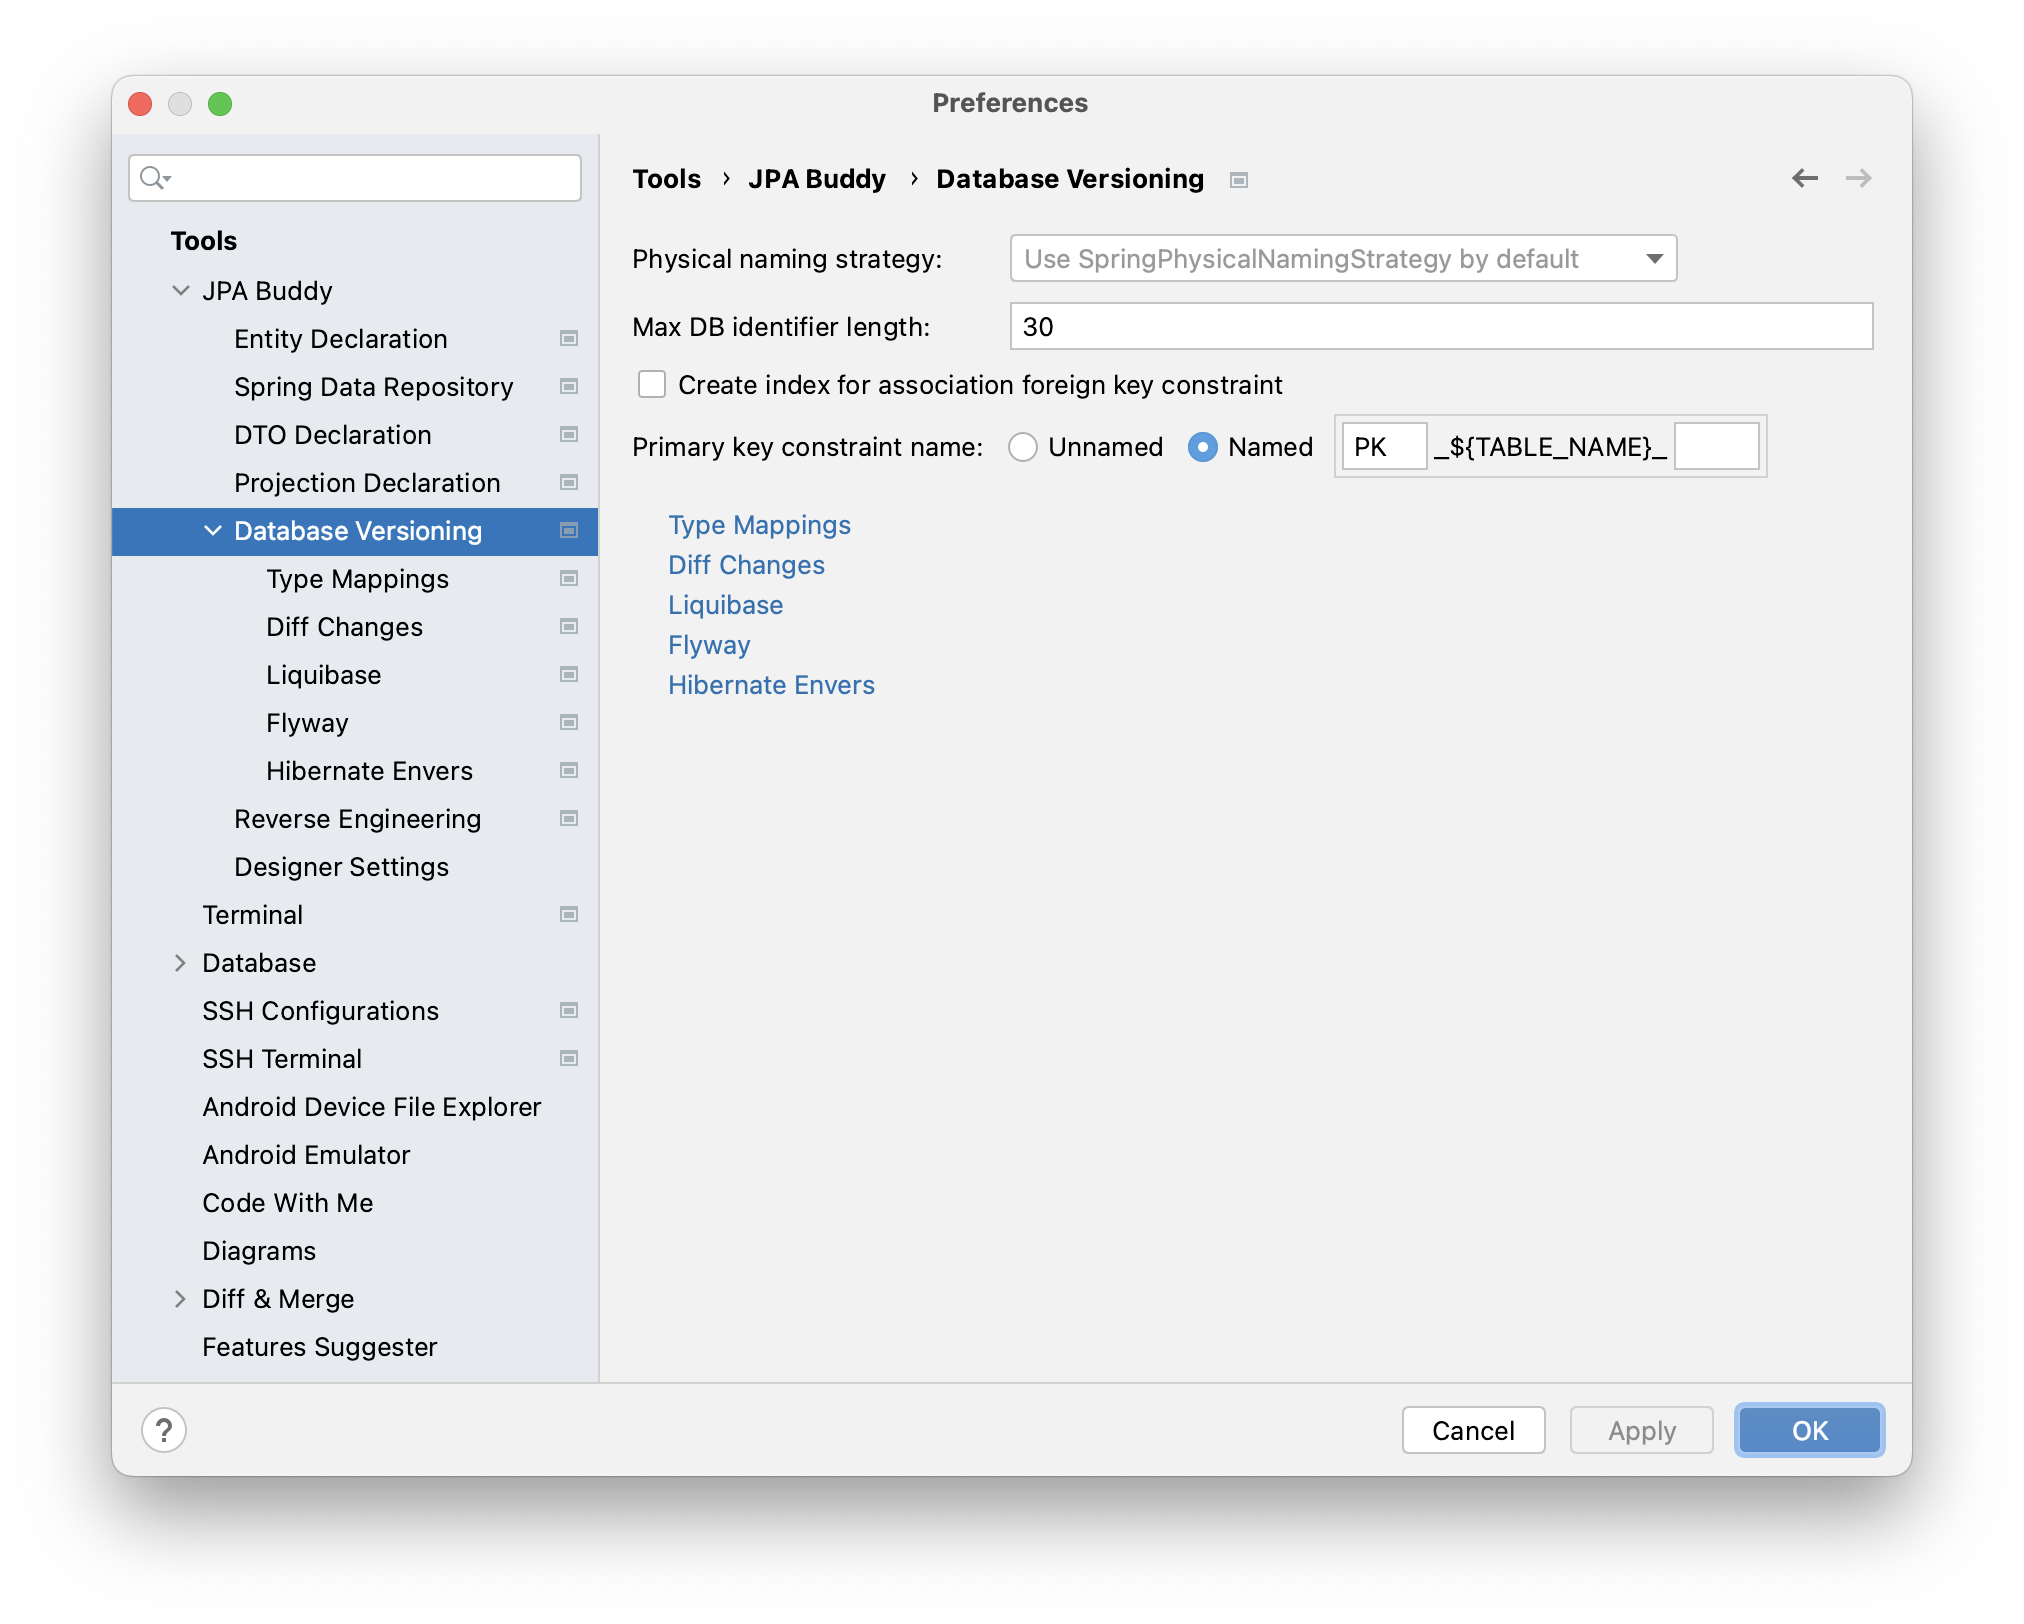
Also, you can define:
- whether to create an index for the association foreign key constraint or not;
- primary key constraint name.
Sharing Settings via Version Control
JPA Buddy settings define conventions that are supposed to be shared among the team members: file naming rules, how to mark or separate change types, which data types to use for DBMSs etc. To make sharing easier, all the plugin settings are stored in the .jpb folder in the root of the project. This folder is supposed to be pushed to the version control, which automatically keeps the settings in sync across the development team.