Reverse Engineering
Introduction
JPA Buddy allows you to selectively pick tables/views and fields from your database and get them as JPA entities:
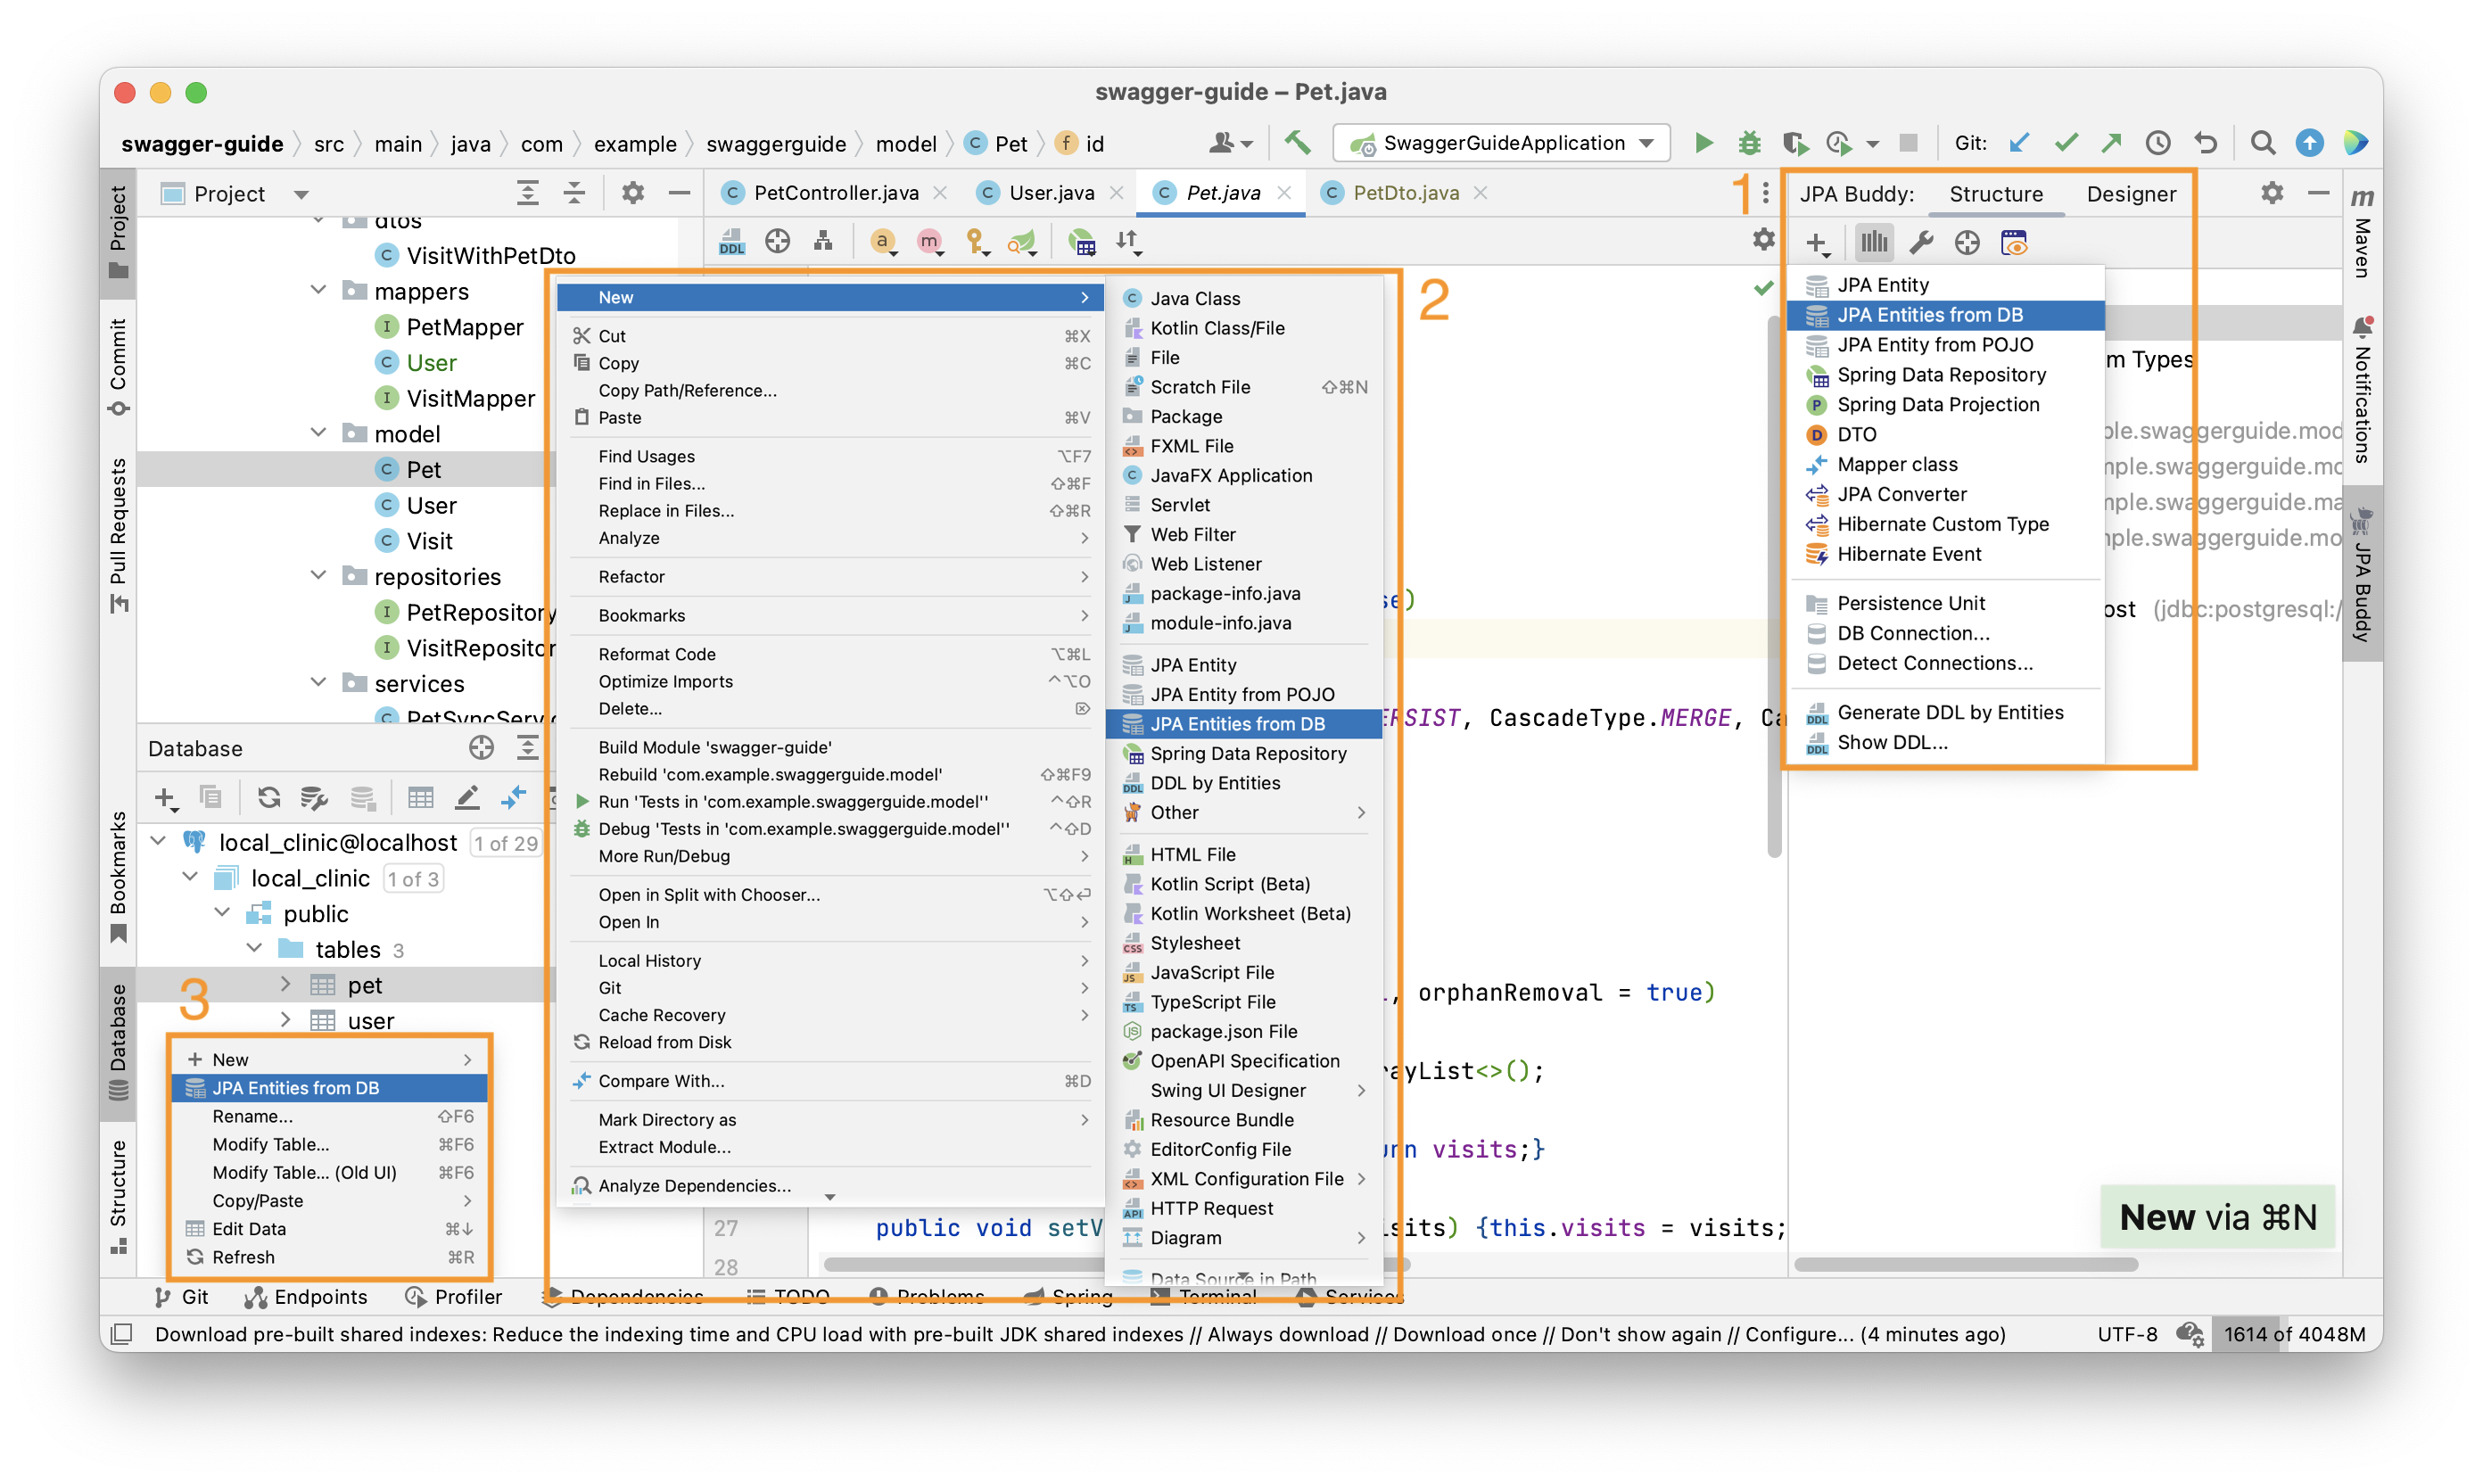
In the IntelliJ IDEA Community Edition, you can generate entities from DB via:
- JPA Structure (1) using plus button;
- Project Panel (2) using right-click.
In the IntelliJ IDEA Ultimate Edition, you can generate entities from DB via:
- JPA Structure (1) using plus button;
- Project Panel (2) using right-click;
- Database panel (3) using right-click;
Entities from DB Wizard
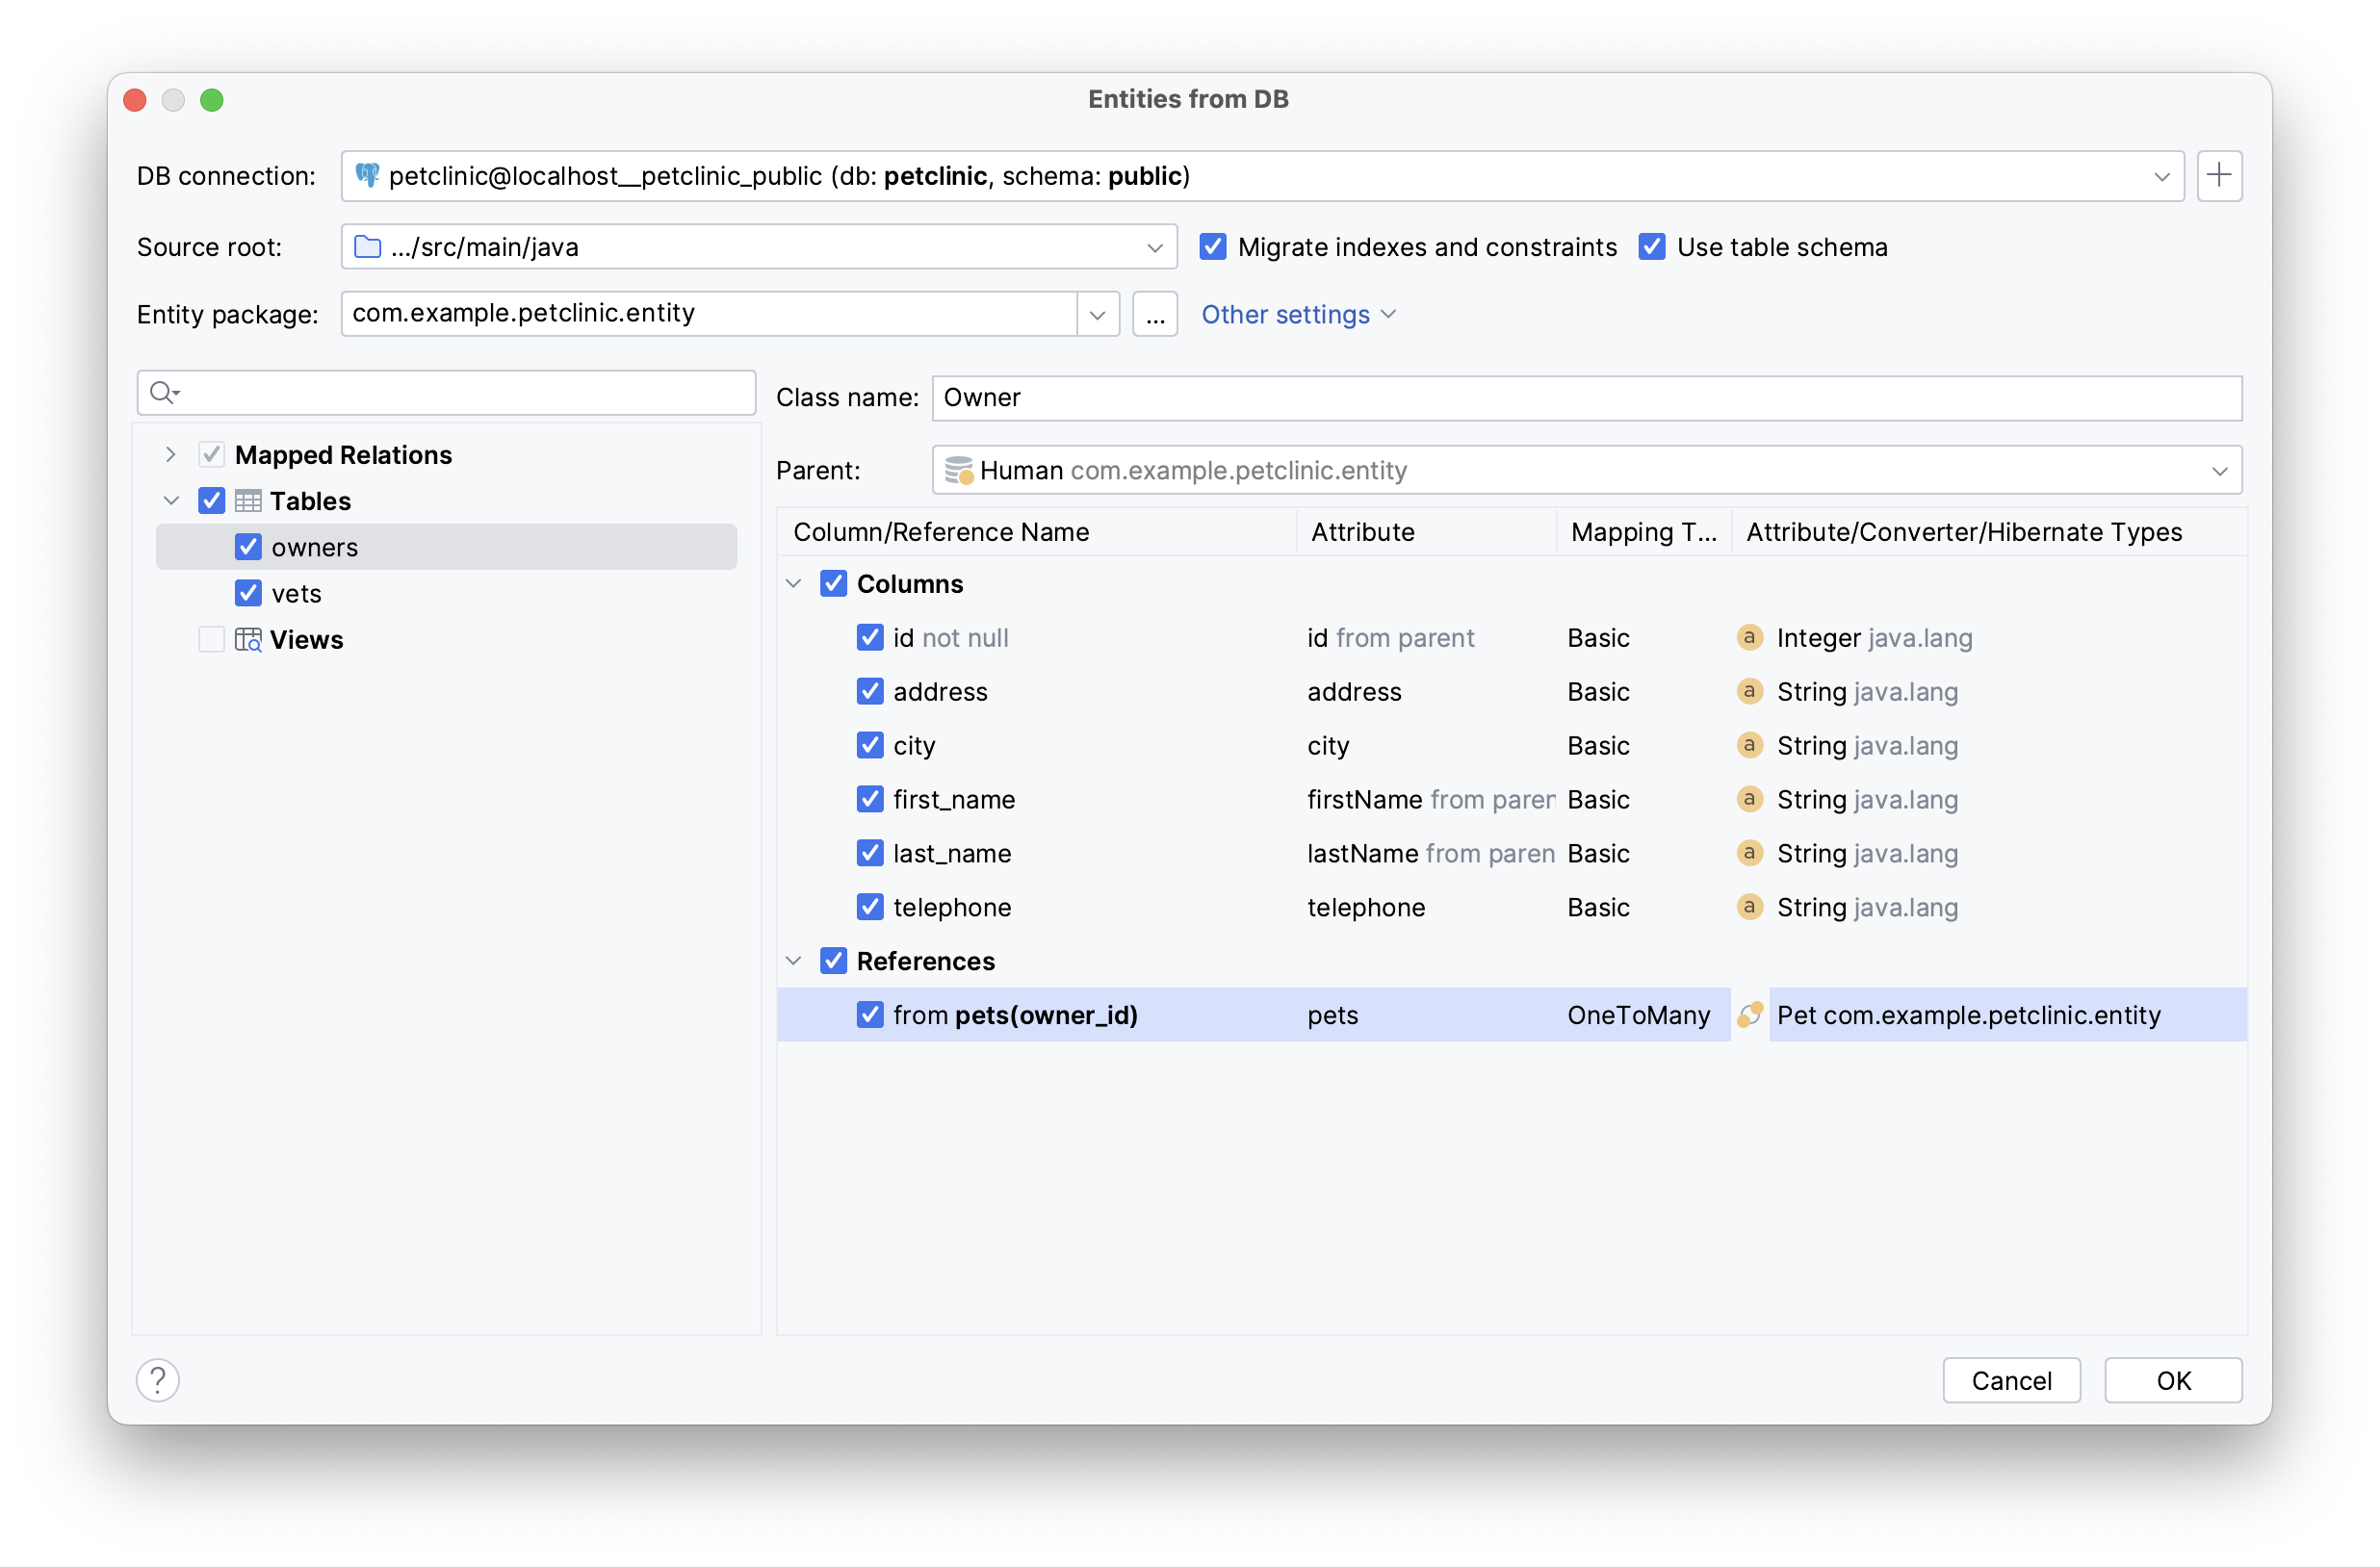
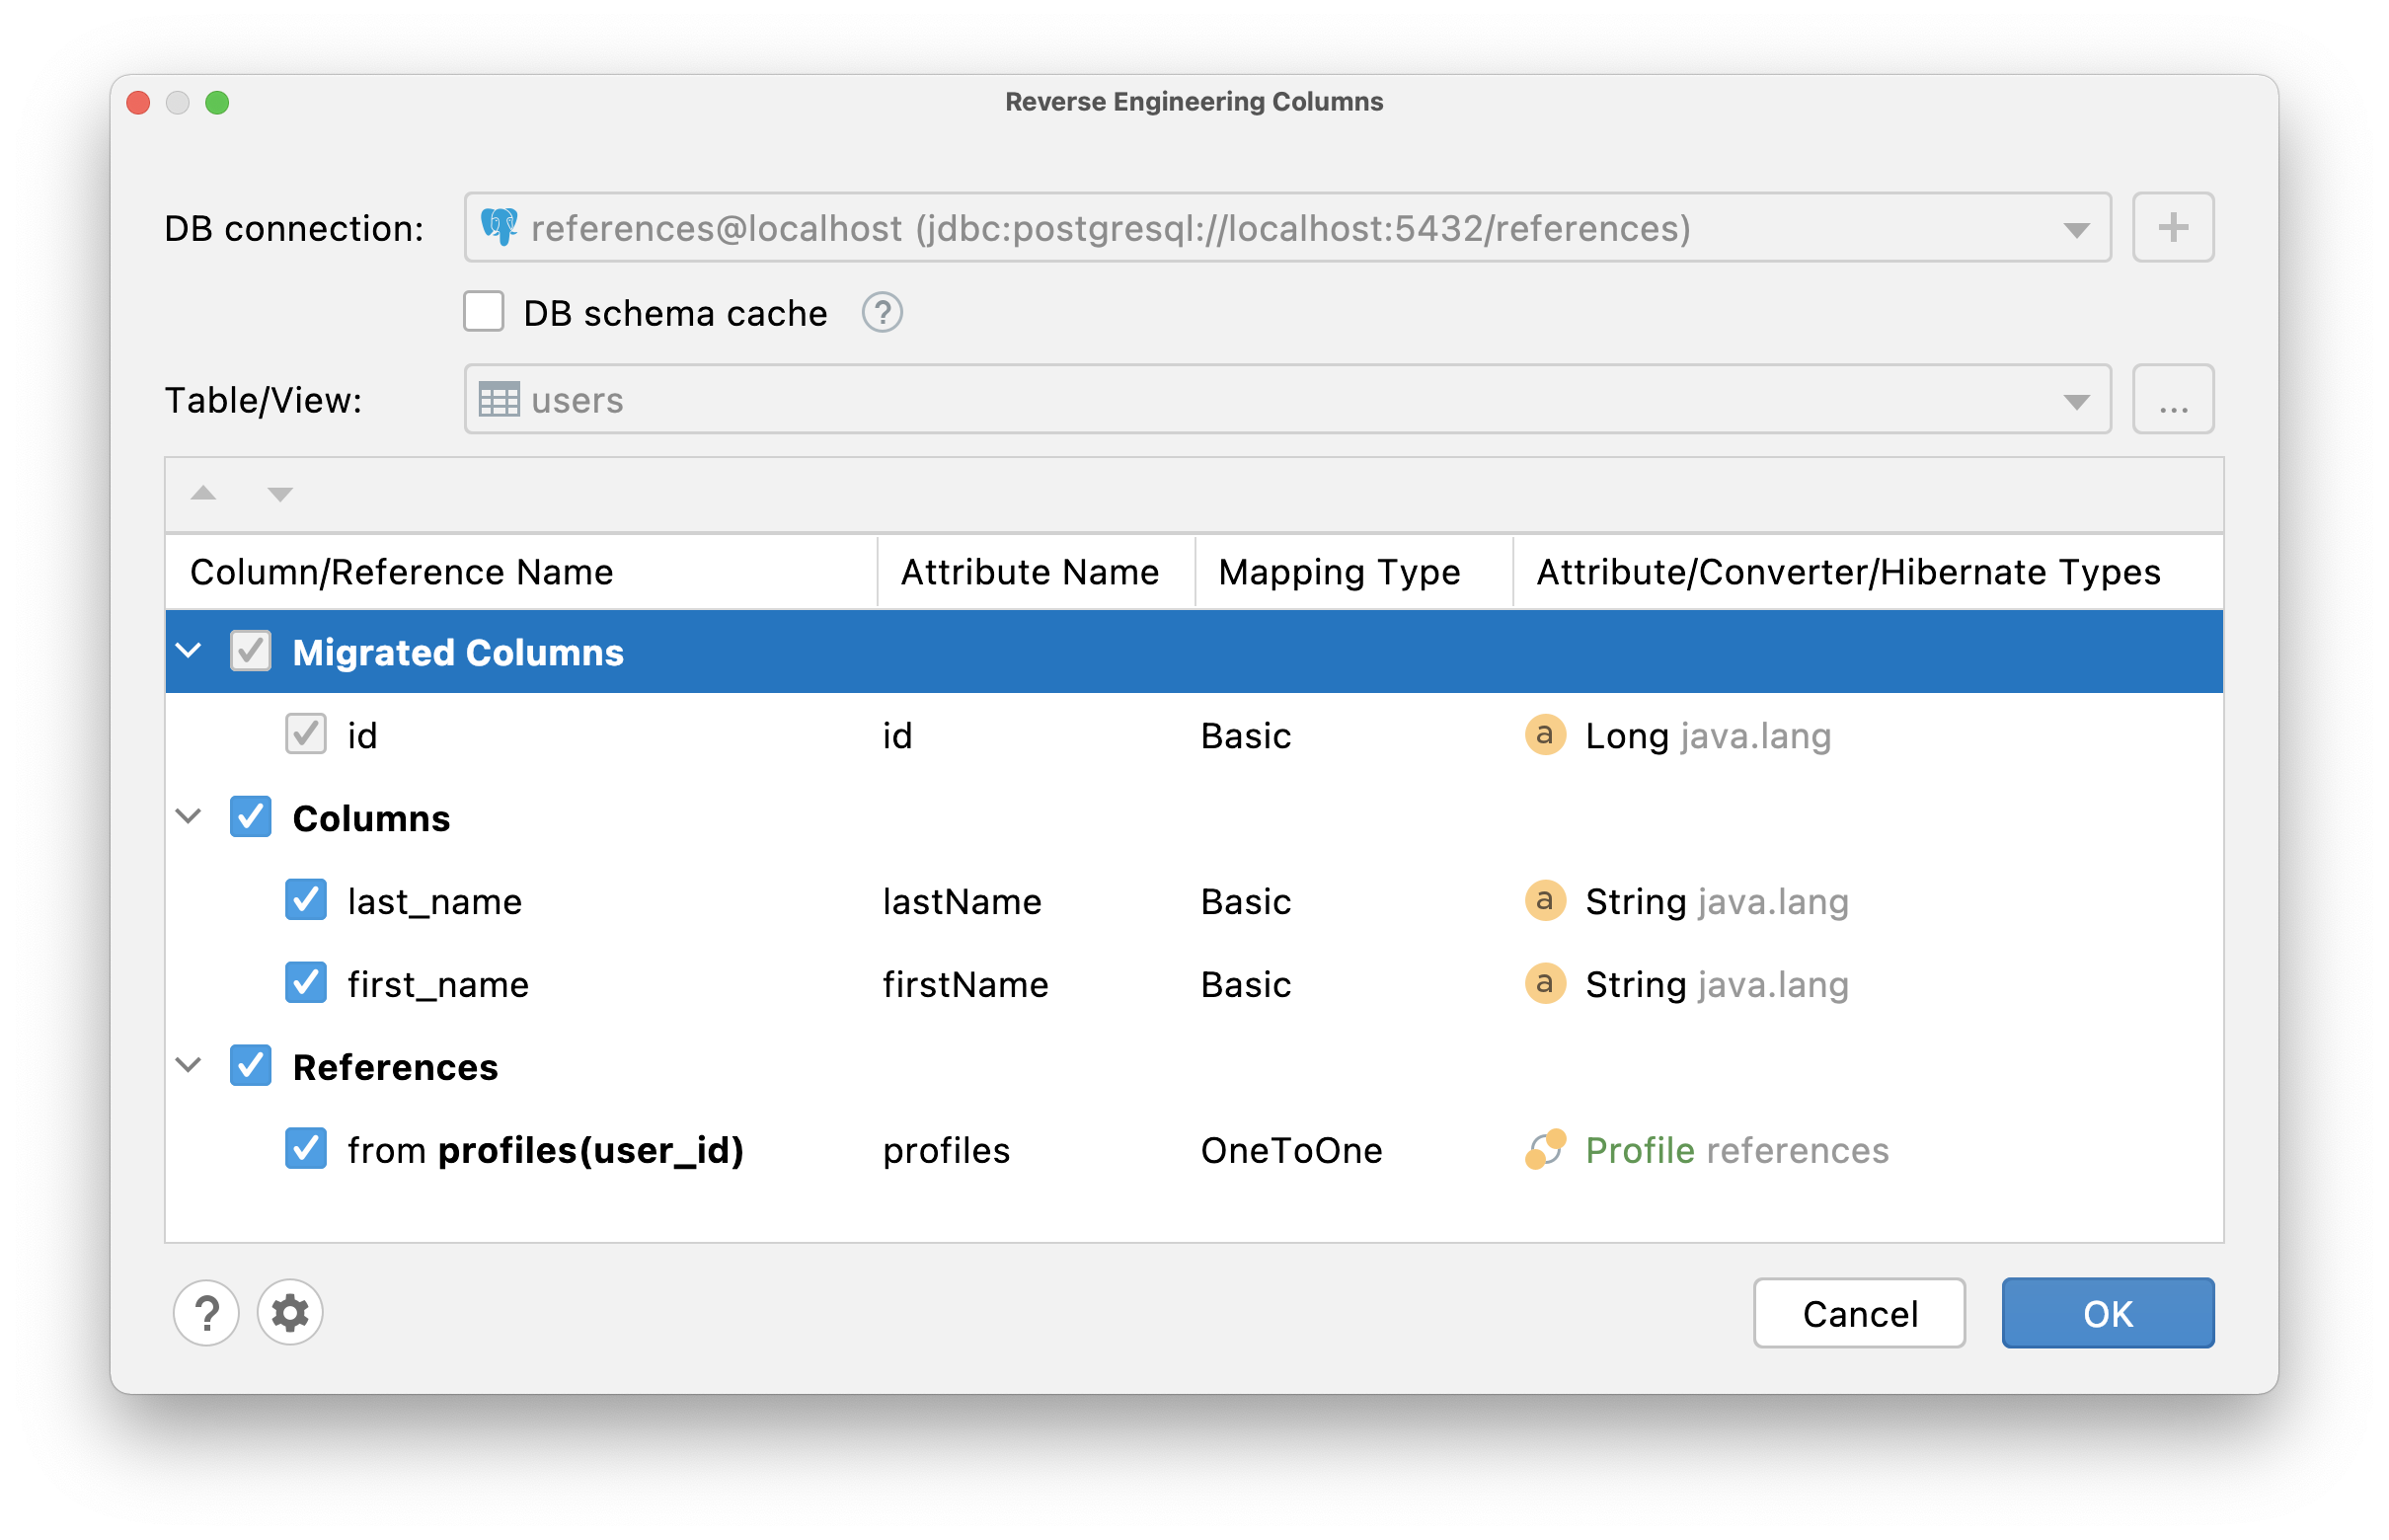
Configuration
The menu on the top of the window allows you to configure:
- DB connection
- DB schema cache
- Source root and package where the generated entities will be saved
- Whether indexes and constraints need to be migrated
- Whether schema name should be specified in the
@Tableannotation
Also, from the "Other settings" drop-down list, you can move to the entity declaration and reverse engineering settings.
Mapped Relations, Tables and Views
On the left side of the window, you can see:
- Mapped Relations - tables and views mapped to JPA entities
- Tables - tables that exist in the DB but are not mapped to entities
- Views - views that exist in the DB but are not mapped to entities
After selecting any element from the tree, a panel for migrating attributes from columns will appear. Also, you will be able to define a class name in the corresponding field.
Migrating Attributes
The main part of the window allows you to configure everything related to attributes. You can choose which attributes you want to add and change all their params, except "Column Name". Mapping type and attribute/converter/hibernate types are represented as drop-down lists.
All attributes are divided into 3 categories:
- Migrated Columns - columns that are already present in the entity (available only for mapped relations)
- Columns - new columns that are not yet mapped in the entity or parent @MappedSuperclass
- References - optional associations that are not represented as a column in the observed table
Parent Entities
JPA Buddy offers the ability to define a parent entity by selecting a class annotated with @MappedSuperclass from the "Parent" drop-down box. This allows the generated entities to extend from the parent class and automatically inherit all attributes that have the same name and type.
In cases where the column name in the @MappedSuperclass doesn't match the child entity's table, we can still inherit the attribute using the @AttributeOverride annotation. By simply selecting the attribute name and choosing the one to override, JPA Buddy assists in managing the inheritance.

During entity generation, JPA Buddy alerts us if any inherited attributes from the @MappedSuperclass are missing in the database, to align the model with the database access the "Generate DDL by Entities" action in the JPA Structure menu and select the "Existing DB update" option.
Creating Enums
For attributes matching the String or Integer type, you can change the mapping type from Basic to Enum, and JPA Buddy will create the corresponding Enum class in the project. You need to fill the enum with proper values manually.
Dealing With Unknown Types
For some SQL types, there is no exact match to Java classes. In this case, JPA Buddy does not set the type to prevent generating non-working code. You will need to choose the attribute type yourself. You can also configure default type mappings for each DBMS in the settings.
If you have the HibernateTypes library in your project dependencies list, JPA Buddy can automatically suggest suitable types from the library for the unsupported SQL types during reverse engineering:
// TODO Comments
If you want to postpone an attribute creation for specific columns, you can choose //todo comment as the mapping type. JPA Buddy will generate the //todo comment with the corresponding quick-fix actions depending on the column type. You can call these actions via ⌘+B (Ctrl+B) shortcut:
- For known basic and association types you can:
- Uncomment as is
- Remove column mapping
- For unknown column type you can:
- Define target Java type
- Uncomment as is
- Remove column mapping
Here is the example of generated //todo comment for the attribute with unknown column type:
/*
  TODO [JPA Buddy] create field to map the 'description' column
   Available actions: Define target Java type | Uncomment as is | Remove column mapping
  @Column(name = "description", columnDefinition = "jsonb")
  private java.lang.Object description;
*/
After calling the "Define target Java type" action, the following window will appear:
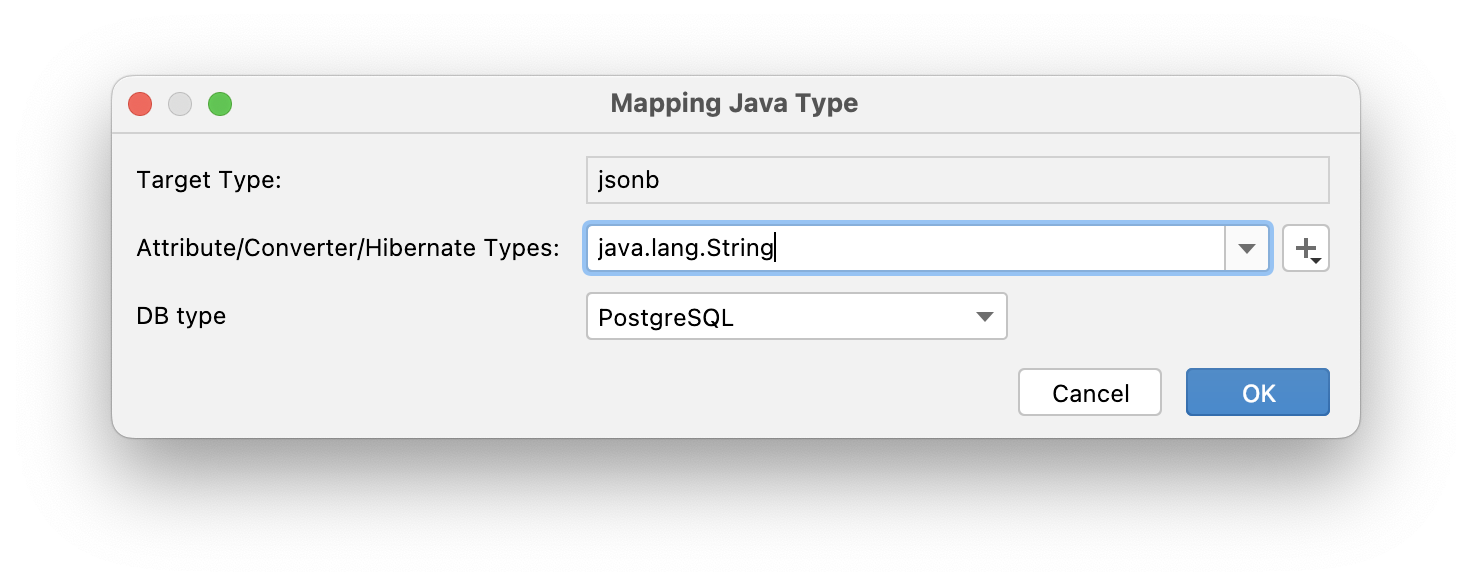
JPA Buddy will remember data mappings for the subsequent reverse engineering actions. You can always change them in the settings.
Map DB Views to JPA Entities
JPA Buddy follows all best practices providing the most efficient mapping for DB views while reverse engineering:
- As DB views do not have a primary key, JPA Buddy allows you to select a field or a set of fields to use as the identifier for the target entity.
- Most DB views are immutable. So, JPA Buddy adds
@Immutableannotation to the entity and generates getters only. This helps to improve application performance. - JPA Buddy generates only a no-arg protected constructor for entities that are mapped to a DB view, as per JPA specifications, which prevents developers from creating a new instance of such entities in the business logic code
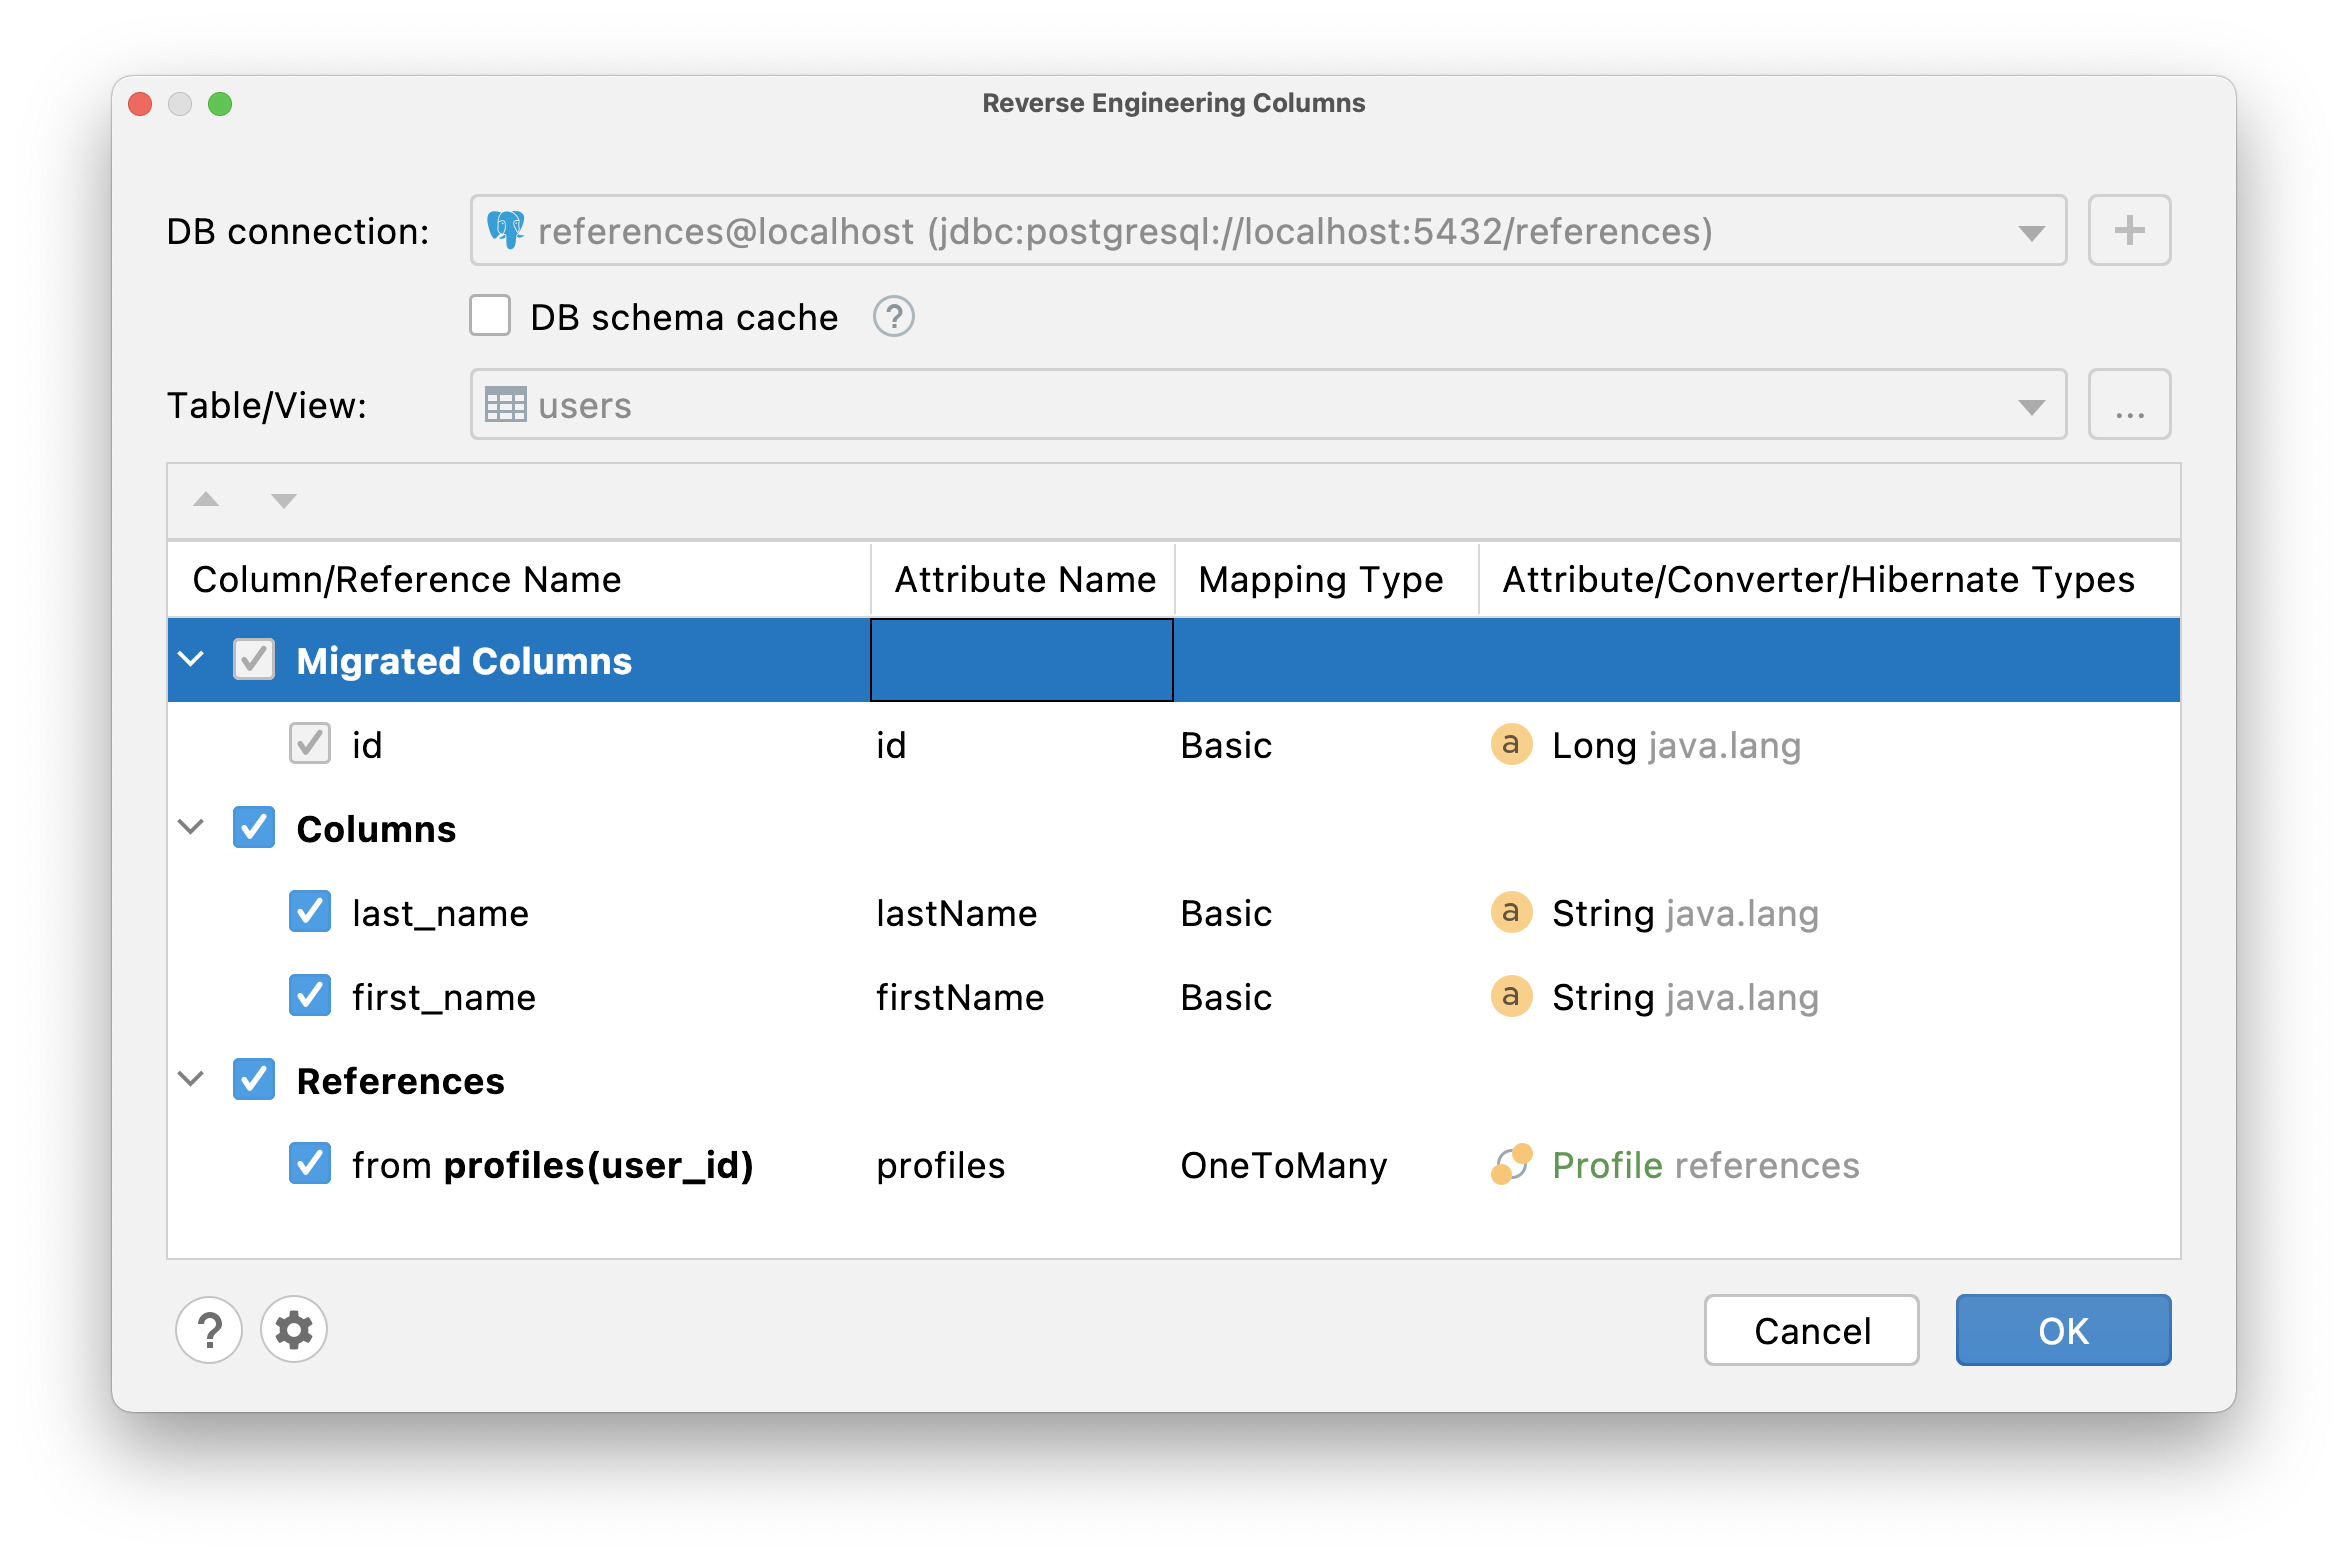
Reverse Engineering Columns
Some developers prefer the DB-first application development approach. First, they add columns directly to the database and then update the JPA model. JPA Buddy can automate this process. To add attributes to the existing entity, choose From DB action in JPA Designer (1), Editor Toolbar (2) or from IntelliJ IDEA's "Generate" menu (3):
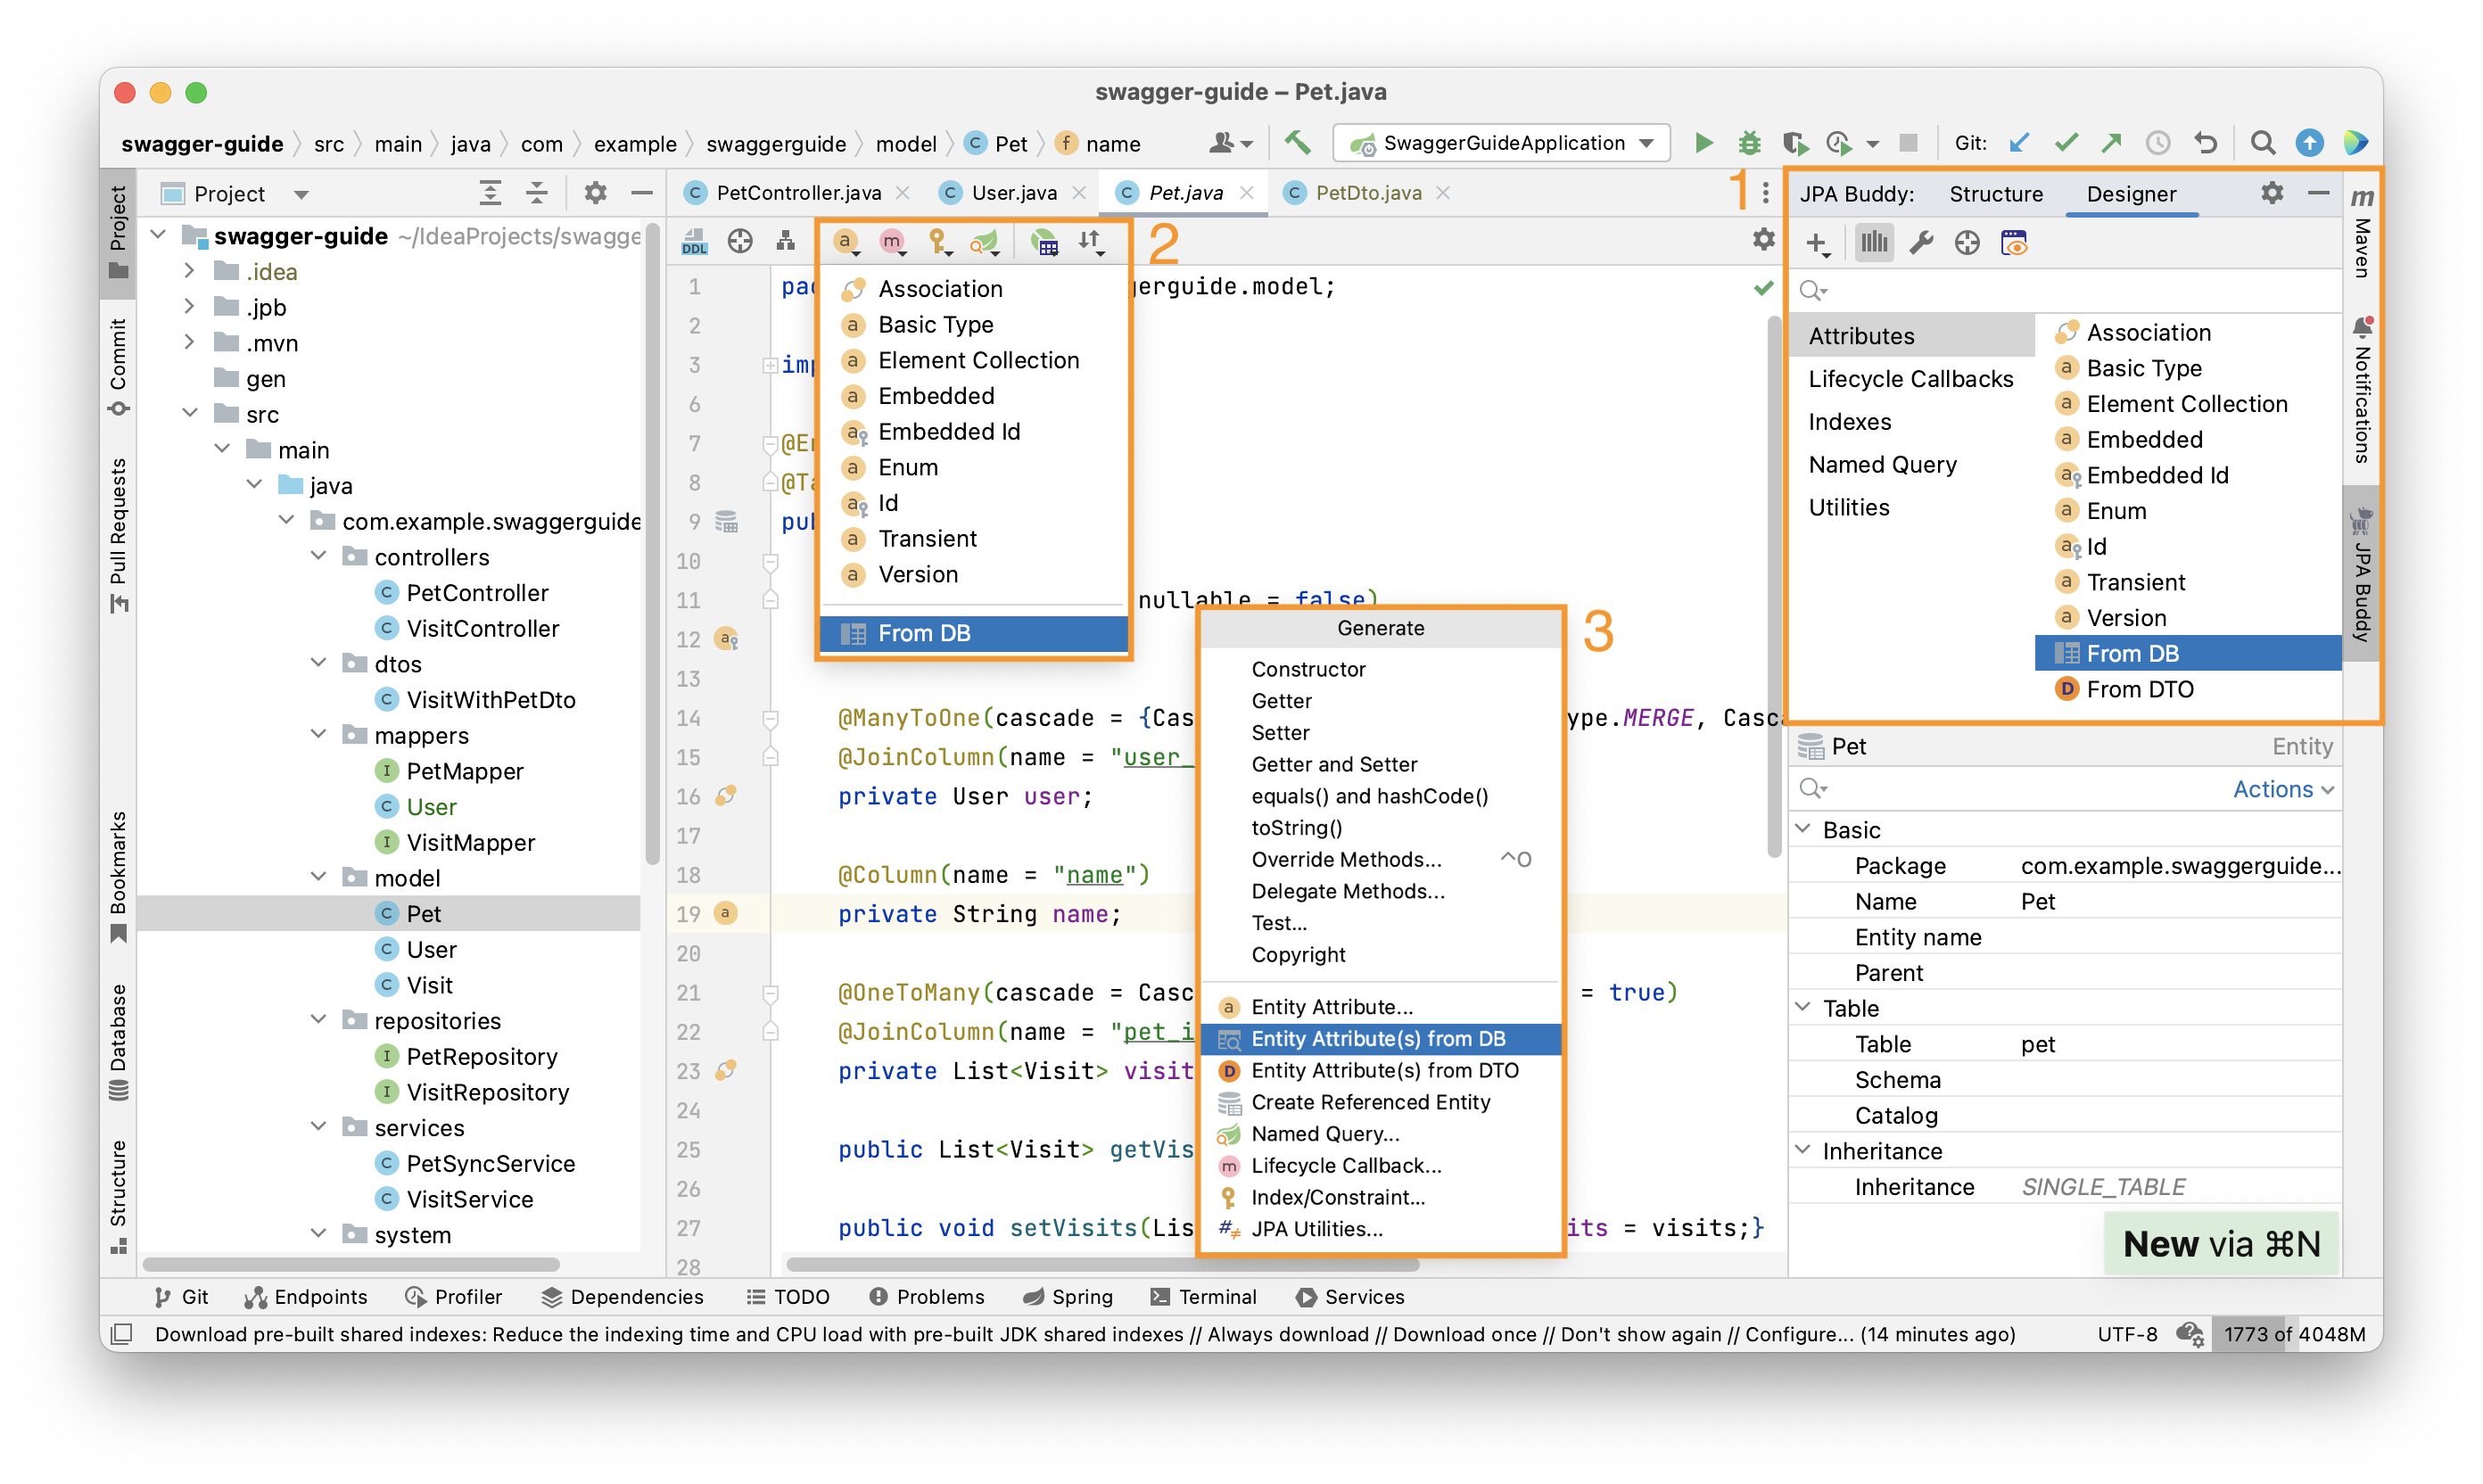
After that, the Reverse Engineering Columns wizard will appear:
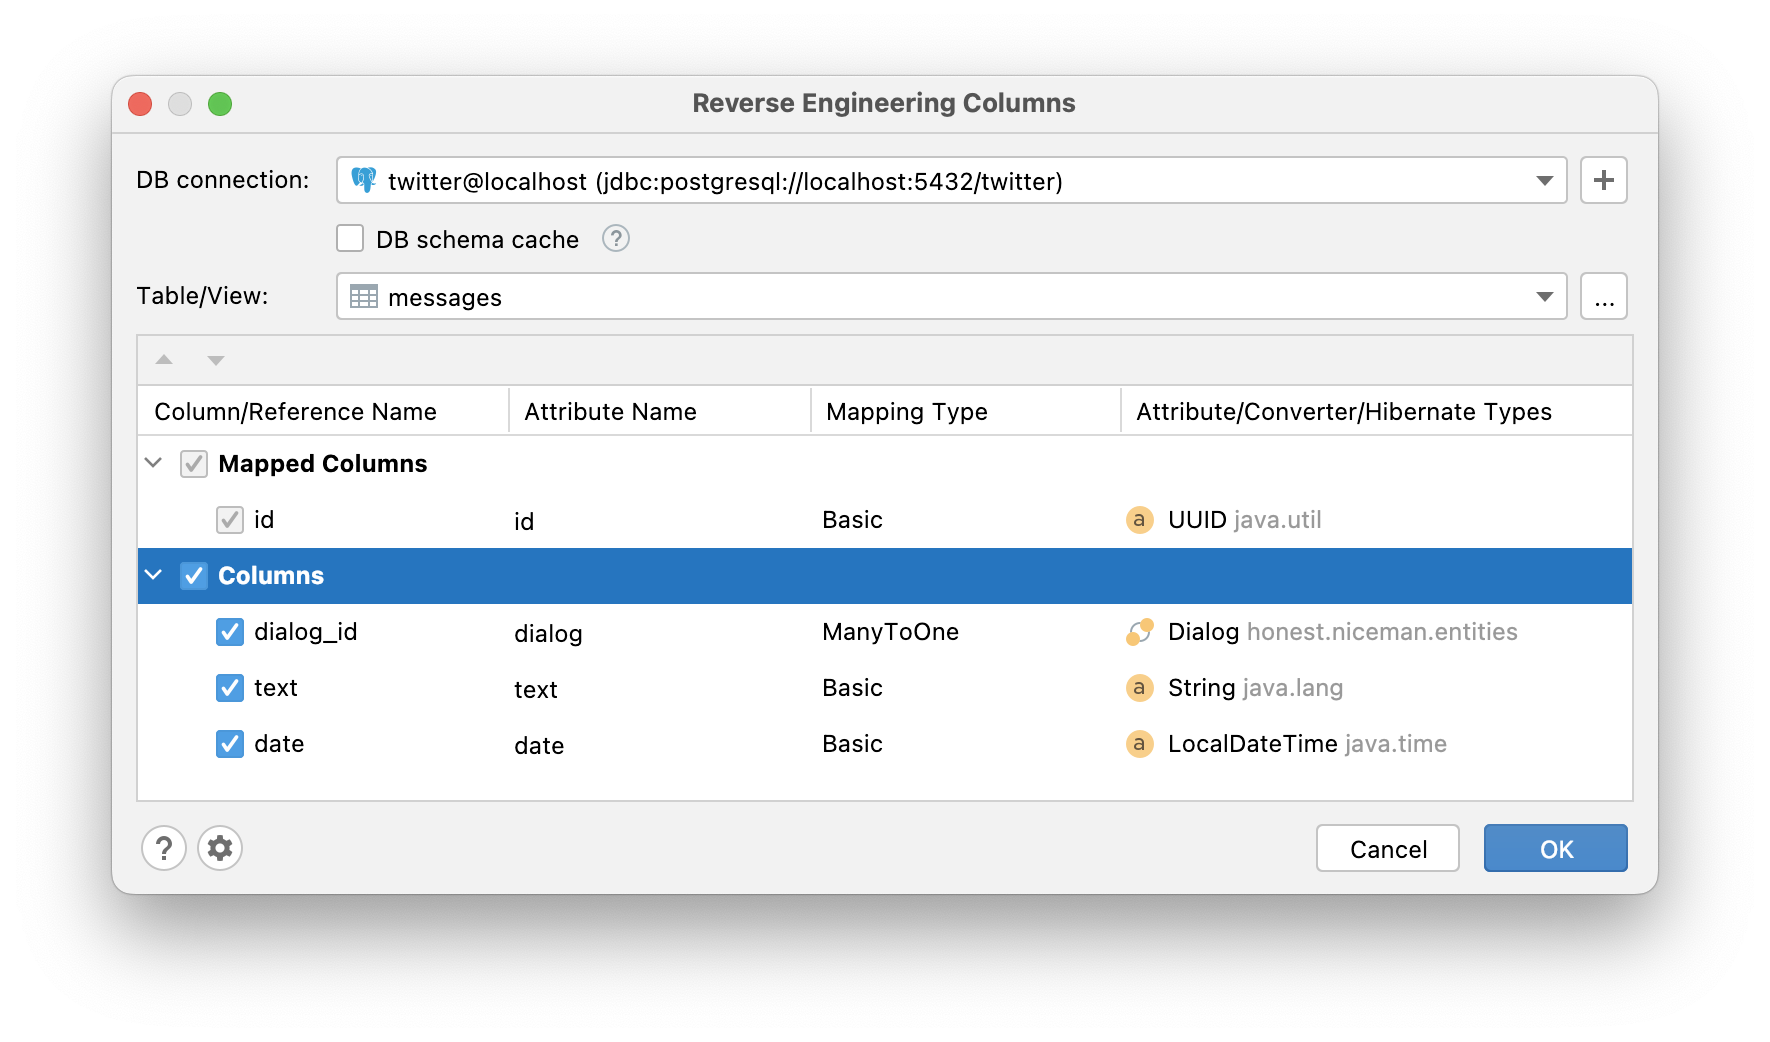
The attributes migration flow here is identical to what was described in the Entities from DB wizard section.
Smart References Detection
JPA Buddy deeply understands your model. In certain cases, it's able to properly detect cardinality: @OneToOne, @OneToMany, @ManyToOne, @ManyToMany. The coolest thing is that JPA Buddy can show references even when there are no corresponding columns in the current table
Let's look more closely at each of these cases.
@OneToOne
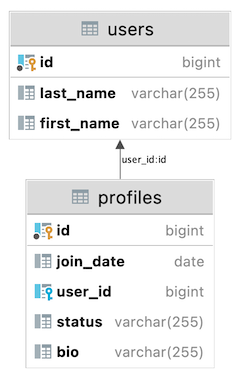
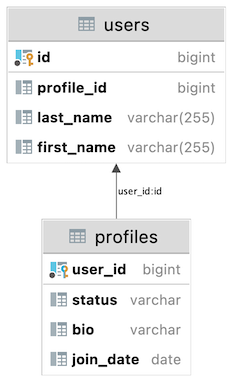
There are two situations where we can confidently assume the cardinality of the relation as @OneToOne:
- Table has a column with the unique constraint that refers to the primary key of another table
- Primary key of the table is a foreign key
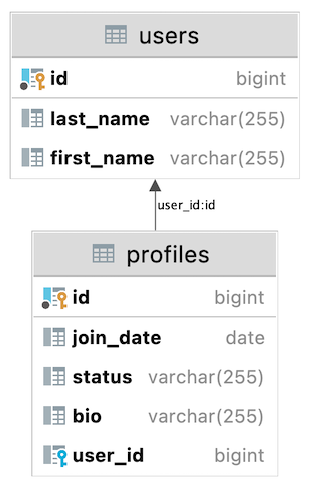
Case №1:
CREATE TABLE profiles
(
    id        BIGINT GENERATED BY DEFAULT AS IDENTITY NOT NULL,
    join_date date,
    user_id BIGINT,
    status    VARCHAR(255),
    bio       VARCHAR(255),
    CONSTRAINT pk_profiles PRIMARY KEY (id)
);

CREATE TABLE users
(
    id         BIGINT GENERATED BY DEFAULT AS IDENTITY NOT NULL,
    last_name  VARCHAR(255),
    first_name VARCHAR(255),
    CONSTRAINT pk_users PRIMARY KEY (id)
);

ALTER TABLE profiles
    ADD CONSTRAINT uc_profiles_user UNIQUE (user_id);

ALTER TABLE profiles
    ADD CONSTRAINT FK_PROFILES_ON_USER FOREIGN KEY (user_id) REFERENCES users (id);

JPA Buddy will generate a @OneToOne association with a @JoinColumn annotation in the User entity, and a @OneToOne association with a mappedBy parameter in the Profile entity:
@Entity
@Table(name = "users")
public class User {
  @Id
  @GeneratedValue(strategy = GenerationType.IDENTITY)
  @Column(name = "id", nullable = false)
  private Long id;

  @OneToOne(fetch = FetchType.LAZY)
  @JoinColumn(name = "profile_id")
  private Profile profile;
}

@Entity
@Table(name = "profiles")
public class Profile {
  @Id
  @GeneratedValue(strategy = GenerationType.IDENTITY)
  @Column(name = "id", nullable = false)
  private Long id;

  @OneToOne(fetch = FetchType.LAZY, mappedBy = "profile")
  private User users;
}
Case №2:
CREATE TABLE users
(
    id         BIGINT GENERATED BY DEFAULT AS IDENTITY NOT NULL,
    last_name  VARCHAR(255),
    first_name VARCHAR(255),
    CONSTRAINT pk_users PRIMARY KEY (id)
);

CREATE TABLE profiles
(
    user_id   BIGINT NOT NULL,
    status    VARCHAR(255),
    bio       VARCHAR(255),
    join_date date,
    CONSTRAINT pk_profiles PRIMARY KEY (user_id)
);

ALTER TABLE profiles
    ADD CONSTRAINT FK_PROFILES_ON_USER FOREIGN KEY (user_id) REFERENCES users (id);
Since @Id should not be a persistence entity, JPA Buddy will generate:
idattribute of basic type and mark it with@Id annotationusers@OneToOne association and mark it with@MapsId annotation
@Entity
@Table(name = "profiles")
public class Profile {
  @Id
  @Column(name = "user_id", nullable = false)
  private Long id;

  @MapsId
  @OneToOne(fetch = FetchType.LAZY, optional = false)
  @JoinColumn(name = "user_id", nullable = false)
  private User users;

  //...
}

@Entity
@Table(name = "users")
public class User {
  @Id
  @GeneratedValue(strategy = GenerationType.IDENTITY)
  @Column(name = "id", nullable = false)
  private Long id;

  @OneToOne(fetch = FetchType.LAZY, mappedBy = "user")
  private Profile profiles;

  //...
}
@OneToMany & @ManyToOne
If a table has the column that refers to the primary key of another table, it is most likely a @ManyToOne association. But you are also able to change cardinality to @OneToOne if required. So, depending on which table you call the reverse engineering action, JPA Buddy will detect mapping type as @OneToMany or @ManyToOne:
CREATE TABLE users
(
    id         BIGINT GENERATED BY DEFAULT AS IDENTITY NOT NULL,
    last_name  VARCHAR(255),
    first_name VARCHAR(255),
    CONSTRAINT pk_users PRIMARY KEY (id)
);

CREATE TABLE profiles
(
    id        BIGINT GENERATED BY DEFAULT AS IDENTITY NOT NULL,
    join_date date,
    status    VARCHAR(255),
    bio       VARCHAR(255),
    user_id   BIGINT,
    CONSTRAINT pk_profiles PRIMARY KEY (id)
);

ALTER TABLE profiles
    ADD CONSTRAINT FK_PROFILES_ON_USER FOREIGN KEY (user_id) REFERENCES users (id);
JPA Buddy will generate the following code:
@Entity
@Table(name = "users")
public class User {
  @Id
  @GeneratedValue(strategy = GenerationType.IDENTITY)
  @Column(name = "id", nullable = false)
  private Long id;

  @OneToMany(mappedBy = "user")
  private Set<Profile> profiles = new LinkedHashSet<>();

  //...
}

@Entity
@Table(name = "profiles")
public class Profile {
  @Id
  @GeneratedValue(strategy = GenerationType.IDENTITY)
  @Column(name = "id", nullable = false)
  private Long id;

  @ManyToOne(fetch = FetchType.LAZY)
  @JoinColumn(name = "user_id")
  private User user;

  //...
}
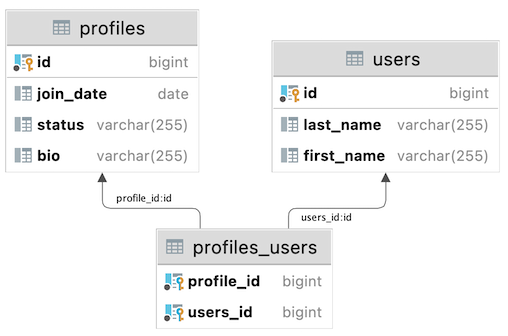
@ManyToMany
To establish a many-to-many relationship between two tables, you need to use a junction table. The junction table, in this case, contains only two columns - foreign keys. JPA Buddy can automatically detect such a table and identify the relation cardinality between the two tables whose ids are represented as foreign keys in the junction table as @ManyToMany.
CREATE TABLE users
(
  id         BIGINT GENERATED BY DEFAULT AS IDENTITY NOT NULL,
  last_name  VARCHAR(255),
  first_name VARCHAR(255),
  CONSTRAINT pk_users PRIMARY KEY (id)
);

CREATE TABLE profiles
(
  id        BIGINT GENERATED BY DEFAULT AS IDENTITY NOT NULL,
  join_date date,
  status    VARCHAR(255),
  bio       VARCHAR(255),
  CONSTRAINT pk_profiles PRIMARY KEY (id)
);

CREATE TABLE profiles_users
(
    profile_id BIGINT NOT NULL,
    users_id   BIGINT NOT NULL,
    CONSTRAINT pk_profiles_users PRIMARY KEY (profile_id, users_id)
);

ALTER TABLE profiles_users
    ADD CONSTRAINT fk_prouse_on_profile FOREIGN KEY (profile_id) REFERENCES profiles (id);

ALTER TABLE profiles_users
    ADD CONSTRAINT fk_prouse_on_user FOREIGN KEY (users_id) REFERENCES users (id);
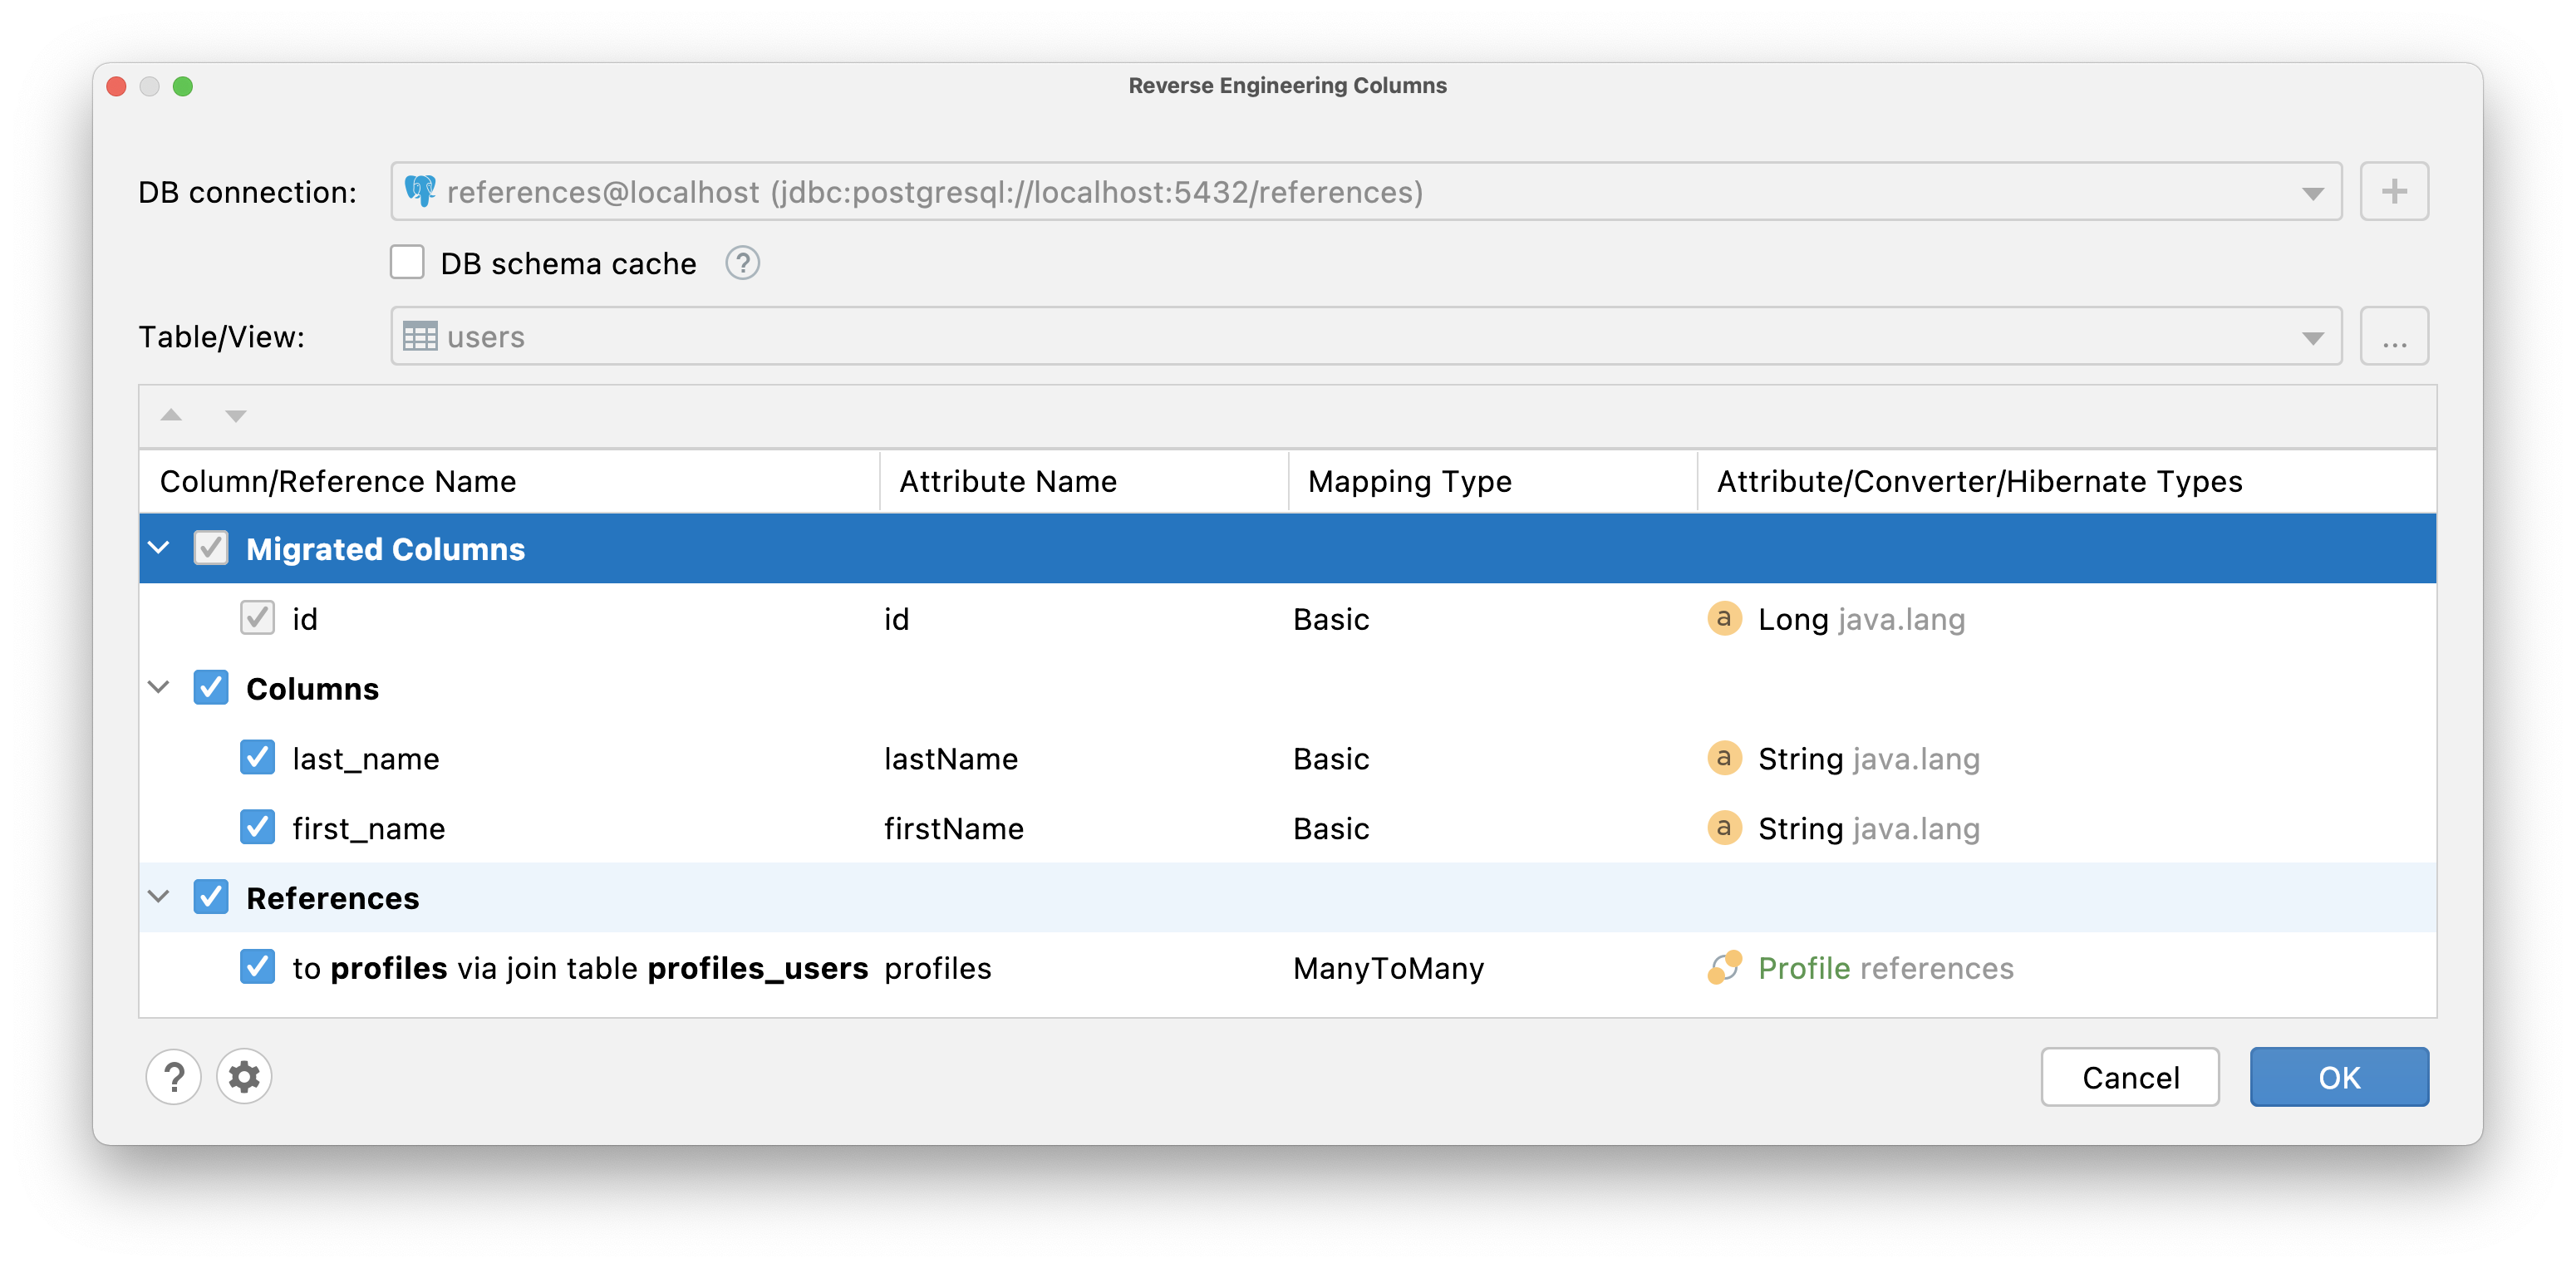
If this association does not exist in any of the entities, JPA Buddy will generate it in the entity for which the reverse engineering action was called.
@Entity
@Table(name = "users")
public class User {
   @Id
   @GeneratedValue(strategy = GenerationType.IDENTITY)
   @Column(name = "id", nullable = false)
   private Long id;

   @ManyToMany
   @JoinTable(name = "profiles_users",
      joinColumns = @JoinColumn(name = "users_id"),
      inverseJoinColumns = @JoinColumn(name = "profile_id"))
   private Set<Profile> profiles = new LinkedHashSet<>();

   //...
}
If this association already exists in one of the entities, then JPA Buddy will generate the @ManyToMany attribute with the mappedBy parameter.
@Entity
@Table(name = "profiles")
public class Profile {
   @Id
   @GeneratedValue(strategy = GenerationType.IDENTITY)
   @Column(name = "id", nullable = false)
   private Long id;

   @ManyToMany(mappedBy = "profiles")
   private Set<User> users = new LinkedHashSet<>();

   //...
}
Working With Remote DB
The larger the database and the slower the connection of the database (for example, if it is a remote DB), the longer it will take to load the DB schema. For better usability, JPA Buddy provides a DB schema cache. Once you enable it (1), a snapshot file will be created for the selected DB in the temporary directory. Otherwise, the DB schema will be loaded from the DB on each reverse engineering use. When you need it, you can refresh the saved schema cache (2).

Settings
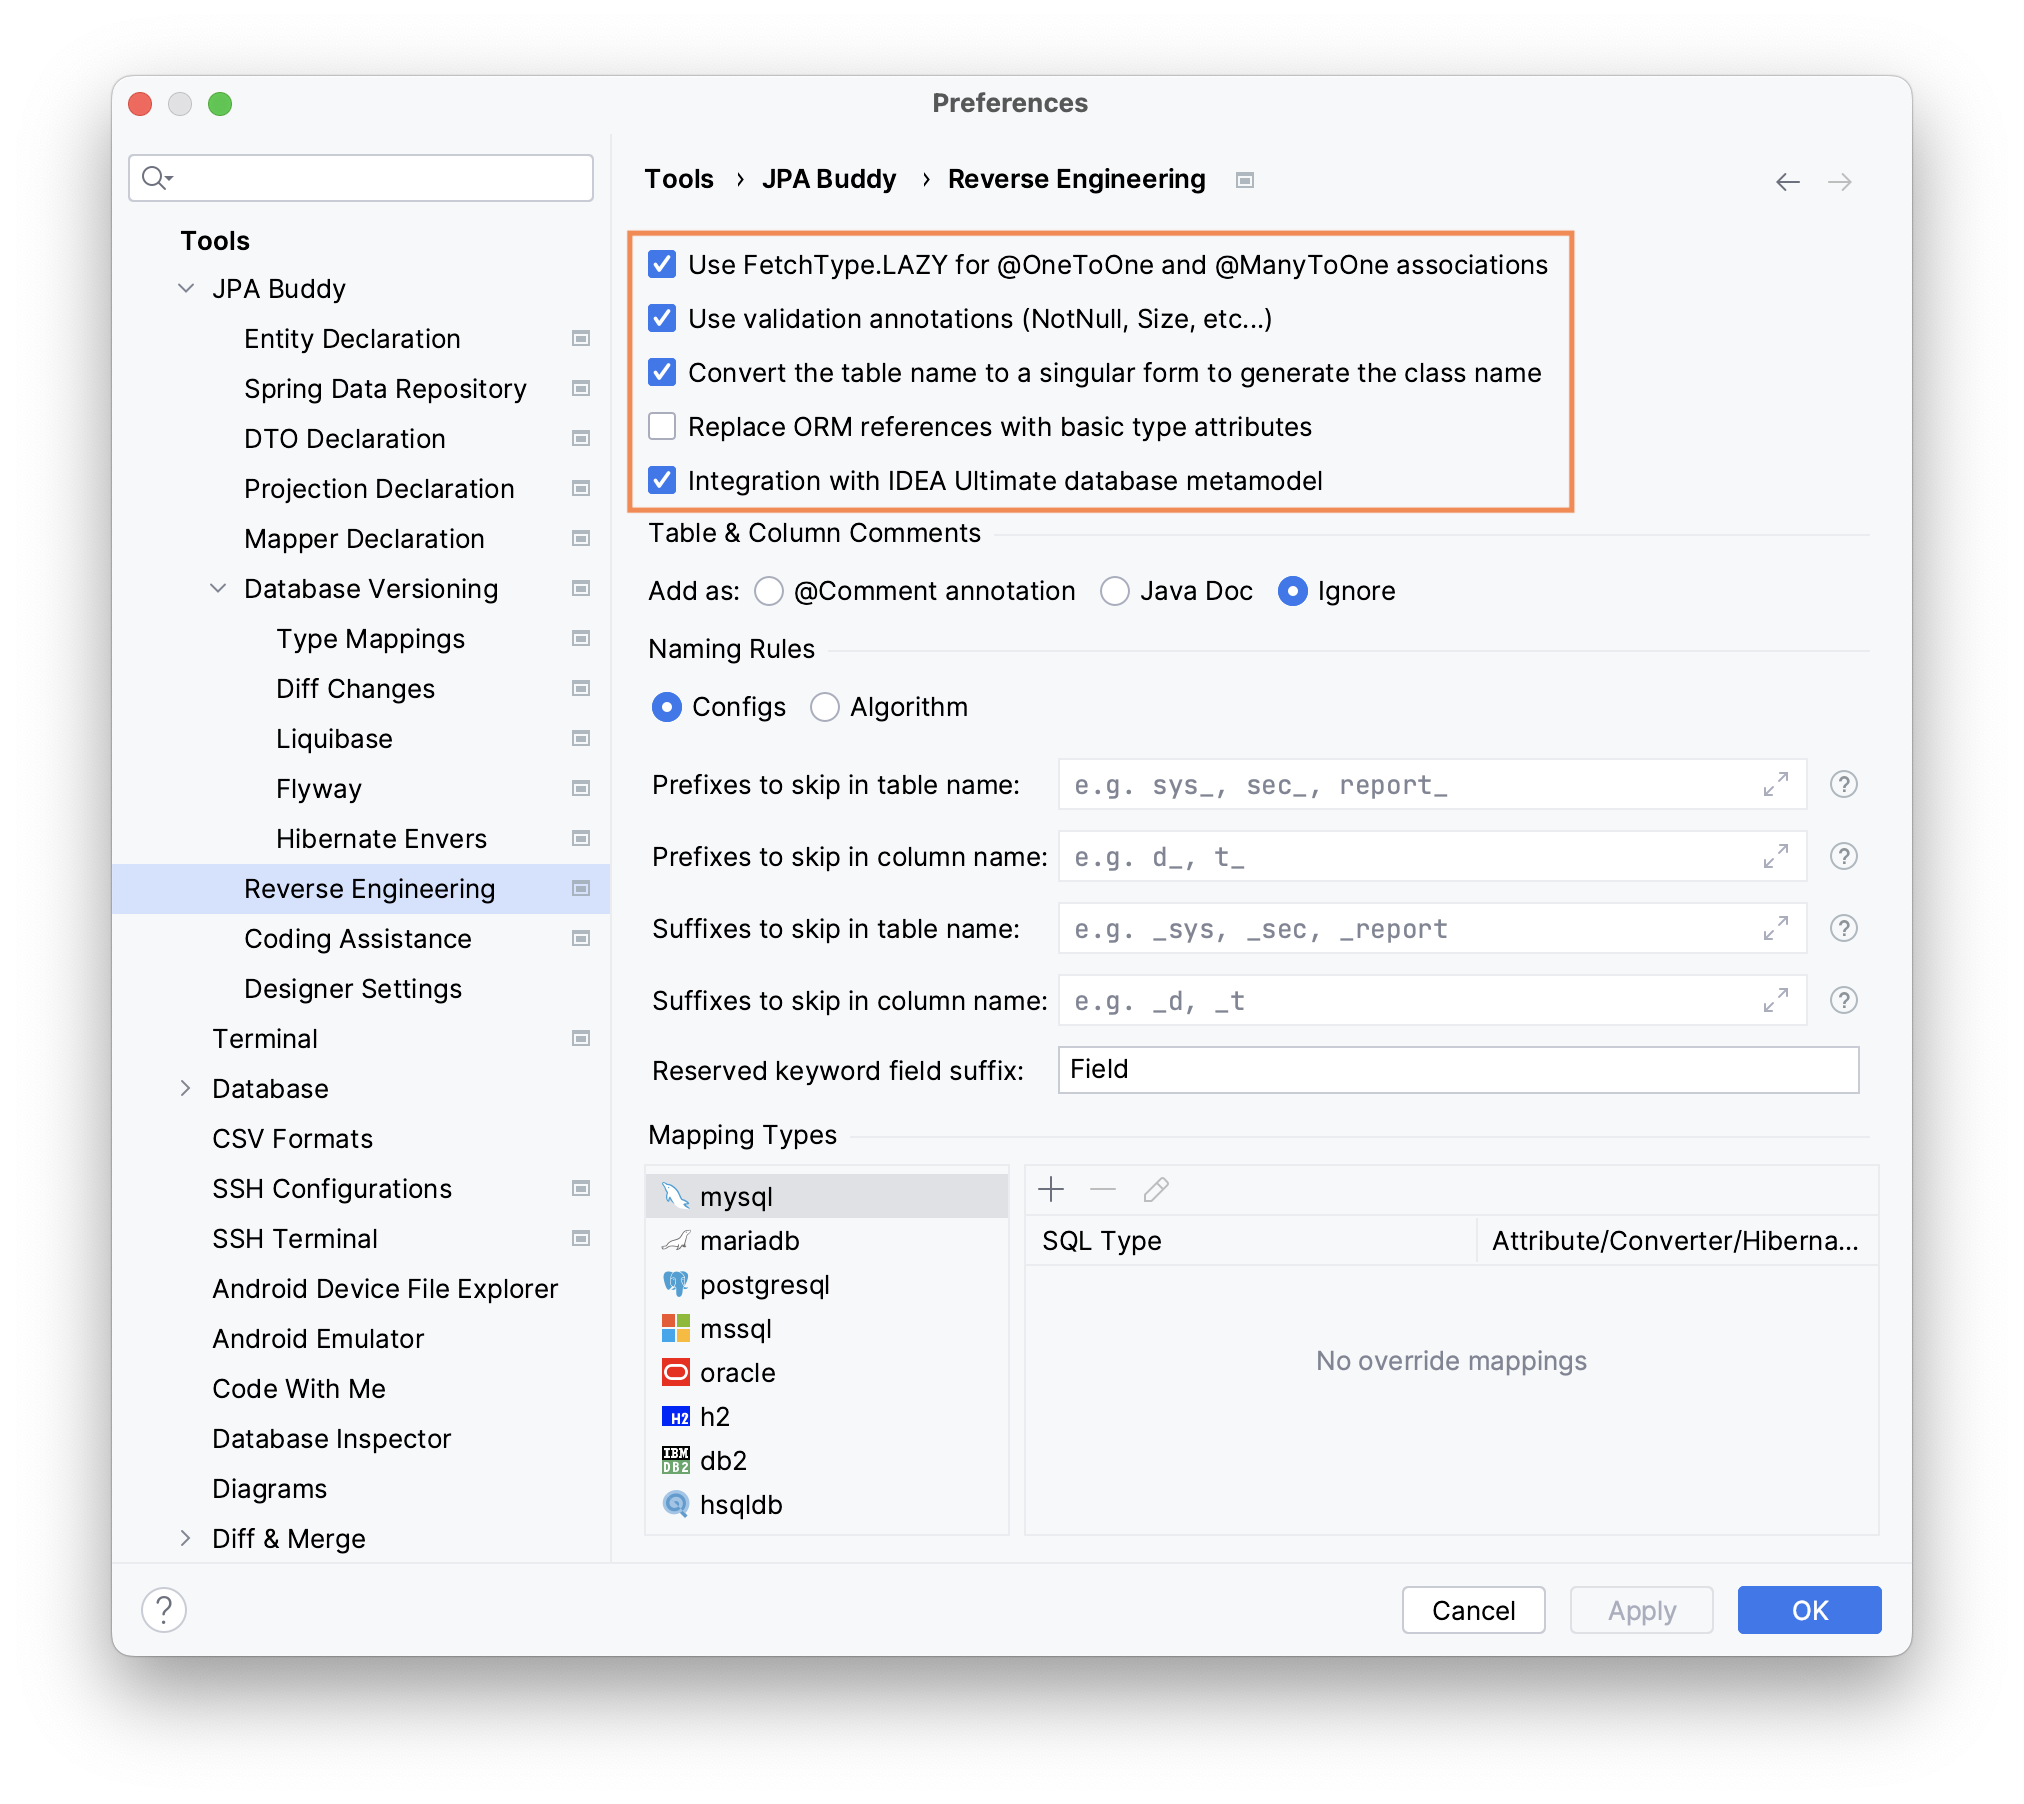
General
- Fetch Type – to follow best practices and avoid potential performance issues, JPA Buddy sets
FetchType.LAZYfor@OneToOneand@ManyToOneassociations by default. - Validation Annotations – validation annotations give you another layer of protection in addition to the DB constraints. By default, JPA Buddy will apply such annotations over entity attributes while reverse engineering.
- Pluralization - by default, JPA Buddy uses the singular form for entity names. For example, if you have a table called
users, JPA Buddy will generate aUserentity. If you disable this option, JPA Buddy will keep the original name of the table and only capitalize the first letter –Users. - Basic type attribute - when this option is enabled, JPA Buddy will analyze the ORM references in the database schema and generate basic type attributes instead of creating associations or relationships between entities. This can be useful in certain scenarios where you prefer to have simple attribute types instead of complex associations.
- IDEA Ultimate integration - enable this option to use the database metamodel provided by IntelliJ IDEA Ultimate to generate data related objects instead of using a JDBC driver to obtain meta information. This ensures that the generated objects align perfectly with the database structure. The most amazing part of it is that JPA Buddy can utilize all the connection settings specified within the IntelliJ IDEA Ultimate interface.
Tables & Column Comments
To preserve comments added to the database objects, JPA Buddy transfers them to the corresponding entity using the Hibernate @Comment annotation or JavaDocs, depending on your settings.
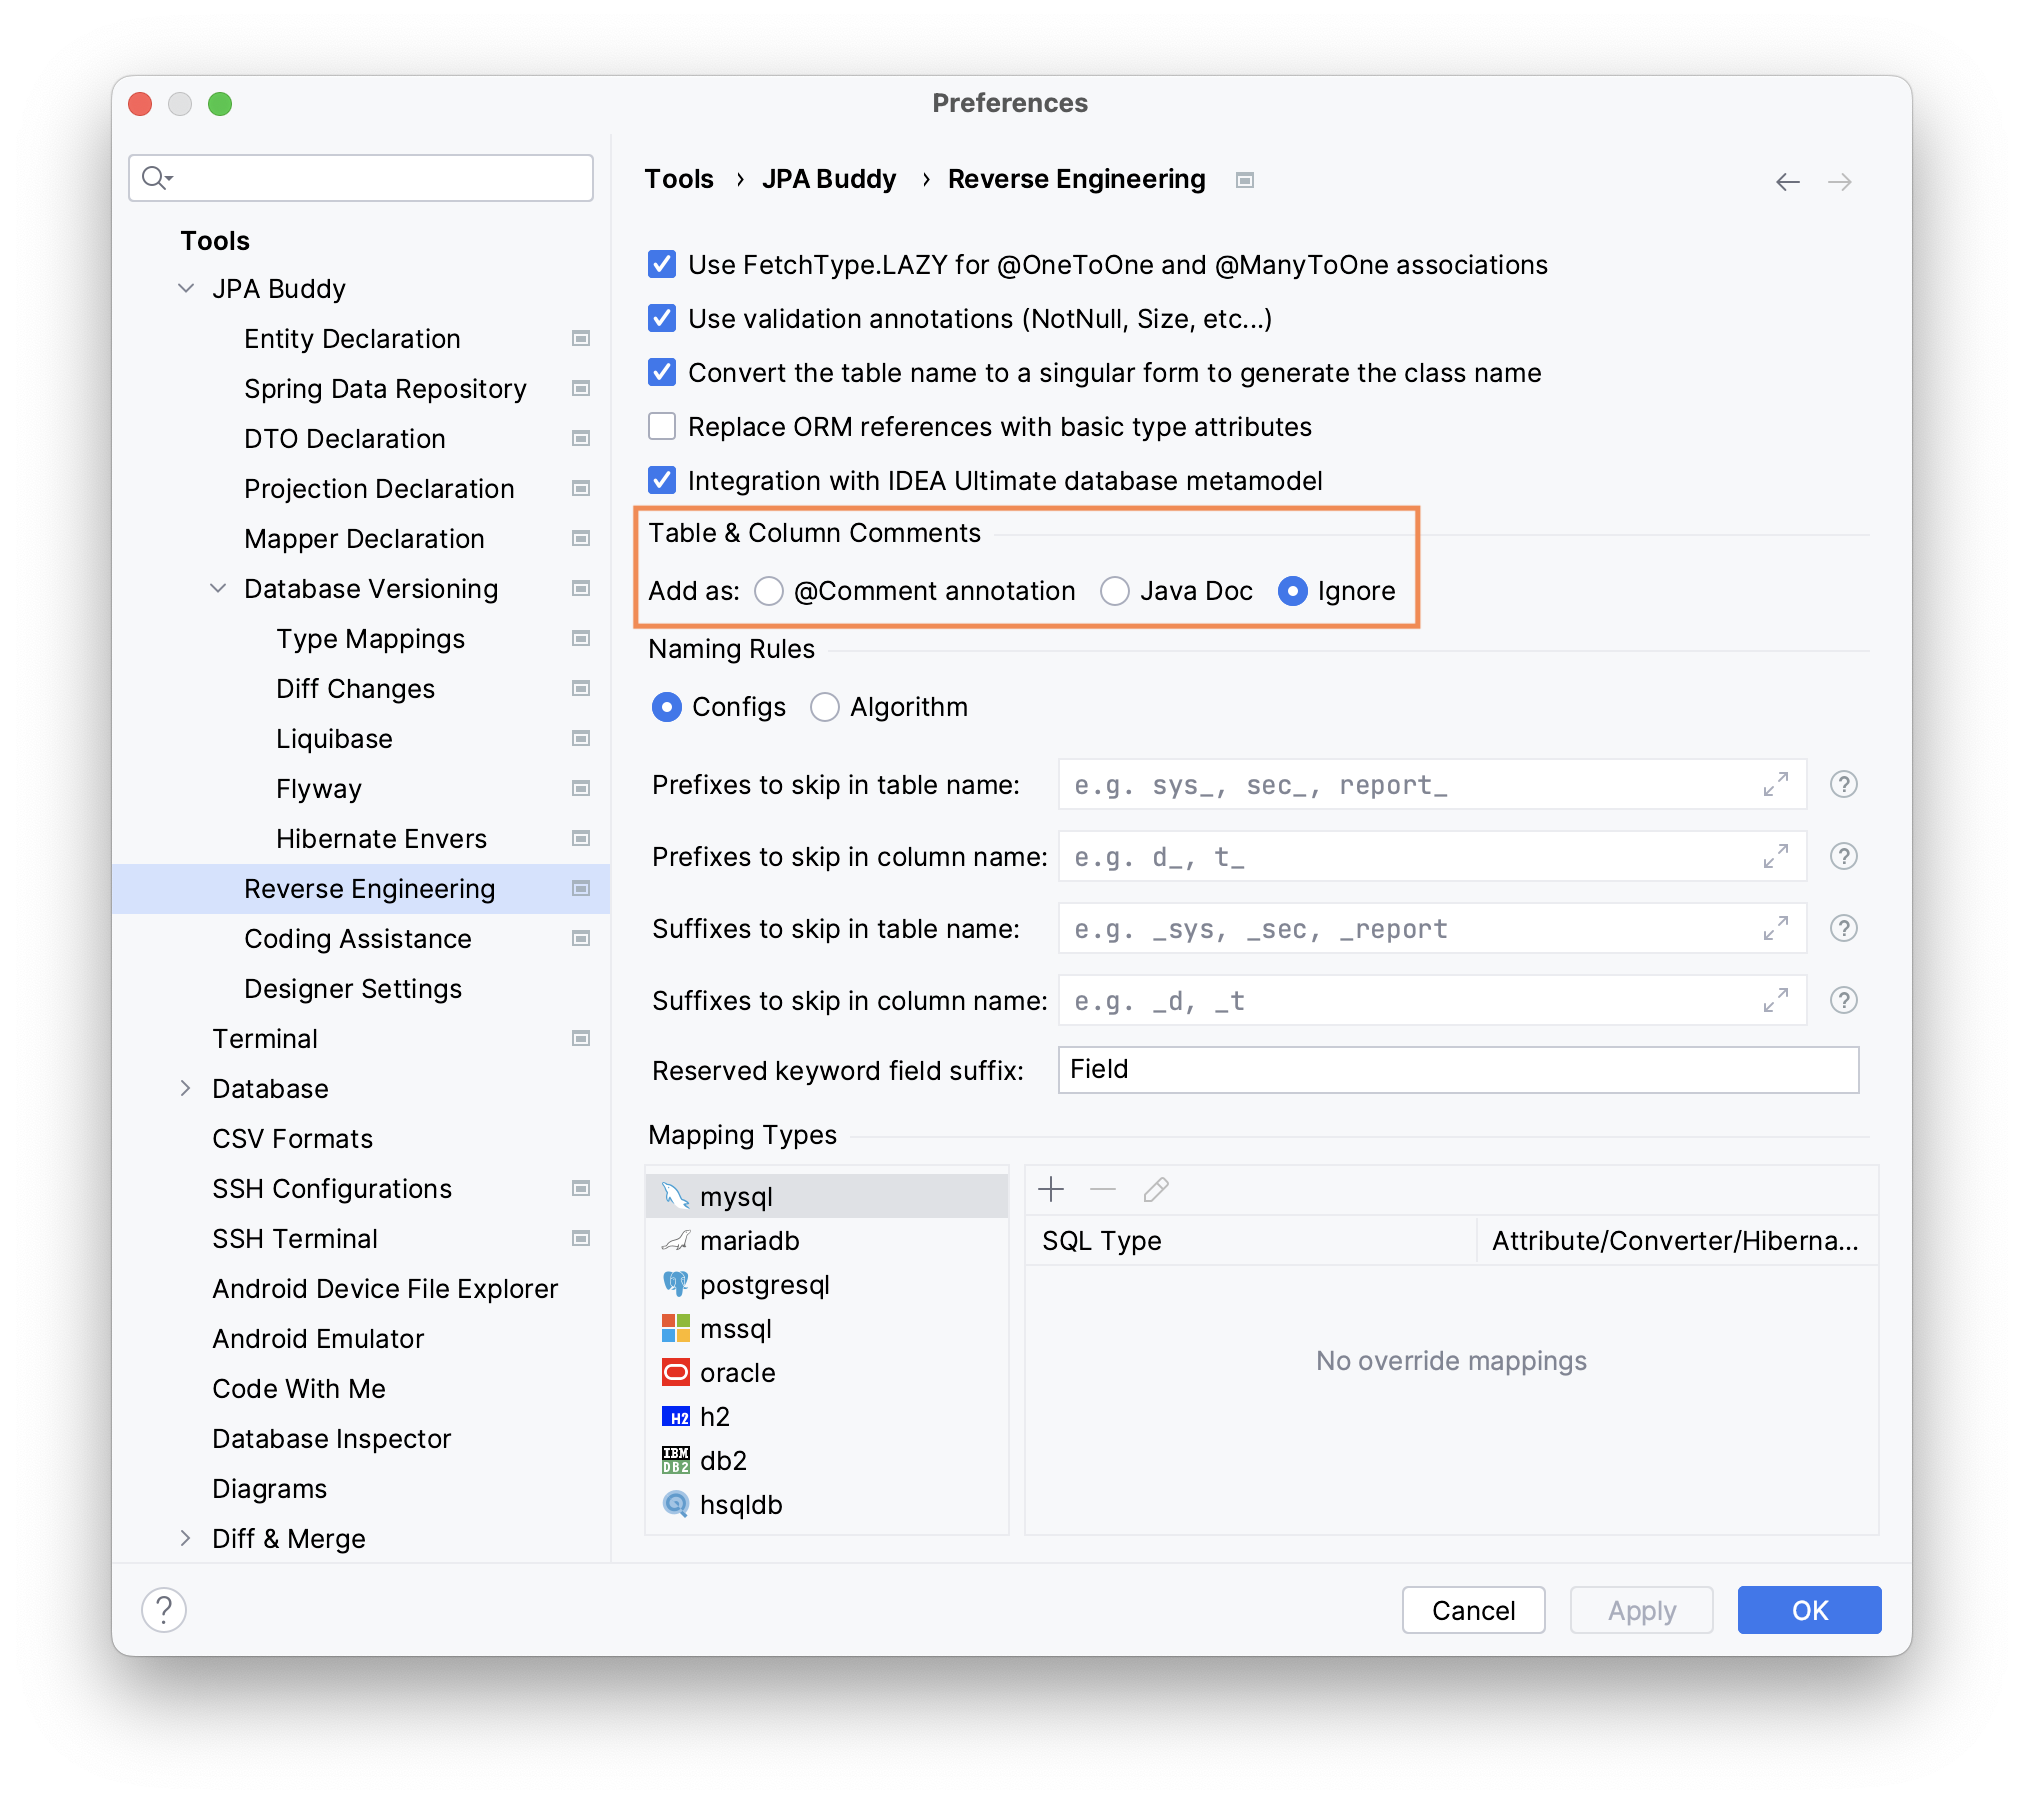
Please note that only
@Commentannotations on entities can be included in the generated DDL scripts, depending on the settings, JavaDocs will be ignored anyway.
Naming Rules
Via Configs
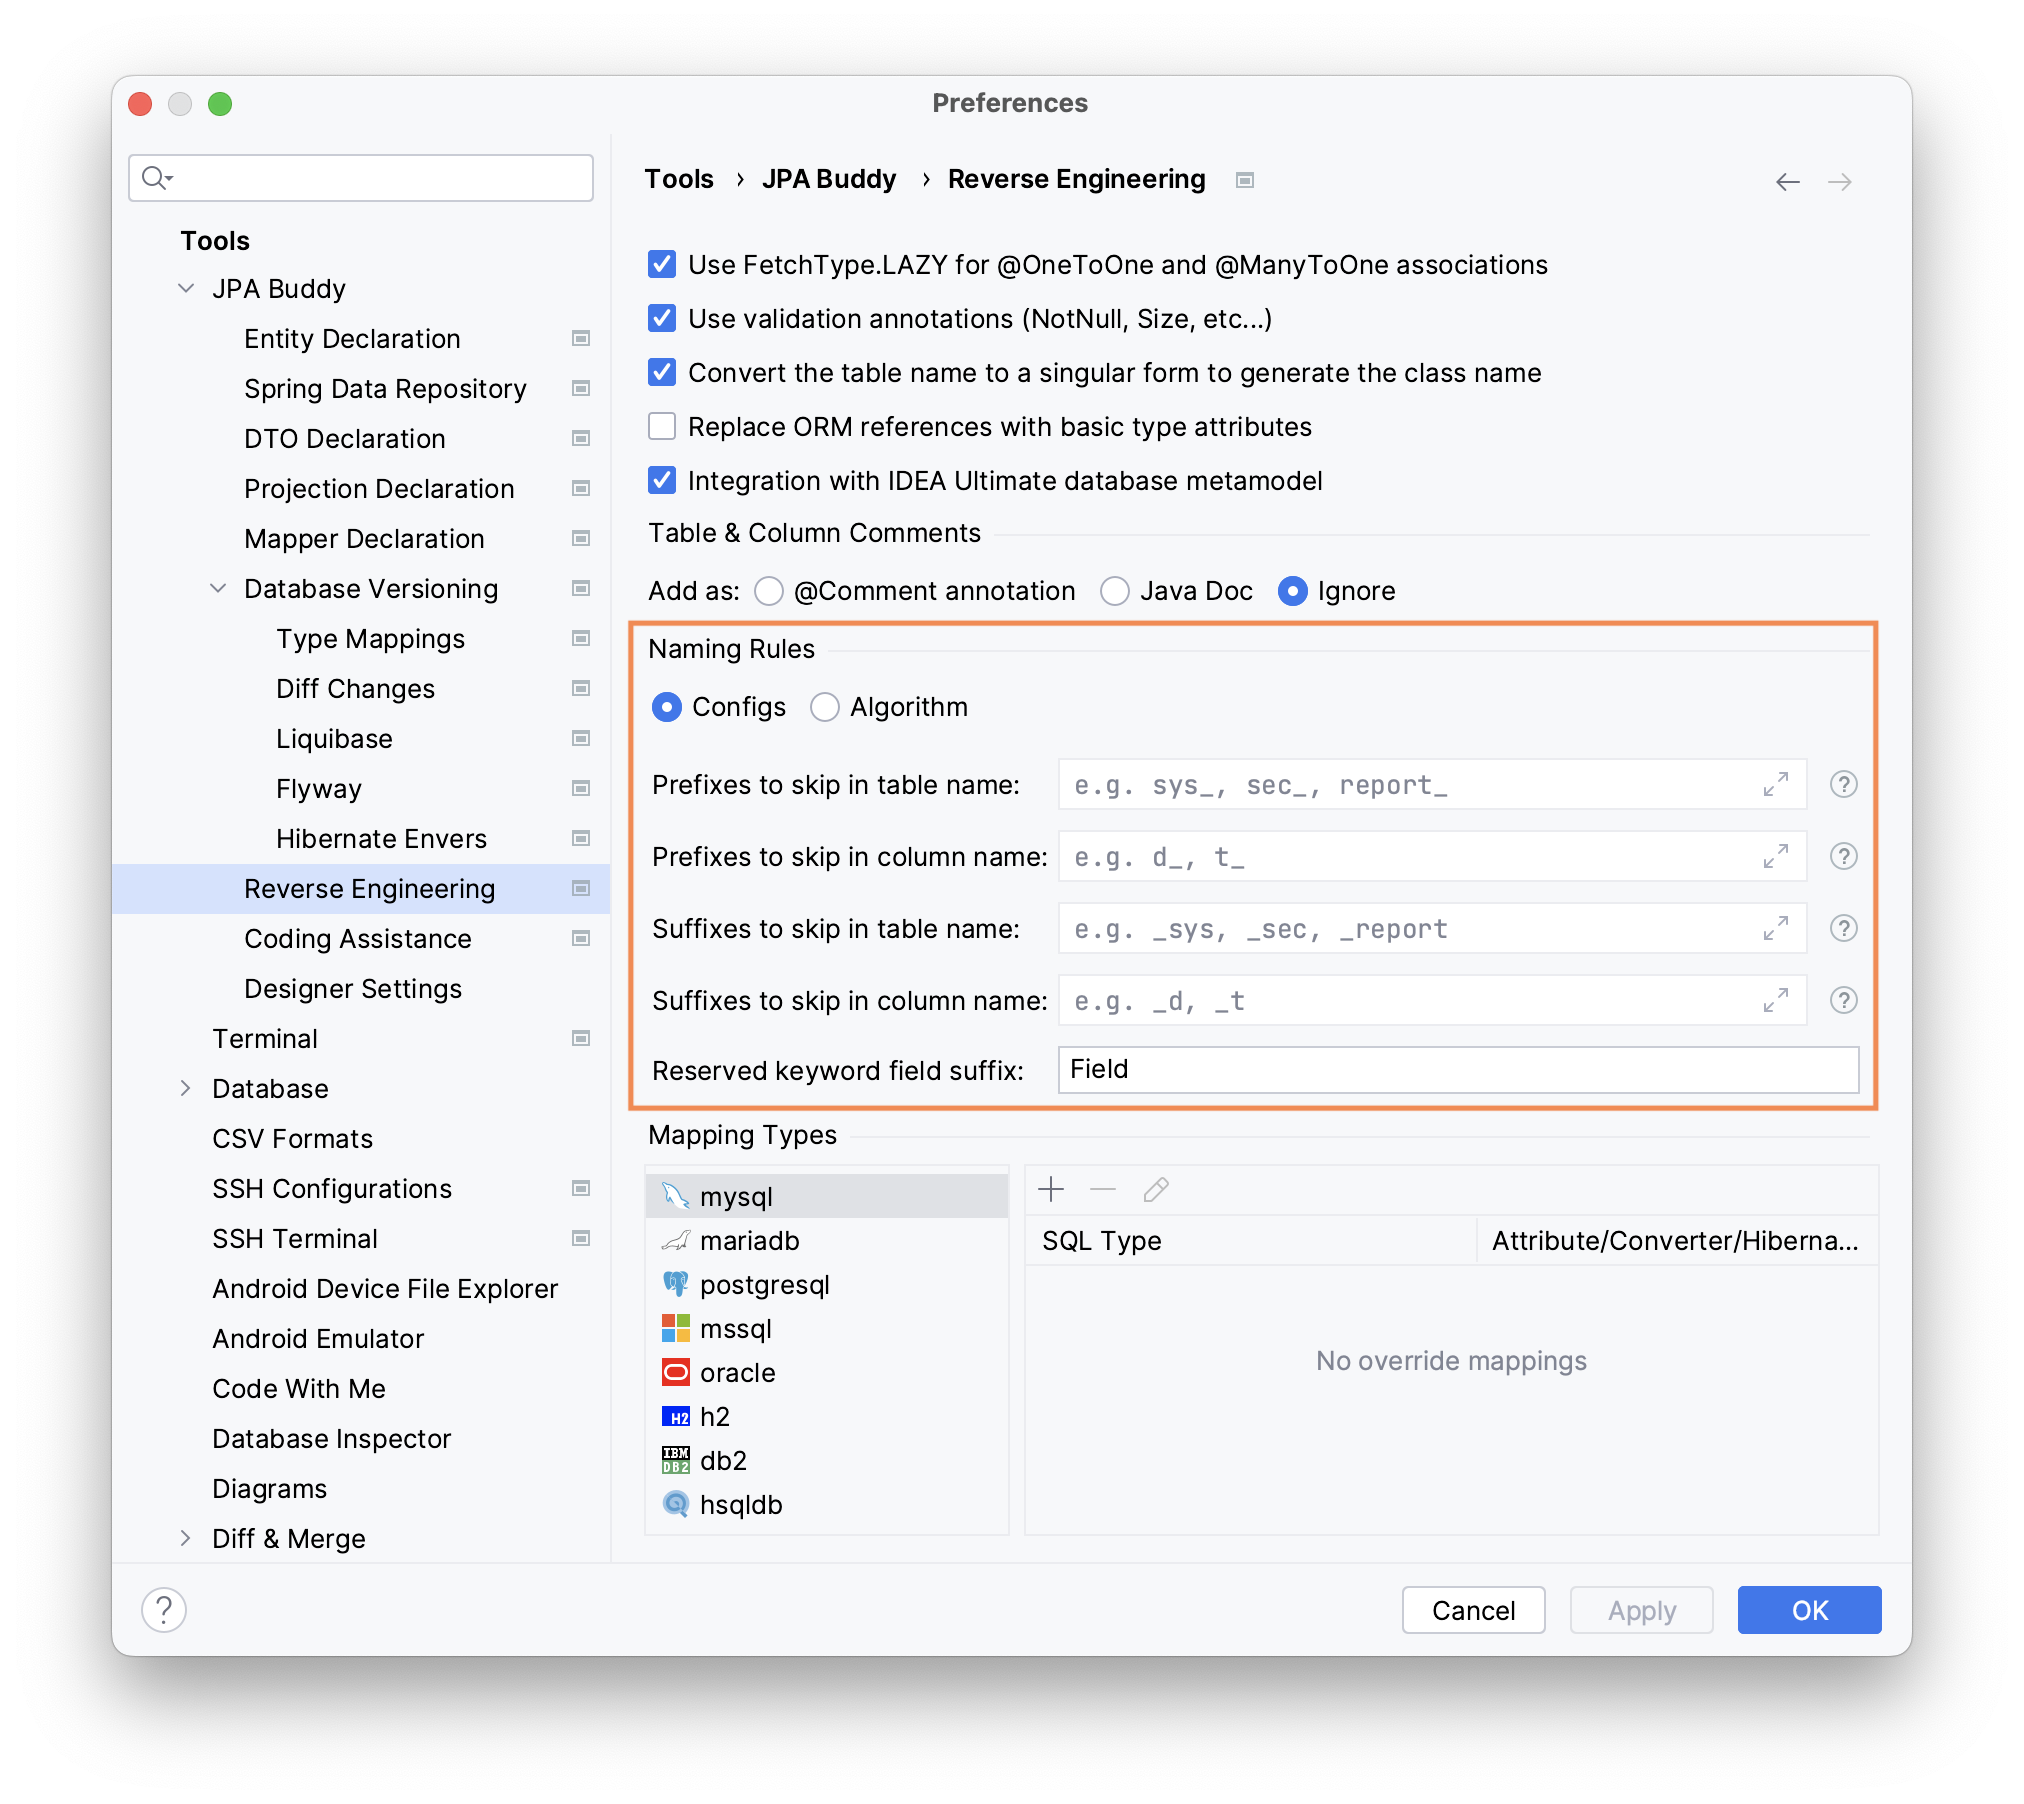
Often, DBA specialists adhere to certain naming conventions for database objects. For example, all table or column names have a specific prefix/suffix. Yet, Java developers usually prefer to drop these prefixes/suffixes for the JPA model. JPA Buddy allows you to specify prefixes and suffixes to skip.
Assume we set sys_ and p_ as prefixes to skip. After that, we apply reverse engineering for sys_user and p_product tables. As a result, prefixes will not appear in the corresponding entity names. The final entity names will be User and Product instead of SysUser and PProduct.
Also, the database column names sometimes match the reserved Java keywords. E.g., public, interface, and so on... In this case, you can configure the field suffix so that JPA Buddy will append it to the original column name. E.g. for the Field suffix, the resulting names will be publicField and interfaceField.
Via Algorithm

Despite the flexible options for configuring prefixes, suffixes, reserved words, and so on, in some cases this may still be insufficient. JPA Buddy does not limit you only to these settings. You can write custom code for processing the names of database tables/columns. Moreover, you can not only write code in the current editor but also import an existing class and use its methods.
It is important to note that JPA Buddy does not track changes in classes used in the naming algorithm in real-time. Therefore, after changing the class used in the algorithm, either update your settings or restart IntelliJ IDEA.
Type Mappings
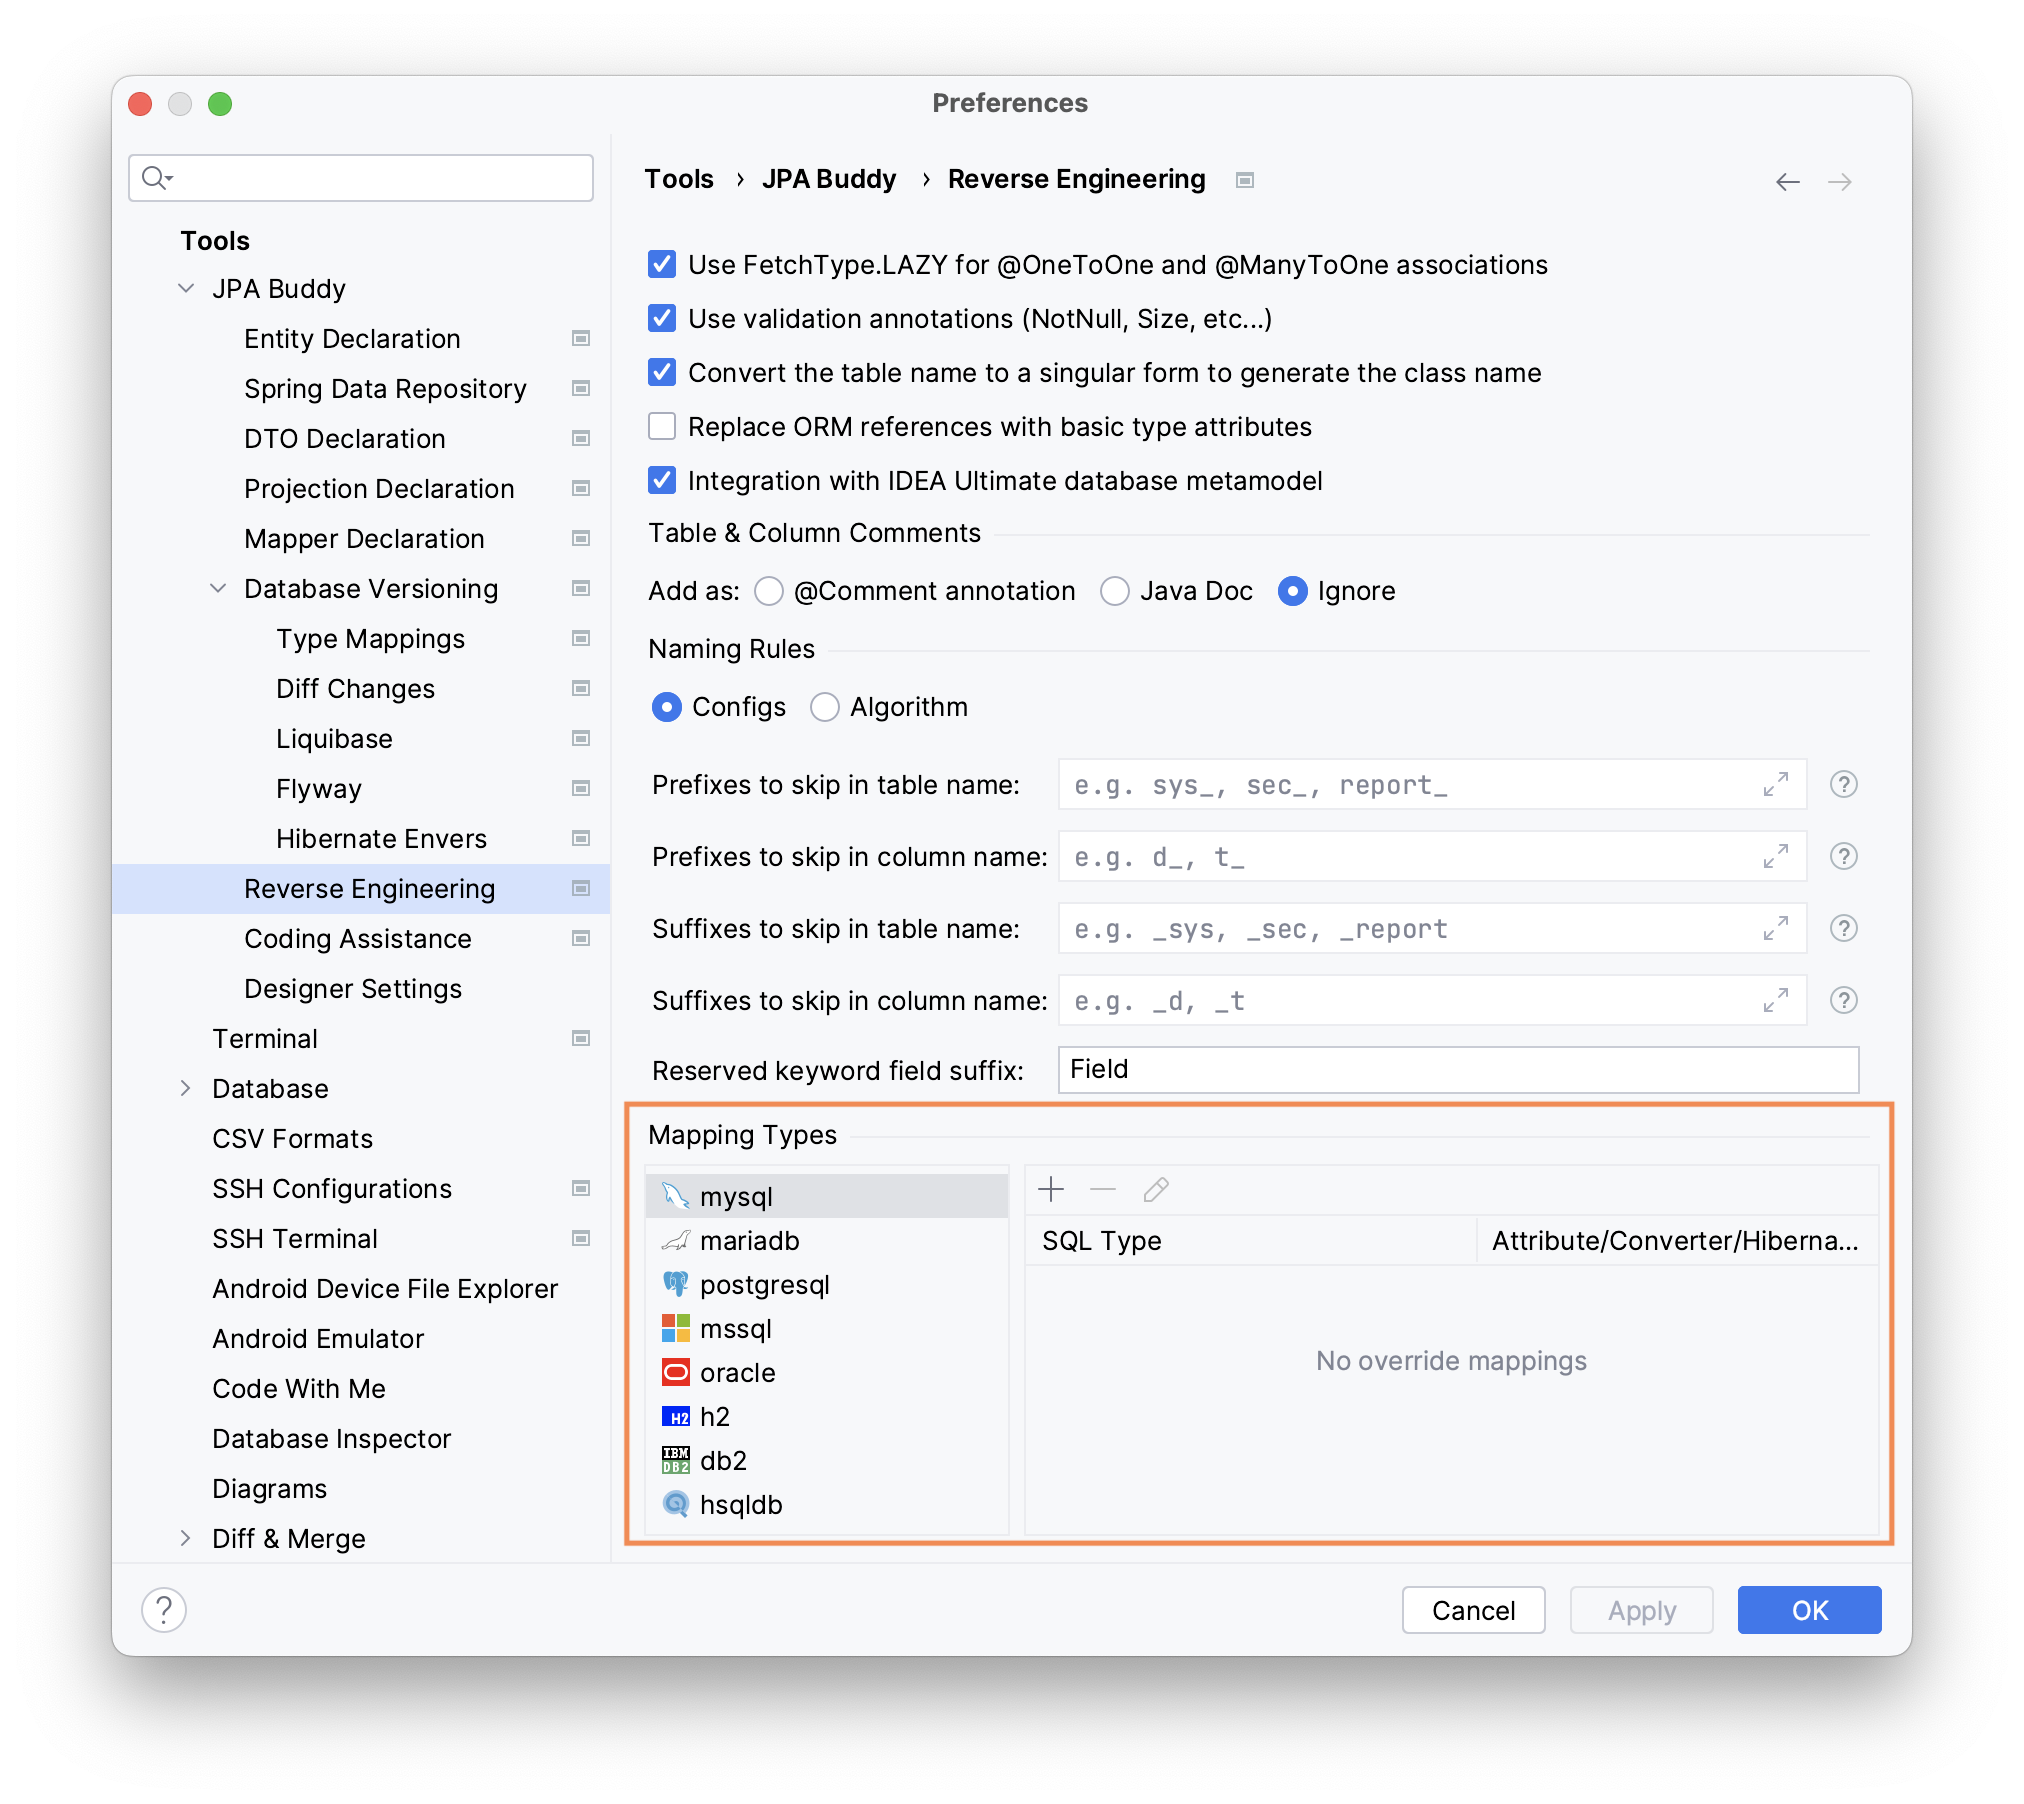
When the application works with several DBMSs, your schema might have slightly different data types for each of them.
Let's say the application needs to support both PostgreSQL and MS SQL and you need to store Unicode characters in string data. PostgreSQL supports Unicode chars in VARCHAR, but MS SQL has a separate NVARCHAR data type for it.
JPA Buddy lets you specify type mappings for each DBMS. It is also possible to set mappings for JPA Converters and Hibernate Types:
See how you can configure type mappings for reverse engineering in JPA Buddy to make use of the @JavaType annotation from Hibernate 6:
Tags: JPA, Entity generation, Database schema, Hibernate, ORM, Entity mapping, DBMS, Java development, Performance optimization, Best practices, Validation annotations, Fetch type